The Bayeux Tapestry
In this lecture, there is hardly need to say anything about the subject of the work I want to show you, or about its context, because everyone is familiar with ‘1066 and All That’. The physical appearance of the Bayeux Tapestry and some of its major scenes are simply part of the English ‘collective consciousness’ and are taken for granted by all cartoonists (cf. figs. 2, 10). Nevertheless, I ought to begin by reminding you of the general layout, the dimensions, and the materials and technique used in a work which is not a ‘tapestry’ at all, but a piece of embroidery.
It consists of a single strip of linen about 230 feet long and twenty inches high. For most of its length, it has borders above and below which are about three and a half inches deep. These borders are mostly (but far from exclusively) ornamental, and more often than not they are filled with heraldic beasts and birds in pairs.
For much of its length, too, there are words in capital letters, about an inch high, just below the top border, which either spell out isolated proper names to help us to identify the main actors (numbering around a dozen), or, more importantly, combine to form sixty short sentences in Latin, describing the action in that part of the embroidery.
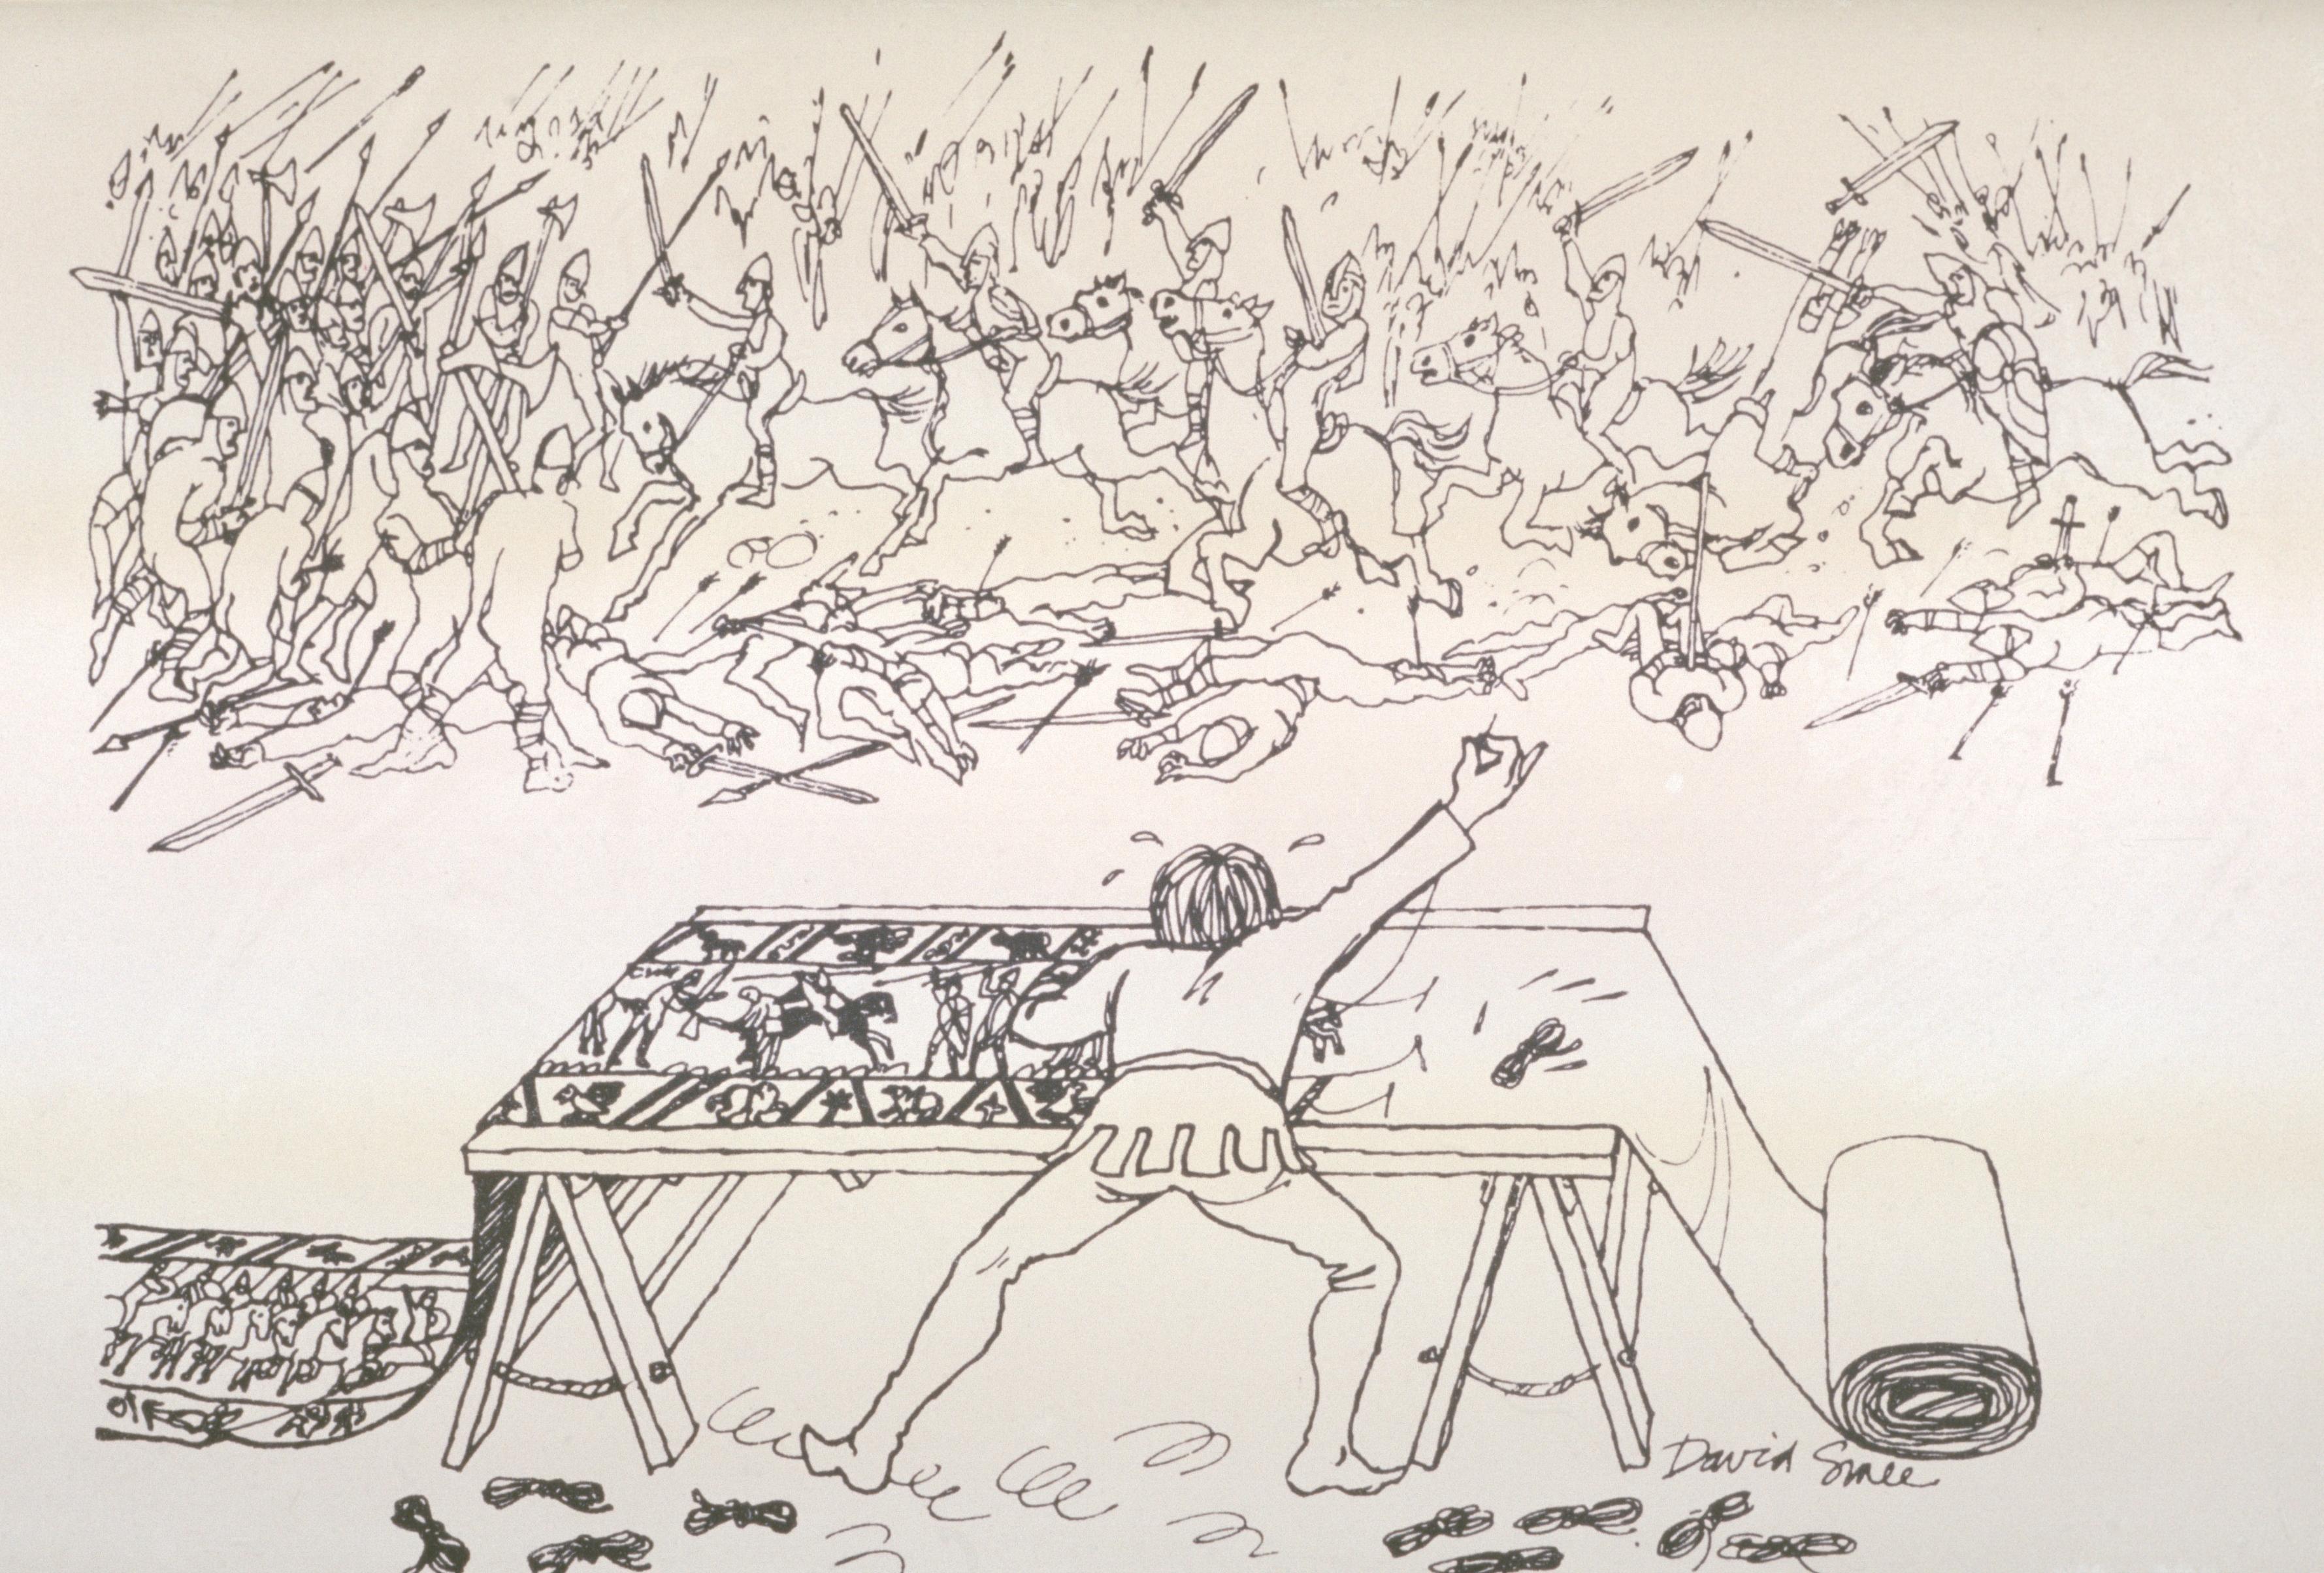
The remaining area—about twelve to thirteen inches high—is reserved for the figures in the story, who are normally confined within this space, and normally fill it almost from top to bottom—whence the following cartoon from the cover of Punch:

All the contours of the letters, the beasts, the humans, and the buildings and objects were apparently drawn freehand onto the linen roll—and drawn with superb vigour, freedom, control of detail, and awareness of the third dimension. The canvas was then handed over—in eight separate sections—to teams of specialist needlewomen. They used coloured thread to pick out all the outlines, whether of limbs or clothes or facial features, working in a form of stem stitch that produces a firm continuous line. Within the outlines they laid in coloured wools, slightly twisted, using long stitches extending right across the given area, working for the most part horizontally or vertically. They secured the wools with threads at right angles, about an eighth of an inch apart, and then ‘couched’ them down with the same thread, securing them firmly to the canvas backing.
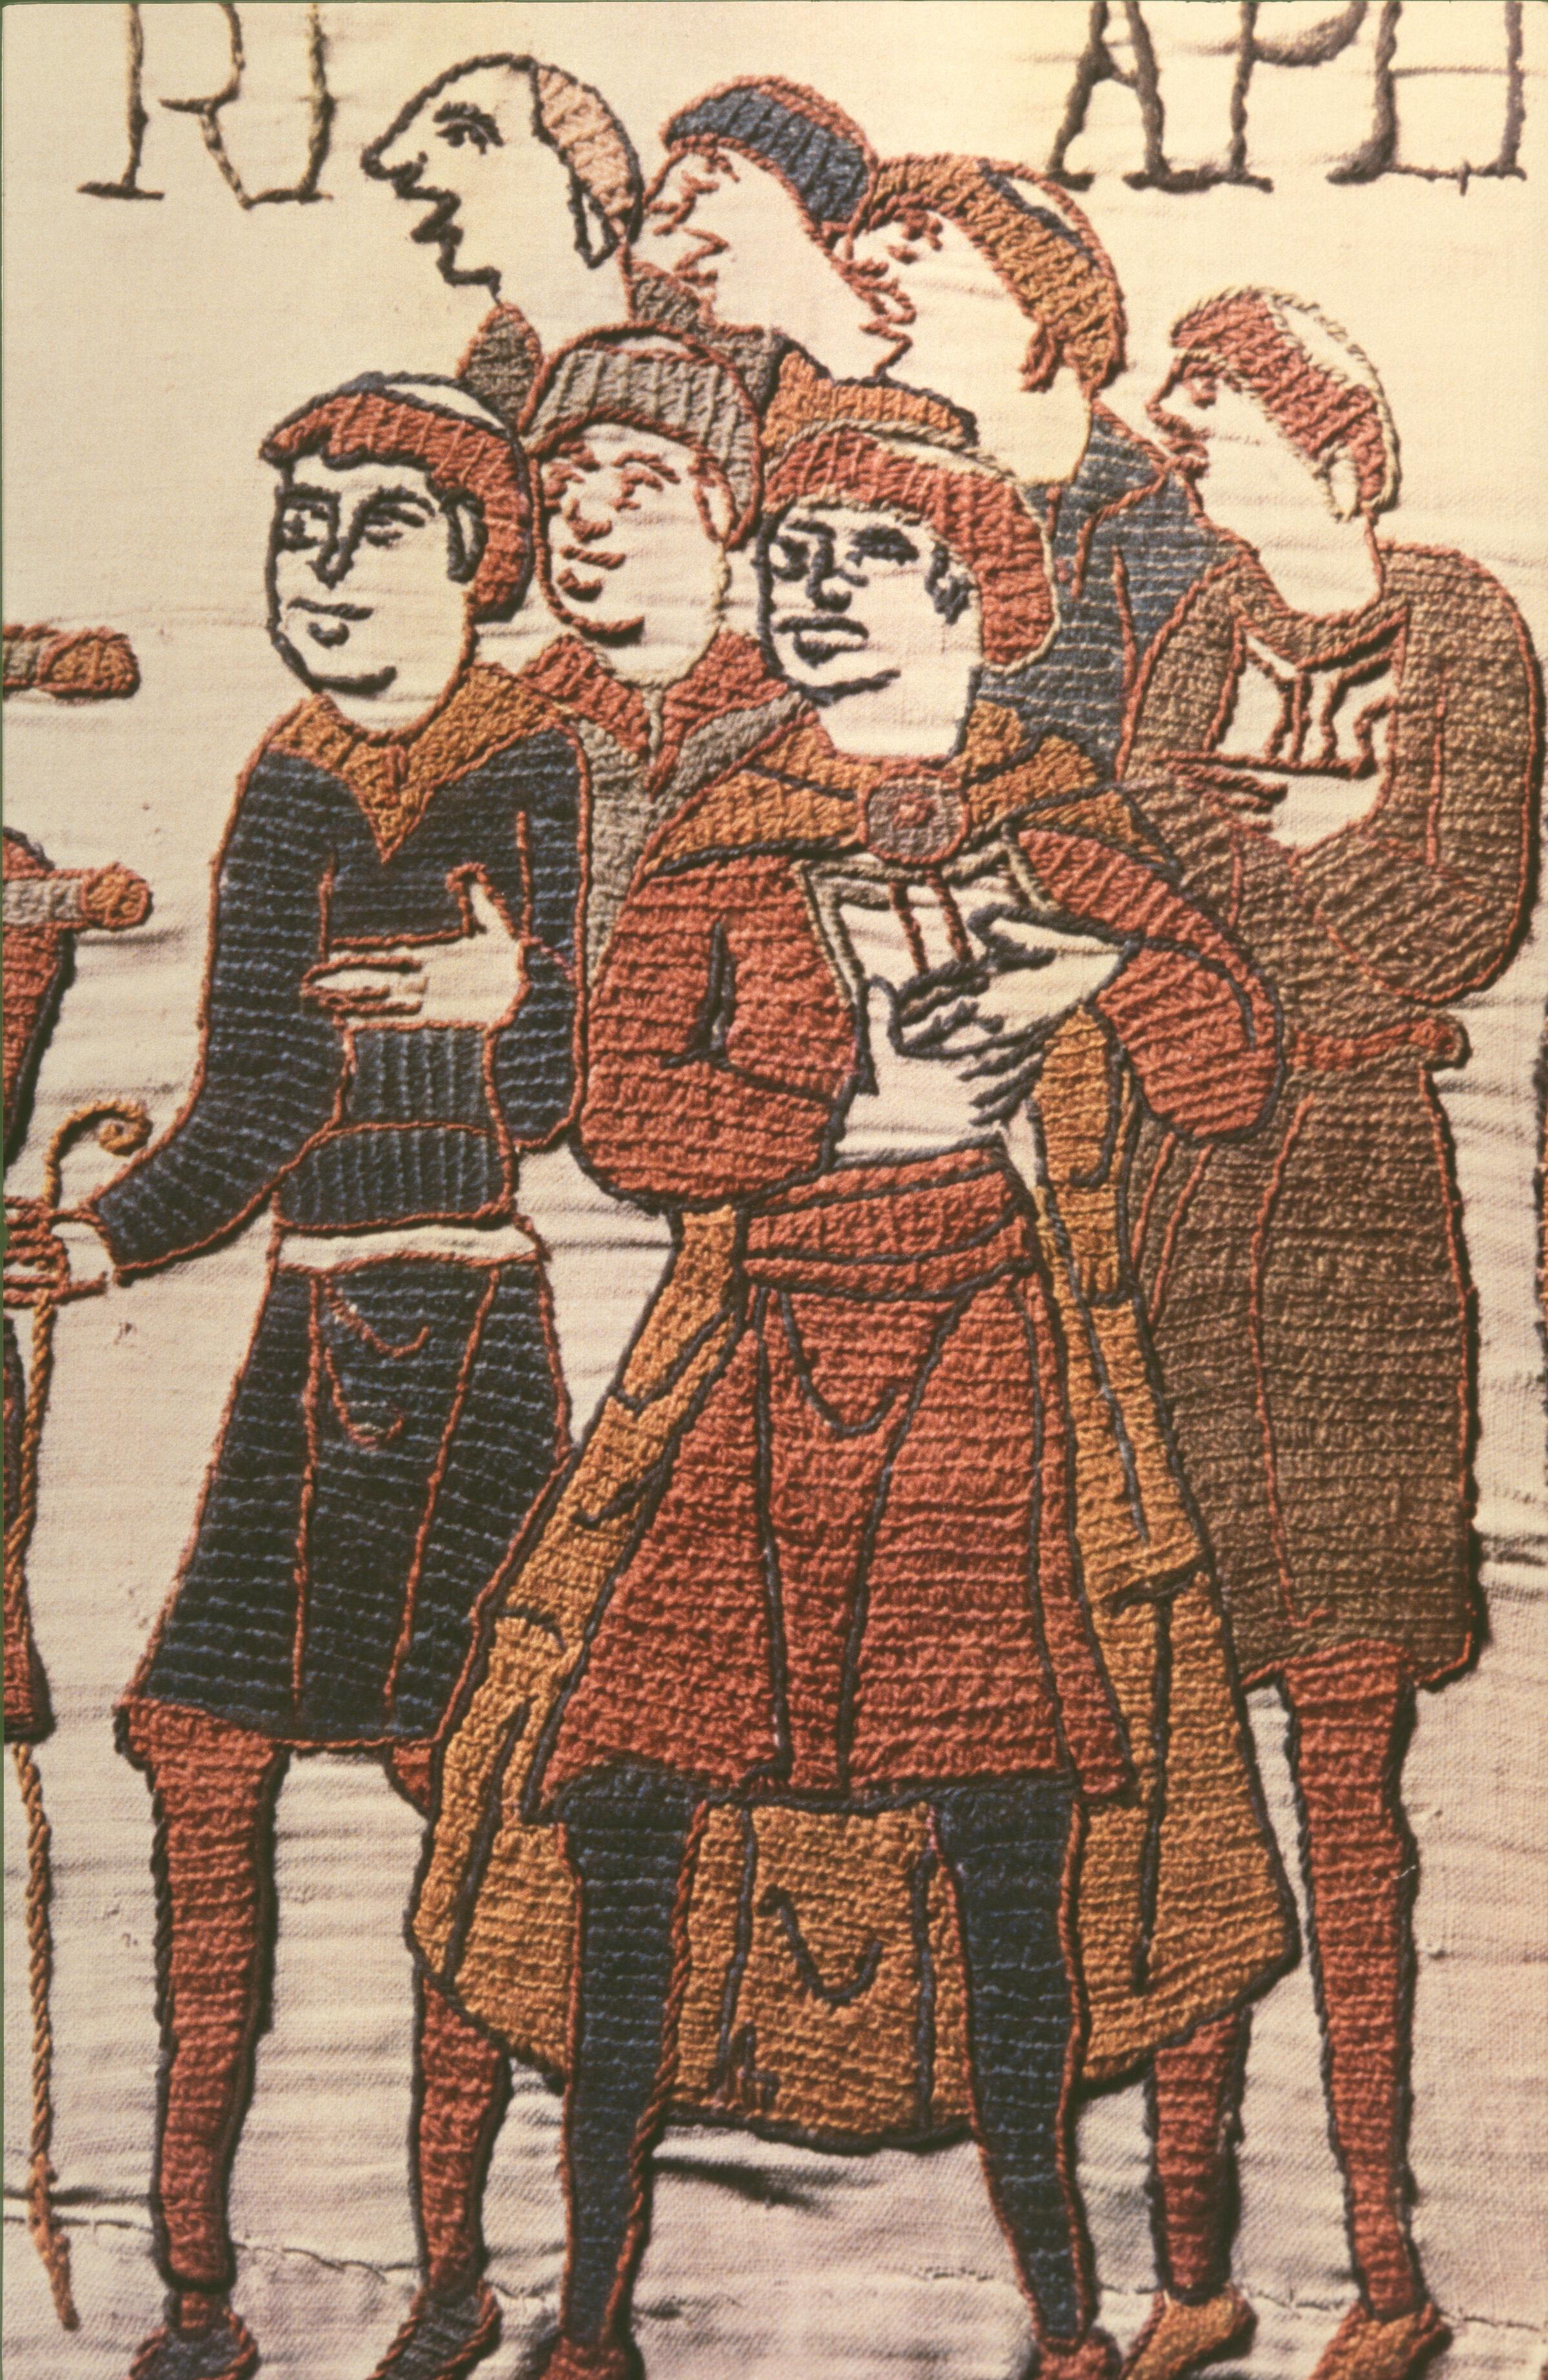
The materials are very cheap, but the quality of the workmanship is astonishingly high—so high that the embroidery can match everything that a contemporary painter might have attempted, while giving the added pleasure, which should be clear from the details in this lecture, of the surface texture. It is particularly successful in the case of clothes, as you can see in fig. 3:
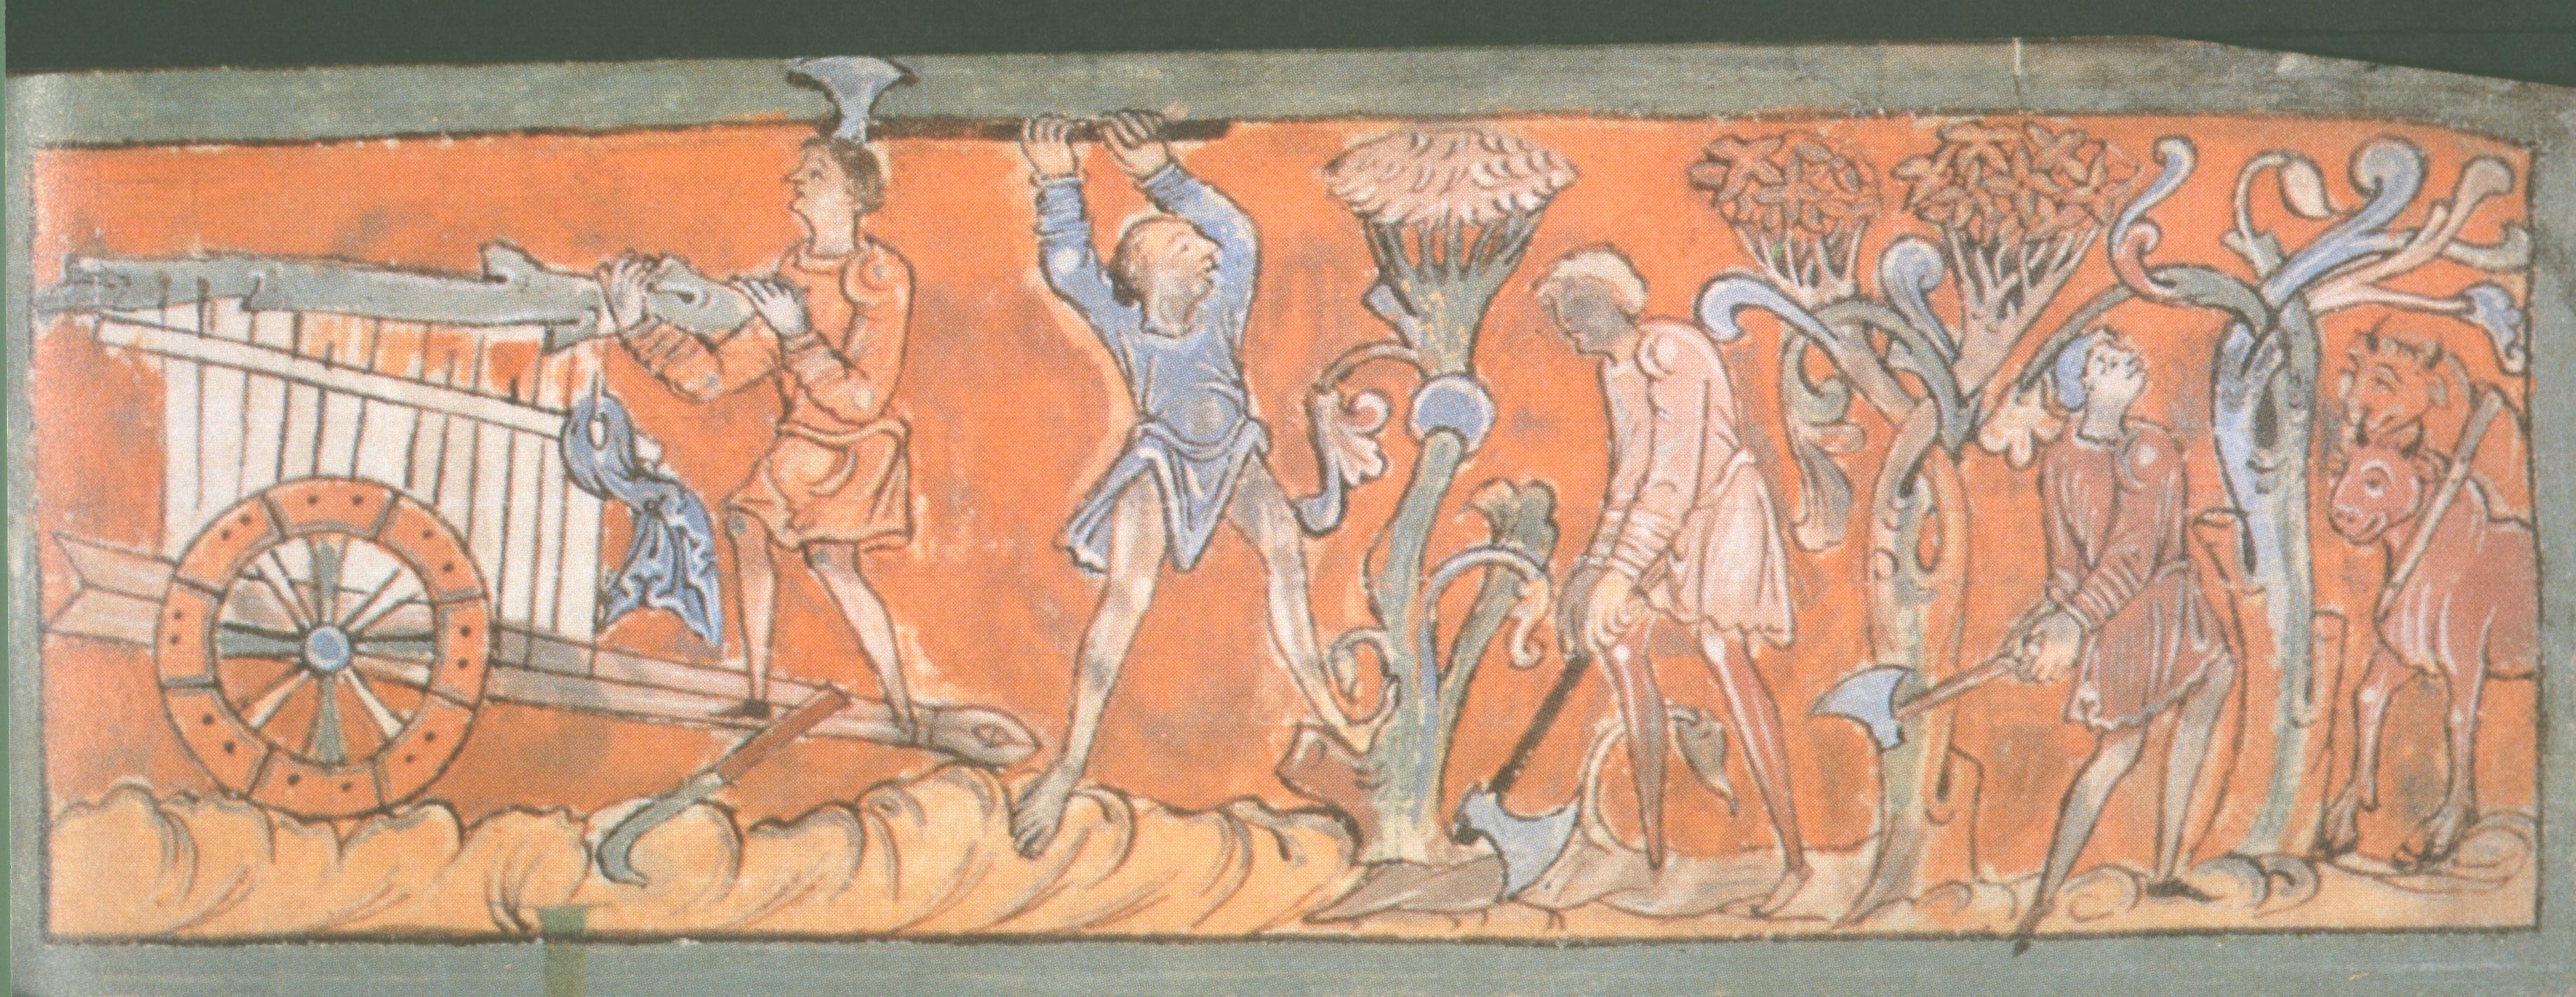
Perhaps the two most important aspects of the medium, however, have nothing to do with wool or thread. Firstly, there is no attempt to fill in, or colour in, the space between the figures, so that the unembroidered areas of neutral canvas dissolve to the eye, allowing effects of openness, space, and even depth which would be unusual in in the art of illumination. You can see how important this is by contrasting our embroidery with a fragment from Norway (fig. 4), executed at some time in the twelfth century:
The other, even more obvious fact about the medium is that the canvas forms a continuous roll. The artist does divide up the action into about seventy-five scenes, using buildings and stylised trees as ‘dividers’ between them, but he was not constrained by any predetermined unit of length: the scenes vary in width from about eighteen inches to nearly ten feet; and the action simply ‘flows’.
{#fig:O_B_5}
**TOM, IT WILL BE BETTER TO NUMBER (AND SPACE) THESE TWO IMAGES SEPARATELY, BUT I WON’T INTERVENE ON THE NUMBERING FOR NOW
There are only two early, important and well-known parallels for this continuous-strip format. fig. ¿fig:O_B_5?a shows a section from a parchment scroll (which in its complete form is approximately thirty-three feet long by twelve inches high), drawn in Constantinople in around 1000 AD: it tells and illustrates the story of Joshua. fig. ¿fig:O_B_5?b shows the relief sculptures that spiral their way up the columns of Trajan and Marcus Aurelius in Rome (the image is of the column of Trajan, which rises to about 100 feet): here you should note the inset detail of soldiers felling trees, which is one of a few striking parallels between scenes on the column and those in our Tapestry (for the rest of the lecture I shall allow myself to use the familiar misnomer).
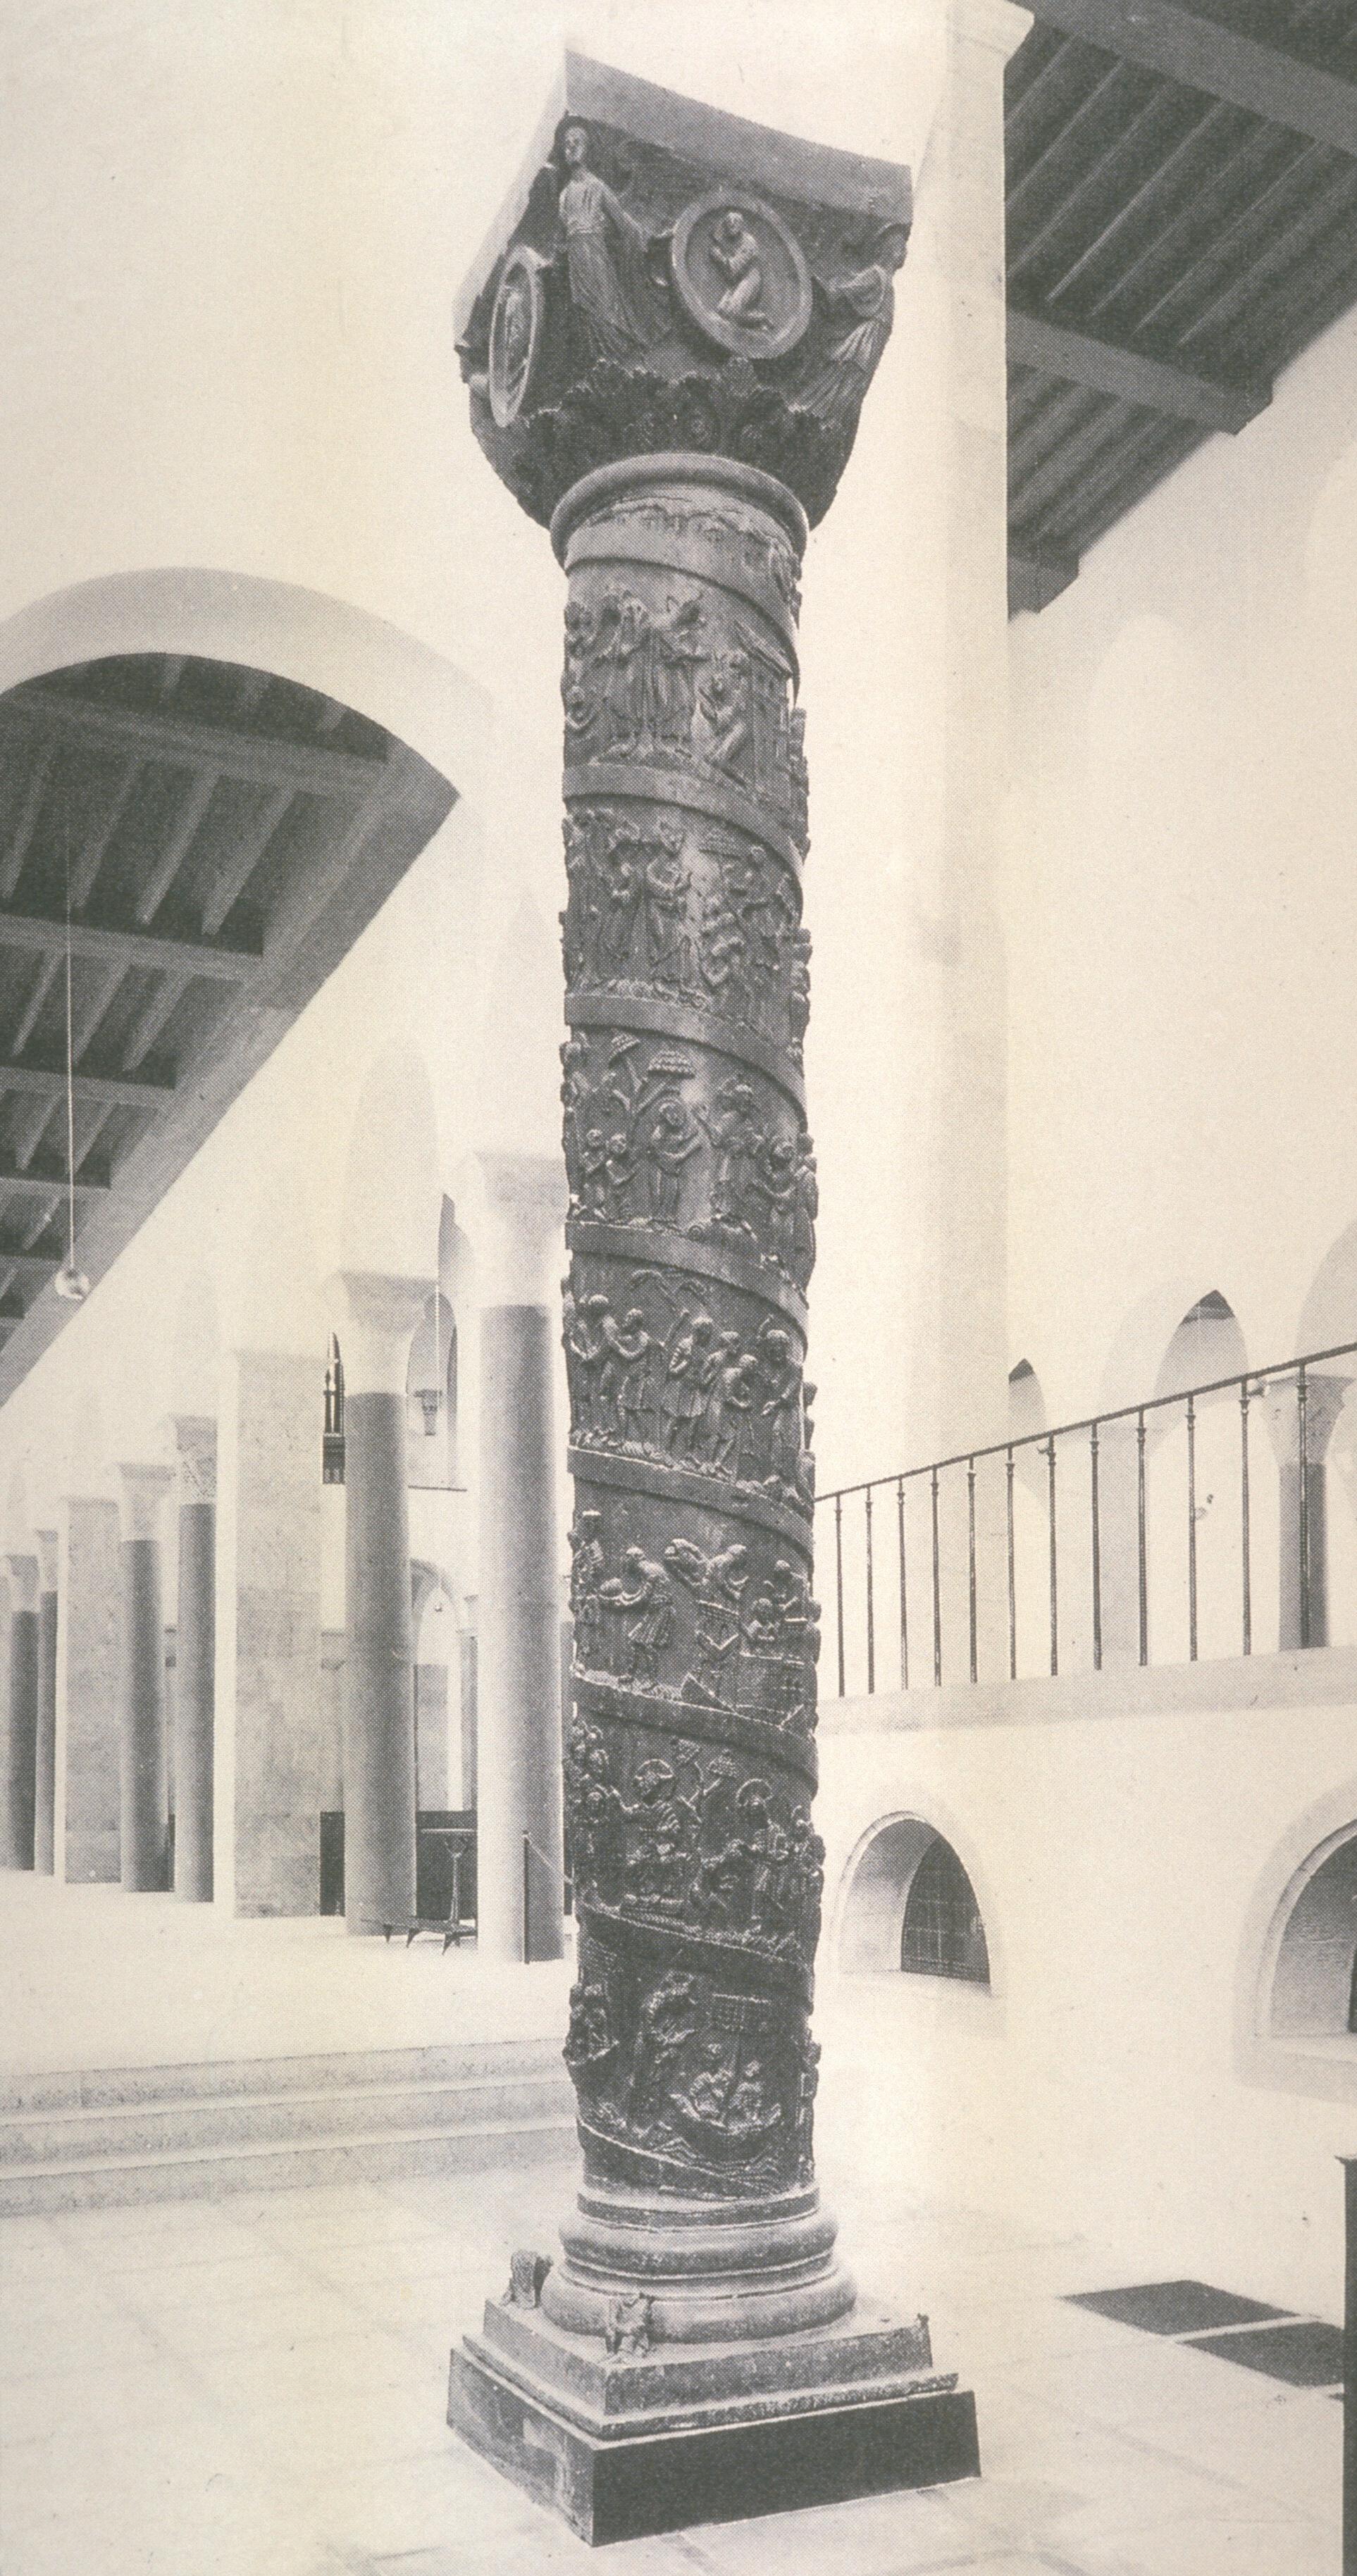
You will be rightly sceptical, or at least suspicious, on being offered Trajan’s column as a direct source—or even a remote source—for the Tapestry. But remember that there was a great deal of diplomatic contact between Rome and Northern Europe in these years. And at some time between 1015 and 1022, the Bishop of Hildesheim had a ‘candlestick’ column cast in bronze (cf. fig. 5: the column is about twelve feet high), which has a continuous, spiralling frieze of figures, telling the story of Jesus up to the moment of his triumphal entry into Jerusalem:
So much, then, by way of introduction to the materials of the Tapestry, to its strip-like, or ‘frieze-like’ format, and to possible remote sources for Duke William’s triumph in the triumphs of a Roman emperor and of Christ. I shall go on now to remind you of the theories—which most scholars seem to accept—concerning the original commission and date, bearing in mind that everything which follows is based on interlocking circumstantial evidence alone. The evidence may be studied in proper detail in two volumes published in the 1980s: a superb Thames and Hudson volume with colour plates of the whole Tapestry at two-thirds original size accompanied by a commentary by Sir David Wilson; and a smaller book by David Bernstein called The Mystery of the Bayeux Tapestry, from which I myself have derived a great deal of pleasure and insight (not to mention images!).
It is highly probable that the embroidery was commissioned by Odo, a half-brother of the Conqueror. He was bishop of Bayeux; and most importantly, he became overlord of most of modern Kent after the Norman conquest. It was probably executed before the mid-1080s, since Odo fell from grace and was imprisoned in the year 1082. Astonishingly, then, it was probably conceived and completed within ten to twenty year of the events it records.
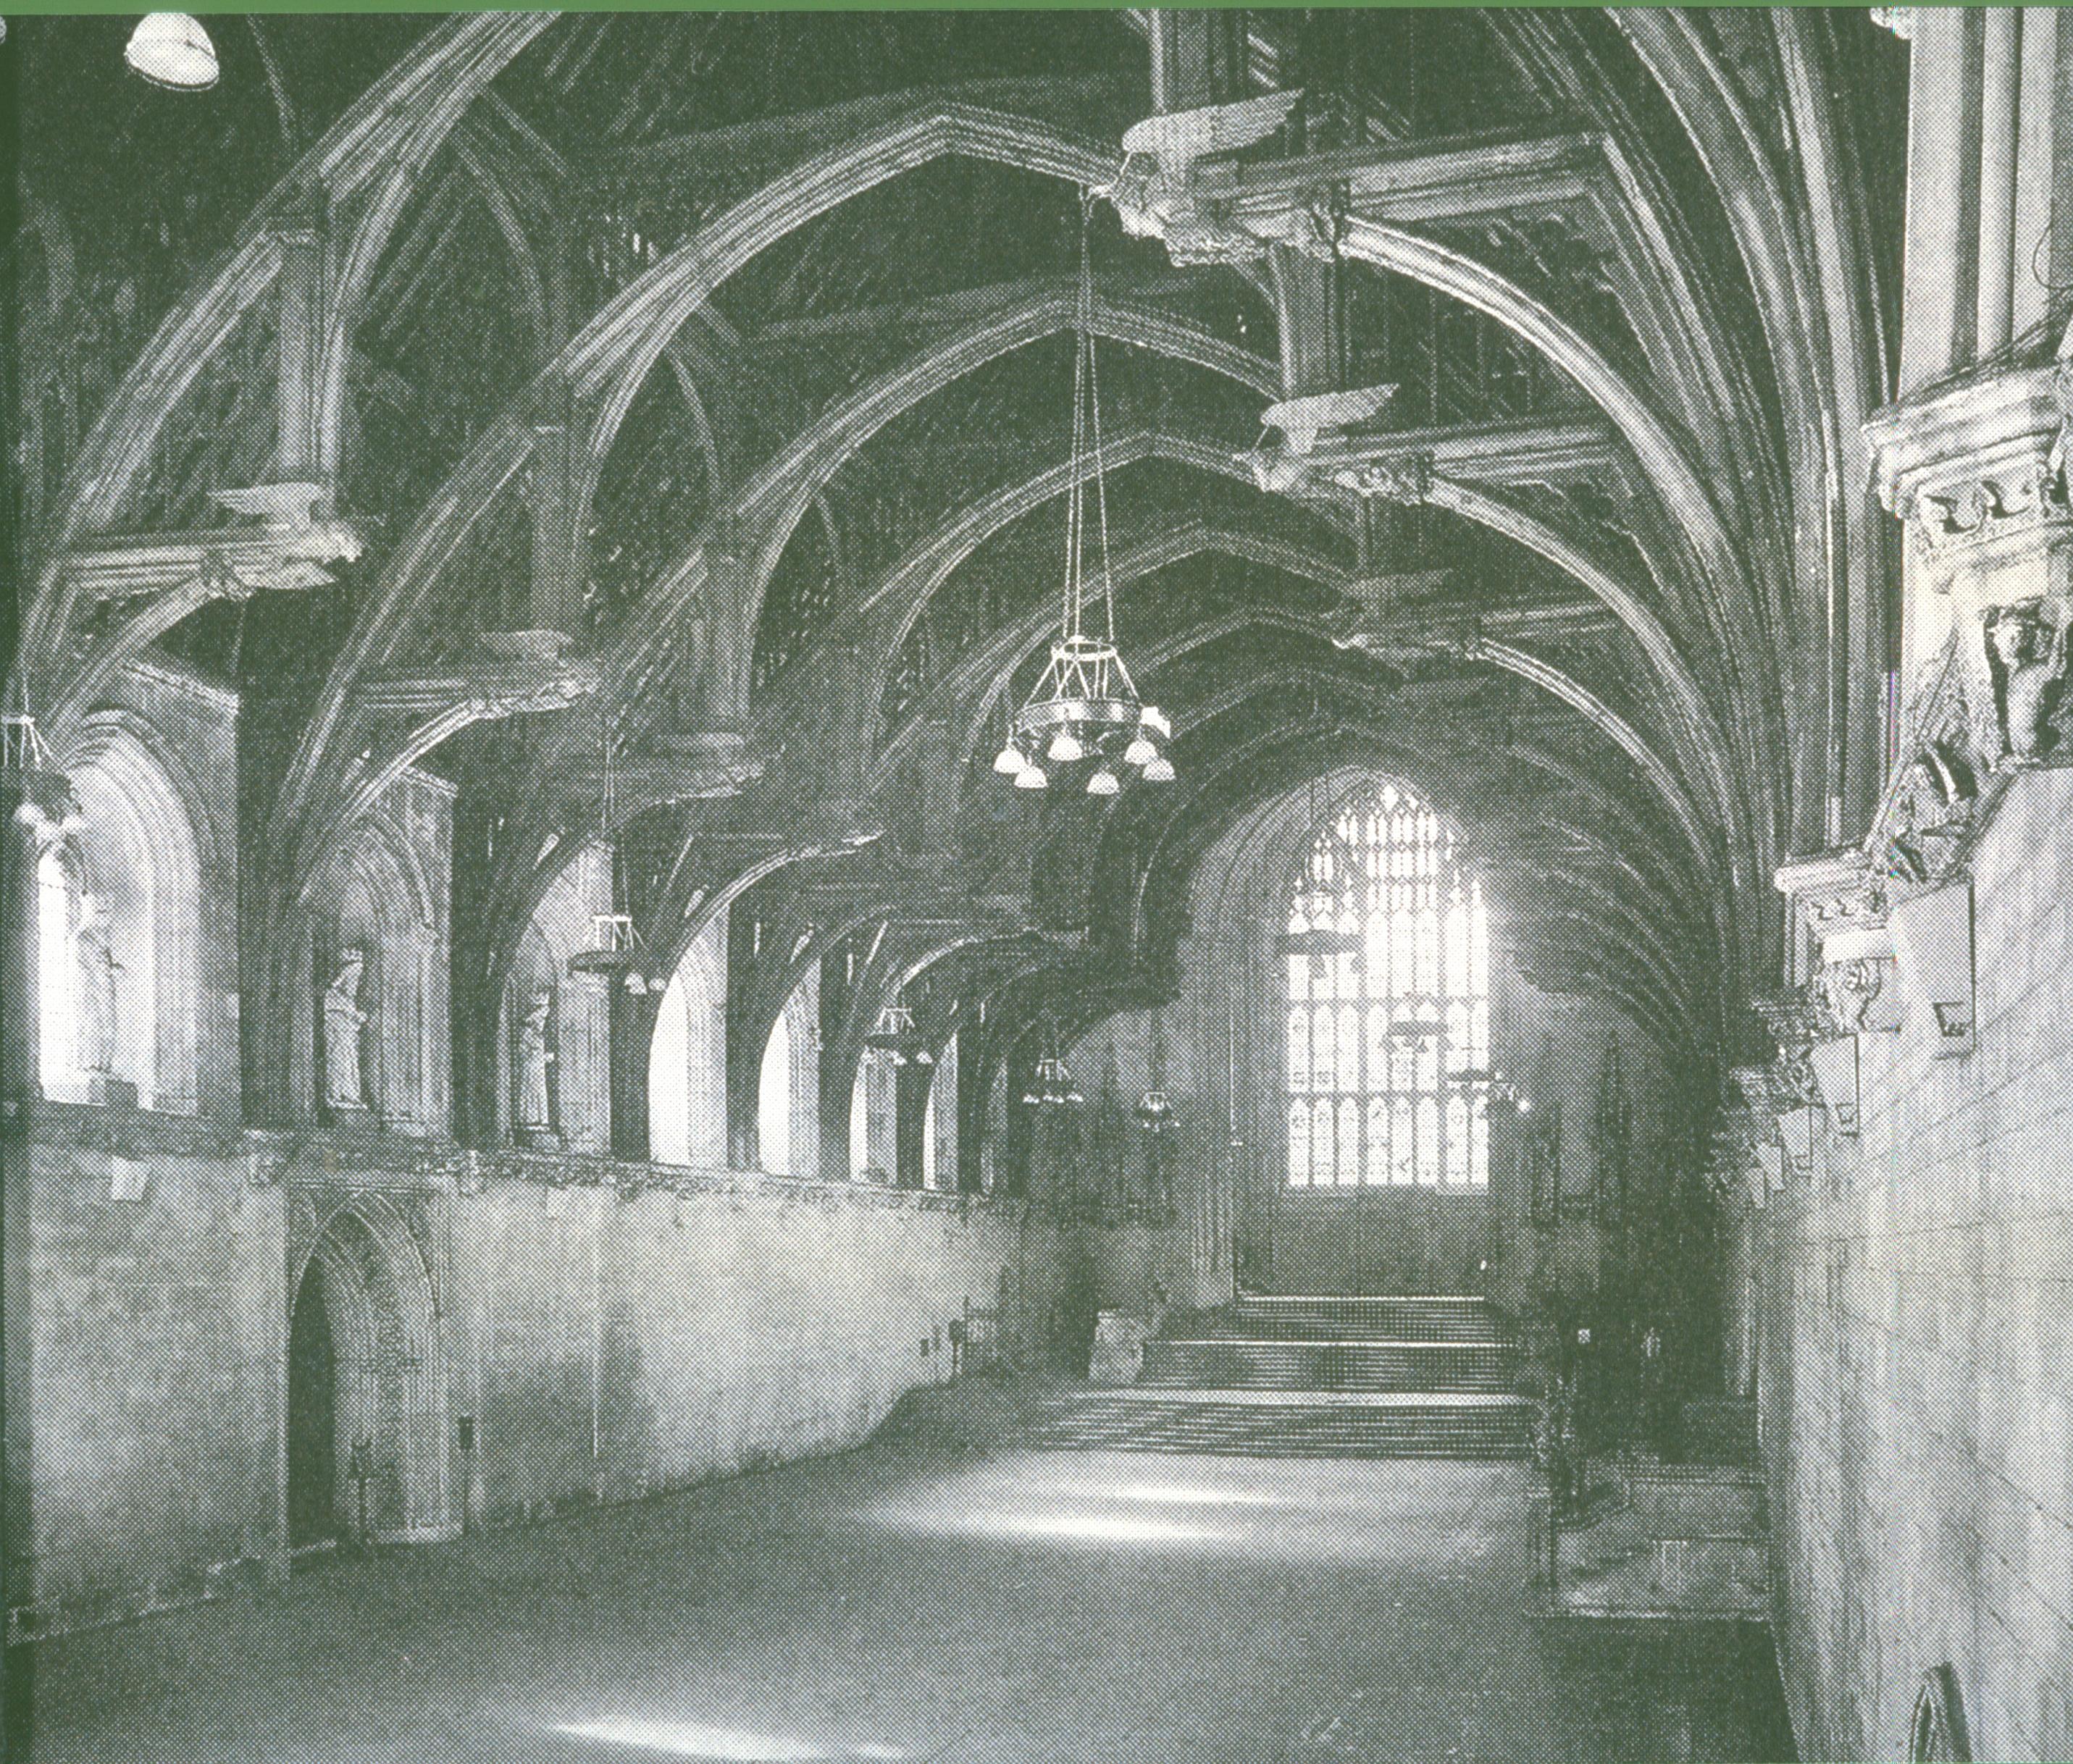
The Tapestry was almost certainly intended for occasional display in a typical Norman secular hall, such as the one at Westminster (fig. 6a) or at Dover Priory, which is reconstructed in the drawing in fig. 6b (with the Tapestry unfurled at eye level).

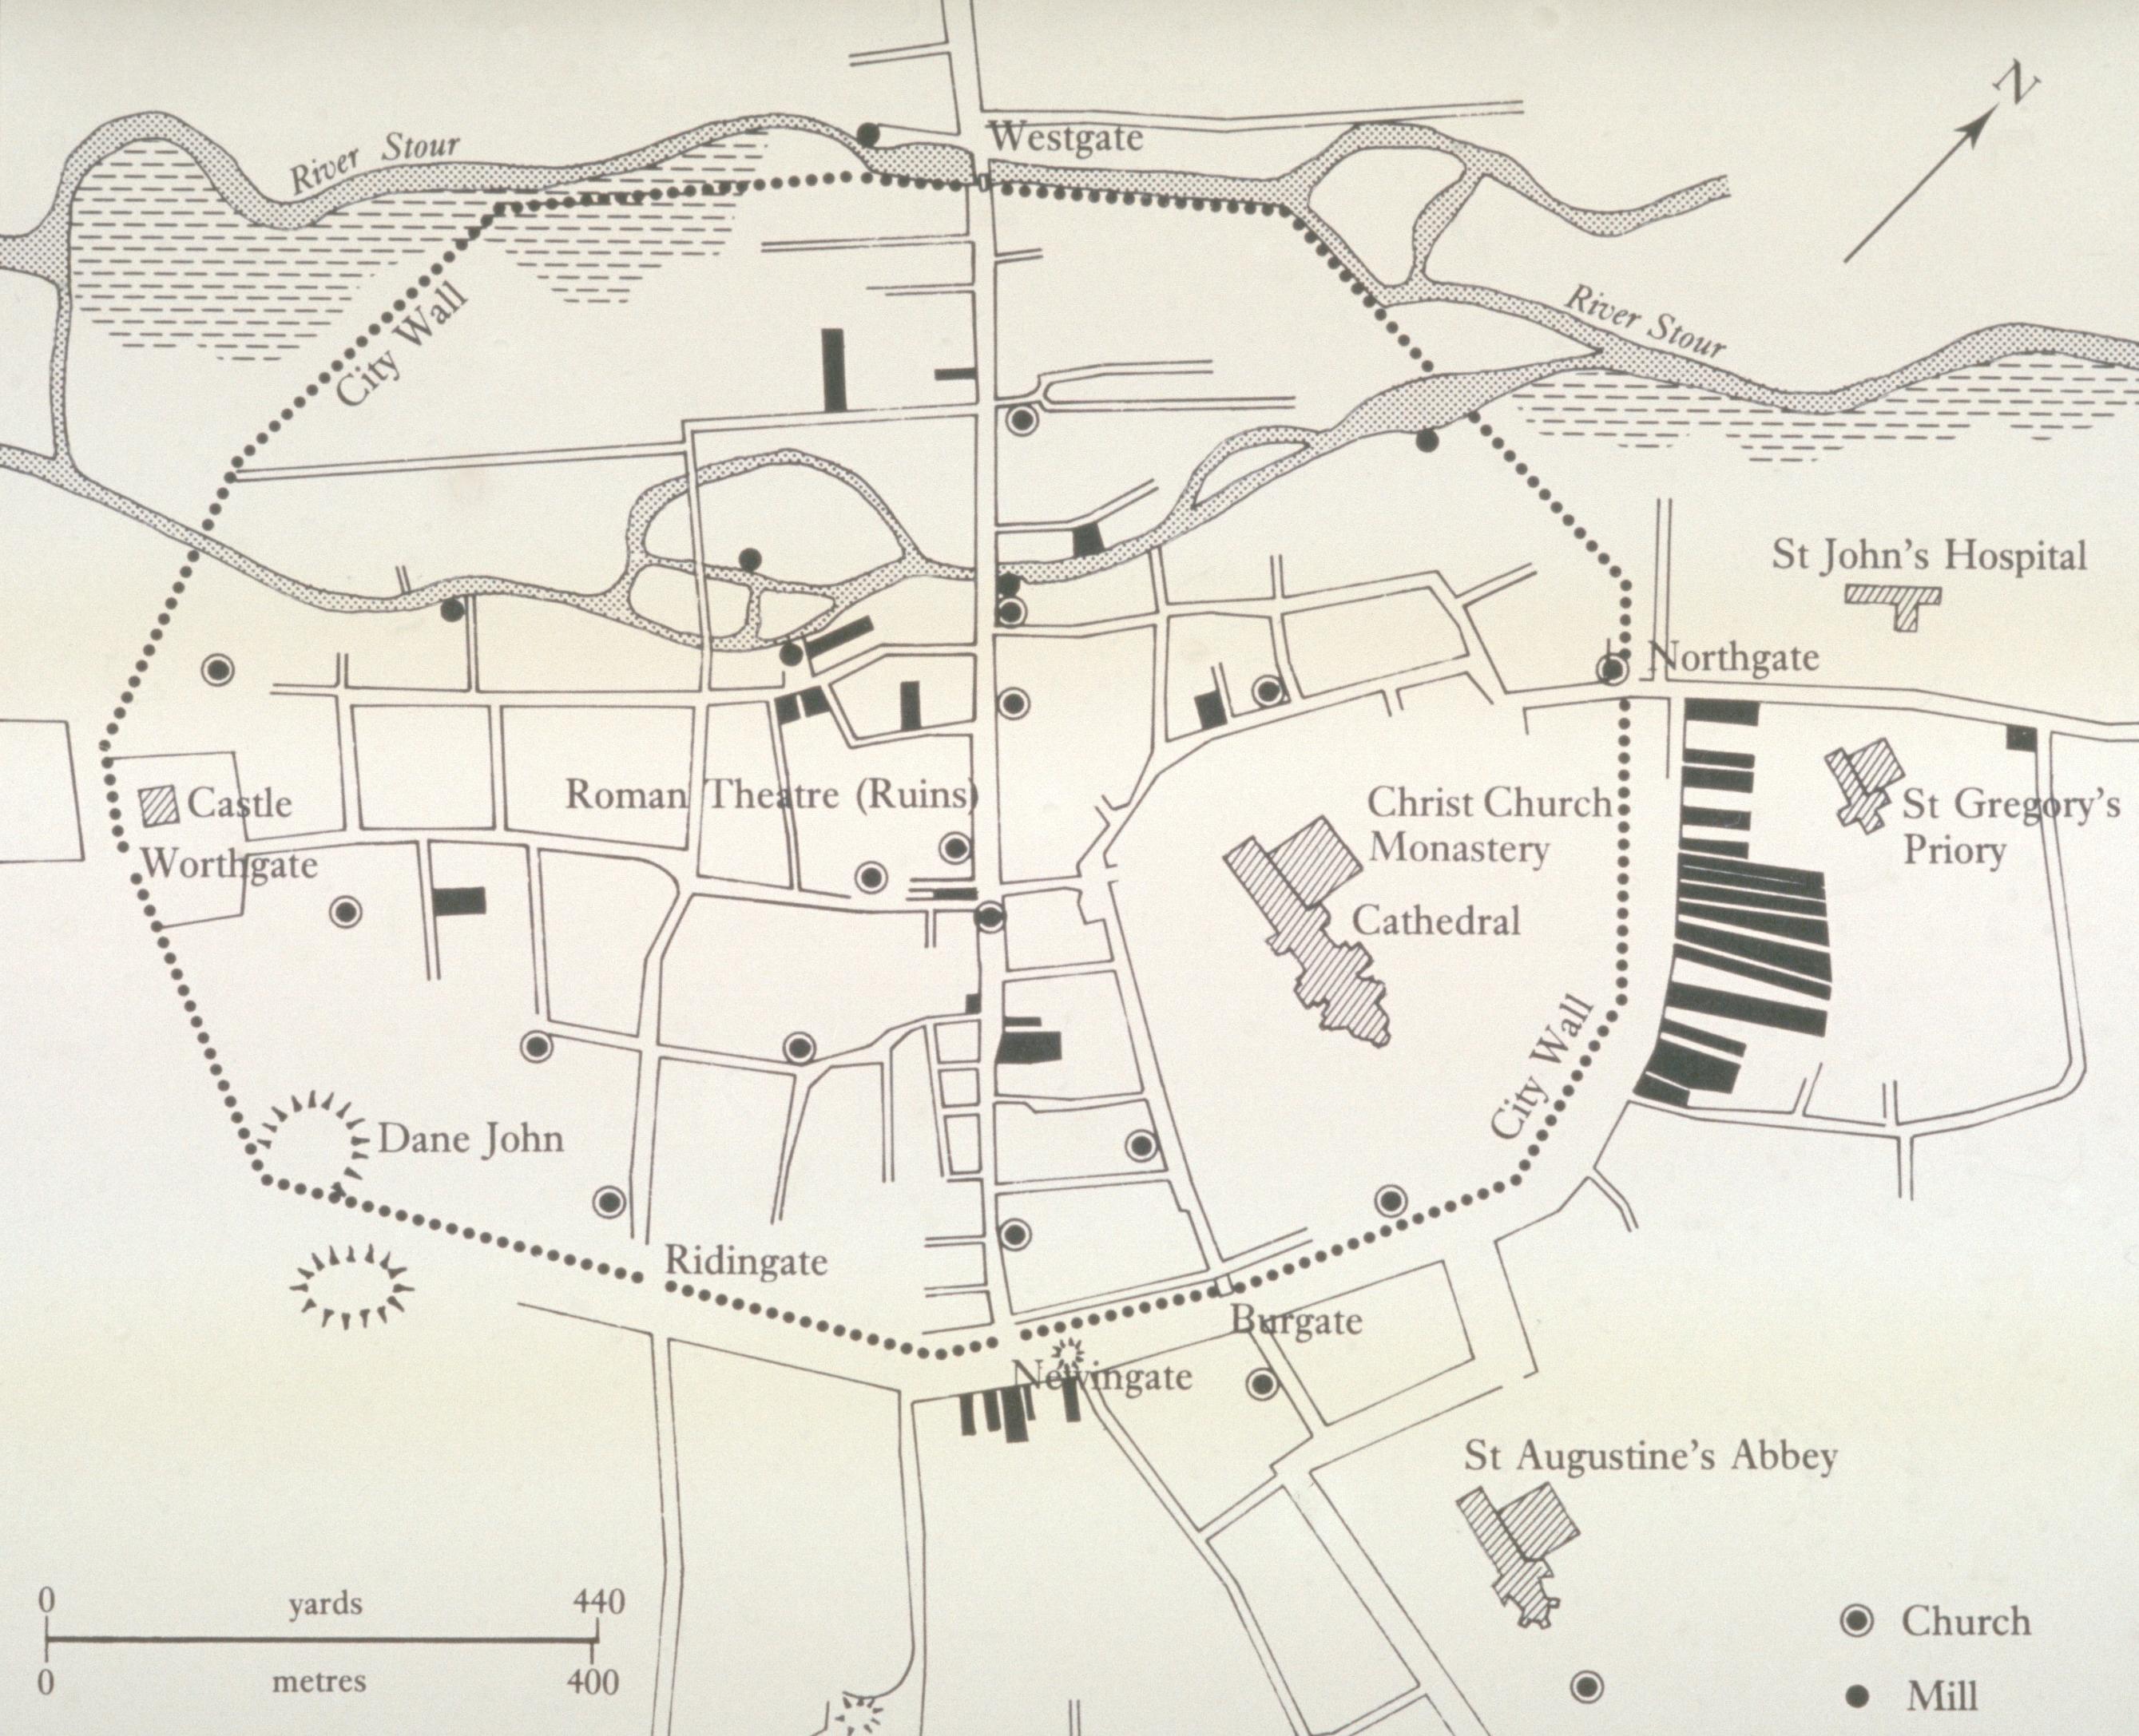
It is likely that the embroidery was executed in Canterbury in the ambience of the Abbey of St Augustine, whose position is shown bottom right in the map in fig. 7. (Bernstein offers an interesting analysis of the differences between this abbey and the Cathedral priory close by.)
The needlewomen were almost certainly English; and it seems highly likely that the anonymous principal artist was also a native of this island, since the drawing style and the handling of colours and decoration can be shown to be distinctively ‘insular’ or ‘Saxon’.
The tree-felling scene in fig. 8 (reminiscent of Trajan’s column) was done at Canterbury in the earlier eleventh century, and you may compare it with the three ornamental trees from the Tapestry I have placed alongside. fig. 9 shows part of a page from a faithful copy of a continental Psalter, made in Canterbury in about the year 1000. You will immediately recognise parallels in the confident drawing style and the free composition of the groups, in the rendering of the tree (bottom right), and in the scenes of battle conducted with spears, axes and shields. But notice in particular the scene in the left foreground where one of the flying arrows has struck a rebel in the eye, from which he is trying to pluck it out: this is a likely source for perhaps the best known detail in the whole of the Bayeux Tapestry, which we shall examine in fig. 83.
![Figure 9: (O_B_10) [FIXME: caption needed]](media/image9.jpeg)
Our artist was interpreting a brief prepared by and prepared for men who had actually taken part in the invasion of 1066; and he was certainly a wonderfully sharp-eyed observer of contemporary costume, armour, weaponry, and all manner of details. But it was equally certain that he was not a ‘war photographer’ or ‘war artist’, and the earlier Punch cartoon in fig. 10 (from the days when cartoonists could still draw) is funny precisely because we know that he was not there at Hastings, taking the action down ‘stitch by stitch’. On the contrary, he was clearly an educated and a highly sophisticated artist, who seems to have shaped and interpreted his material in the light of at least three related models.
First, and not surprisingly, he was influenced by the very rhetorical historiography of the official Norman accounts of the conquest, most notably that of William of Poitiers, whose approach is far from being detached.
Second, and more interestingly, his interpretation is permeated the conventions and values of contemporary epic poetry, whether in Anglo Saxon or in Norman French (I remind you that the Song of Roland was written down in Anglo-Norman French in about 1120, by a man called Turold). It is from these literary traditions that our artist will have derived the frequent scenes of councils, journeys, and feasts, the intense interest in armour and single combat, as well as the value system whereby Harold stands indicted of treachery (having broken his sworn oath to his feudal overlord), but may nevertheless be portrayed as a man of courage and a great leader of men—in modern terms, a ‘Rommel’ worthy of his ‘Montgomery’.
The third model was persuasively proposed in 1986 by David Bernstein, who suggested that our artist may have been inspired by the approach of all Christian interpreters of the Bible—whether they used words or images—and that he may have been seeking to comment on the events in by suggesting some prefigurations or antetypes in the Old Testament. Bernstein reminds us that the artist was a Saxon, and may well have come to see his nation as similar to that of the Jews, who delivered into bondage under a foreign yoke. In this perspective William would be cast in the role of Nebuchadnezzar (an instrument of divine wrath), and Harold in the role of King Zedekiah (cf. 2 Kings 24–25) who provoked Nebuchadnezzar by breaking his oath, and who was blinded after his family had been killed before his eyes.
I will return to this possible third dimension at the end of the lecture, but now it is time to ‘watch the whole film’ or to ‘hear the symphony through’, rejoicing in the details but willing to recognise the influence of epic poetry, rhetoricised history and Christian iconography in a complex and subtle narrative, which is very far from being either a comic strip or a naive eyewitness record.
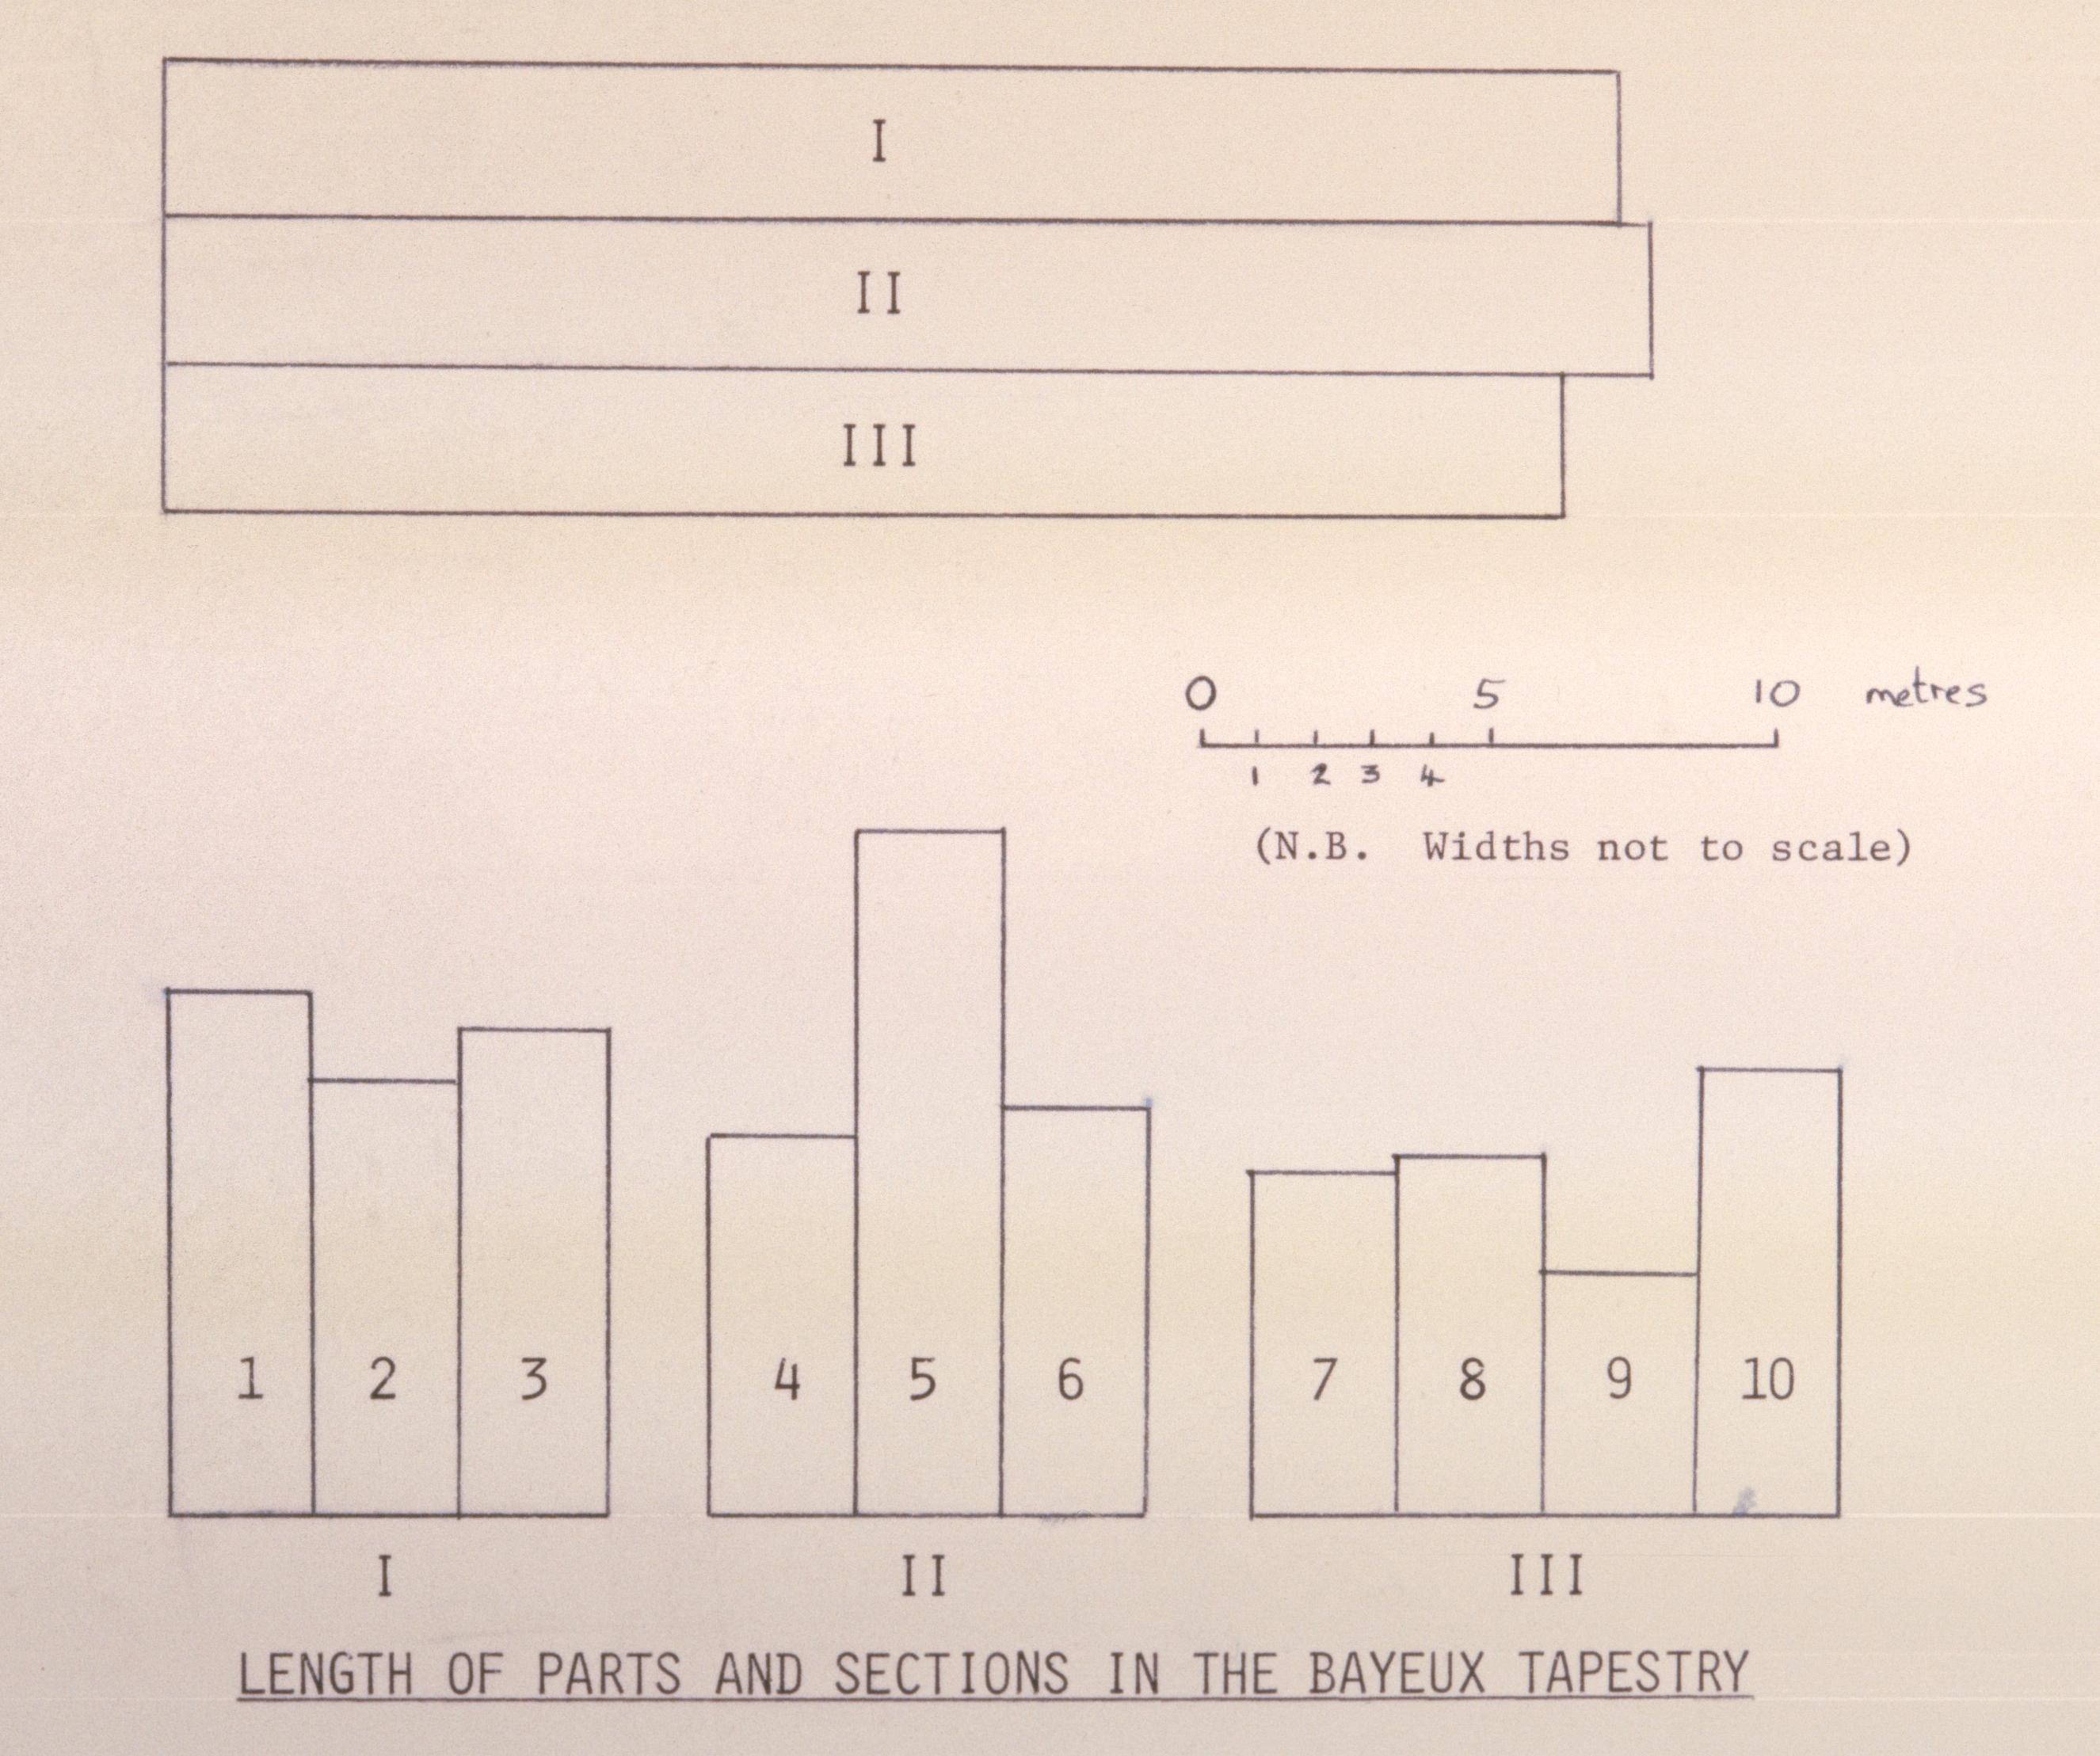
I have said that the telling of the story is characterised above all by its flow, but I find it helpful to divide the Tapestry into three main parts of nearly equal length, as is made visible in the diagram in fig. 11 (each part is therefore about eighty feet long). I also find it helpful to gather the seventy or so distinct scenes into ten ‘chapters’ (grouped 3 + 3 + 4, as you can see in the same diagram). And while this division into chapters is more arbitrary, you will observe that it is not entirely misleading—in that most of my ‘chapters’ are close to the average length of twenty-four feet. Here then is an overview in my own informal table des matières.
The Bayeux Tapestry
Part One
- Unlawful Arrest
- Liberation
- Vassal and Lord
Part Two
- The Renegade
- The Taskforce
- The Beachhead
Part Three
- Deployment
- Attack
- Mêlée
- Victory
The first part deals with Harold’s adventures (or misadventures) on the continent, leading up to his oath of allegiance to Duke William of Normandy: the three chapters are entitled ‘Arrest’, ‘Liberation’ and ‘Vassal and Lord’. The second part tells of Harold’s perfidious acceptance of the crown of England, and of the consequent invasion by the Norman, up to and including the building of a fortification near Hastings: the chapters are called ‘The Renegade’, The Task Force’ and ‘The Beachhead’. The last part is given over to the Battle of Hastings, and divides more naturally into four: ‘Deployment’, ‘Cavalry Attack’, ‘Hand to Hand Fighting’, and ‘Victory (a second onslaught by the Normans, culminating in the death of Harold and the flight of his followers).
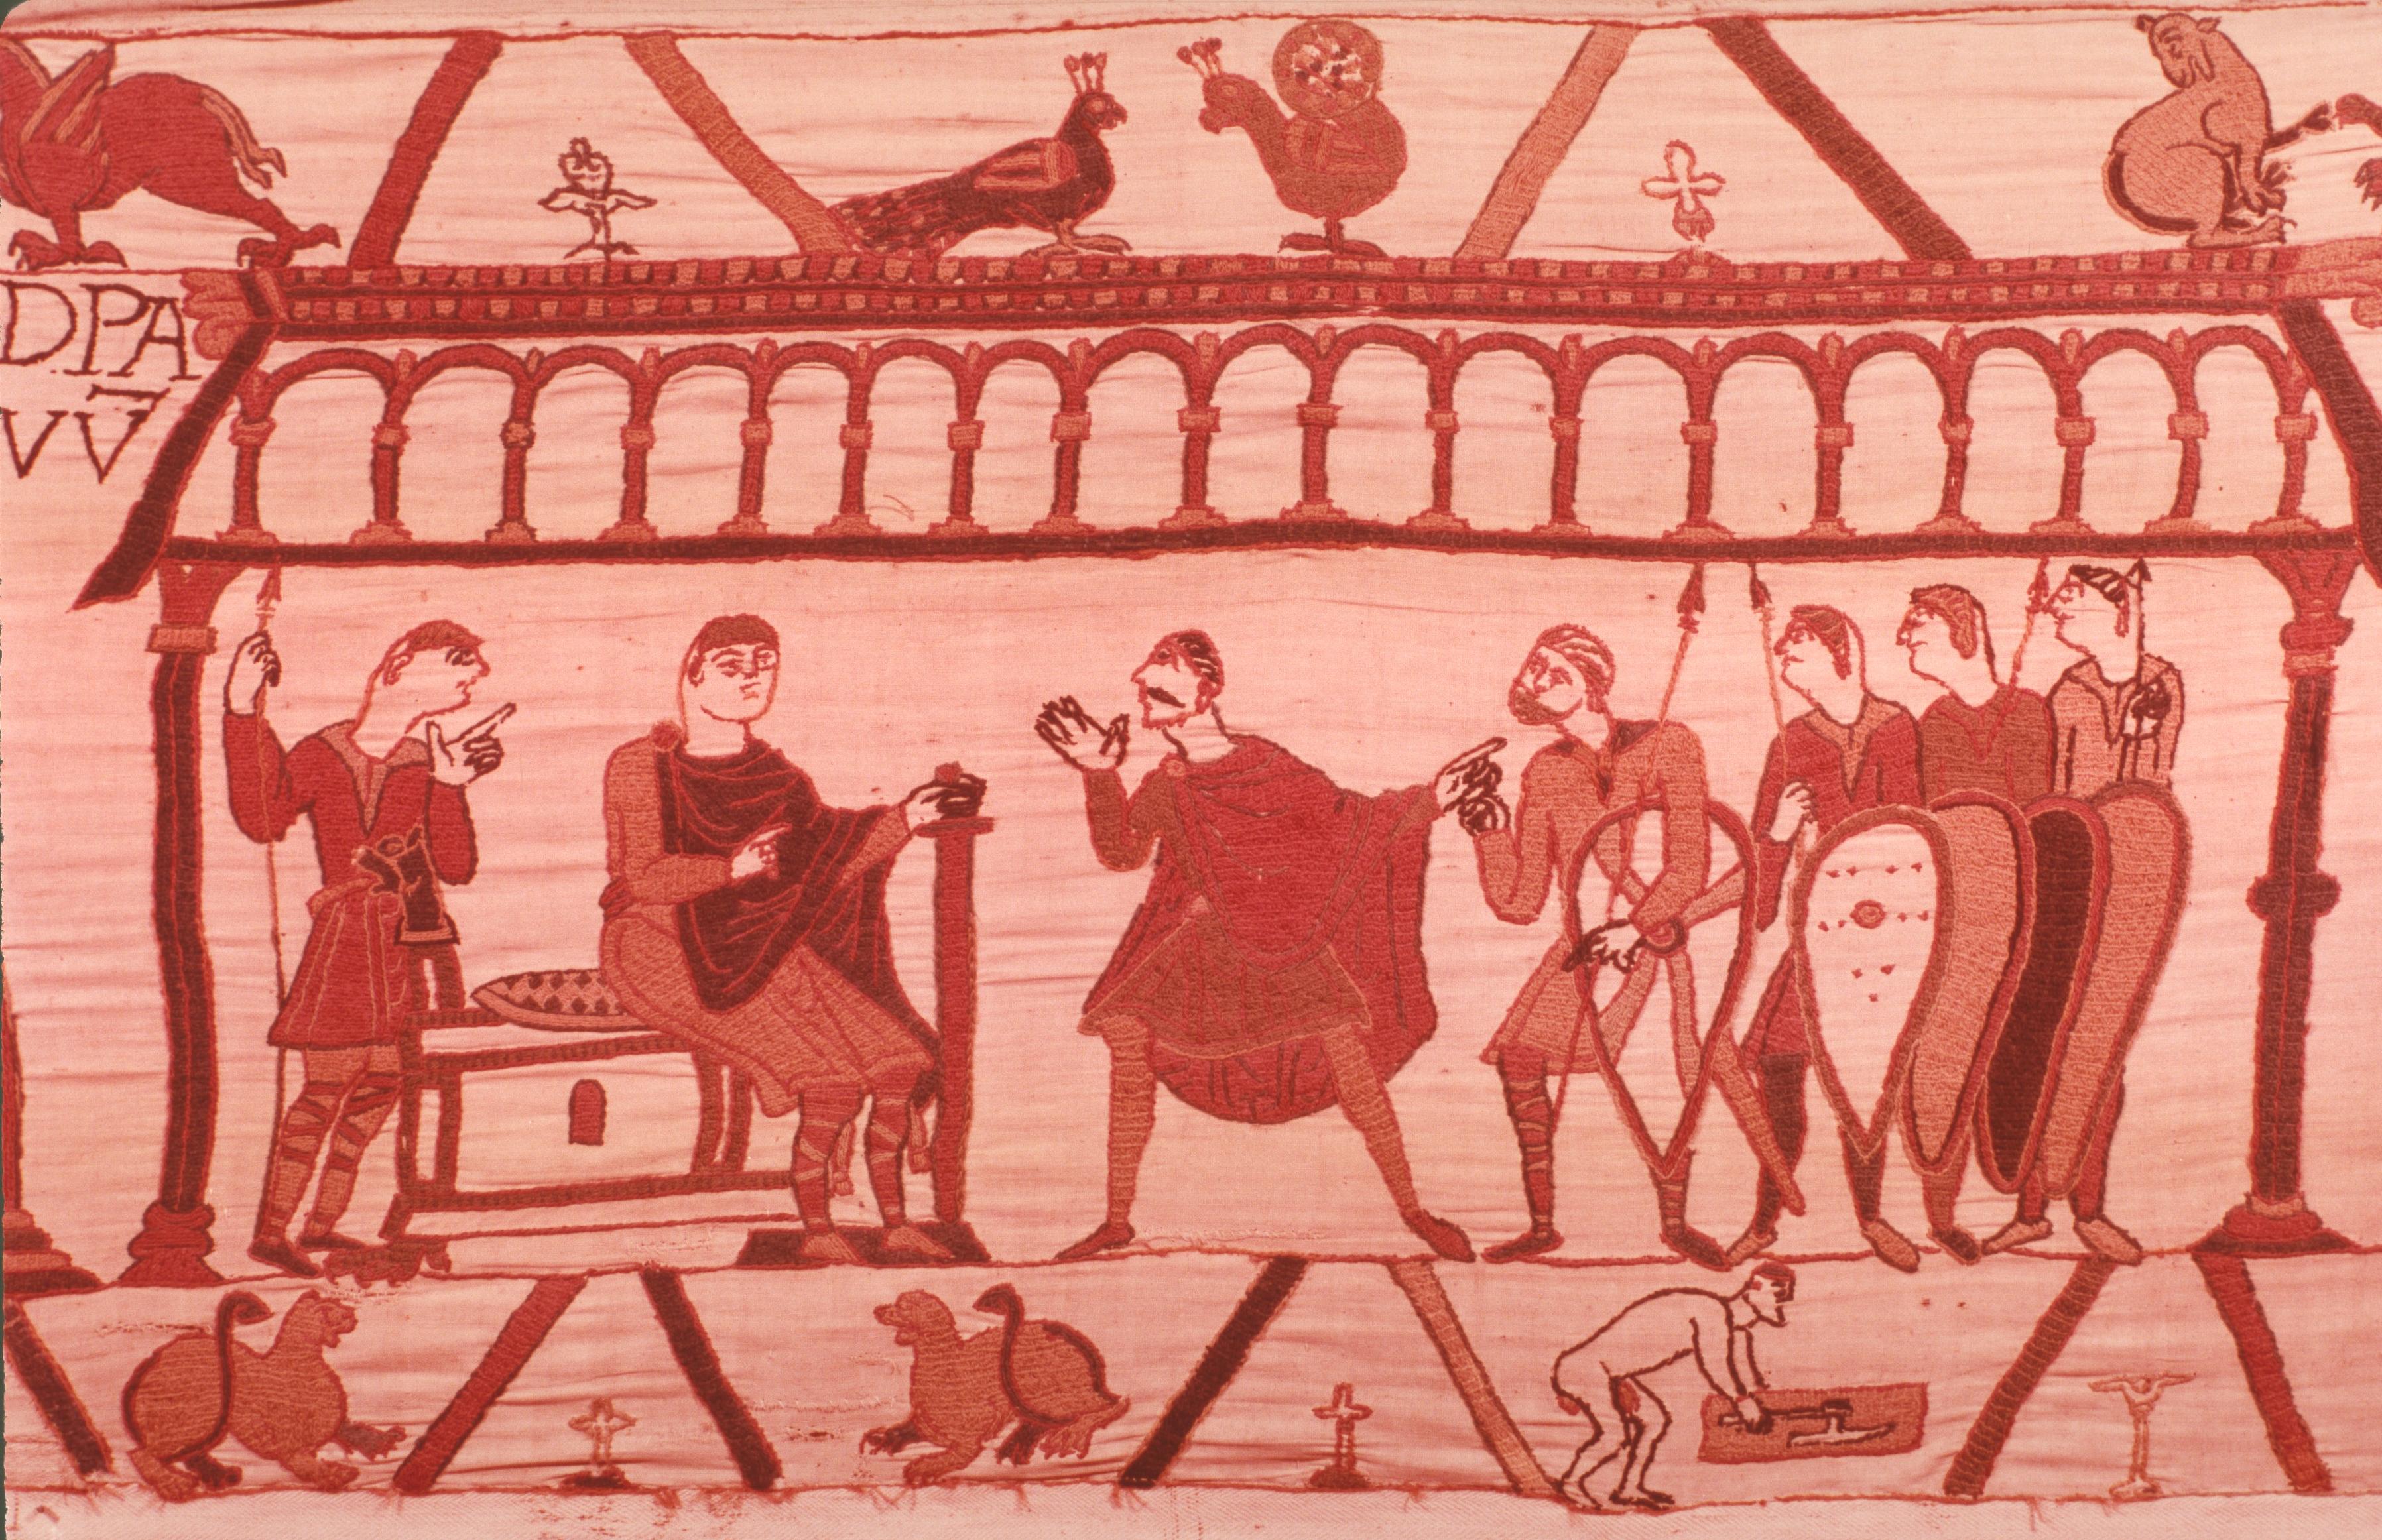
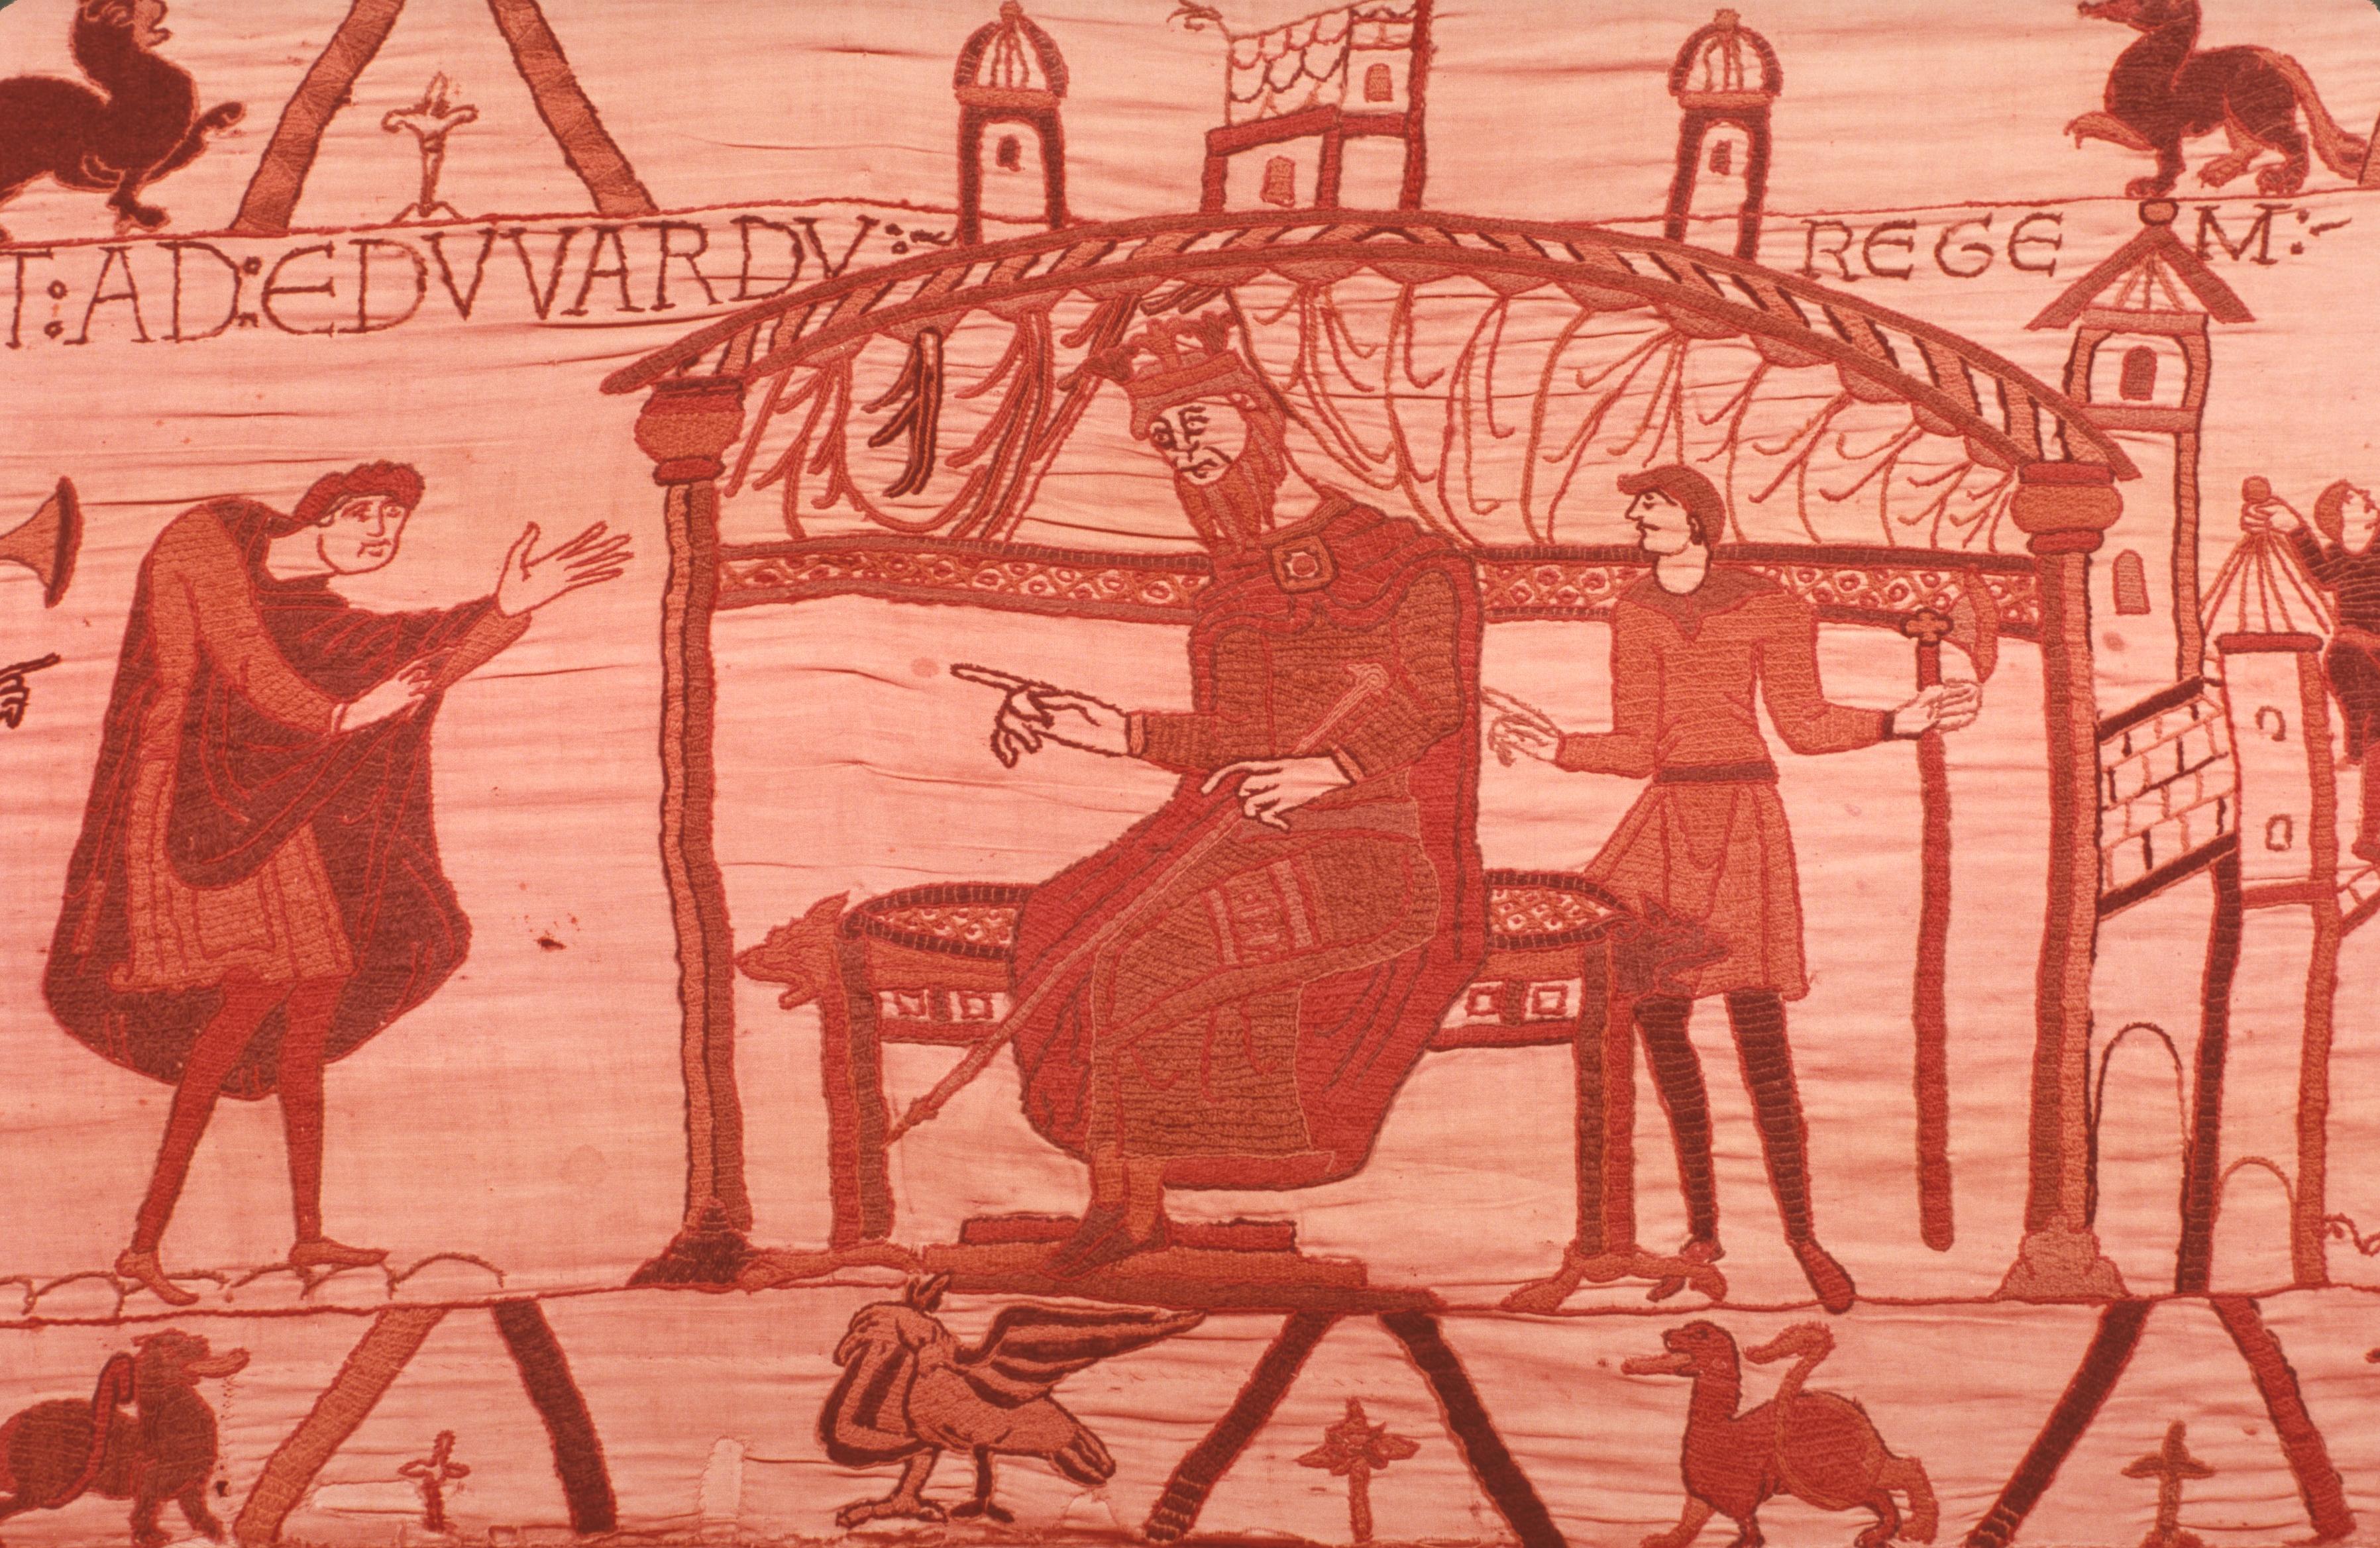
Chapter one begins in the Hall of a Palace, which is shown in a convenient overview in fig. 12, and in the detail in fig. 13. We see Harold and a retainer (both clean shaven with moustaches) receiving instructions from the dominant figure—‘dominant’ in that he is greater in scale, as well as being crowned, bearded, holding a sceptre, and sitting on a cushioned throne—who is identified in the border above as ‘Edward…King’.

The four hands, expressively enlarged, show that the King is spelling something out; and the sequel makes it clear that Harold is being sent as a special envoy on a peaceful, but very important, diplomatic mission.
It is ‘important’ because in the following scene (fig. 14) Harold is described in the border as ‘Dux Anglorum’ and is accompanied by mounted knights; and it is ‘peaceful’ because he is riding off unarmed, with his hounds before him and a hawk on his wrist.
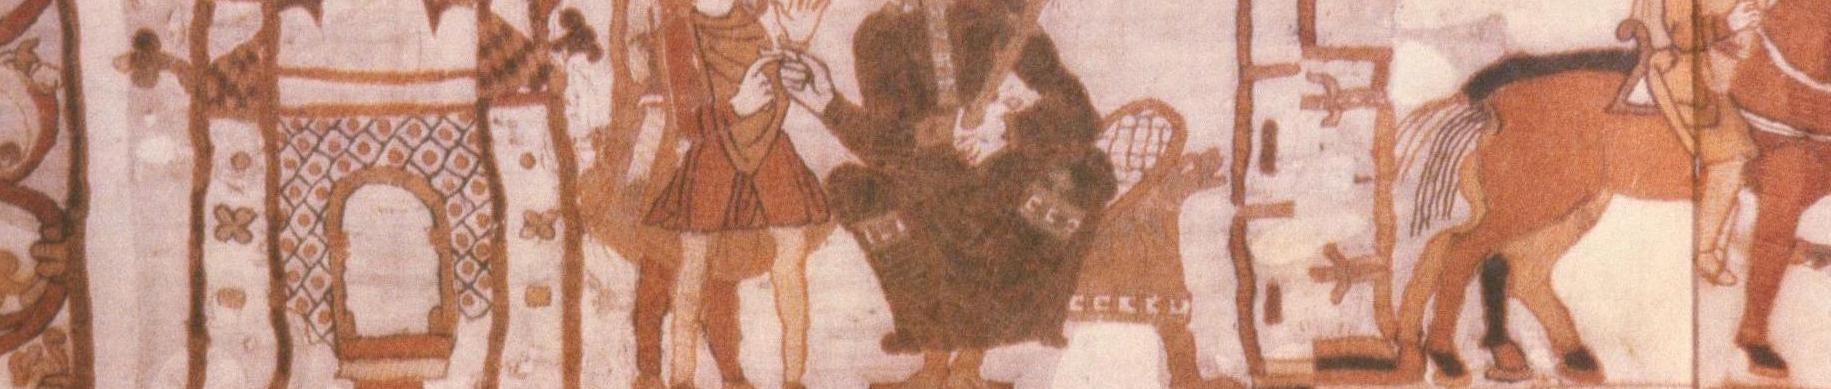
They come first to Bosham (in Sussex), as we are told in the border, where there are two buildings which act as locations for successive scenes (fig. 15a). Both of them emphasise the calm and dignity of the journey. With knees bent, Harold and his companion enter a church, like God-fearing men with a clear conscience, to pray presumably for a safe crossing. Then (cf. detail in fig. 15b) he and his followers have a suitably ‘epic’ feast in the hall on the first floor of a manor house:
Harold is drinking from a bowl, while his companions use drinking horns, when a messenger arrives to tell them that ‘time and tide wait for no man’ (or words to that effect). So down the stairs they go (fig. 16), with crew members carrying oars and the tiller, while the arisotcrats have removed their hose to wade out to the ship, still carrying two hounds and a hawk.
Immediately, the crew begin pushing off (most energetically) and stepping the mast. As you can confirm by returning to the overview in fig. 12, this area offer a perfect example of the flow of the narrative, with one scene gliding smoothly into the next.
[TOM: ** DID I CROP THE SLIDES TOO DRASTICALLY, OR DID YOU CROP THE SCANNINGS? I THINK WE NEED TO INSERT (SCANNING FROM THE BOOK ON MY SHELVES) THE LOWER MARGIN WITH THE FABLES HERE. I’ve referred to it as 17b in the text below—Pat: the slides themselves were cropped as you see them; I think making up a new set of images is probably necessary]
Before we follow Harold as he ‘sailed the sea’, however, we should take a look at the borders. In the top strip (cf. fig. 12 again), the beasts are heraldic (perhaps underlining the solemnity of the occasion); but under the steps of the hall (cf. fig. 16b), they become beasts in well-known fables, and make oblique commentaries on the forthcoming action from the English point of view: the fox tricks the raven of his piece of cheese by insincere flattery, while the waves of the sea above remind the artist of the fable of the lamb—the one in which the wolf accuses a lamb of muddying the stream in order to have a pretext for eating it.
The borders in the following section (fig. 17) offer four more fables which deal with the weak falling victim to the strong: the heron puts her beak down the wolf’s throat; the monkey leads animals to the sick Lion; and (most apt to the coming situation) the mouse is seized by a treacherous frog who tries to drown it, while a kite swoops down and seizes the frog (cf. the wonderful detail in fig. 18).
Before we leave the subject of these borders, you must also notice the freedom with which the artist simply eliminates the top margin (cf. fig. 17) in order to have space to accommodate the swelling sails of Harold’s boats (the Latin words here include VELIS VENTO PLENIS).
FIXME: Search for “**”
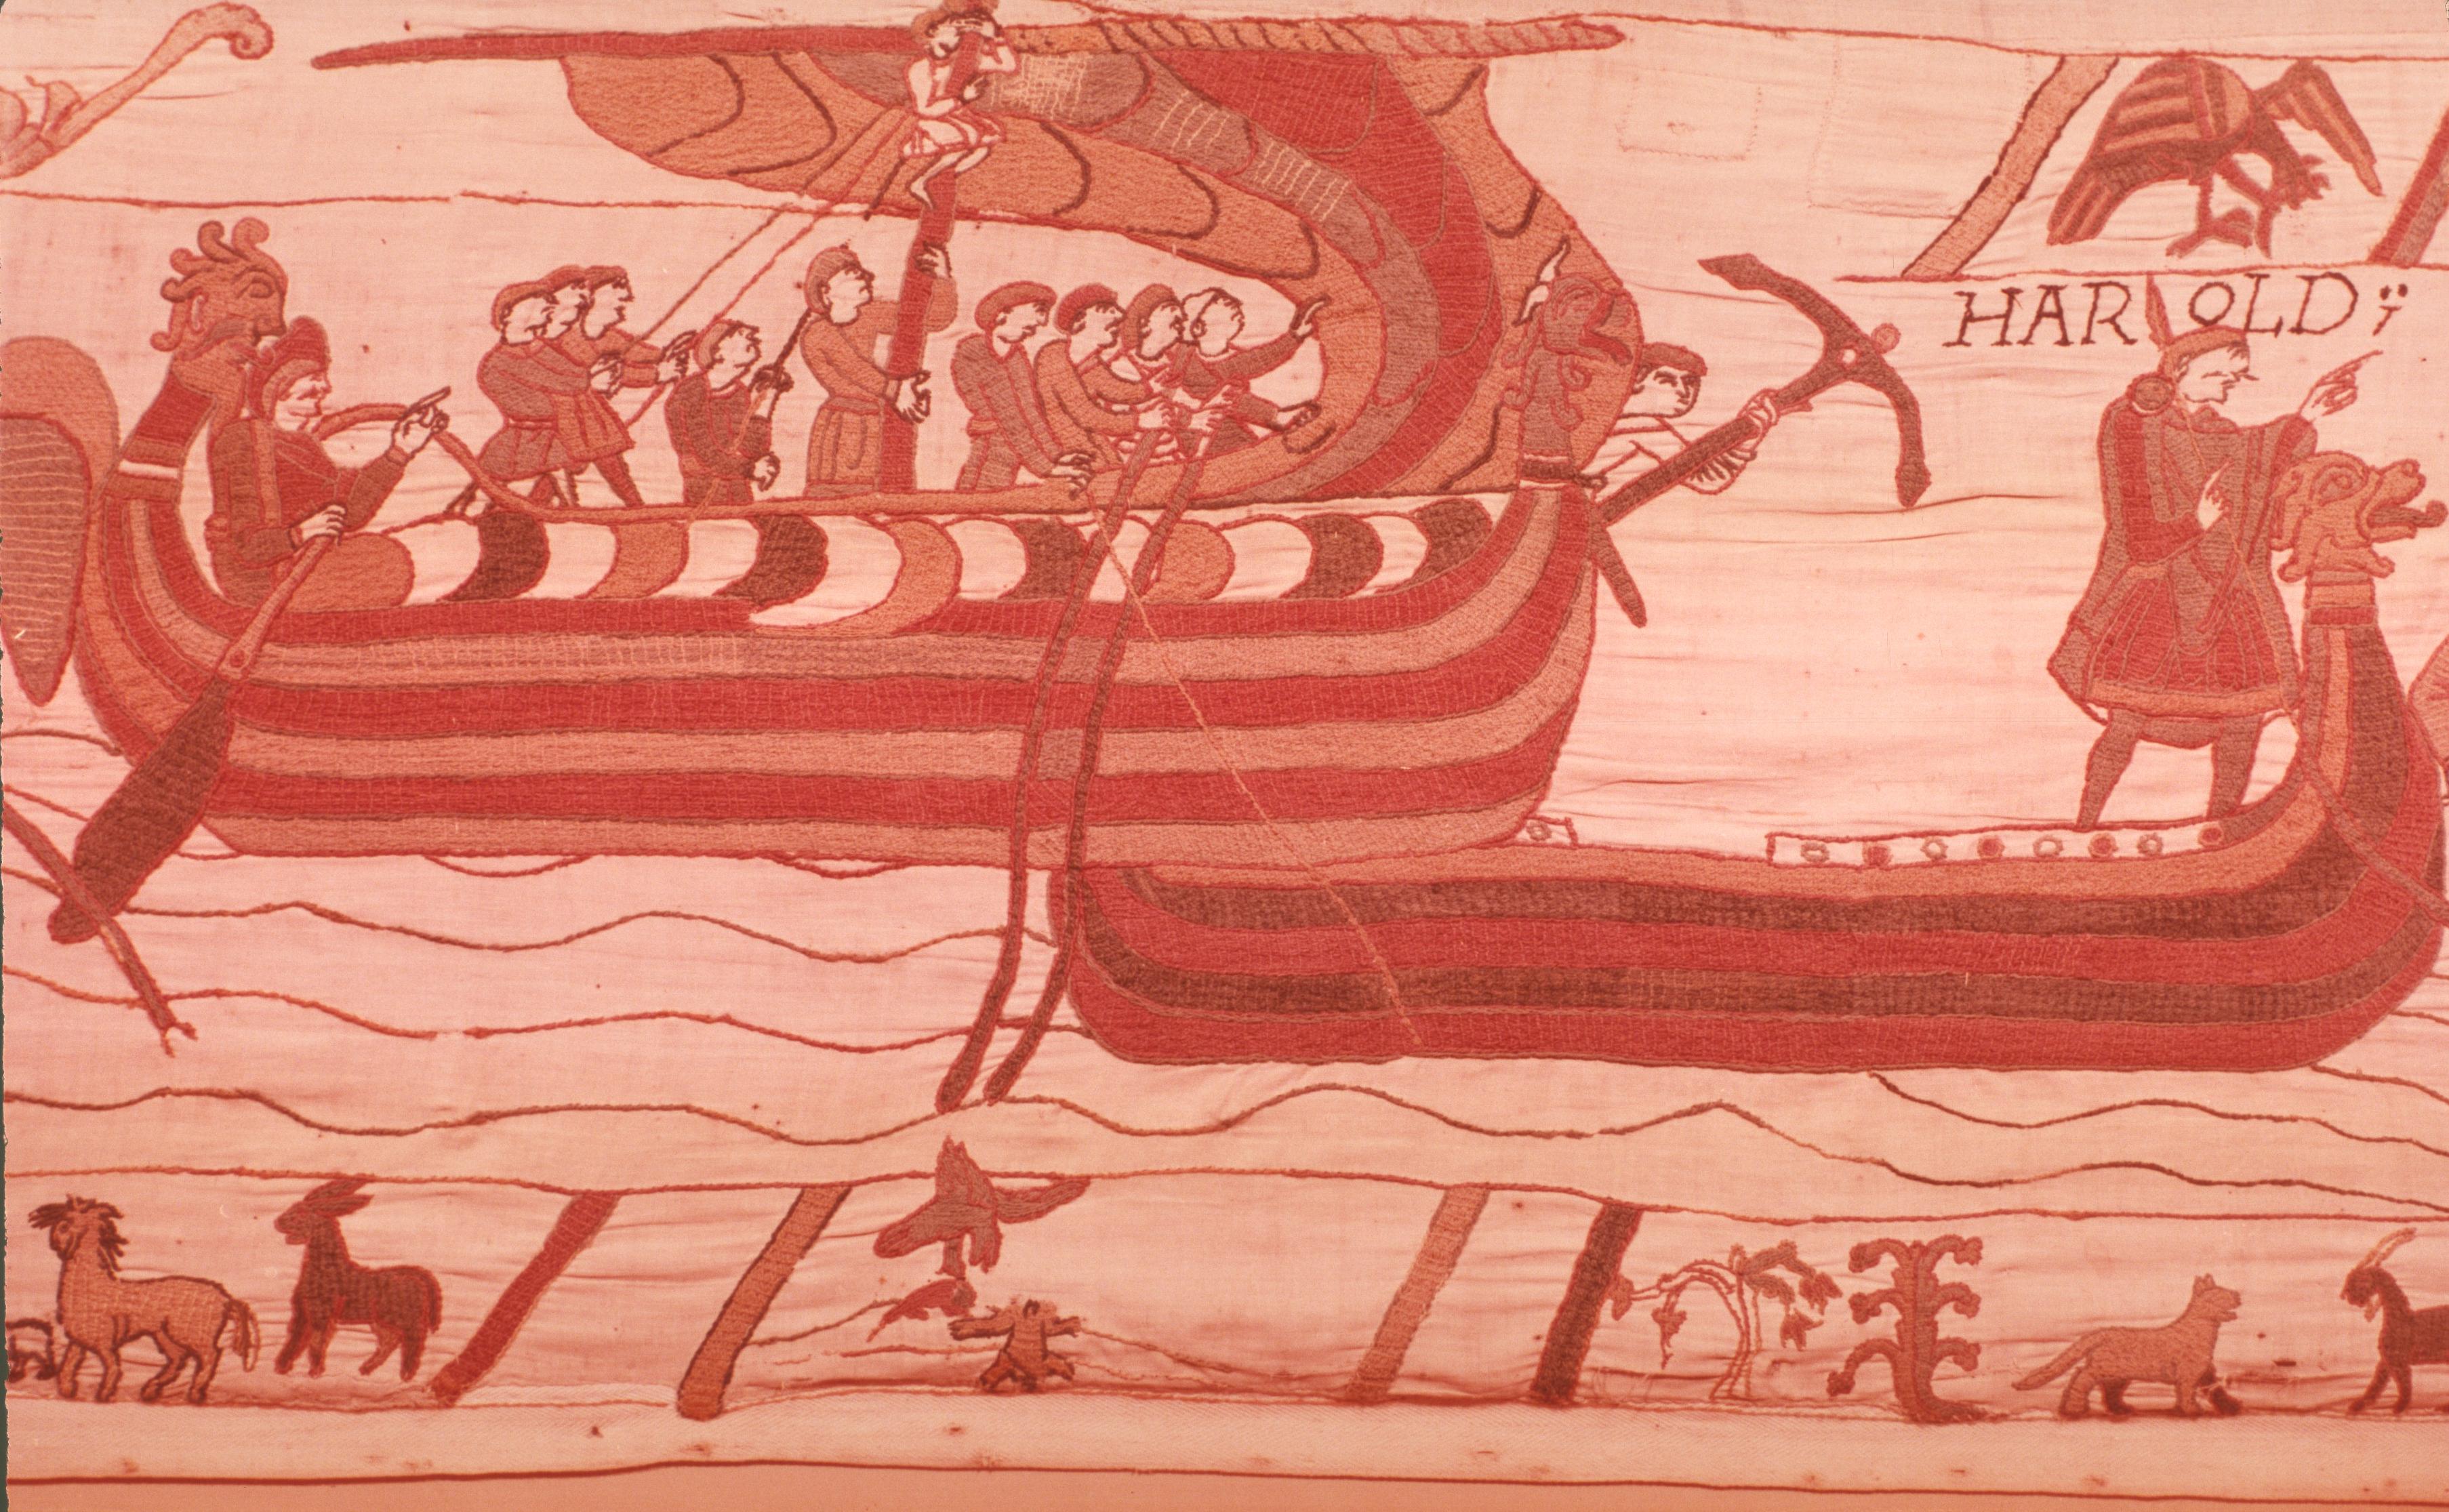
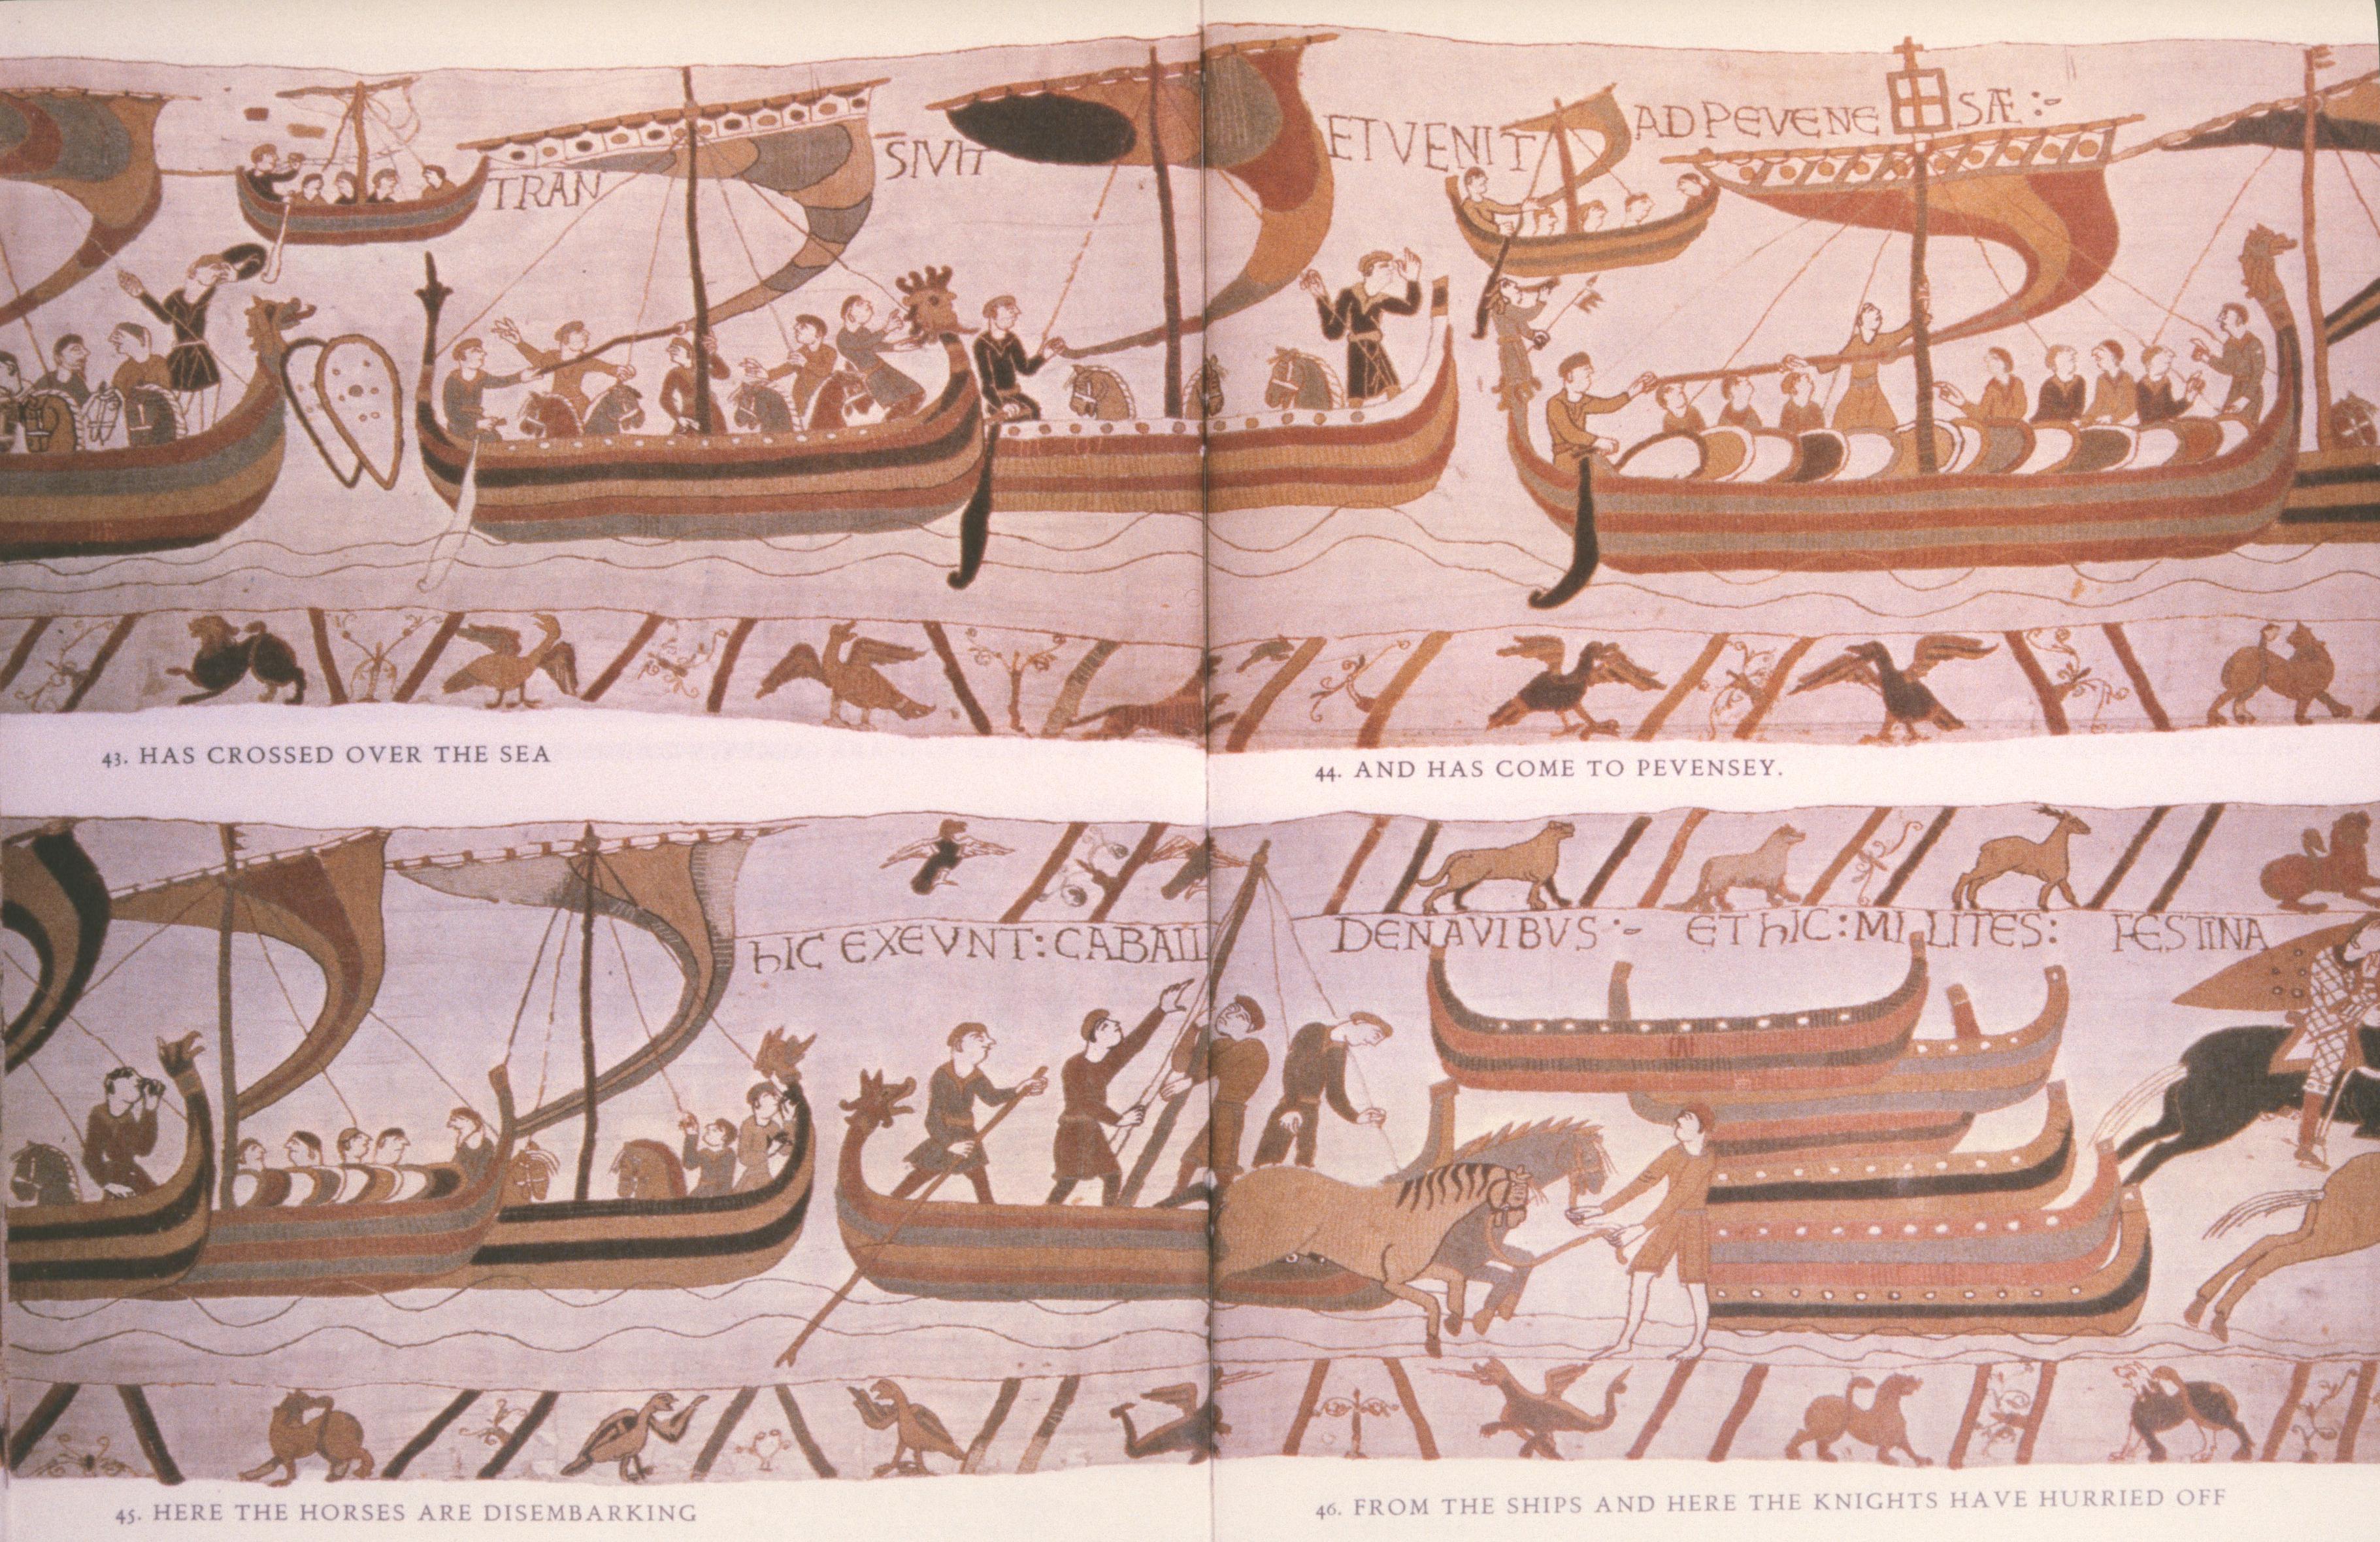
The journey has resumed, by sea, with a vigorous movement from left to right in a splendid section in which the single vessel is repeated four times, giving pleasure in the patterned surface of planks and shields, the vigorous, curving lines of the billowing sails, and a convincing succession of details as we see the ship approaching the coast.
In fig. 19, Harold is at the helm, with a lookout at the masthead, one man swinging the lead, and another ready with the anchor. Then in a flash, the crew have taken their shields and disembarked, while Harold (duly named), standing next to the carved figurehead, will be the last man to come ashore.
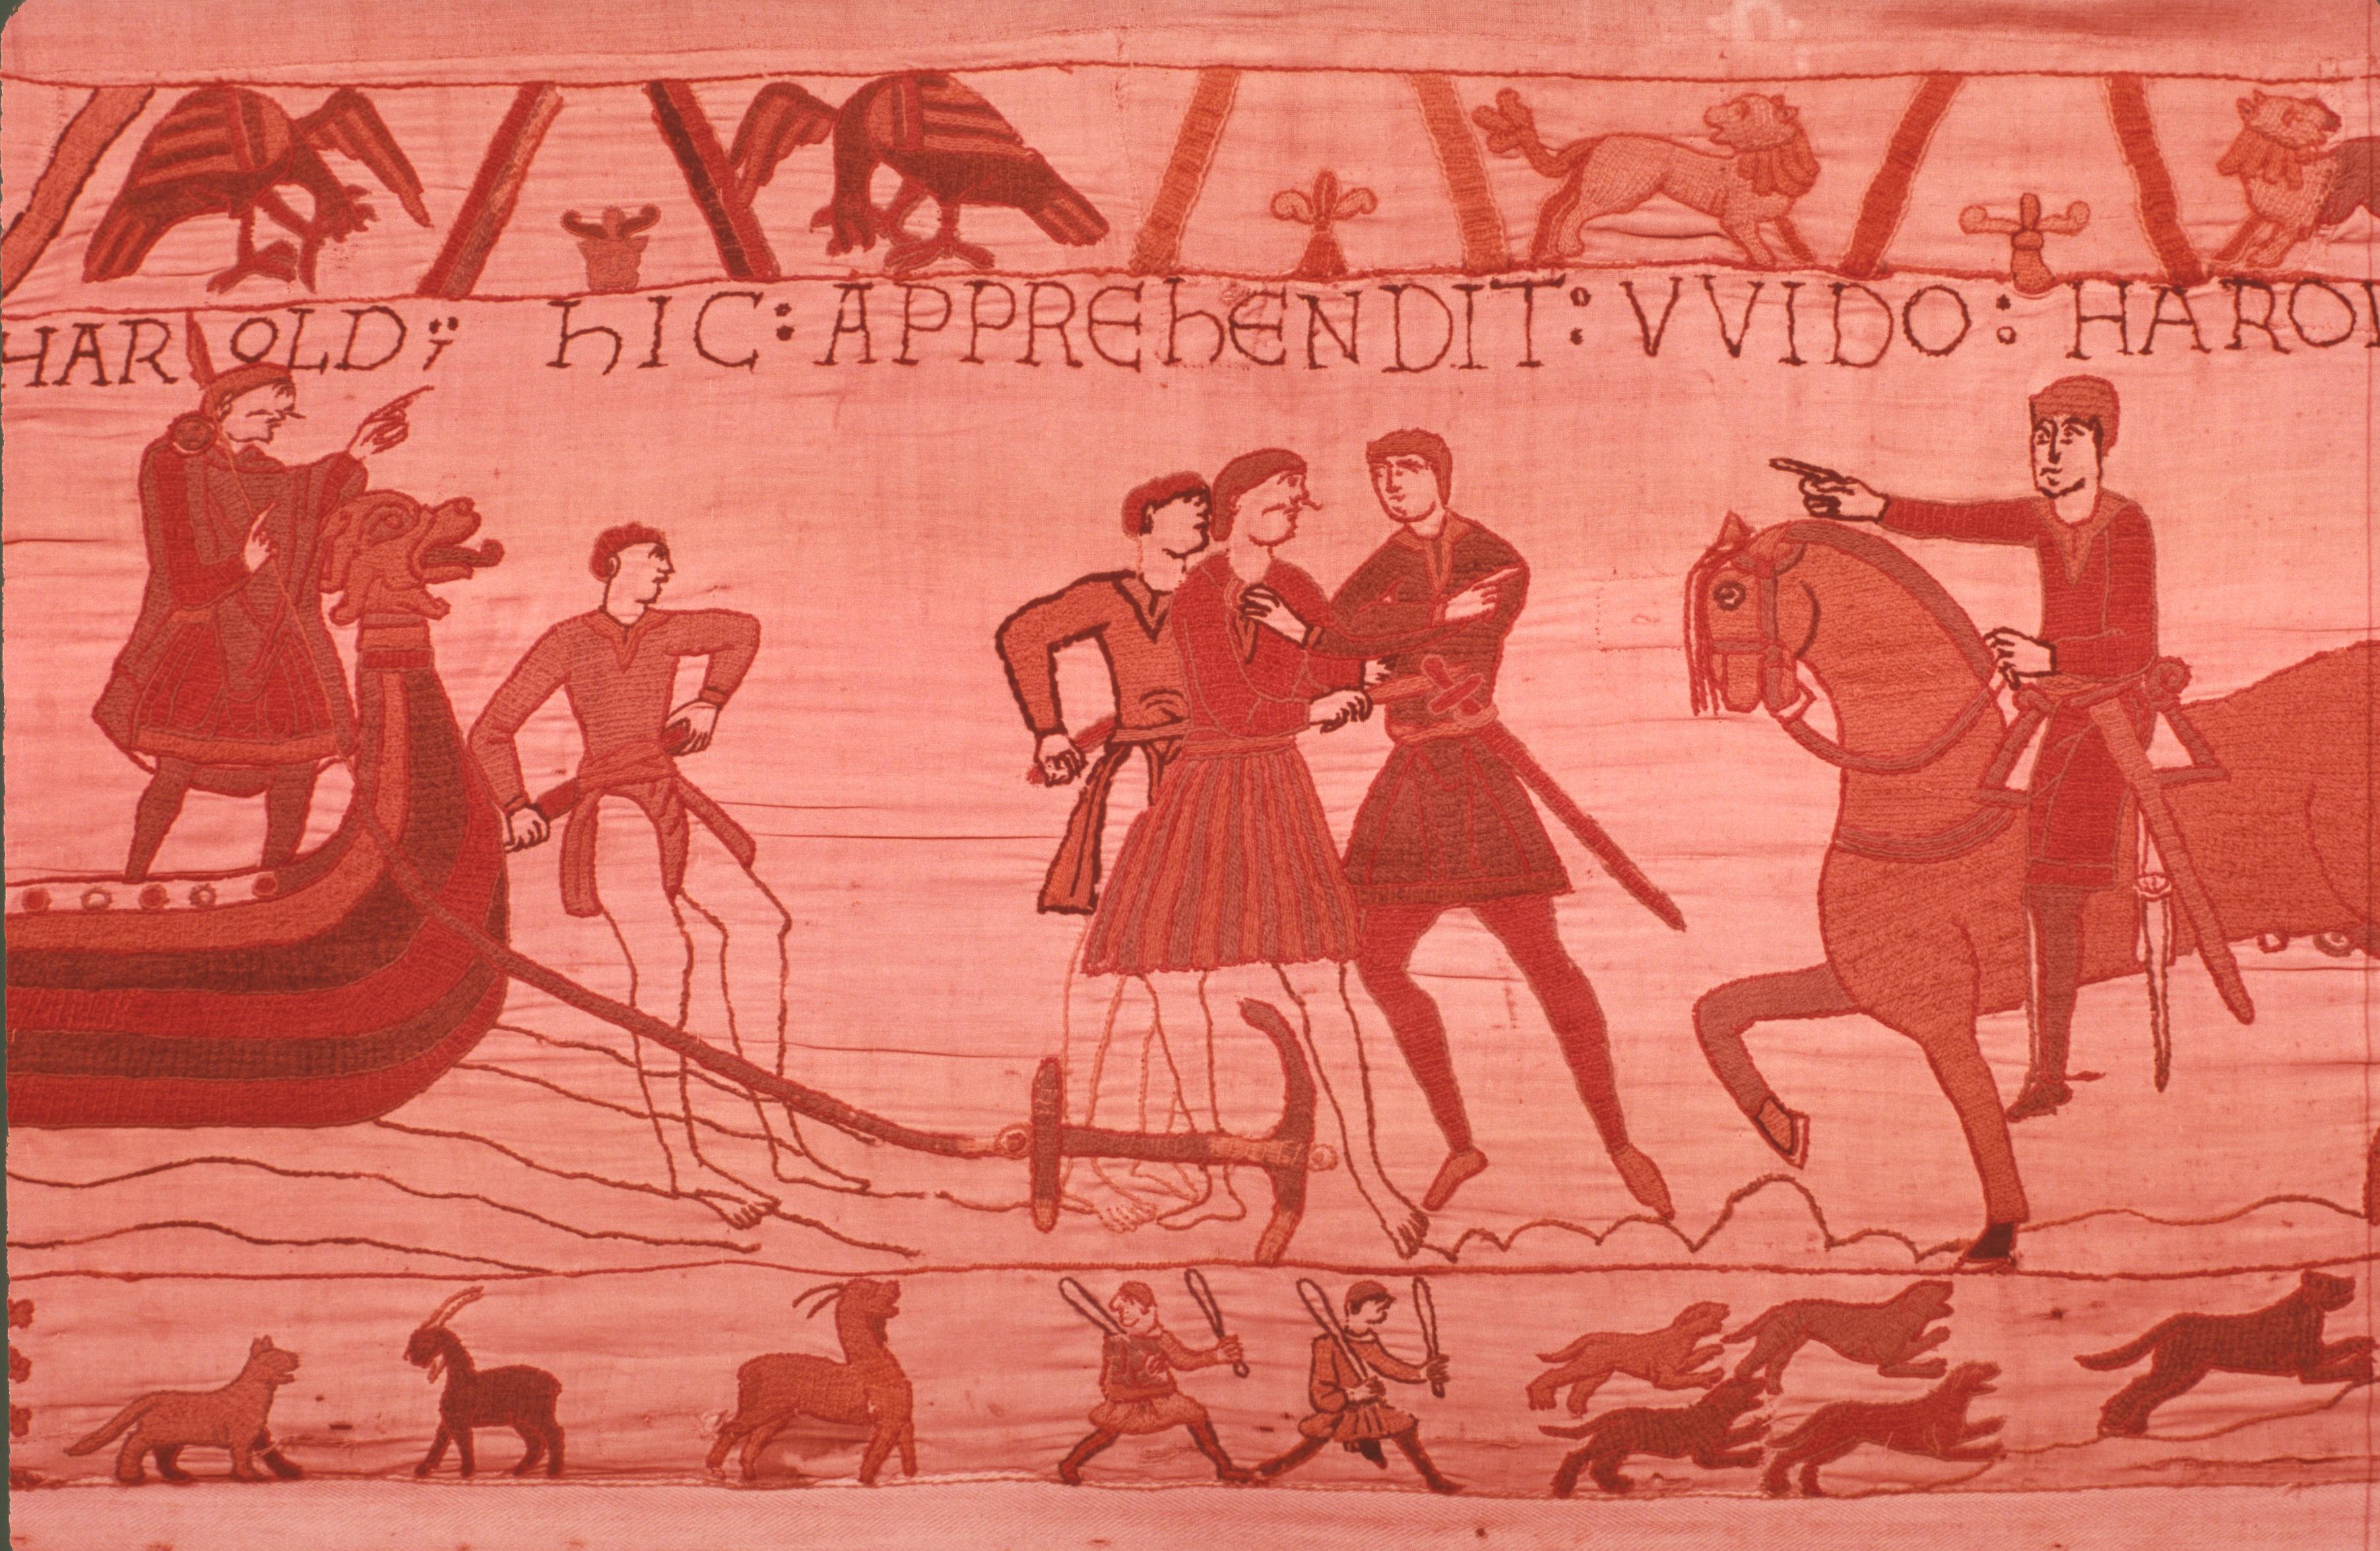
As the bare-legged aristocrats wade up the shelving beach (cf. the detail in fig. 20), we are faced with the first vigorous movement from right to left. Four armed and mounted knights (cf. fig. 17) trot down to the shore, led by the clean-shaven Count Guy (duly named). He orders his men-at-arms to seize Harold. The top border returns quietly to pairs of heraldic beasts, but the lower continues its commentary on the action– not through animal fables, but a real-life scene of an extended hunt, with hounds pursuing their victim and apprehending it.
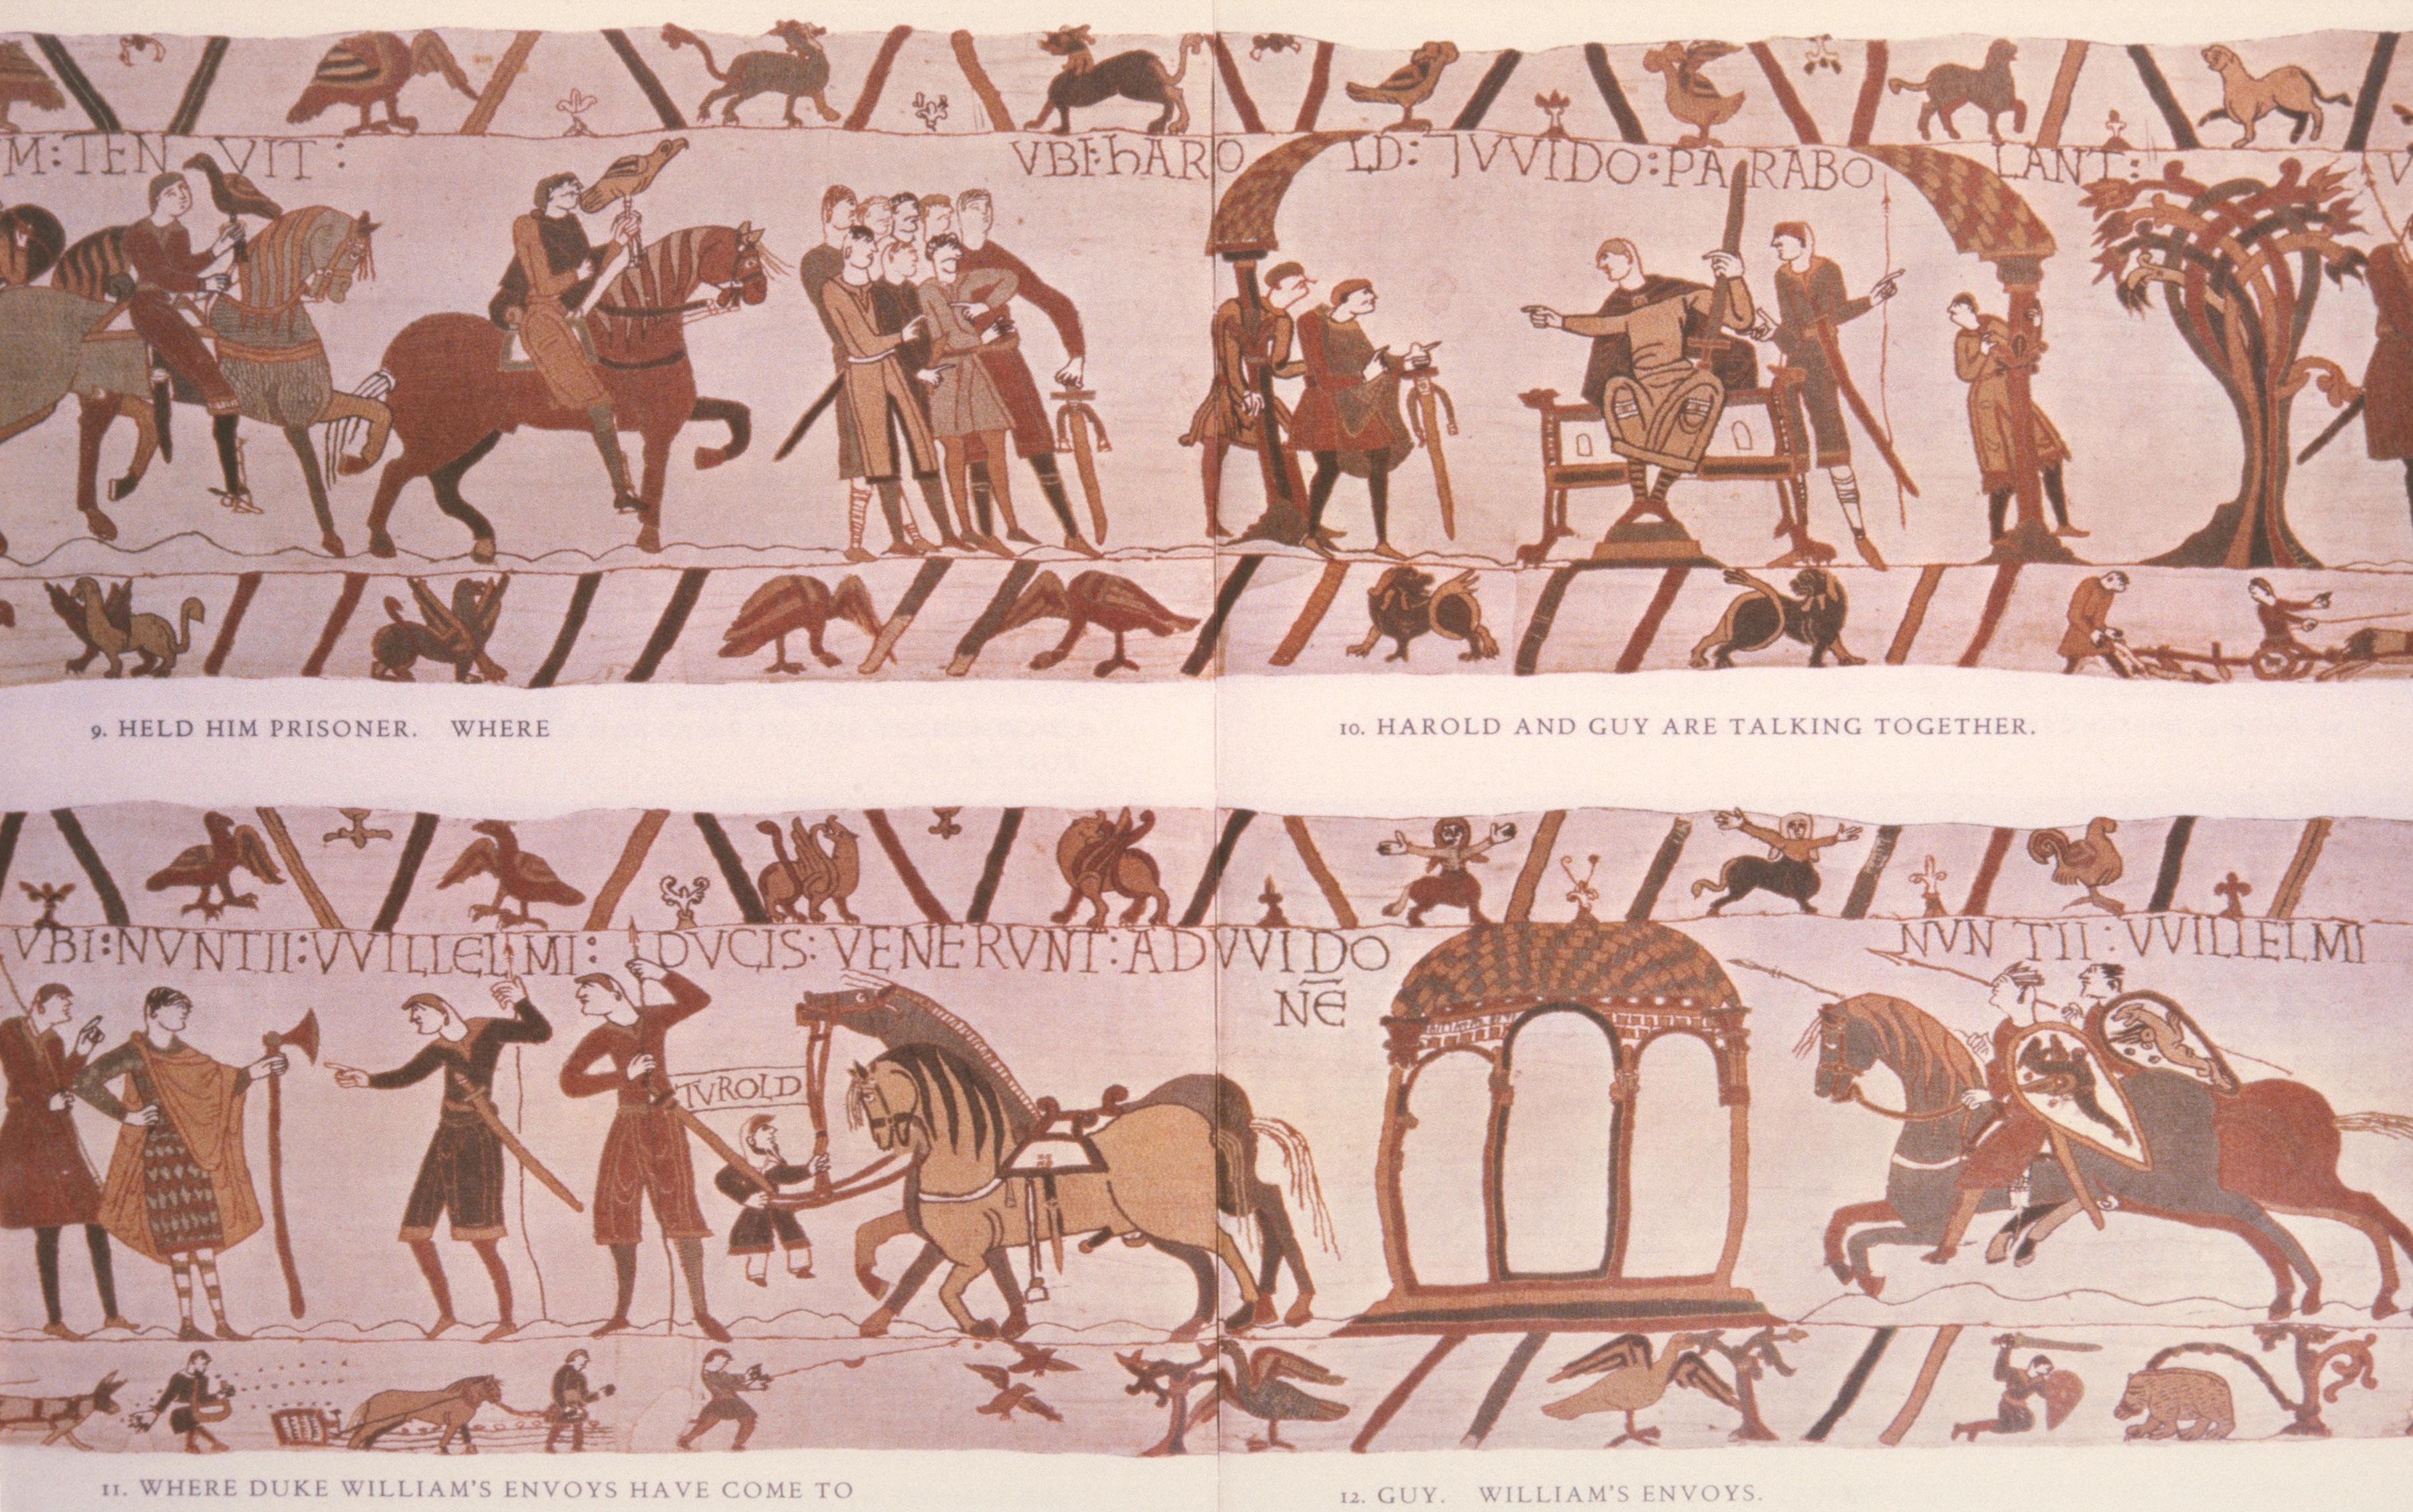
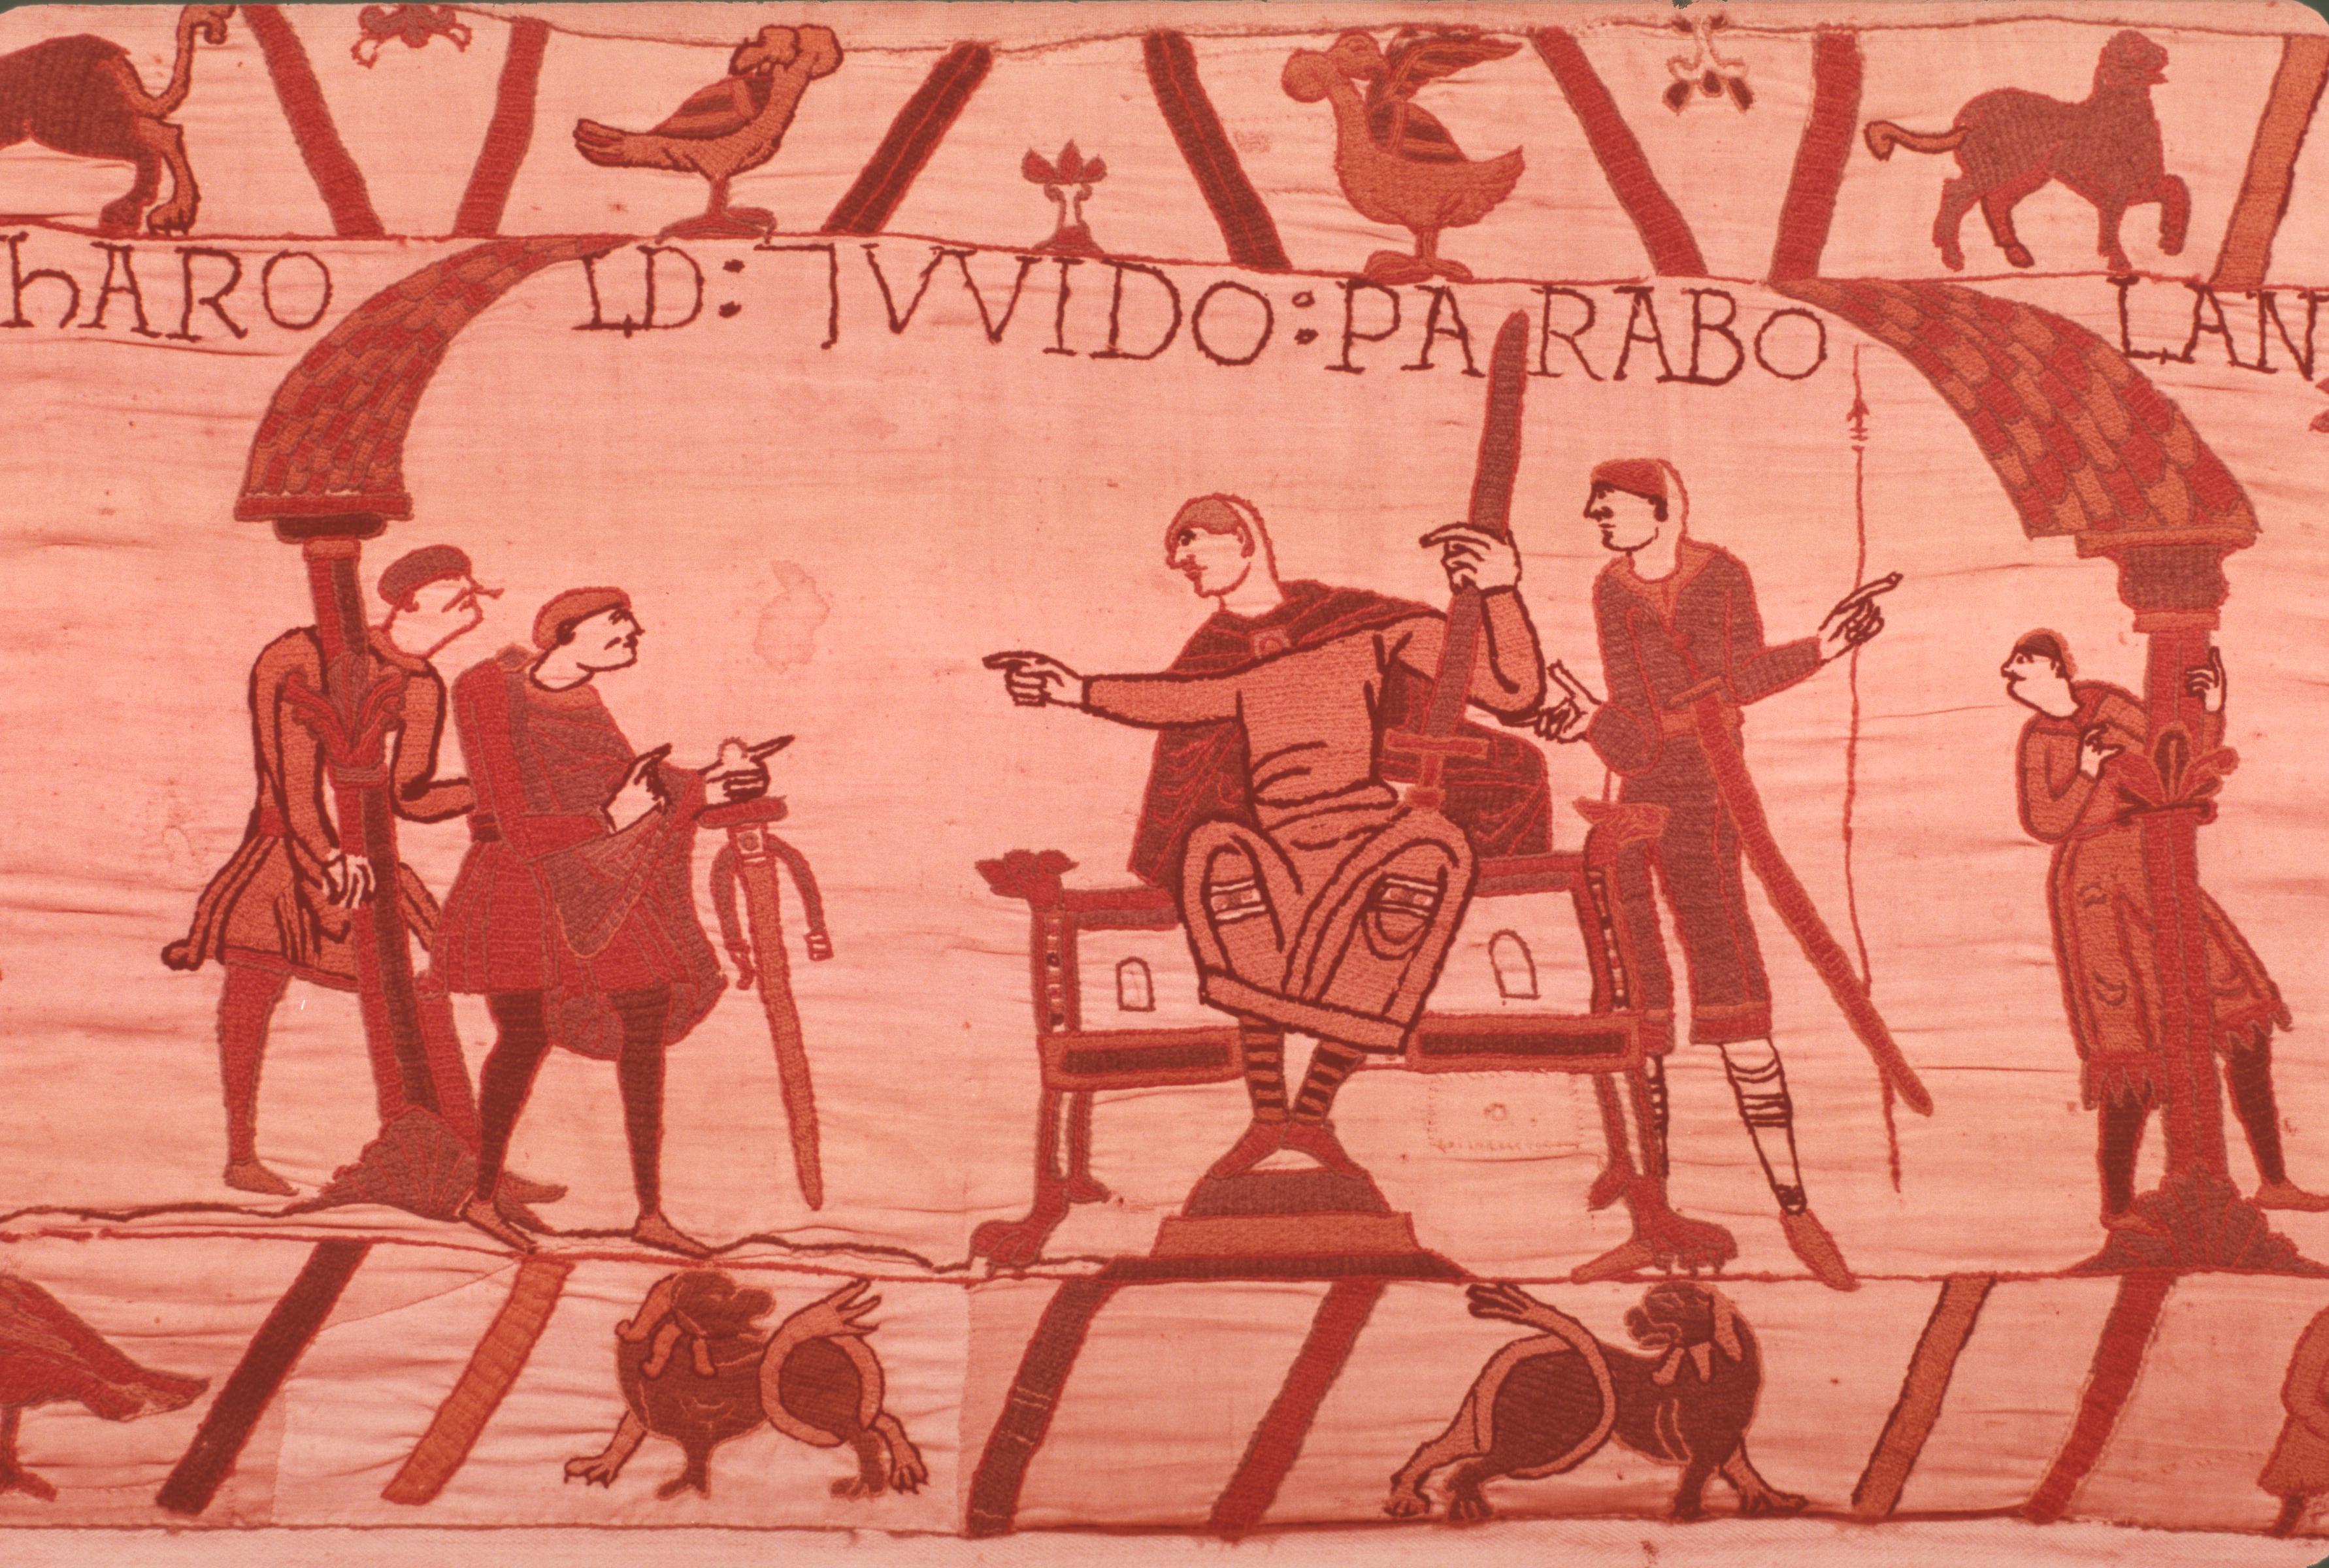
Harold is a prisoner, but he makes the best of a bad job and rides, hawk on wrist again (fig. 21), at the head of his captors to the town of Beaurain. There (in a hall represented economically by two pillars supporting two eaves) he negotiates energetically with his captor (presumably over the ransom money), although the relative heights and sizes show that all the advantage lies with Guy. (You should notice here the distinctively continental hair-style of the Normans, with the backs of their heads shaven, while the English, and only the English, have moustaches.) The best-laid plans ‘gang aft agley’, however, and although the ‘mouse’ has been seized by the ‘frog’, the ‘kite’ is about to swoop down and apprehend both of them.
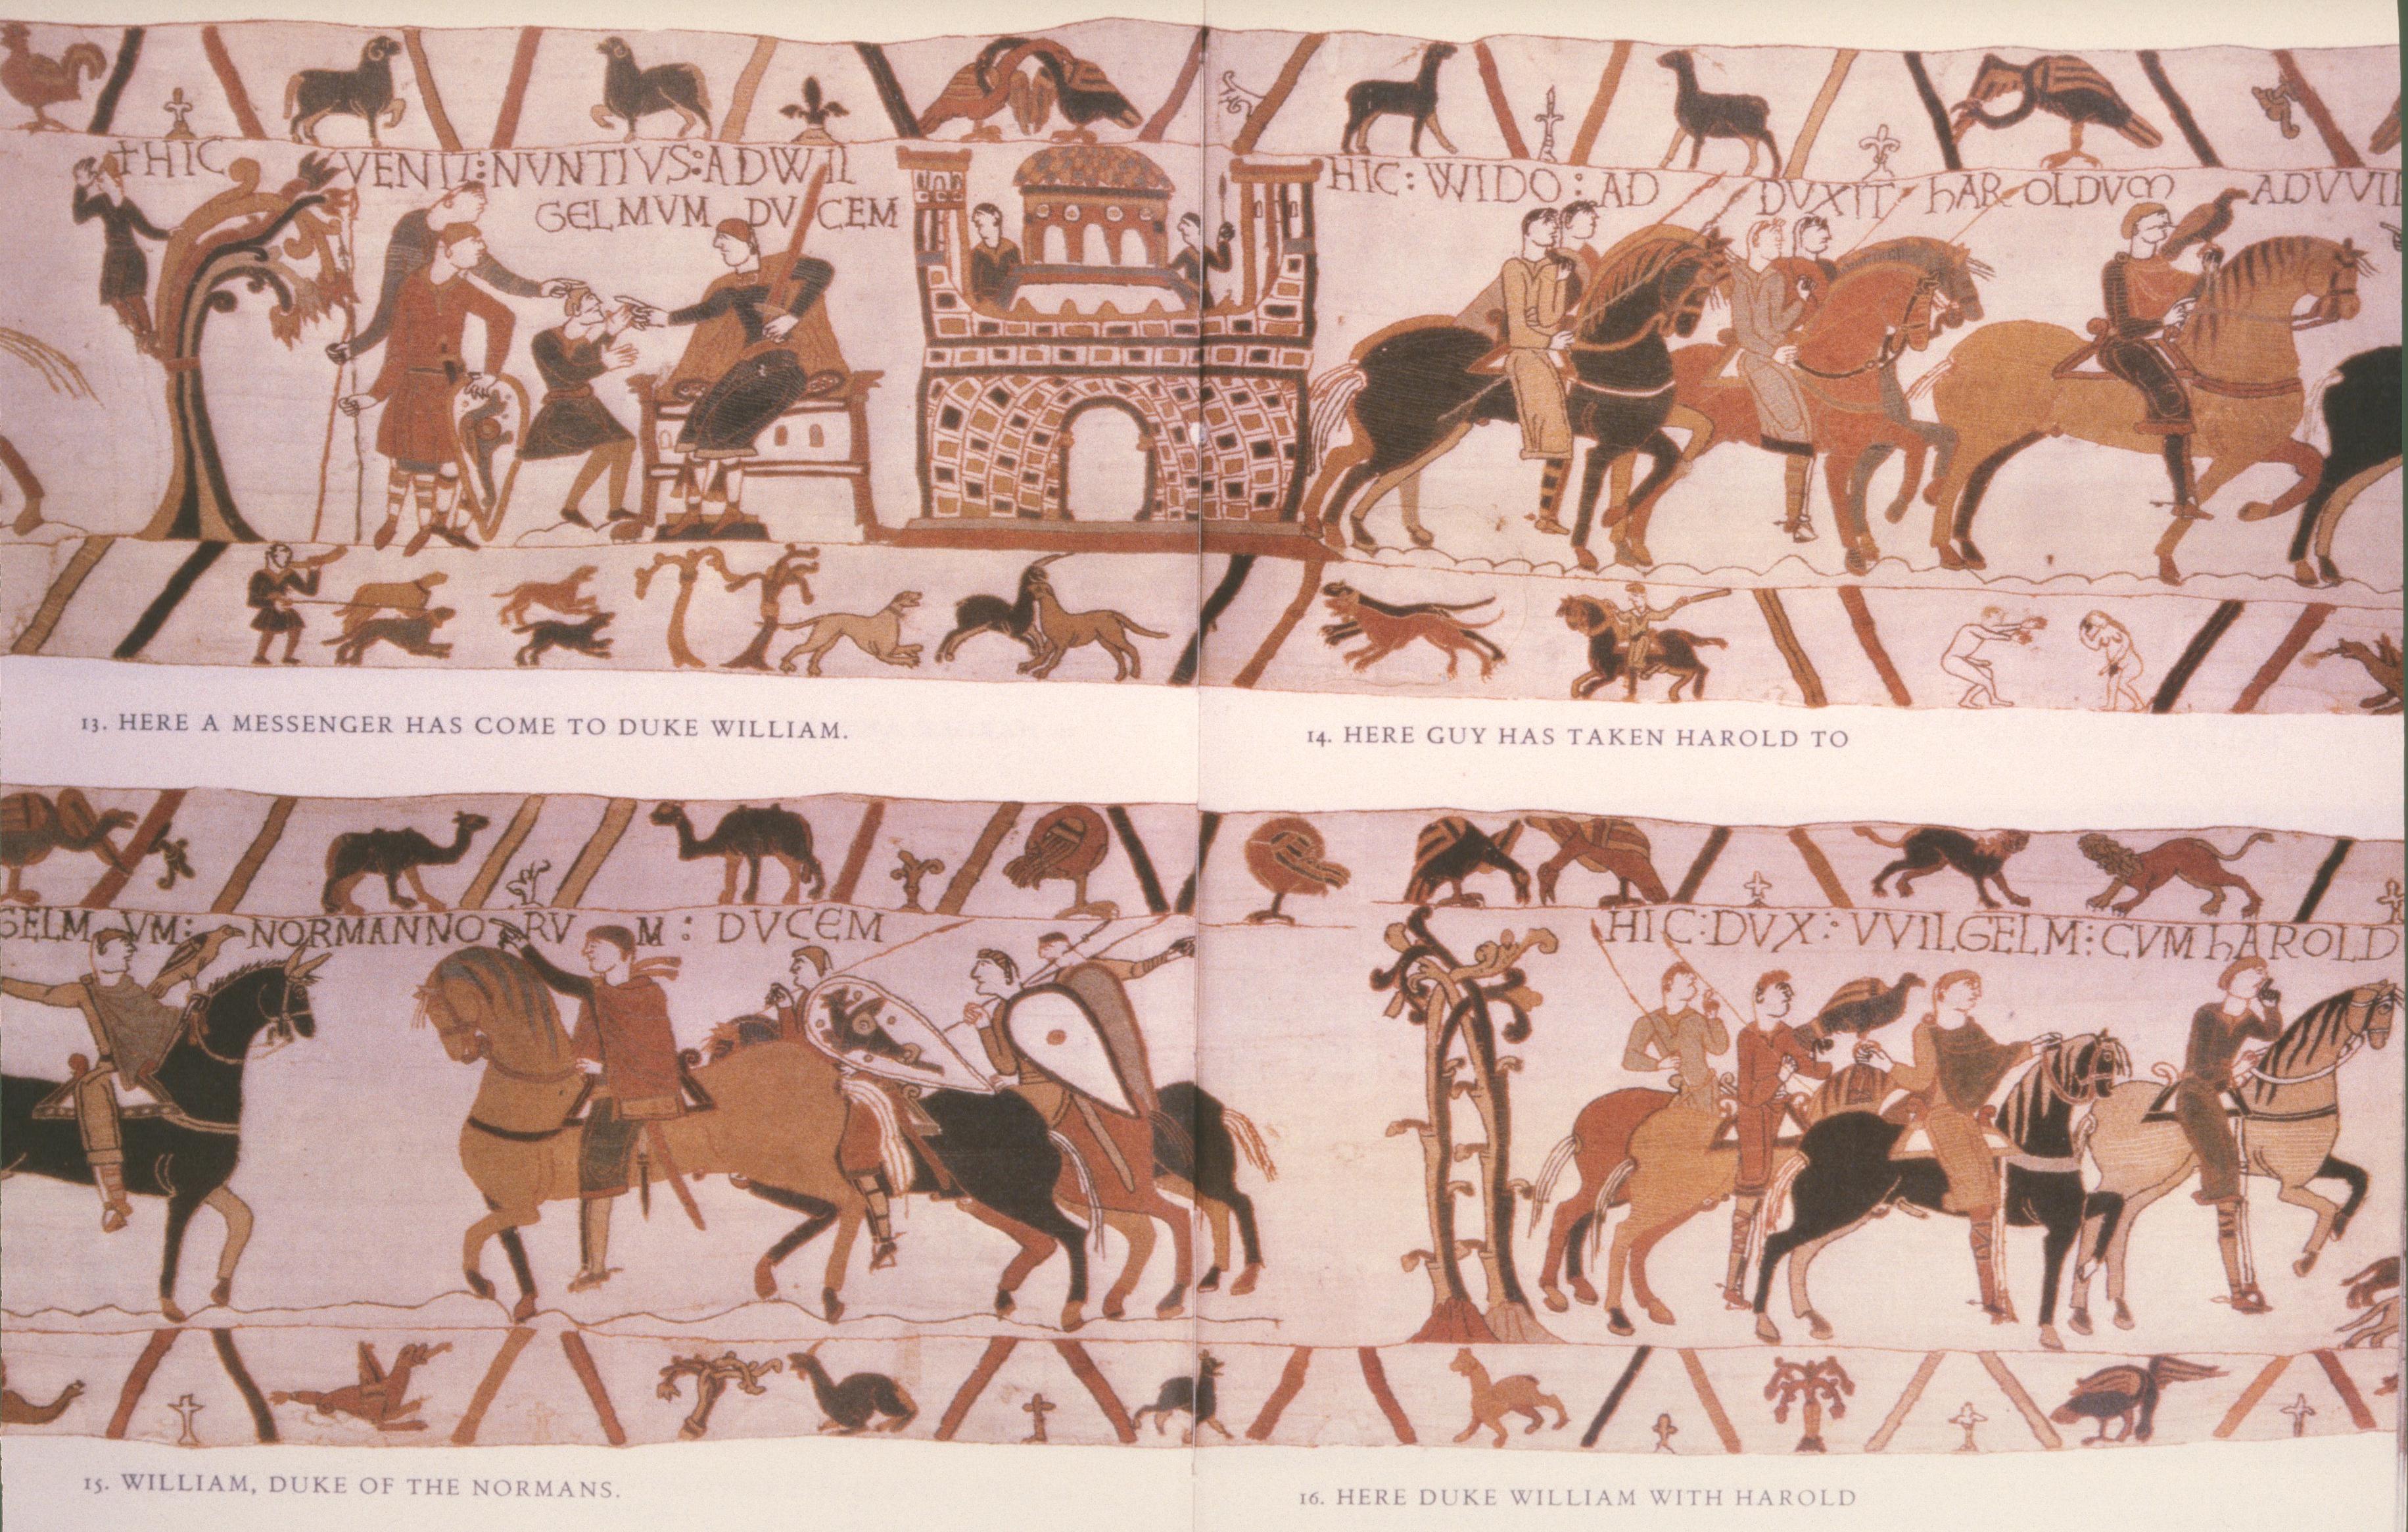
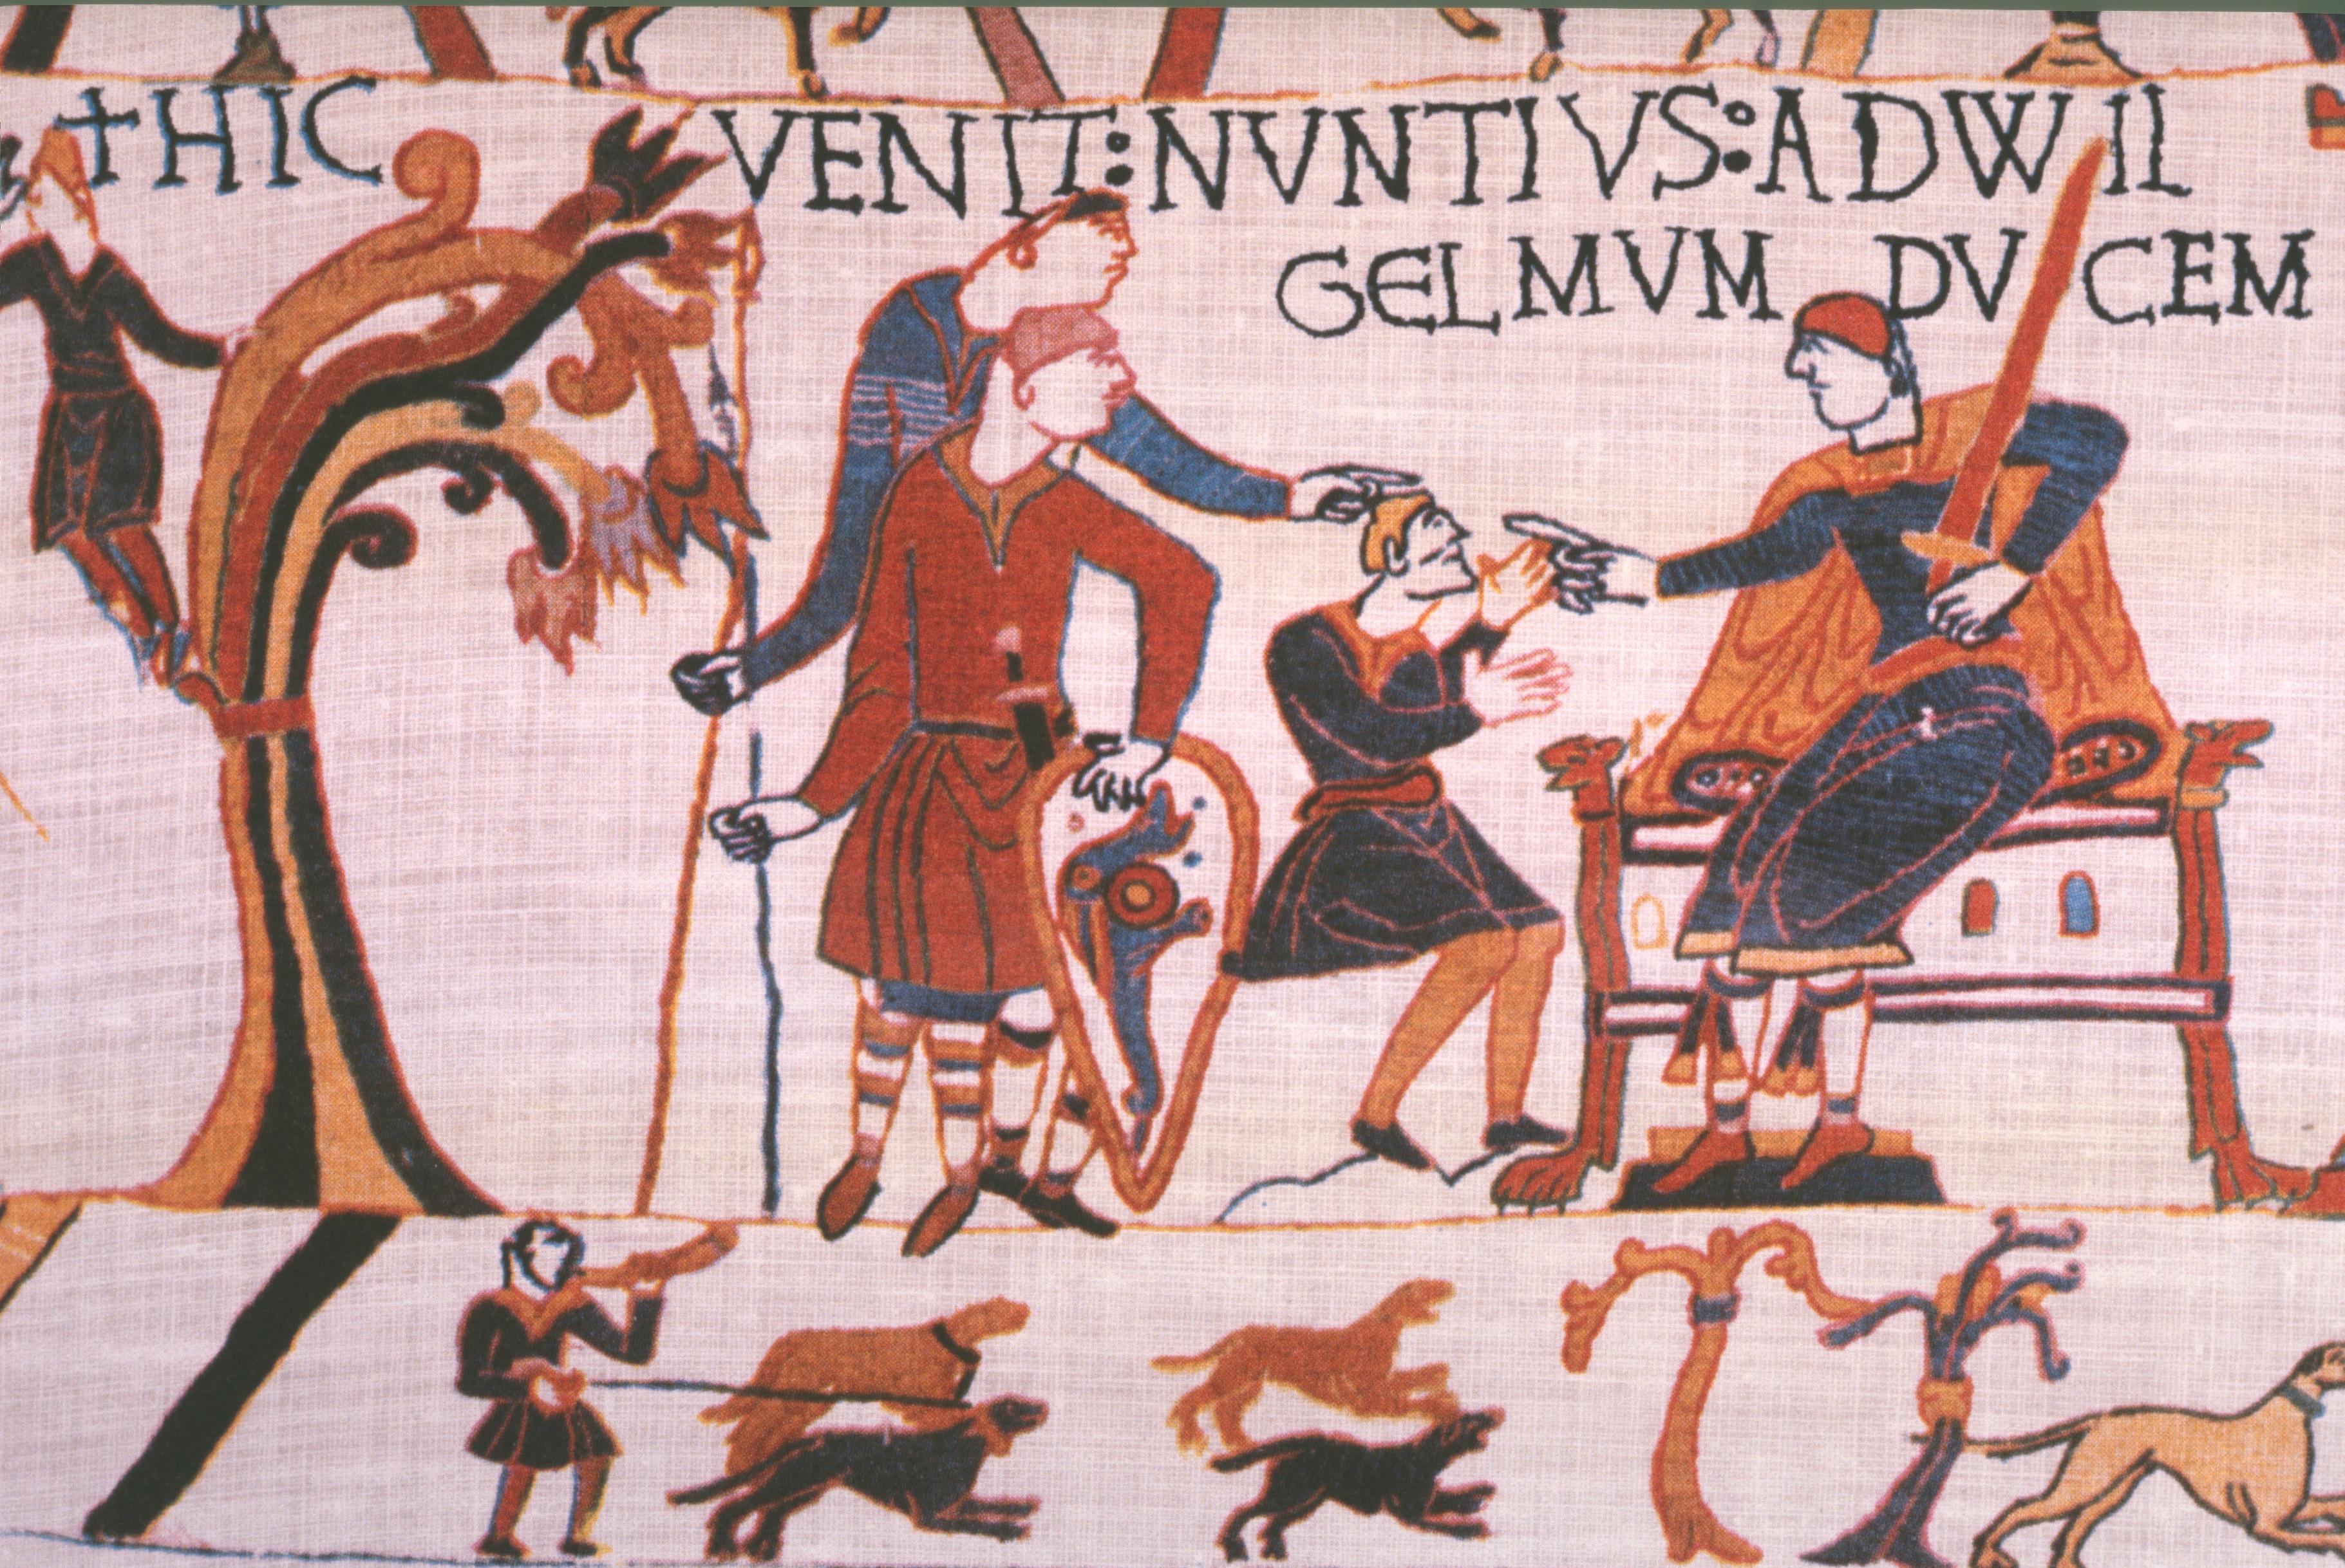
Chapter Two is hard to follow in book format. We must jump to the right, to the fortress of William, Duke of Normandy (see the detail in fig. 24), where an English messenger (note the moustache) is telling the Duke of Harold’s detention—a powerful reason for believing that Edward’s diplomatic mission was to William. The ‘hunt’ is on again, as the lower border reminds us.
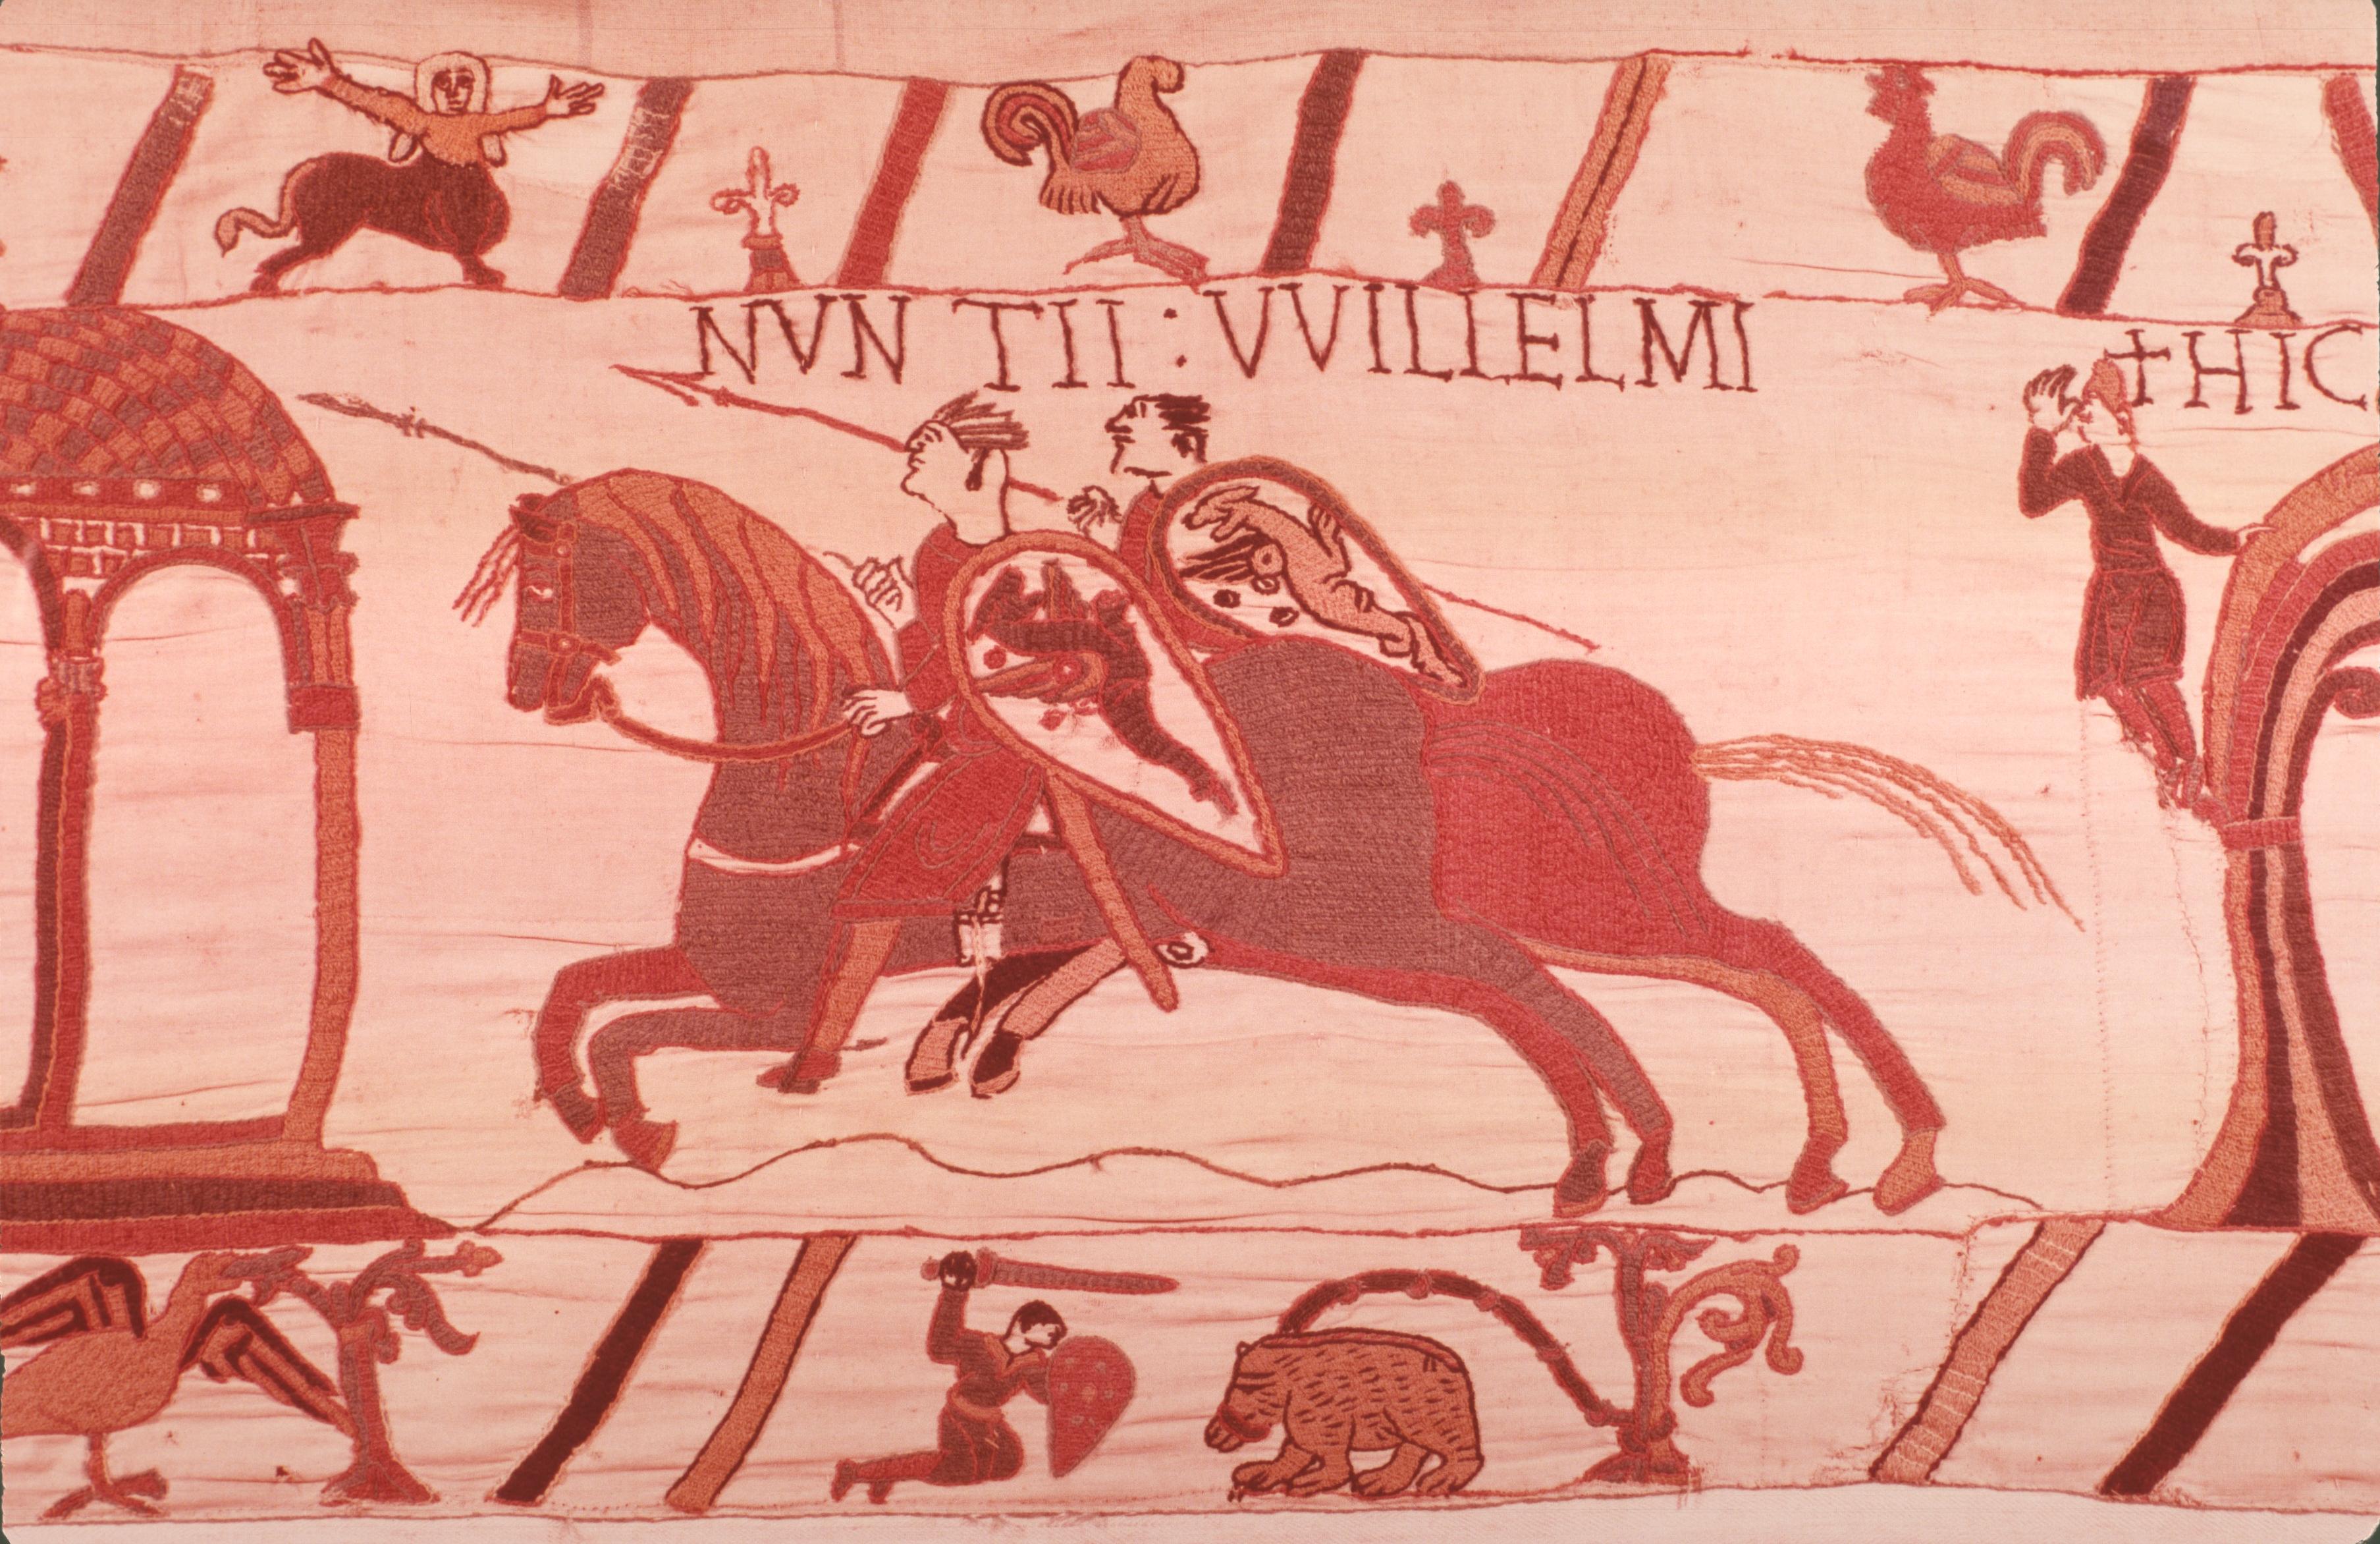
From here we must read ‘backwards’, from right to left, as two Norman messengers (fig. 25) set out from William’s court, their hair swept by the wind they create, hurtling back to Beaurain, where we left Harold and Guy. (In the lower margin, the artist suggests that the situation is like a man baiting a tethered bear).
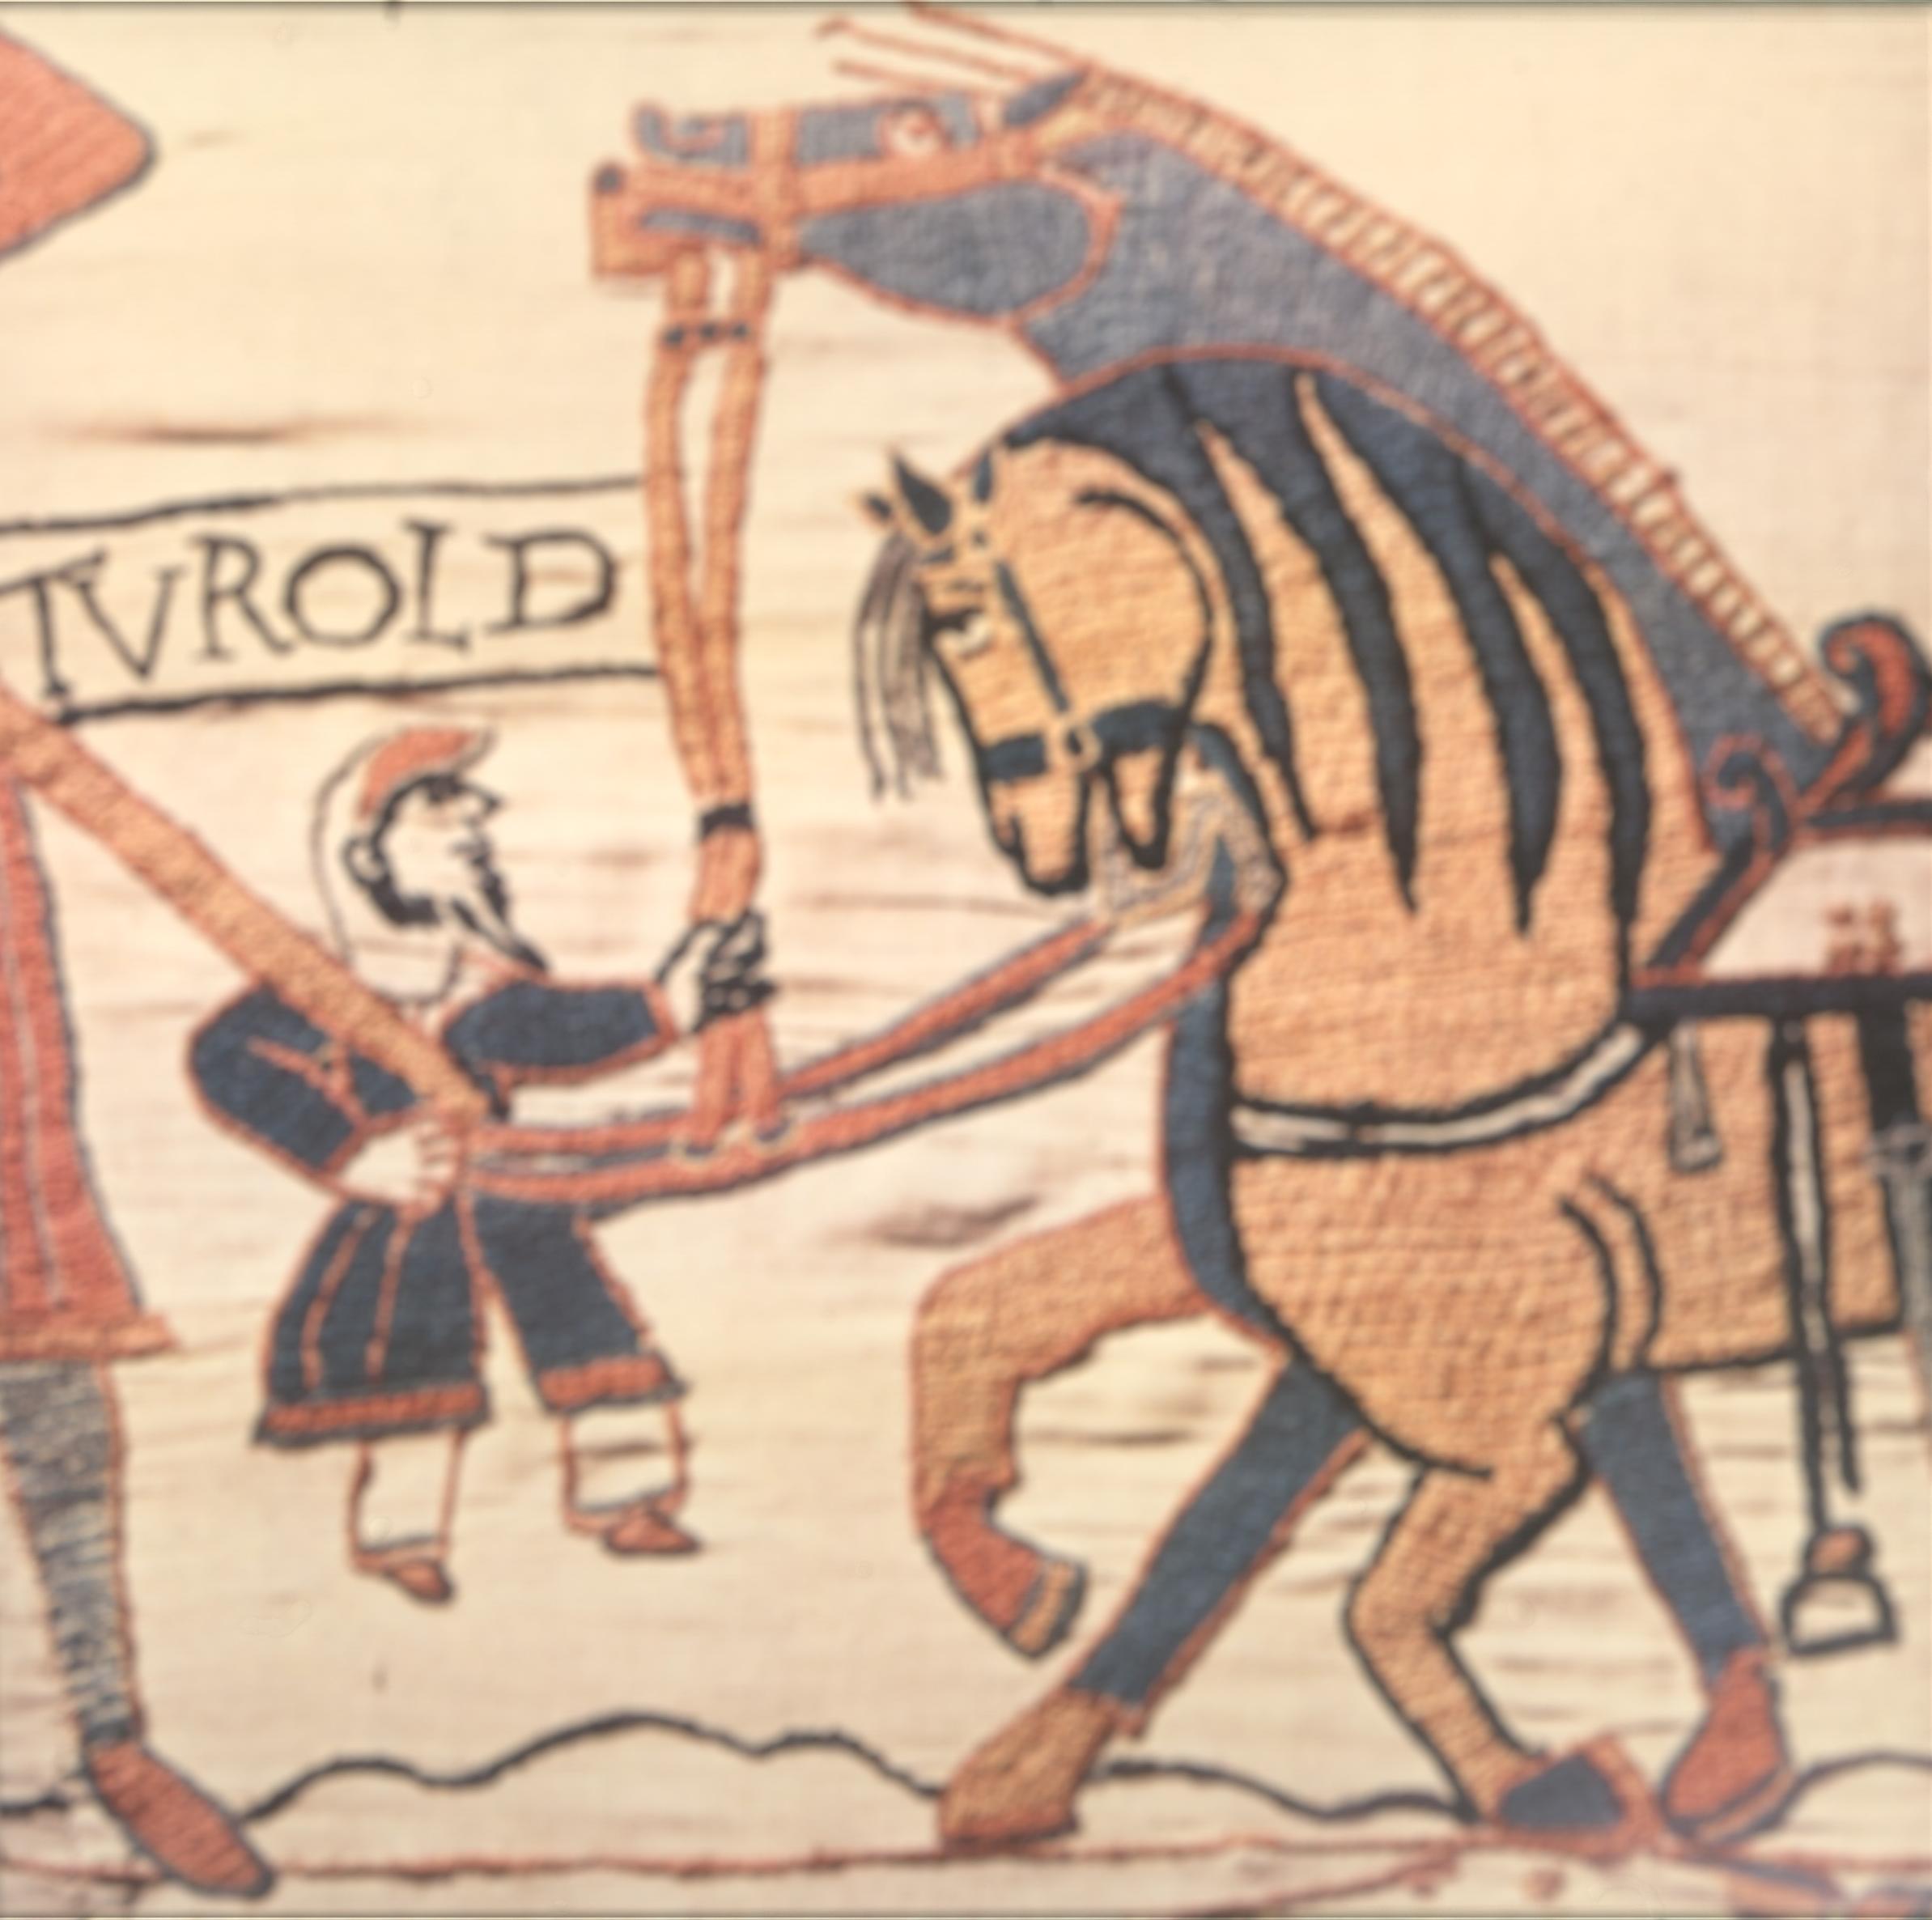
They come into Guy’s presence, and with energetic gestures, the leader, Turold, demands that the captive be sent on to Duke William. (A bearded dwarf in baggy trousers (fig. 26) restrains the expressively contrasted heads of the exhausted horses.) Guy looks defiant, but there is nothing he can do.
We jump forward again, to a splendid, ‘centralised’ scene, in which Duke William and his knights advance on horseback from the right to meet Guy and his knights who approach on horseback from the left, with Harold, hawk on wrist (fig. 27), sandwiched between his captor and his escorts. Harold is now in William’s power, although he continues to be treated with full honours.

For the third time in the story, Harold finds himself standing before a ruler who is seated in majesty on a throne; and while his arguments are being expressed as forcefully as ever, the presence of the armed Normans behind him show that all the advantage lies with William. I called my second chapter ‘Liberation’, but it might have been called ‘Out of the Frying Pan into the Fire’.
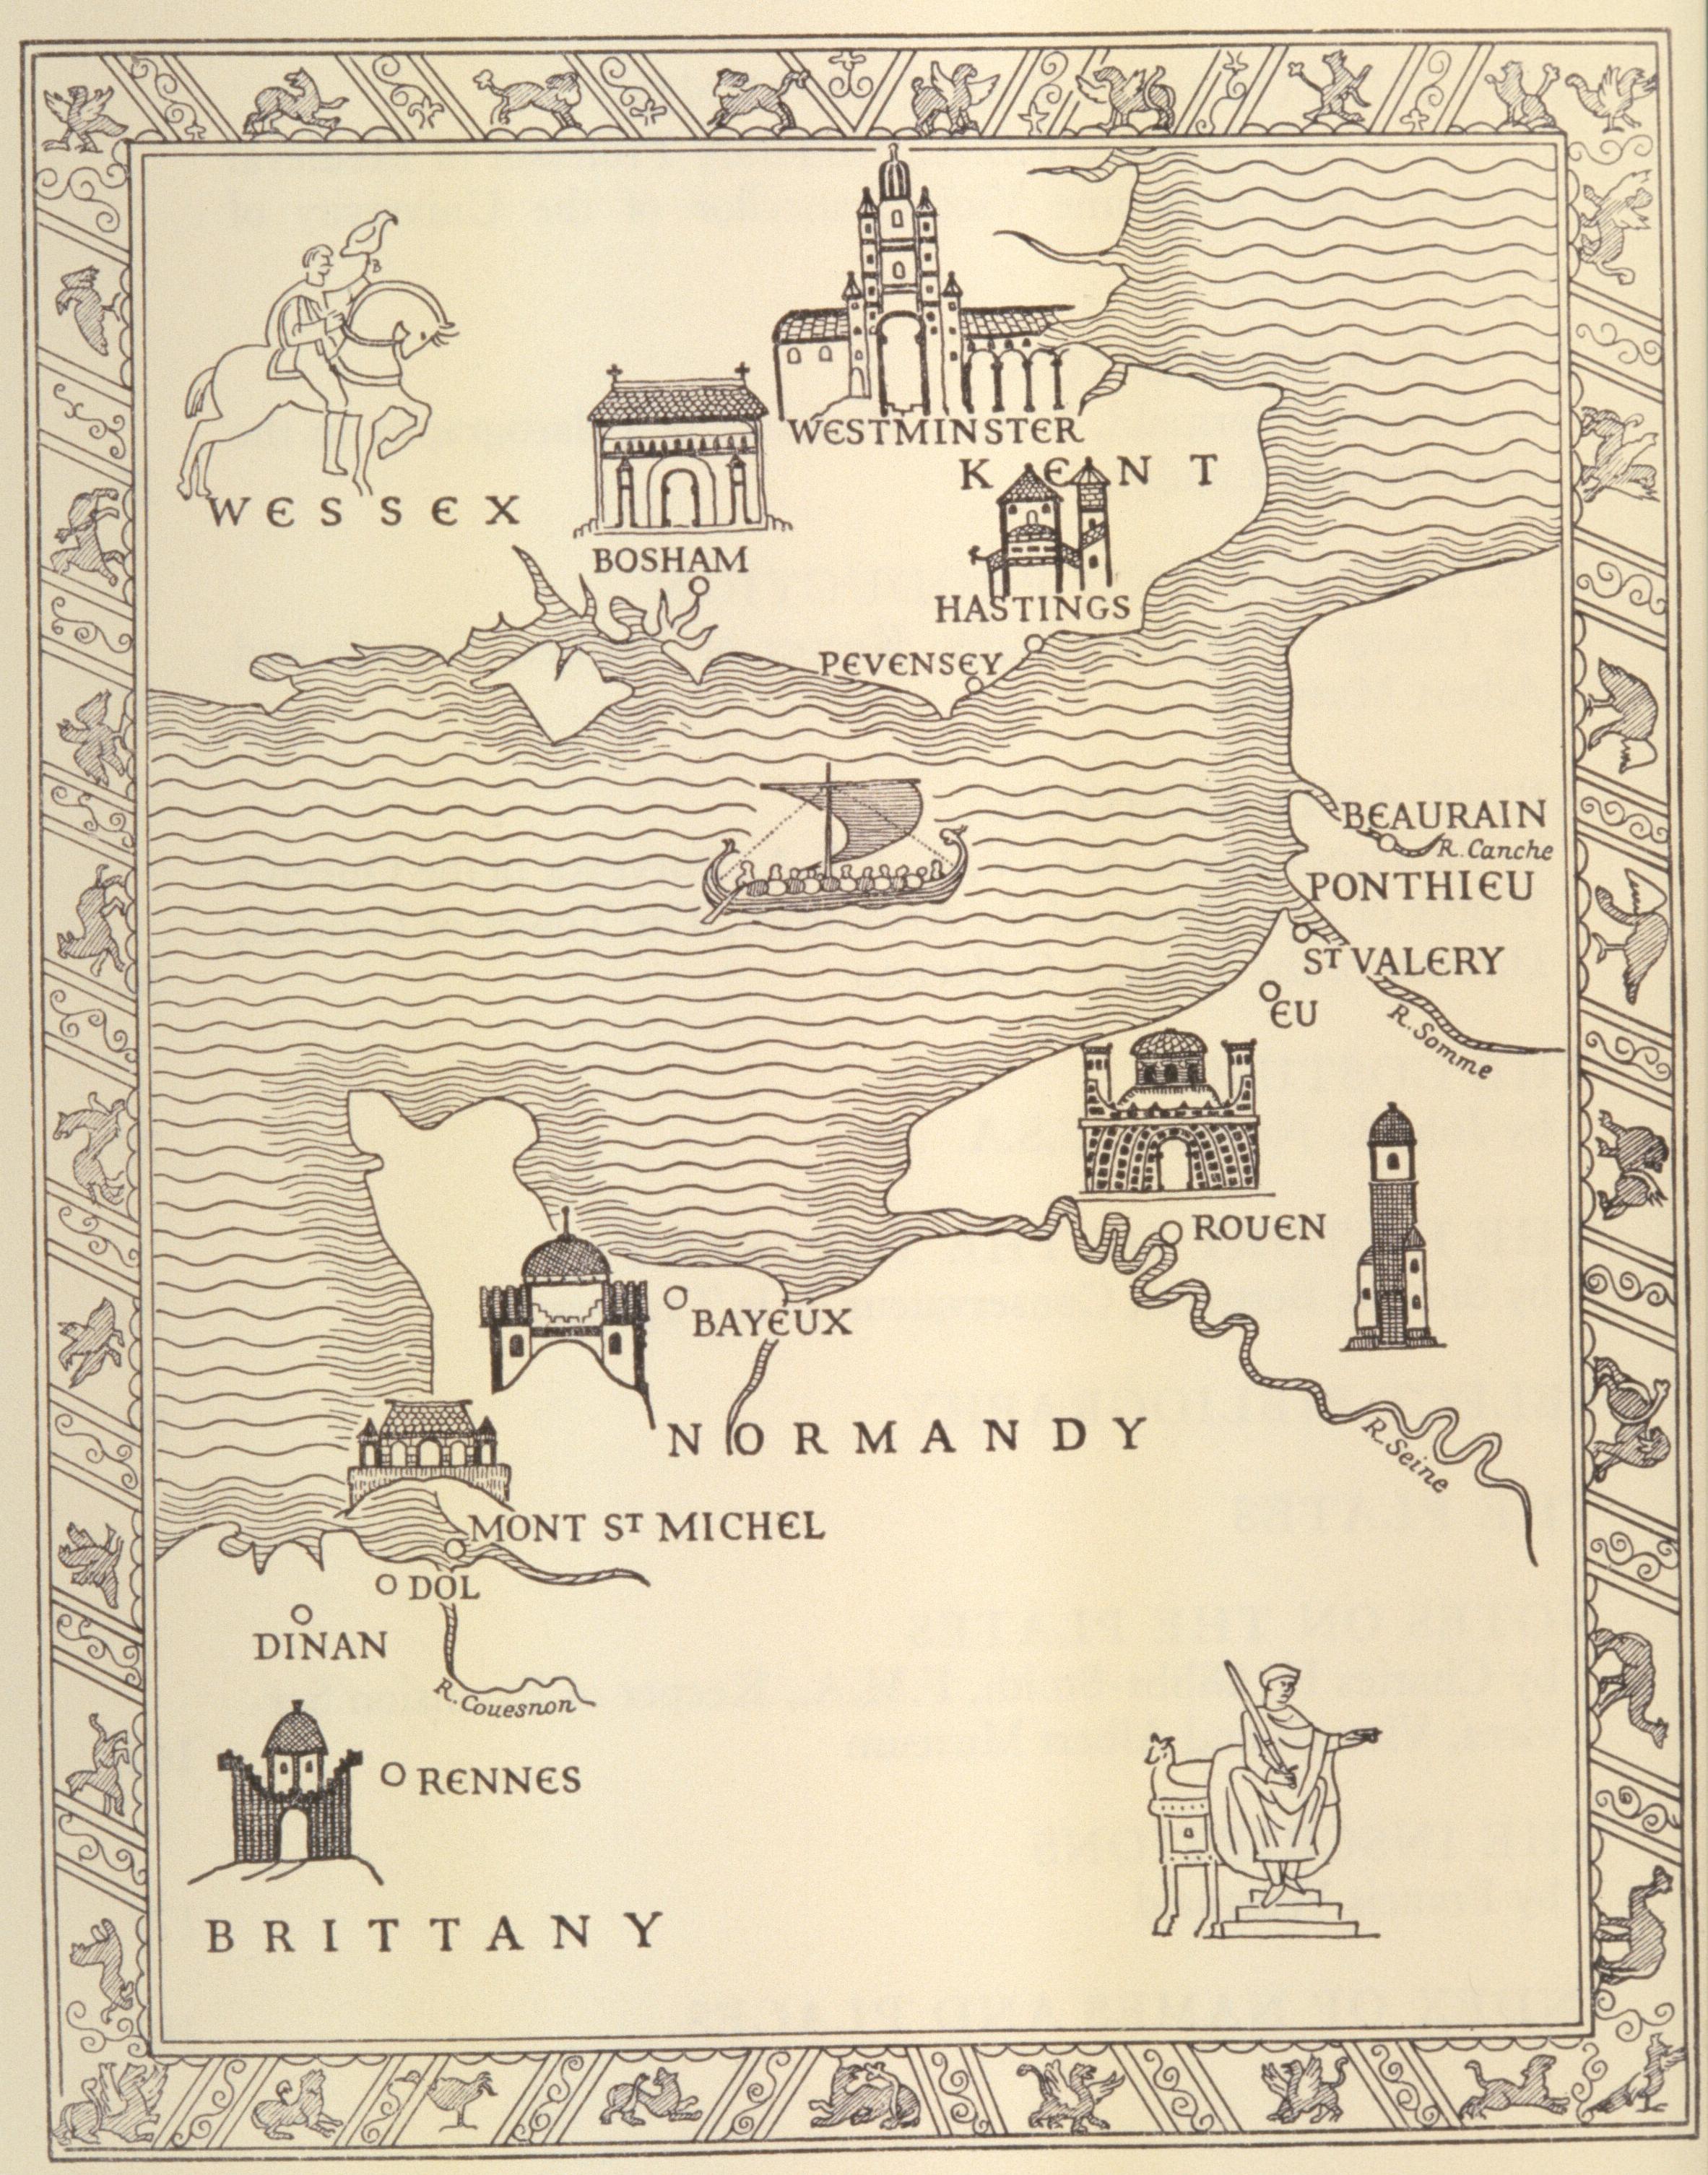
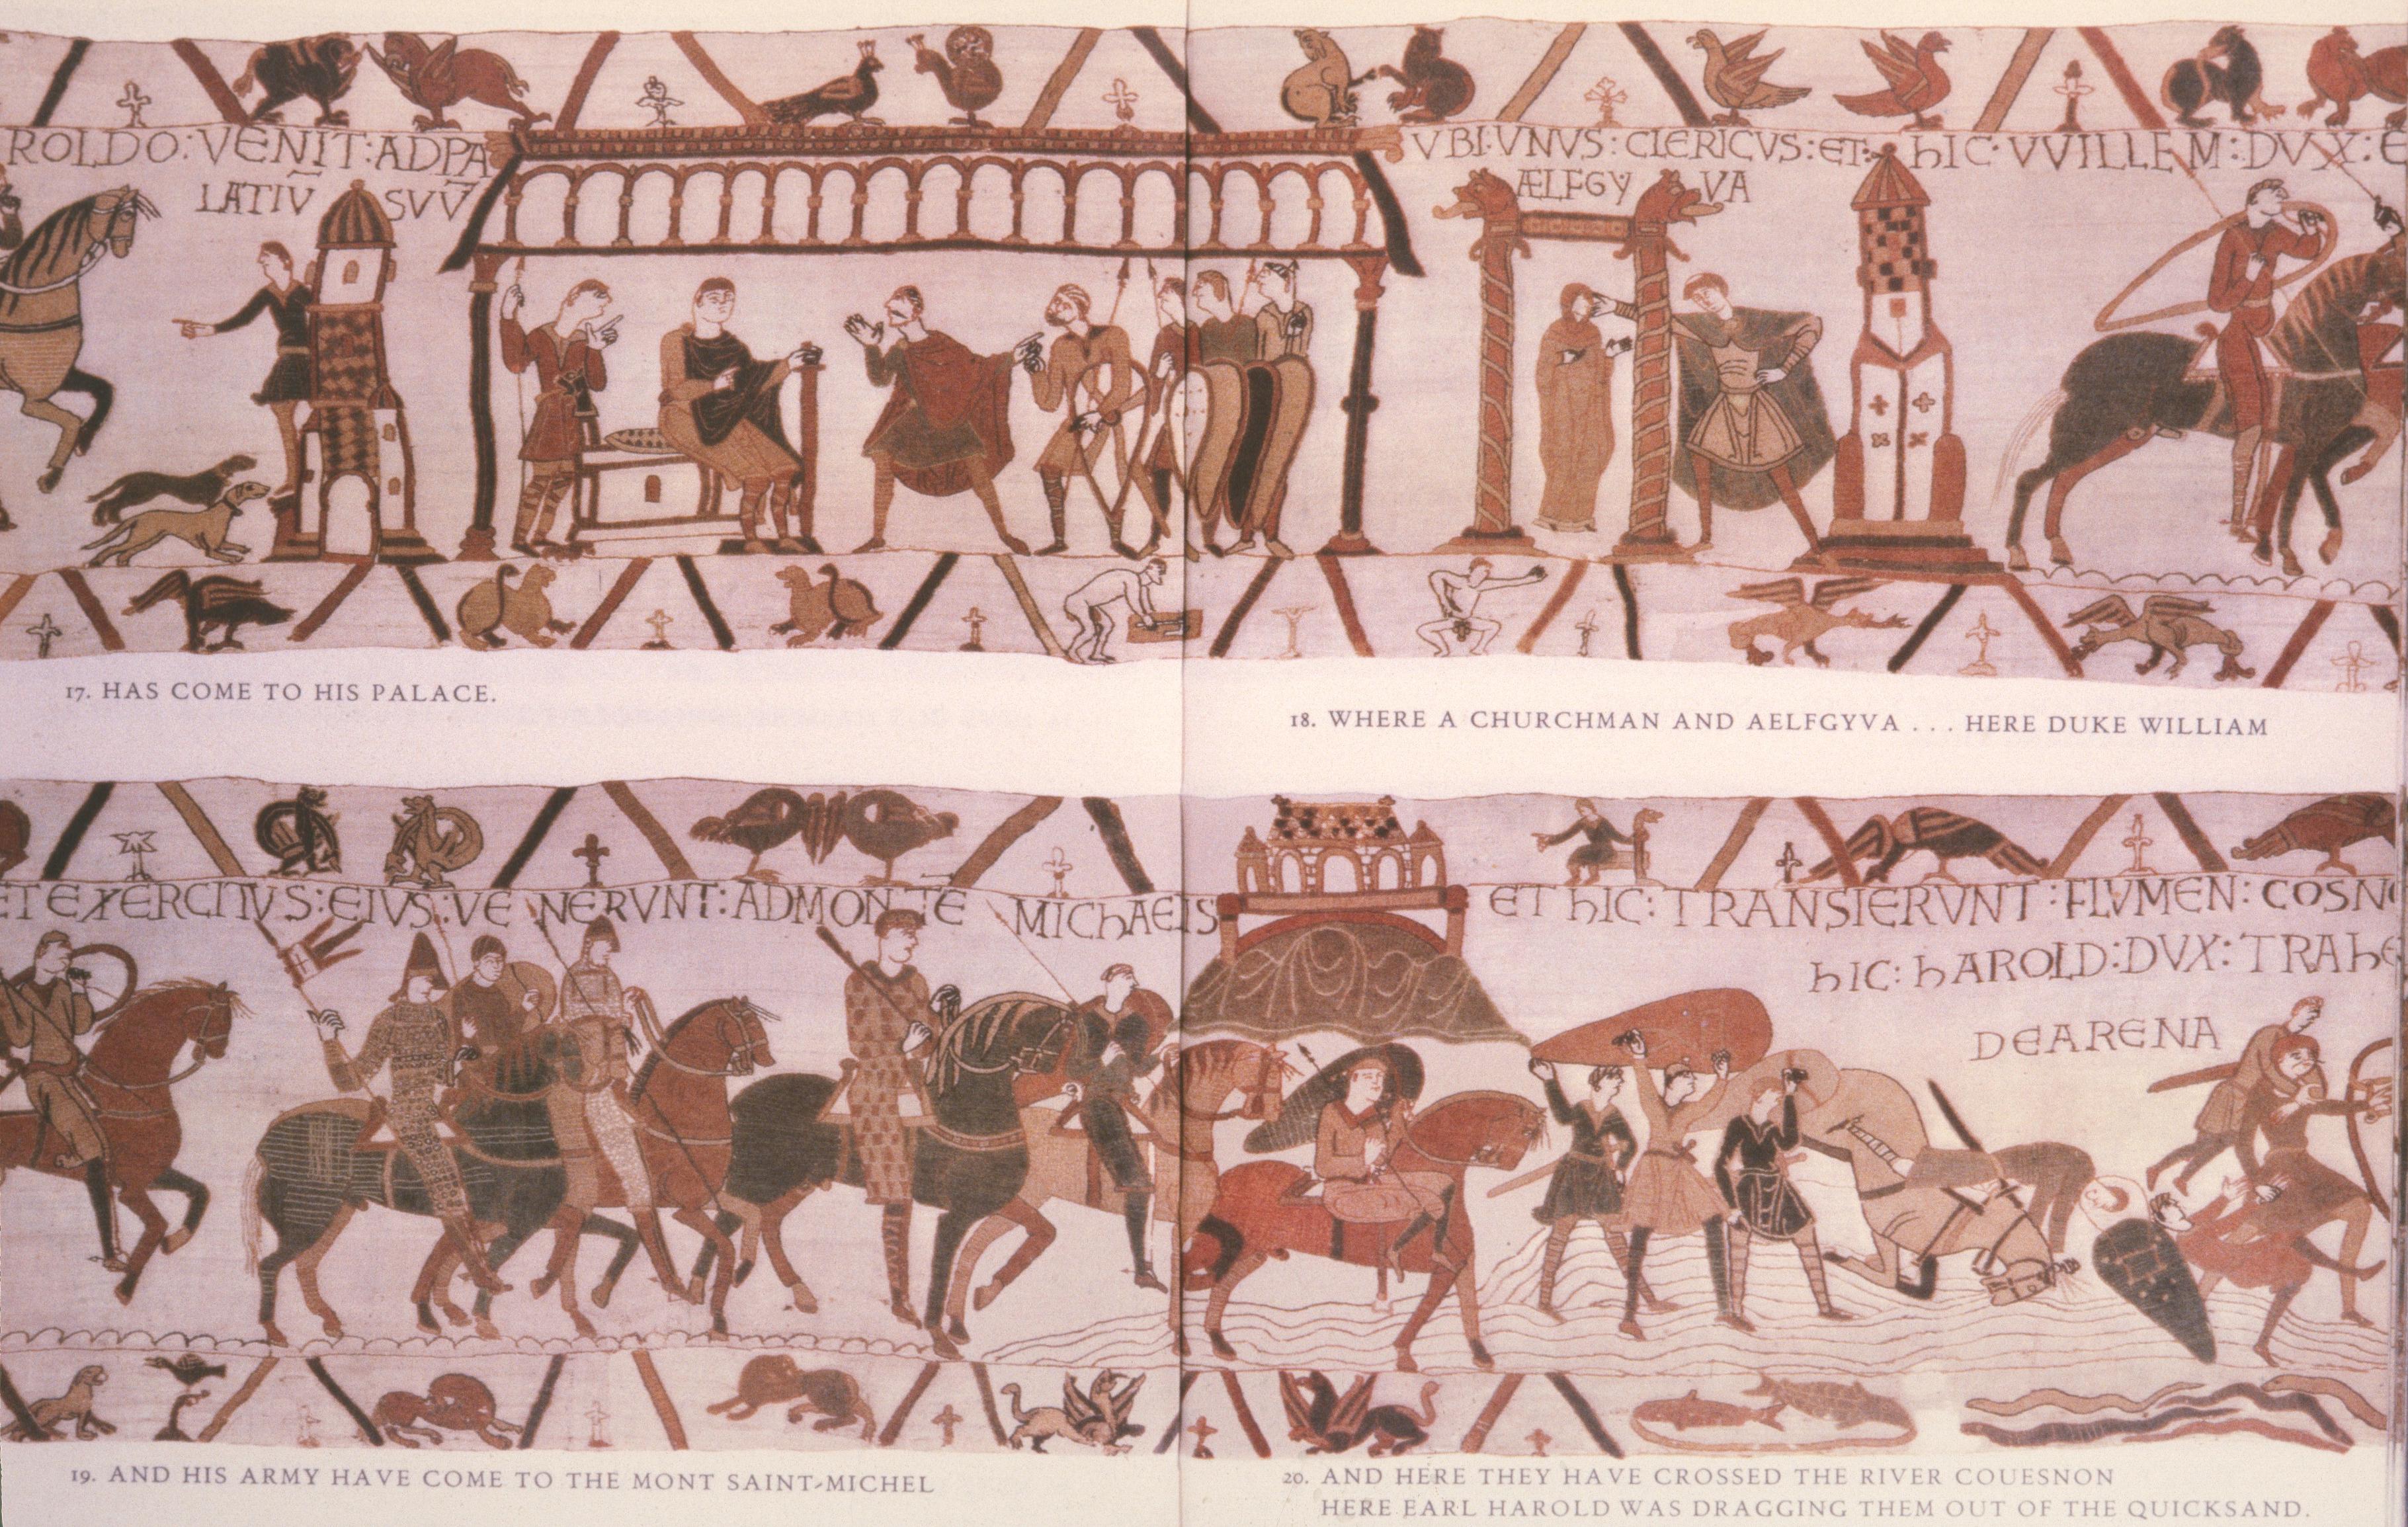
Before we pass on to the last chapter in Part One, we should look at the map in fig. 30 in order to get our bearings. In chapter one, Harold crossed almost due east from Bosham to Ponthieu, and was taken to Beaurain; in chapter two he was conducted under escort to Rouen. Chapter three will give us our first taste of battle, and will show William and Harold fighting as allies, or as Lord and Vassal, in a punitive expedition across the borders into Brittany. They will pass Mont St Michel, cross the river, attack Duke Conan in Dol, pursue him to Rennes, and then receive his surrender in Dinan.
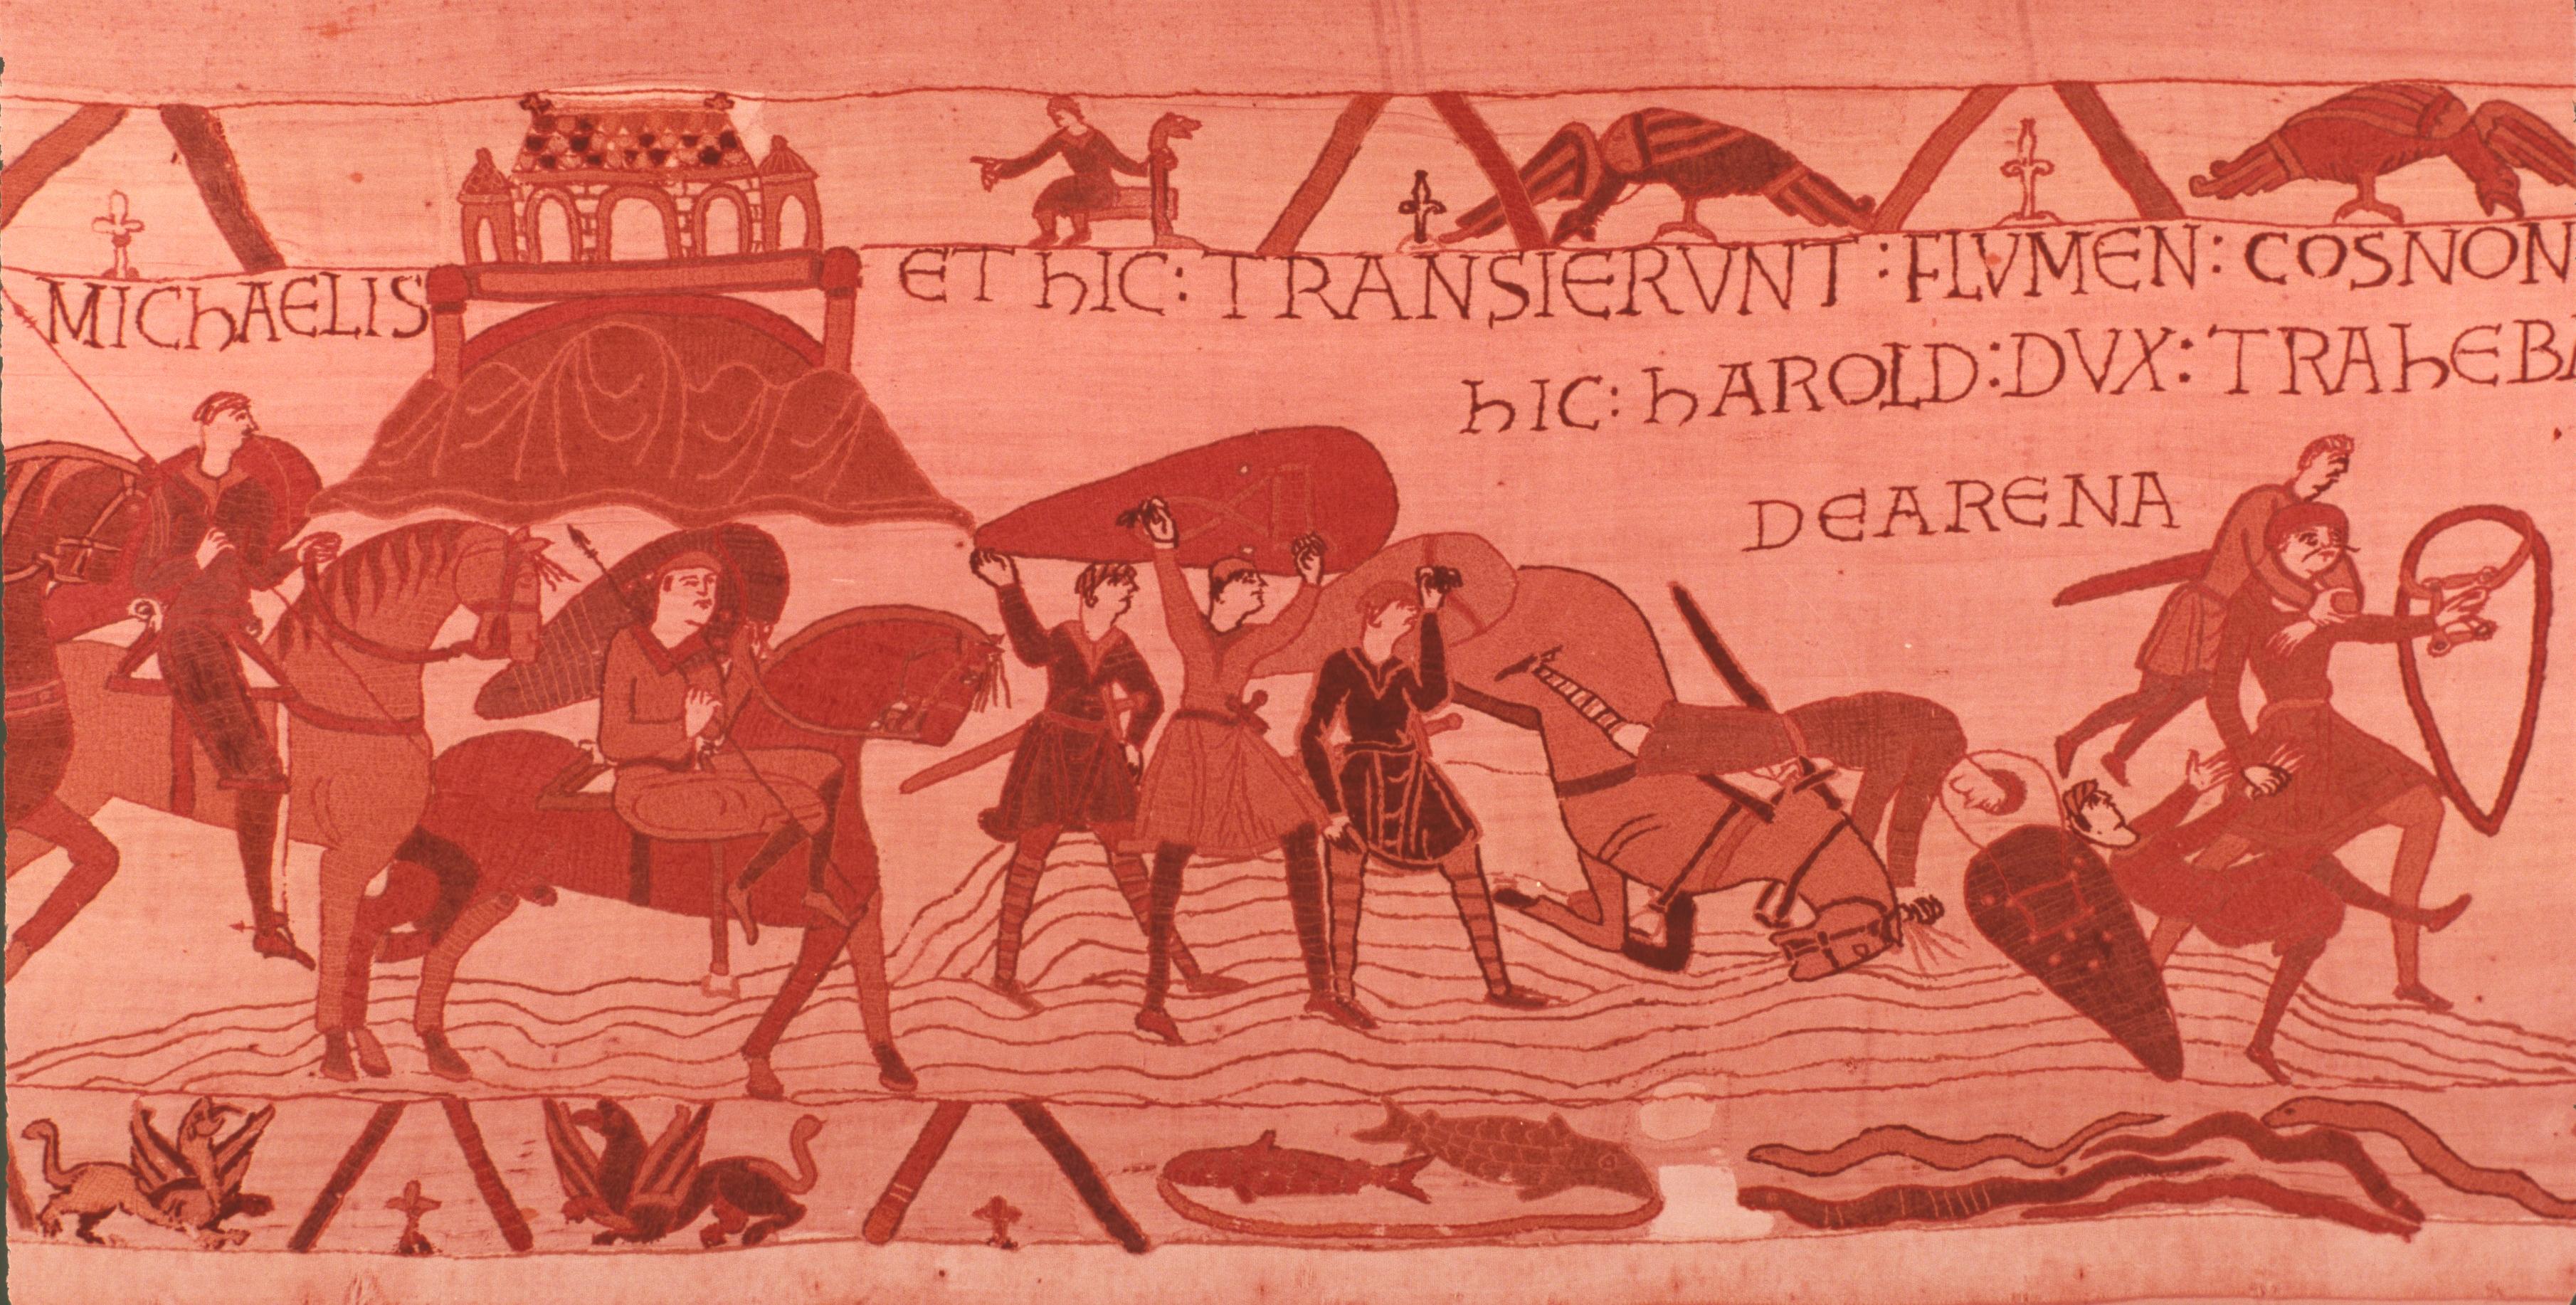
The party set out in a long cavalcade (fig. 28), ready for action in helmets and chain mail. They pass Mont St Michel, perched on its ‘mount’ (cf. detail in fig. 31), and as they come to the river Couesnon, the leading knight draws up his knees and the foot-soldiers lift their shields as they begin to ford the river.
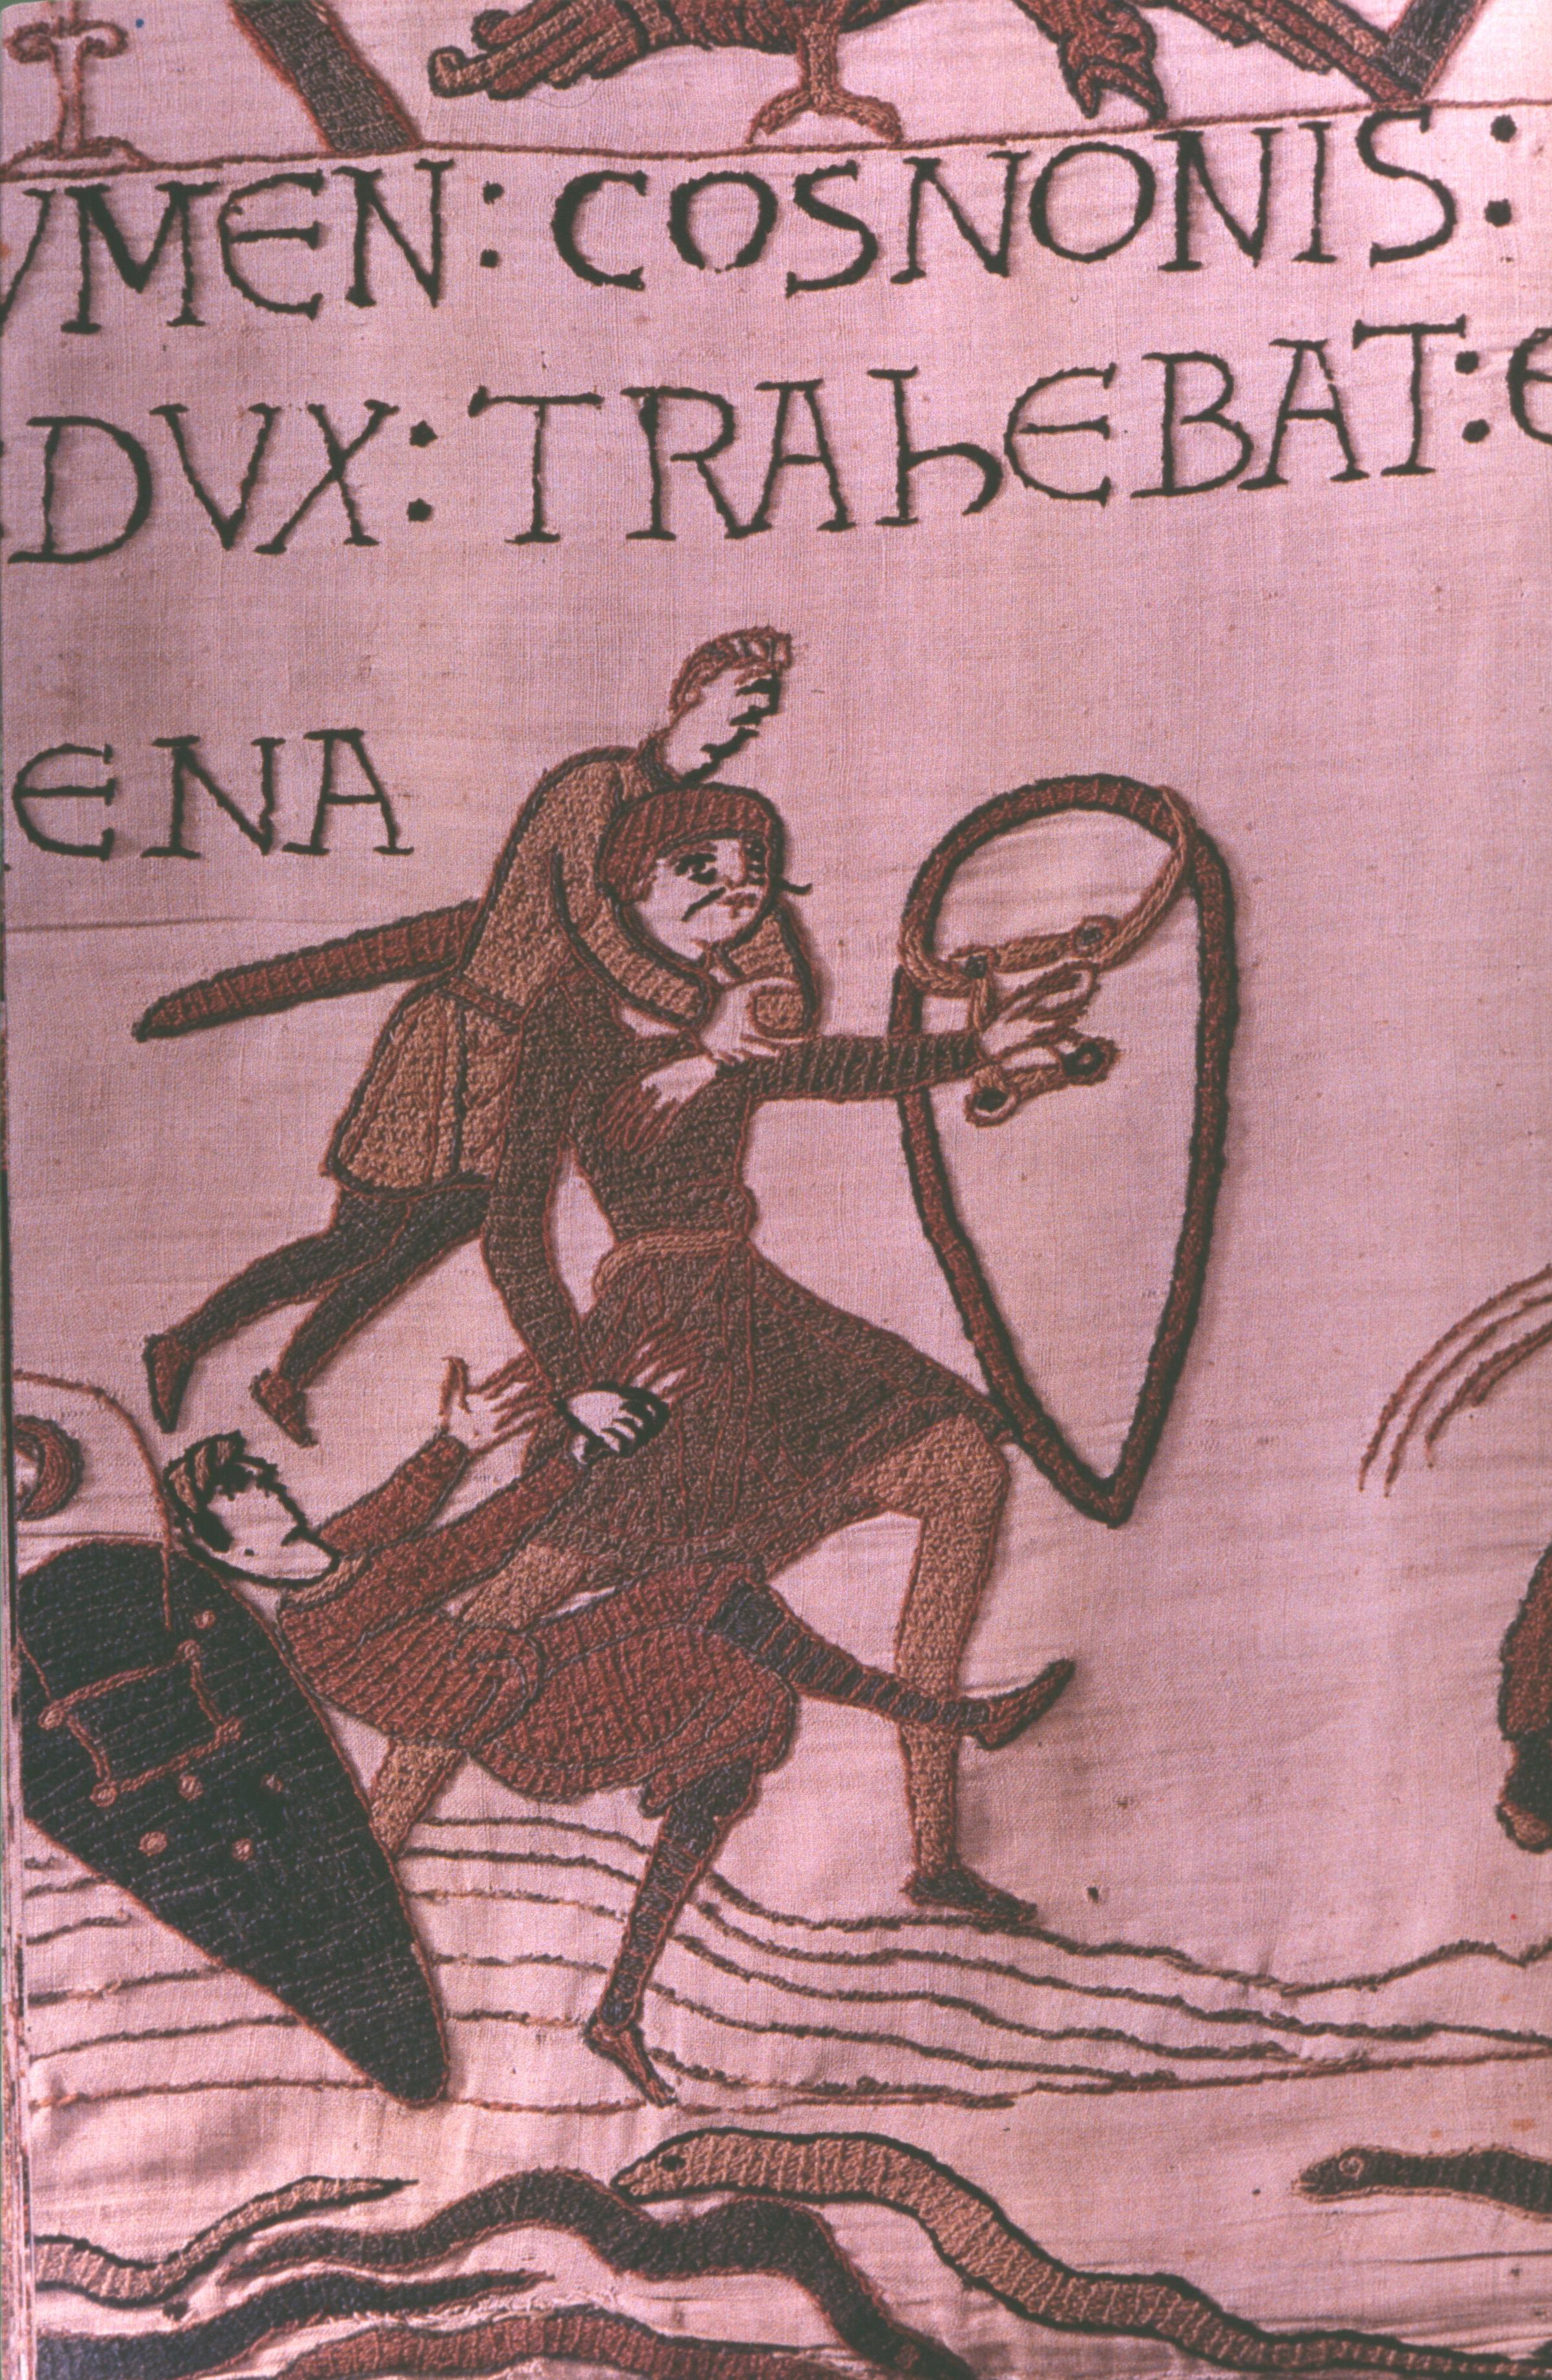
Both horses and men become trapped in quicksand, though; and Harold shows his bravery and his physical strength by dragging one Norman to safety, while carrying another on his back.
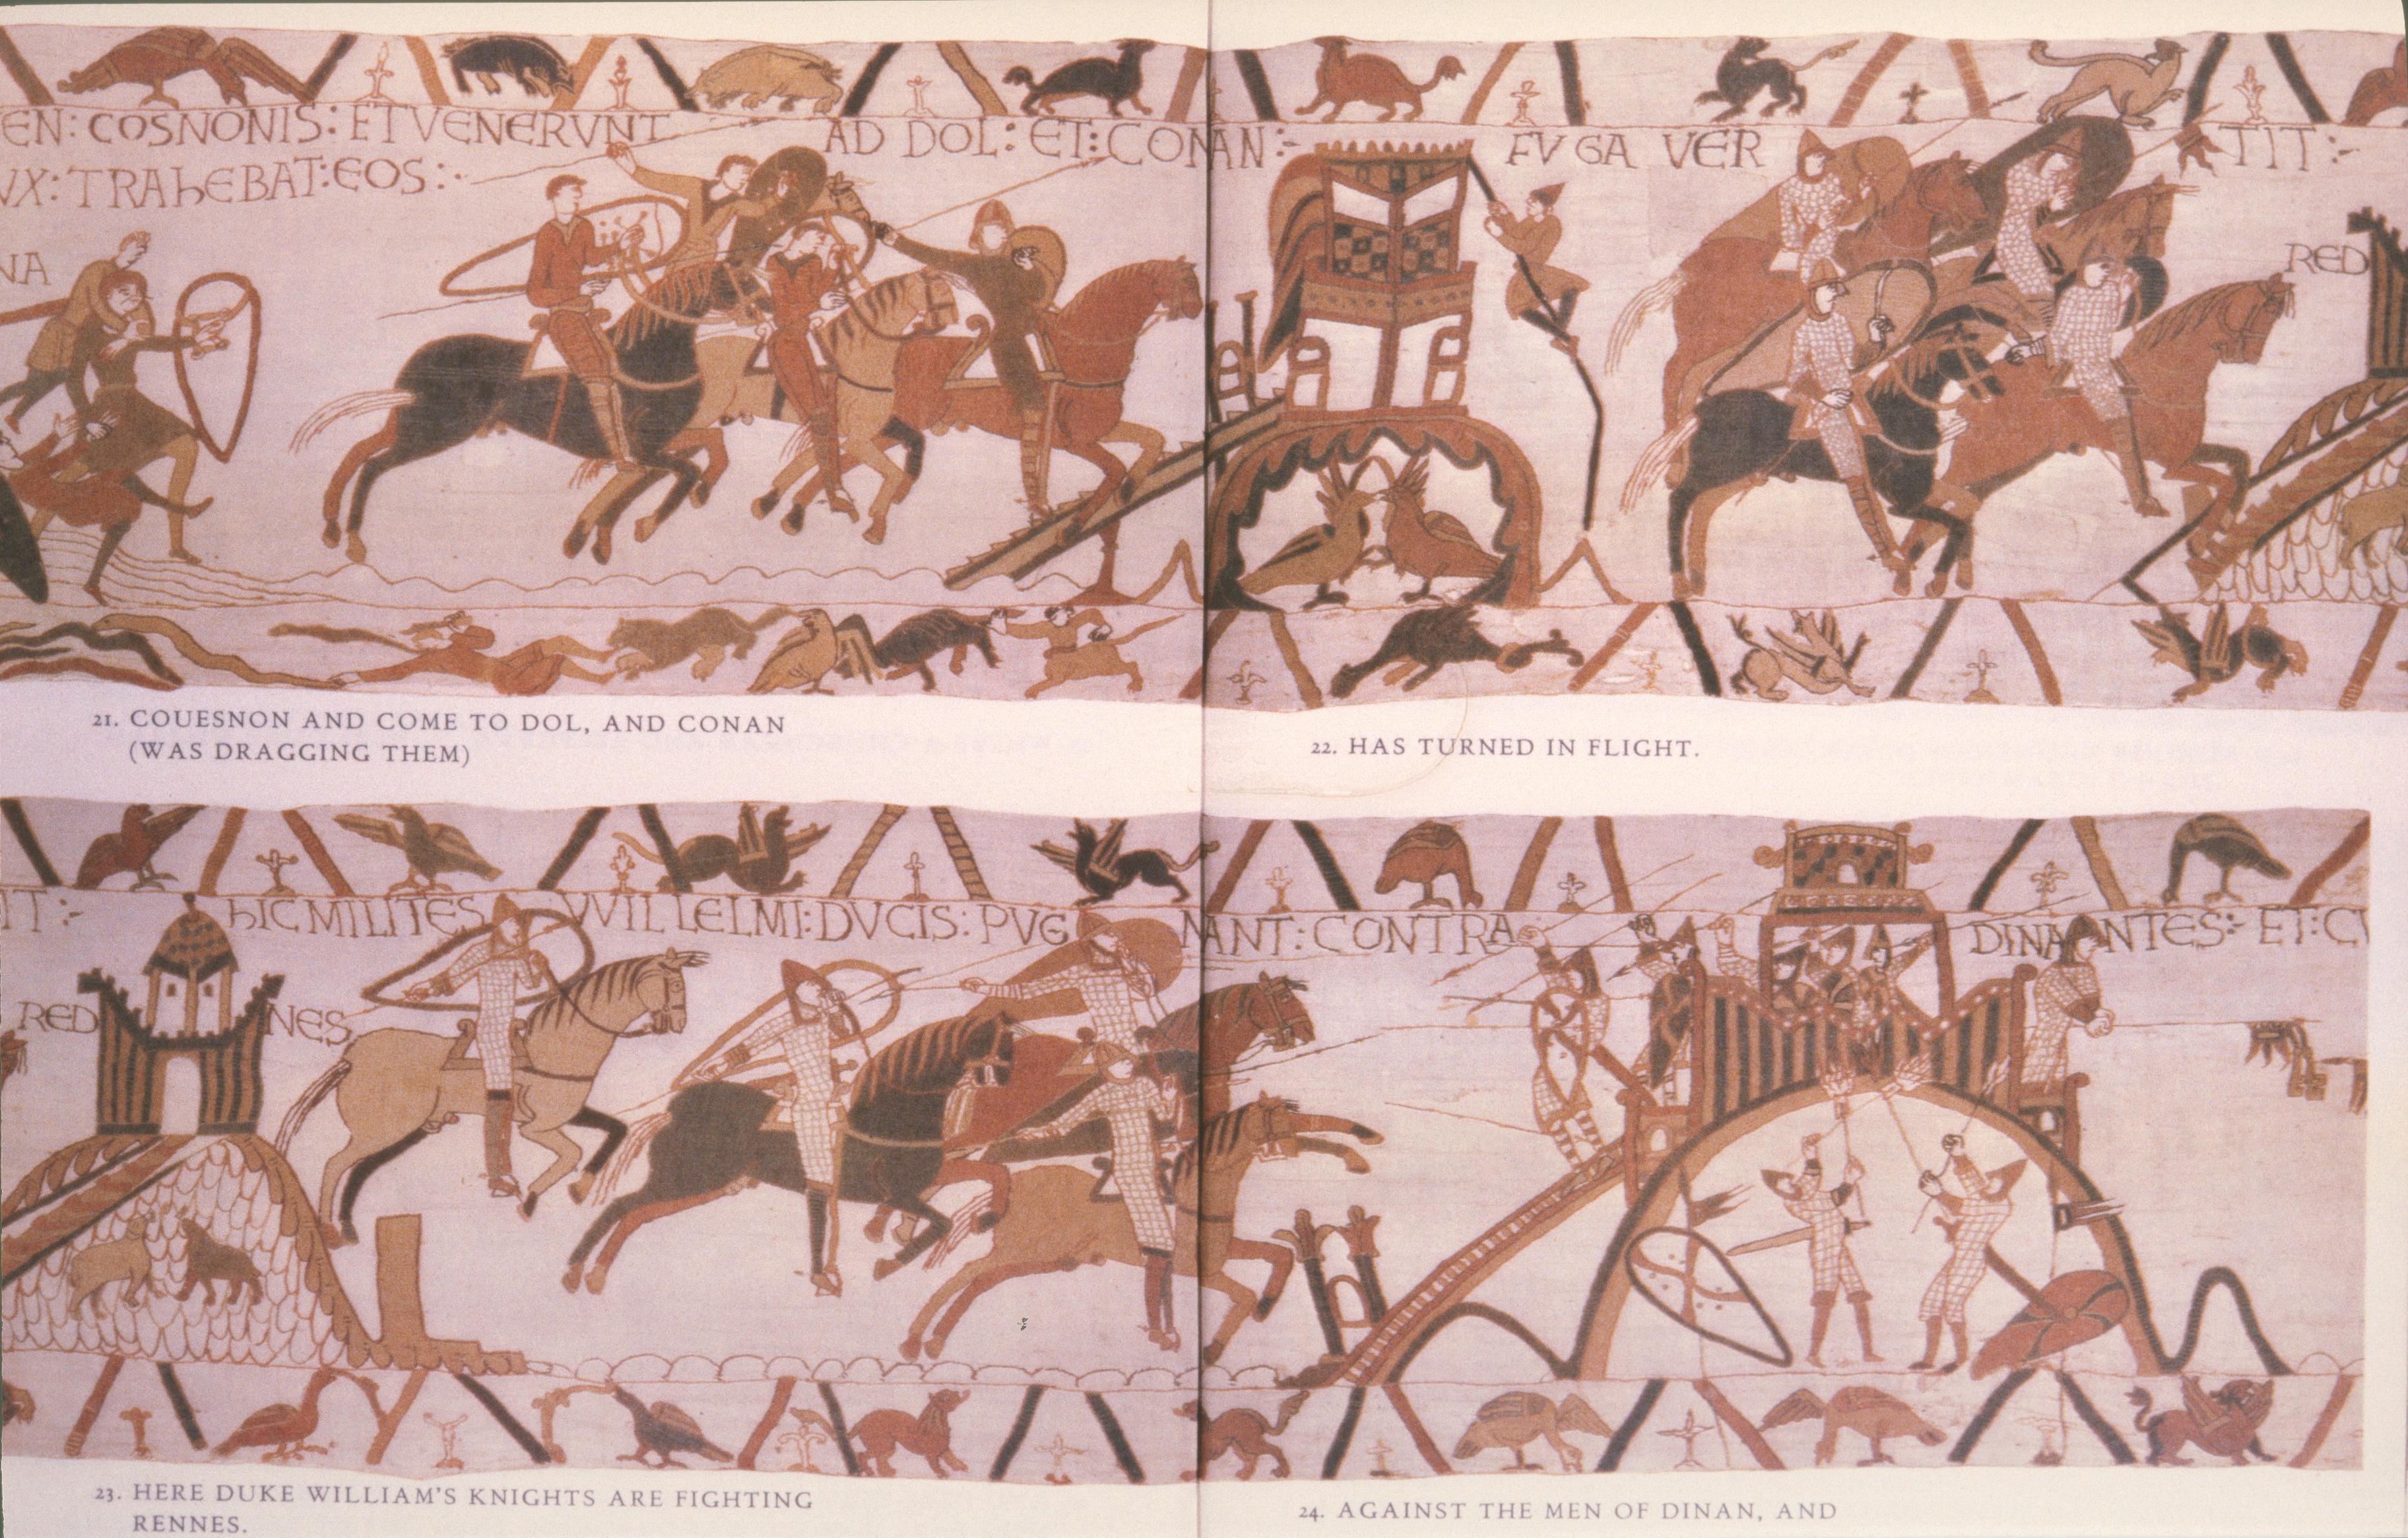

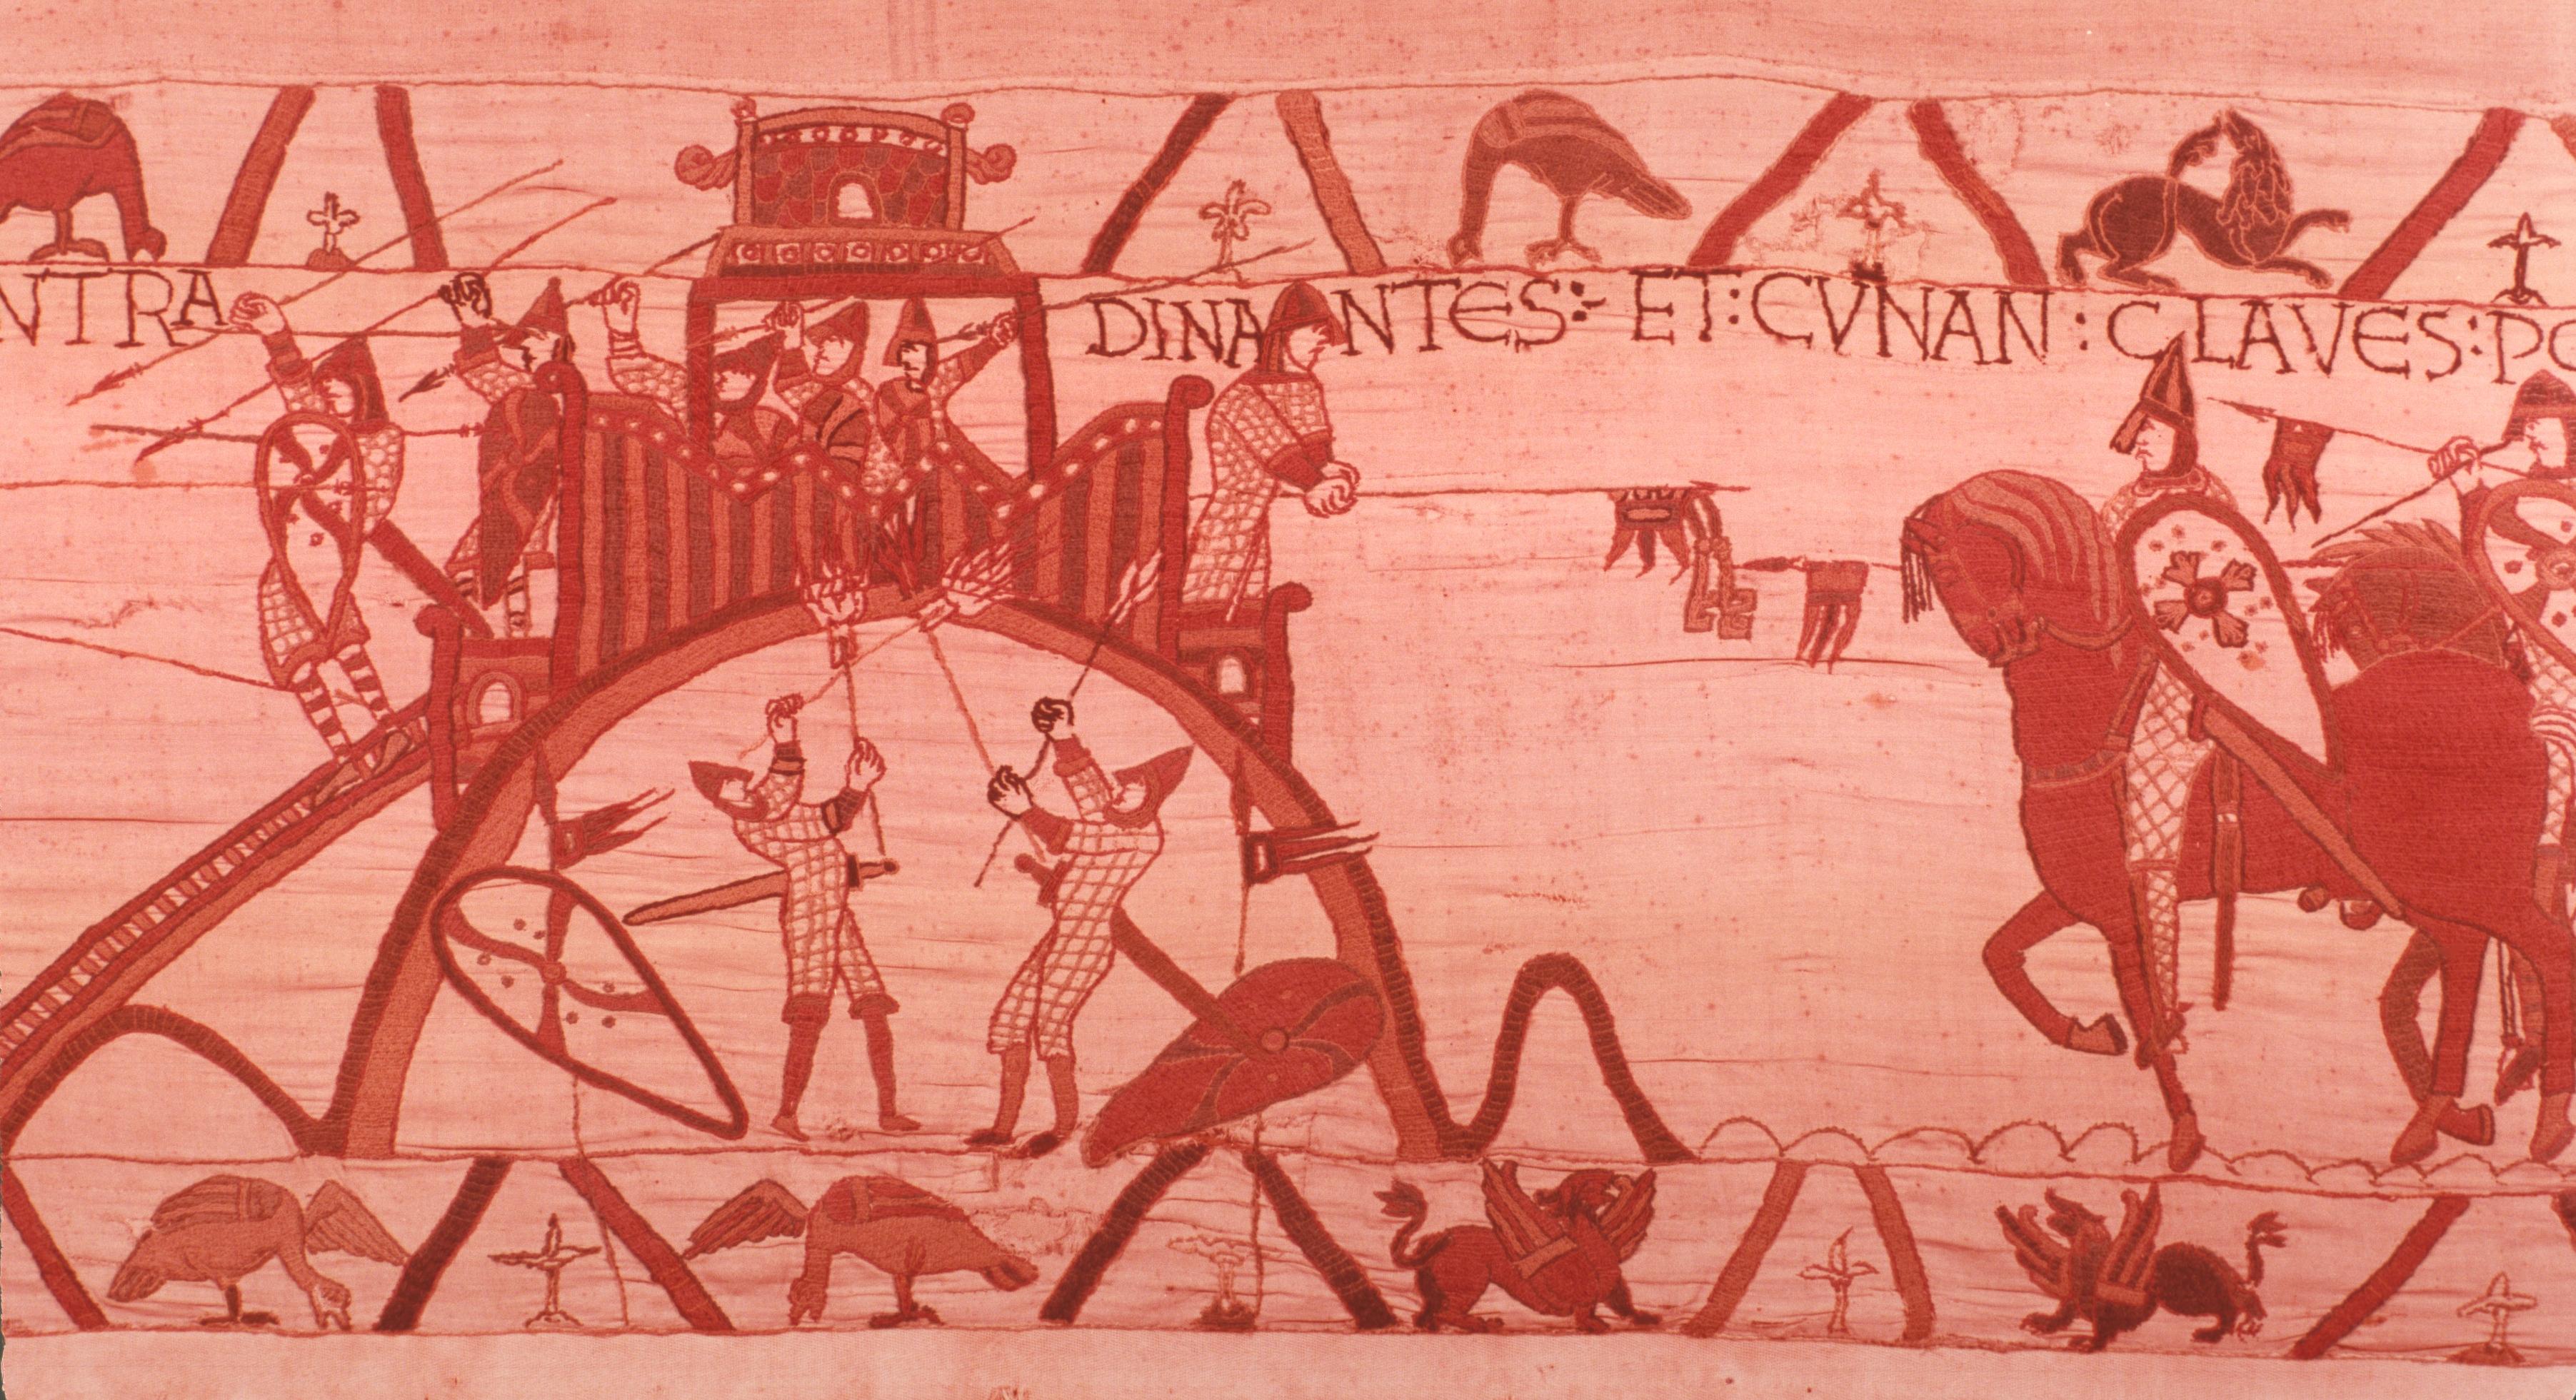
The Normans make a direct charge against the small castle of Dol (fig. 33, top), but as you can see in the rather enchanting detail (fig. 34), Duke Conan gives them the slip. There follows a ‘pursuit sequence’, with a thundering of hooves as in the best Westerns, as the Normans give chase down to Rennes, and then pin Conan down in the bigger castle at Dinan (fig. 33 bottom and fig. 35 top).
Here they meet a stiff resistance, but when they threaten the wooden structure with fire from below (see detail in fig. 36), Conan realises that it is time to capitulate, and he hands down the keys to the victorious William on the end of a lance.
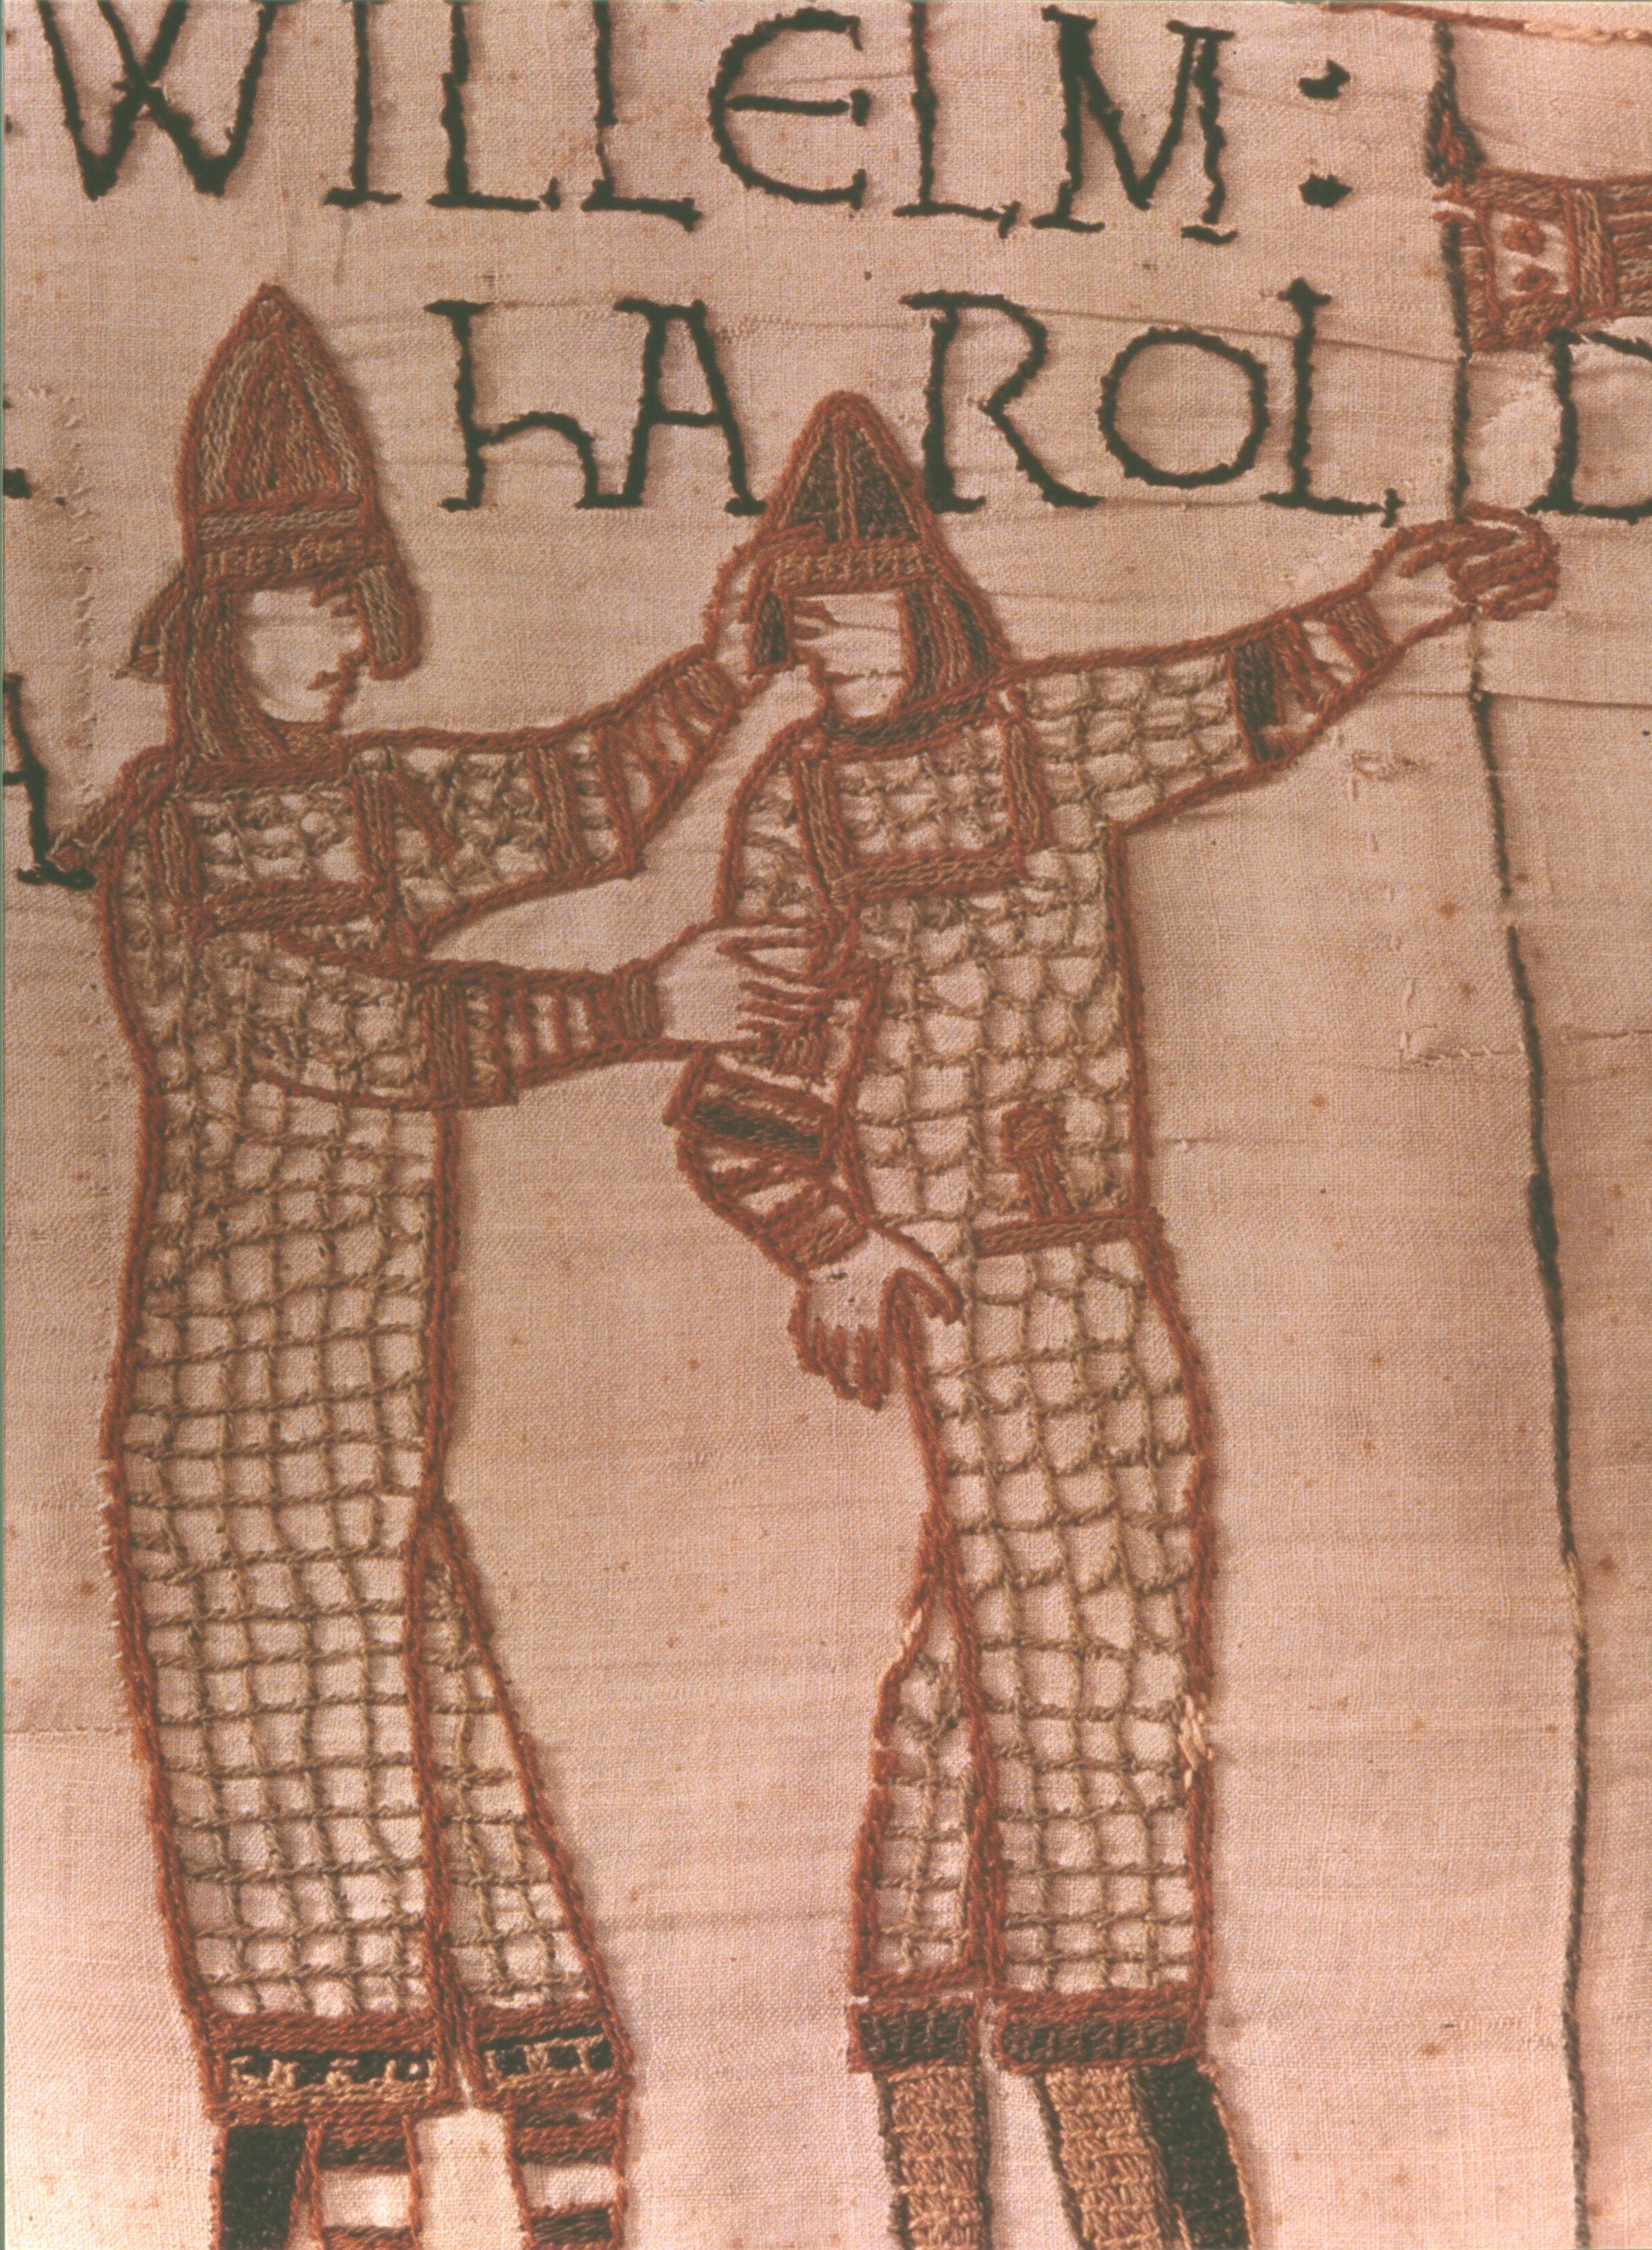
We cannot recognise Harold among the knights because they have all worn helmets, but we know that he has continued to distinguish himself, because in the next scene (fig. 35 top right and detail in fig. 37), William rewards him by investing him with arms.
Remember, though, that this is not the equivalent of the ‘Victoria Cross’, because to ‘receive arms’ from a lord is ipso facto to acknowledge that you are his ‘man’, his homme—it is to do him ‘homage’ as a vassal; and in any case, this little scene is no more than a prelude to the climax of the first part of the story.
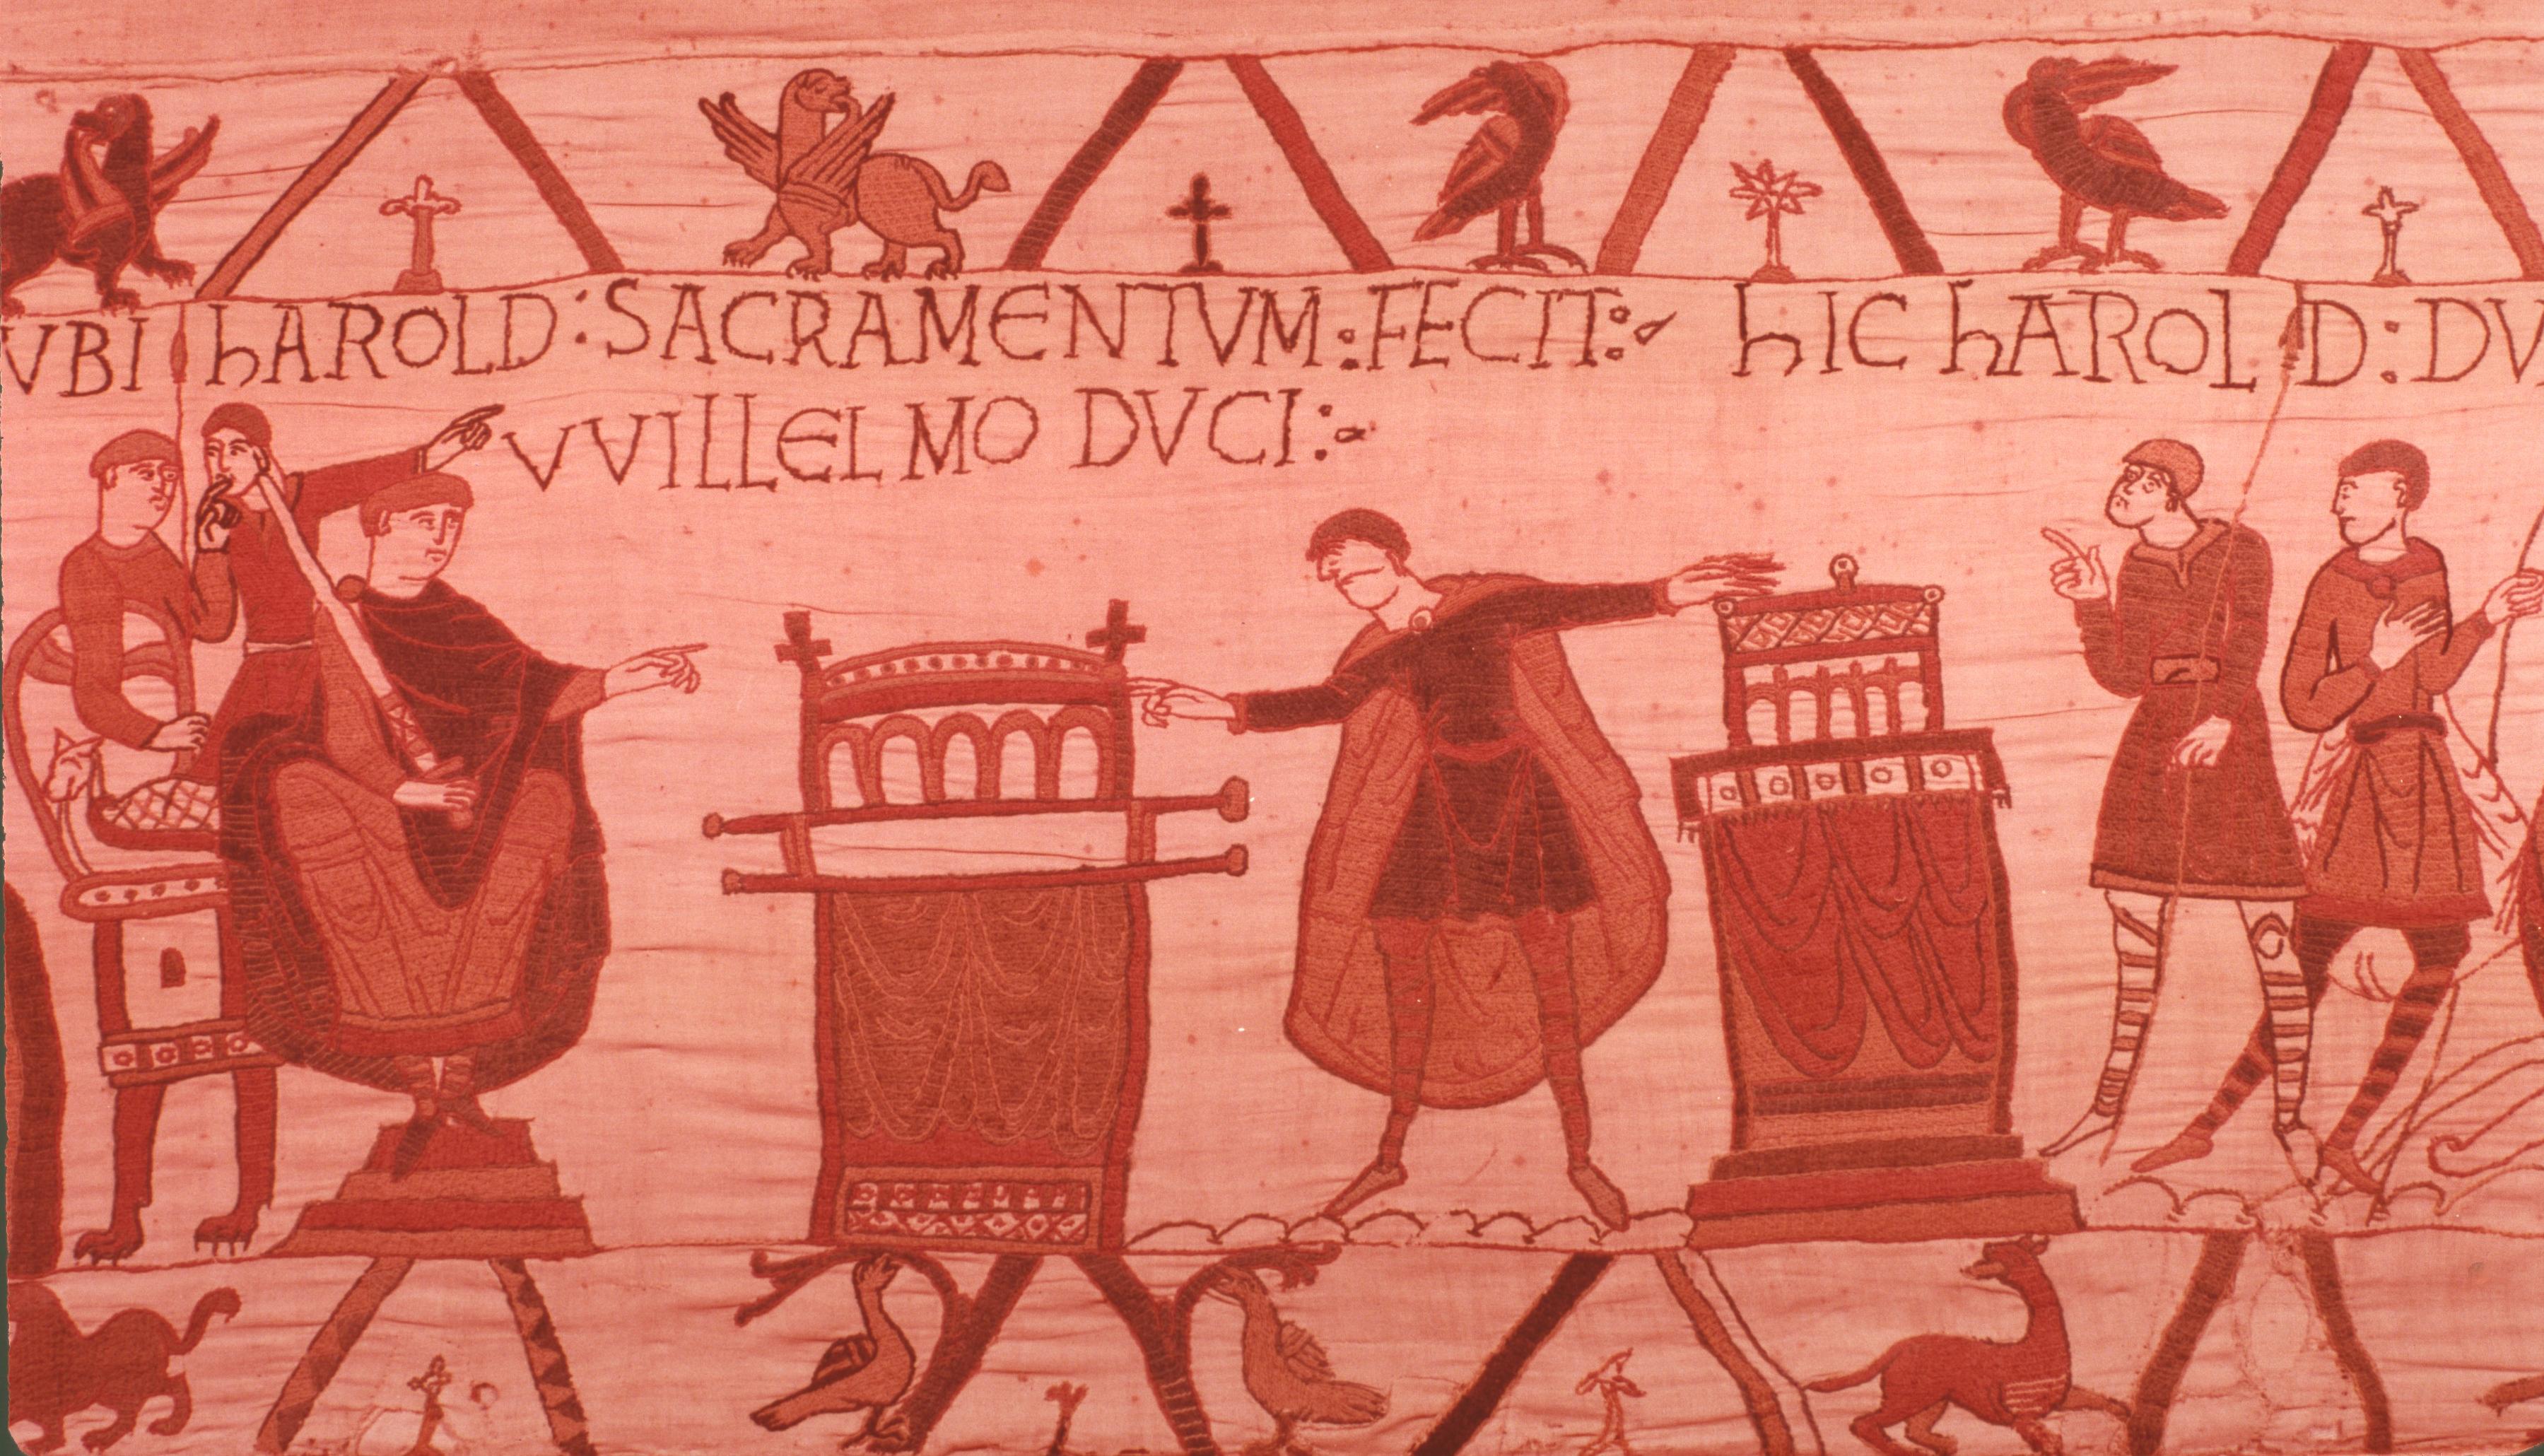
The climax (cf. detail in fig. 38) is the scene where, after they had come to Bayeux, Harold laid his hands on no fewer than two altars with relics, and ‘SACRAMENTUM FECIT’—he swore an oath to accept William as his liege-lord in England too, that is, to recognise him as the rightful heir to the throne of England.
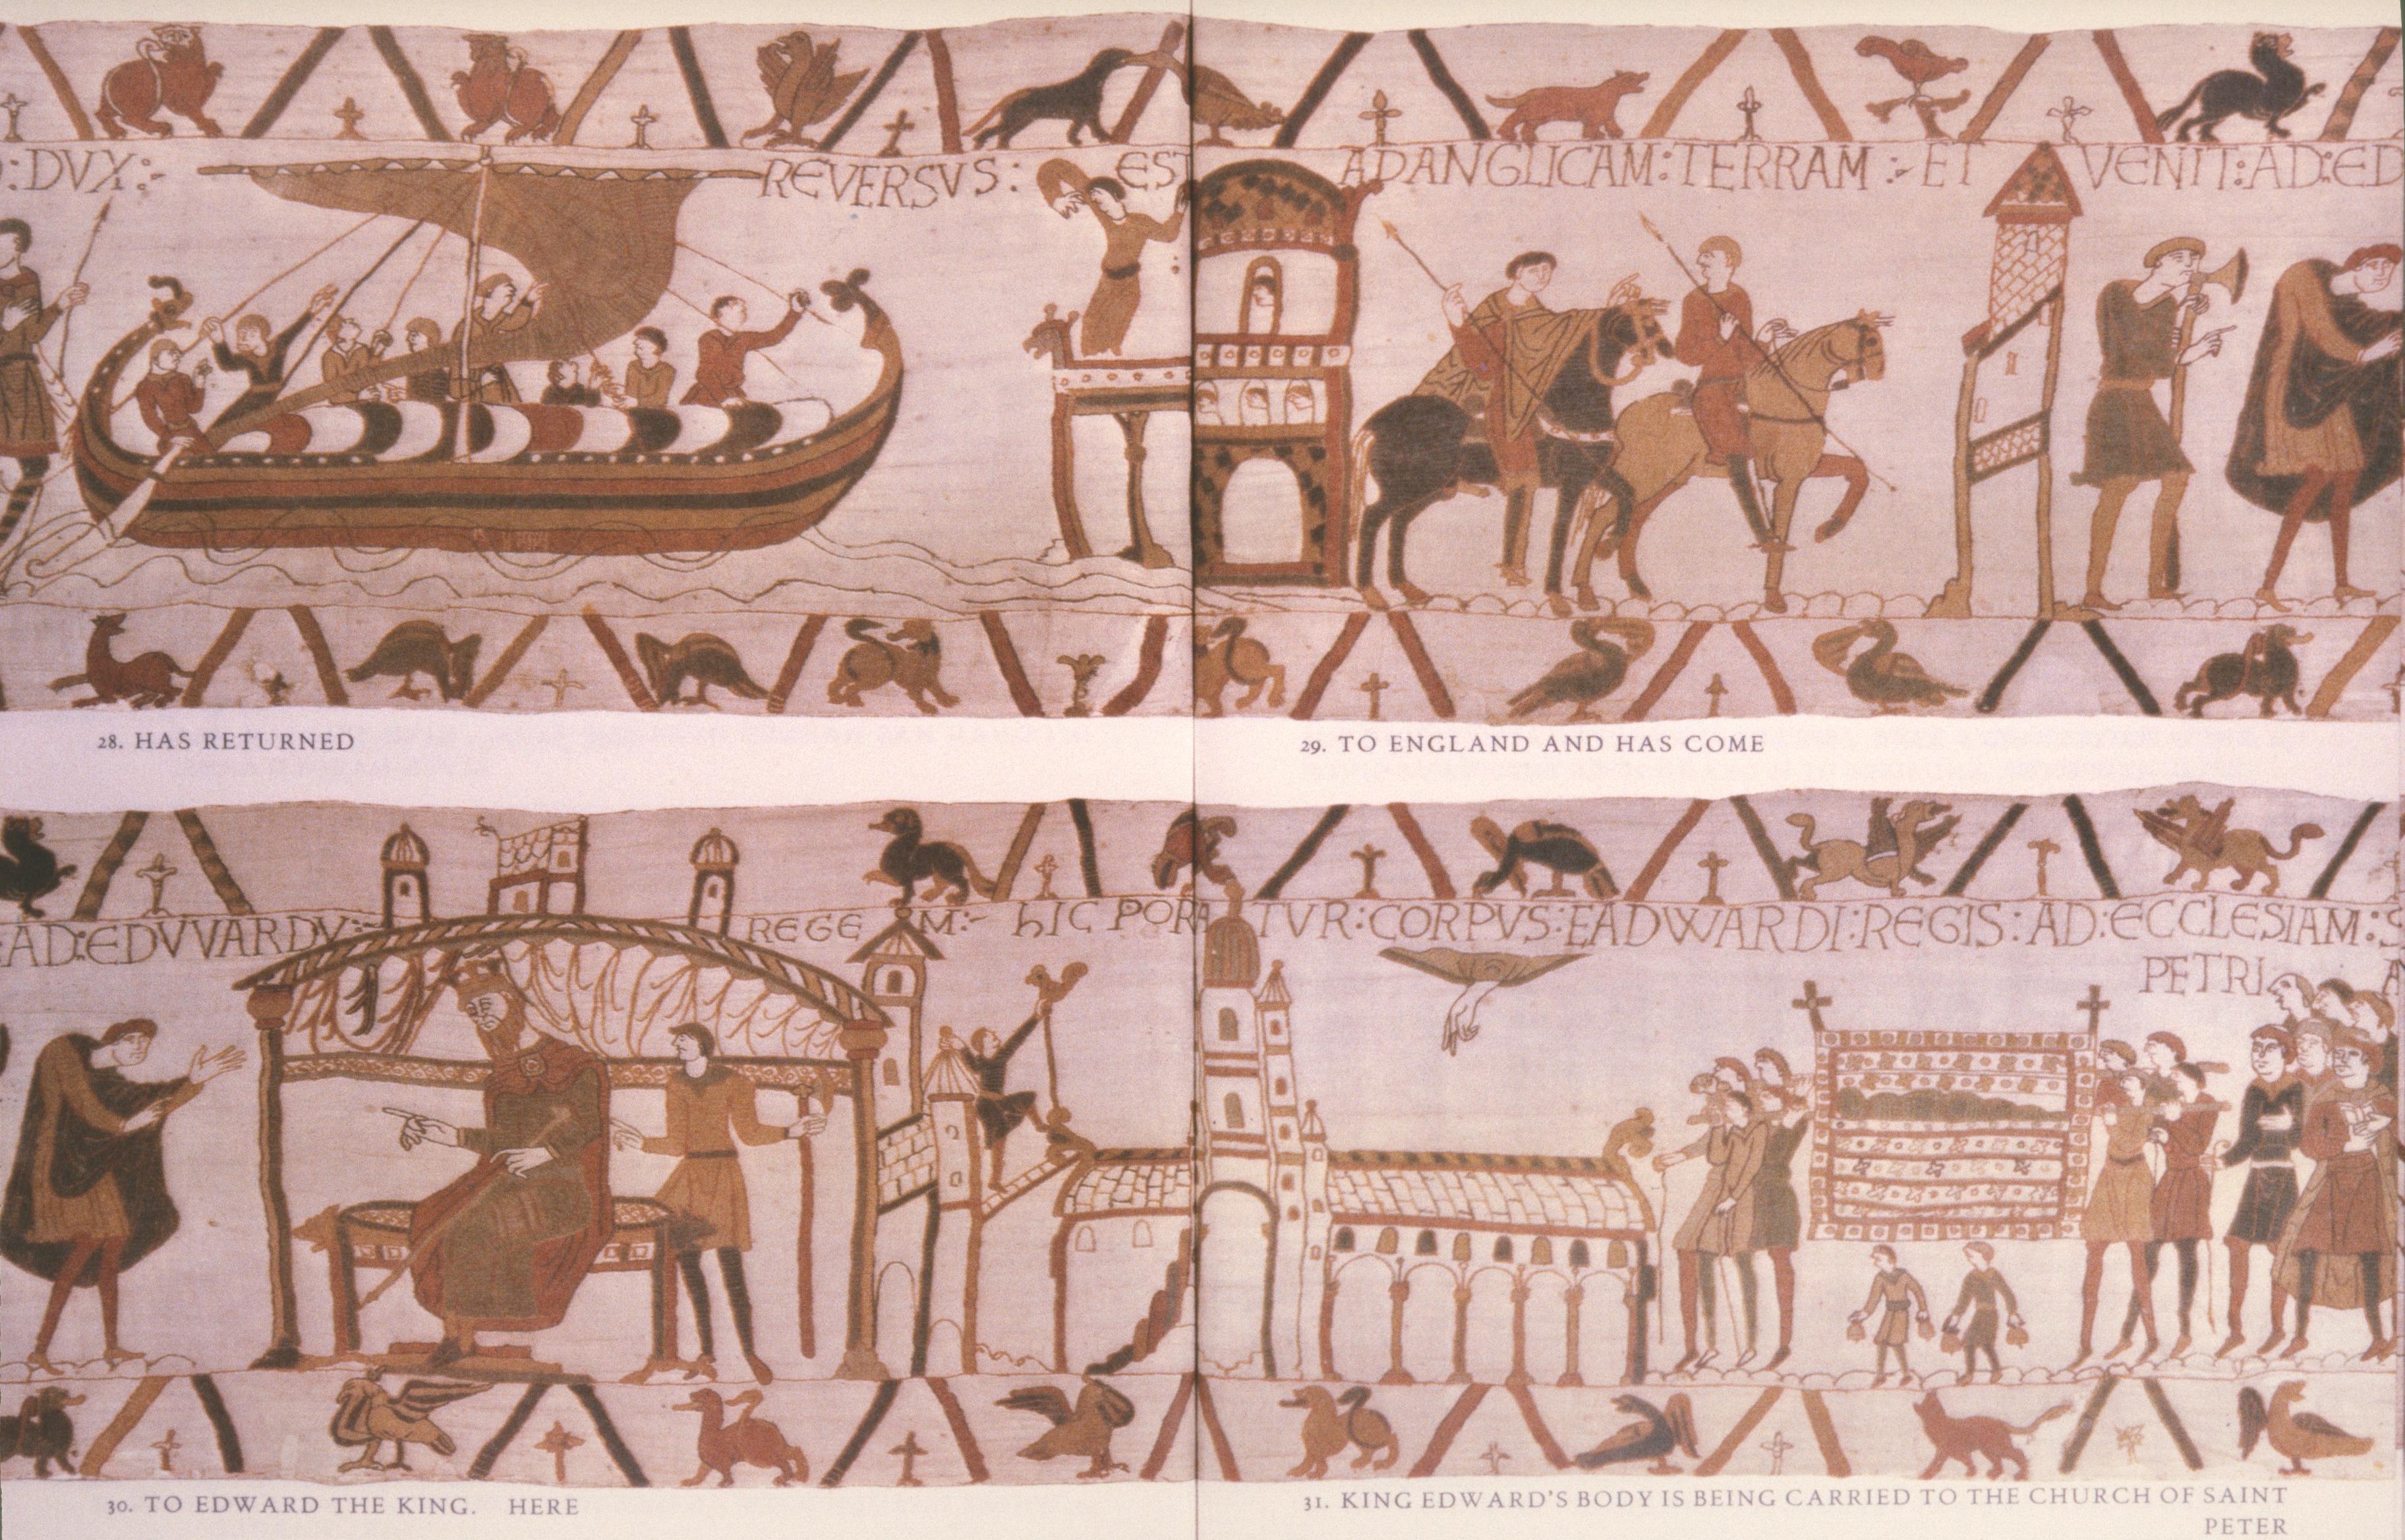
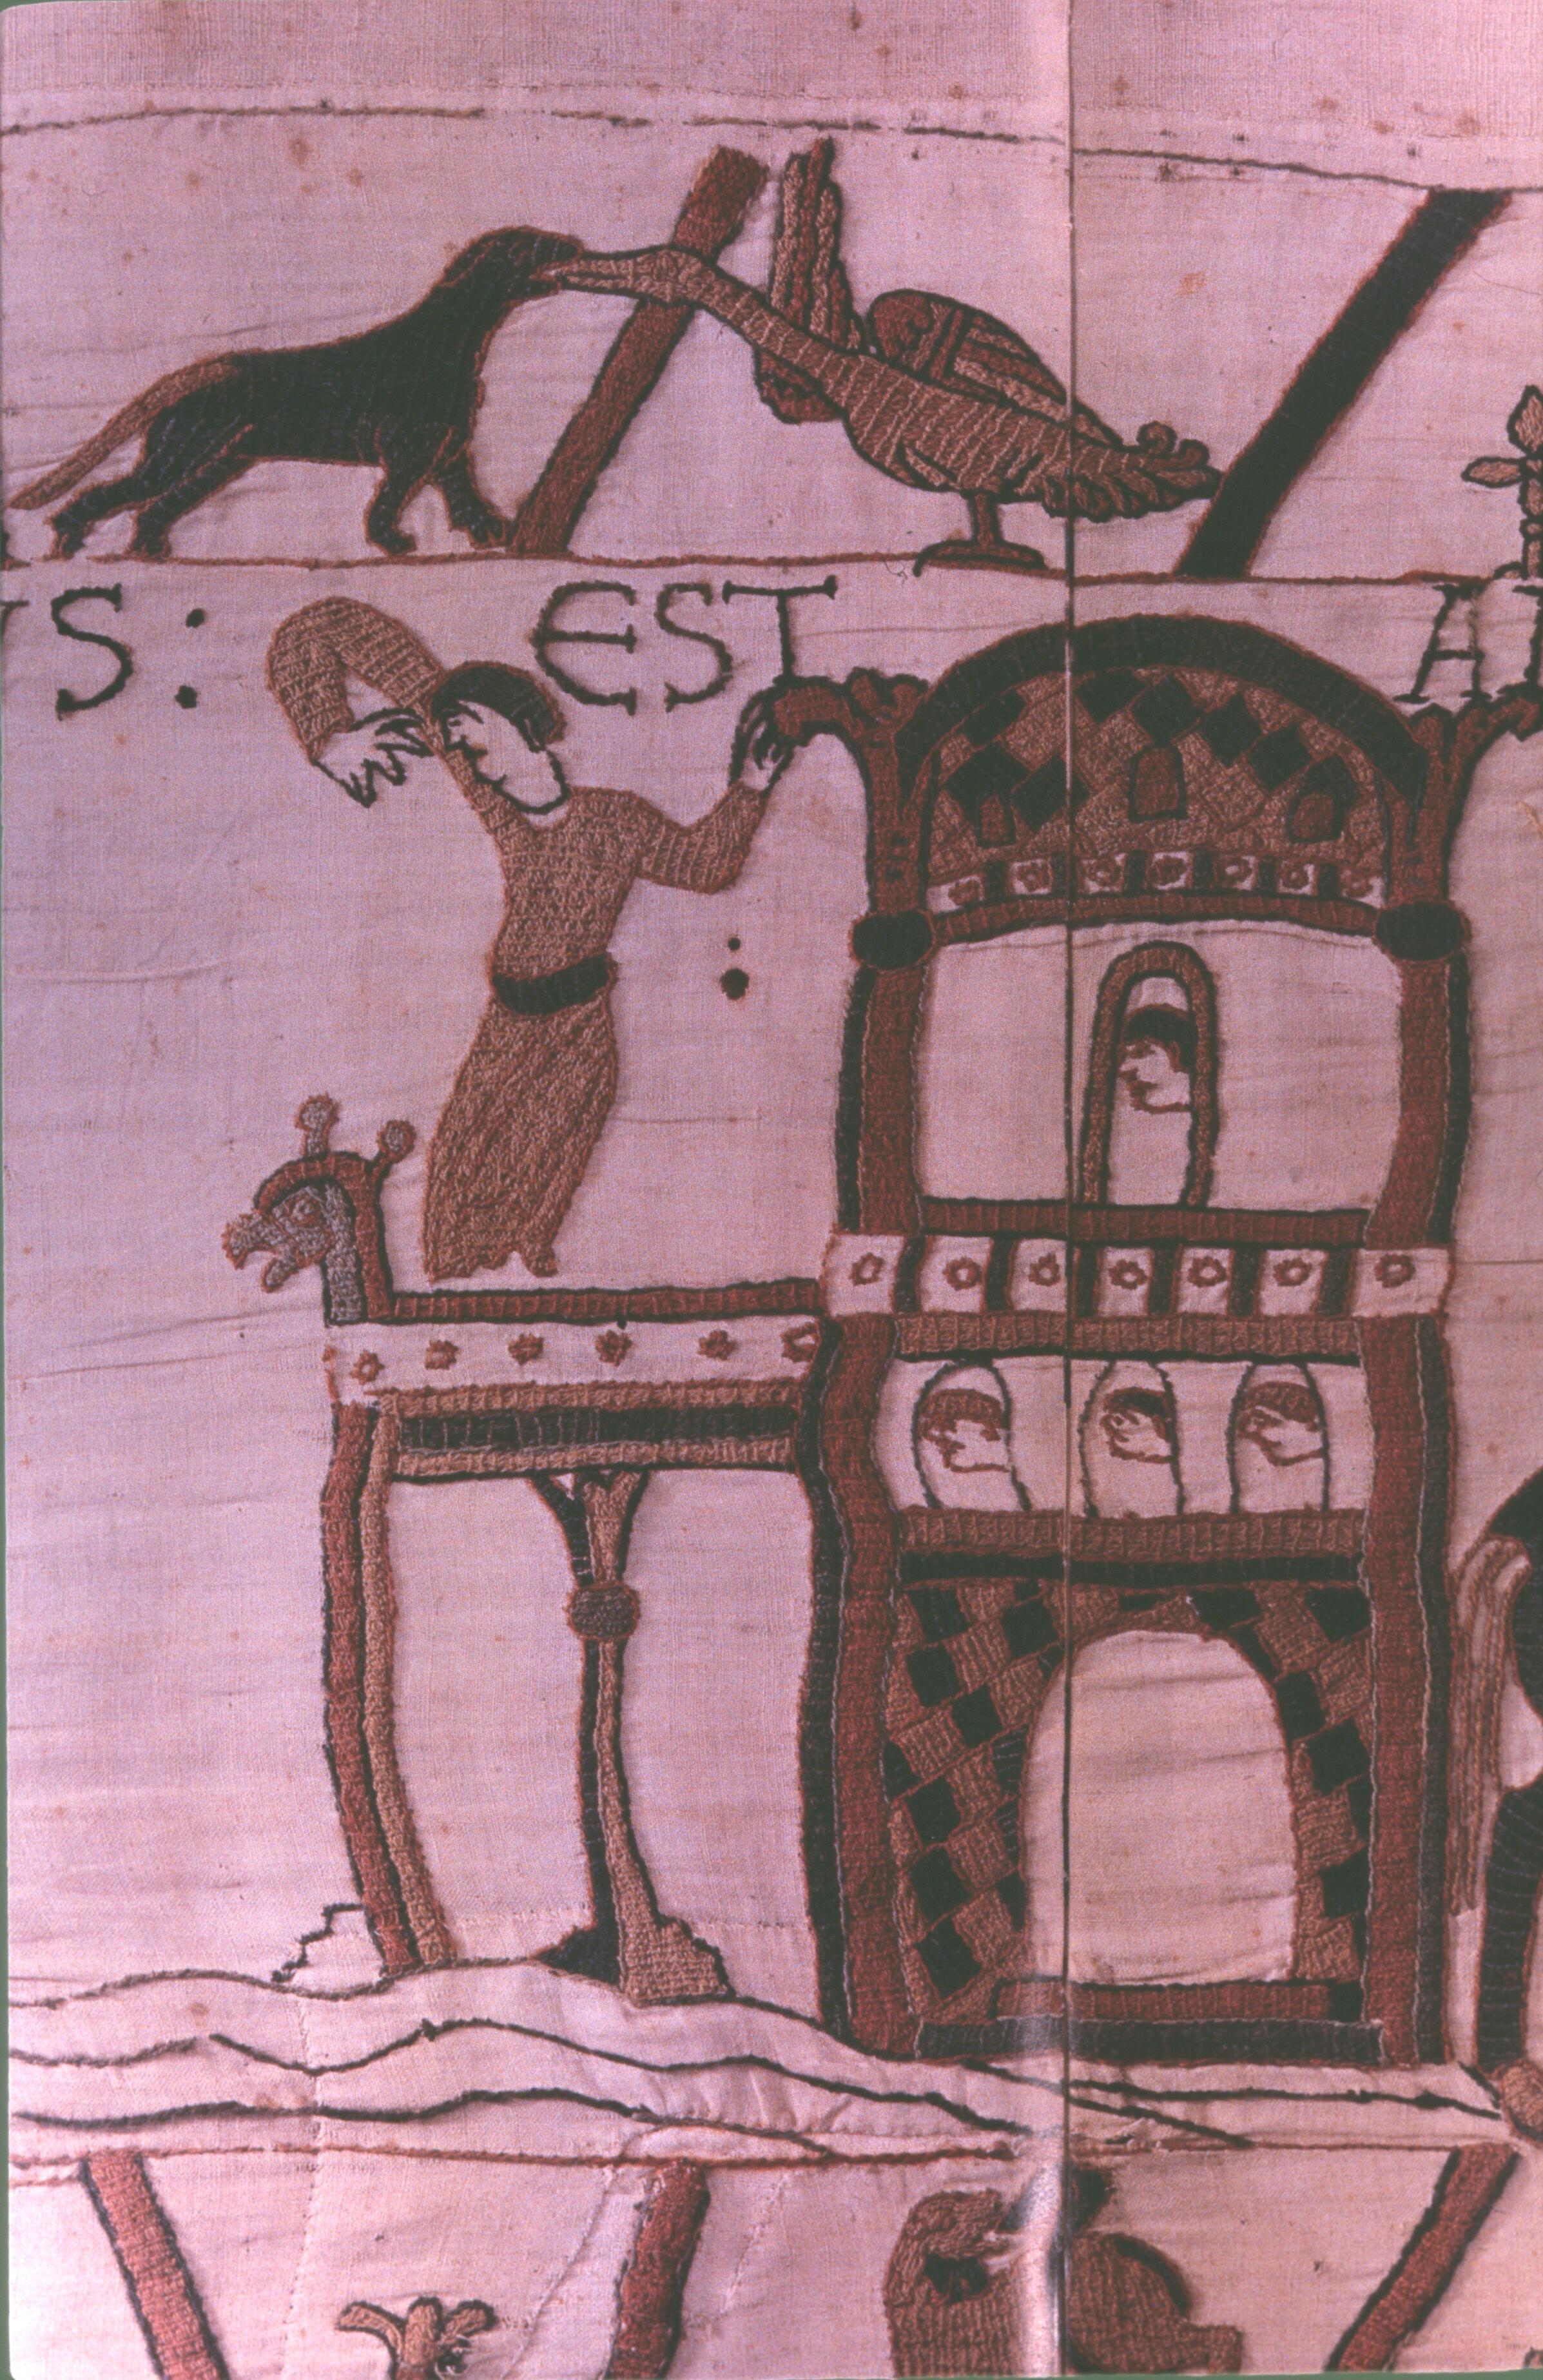
Chapter four begins with Harold’s return to England (fig. 39). His ship sails without delay and is sighted by the coastguards in a vivid piece of drawing (fig. 40). He and one follower ride to London, and a rather crestfallen Harold delivers his report to Edward, seated on a cushion on his throne in his palace, as you see in the detail in fig. 41.
Edward is well-satisfied, because he wanted William to be his successor (and perhaps this had been the purport of Harold’s mission). Once again, however, fate takes a hand, and Edward’s satisfaction is short lived.
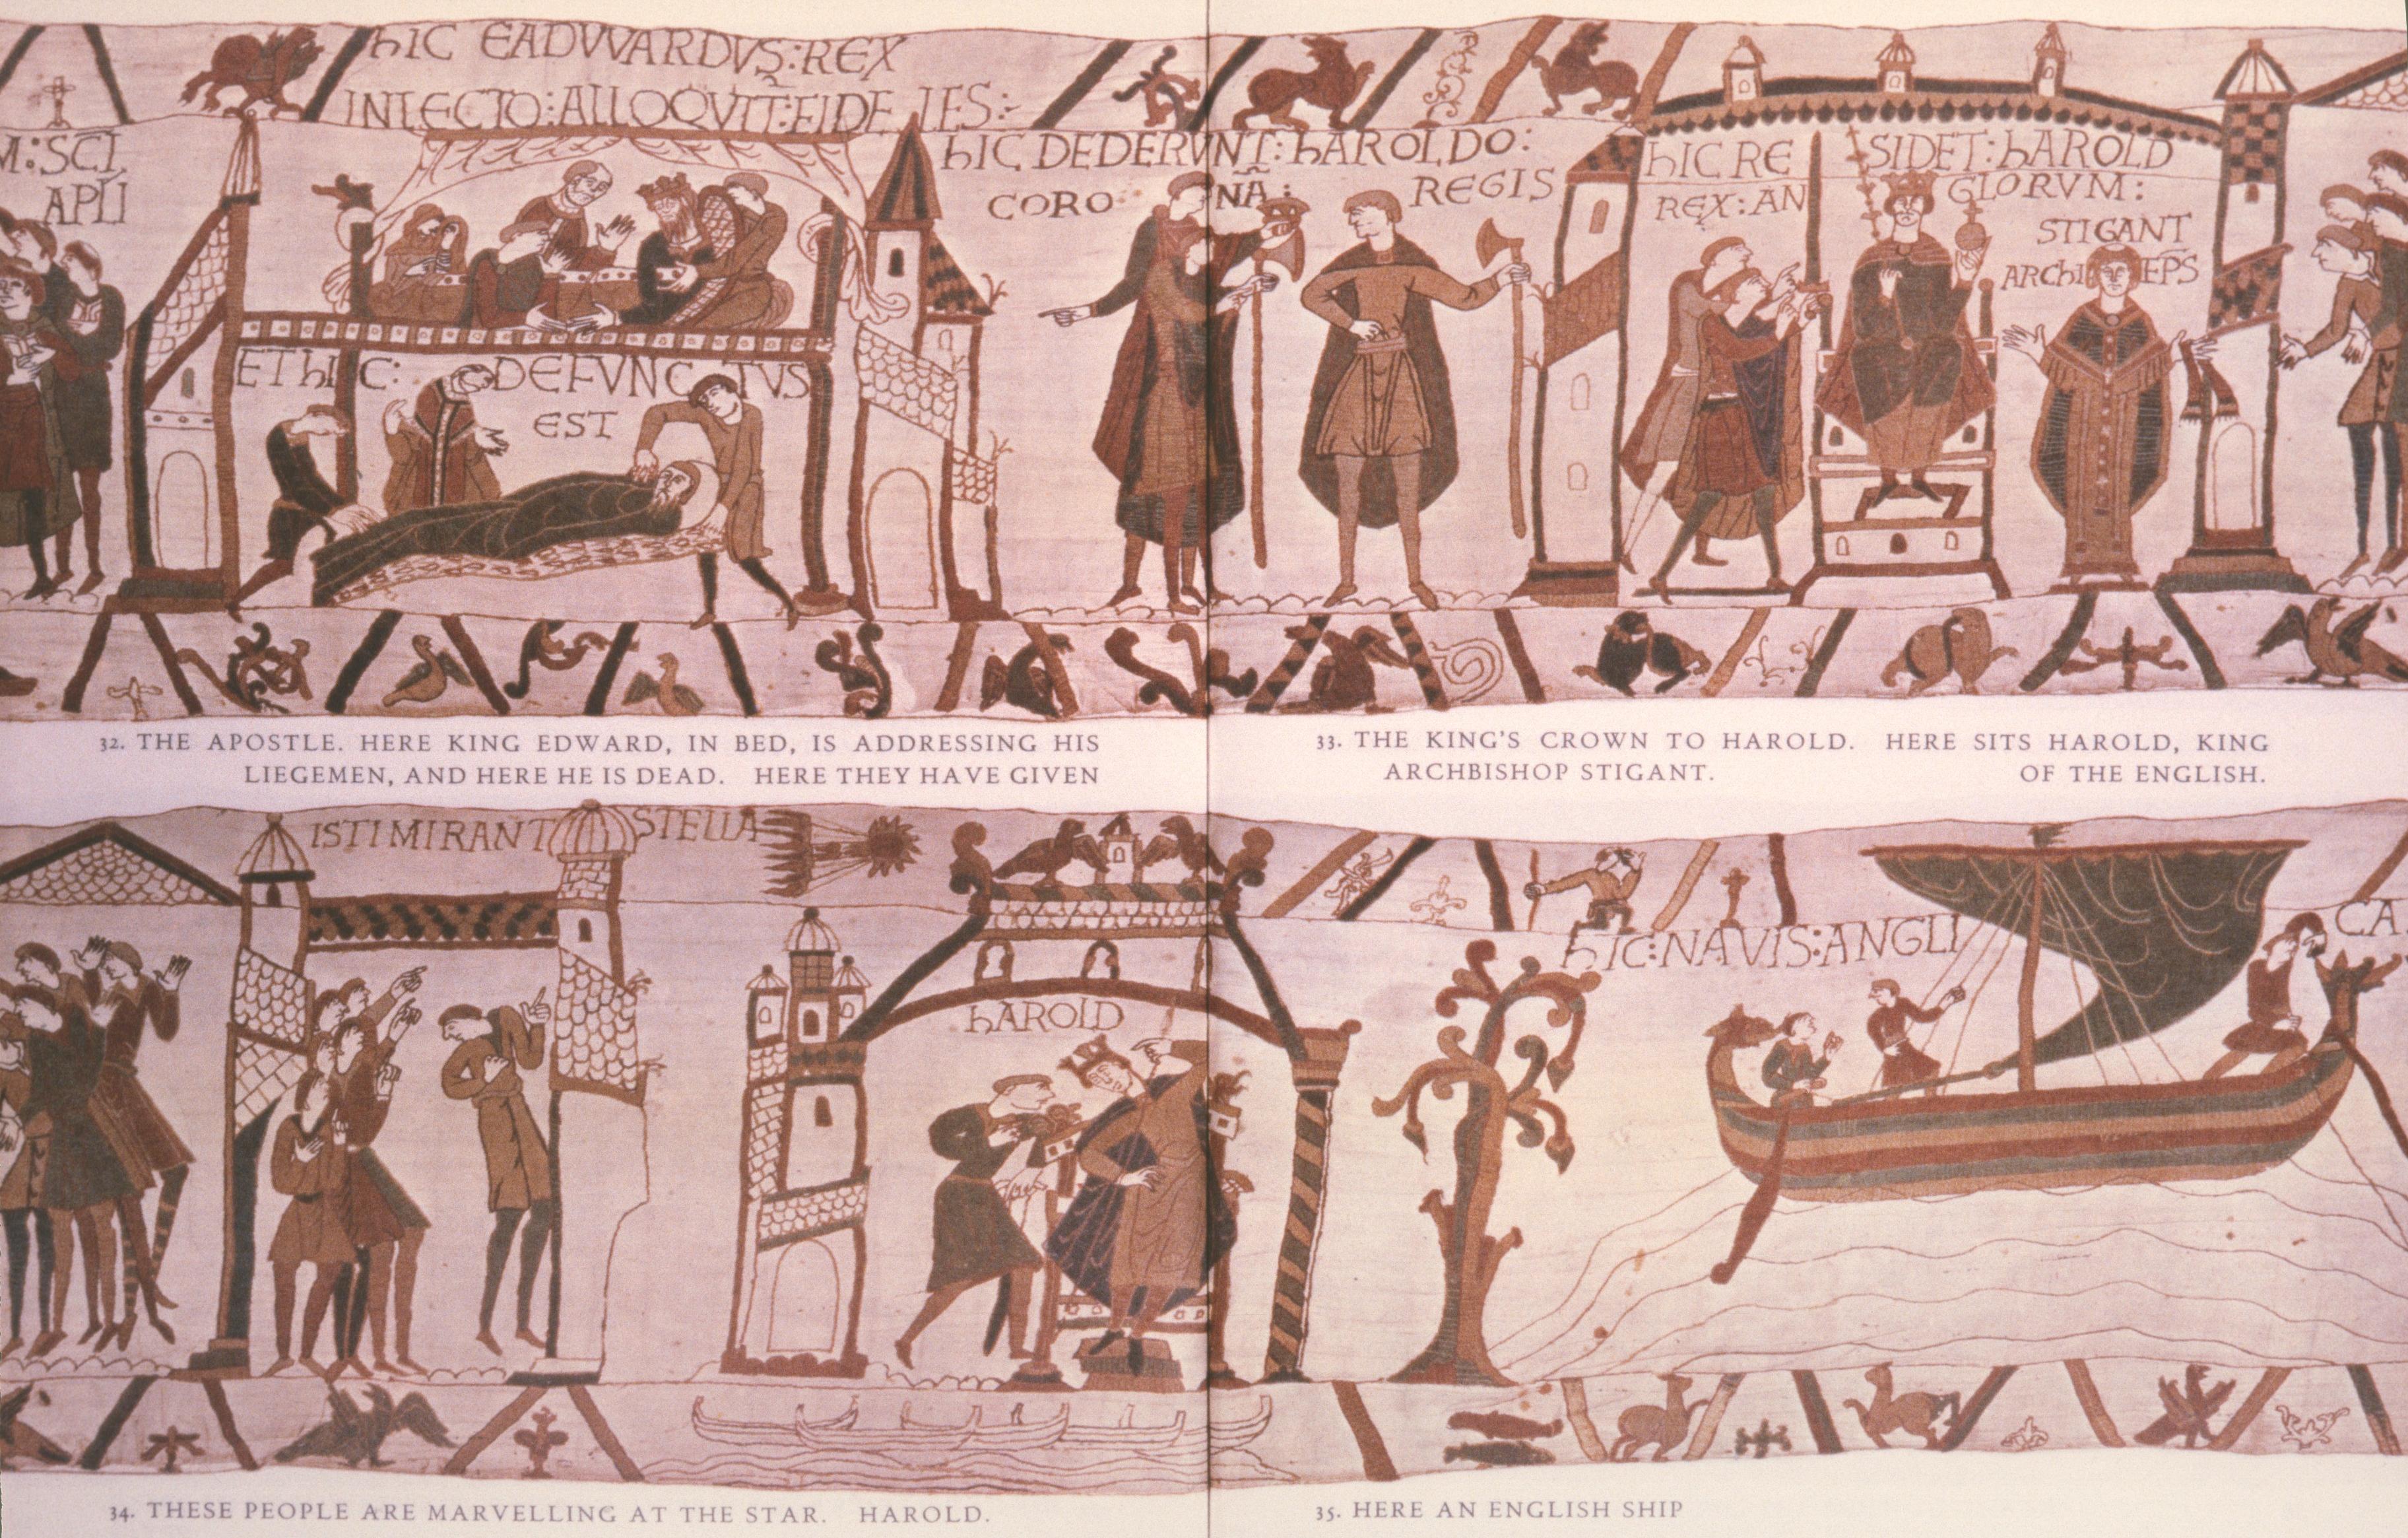
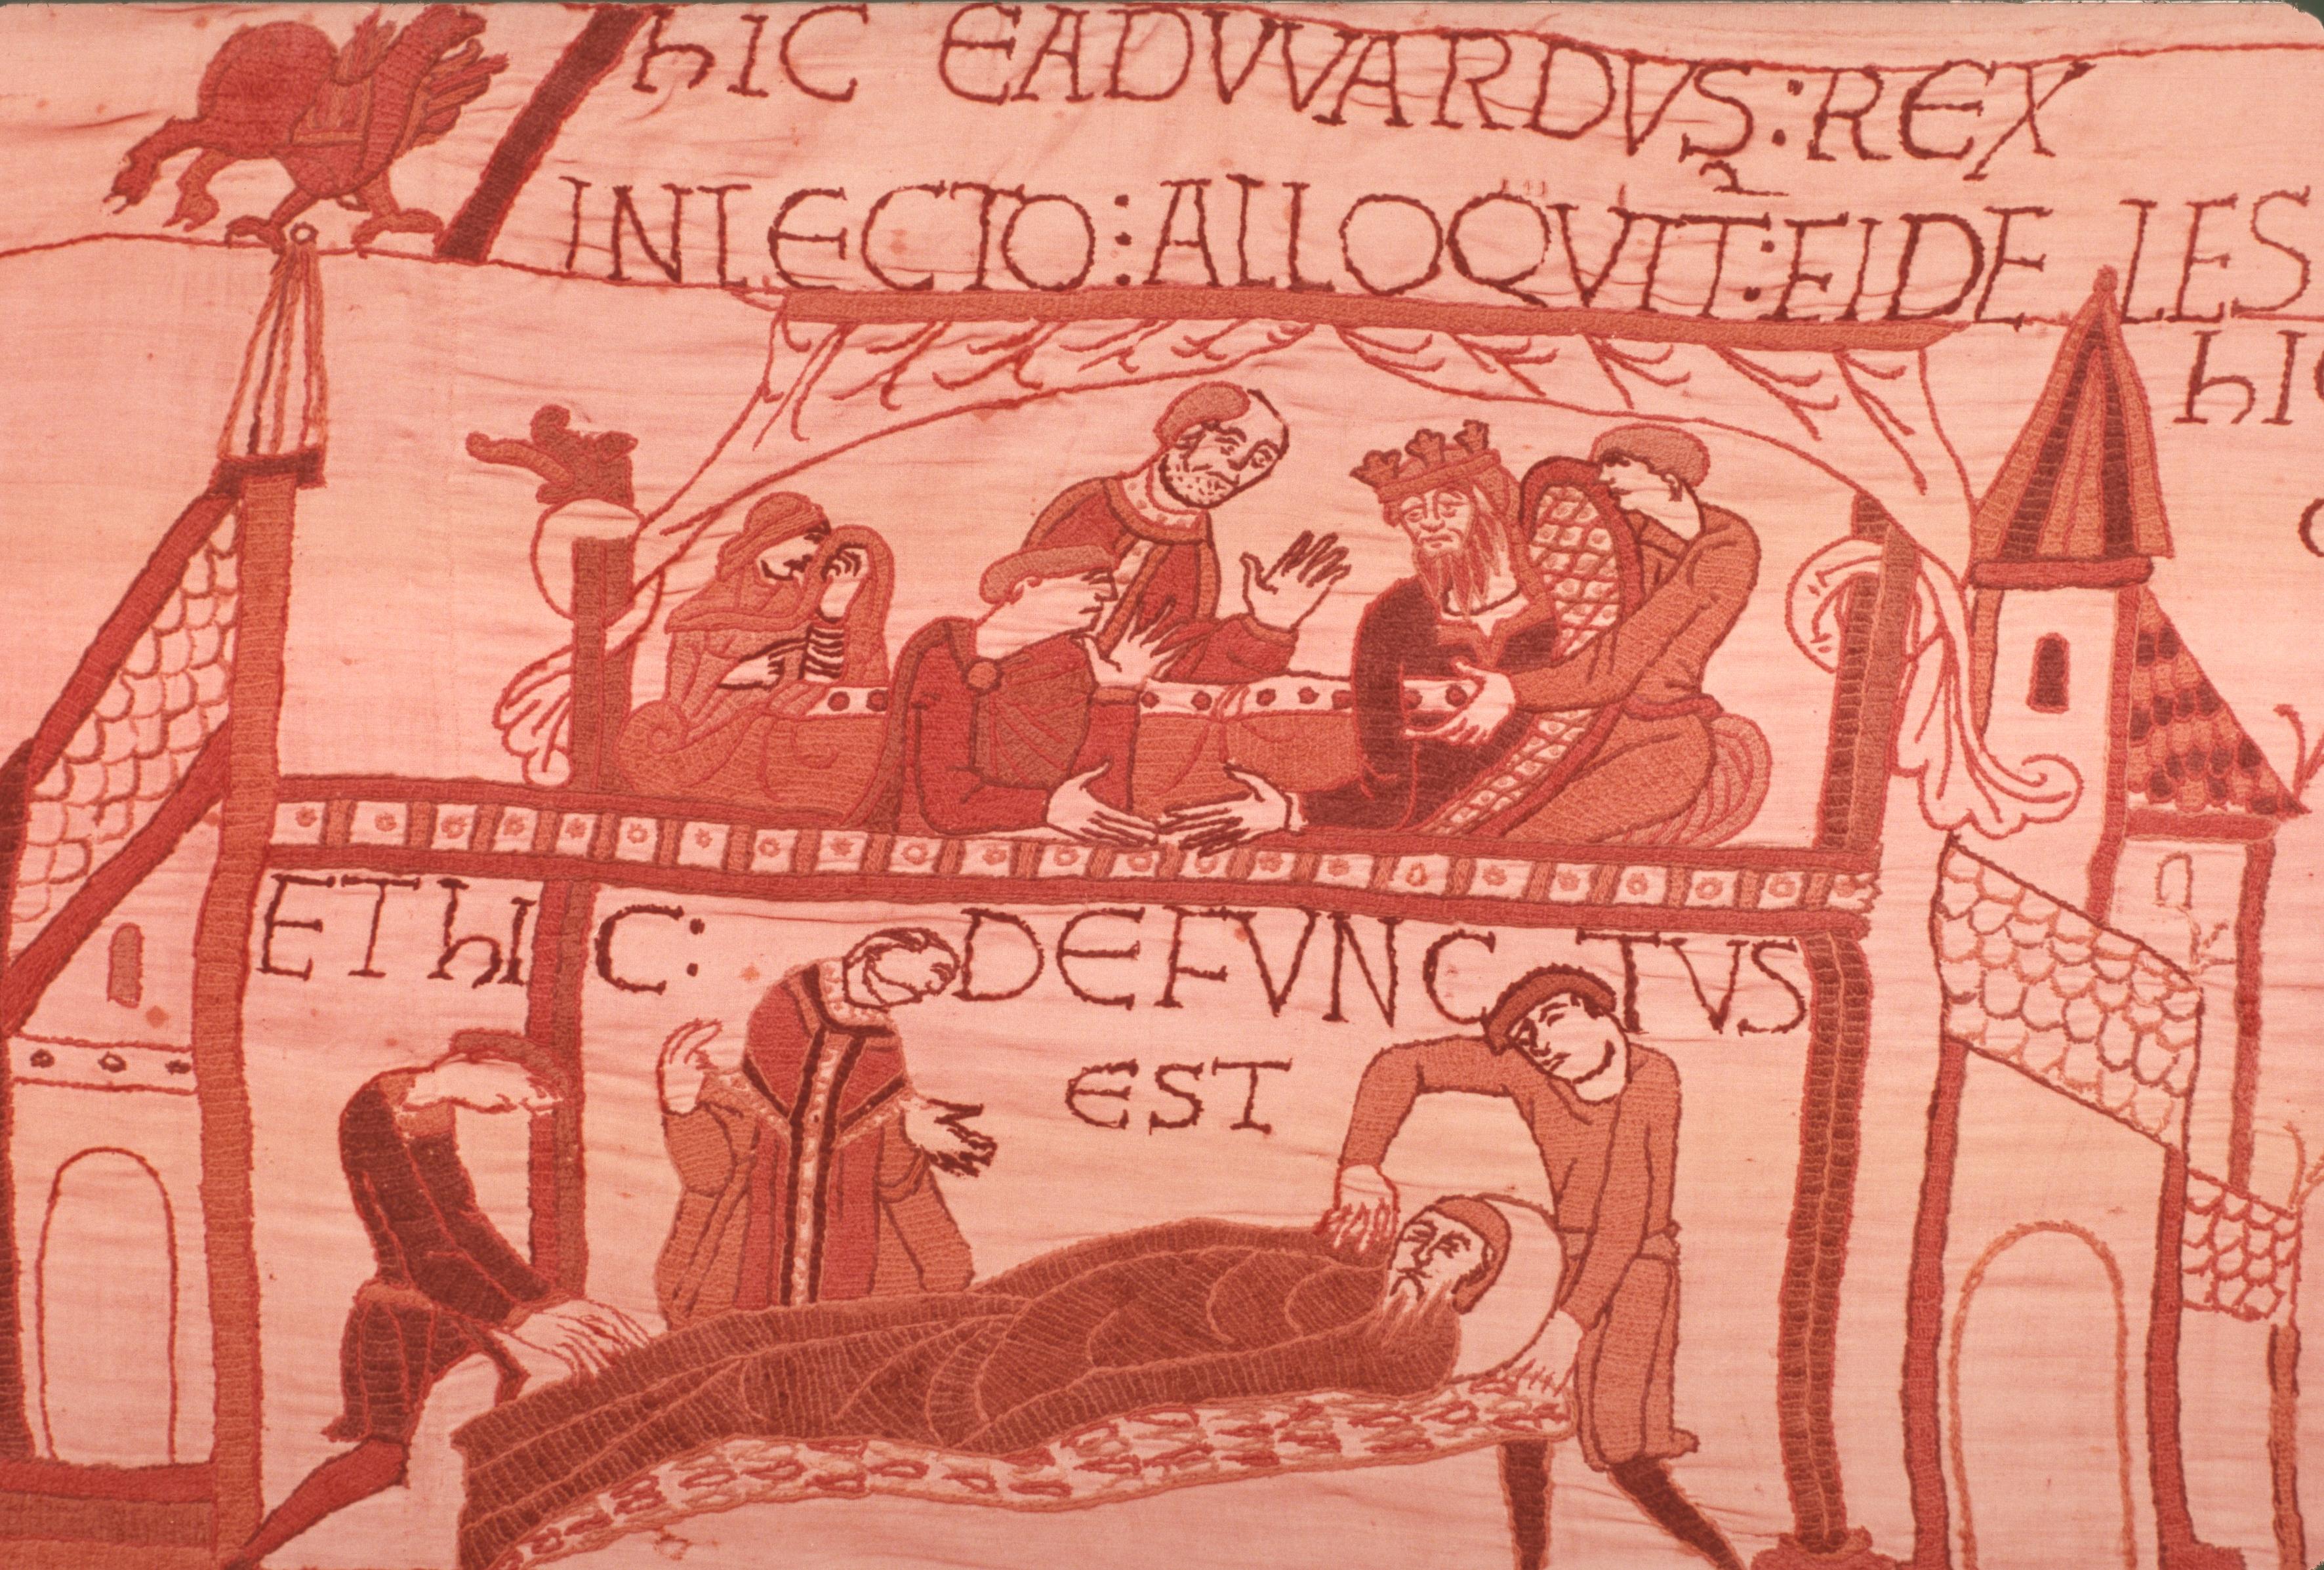
As with earlier untoward events, the action unfolds right to left (from fig. 42 top left back to fig. 40 bottom right) and so we must jump forward to the scene shown in the detail in fig. 43. In the upper room of his palace, Edward lies on his bed (IN LECTO)—on his deathbed, in fact. He is propped up on his throne-cushion, and conveys his last wishes to his FIDELES, who consist of the queen (Harold’s sister), Harold himself, and on the other side of the bed, the perfidious Archbishop of Canterbury, with his five o’clock shadow. Immediately below, the king is DEFUNCTUS; and his body is being laid out for burial, still on his cushion. Then we move backwards (in the detail in fig. 44) with his funeral procession.
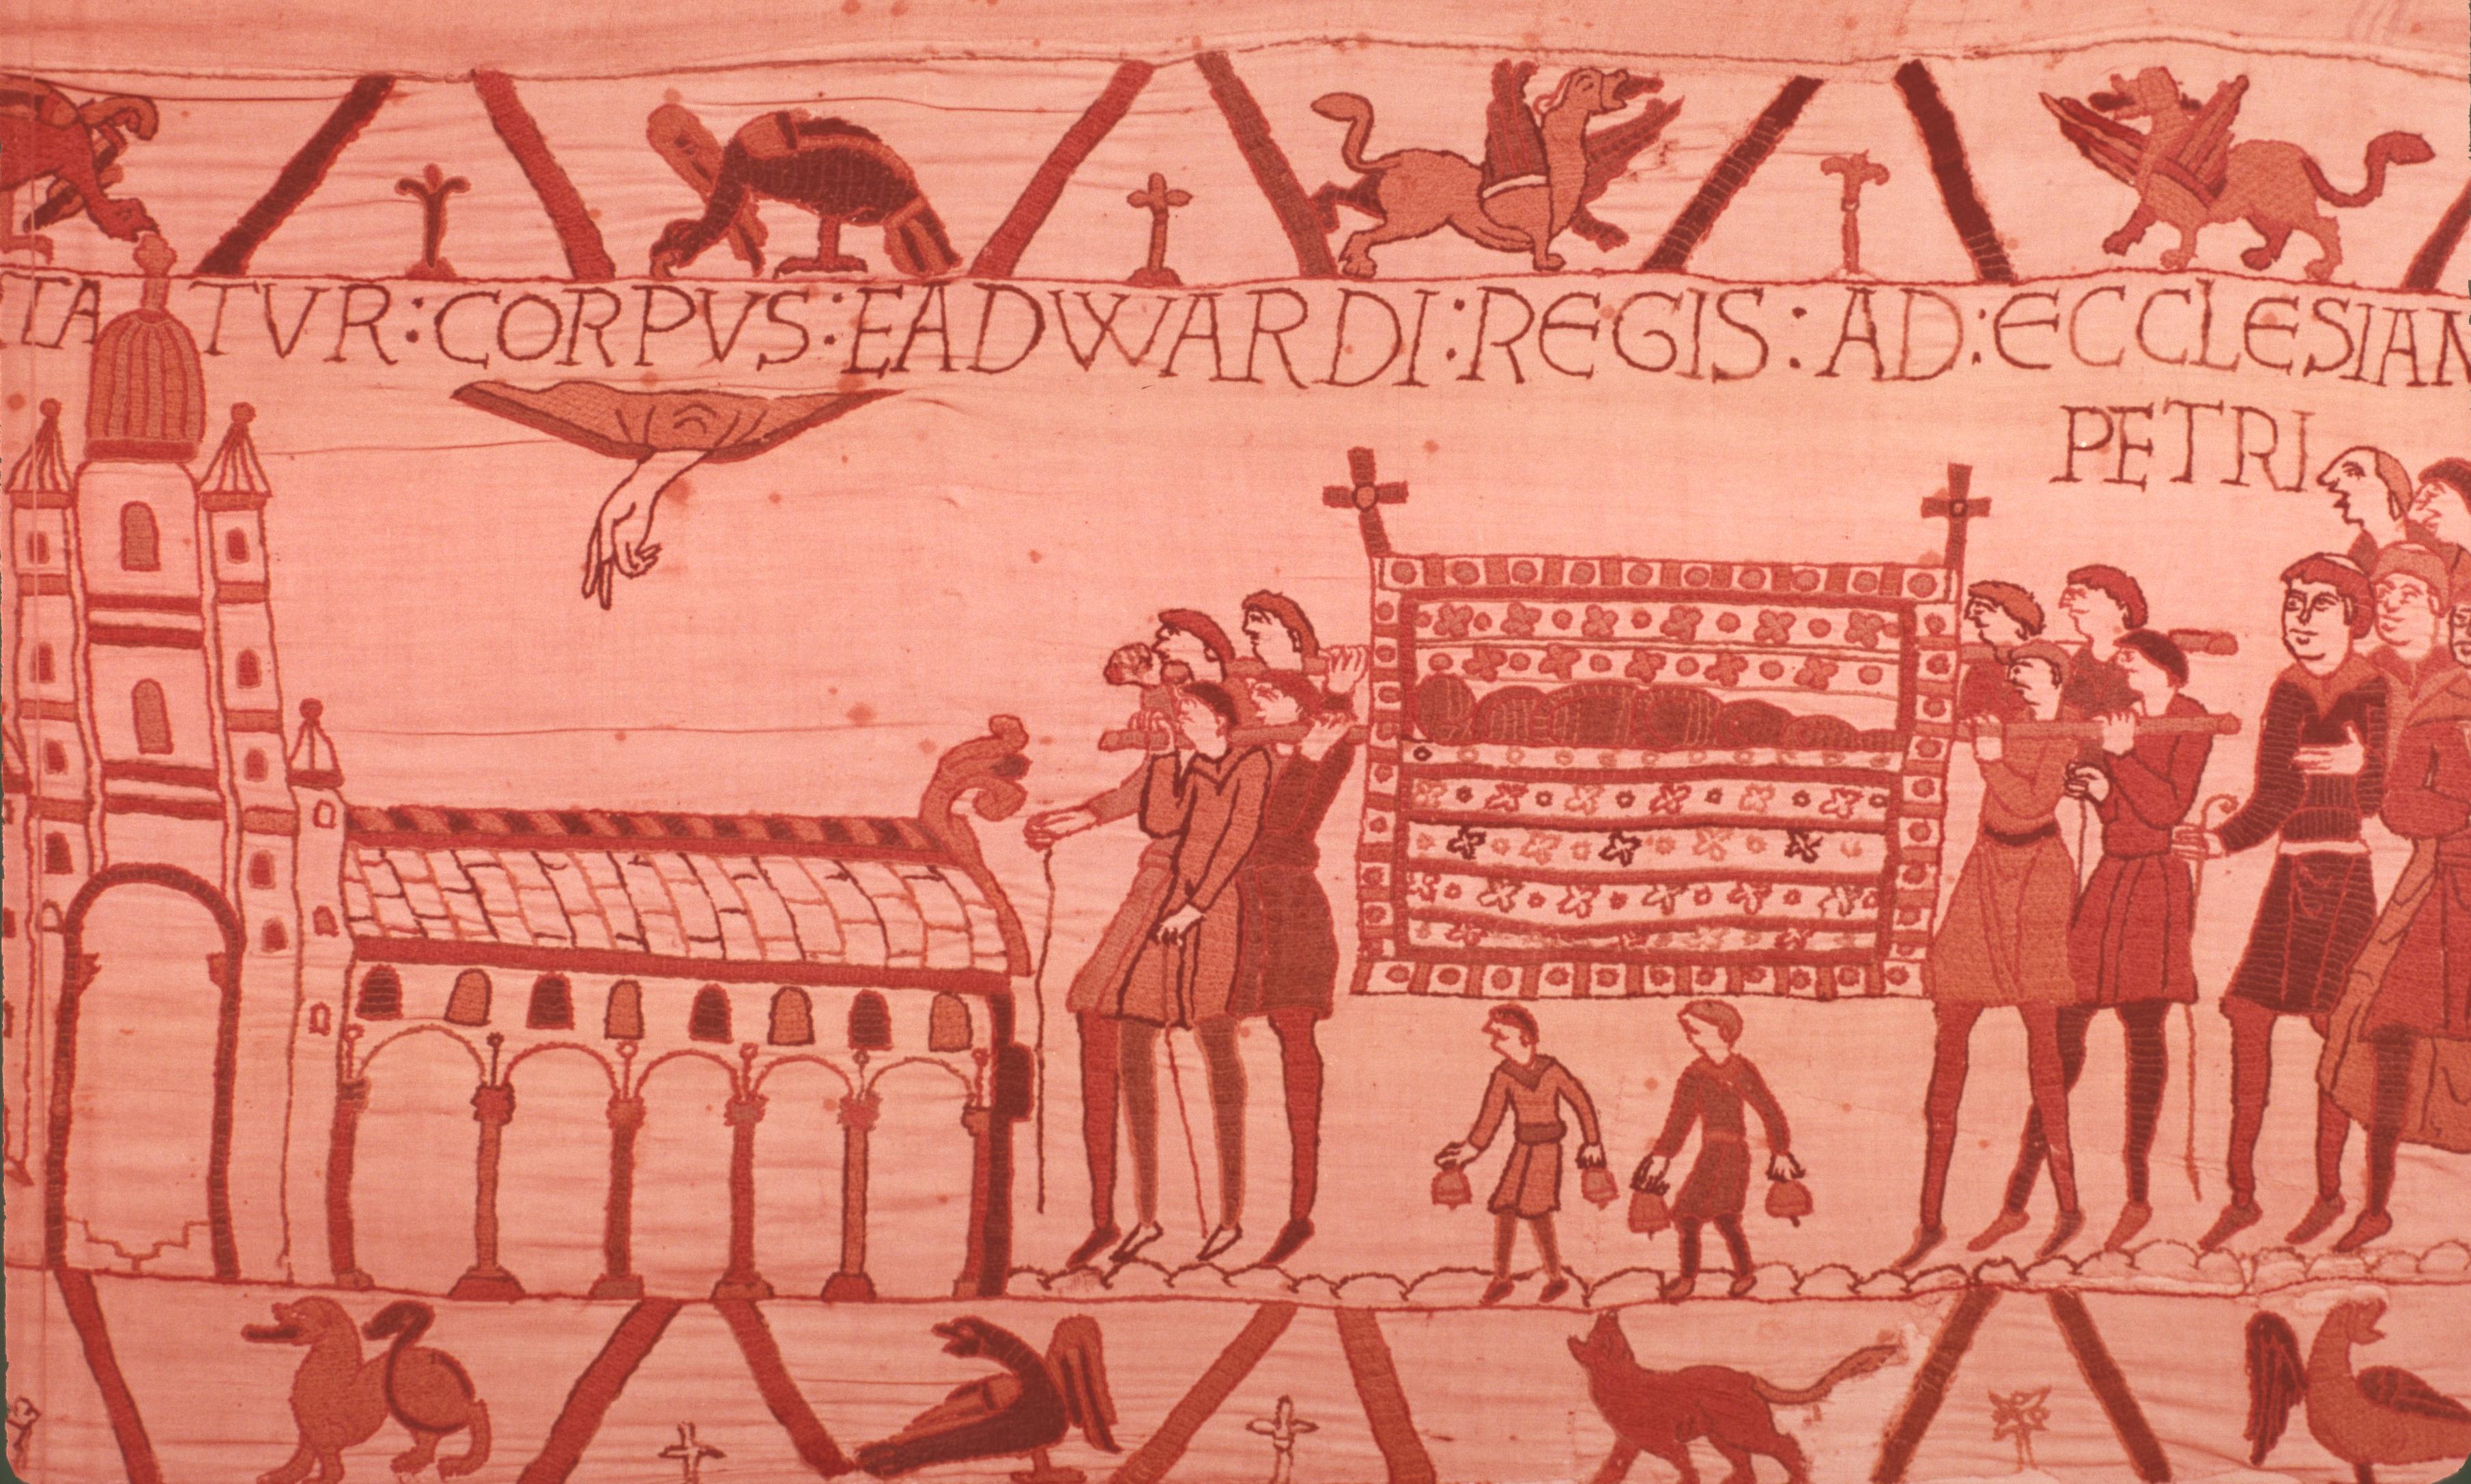
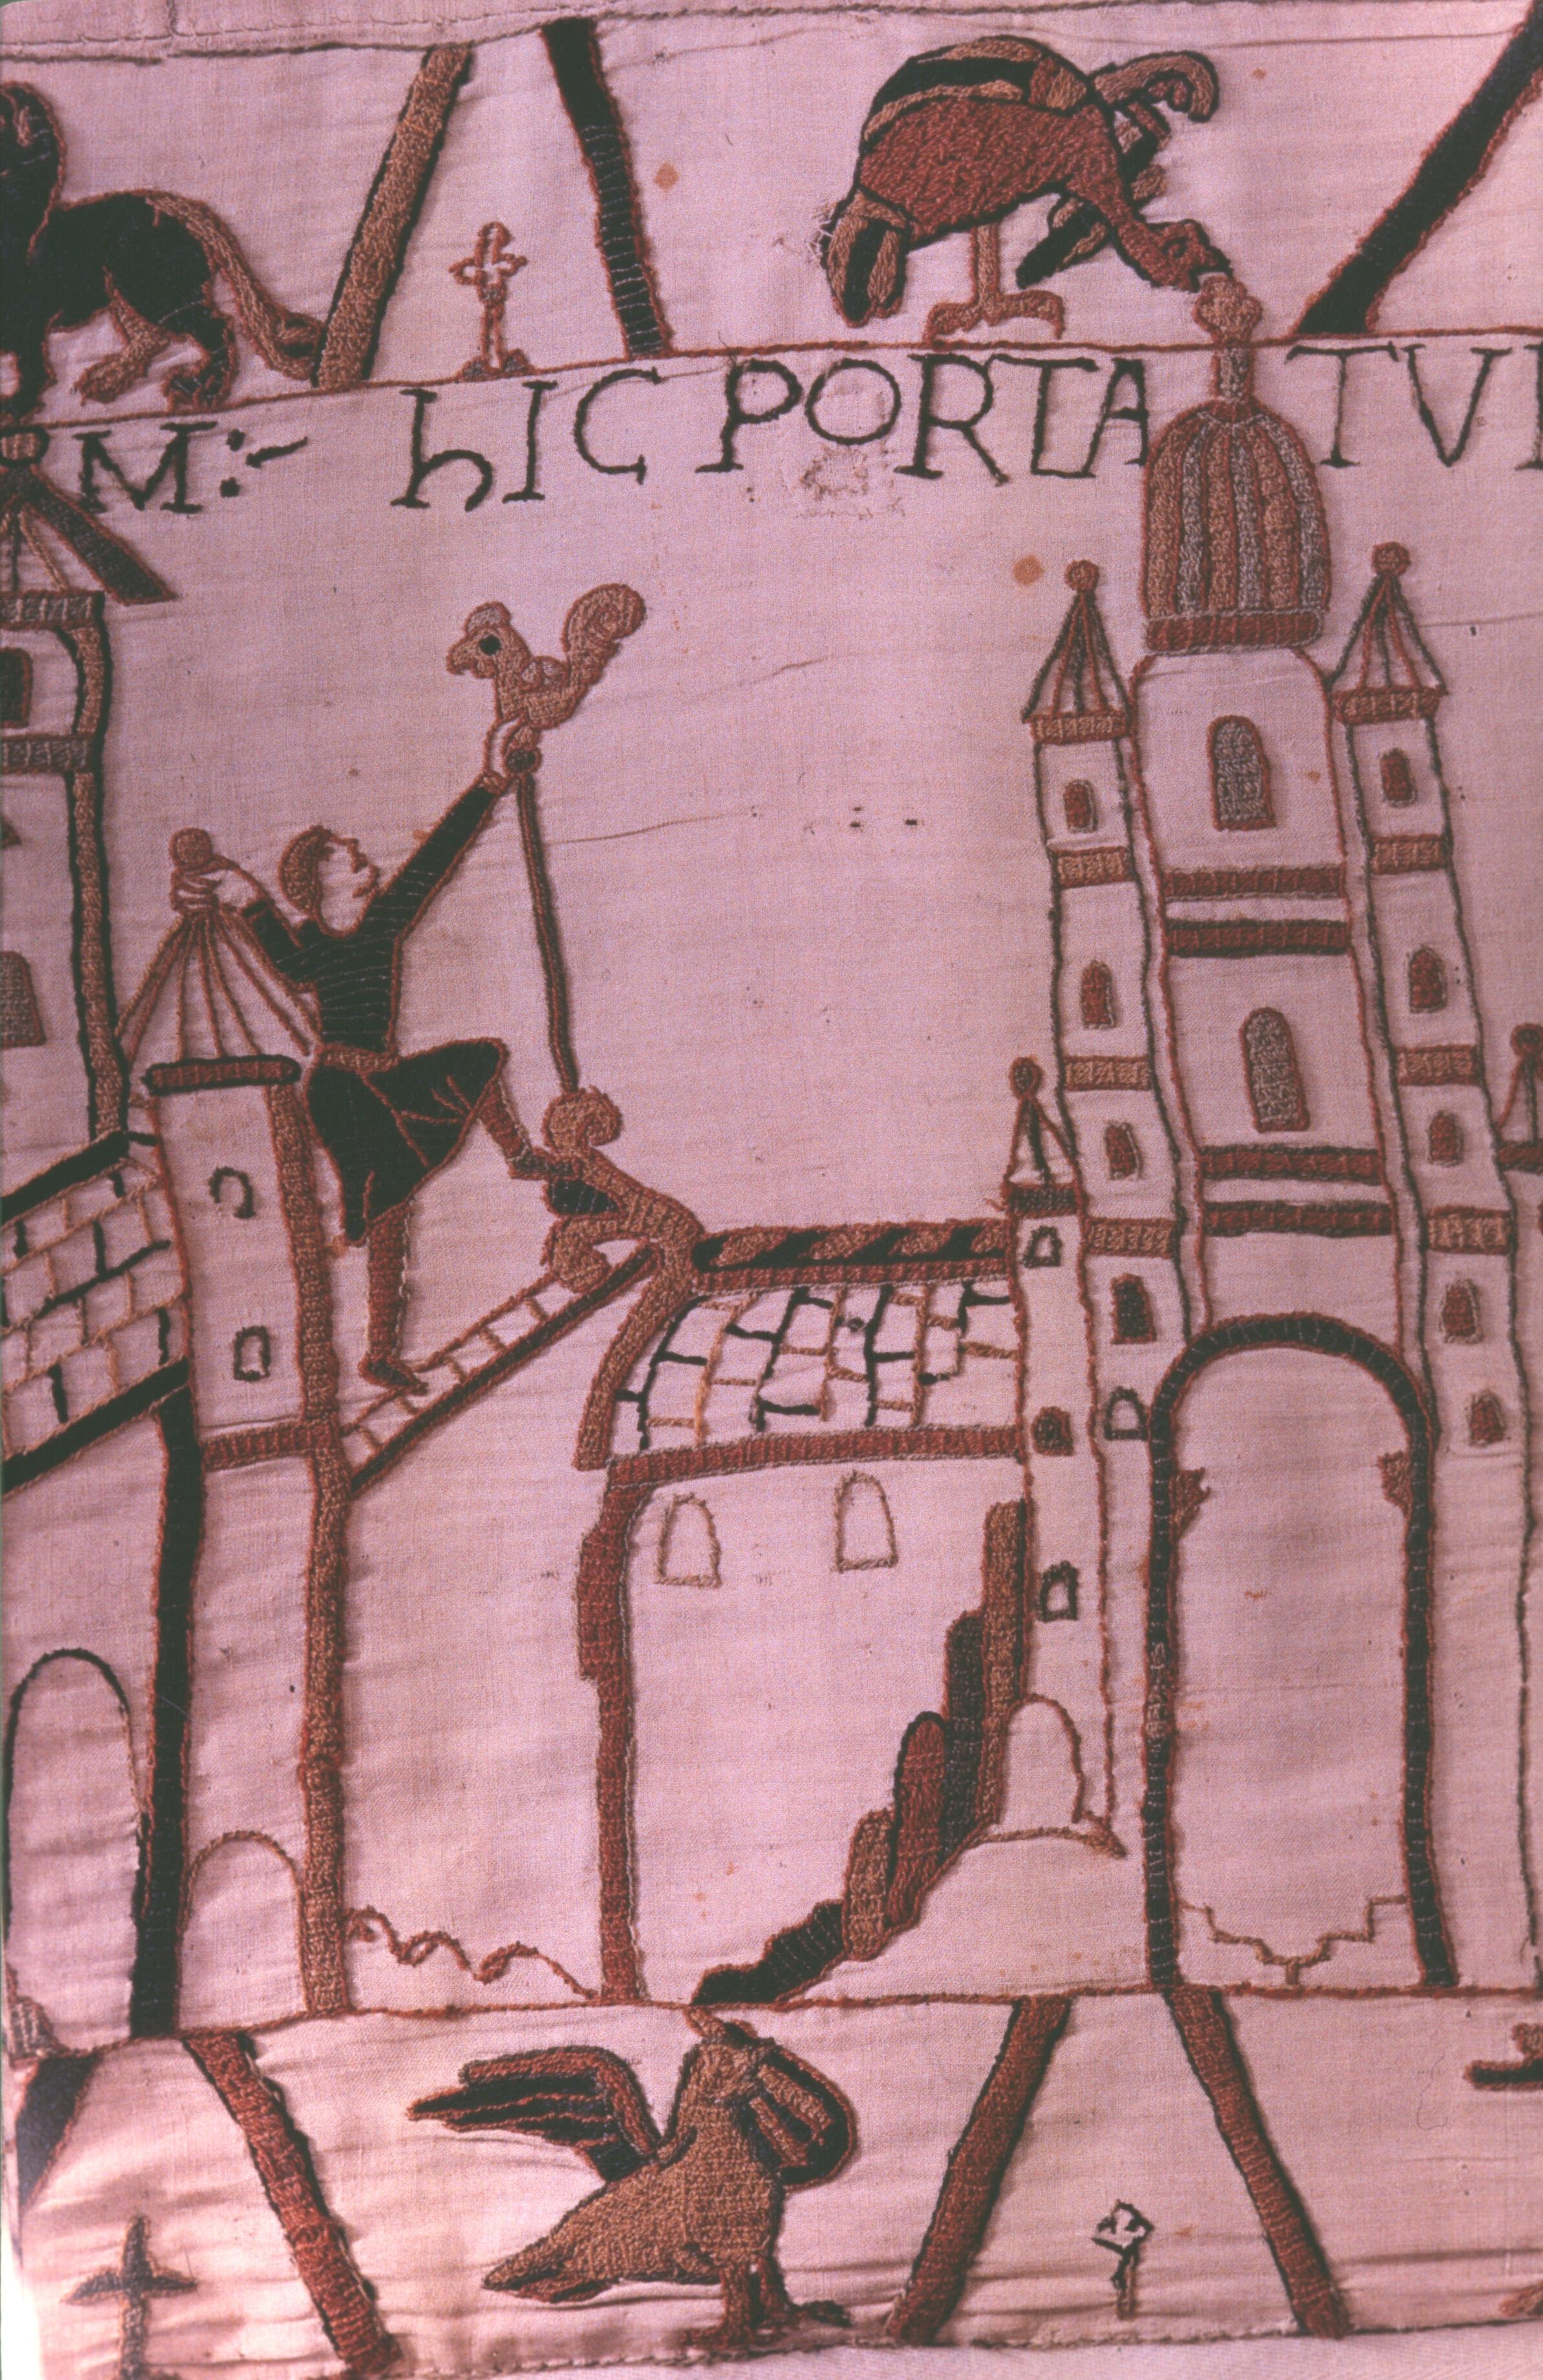
We see the body, accompanied by little boys ringing hand bells, borne by eight pall-bearers (with only eight legs). It is carried, as we read, to the Church of St Peter, on the site of the present day Westminster Abbey. The irony was that this cathedral had only just been consecrated; and that is why you see the hand of God in the sky, and a craftsman still fixing the weathercock (cf. detail in fig. 45):
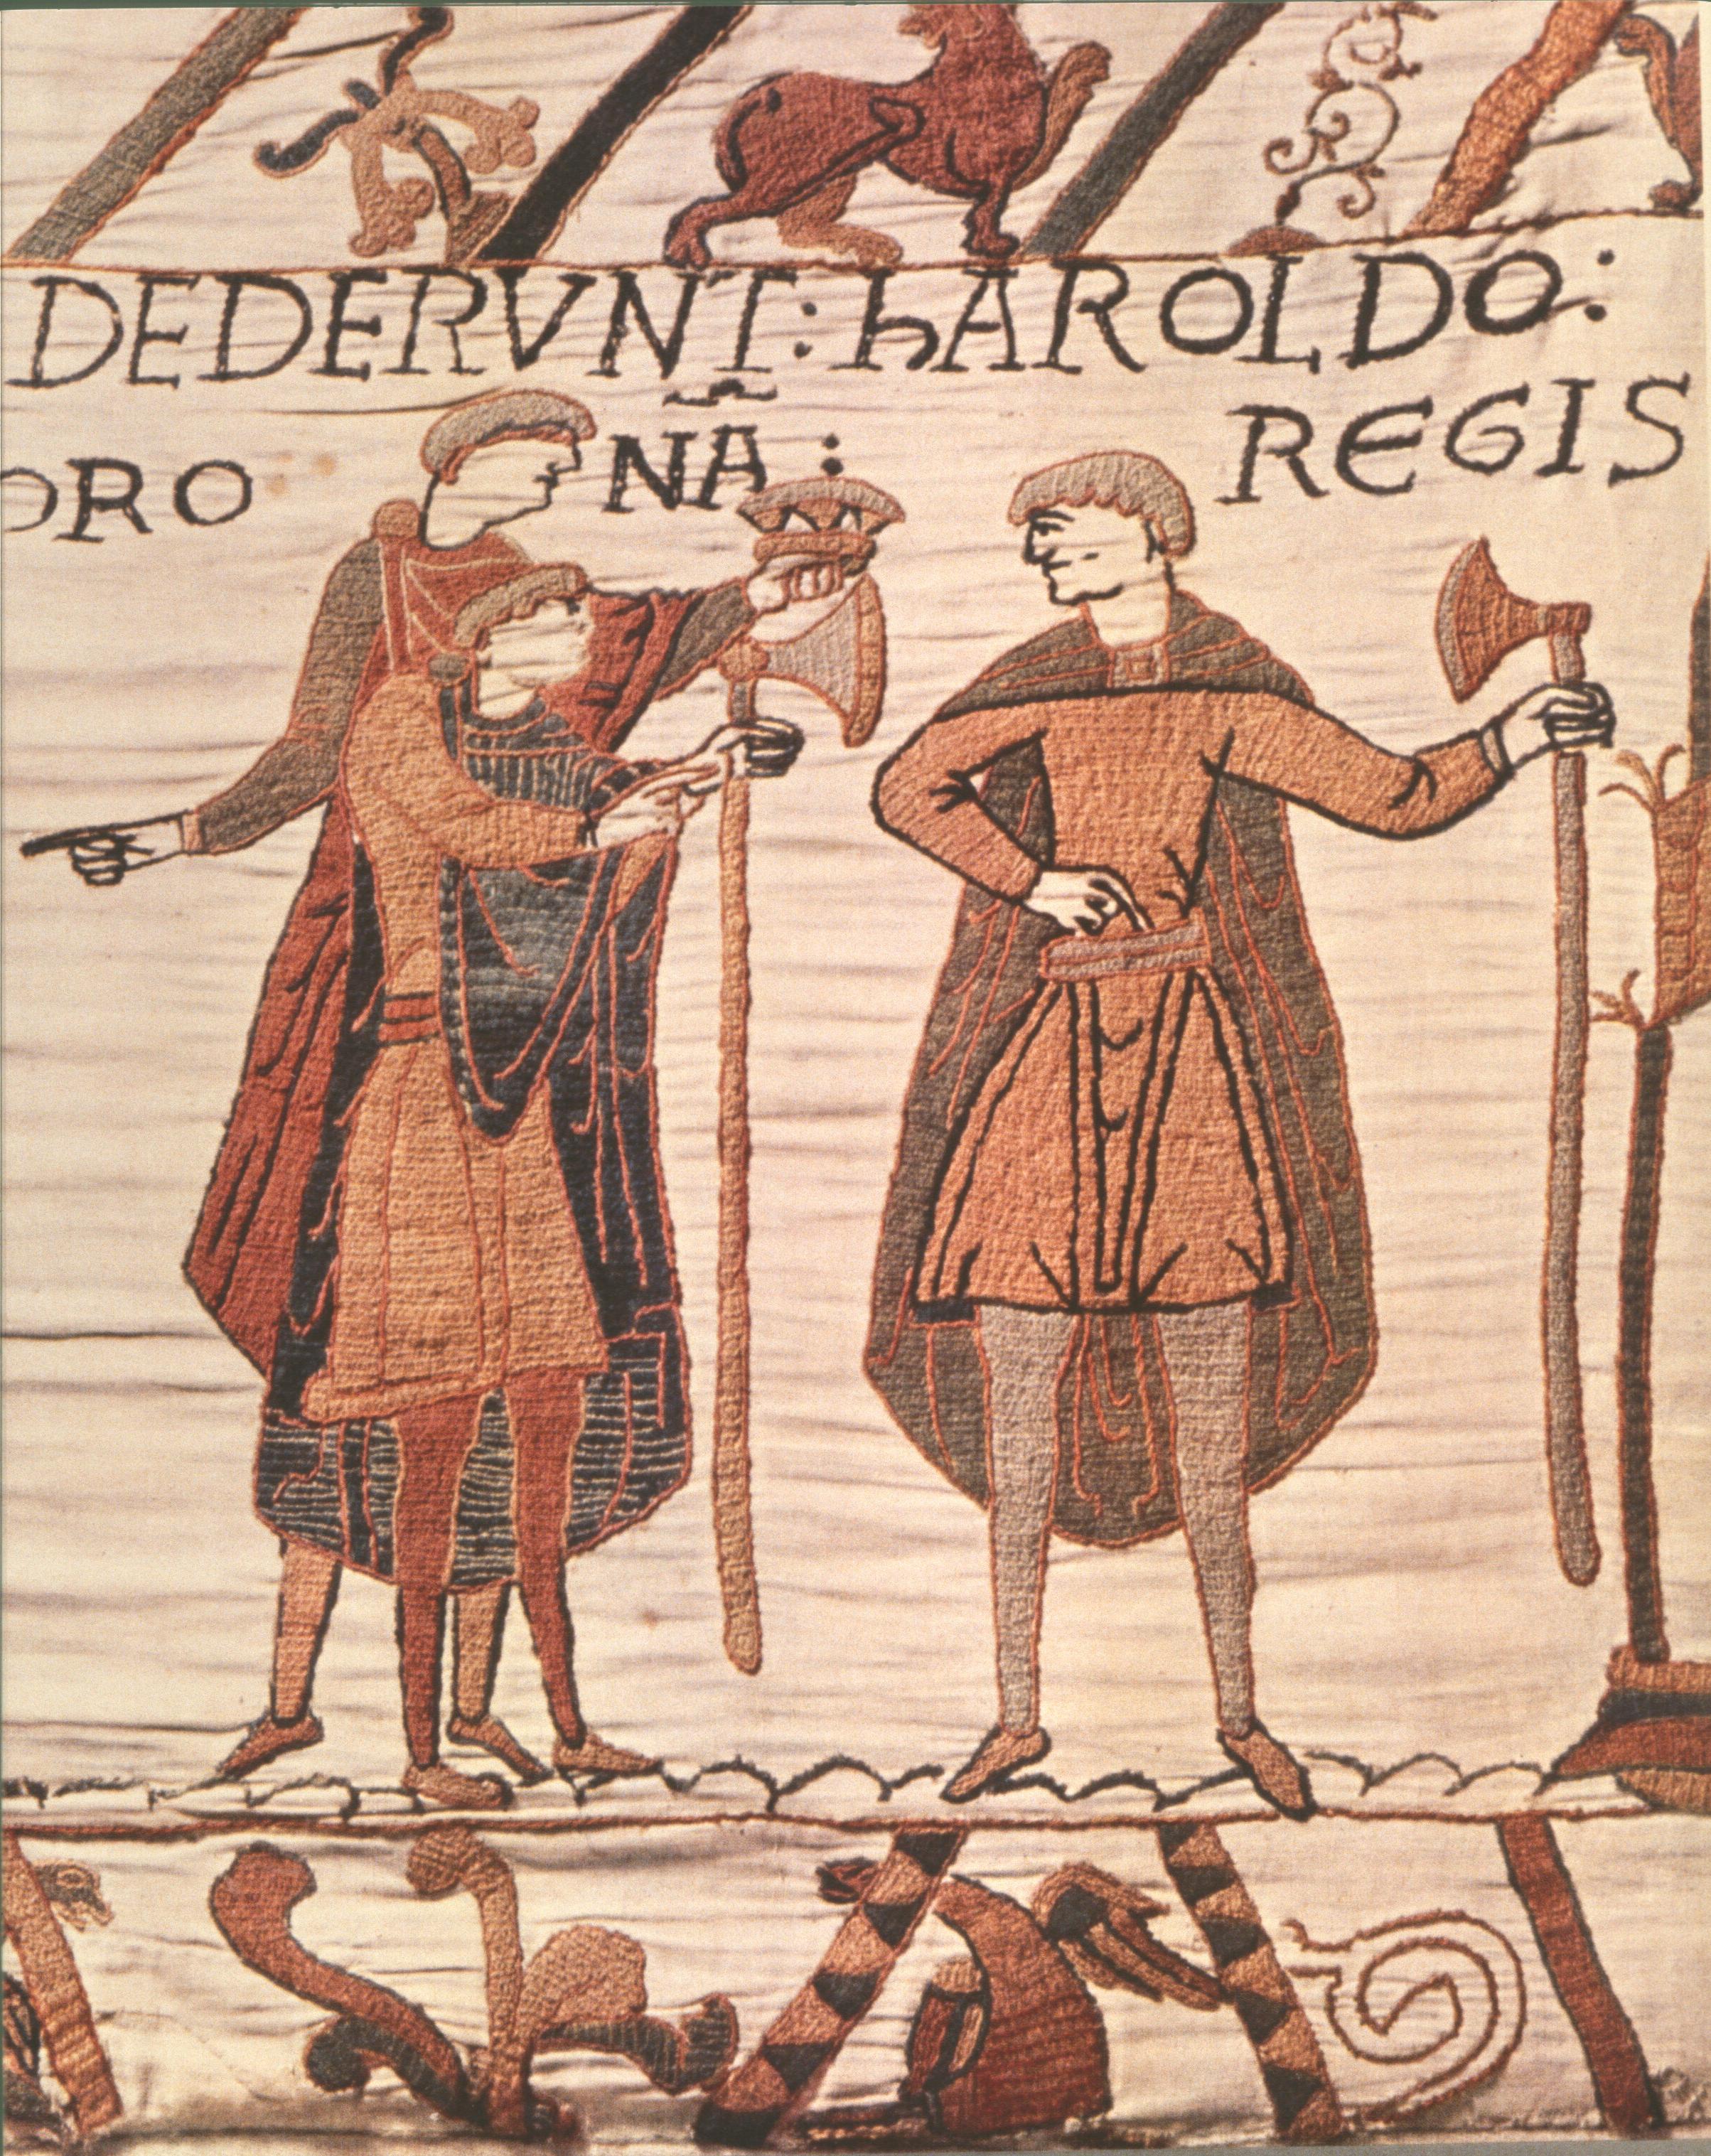
The cathedral was consecrated, for the record, on December 28th 1065. Edward died a week later on January 5th 1066; on the following day, the noblemen offered the crown of England to Earl Harold, as you see in the detail in fig. 46.
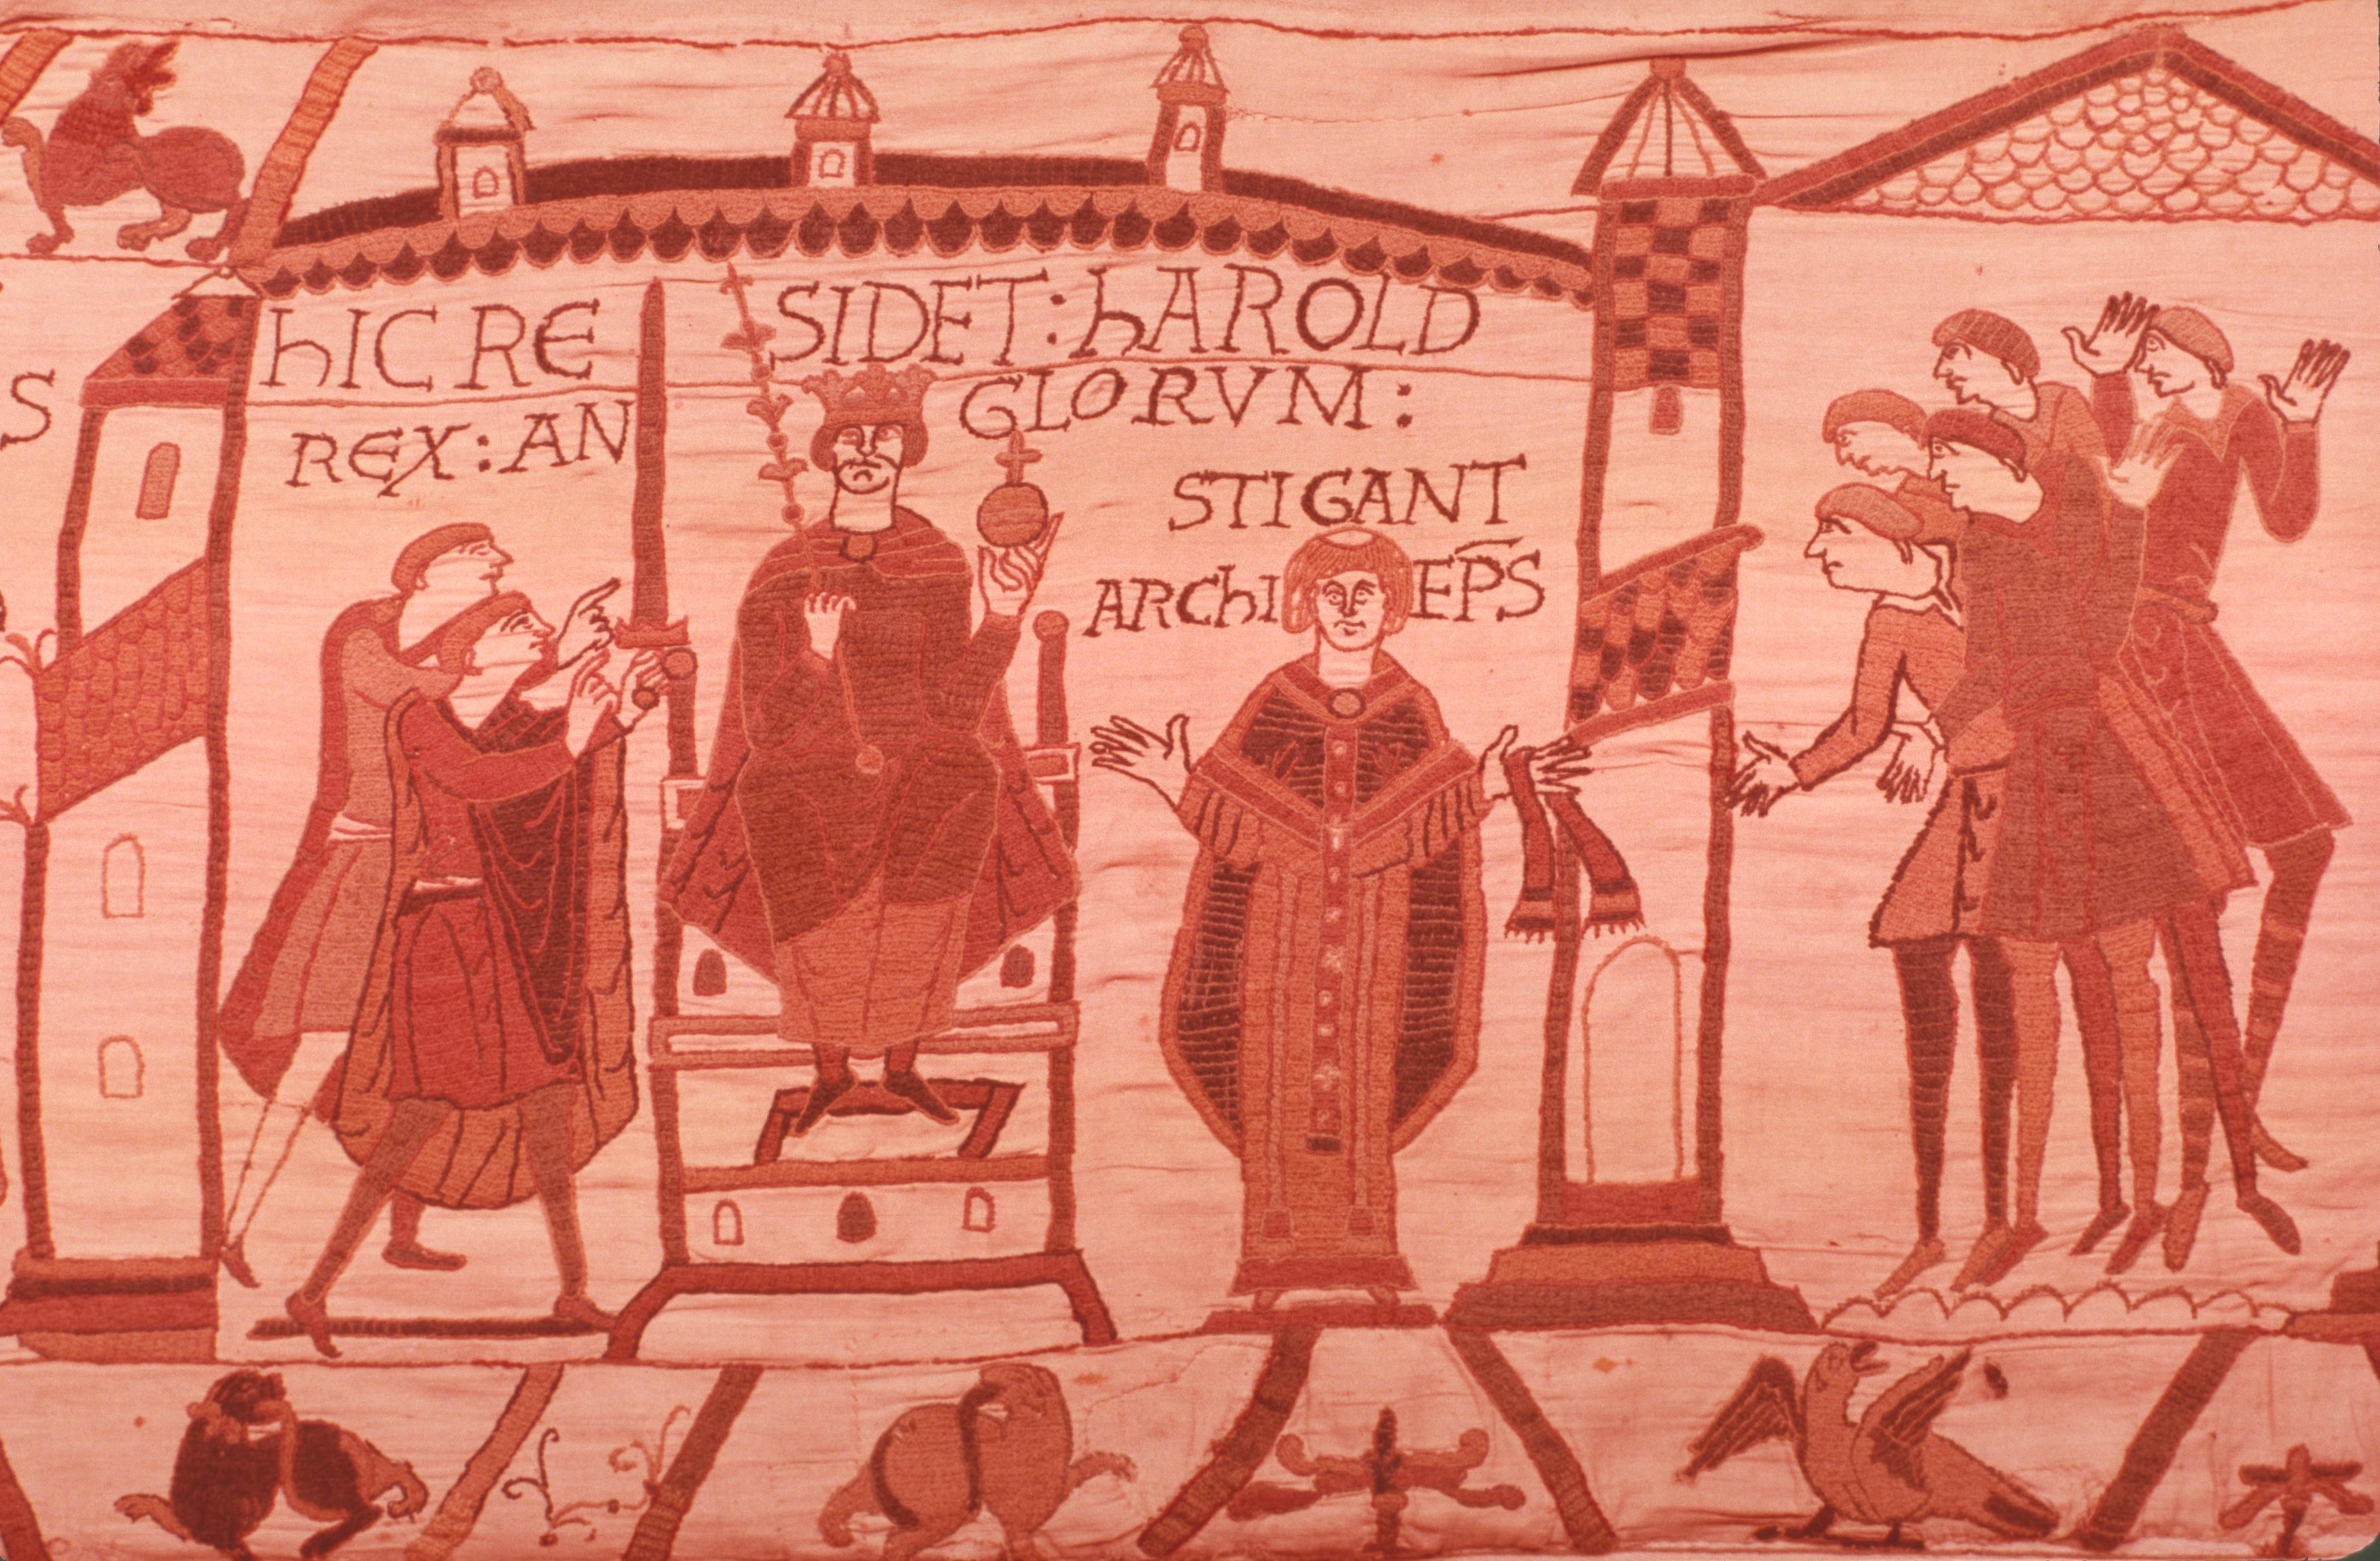
The renegade is not given a moment to enjoy his perfidy, because the artist immediately represents, in the best epic tradition, a portent, a prophecy, and a dream of disaster.
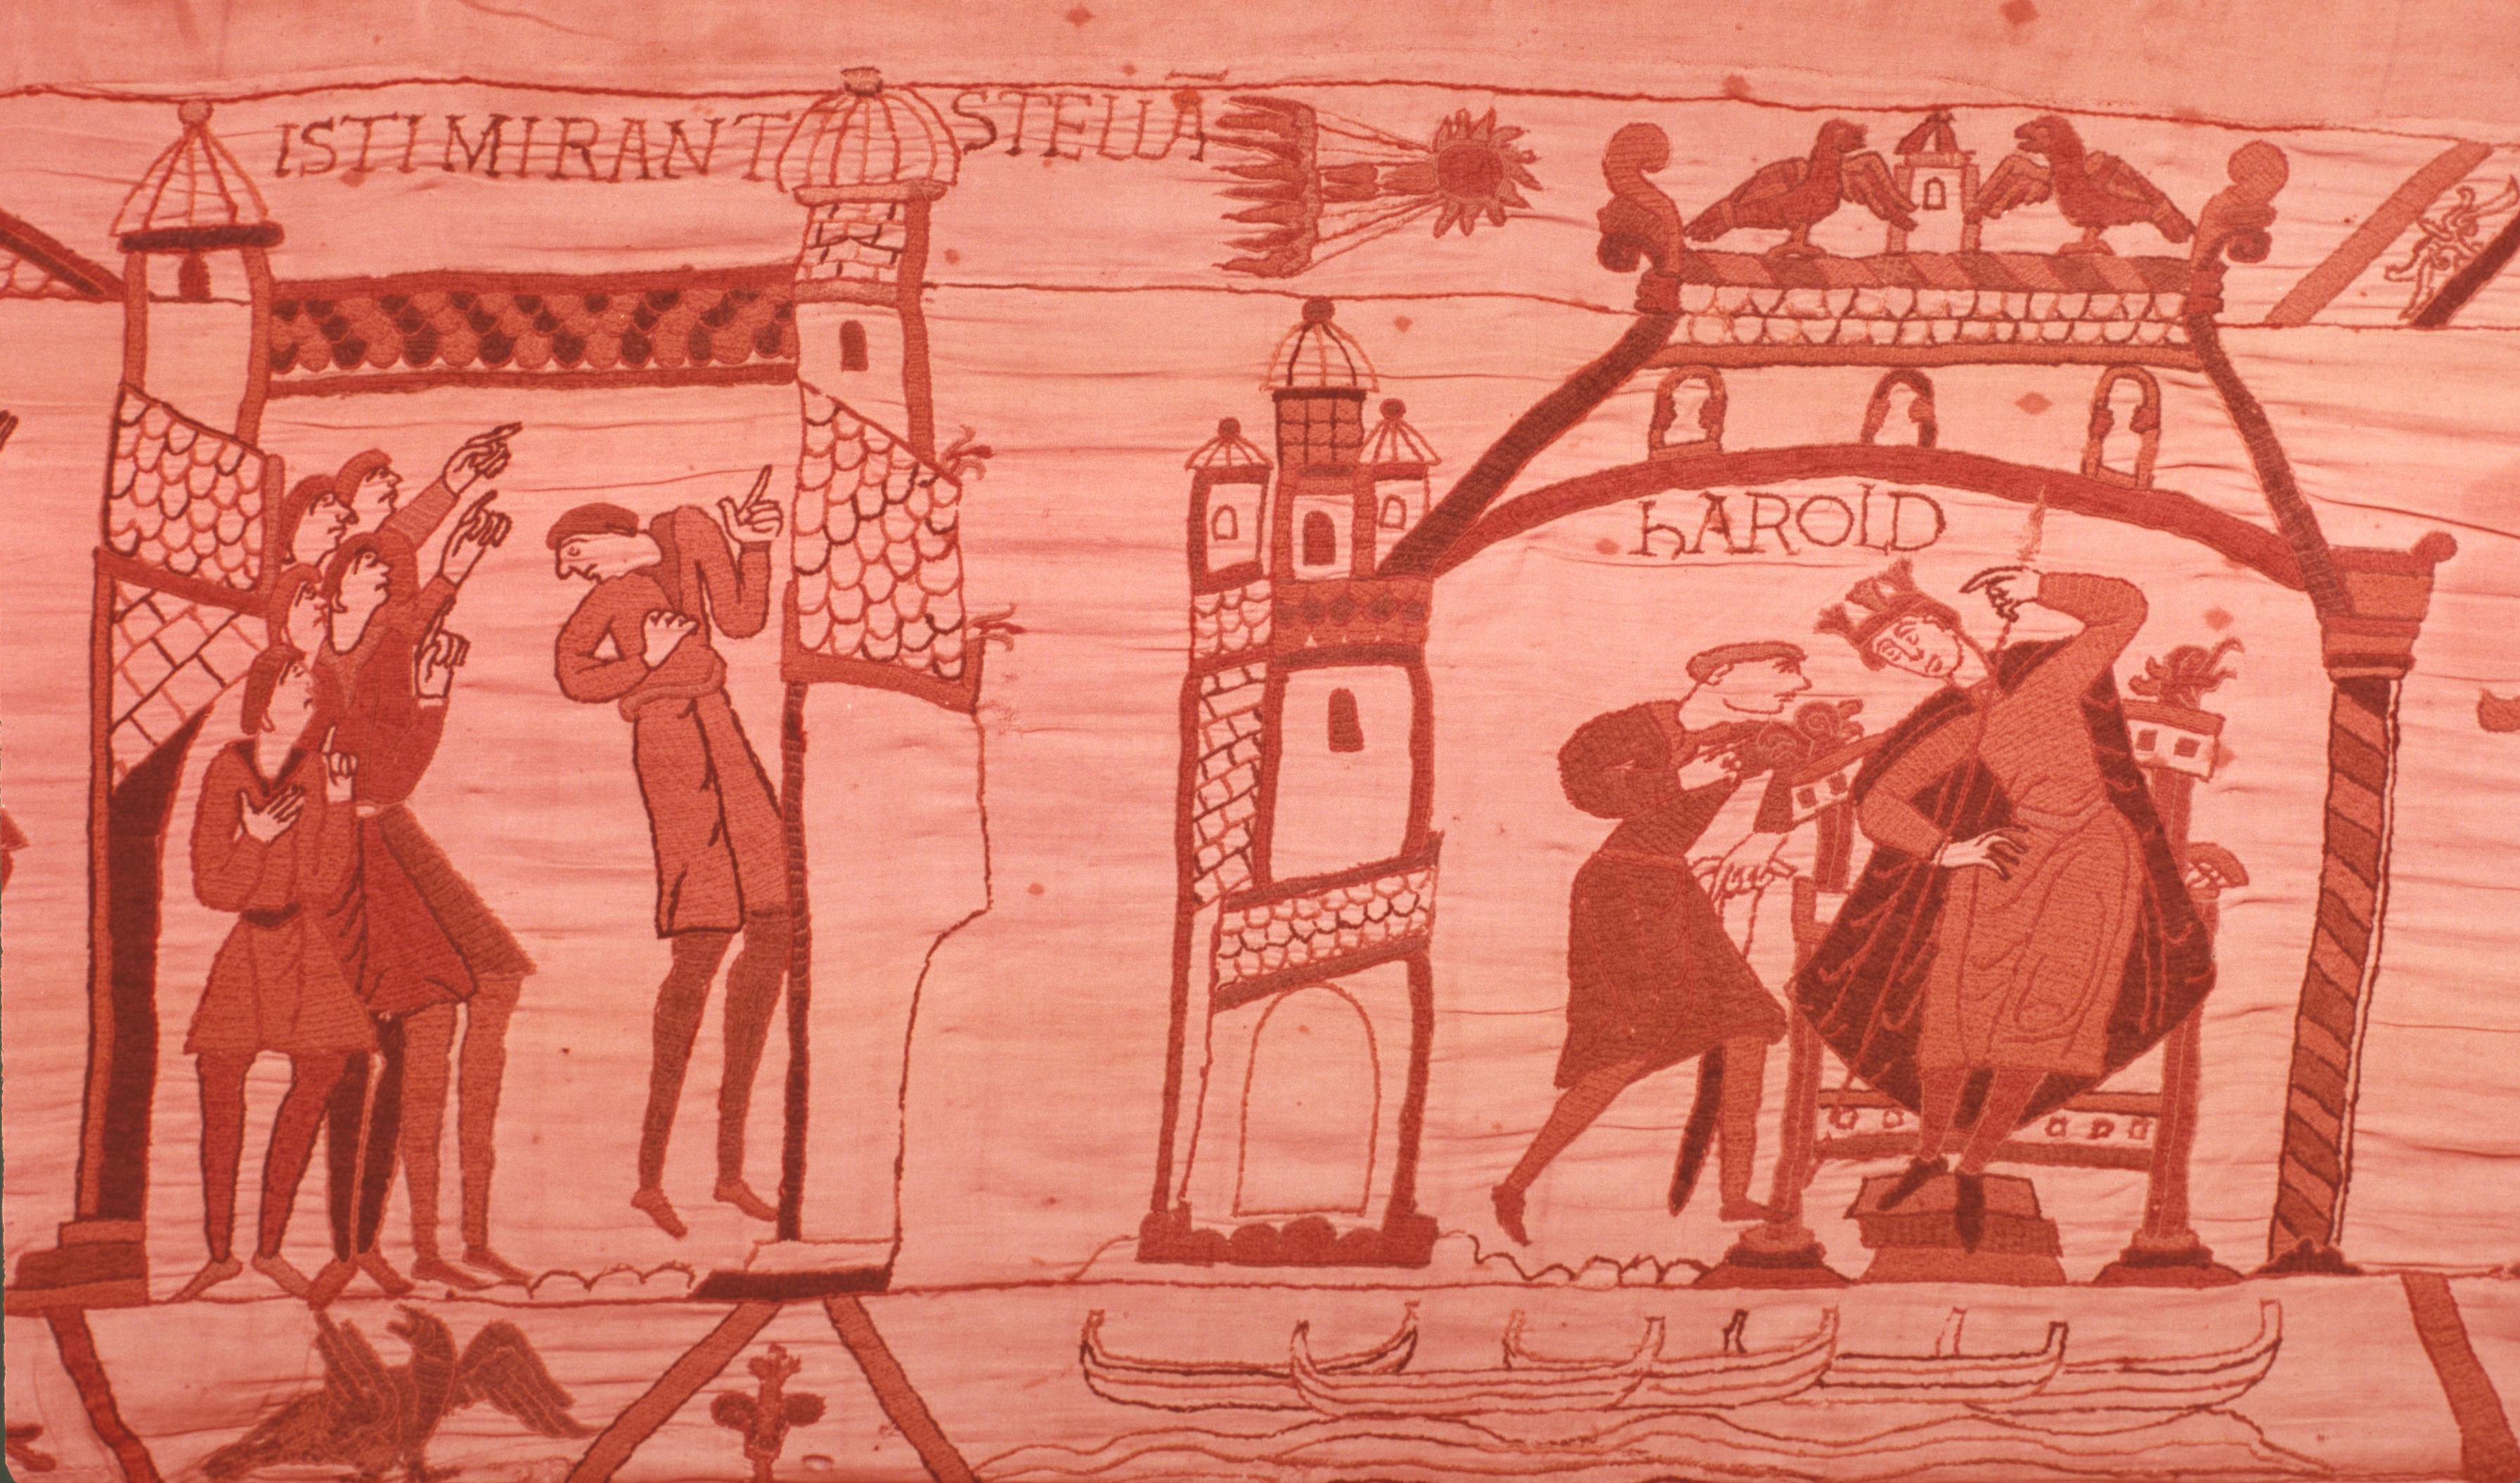
The crowd who acclaimed Harold as their king (in fig. 47) swing round (in fig. 48) and point to the sky, where in the upper margin we see the portentous STELLA—or rather Halley’s comet, complete with tail, which was visible for two or three months in 1066—which appeared on cue to proclaim the coming downfall of a kingdom. An astrologer rushes to interpret the omen to Harold (fig. 48), who looks both guilty and terrified on hearing what is obviously a prophecy of doom. And in a much admired stroke of genius, our artist uses the lower margin of the embroidery to hint at the usurper’s thoughts or dreams, by showing the ghostly outlines of an invasion fleet stealing across from Normandy.
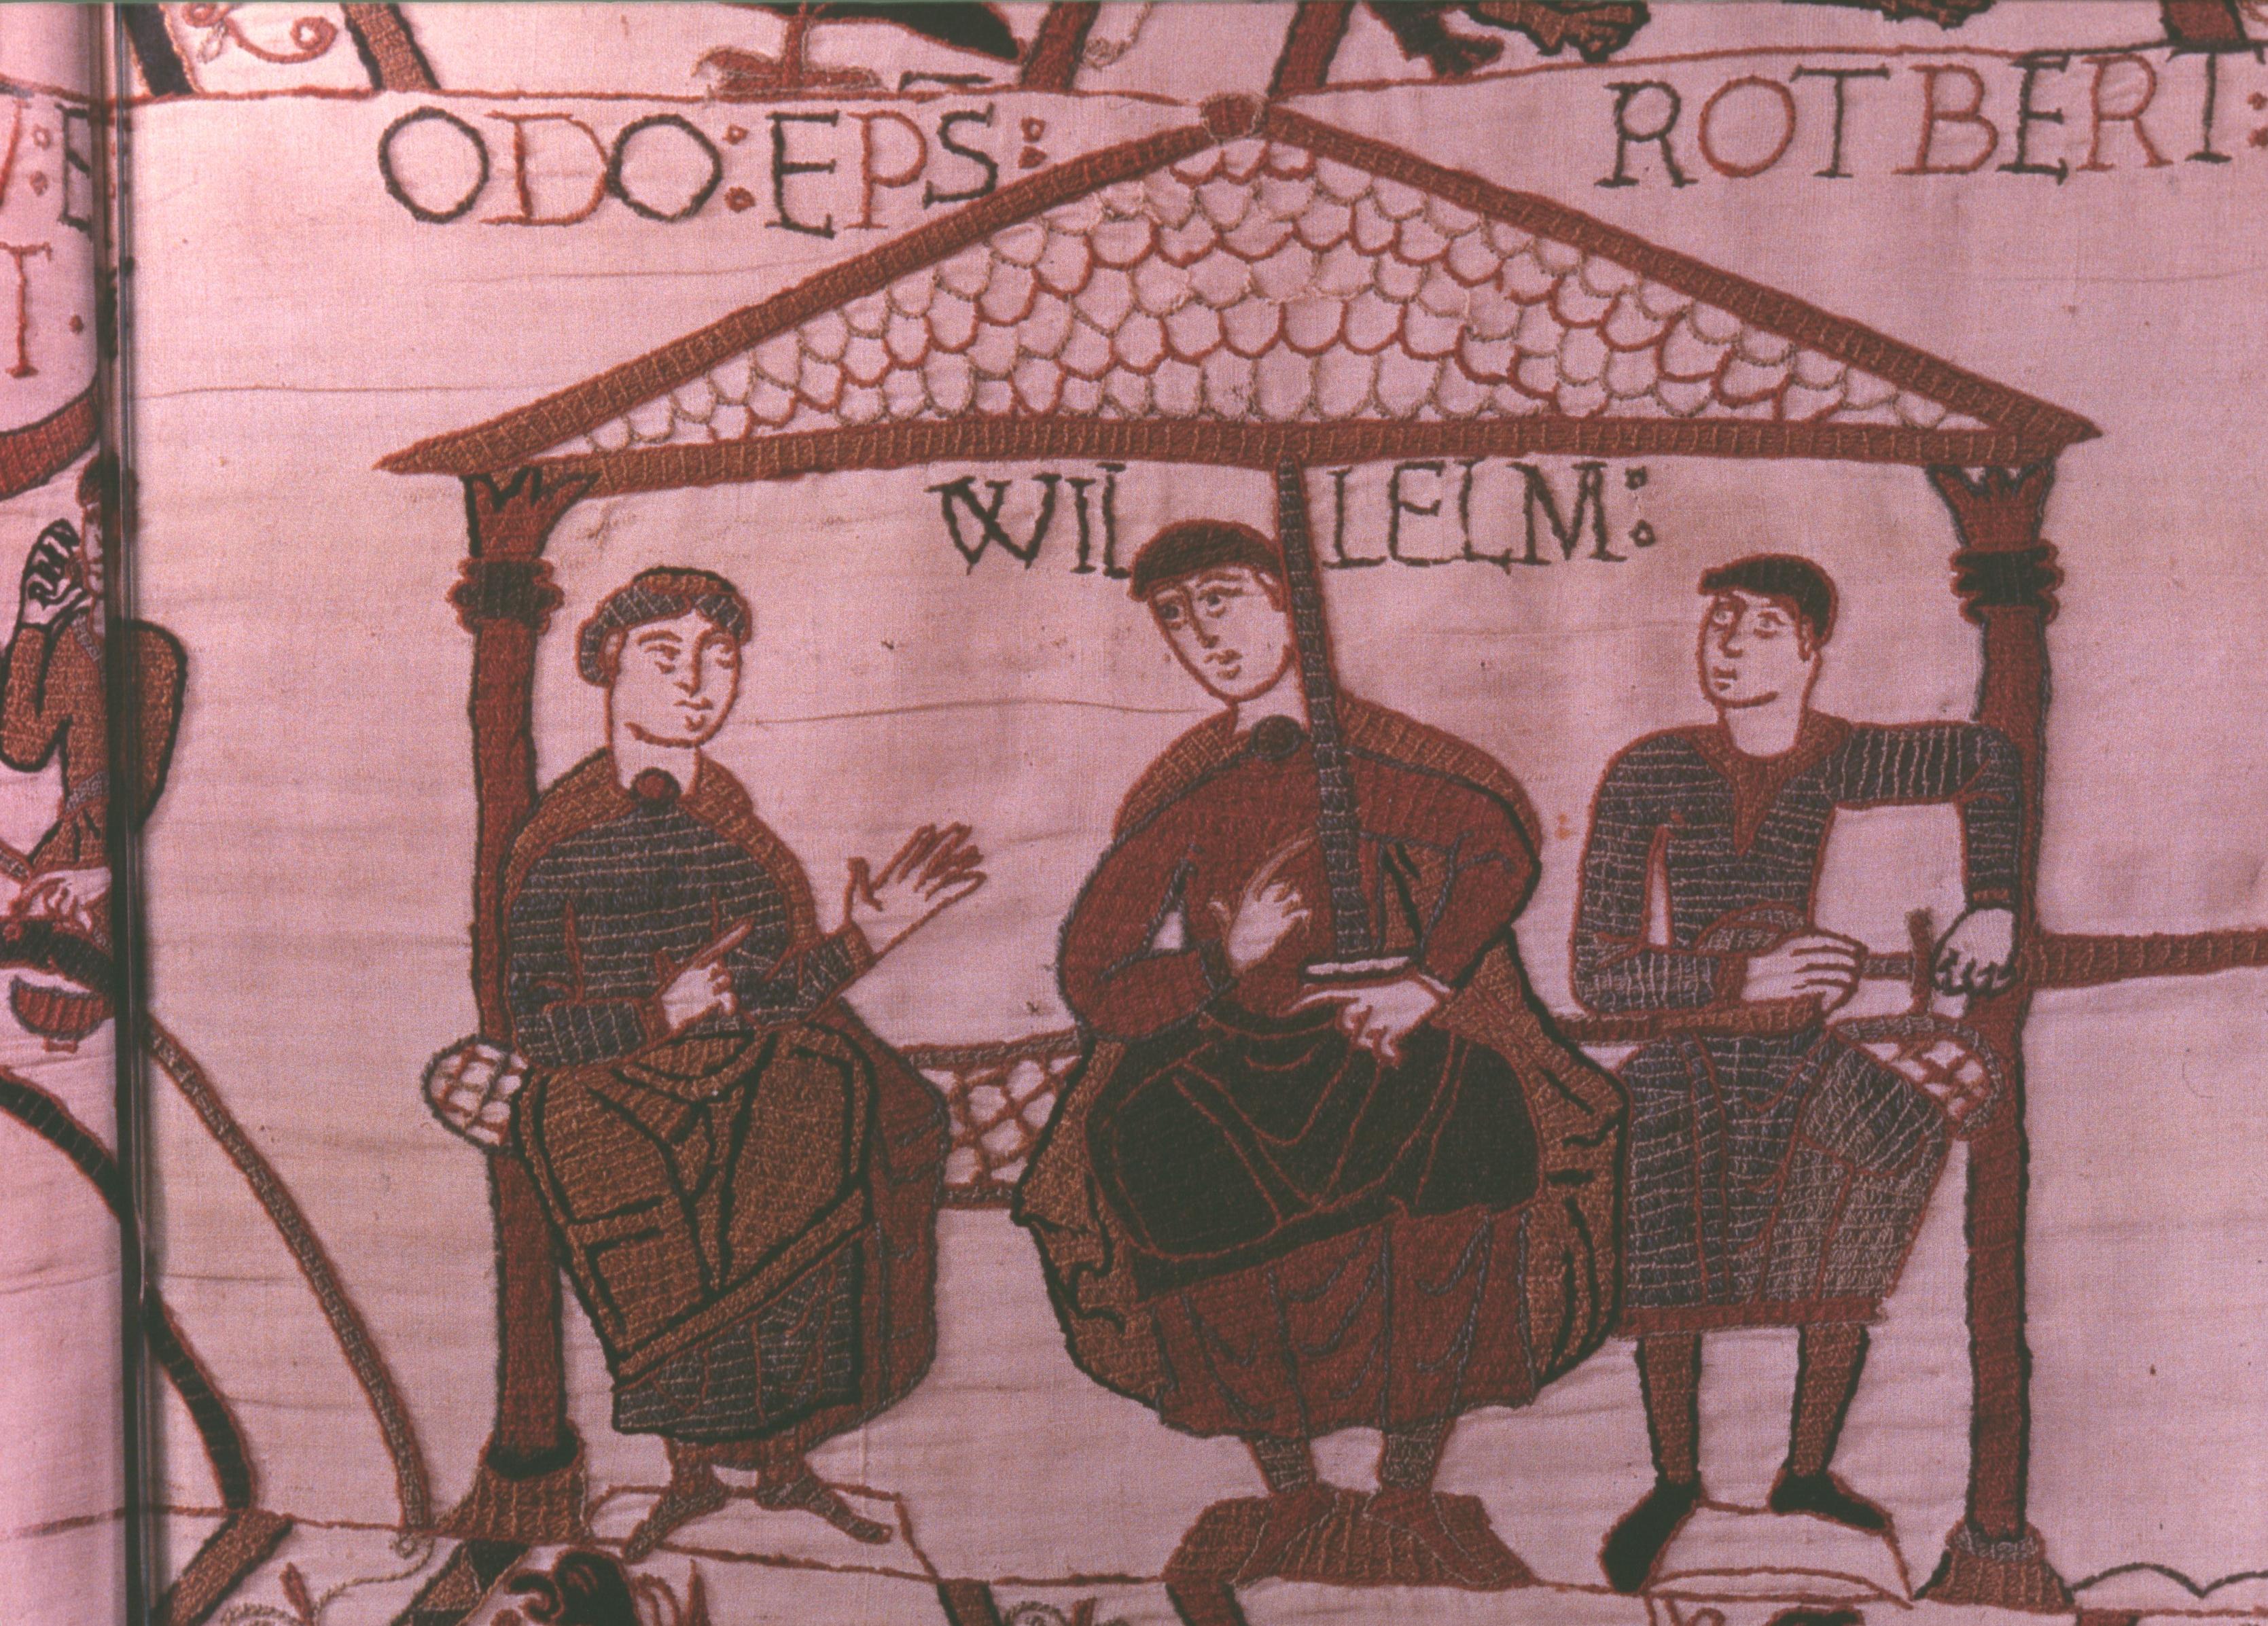
A single ‘tree divider’ marks the beginning of Chapter Five, which I call ‘The Taskforce’. This is the longest of the chapters, and the one with the most extensive single sweep of narrative. News of Harold’s treachery is brought by a skeleton crew, and the usual messenger figure breaks the news to William (fig. 49 top left), seated beside his half-brother Bishop Odo.
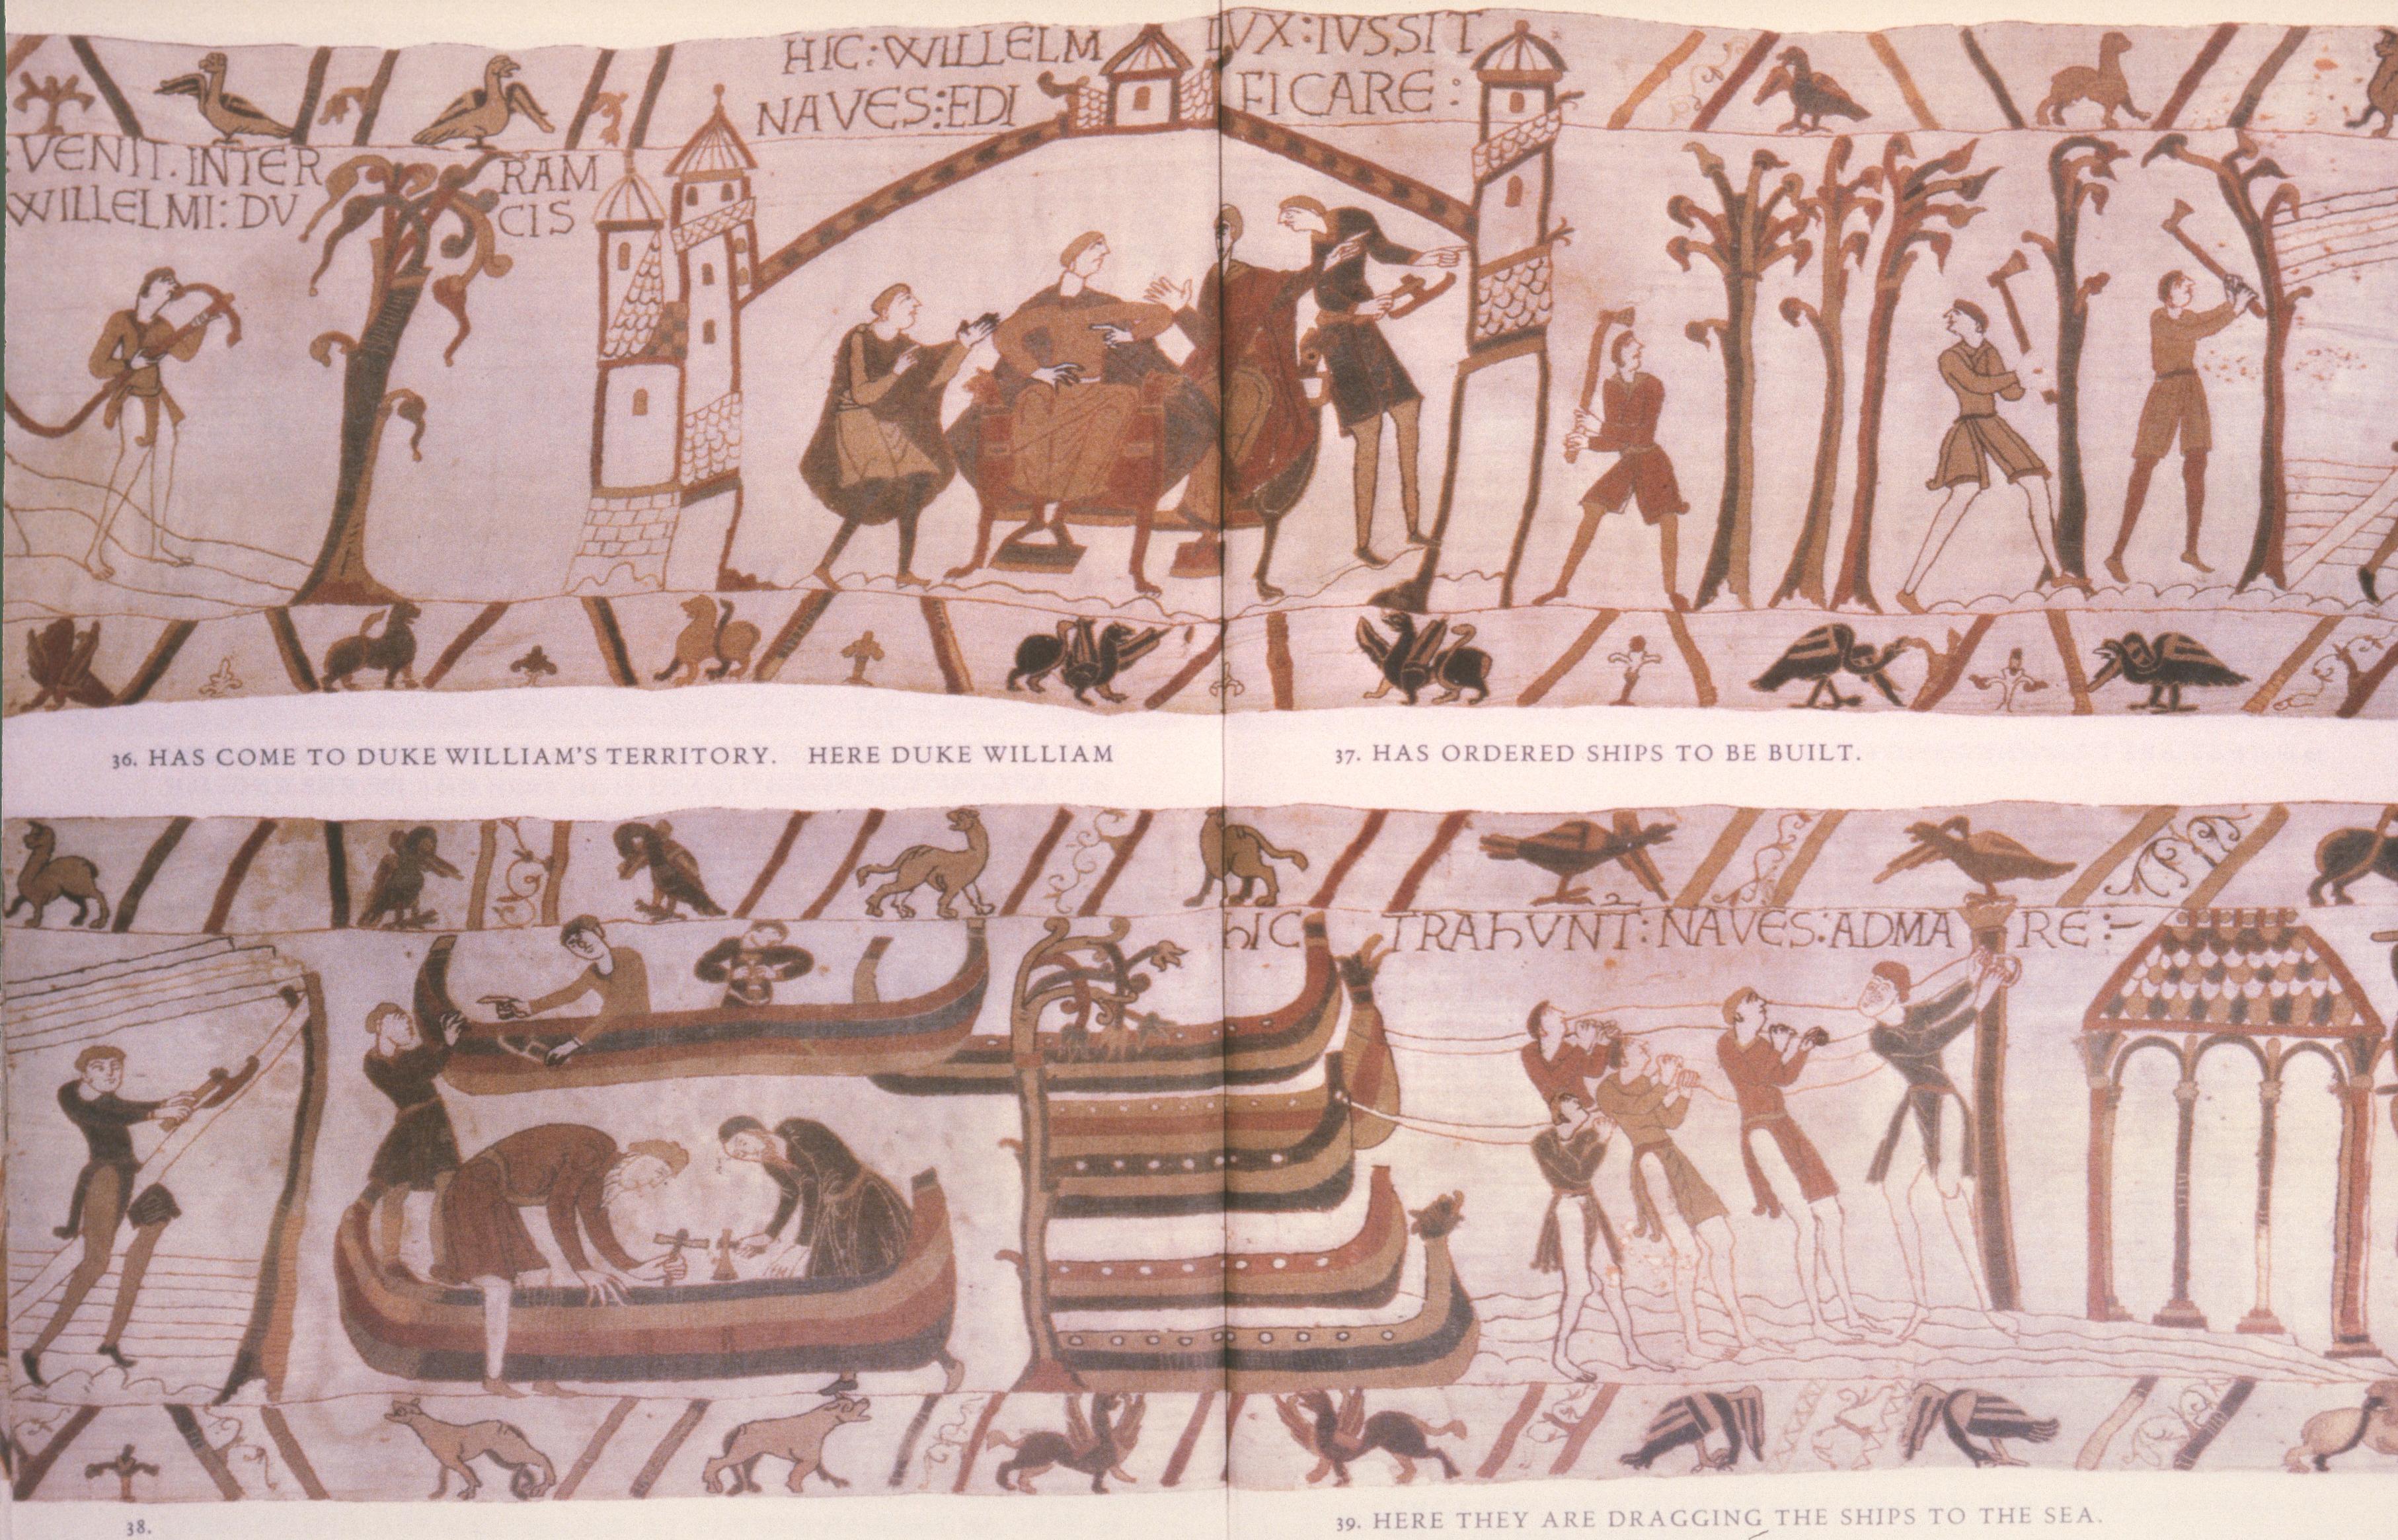

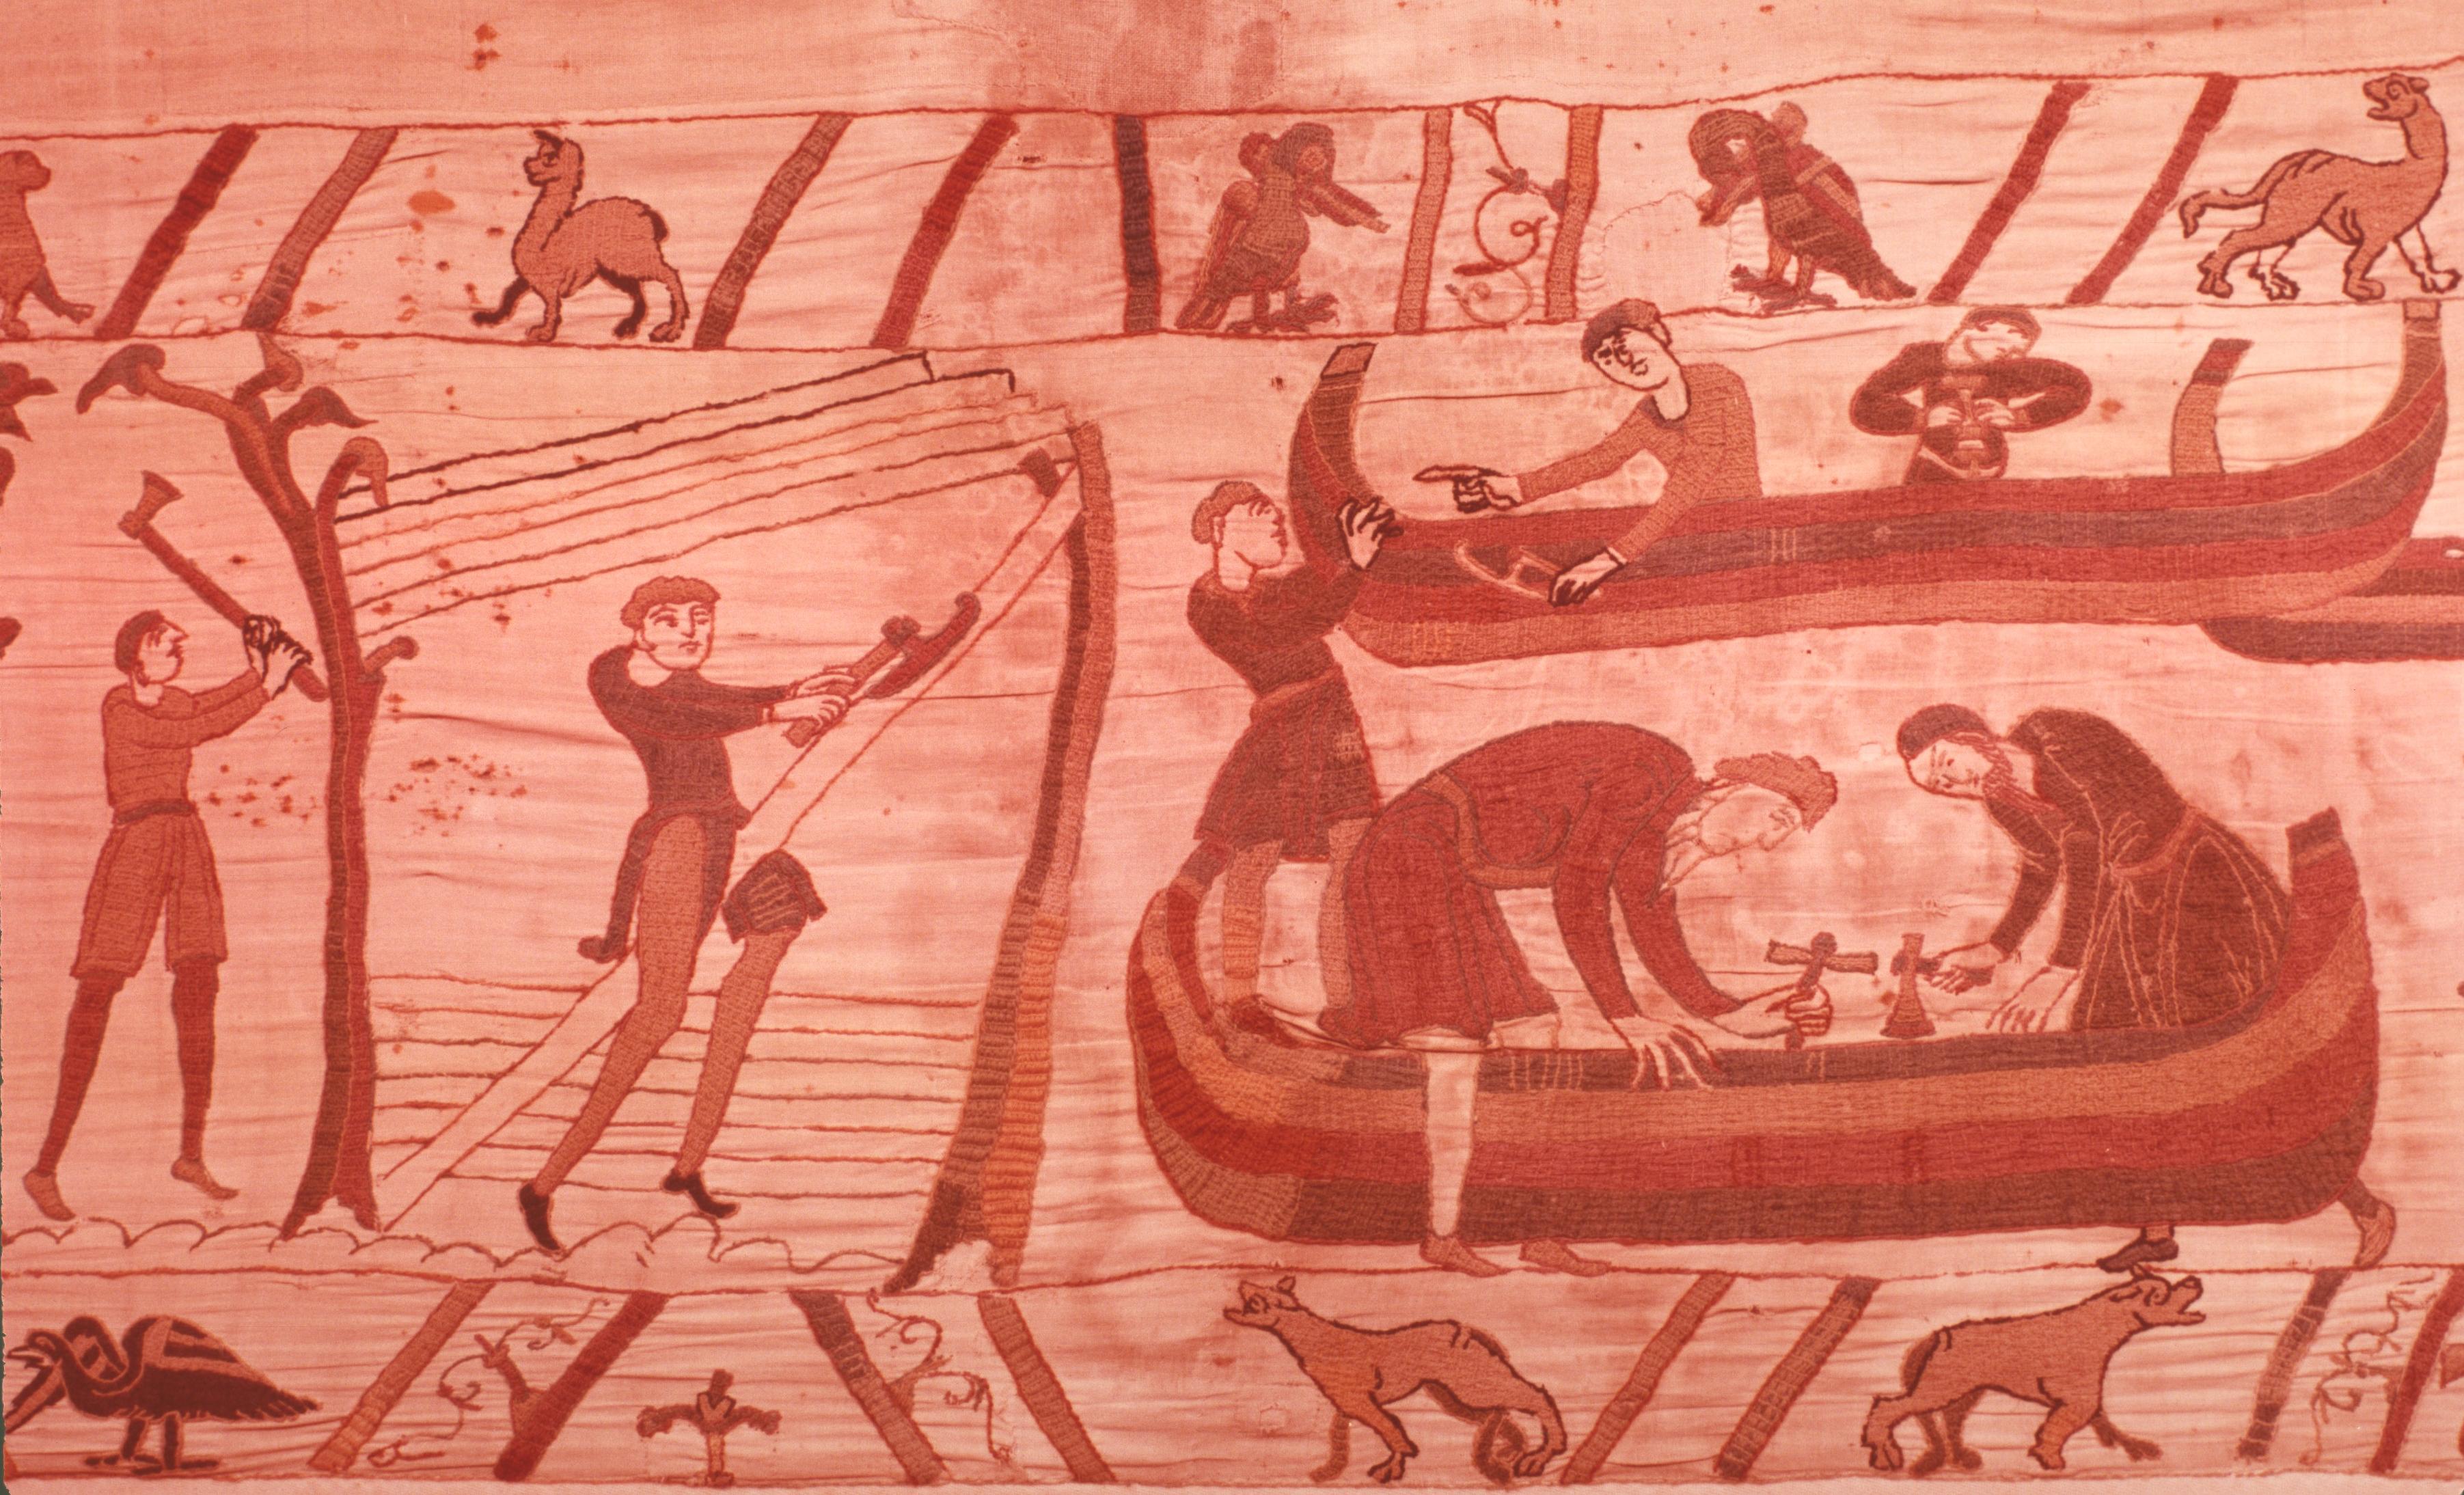
Then a party from the ‘Pioneer Corps’ strip off their hose (fig. 51 right), plant a great pole with a pulley on it out in the sea, and winch the finished boats down to the water, pulling in the opposite direction, as you can see.
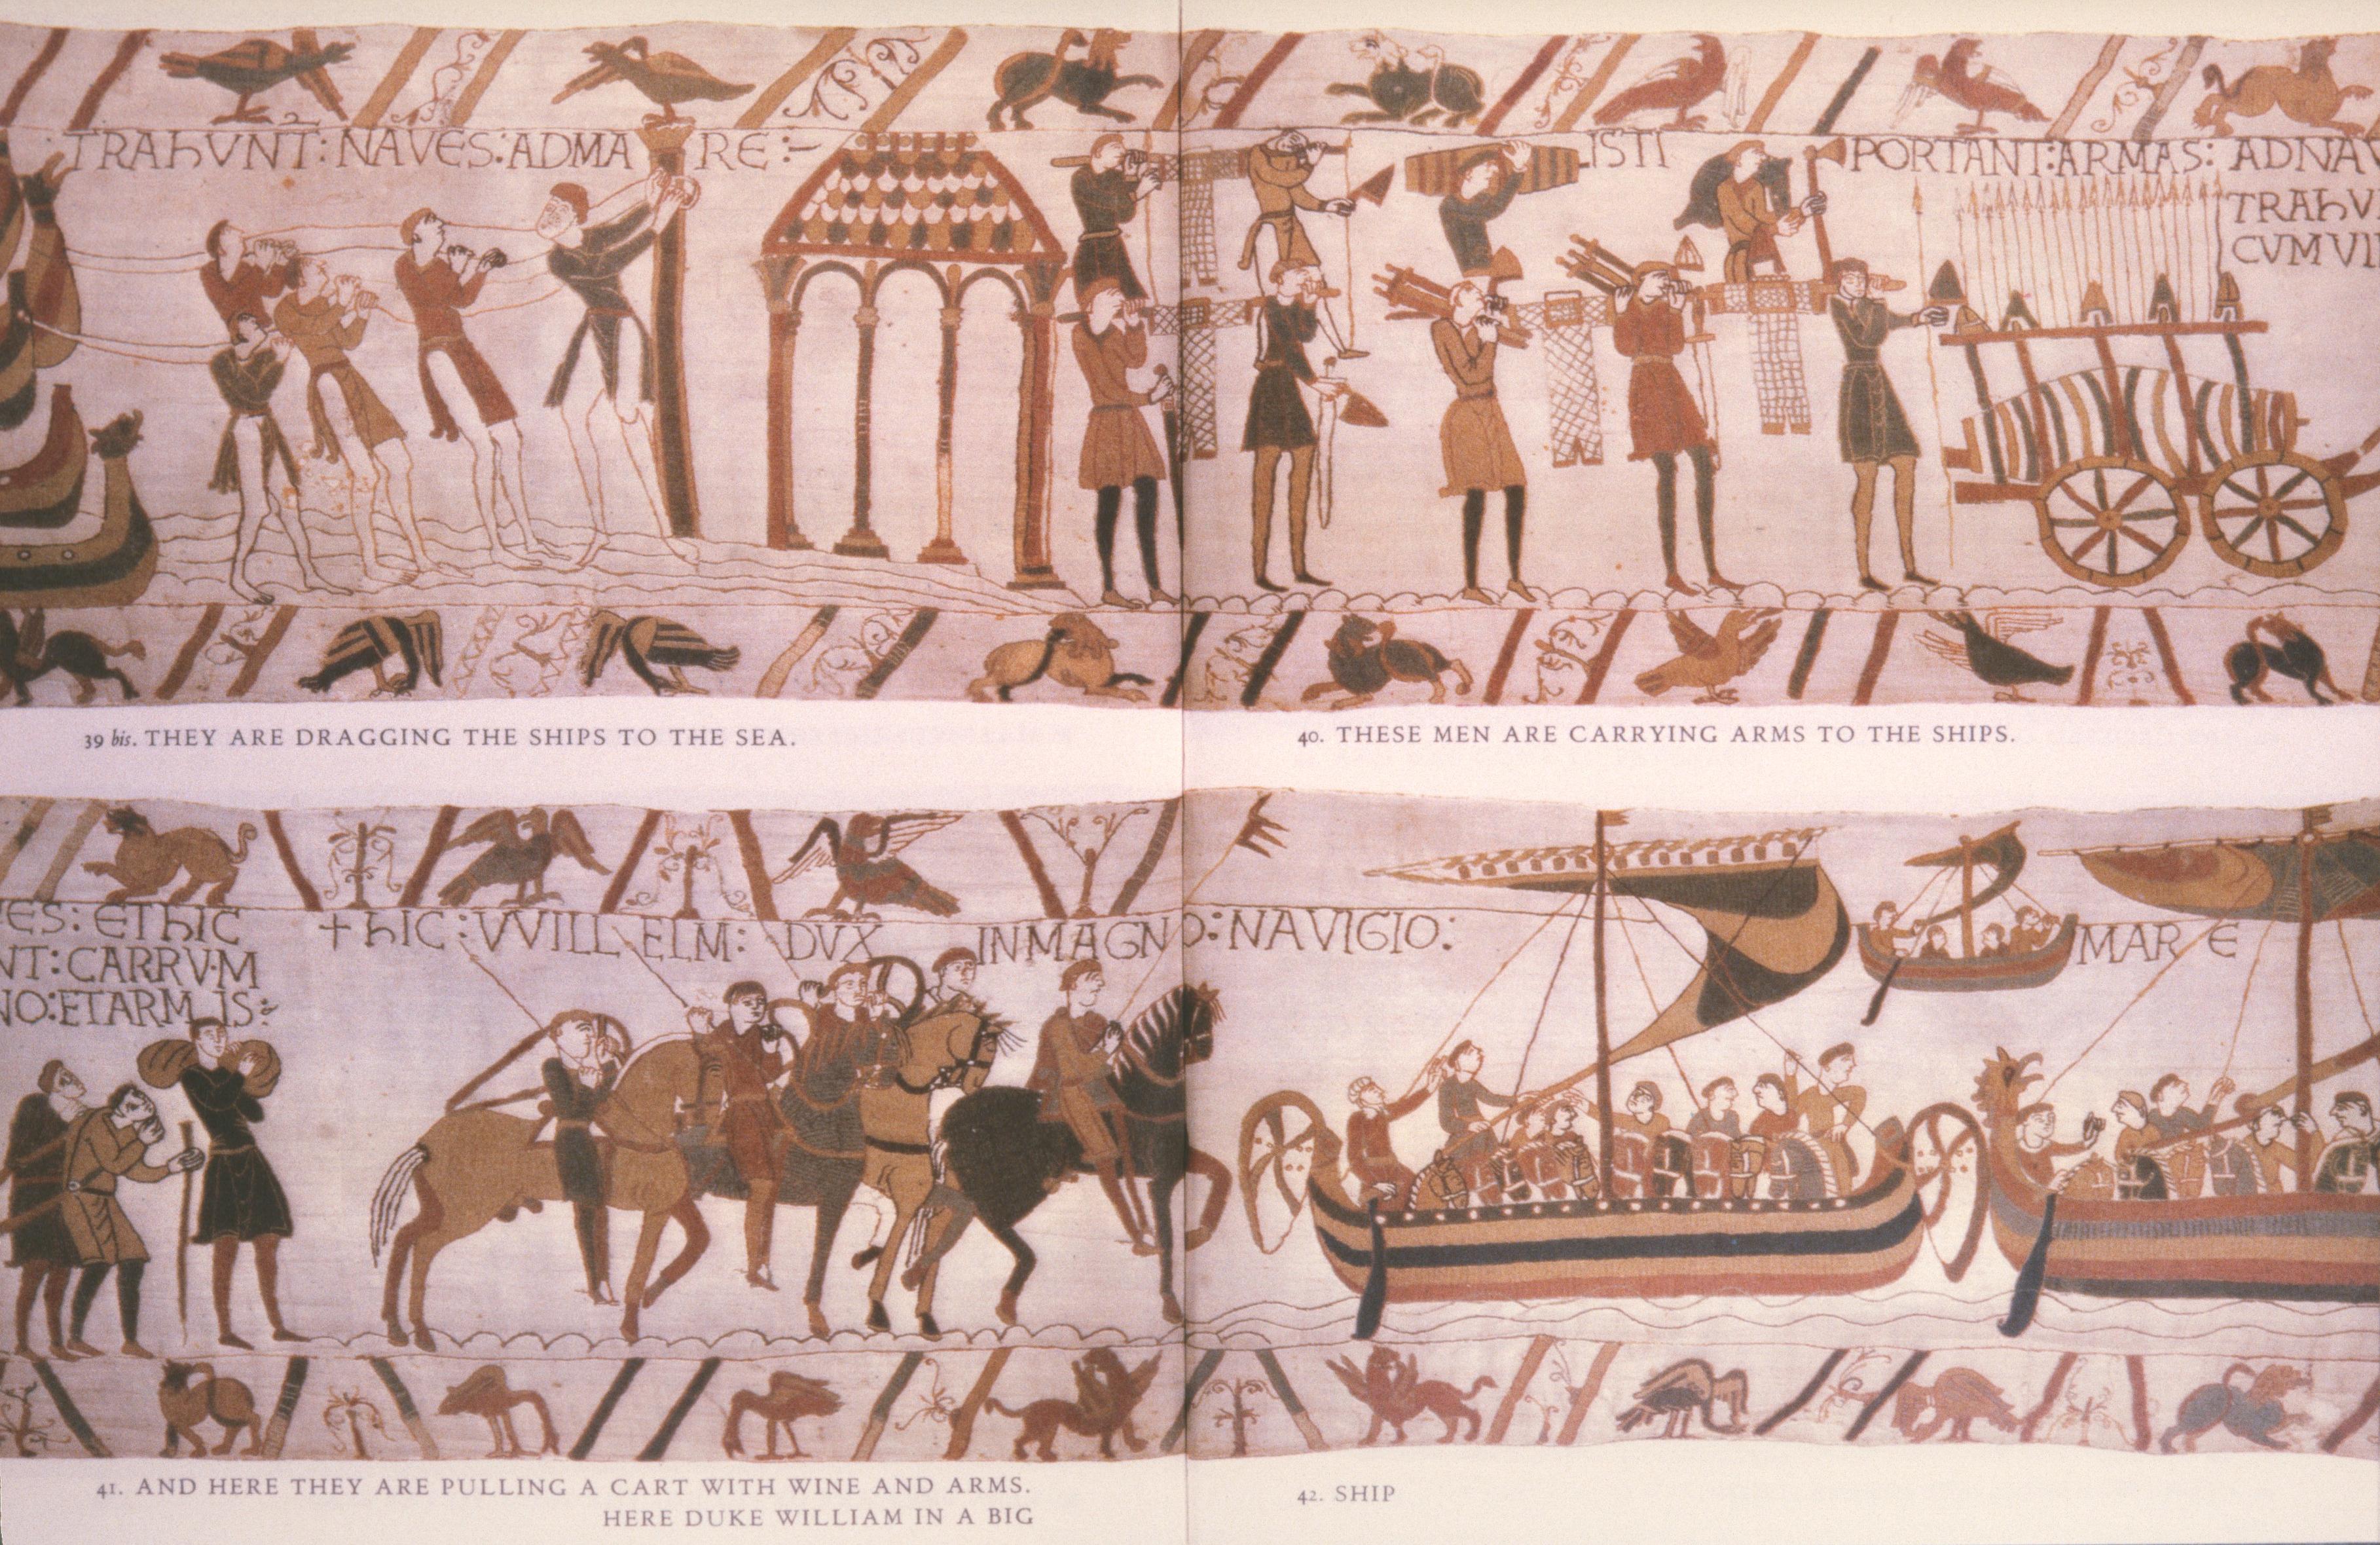
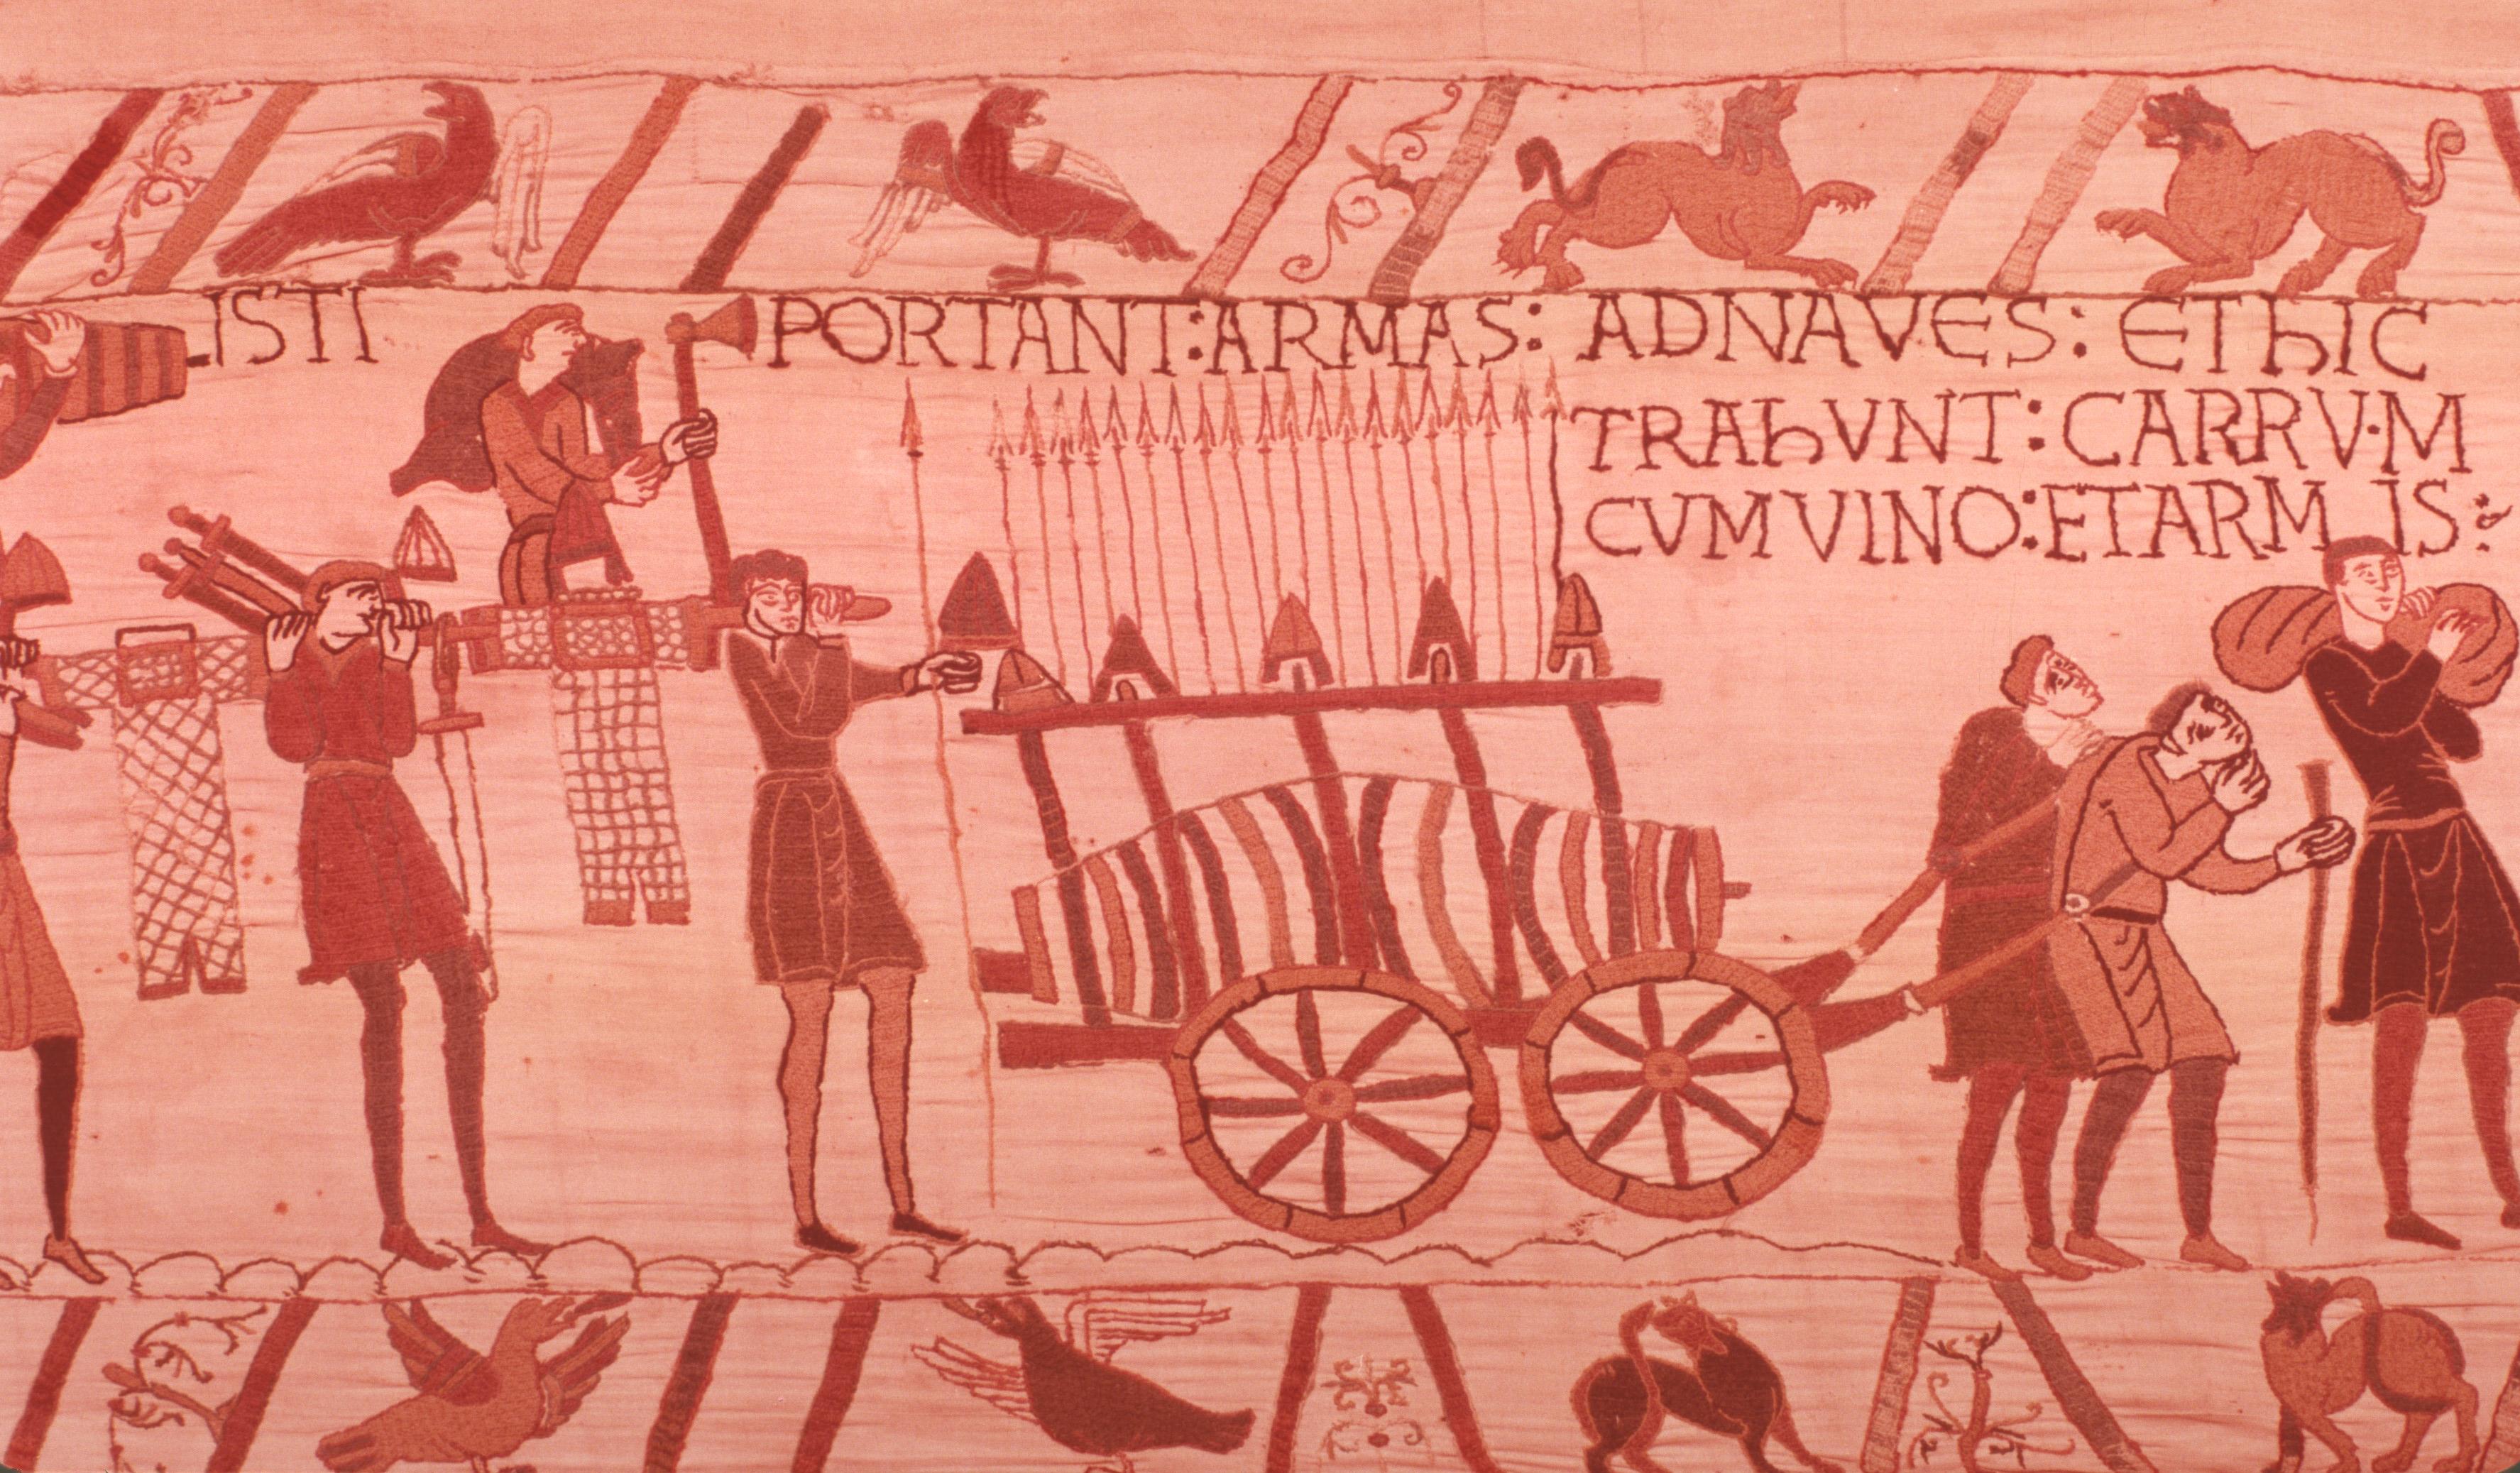
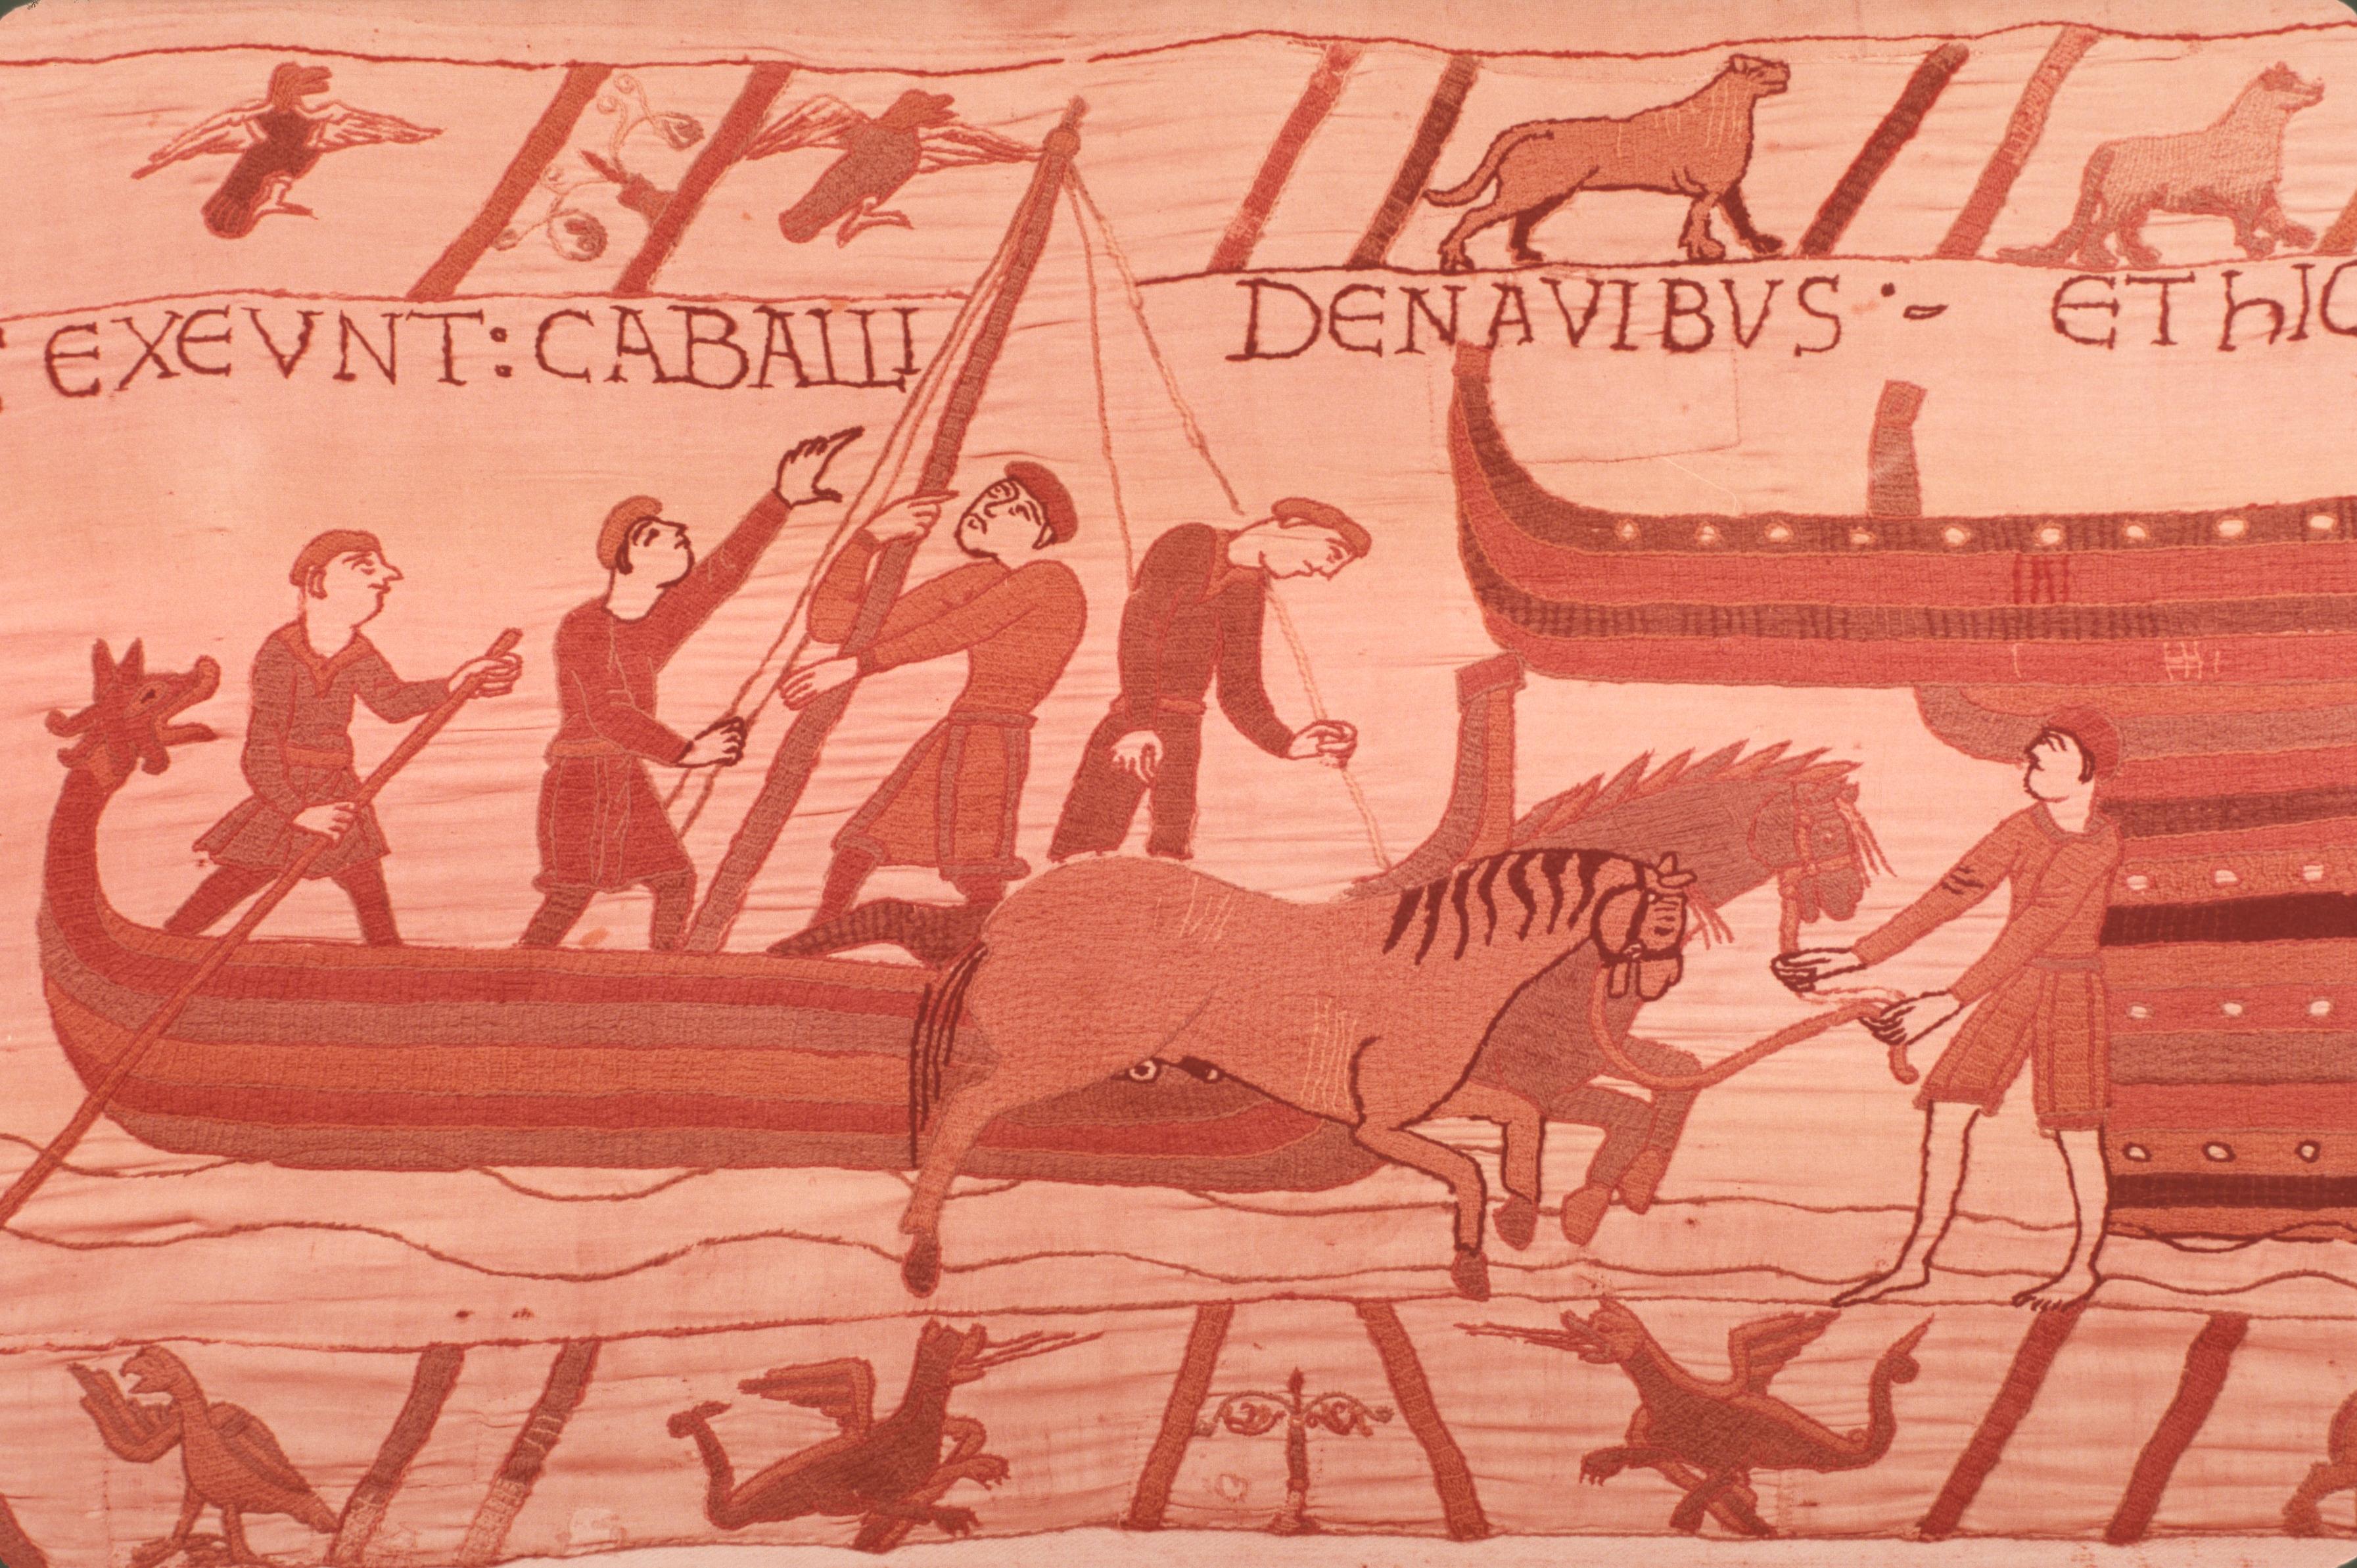
From a great tithe-barn (fig. 52, top left), men immediately begin to load the ships with ARMAS (fig. 53)—bringing swords, suits of chain mail, and a conical helmet held by its nose-piece. Meanwhile others drag a cart with a huge tun of wine, and more arms in the form of spears. They are followed without any interruption (fig. 52 bottom) by Duke William, and by his all-important cavalry—for one of William’s greatest feats was to transport hundreds of horses as well as soldiers, and the artist does not want us to forget the achievement.
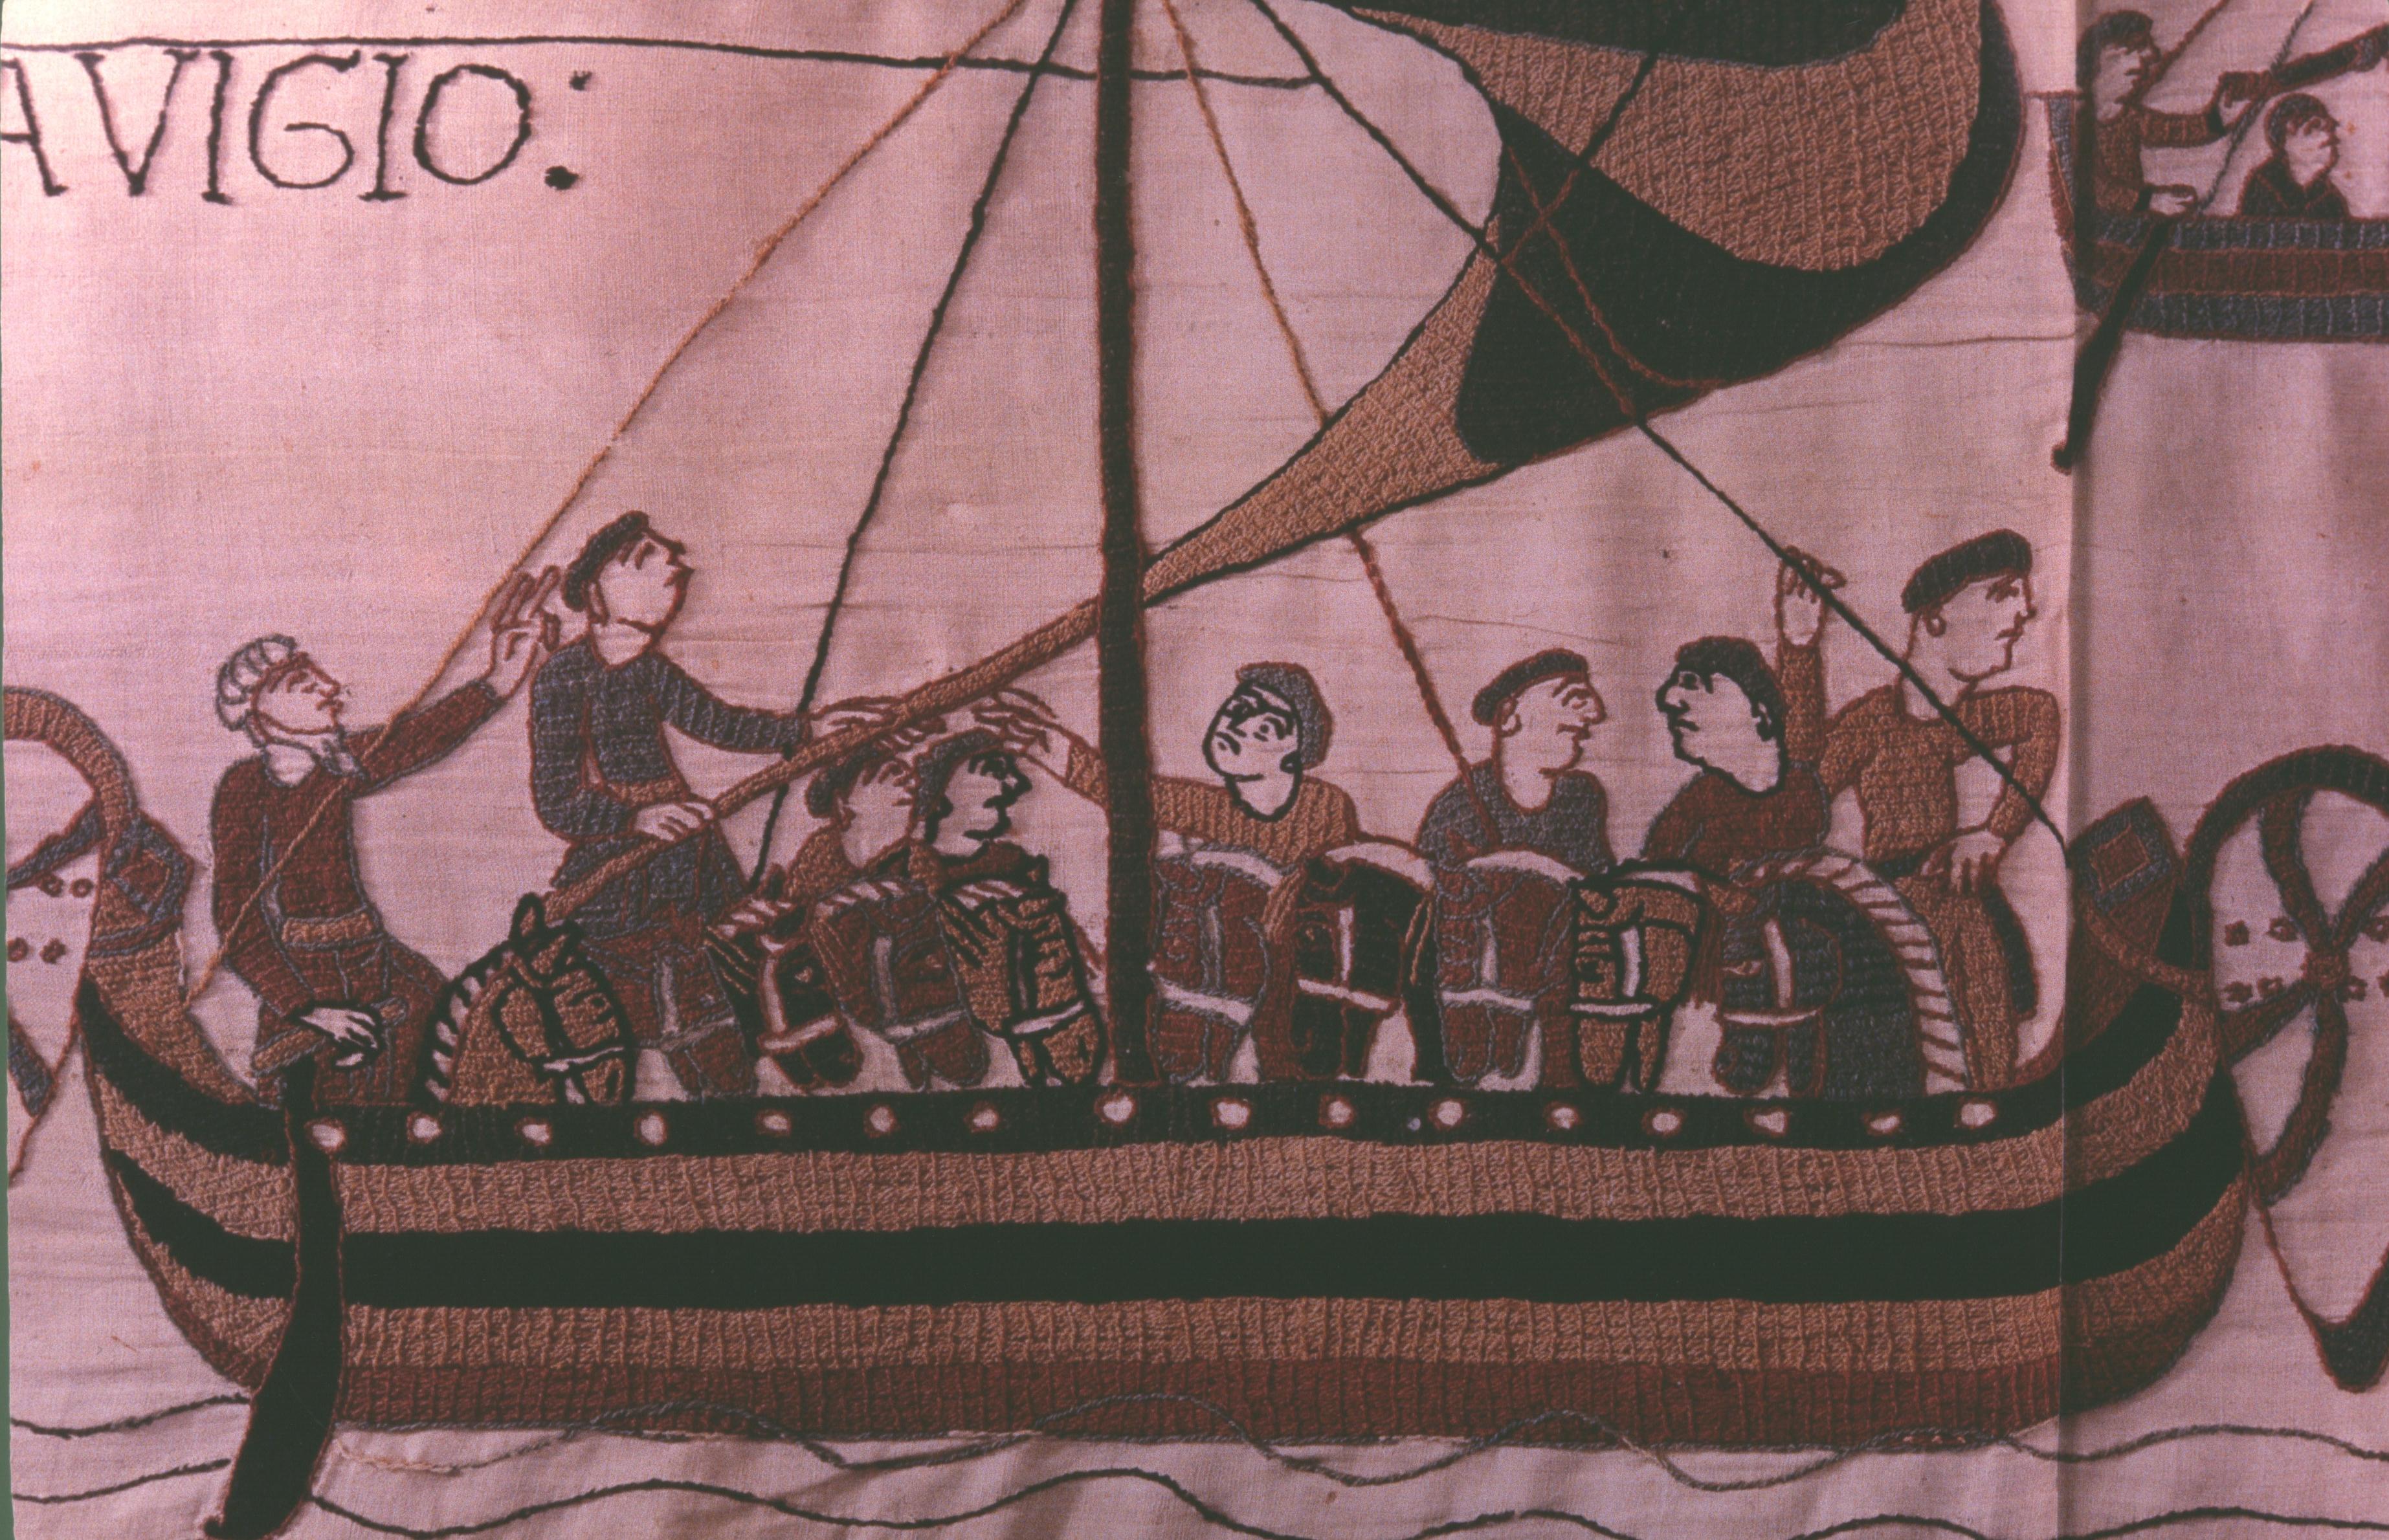
This is a section where the tapestry medium is at its best, and where book reproduction is at its weakest. So let us make do with one final detail to bring the fifth chapter to a close. fig. 56 shows William’s flagship, with its carved sternpost and a great lantern at the masthead, which thrusts up to touch the border, and in so doing divides the place-name Pevensey (miraculously unchanged):

(Critics have been reminded of these lines from the contemporary Song of Roland:
They row, put on full sail, and steer ahead.
Up at the mastheads and the lofty prows
The many lanterns and carbuncles hang
And from that height cast such brightness ahead
That the sea’s beauty is enhanced by night.)
With the place-name PEVENSAE, we come to the last chapter in Part Two—Chapter Six, which I called ‘The Beachhead’. Turning back to fig. 30, we can remind ourselves of the geography of the area. The fleet was built near the mouth of the Seine, not far from Bayeux, and it sailed from the mouth of the Somme; the Normans went ashore at Pevensey, and established headquarters at Hastings.
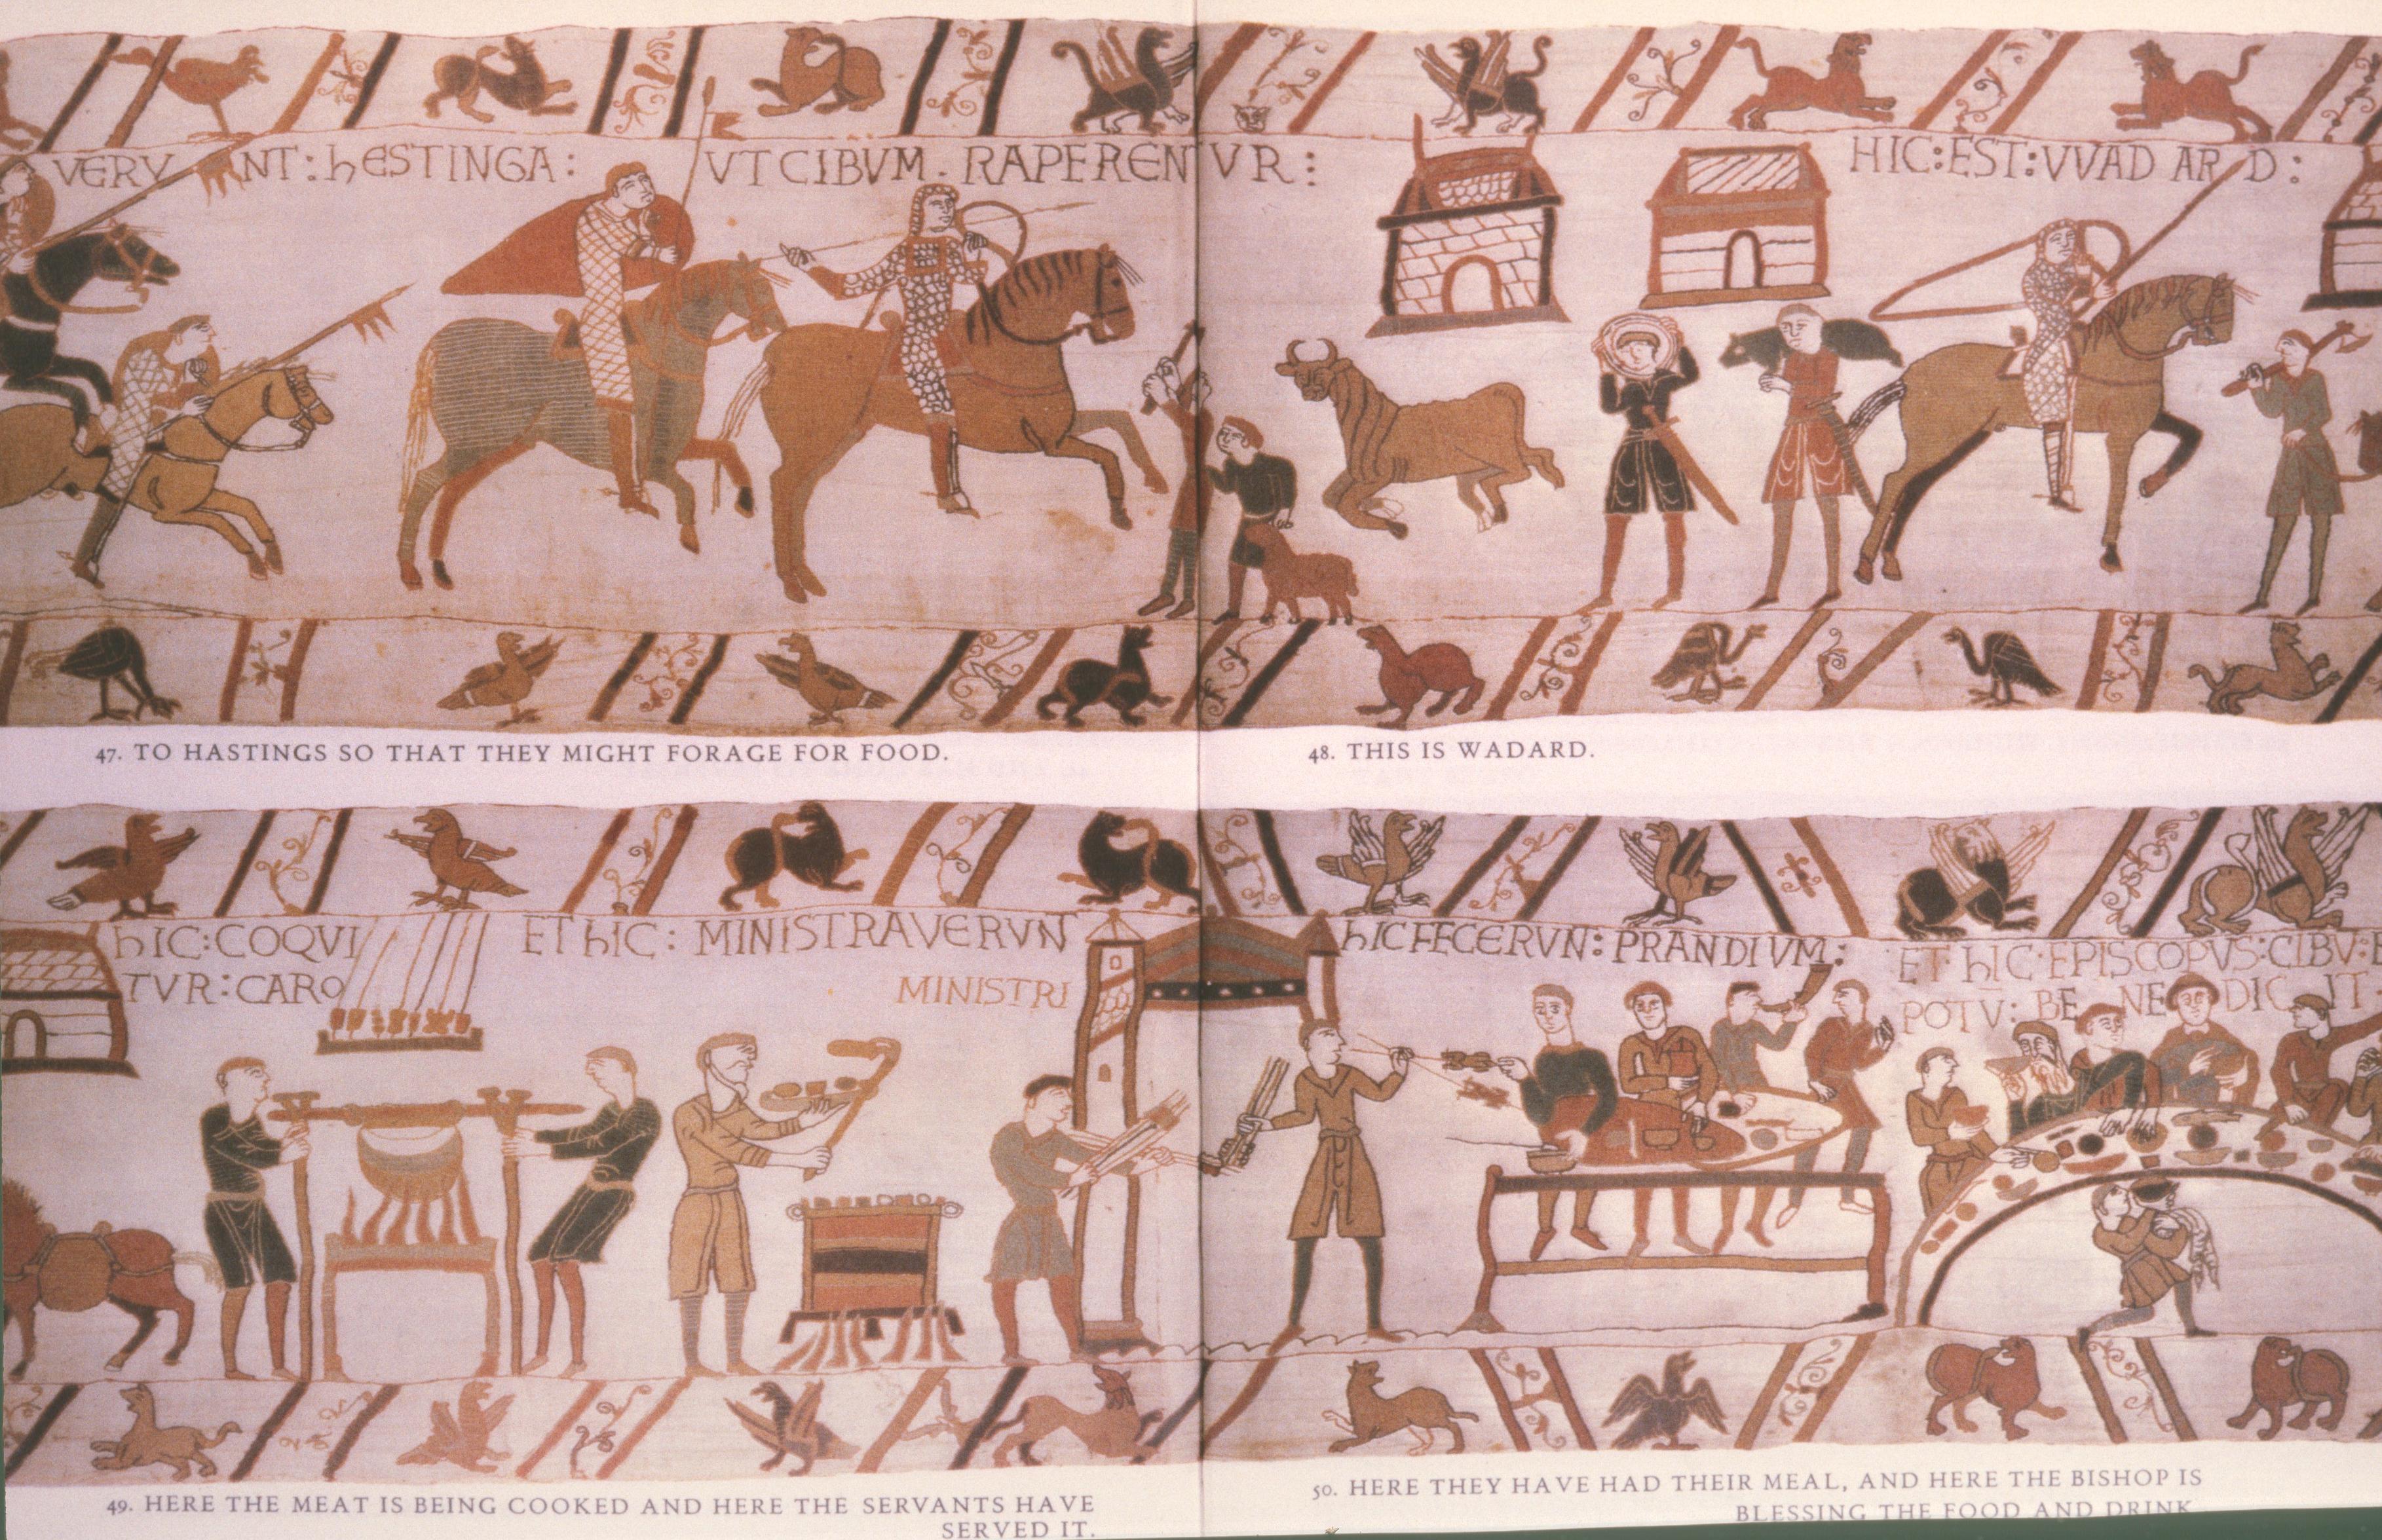
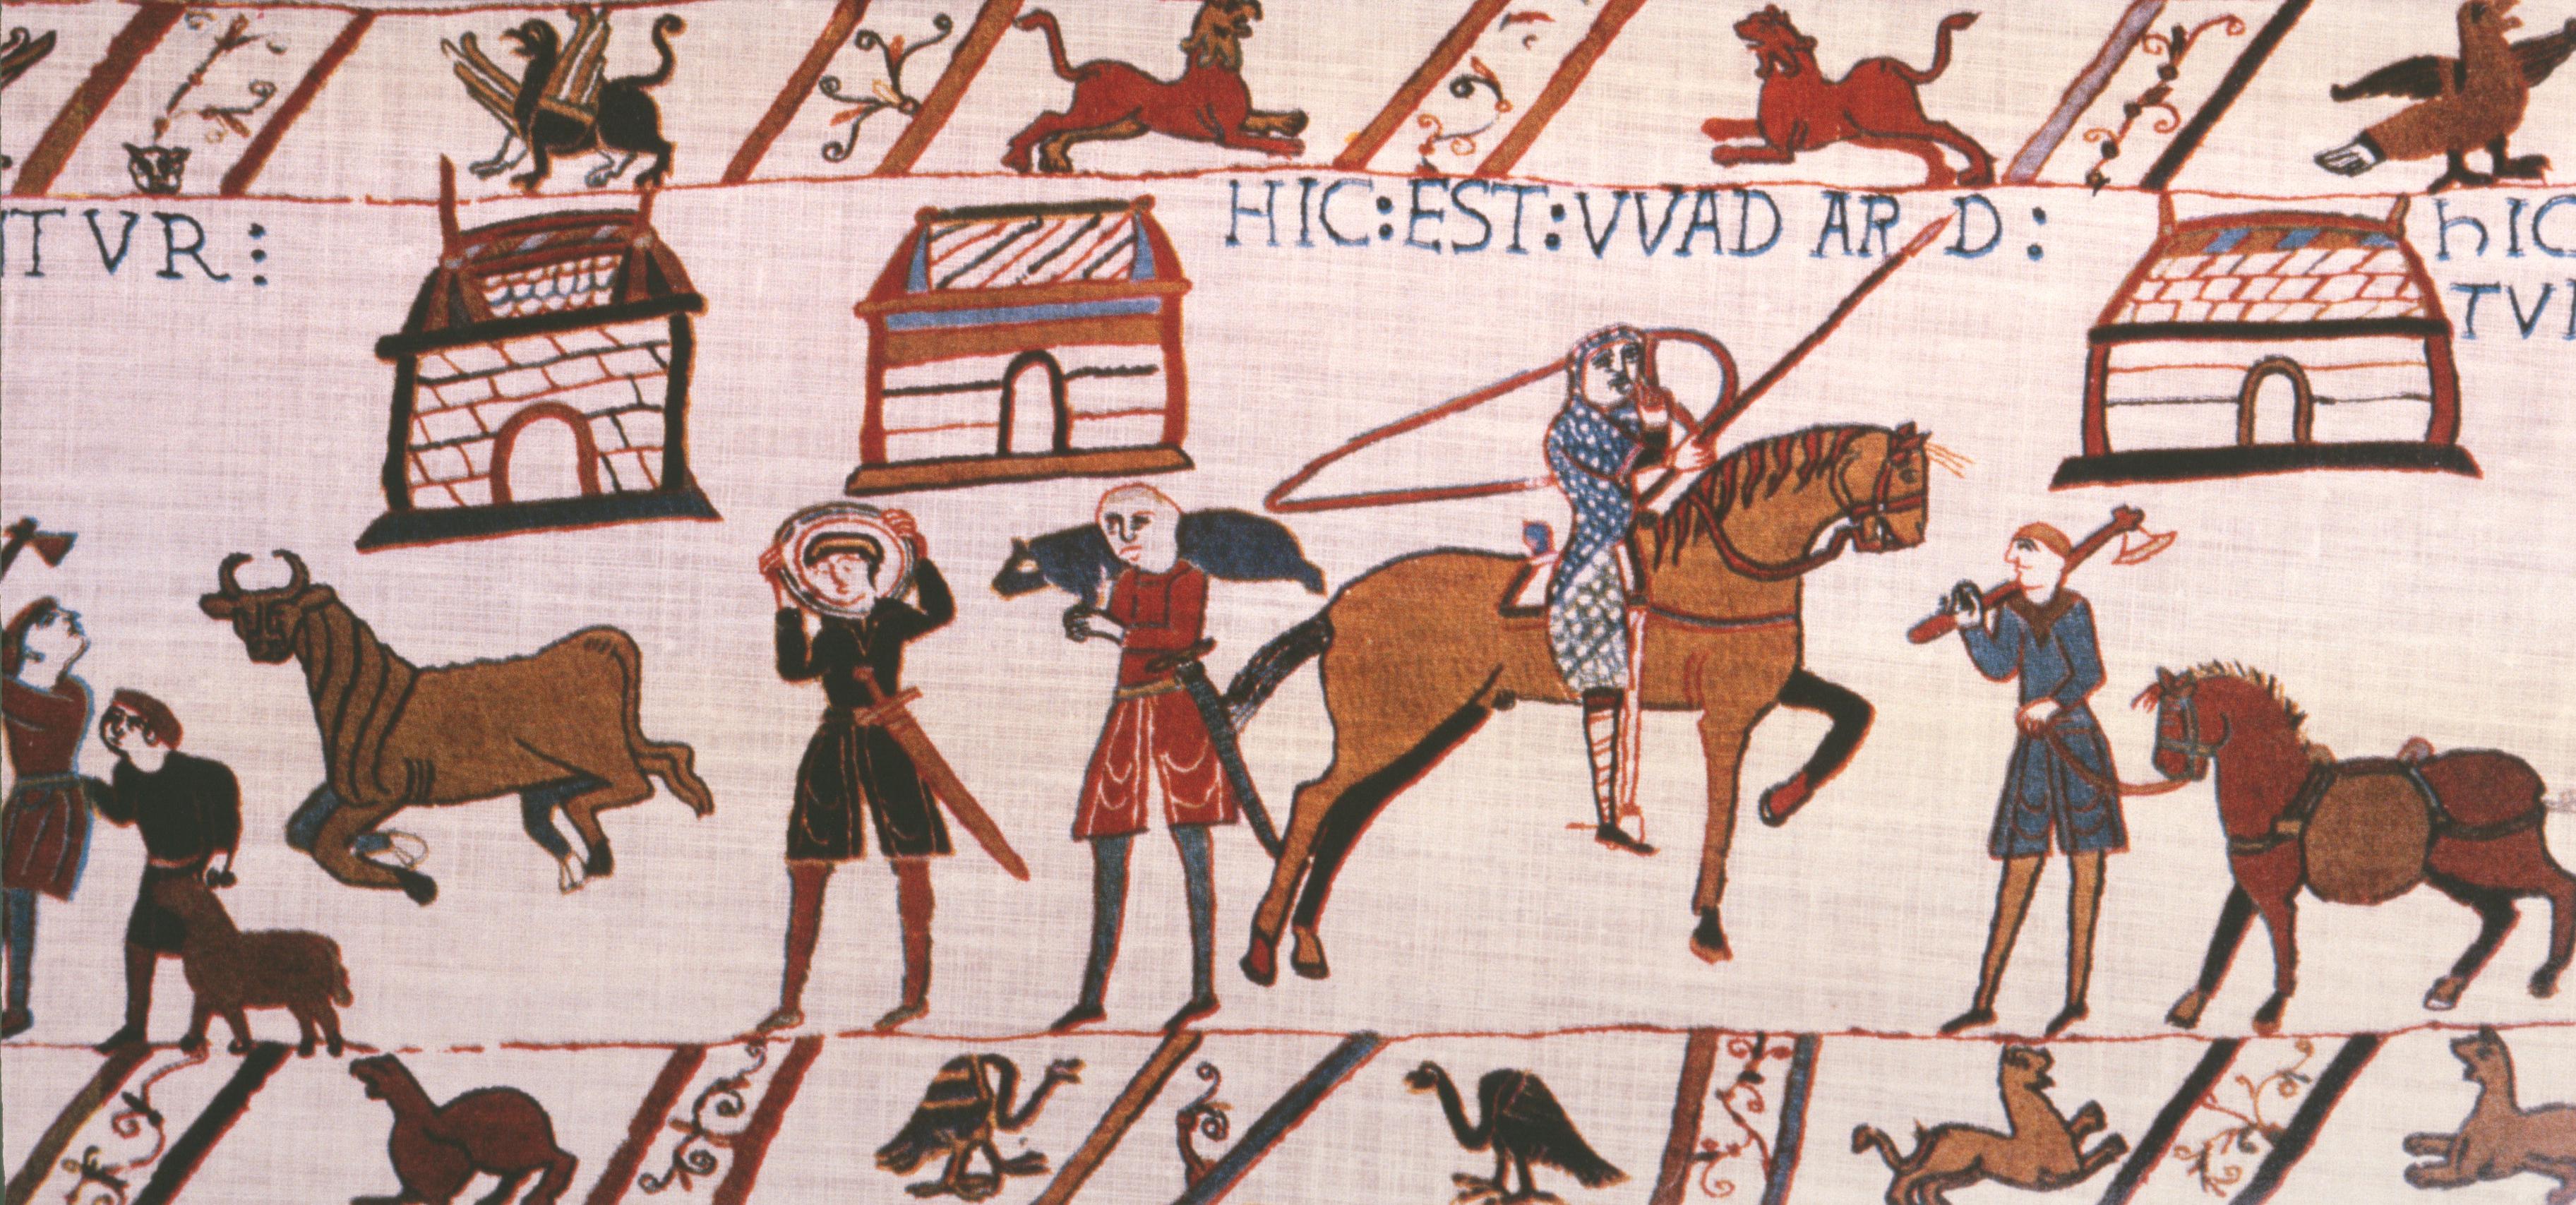
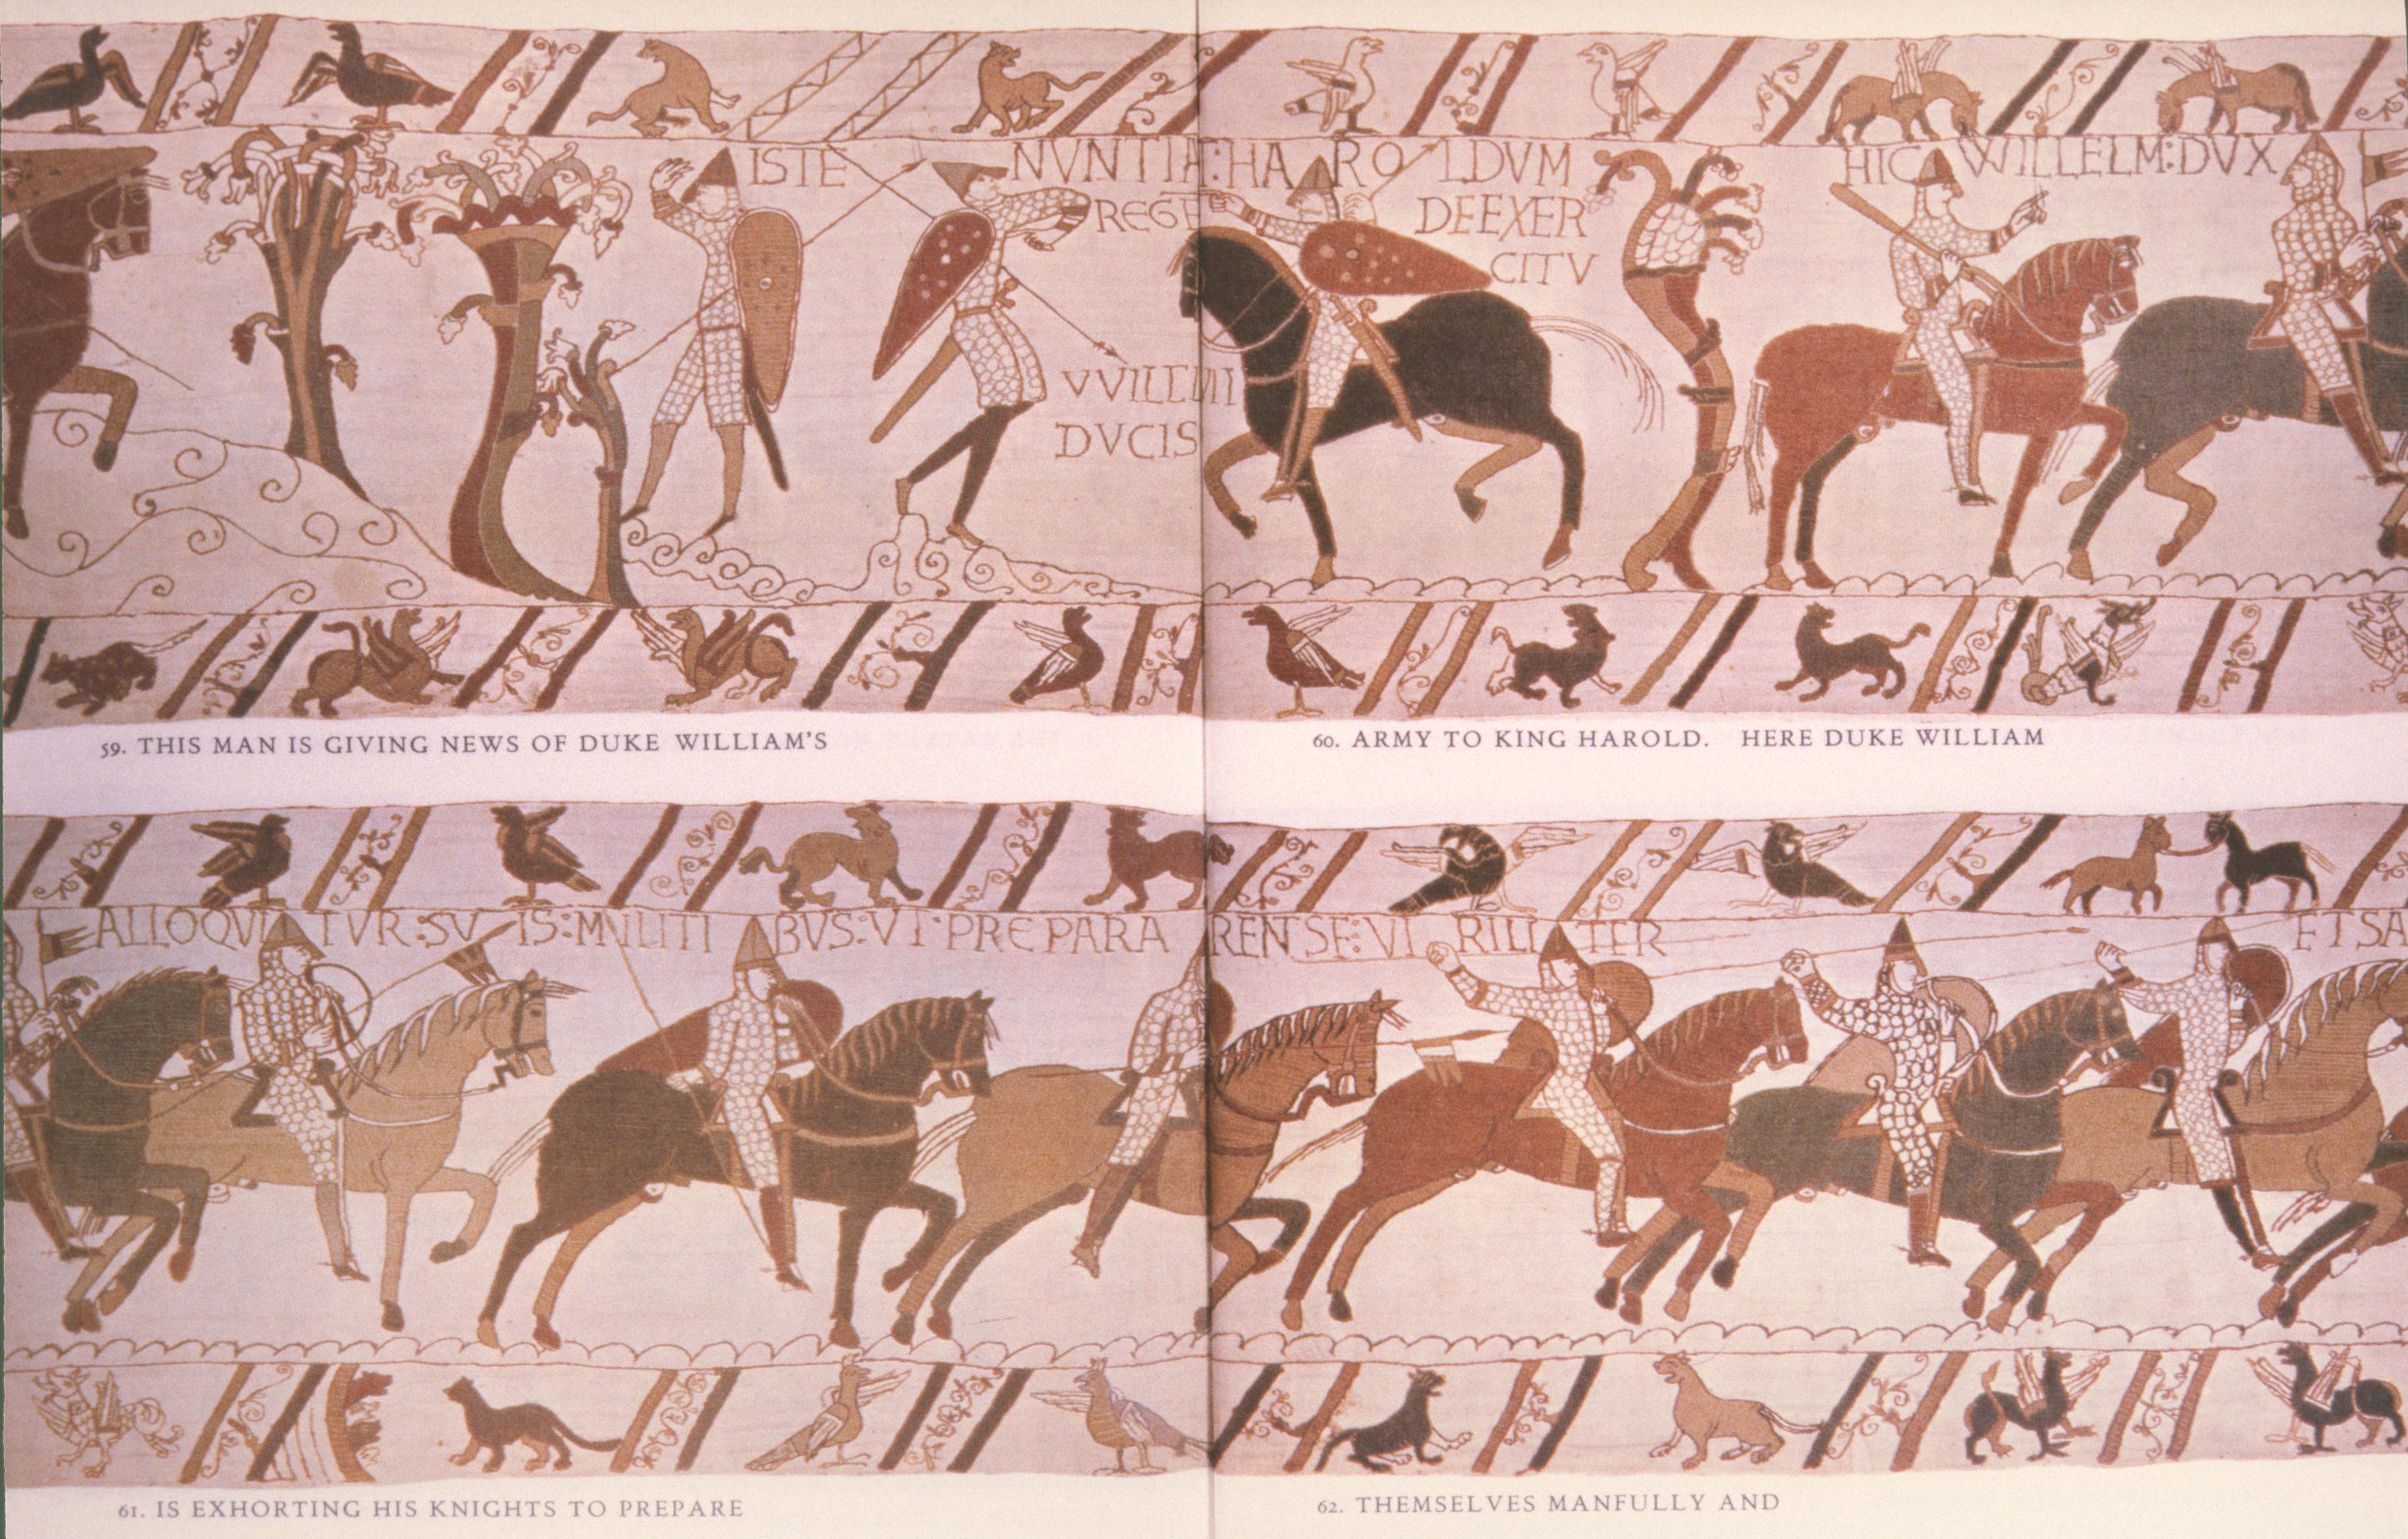
You see the marauders better in the harsh-coloured detail in fig. 59, as the soldiers round up sheep and a rather frisky cow, under the watchful eye of a knight identified as Wadard.
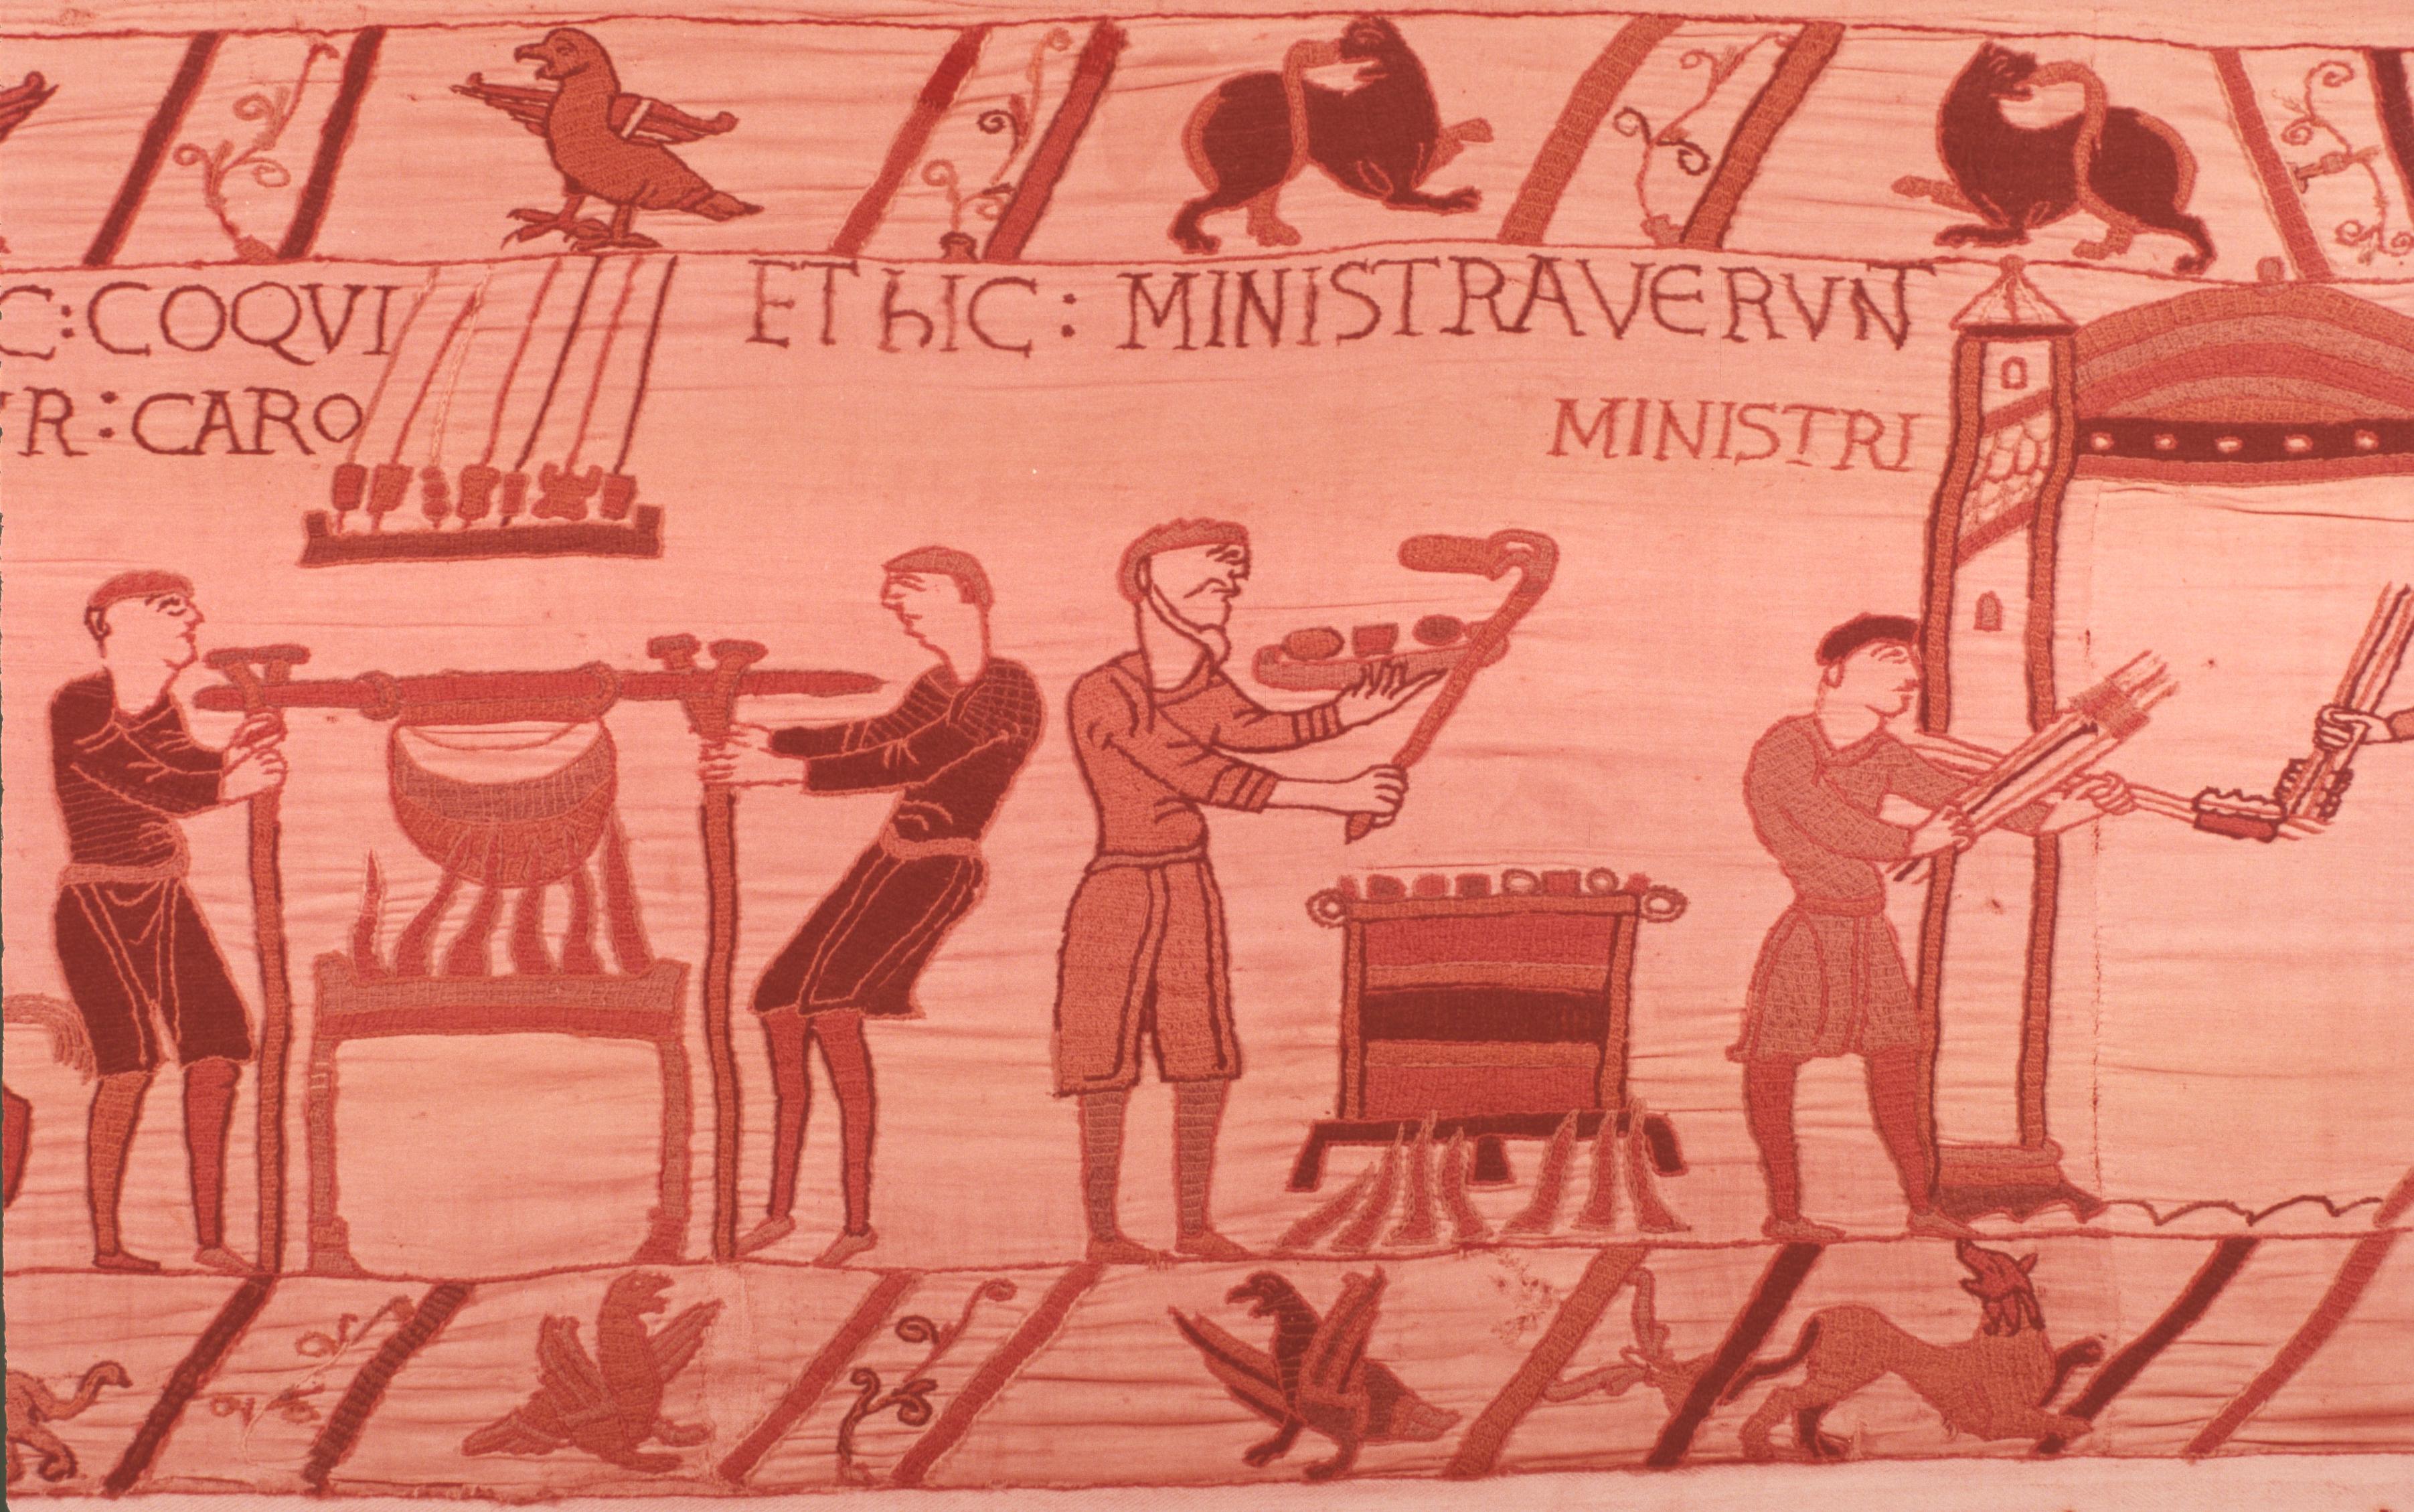
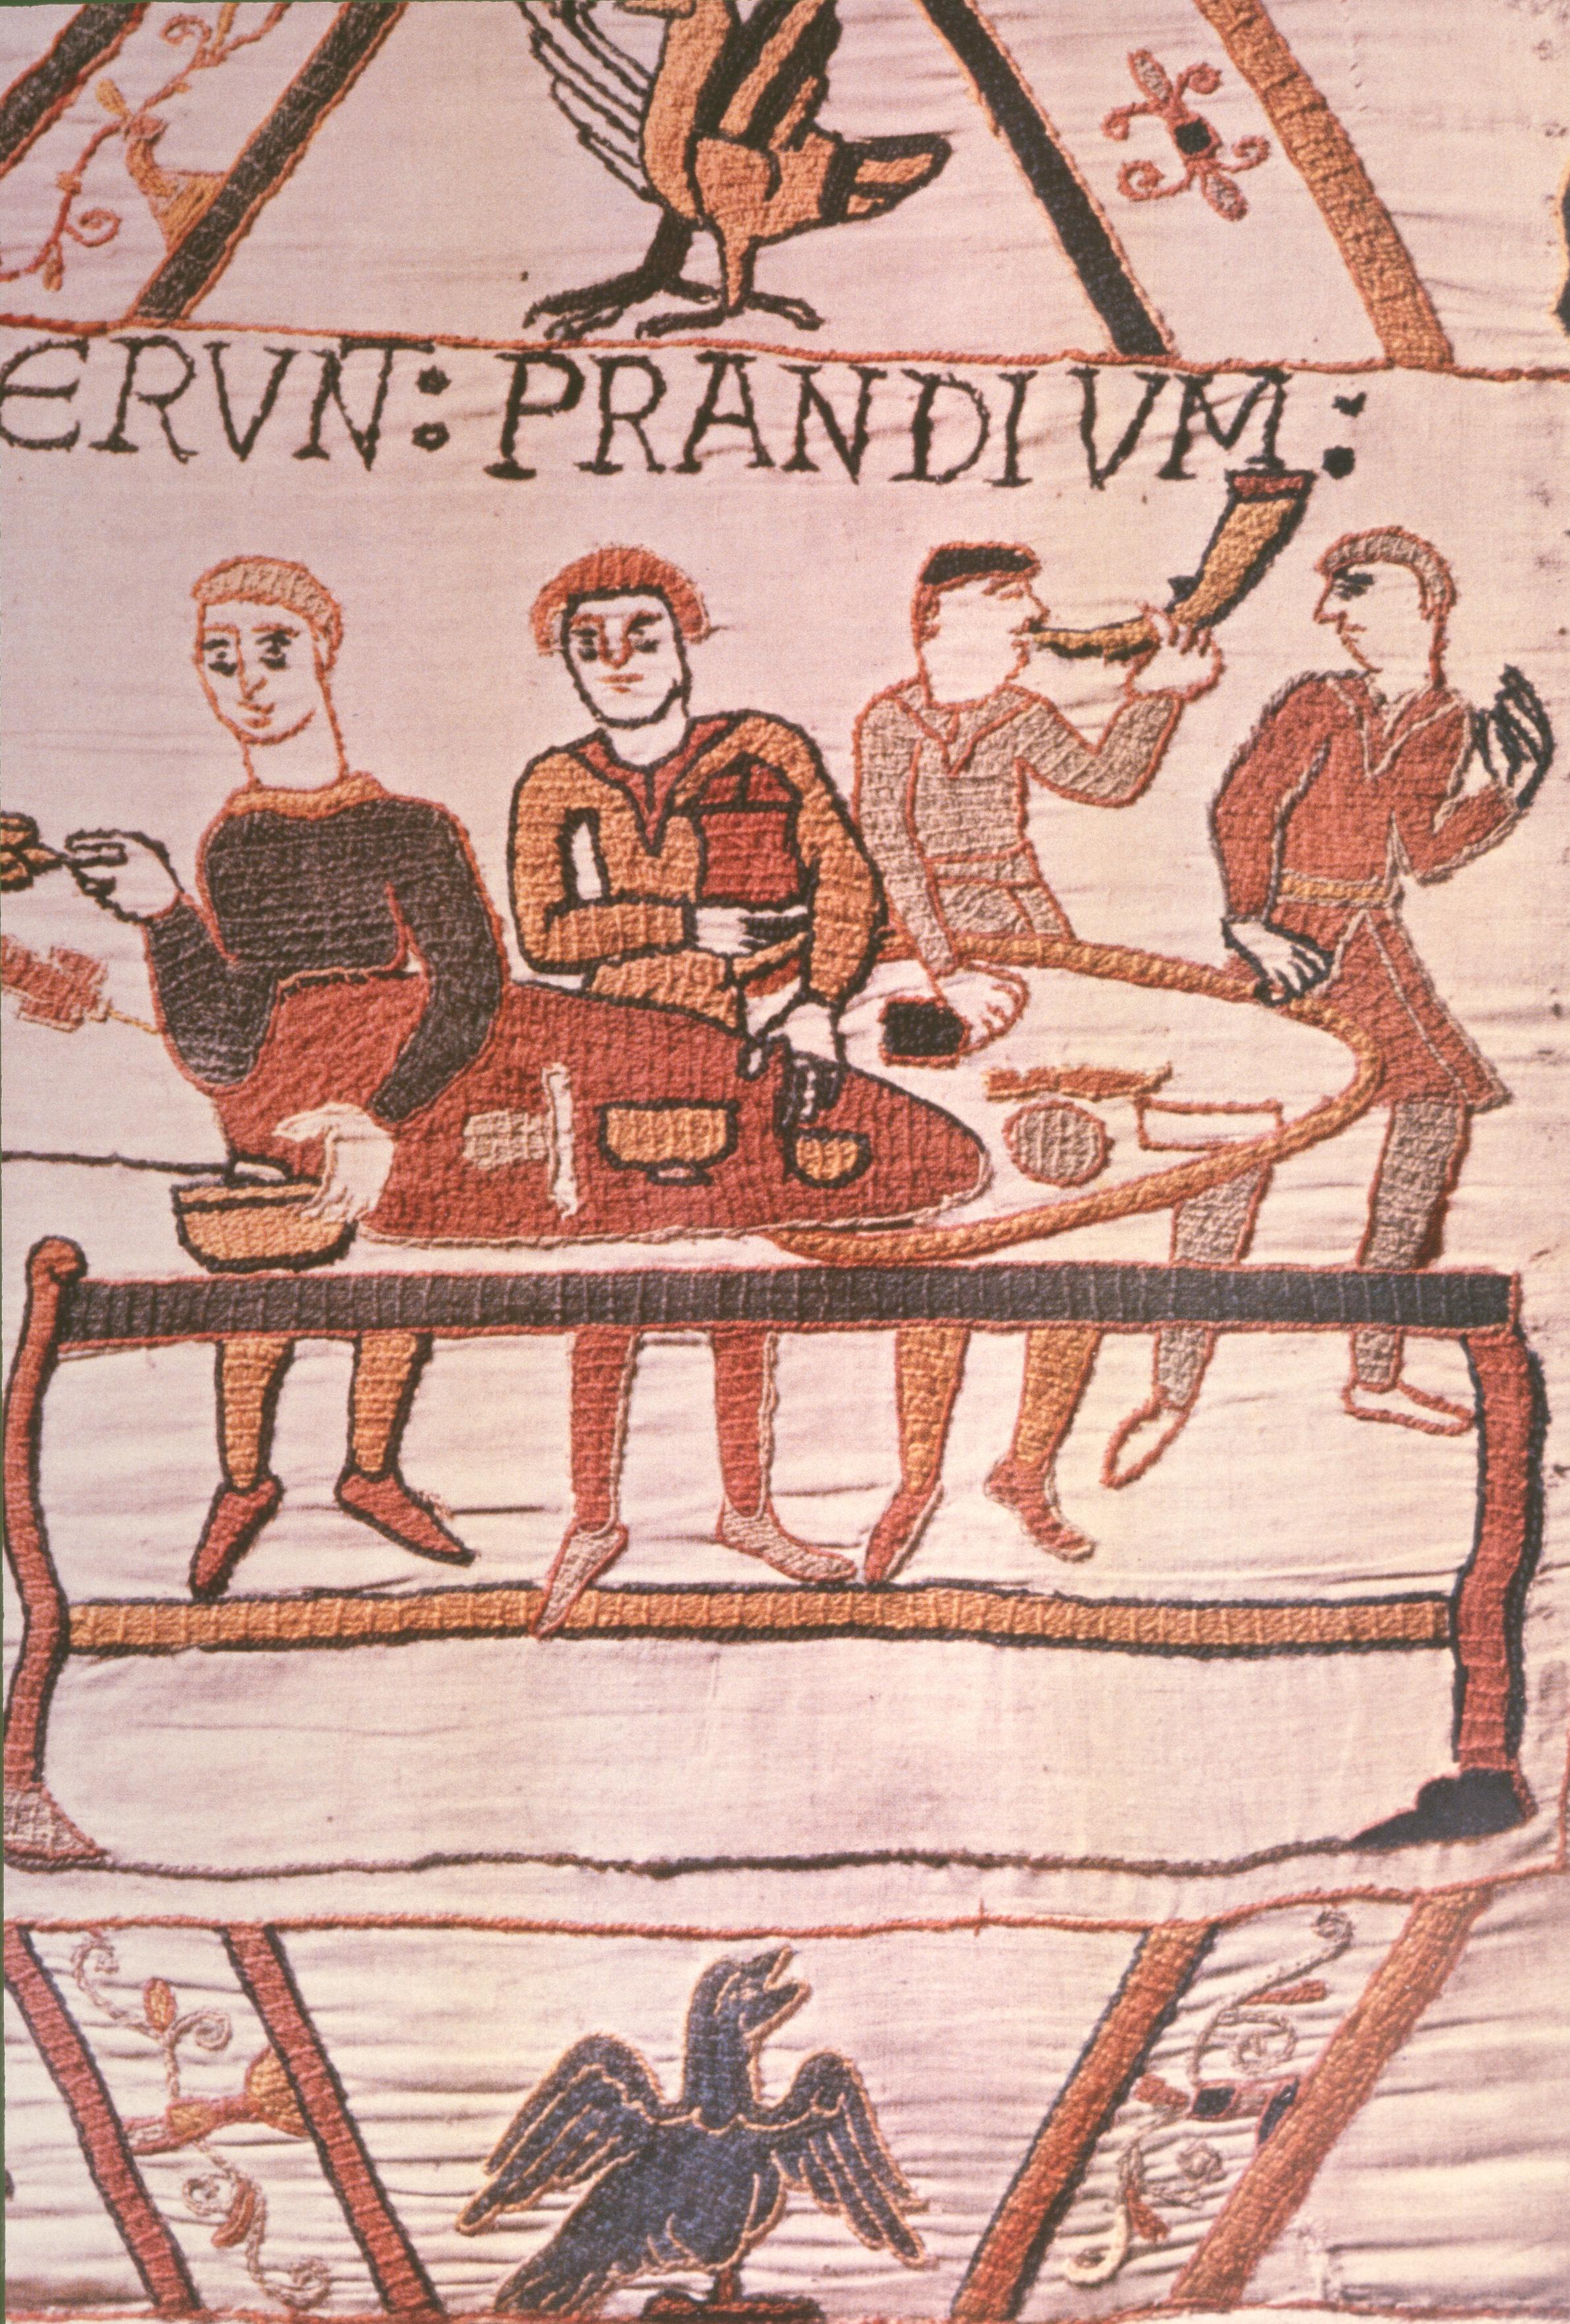
There are some superb domestic details in the next scene (fig. 60), showing how the food was cooked in an open air camp-kitchen. Meat is boiled in a cauldron and roasted on spits; the baker uses tongs to get the piping hot bread out of the oven; servants pass in chickens on spits into the requisitioned building used as a mess (fig. 61), while others set the food out on a table improvised from trestles and shields.
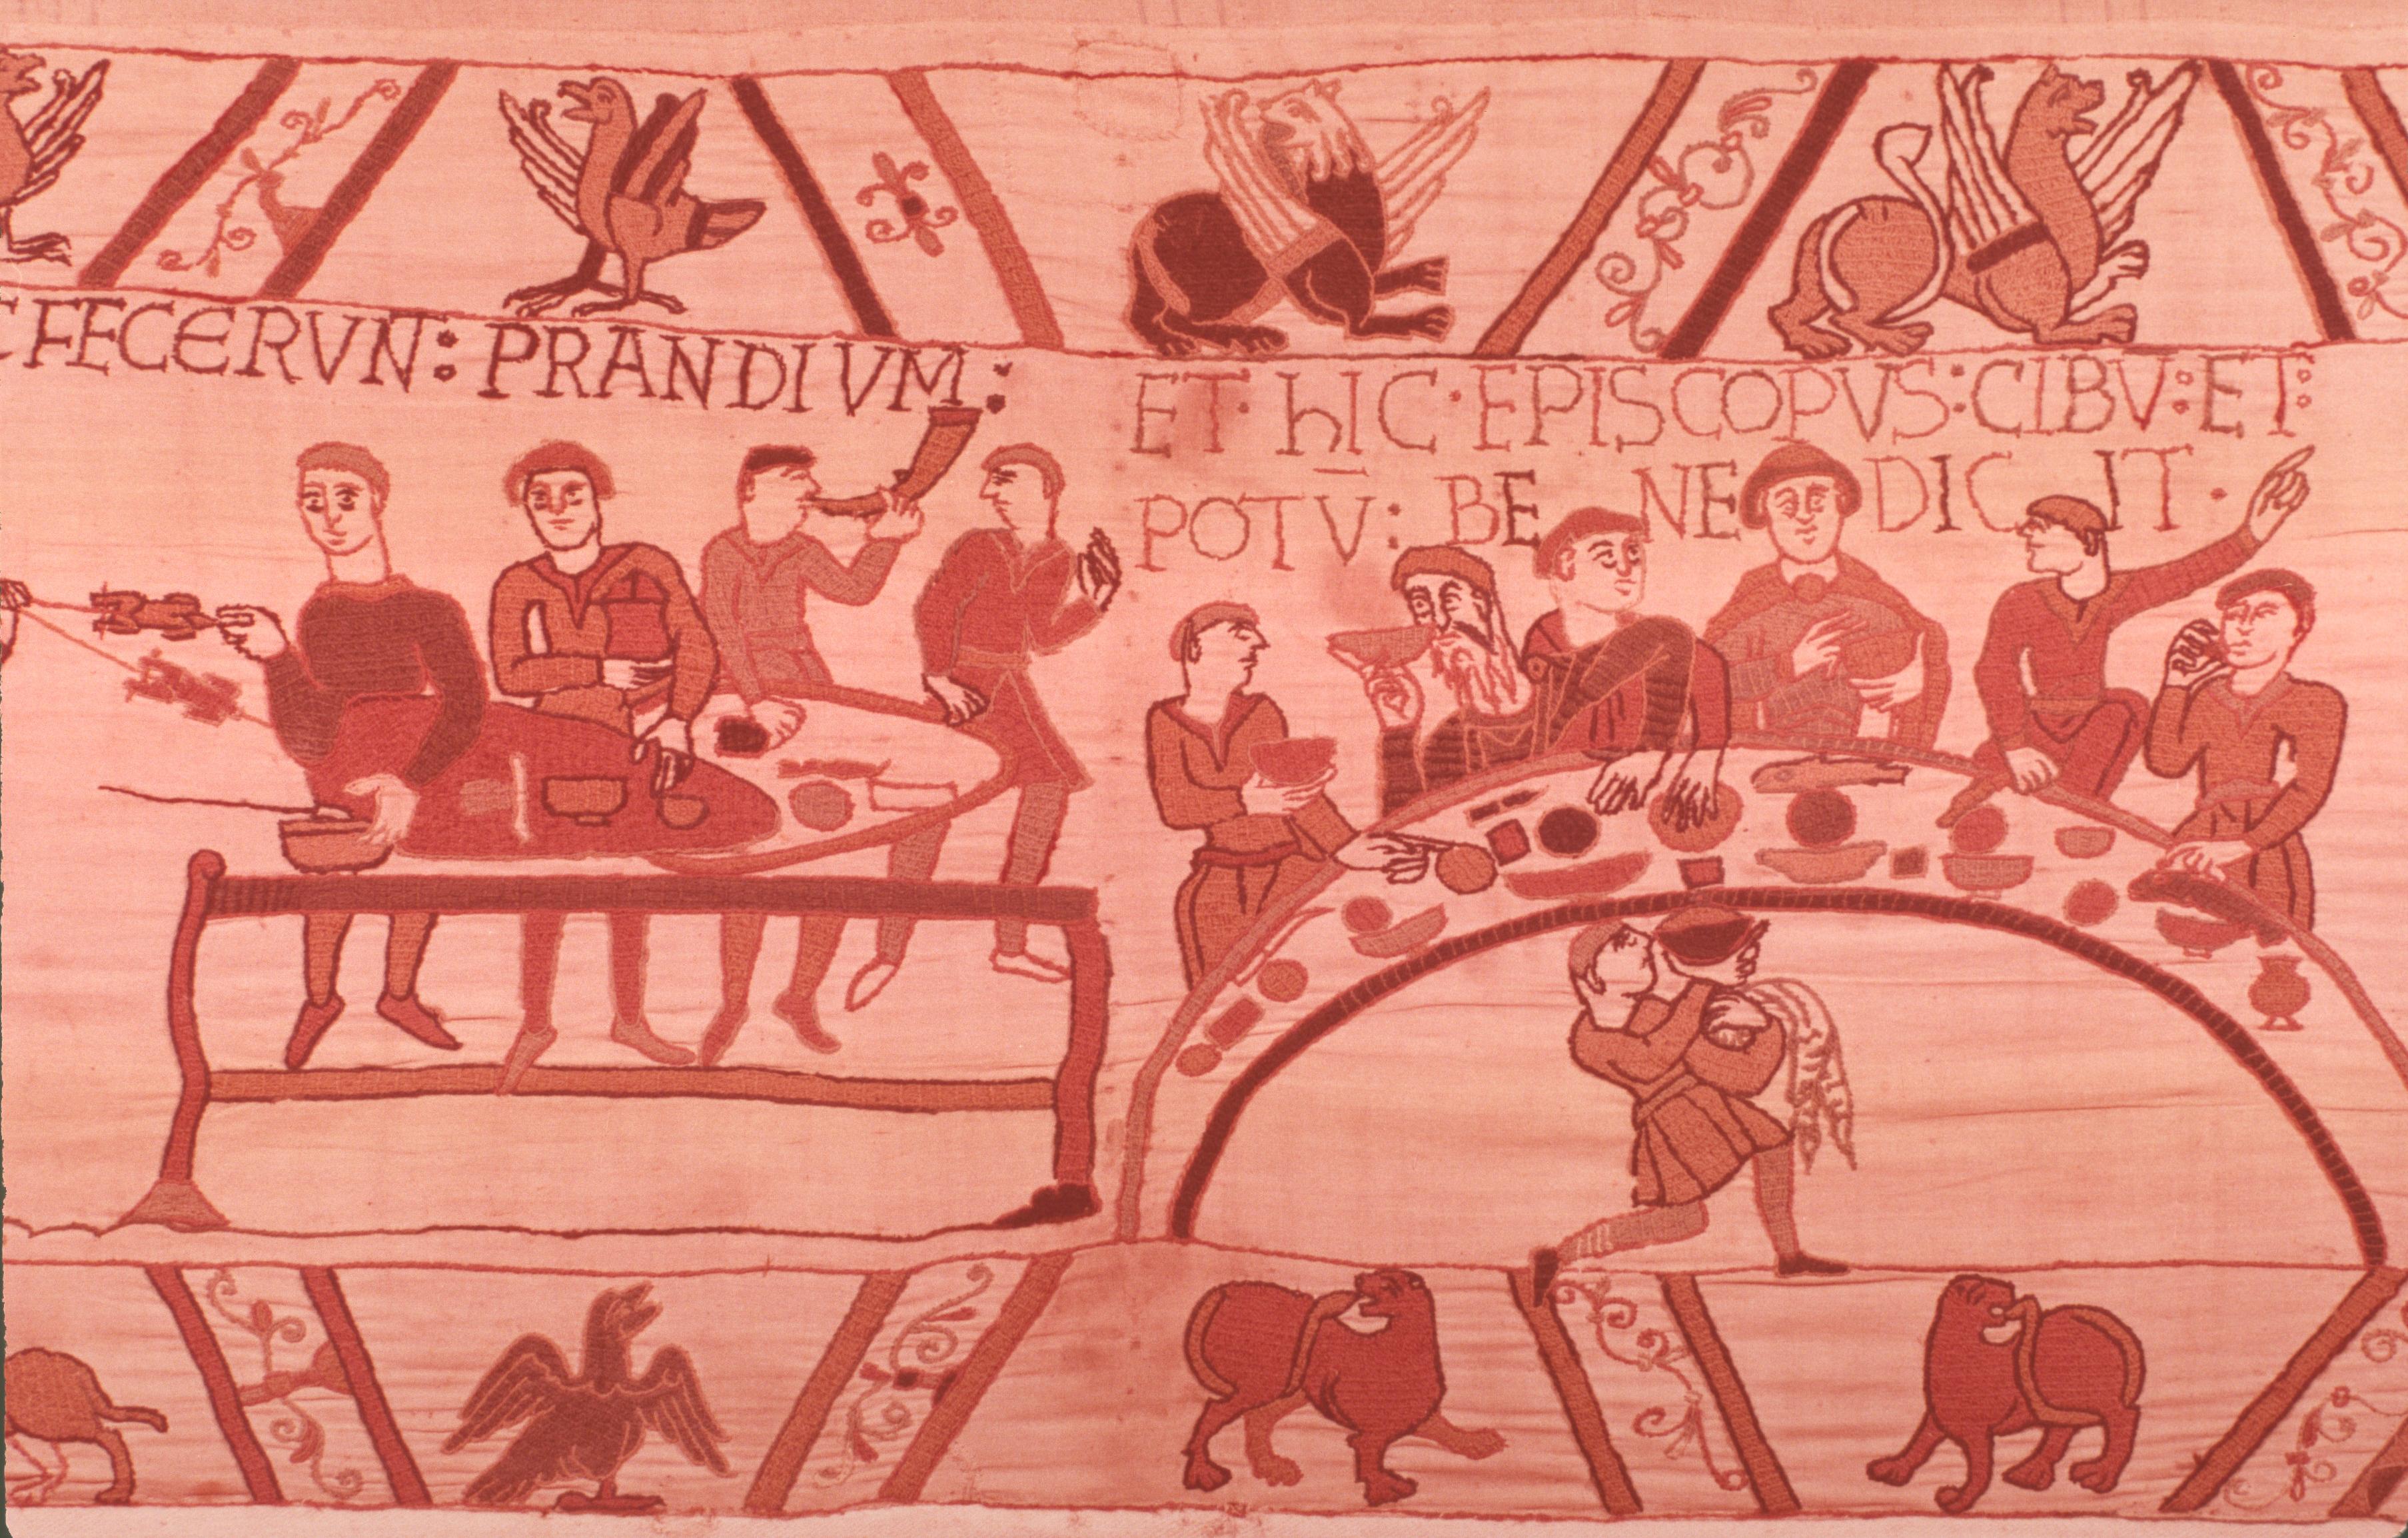
The bugler or horn-player (fig. 61) sounds ‘come to the cookhouse store’, and Bishop Odo reappears here to say grace, asking a blessing for what the man on his right is already receiving. The shape of the high table may be adding a further consecrating touch, as the semicircular form (seen from a high viewpoint) was traditional in a depiction of the Last Supper, as you can see in an example from Italy in fig. 62, painted in almost the same year:
![Figure 62: (O_B_63) [FIXME: caption needed]](media/image55.jpeg)
Odo pops up again in the next scene (fig. 63 top left and detail in fig. 64), alongside William and another brother, Robert, in a council where the generals decide to protect their beachhead with a fortification. Immediately, the ‘Pioneer Corps’ begin to throw up the mound for a typical motte and bailey castle of the kind the Normans put up speedily all over England, including at Cambridge.
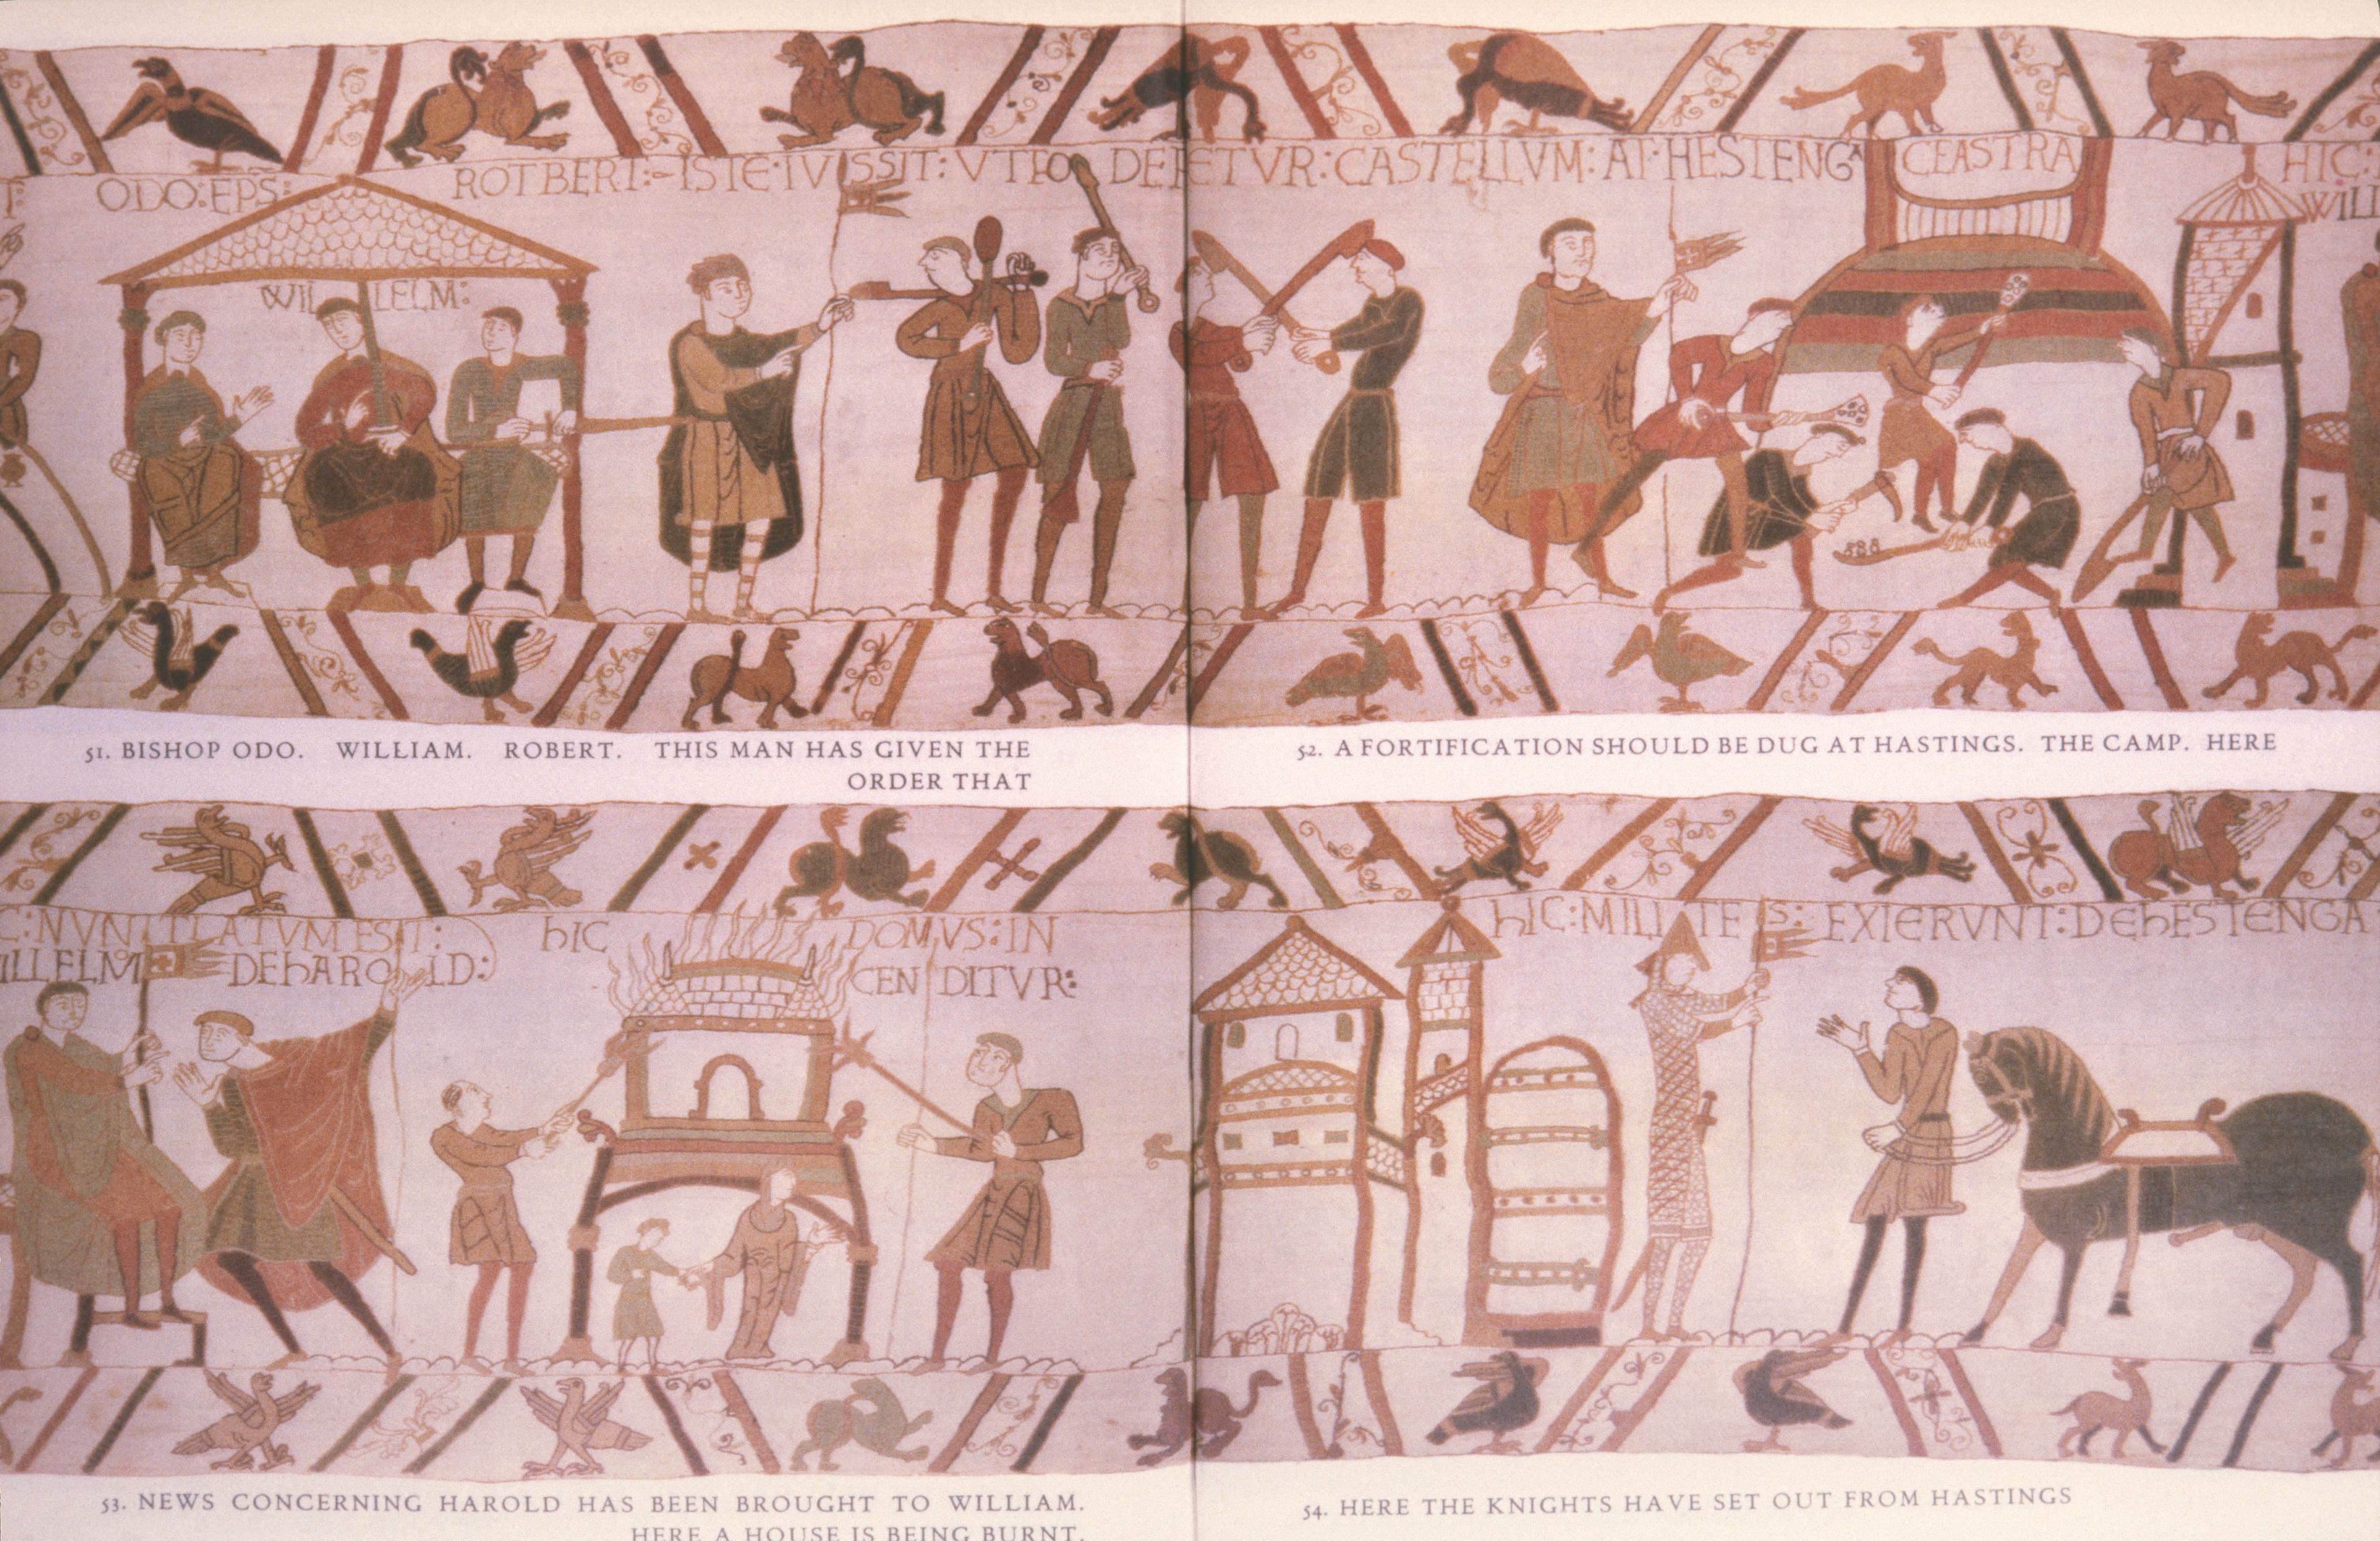
It was clearly a prudent move, since a messenger-figure (fig. 63 bottom left) rushes on to tell William that Harold is in the vicinity (though in the event William will seek to attack Harold rather than be attacked himself).
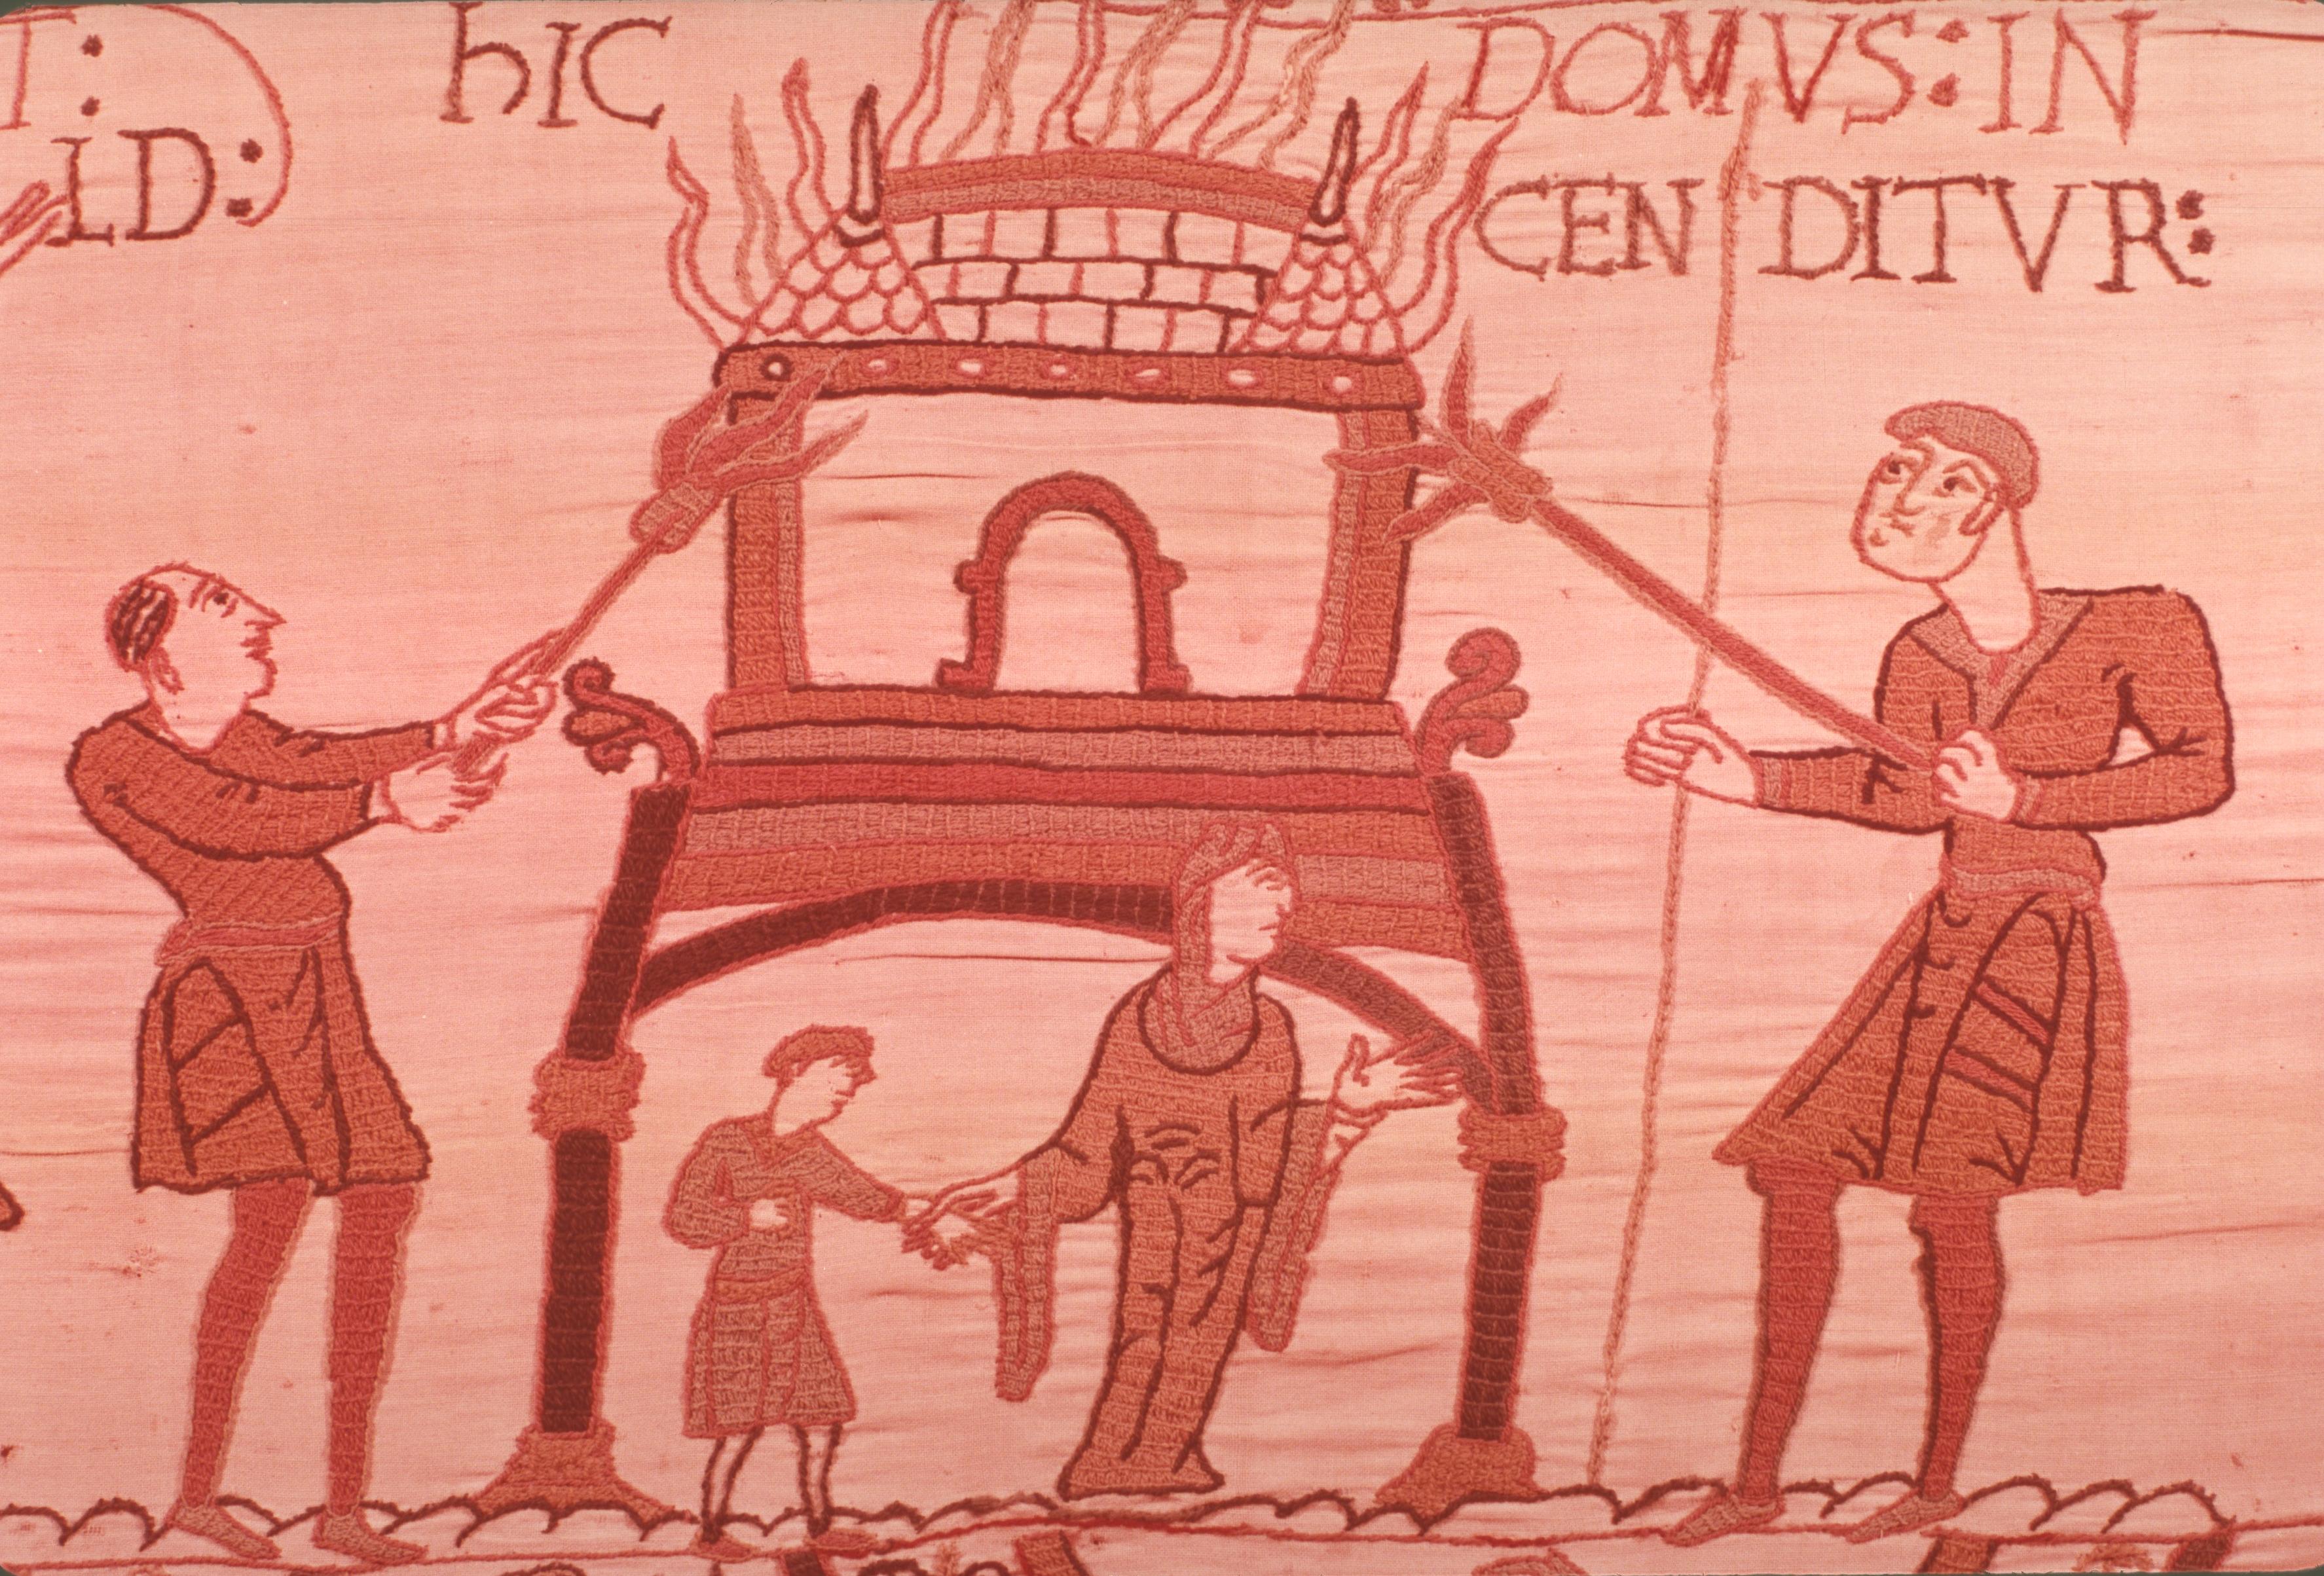
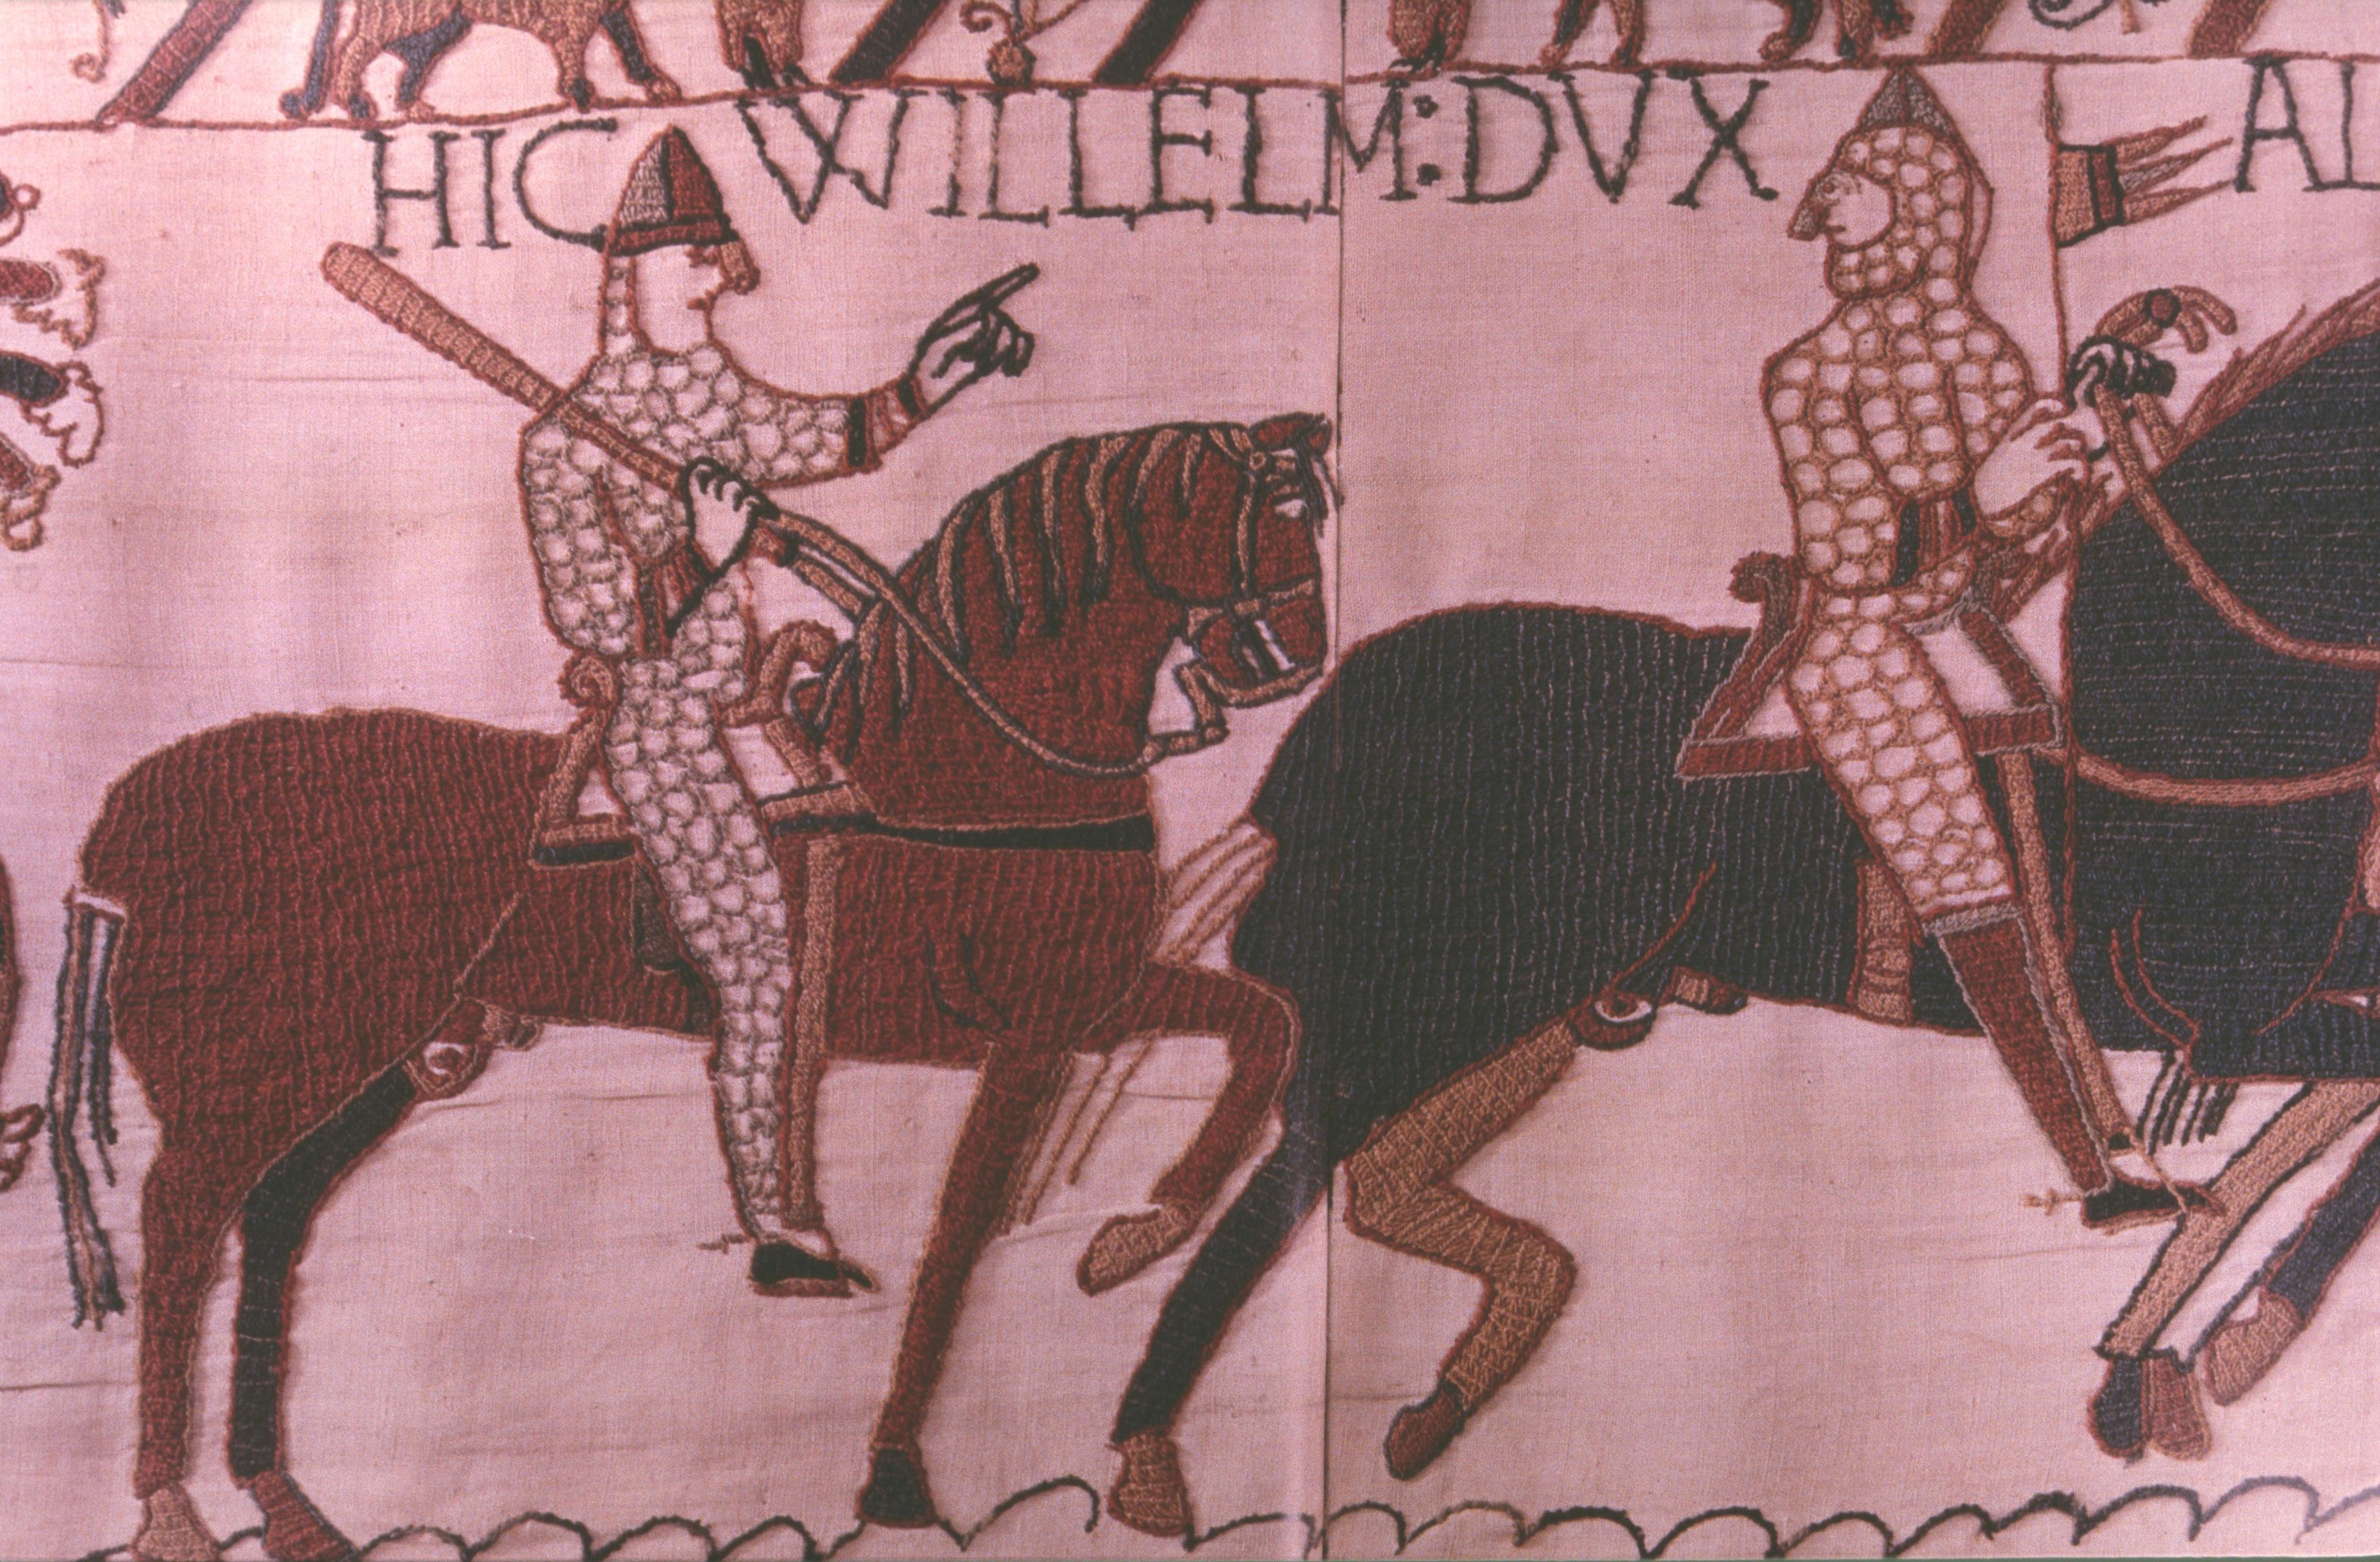
The second main part of the narrative comes to an end with a brief act of reprisal—the burning of a Saxon house (cf. detail in fig. 65); after which the gate of Hastings is flung open and William appears in full armour, holding a banner that had been blessed by the Pope, while a groom leads up his warhorse, and the rubric tells us that ‘the knights set out from Hastings’ (fig. 64 bottom right).
At this point, we may take a moment to recapitulate. Part One took us to Ponthieu, Normandy, and Brittany, and culminated in Harold’s swearing of the oath. Part Two told of Harold’s breaking his vow of allegiance, and William’s preparations and invasion, in order to punish the traitor and to assert his rights. Now, in Part Three—the same length as the other parts, you remember—we shall see the great pageant of the Battle of Hastings, which divides uncontroversially into four sections: the deployment of the two armies; the Normans’ first cavalry charge; hand to hand fighting; and the second decisive charge leading to the death of the renegade.
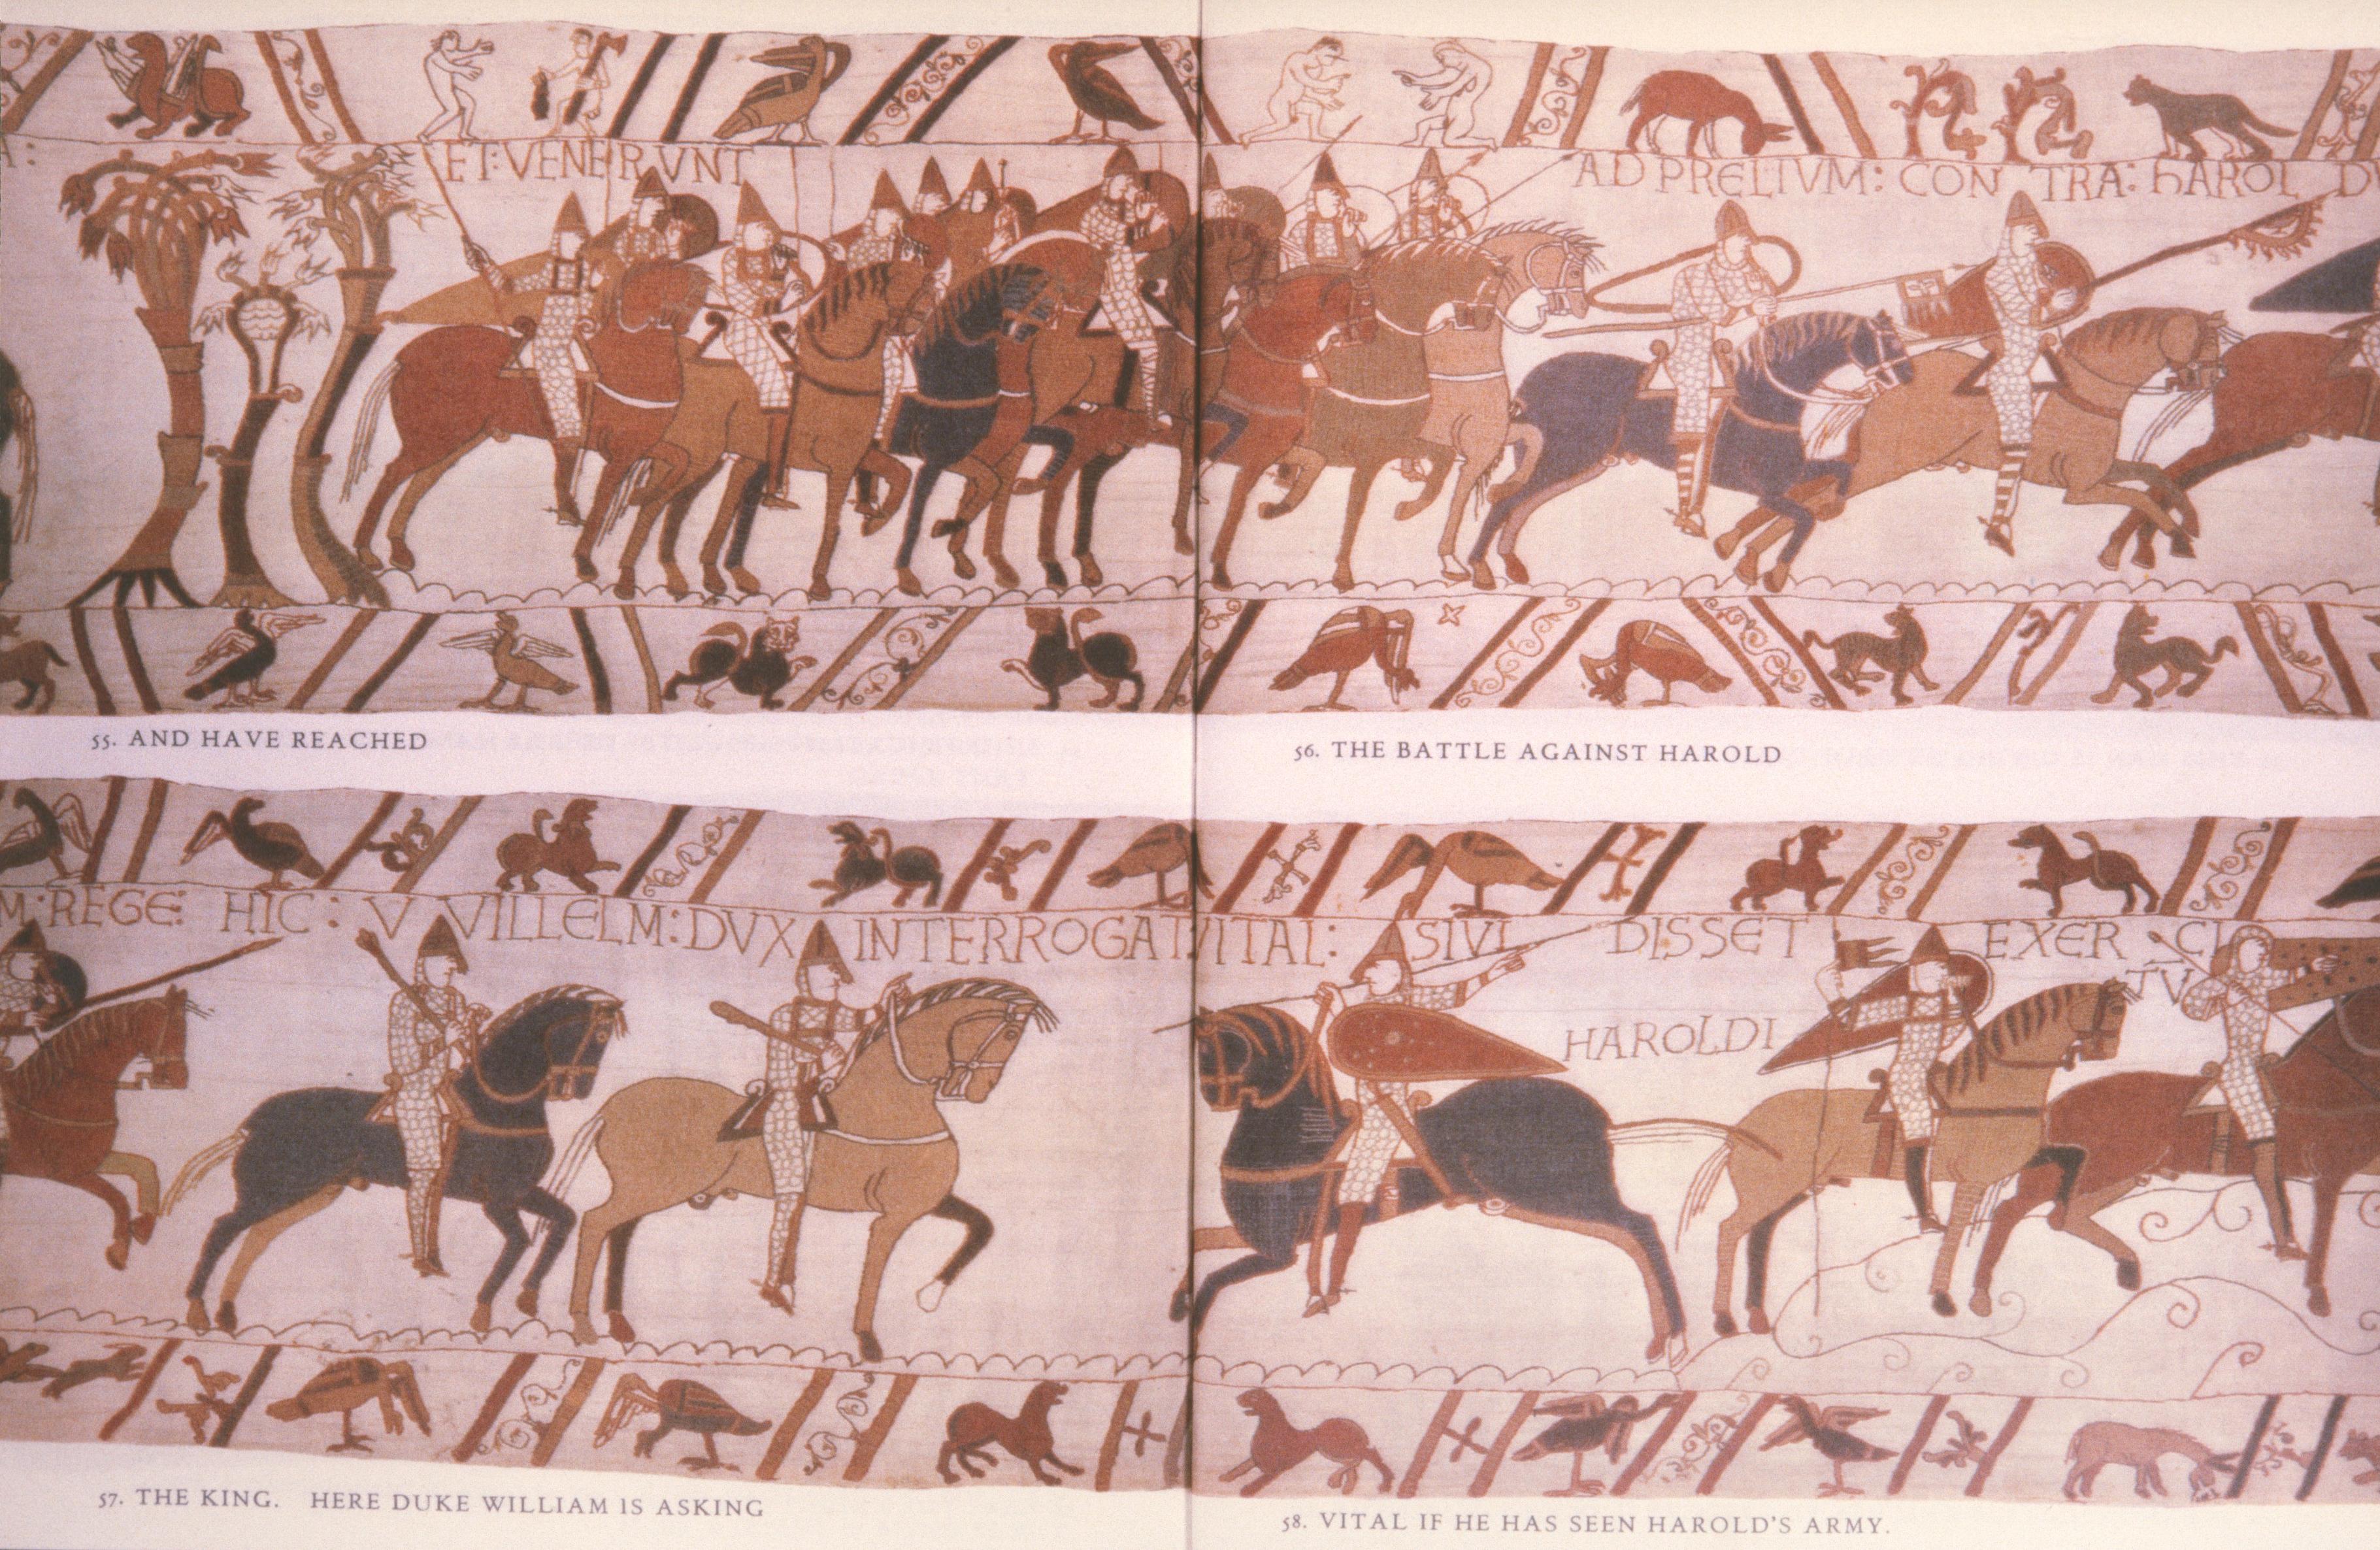
They break into a gallop, and then rein in as they come level with their leaders, Odo and William (each of whom carries a mace: fig. 66 bottom left). They have paused in order to ‘interrogate Vital’—the returning scout on the black horse—to discover ‘if he has seen the army of Harold’; and it is clear from the gestures of the two Normans on the higher ground (fig. 66 bottom right) that they have located the enemy.
The chapter ends with a matching scene in the opposing army, to the right of the screen of trees (fig. 68 top left), where a Saxon look-out shields his eyes, catches sight of the Normans, and runs down hill (notice that it is, to all intents and purposes, the same man shown twice) to bring the news to Harold on his black horse.
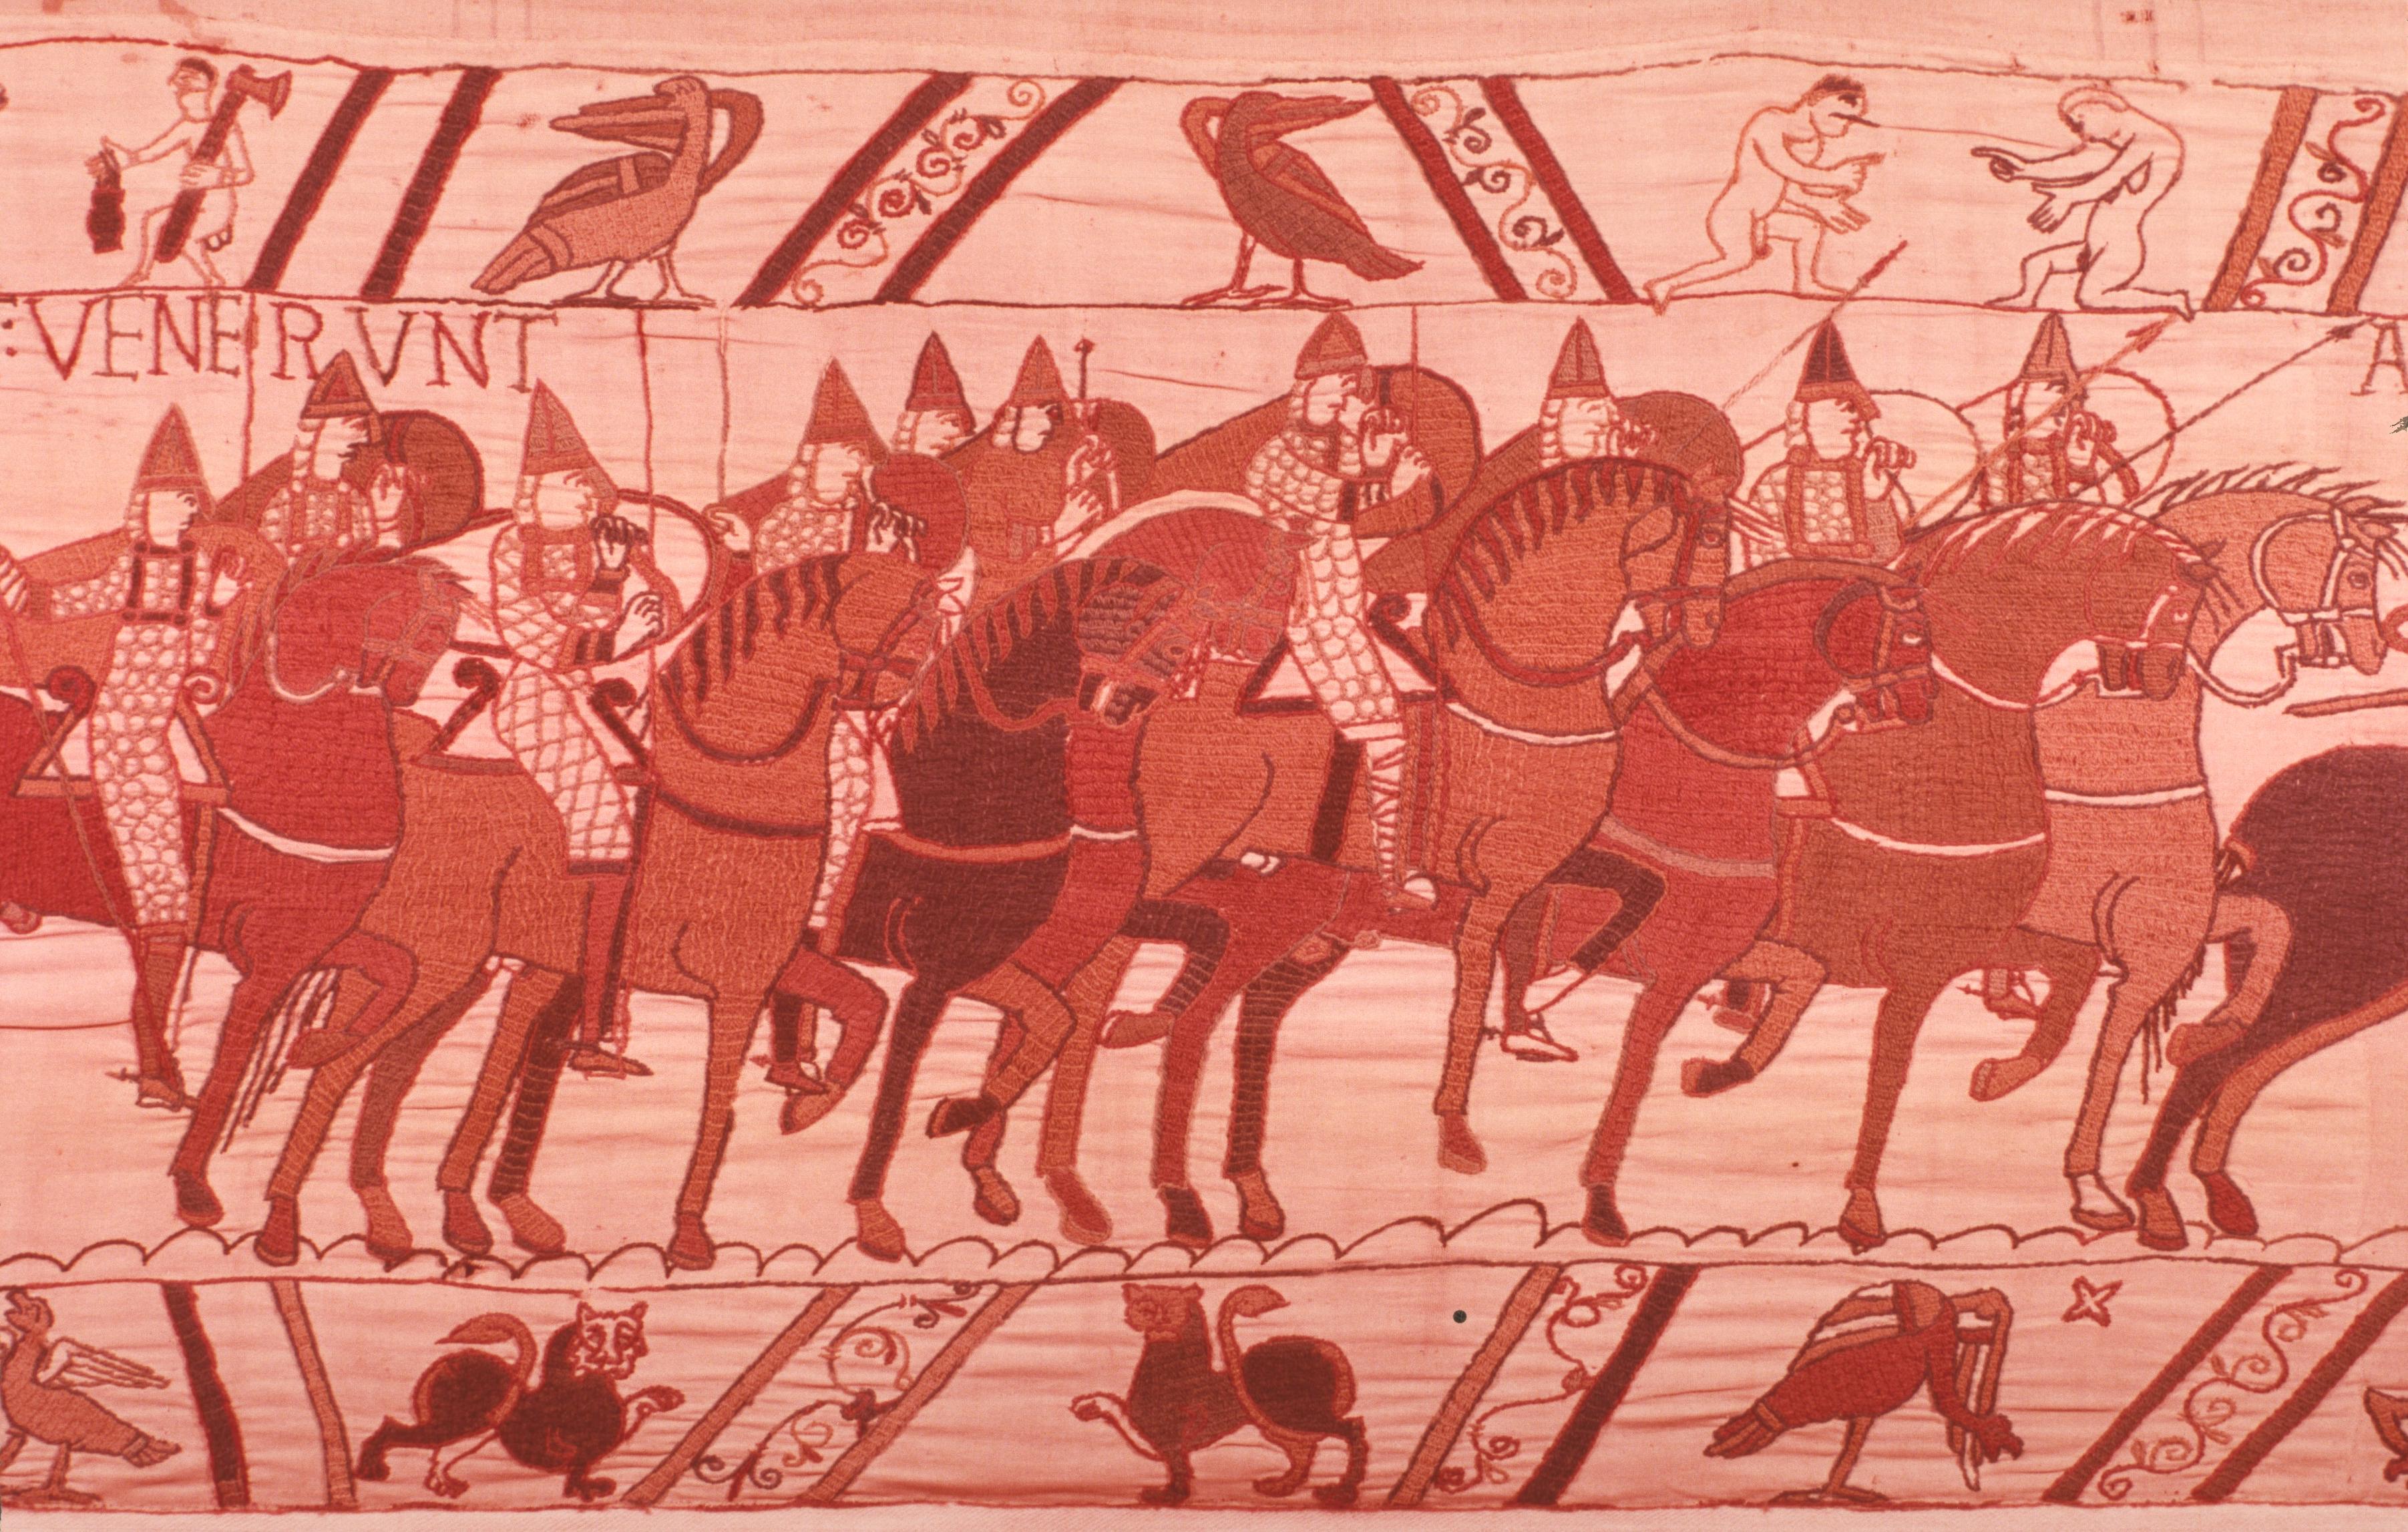
Chapter Eight, ‘The Attack’, begins (cf. detail in fig. 69) by showing us William, most unusually for a hero, in a position behind his troops. But his position is clarified by the turn of the man’s head, who is clearly listening, and above all by the text (which you see can read in fig. 68, bottom), which reveals that William is delivering himself of that most necessary thing in any self-respecting epic—the general’s harangue, in which he urges his men to bear themselves VIRILITER ET SAPIENTER, ‘manfully and wisely’. This thrilling section is the visual equivalent of the ‘Charge of the Light Brigade’ and is perhaps the most stunning example of ‘acceleration’ anywhere in the Tapestry. Once again, the embroidery medium is exploited best where the illustrated page (fig. 68 botttom and fig. 70 top) is most helpless.
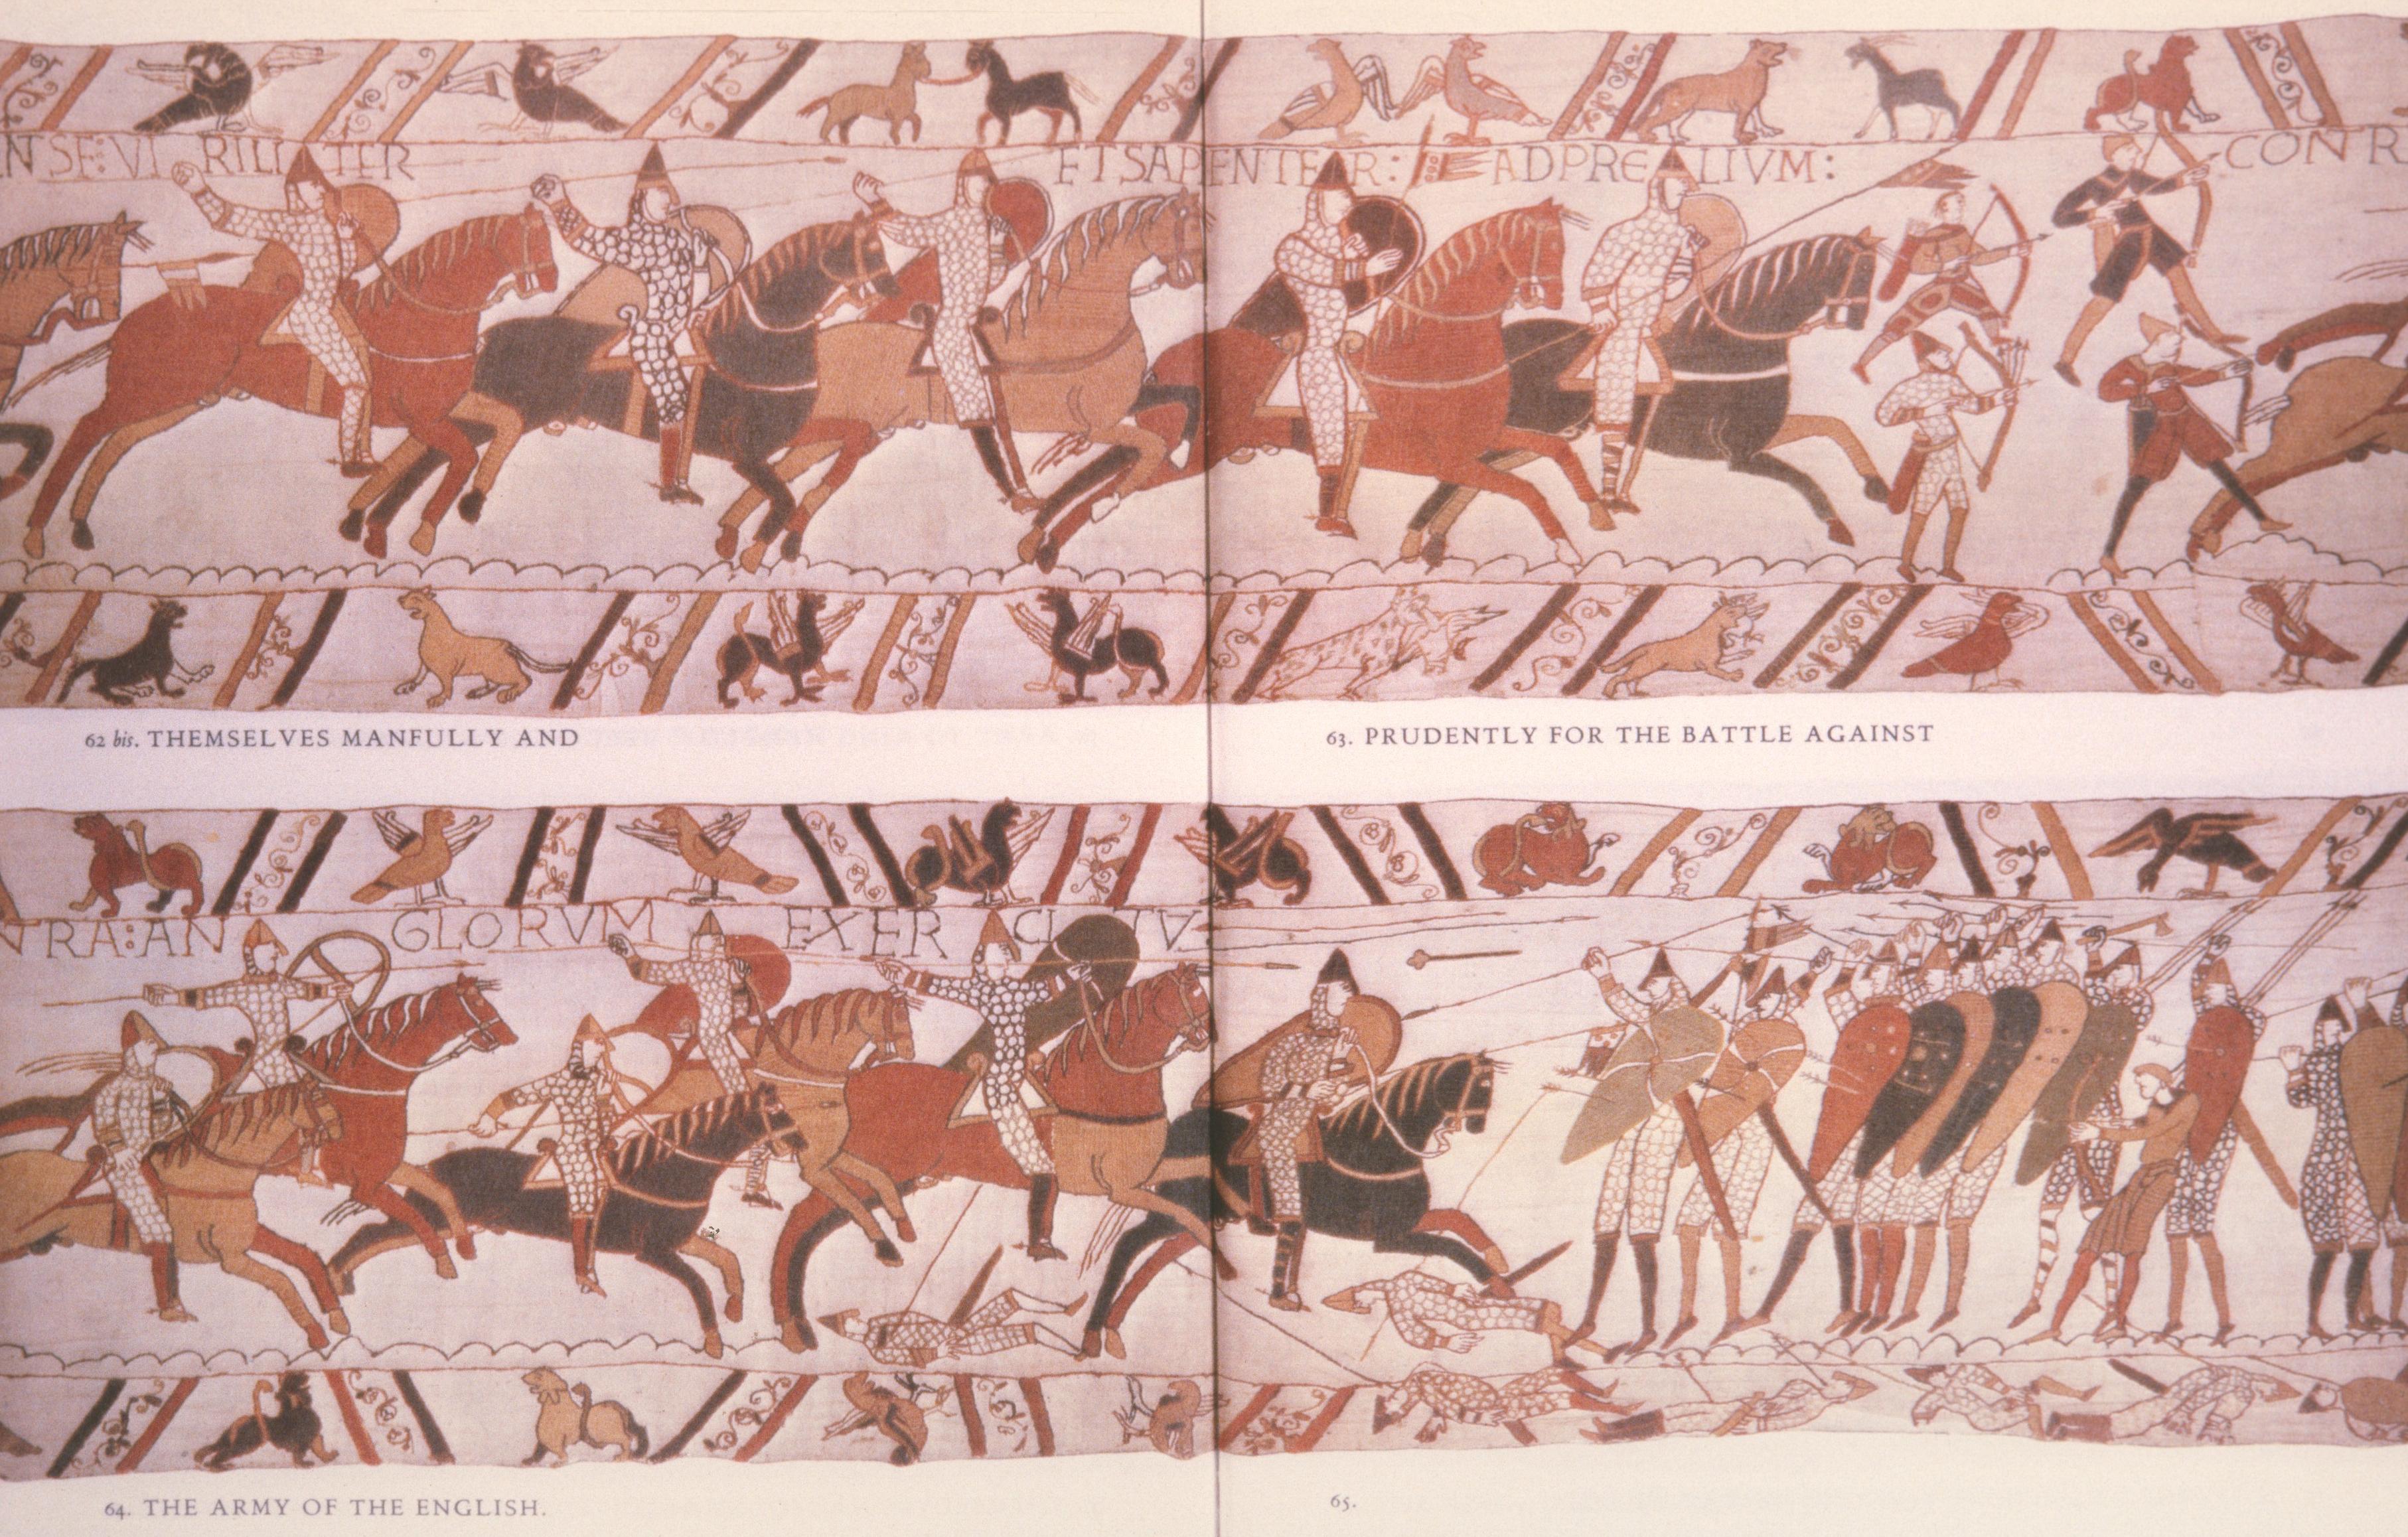
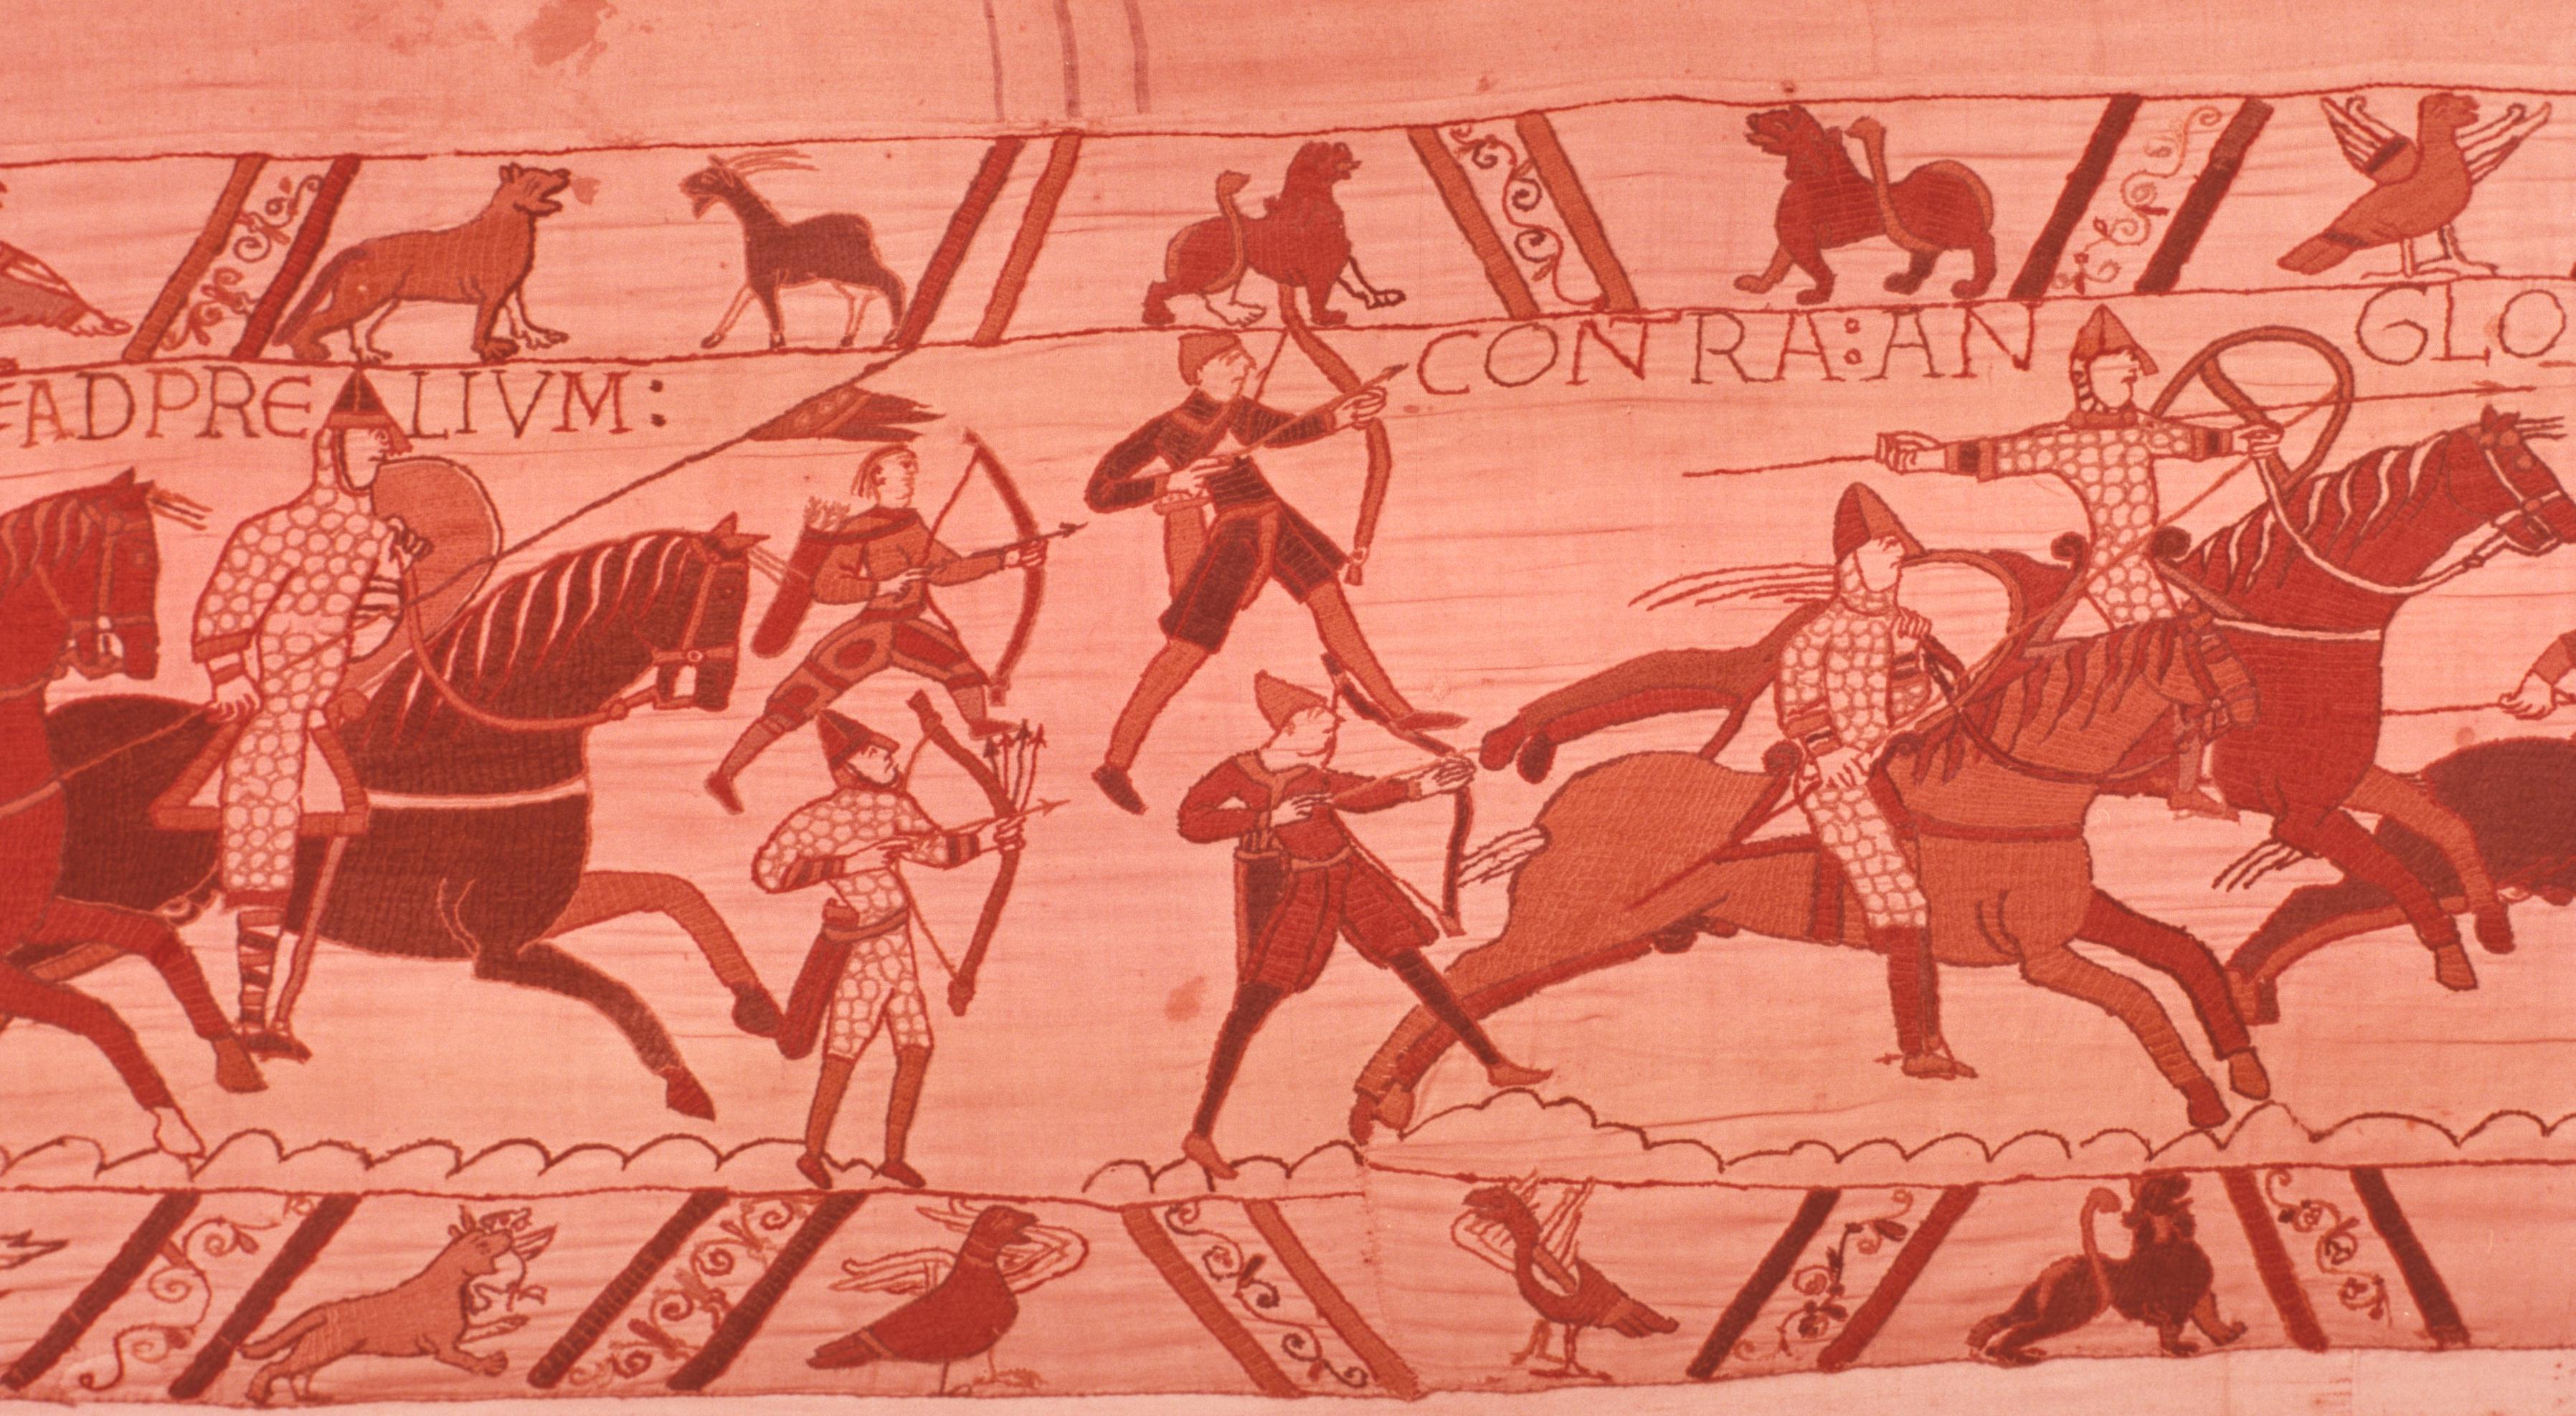
The horsemen catch up with some archers (who will be decisive in the final assault), and hurtle on again against the shield wall of the Saxon infantry The two moments are captured brilliantly in the two details in fig. 71 and 73; and I must smuggle in a wide-angle shot from another source (fig. 73) as well—however narrow the strip becomes on the page—to show you that the cavalry are attacking the Saxons from left and from right.
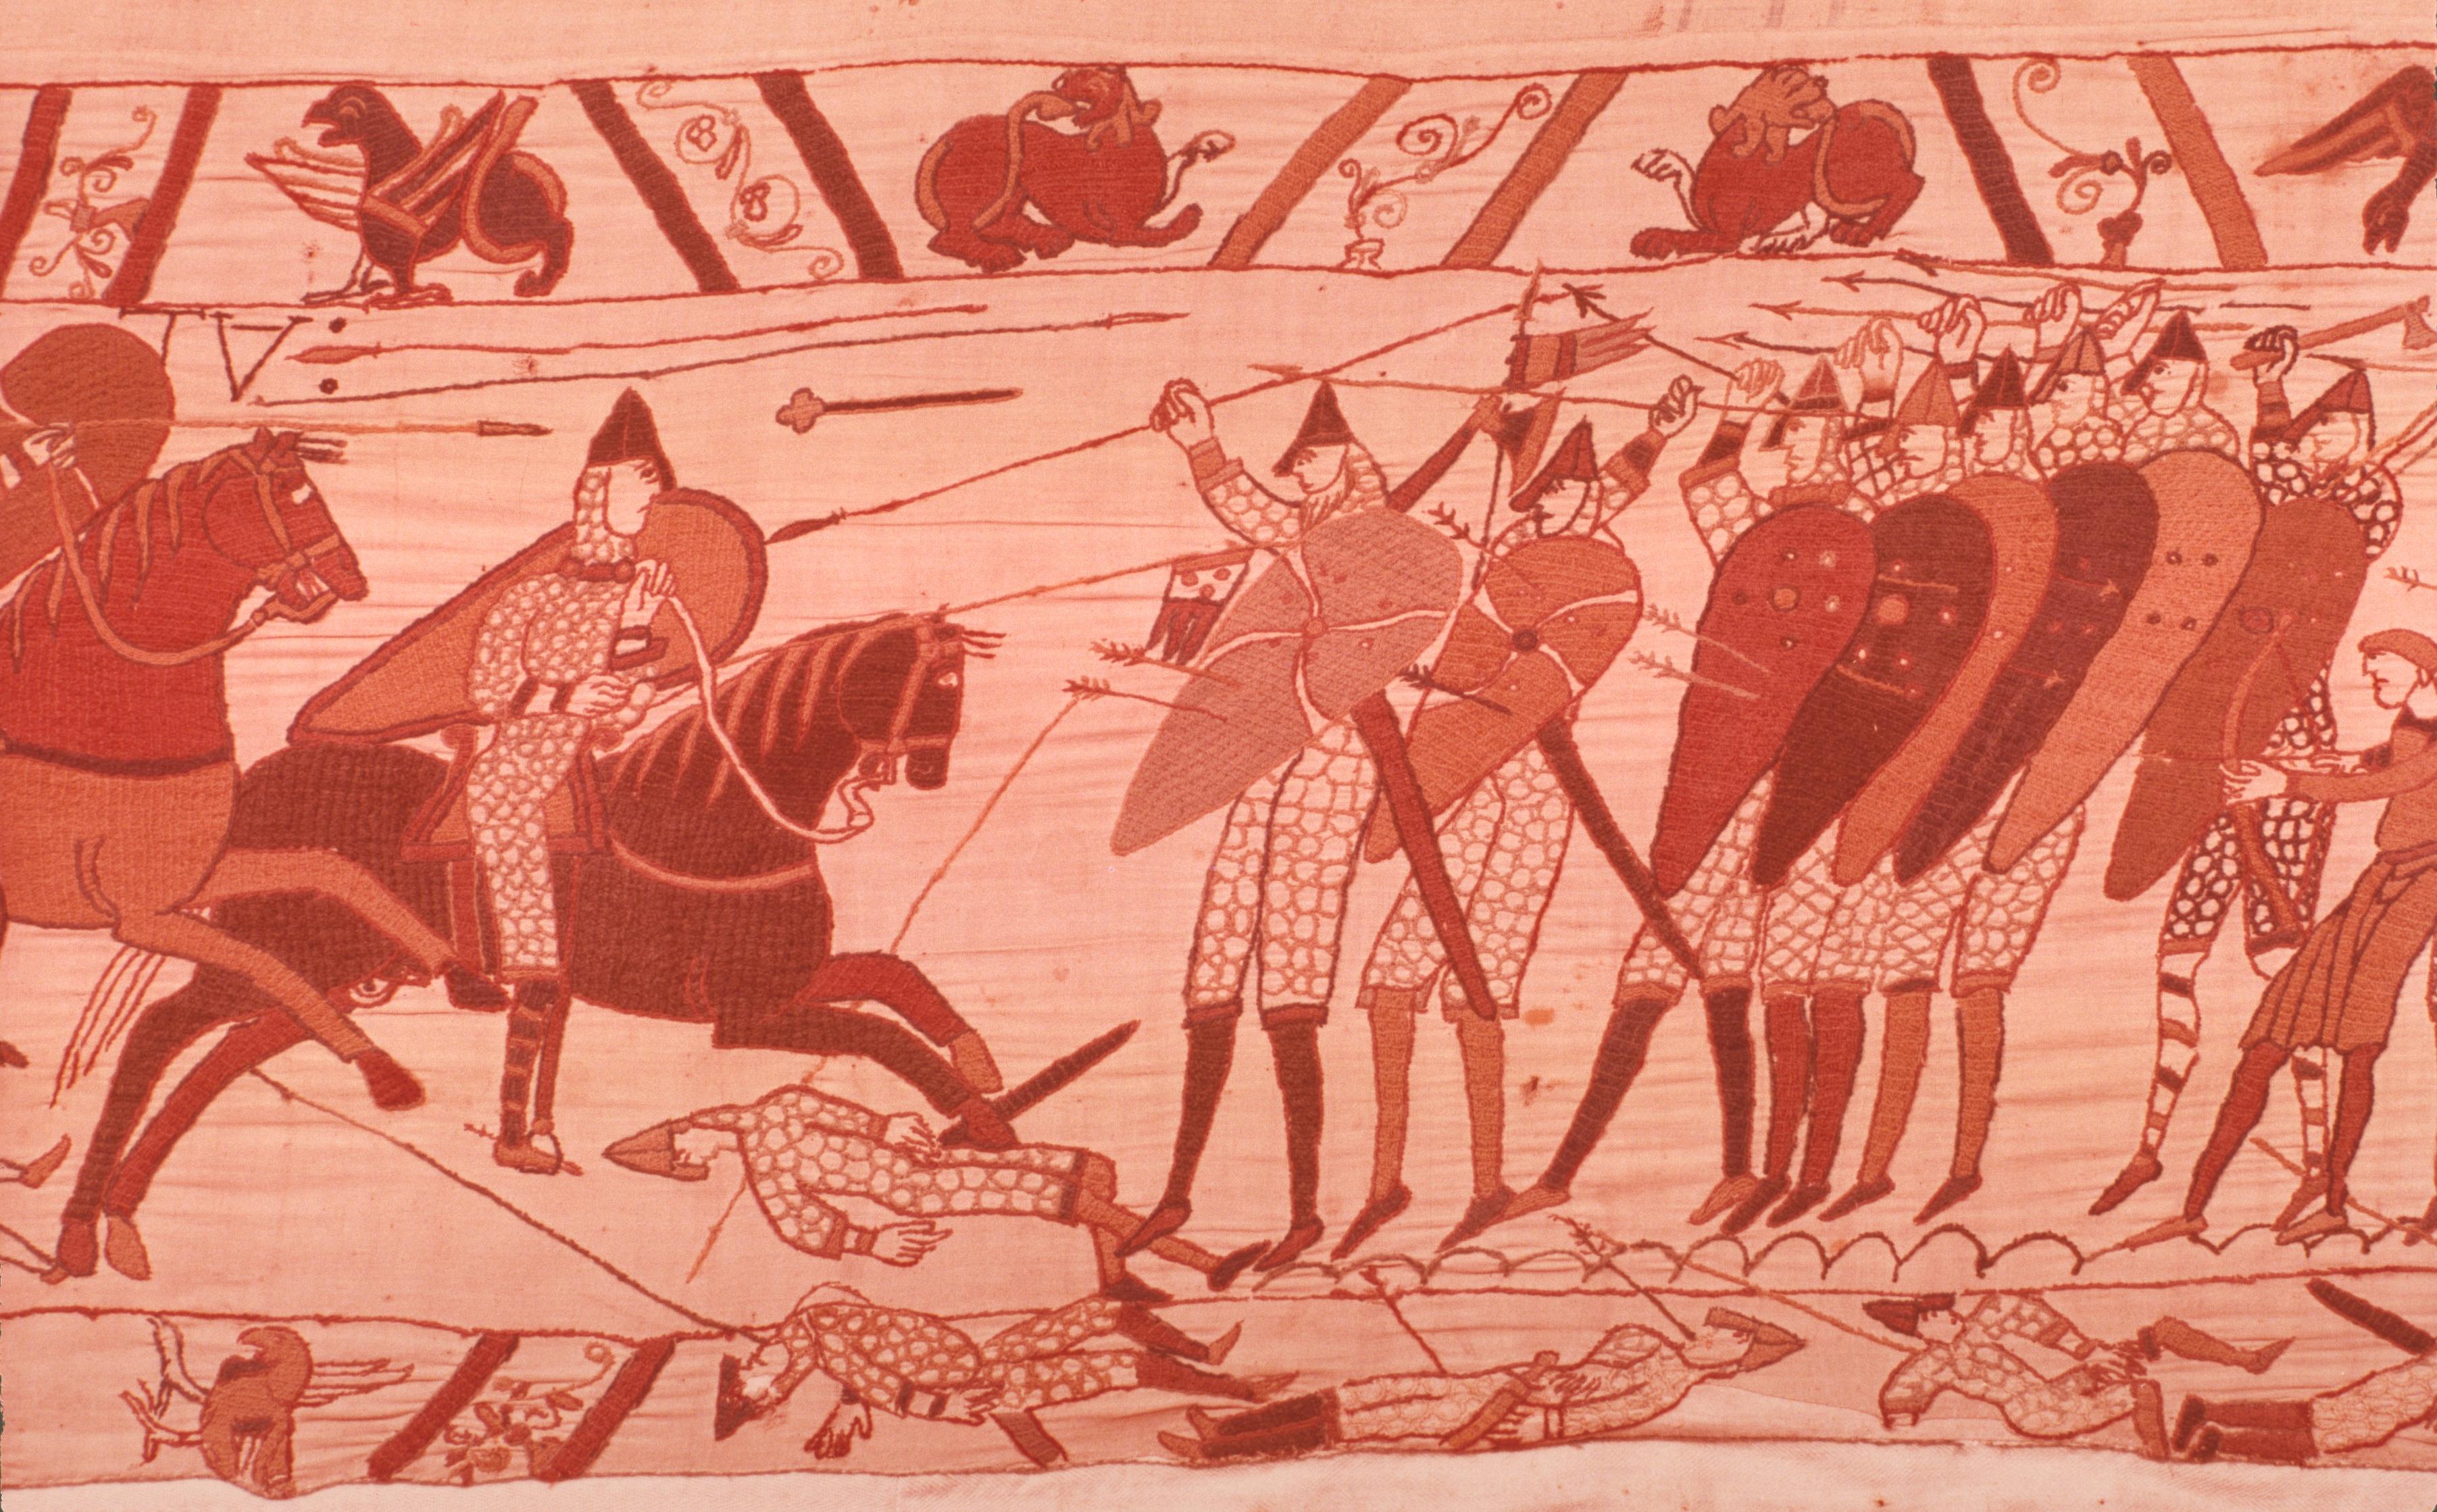
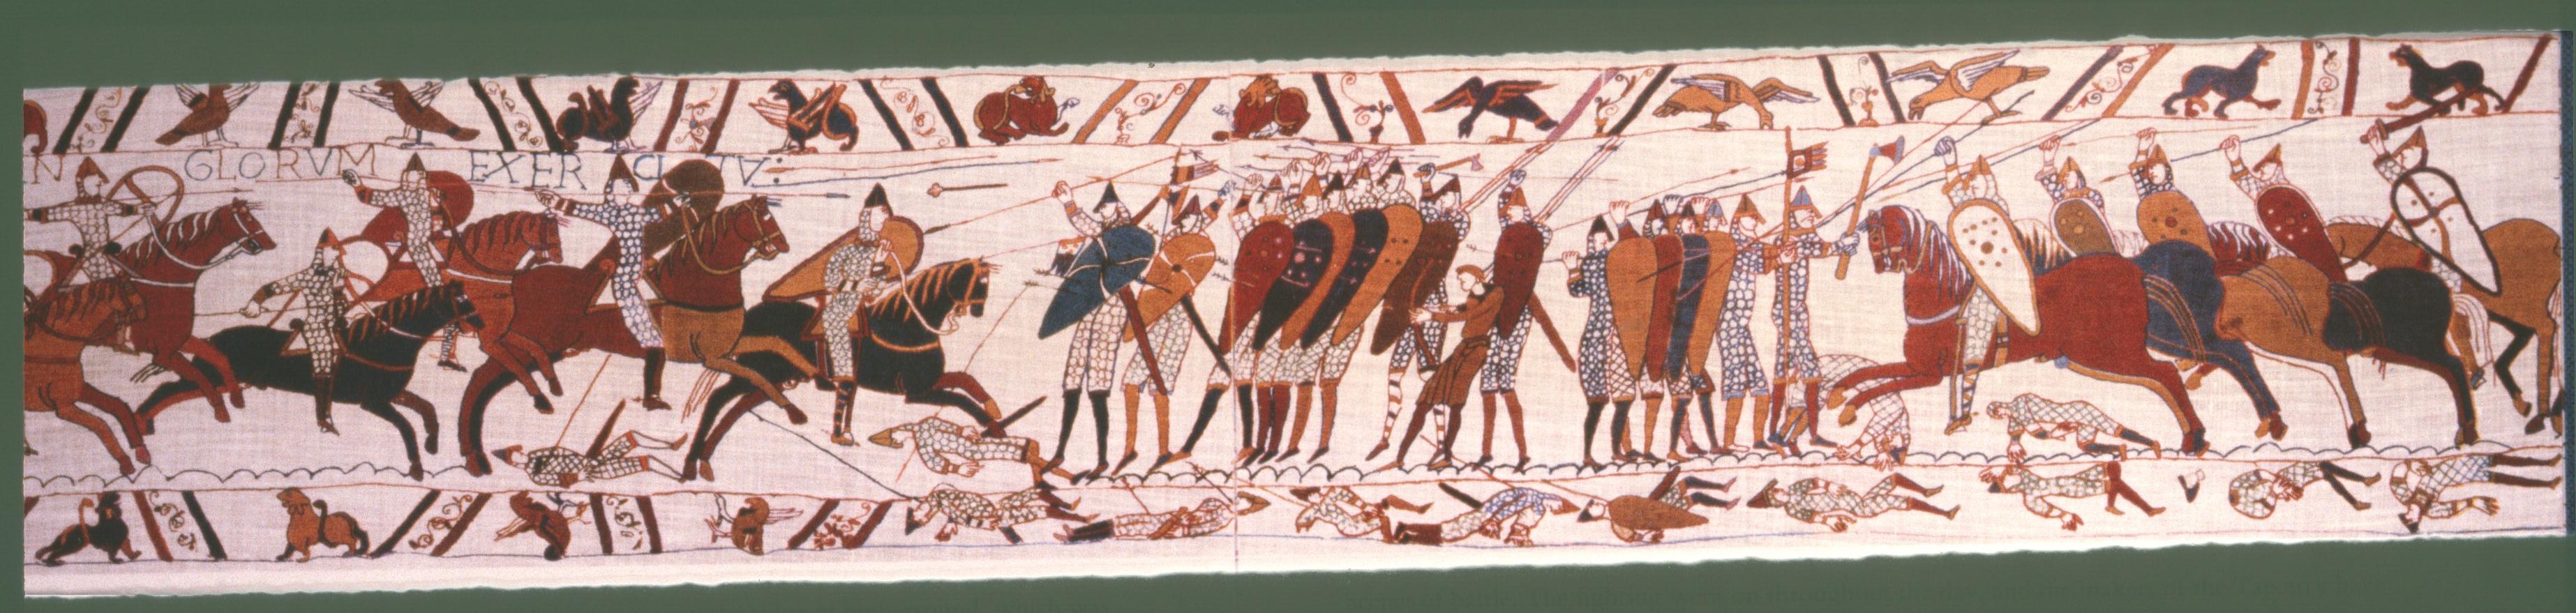
What you can see in these three images (figs. 71-73) represents one of the most exciting and successful areas of the tapestry, unthinkable in another medium. You have the pleasure of patterns and colour, of energy, and an abundance of realistic detail: missiles shower through the air, arrows stick fast in shields, and the first casualties are sprawling on the ground. The borders have been fairly restrained in the last few chapters, but from this point on, the lower margin becomes as realistic as it had been heraldic—it is treated as the field of battle, strewn with the dead who have met their violent ends in the most varied ways and sprawl in the most varied postures.
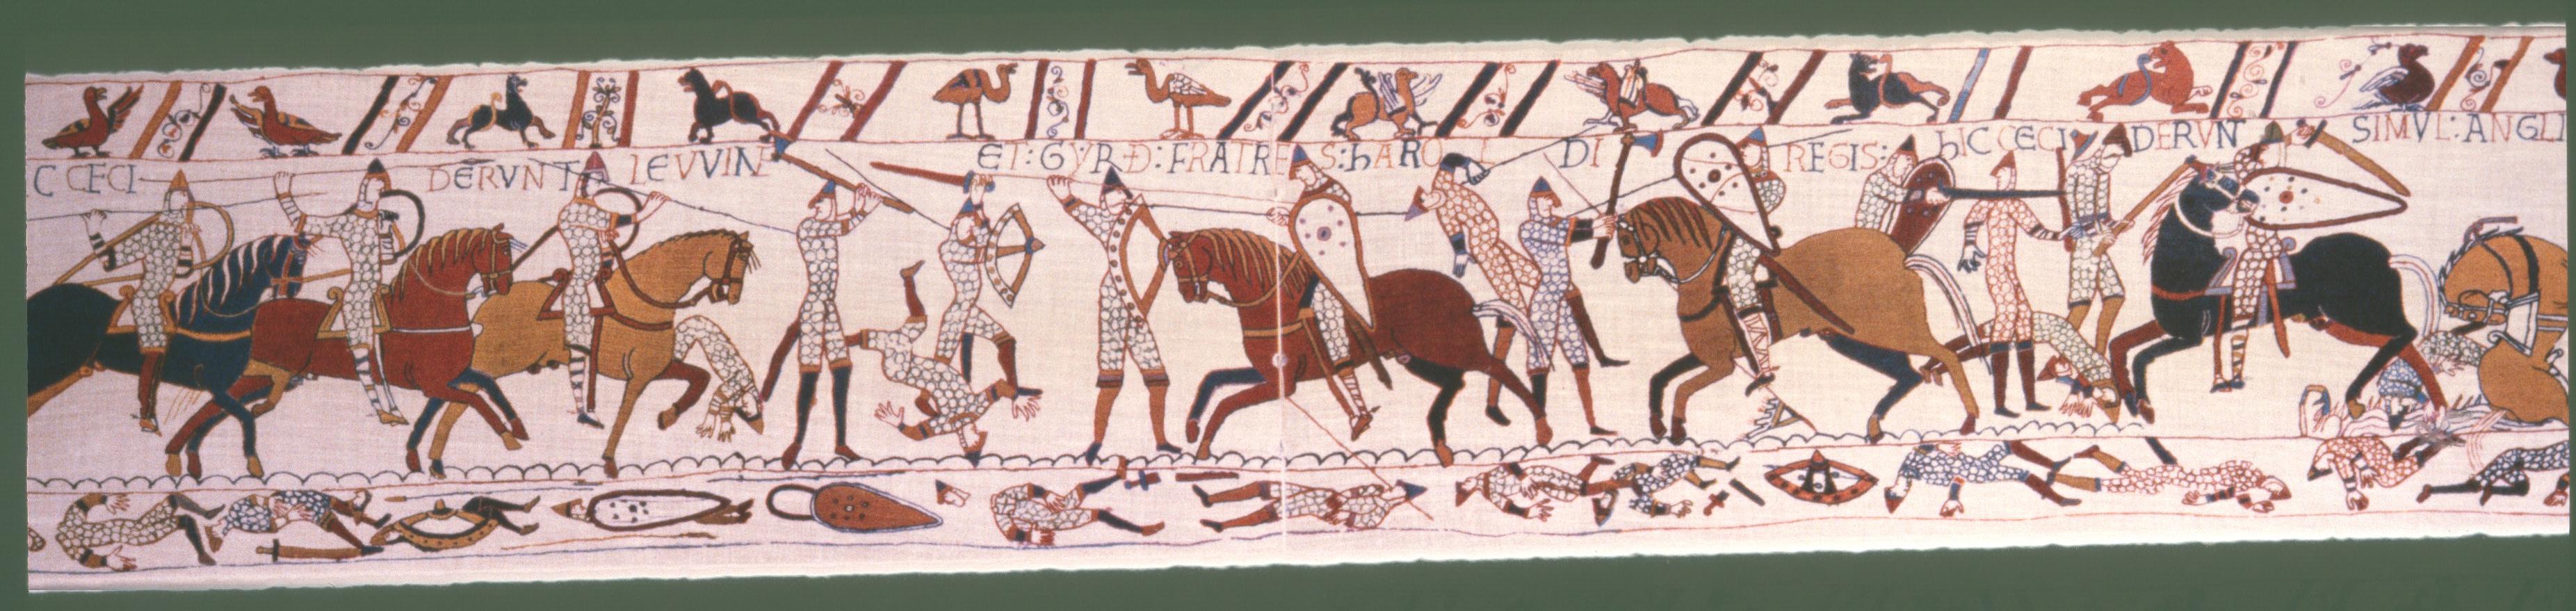
The Normans clearly did not succeed in breaking the Saxon shield-wall straight away. In fig. 74 we move into a more confused section, which constitutes the penultimate chapter that I call ‘The Mêlée’. At first, success is still with the Norman cavalry: they kill ‘Levin and Gyrth the brothers of Harold’.

The detail of this killing (in fig. 75) is an excellent example of the superb freedom of the drawing and at the same time of the all-important space surrounding the characters.
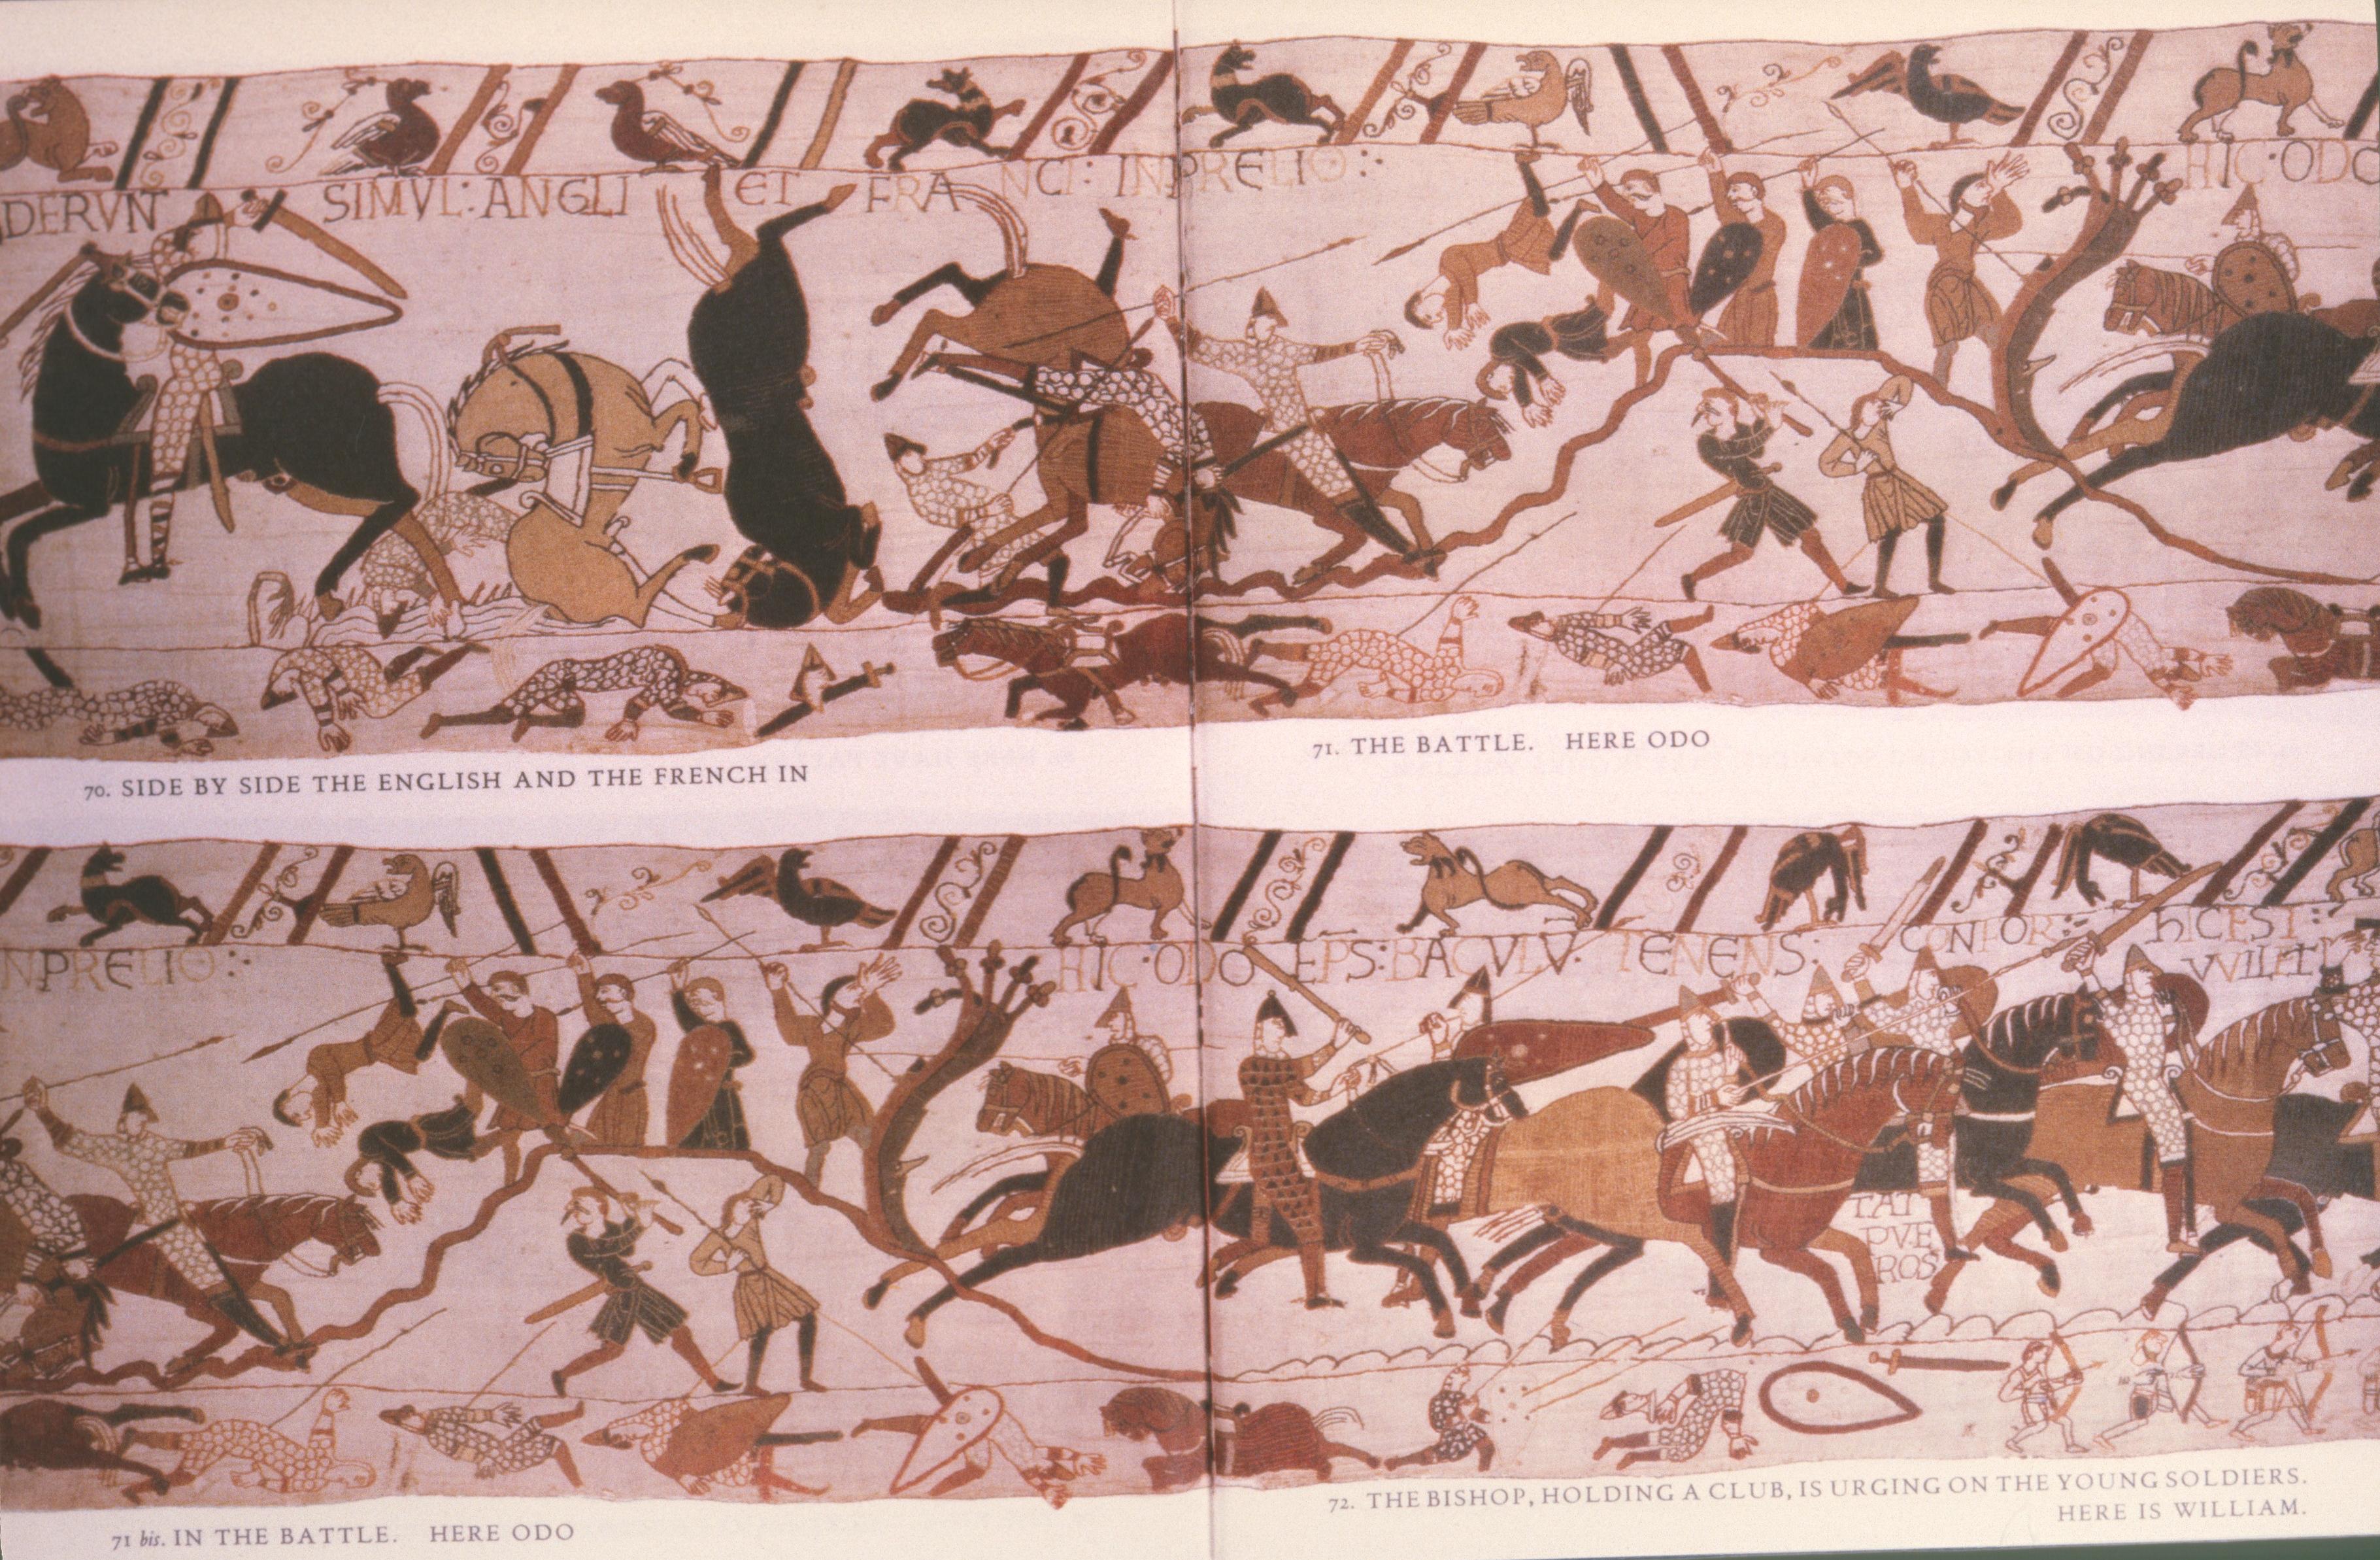
In the next scene, however, the tide of battle begins to turn, and the rubric tells us that ‘here fall together Saxons and Normans’. The Saxons have clearly prepared a low defensive mound with a palisade (fig. 76 top right), and this brings some of the Norman horses tumbling down, including the two in the single most memorable detail of the whole work (fig. 77):

Those horses that get beyond this barrier are seen crashing to the ground, their riders dragged from the saddles, as the Saxon infantry—conspicuously ill-armed here—put up a spirited defence of the high ground on the right (it is the same high ground, an overlap, which we see at the bottom left of fig. 76). The situation obviously became so critical in the last stage of the mêlée that a rumour went round that William himself had been killed, and as a result the younger Normans must have panicked and begun to retreat.

We can tell this from the next scene (fig. 78), where the rubric tells us that ‘Bishop Odo, holding his mace, urges on the boys’; and the artist shows us William, duly identified, lifting the visor of his helmet to show he is still alive, while the man entrusted with the Papal banner swings round to point him out to the troops (fig. 79, top left, and the detail in fig. 80).


Once the Normans have rallied, victory is assured. A strong force of archers—all shown in the lower margin (fig. 79, bottom left)—are brought into action; and the struggle is now, in modern terms, between tanks and artillery on one side and infantry on the other. The Norman cavalry charge again, this time on level ground (fig. 79 bottom), and they overrun Harold’s bodyguard. The rubric states: ‘there fell those who were with Harold’.
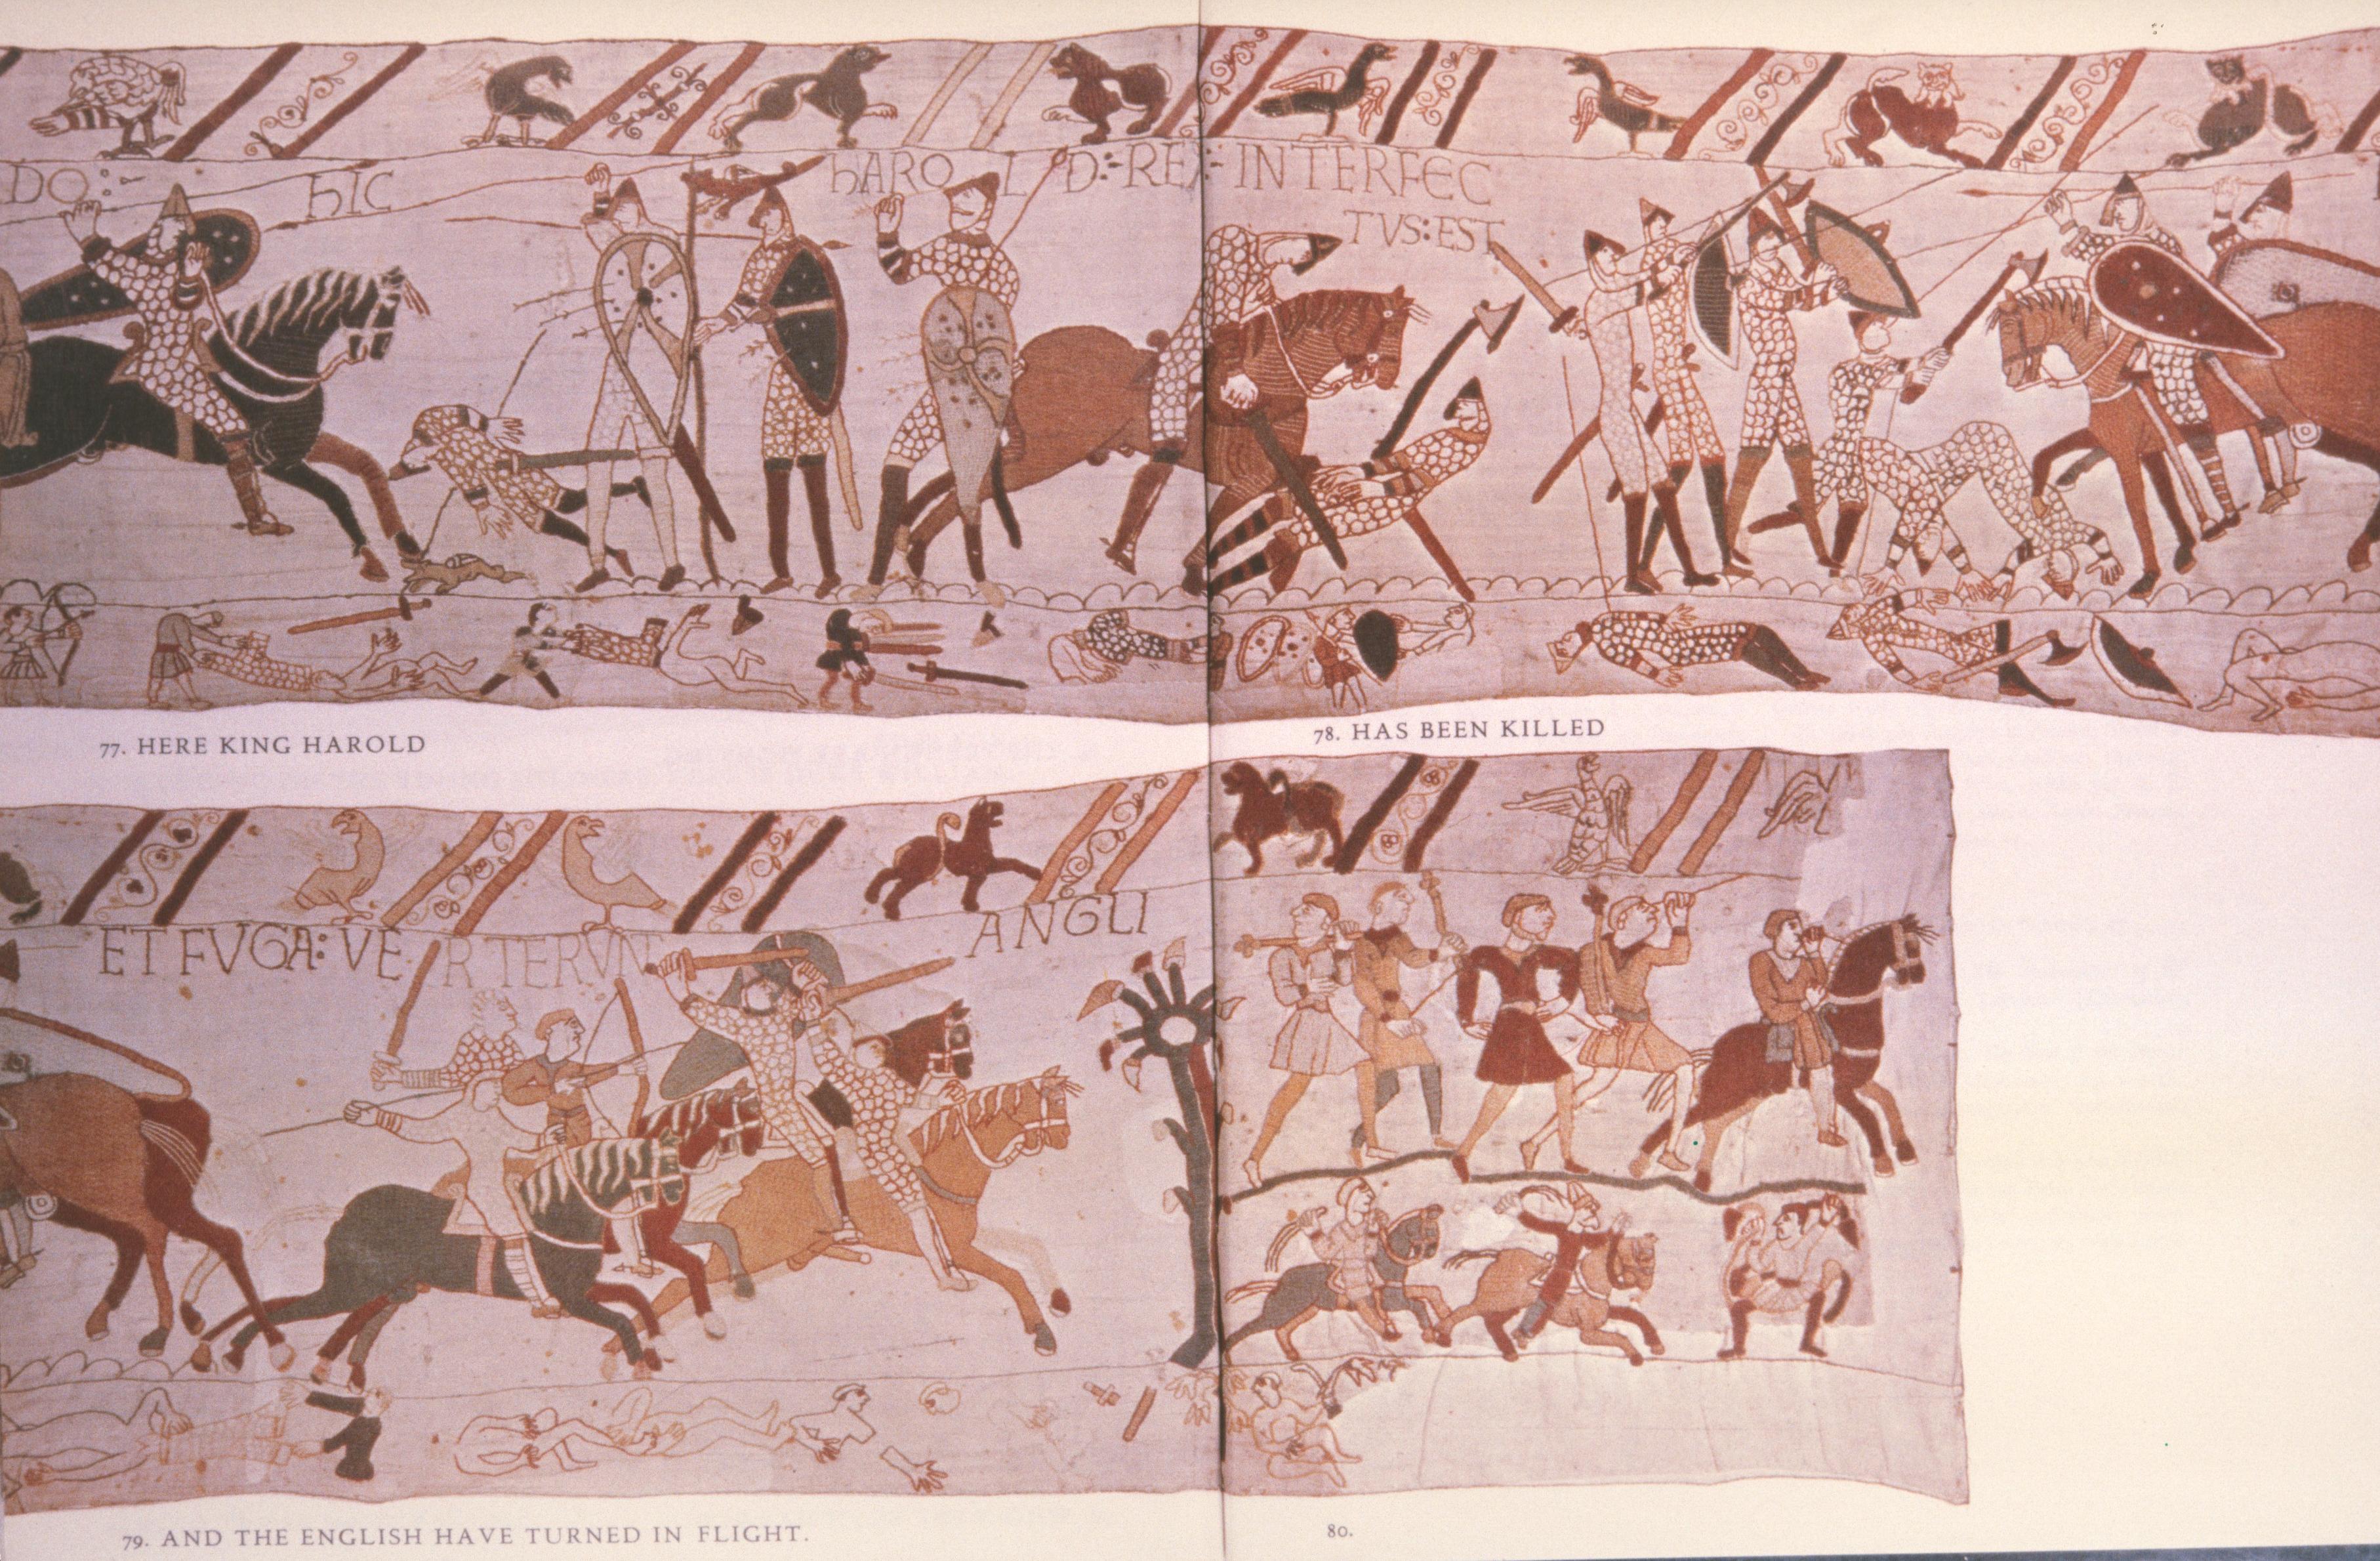
The climax comes quickly. An unarmed attendant is killed (fig. 80 bottom right; and see the details in fig. 82) in a way which reminds Professor Bernstein of the killing of King Zedekiah’s sons. The standard bearer is struck with a lance (fig. 81 top left) and falls to the ground with the standard (the two figures are probably meant to be the same man in successive moments):
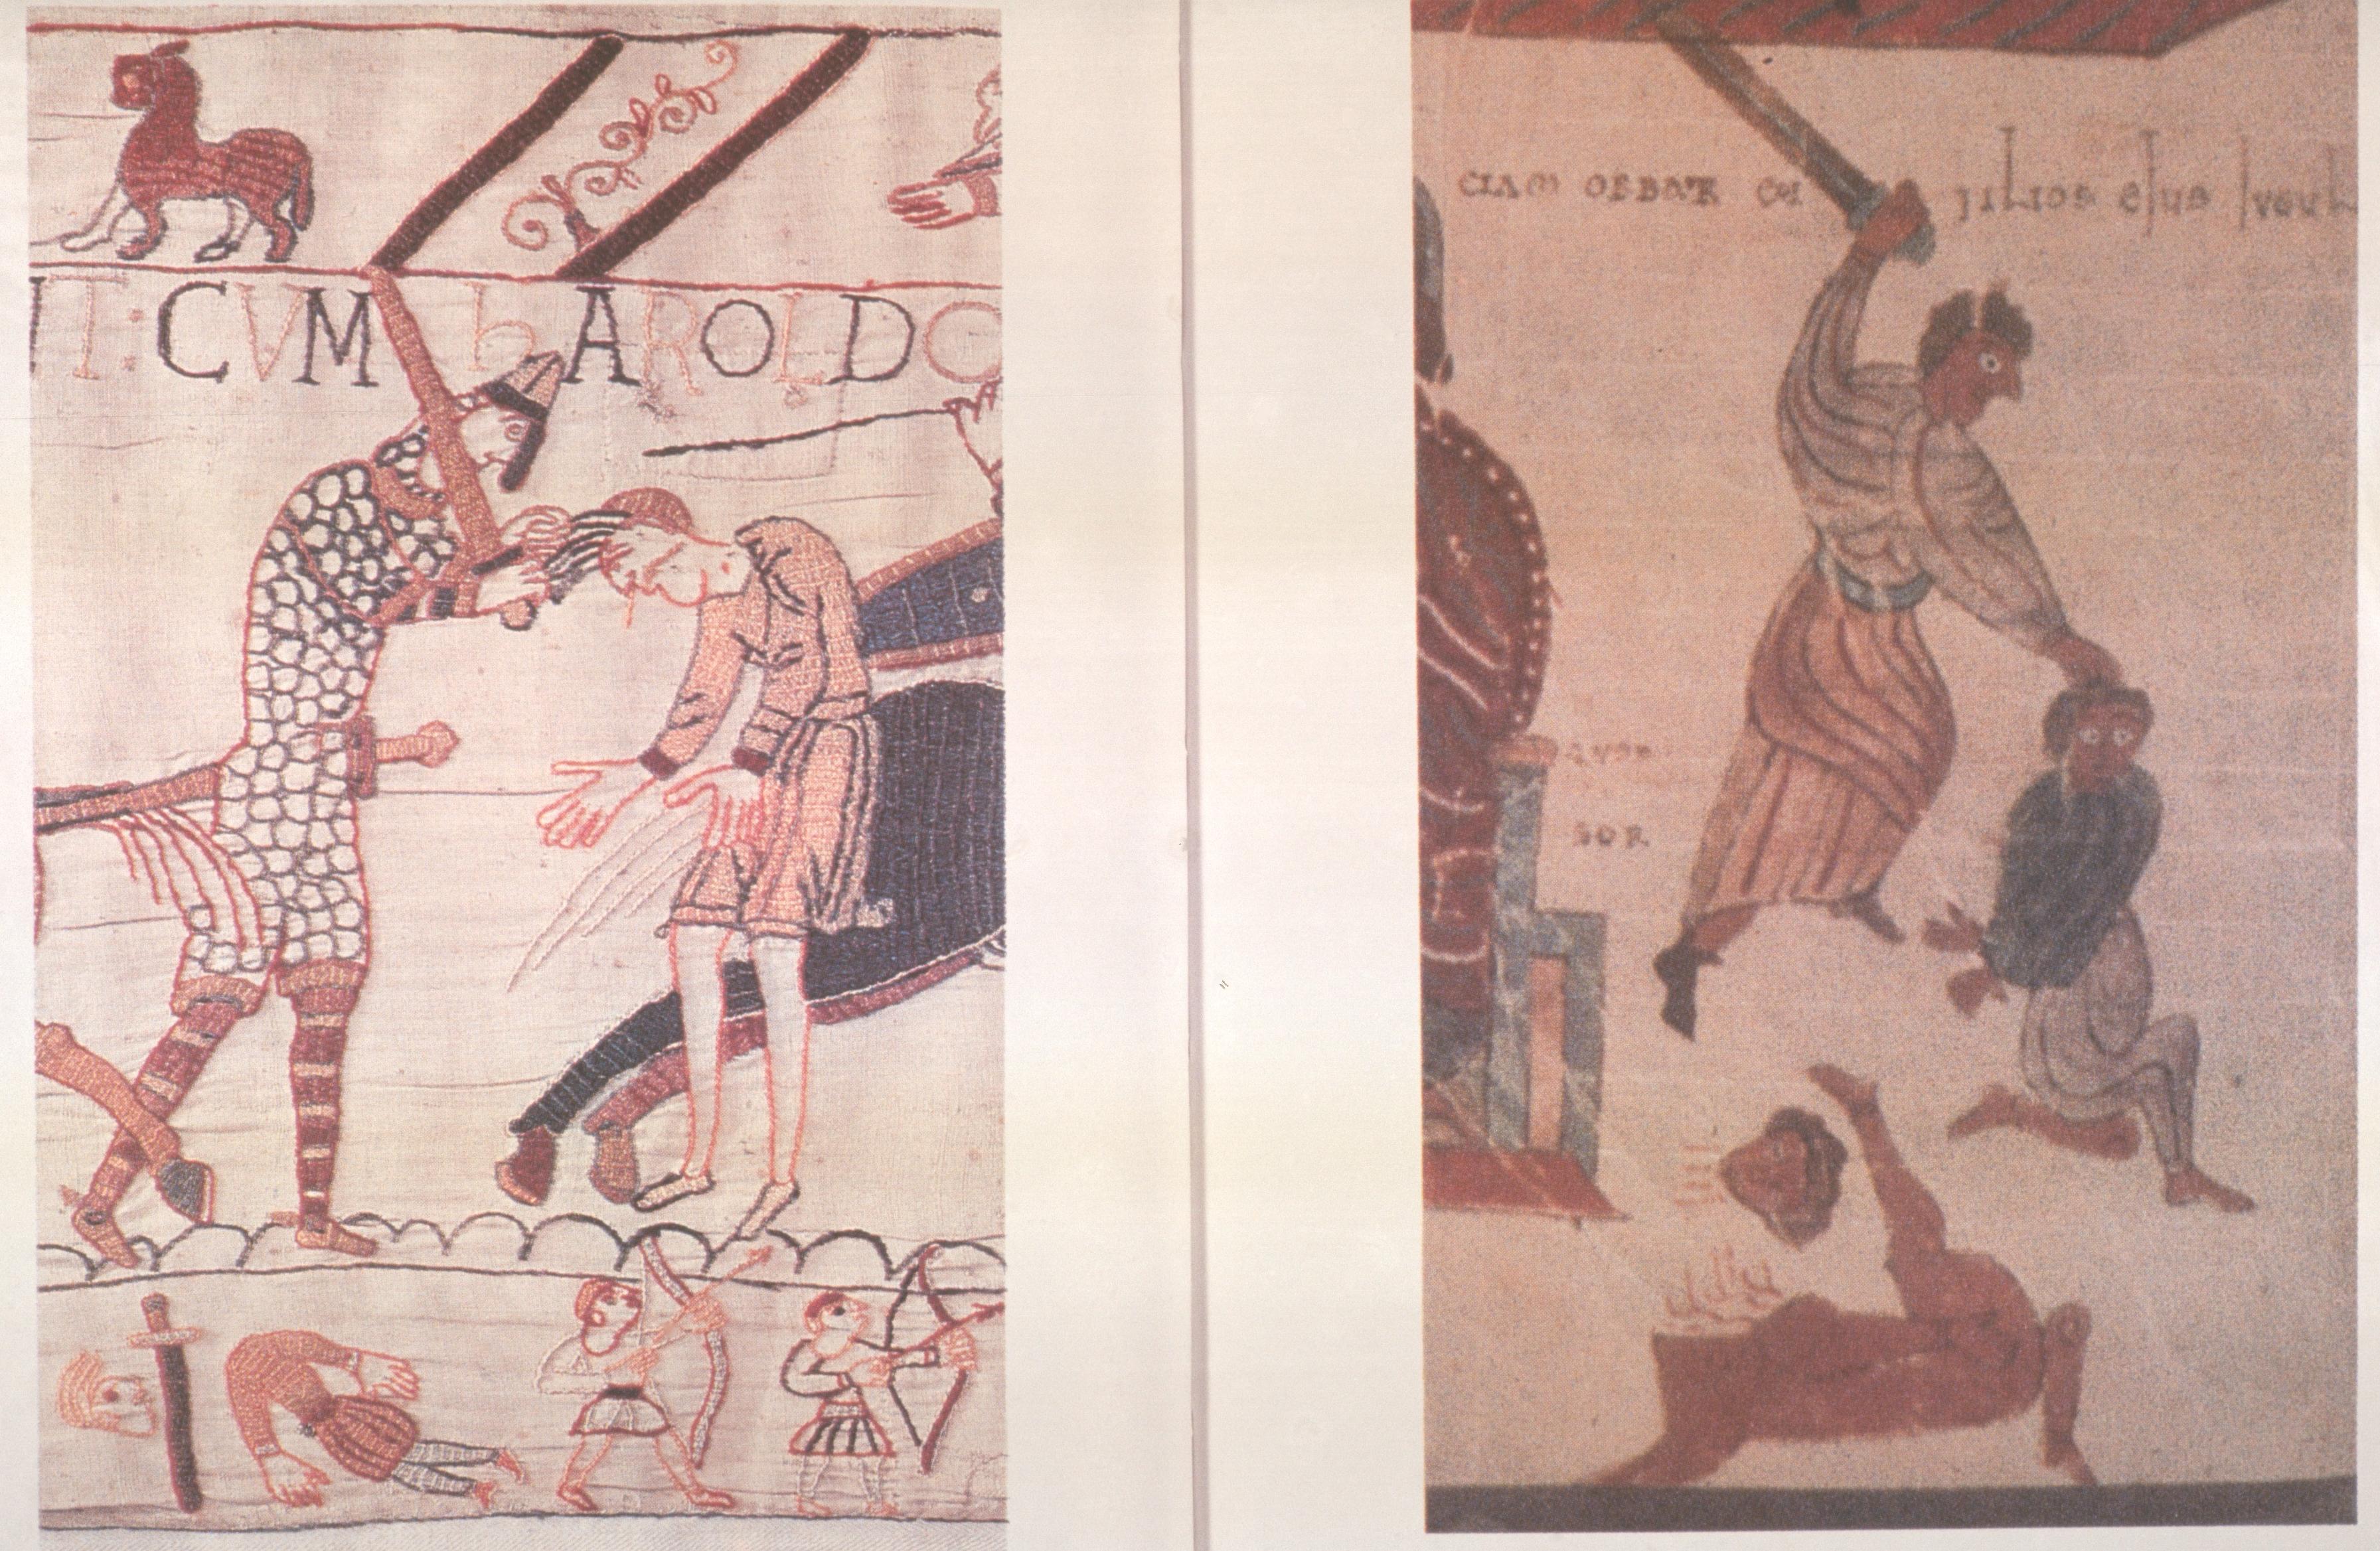

While I remain fairly sceptical about Professor Bernstein’s typological reading, he does convince me that we ought to return to the earlier interpretation of this scene, and accept that Harold is shown twice—once blinded, once cut down with a sword and killed, INTERFECTUS. A little line of needle-holes indicate that the fallen figure used to have an arrow in his eye, which may be the work of the original artist and not of some well-meaning restorer, whose work was subsequently removed.
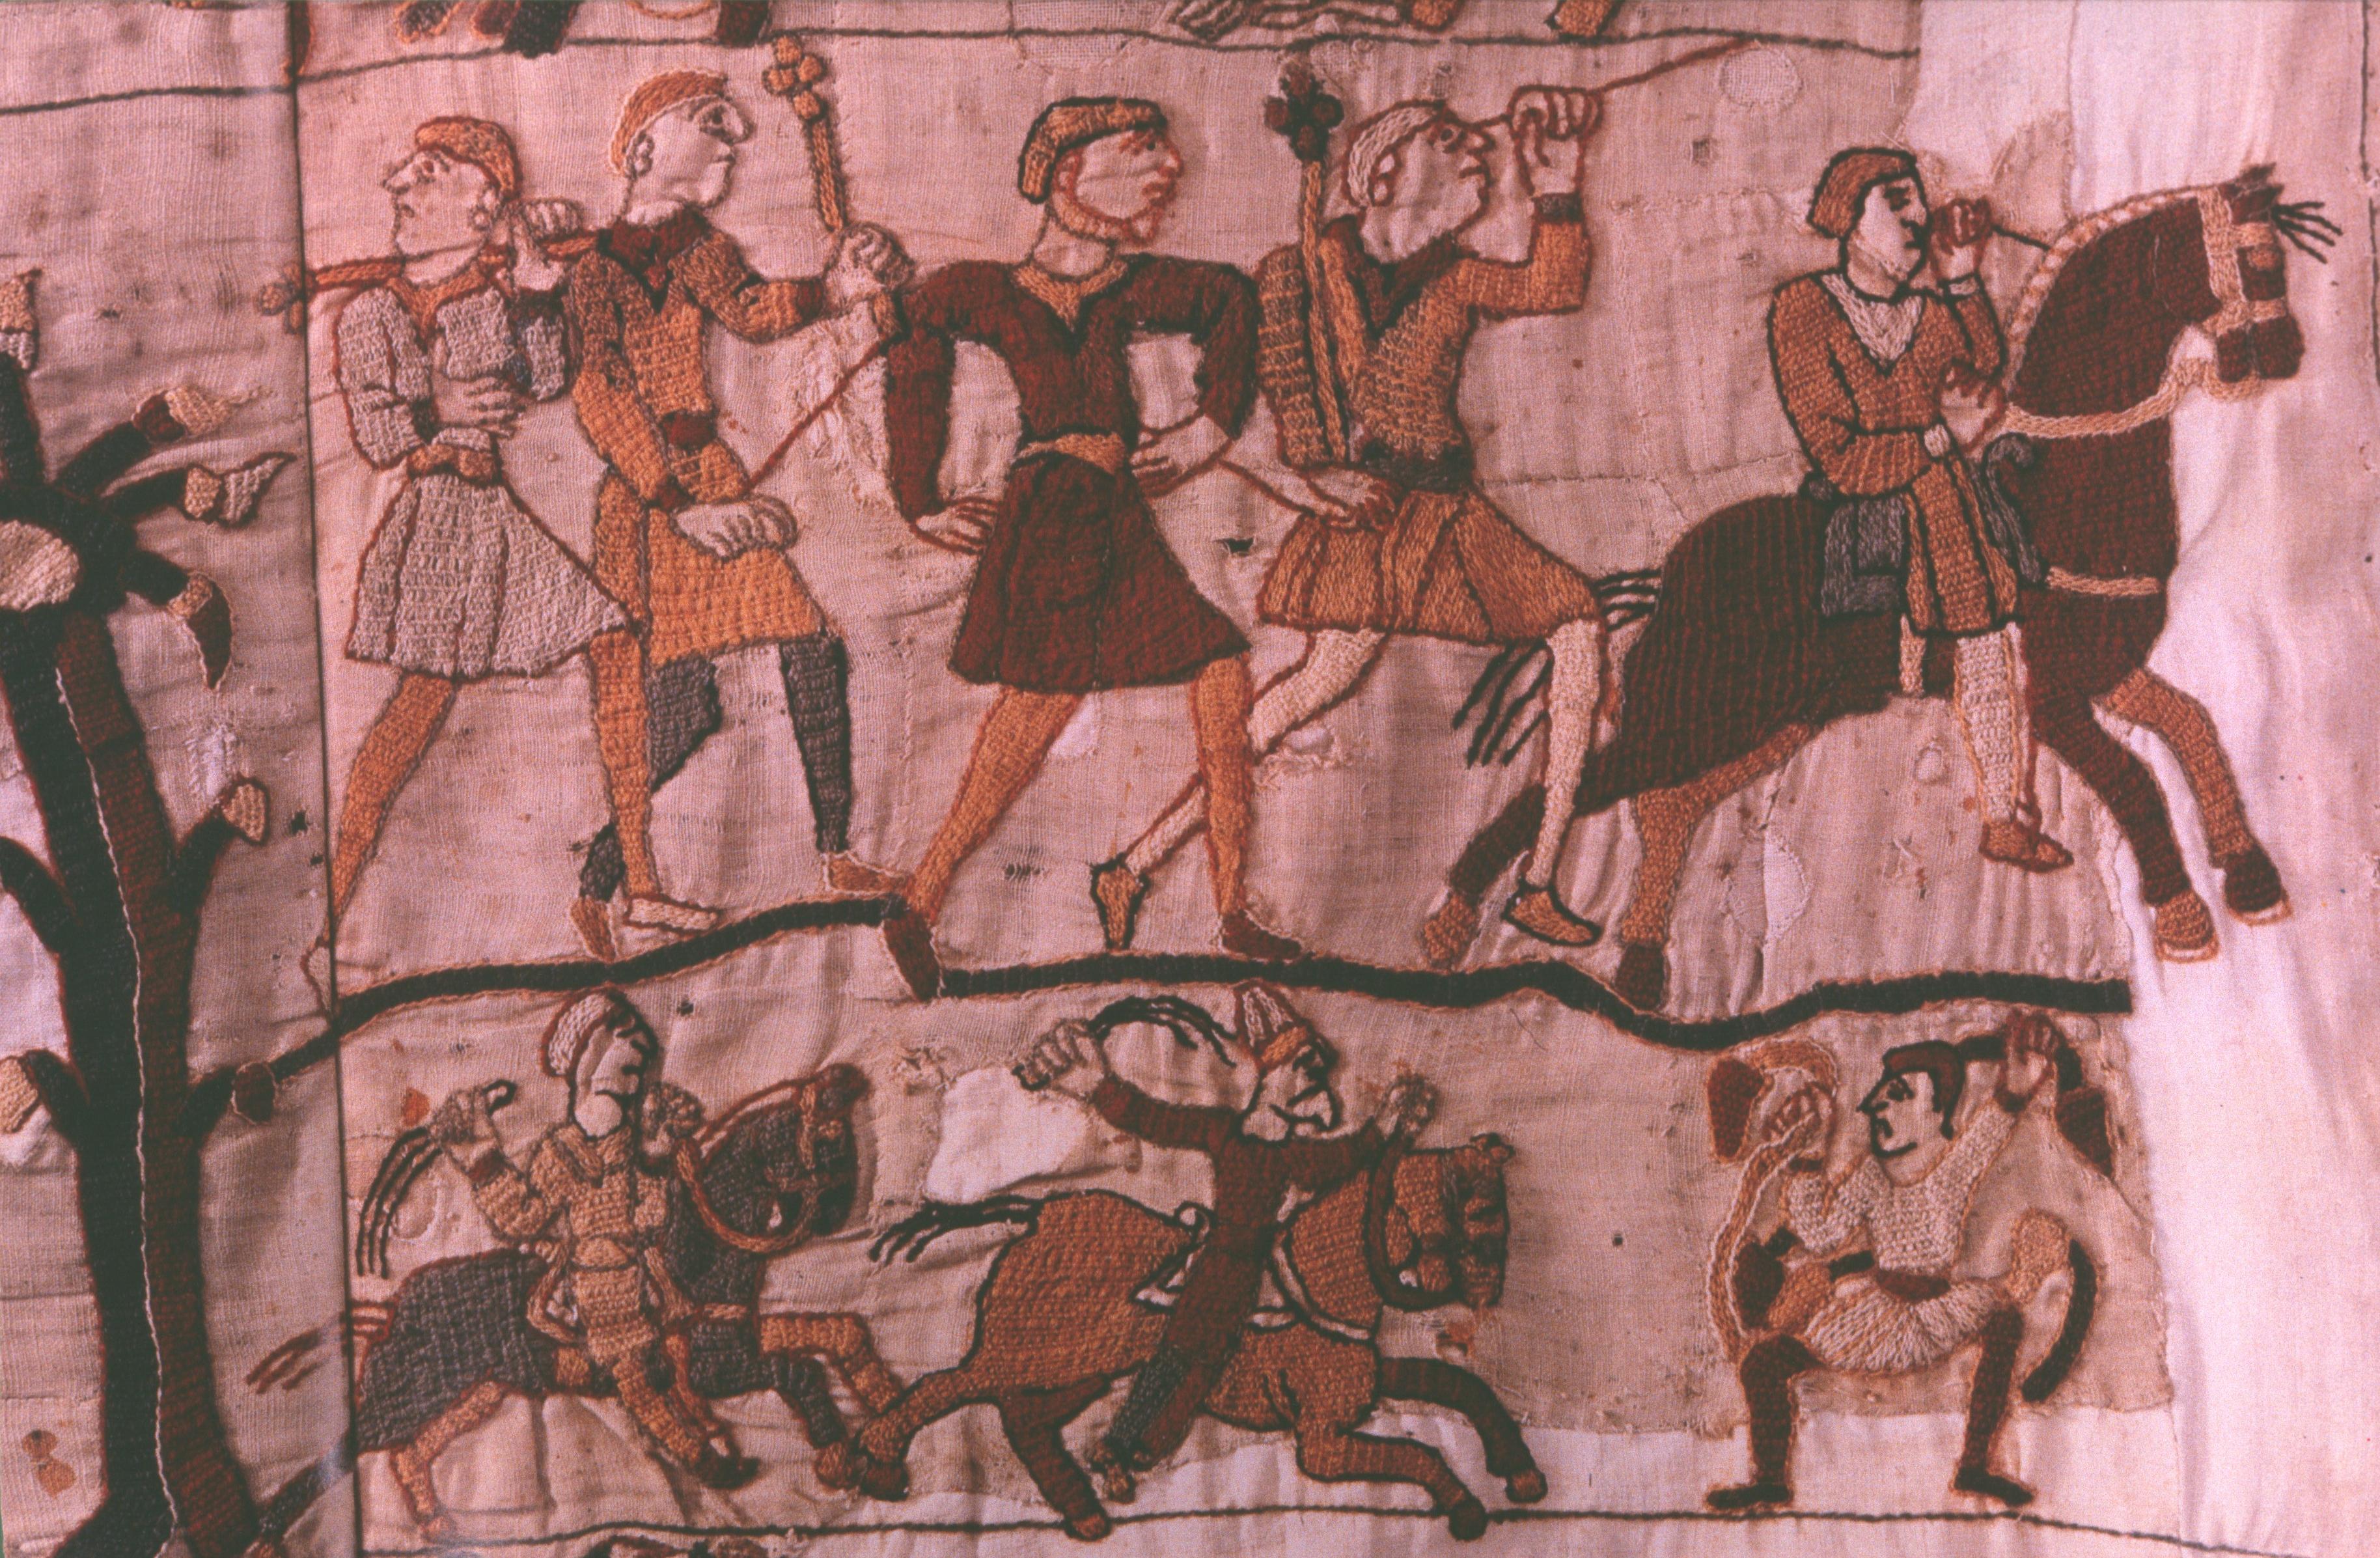
With the death of Harold, the ‘traitor’ has paid the ‘penalty’ (or the rightful king has been overwhelmed), and the Saxons ‘turn in flight’ in the last surviving scene of the Tapestry which you see in fig. 84. There must have been one or two more scenes of triumph, we might have seen Willian (and Odo) in Edward’s palace—but I am not going to attempt a Süssmayr and try to complete the missing few bars of the ‘score’.