Mantegna, the Life of St James and the Triumph of Caesar
In other series on this site (Florence, Siena and Rome), we have remained in central Italy, but now we shall be heading north-east to Venice and some of the ‘Cities of the Plain’, so that I can show you what northern artists have to offer in the way of narrative cycles.
My central interest remains the same—what Shakespeare called ‘the painted imagery of walls’. We are going to look at pictures intended to decorate a particular building or room, which you can go and see in their original environment rather than in museums; pictures that relate to each other, since they tell a story with a common protagonist.
I am sticking to my brief because narrative cycles are arguably the best possible route into the style and unfamiliar pictorial conventions of artists who were painting up to five hundred years ago. Our innate curiosity about what is happening in the story—and what will happen next—takes us into the heartland of a new territory, without losing time on ‘border controls’; and by staying with a single painter for a whole lecture, we have time to become familiar with his idiom, however inept the commentary might be.
In this lecture, we shall be concerned with Padua and Mantua, and I must say just a few words about them before we begin.
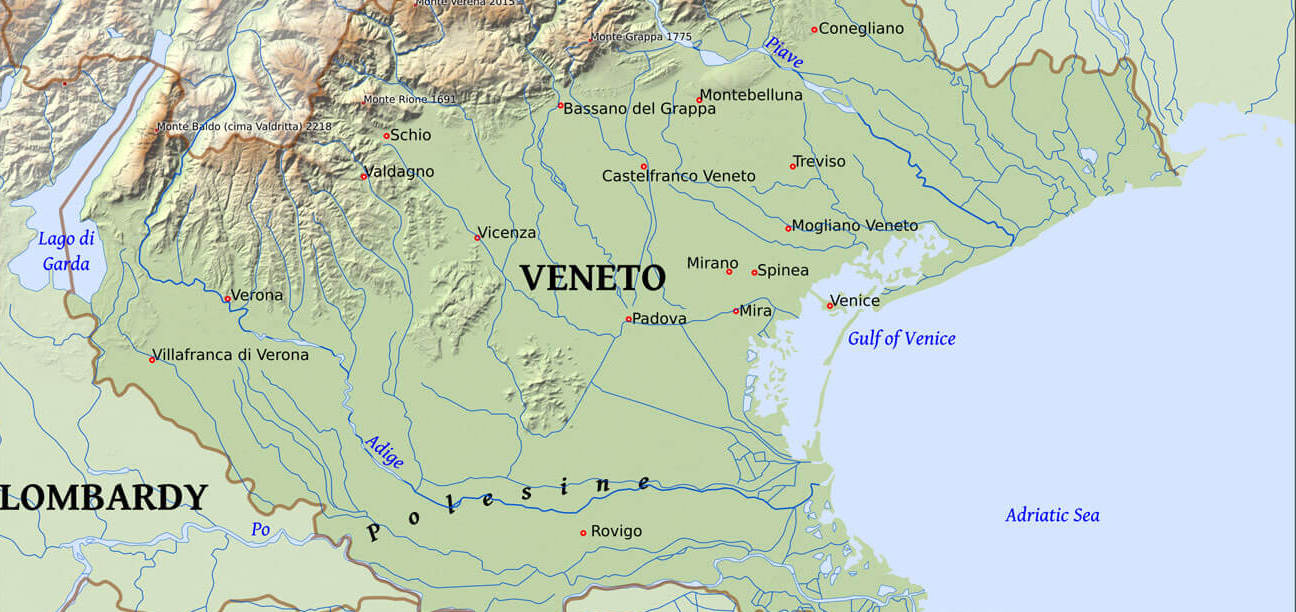
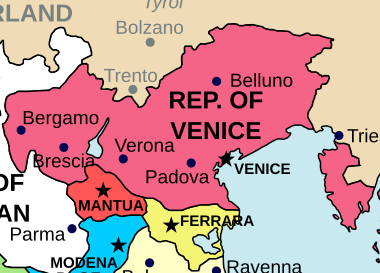
As you can see from this political map, Mantua, the area in white, was an independent state. It was a marquisate and would remain under the rule of the same family until the early seventeenth century.
Padua, by contrast, had been an independent state in the fourteenth century, coming under the rule of the Carrara family, who were Petrarch’s last patrons; but in the early fifteenth century it had been swallowed up by the Republic of Venice, which now ruled over all the area coloured red on the map.

Padua kept its independent traditions, however, and Shakespeare would rightly say: ‘Fair Padua is the nursery of the arts’. It had its own university (which Venice did not), and it was the site of one of the first humanist schools.
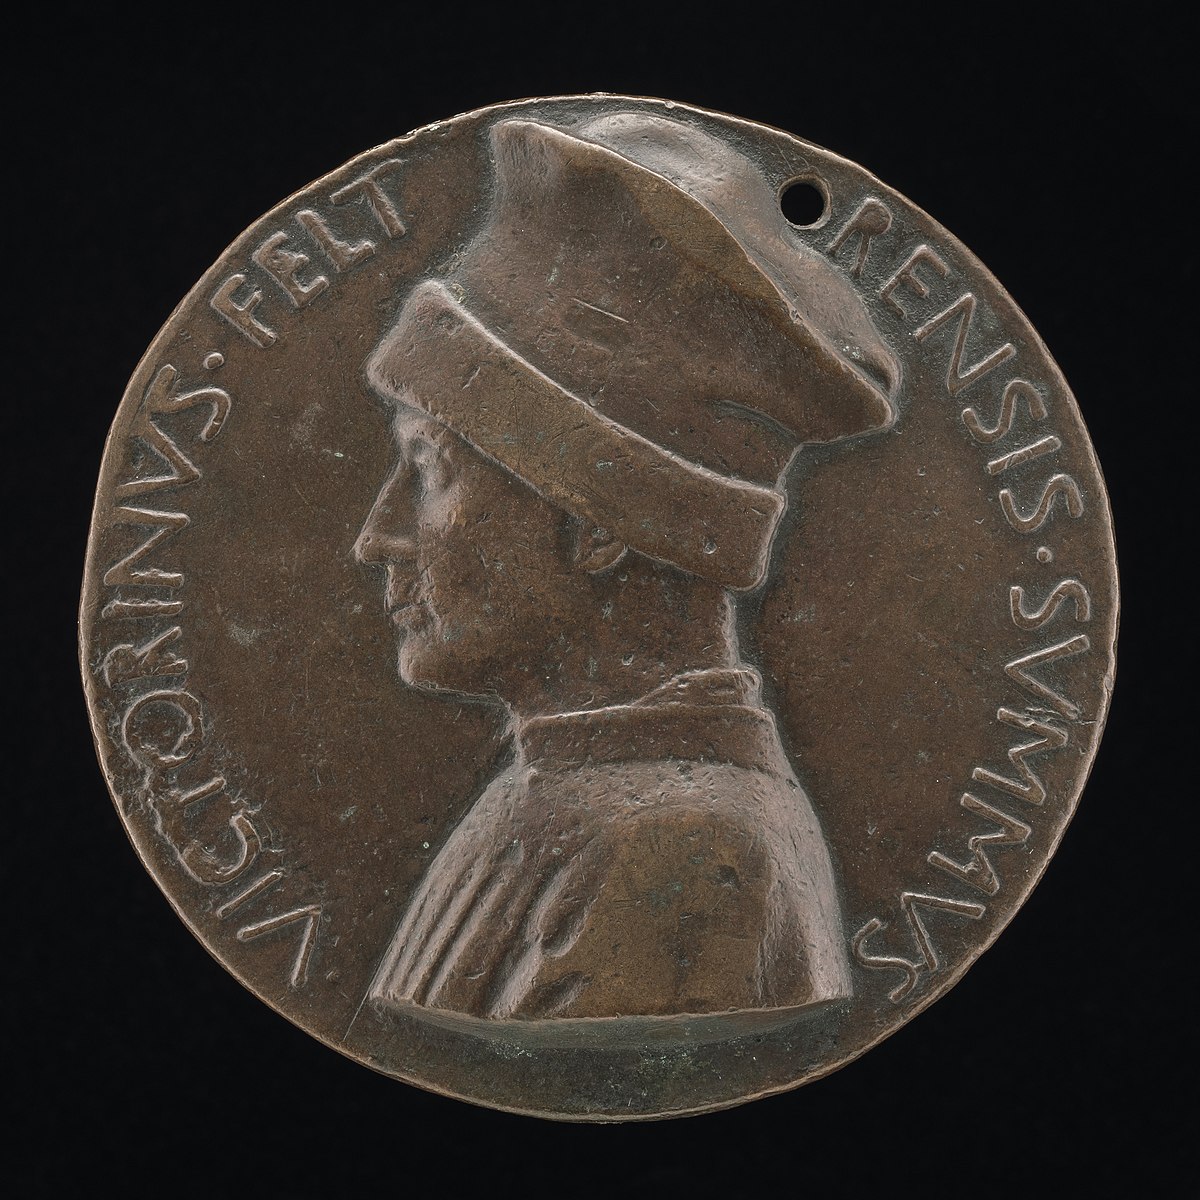
I show you here a medal-portrait of the most influential of the early fifteenth-century educators, Vittorino da Feltre, who virtually invented the ideal English Public School.
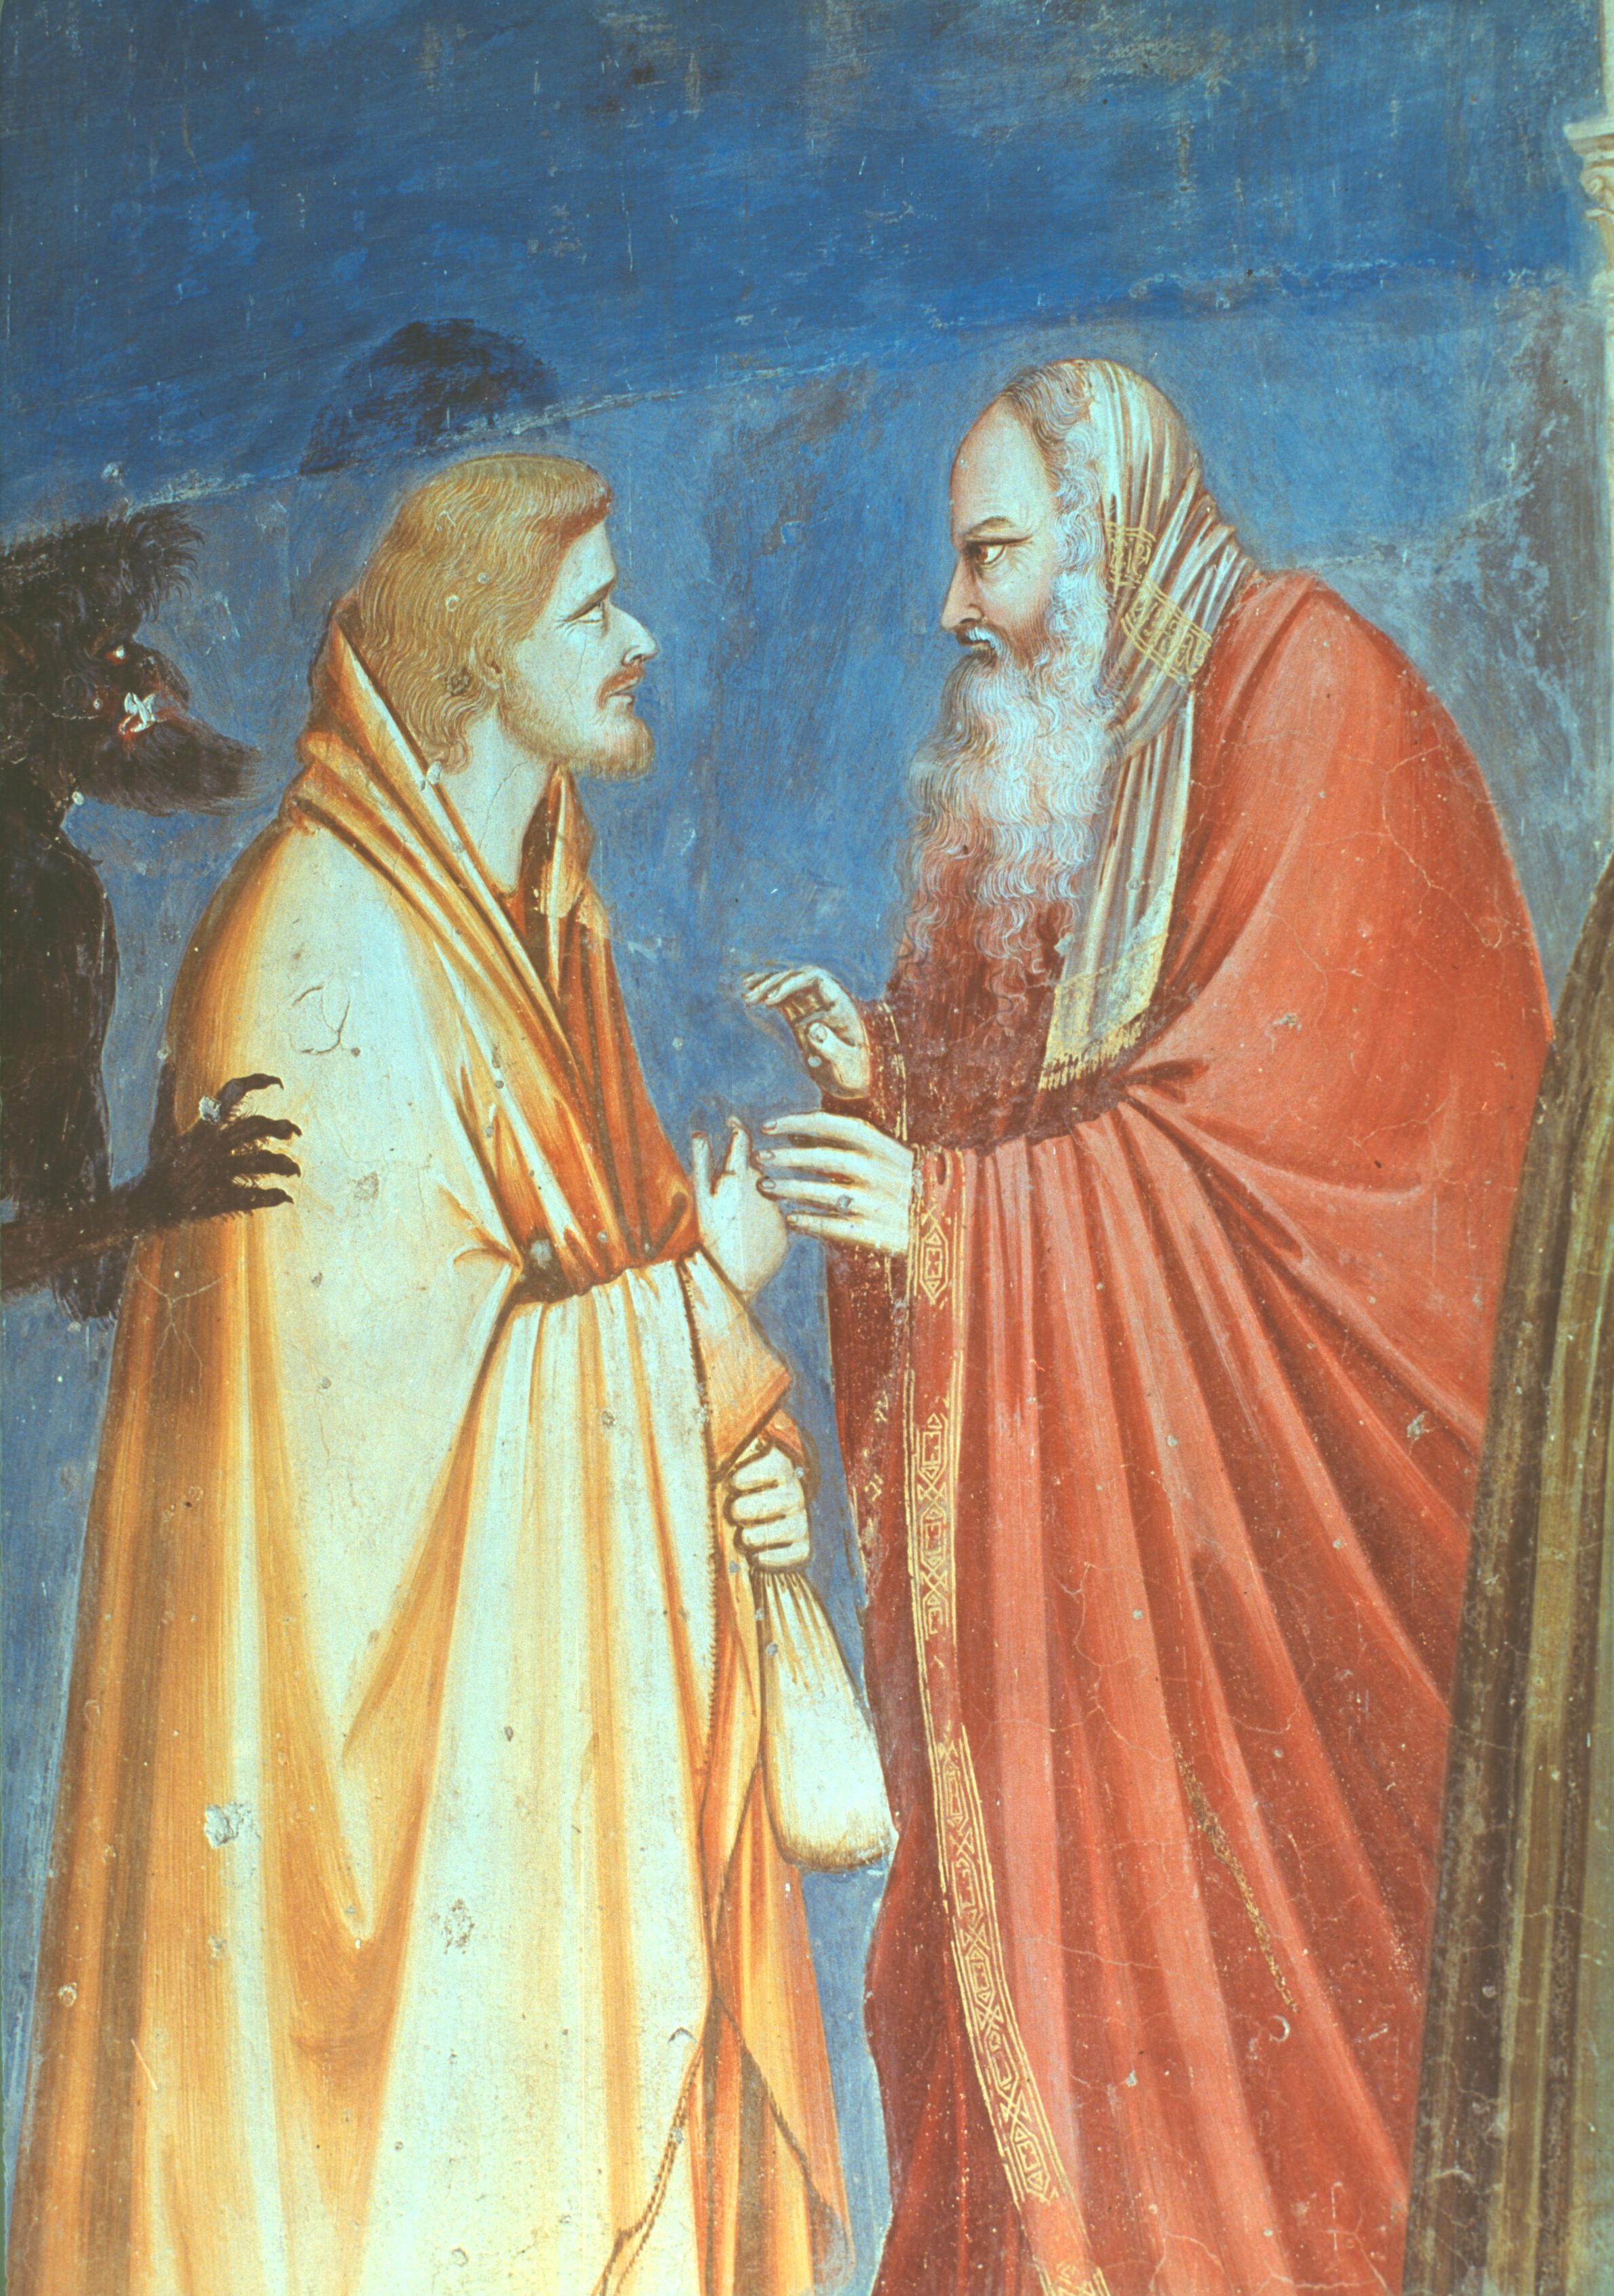
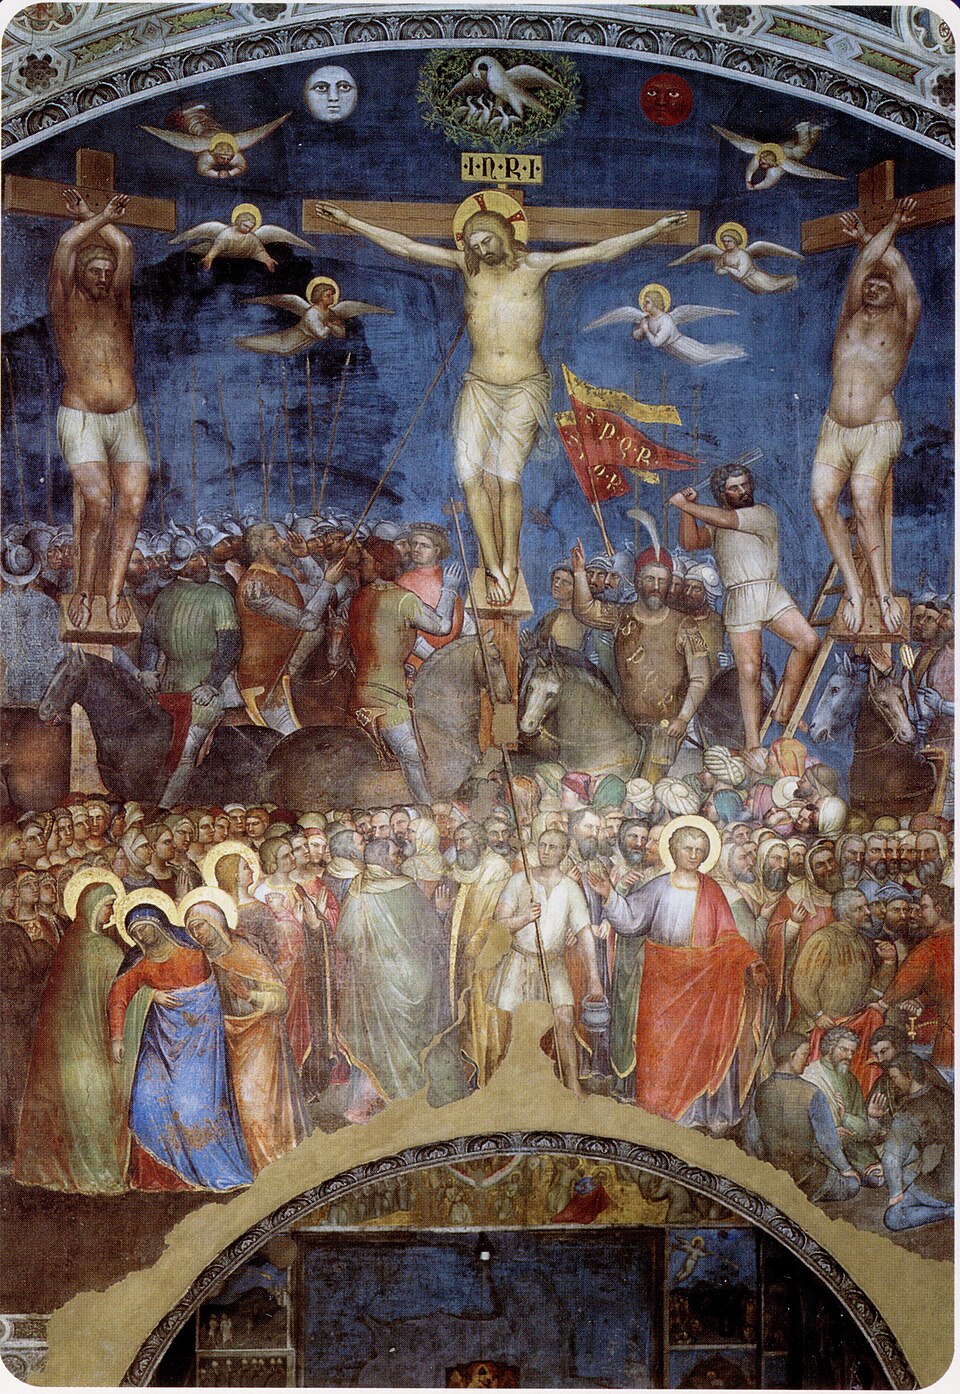
Padua had long been open to Florentine influence in the visual arts, as Venice was not. Giotto frescoed the Scrovegni Chapel between 1303 and 1308; and in the 1380s, Giusto de’ Menabuoi frescoed the Baptistery in a style which is still Giottesque.
More importantly, Padua was to be very receptive to the new developments in early fifteenth-century Florence, and particularly to the new scientific or ‘geometrical’ perspective, developed by Brunelleschi and Masaccio in the 1420s and theorised by Alberti in 1435.
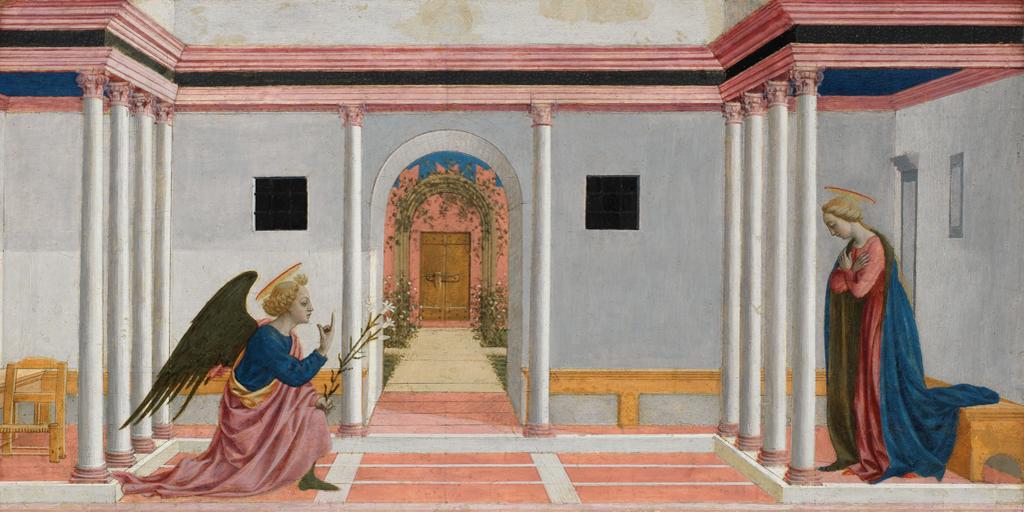
I show you here a panel from the Fitzwilliam Museum by Domenico Veneziano, taken from an altarpiece of 1442, which is the earliest known painting to follow Alberti’s theory to the letter. As you can see, the single most striking feature is the convergence of all the orthogonals—that is, all the lines parallel to the line of sight or ‘centric ray’—to a single vanishing point. Remember that the height of the vanishing point determines the horizon, which may be placed comfortably two thirds of the way up, as here, but may also be placed very high, or dramatically low, as we shall see. Similarly, the vanishing point may be placed near the centre, as it is here, or it may lie to one side, or even outside the picture itself, with dramatic results, as we shall also see.
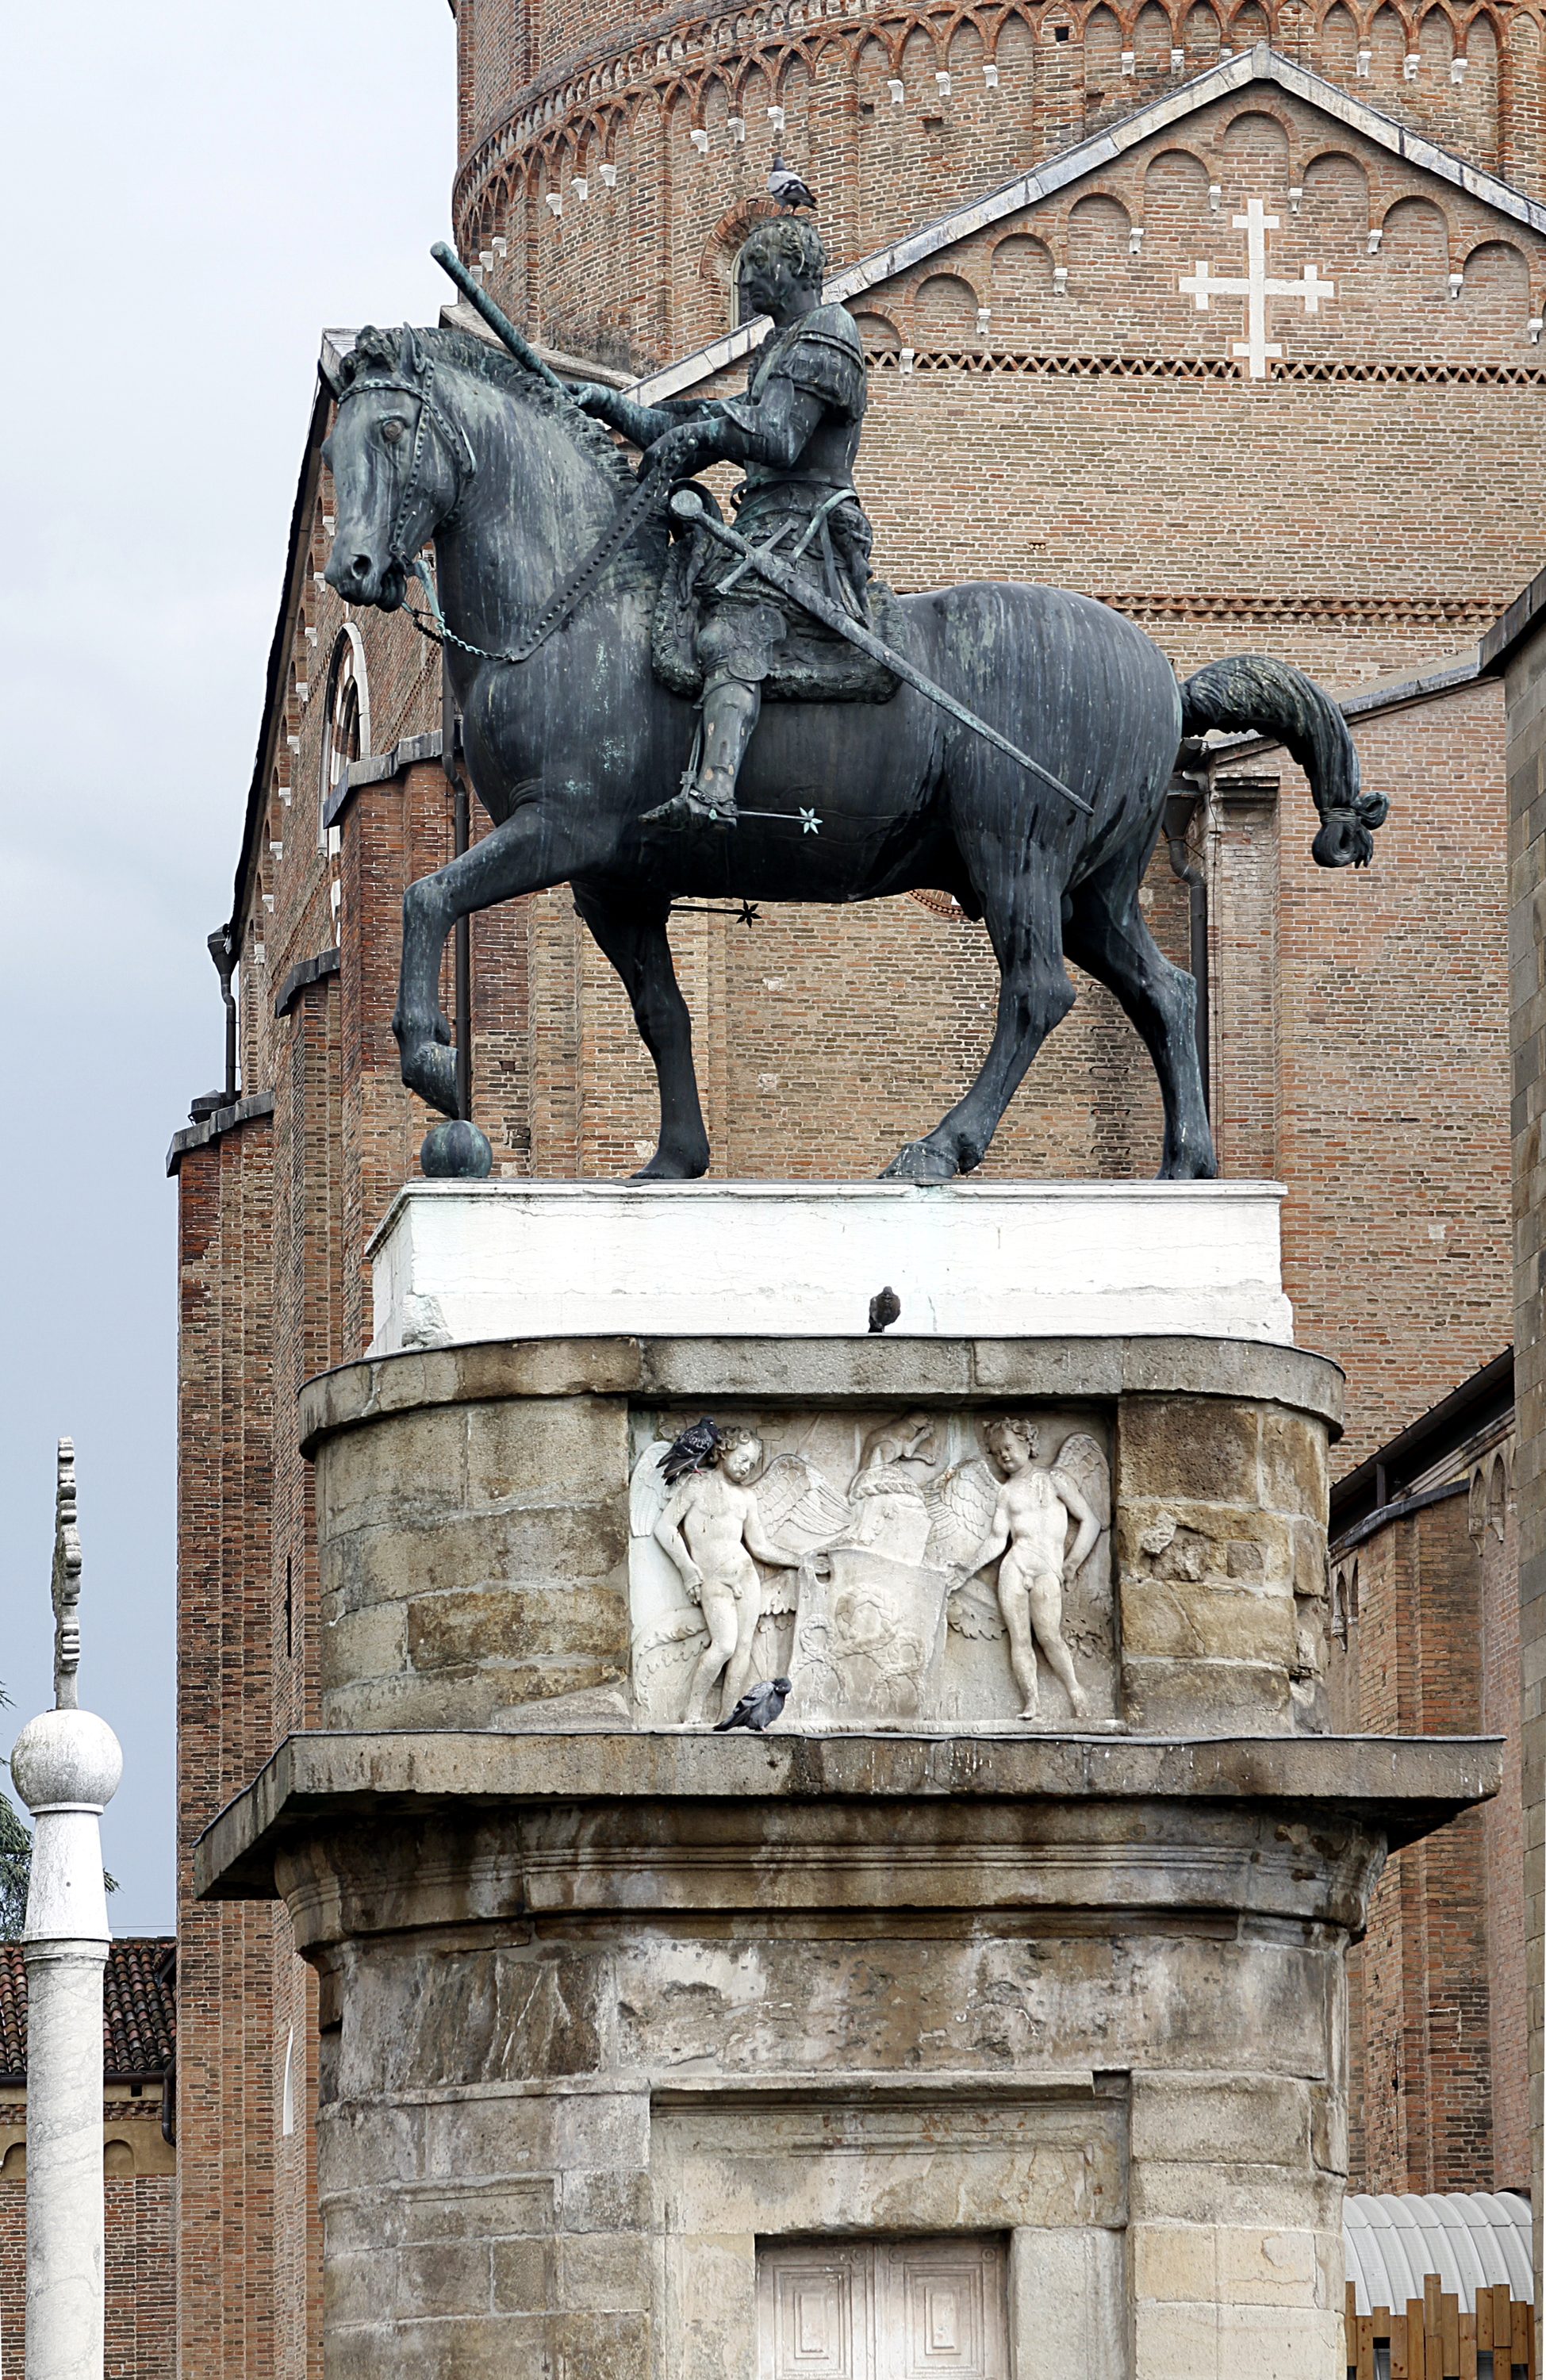
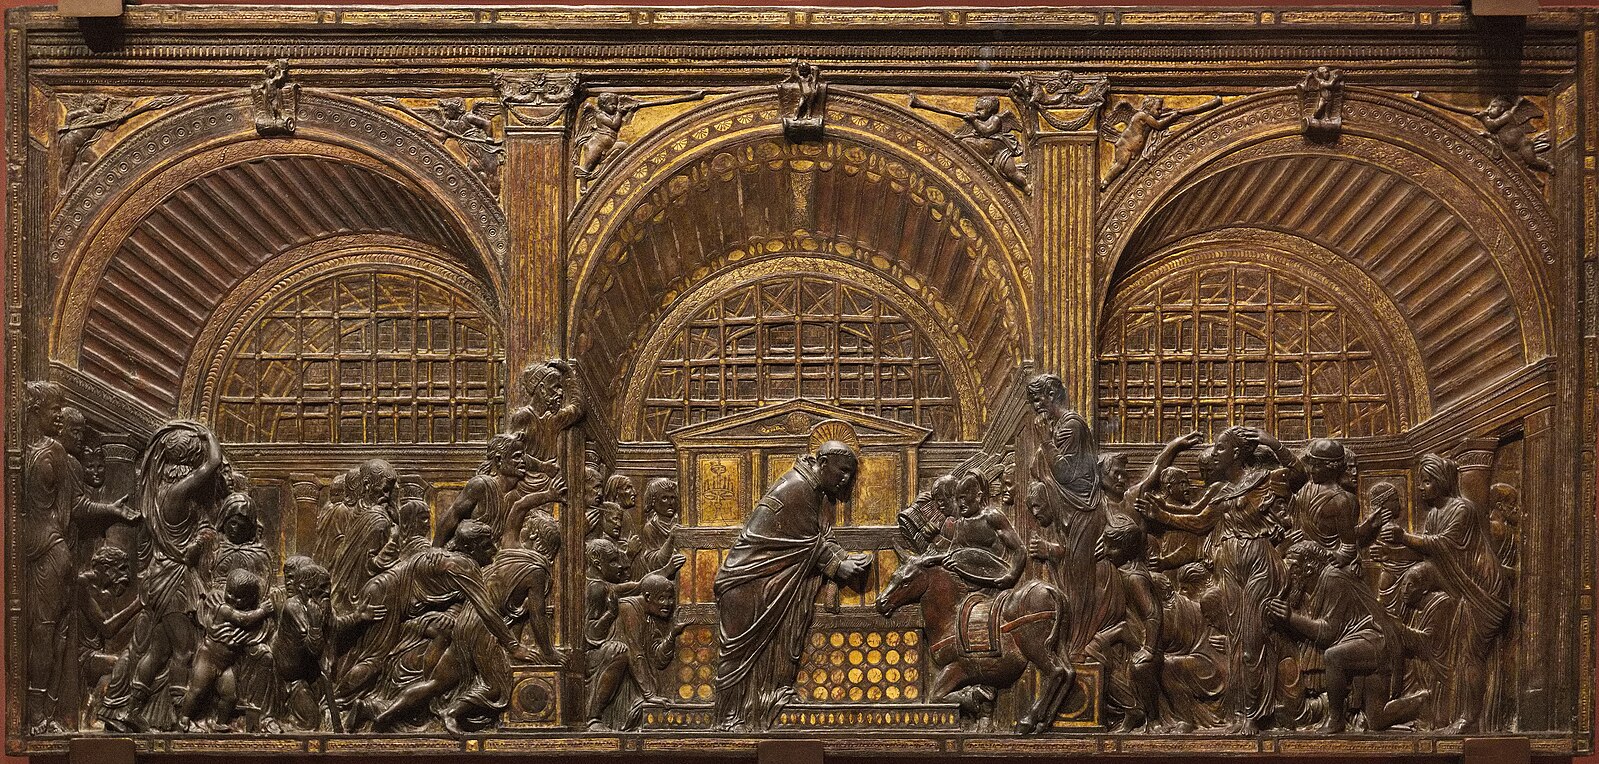
These innovations were brought to Padua by no less a sculptor than Donatello, who in the 1440s did a superb bronze altarpiece for a huge church to the south of the city centre, the Basilica di Sant’Antonio, from which the panel in the second image comes. (It is a good example of what happens when you place the horizon very low, since in this case the barrel vaults are displayed to dominate the composition.)
Elsewhere in Padua, too, in the Piazza del Santo, Donatello executed the magnificent equestrian statue of the mercenary general, Gattamelata.
Our first northern artist is Andrea Mantegna, who was born near Vicenza in 1431, and grew up in Padua, before settling in Mantua.
We shall look at no fewer than three cycles by him.
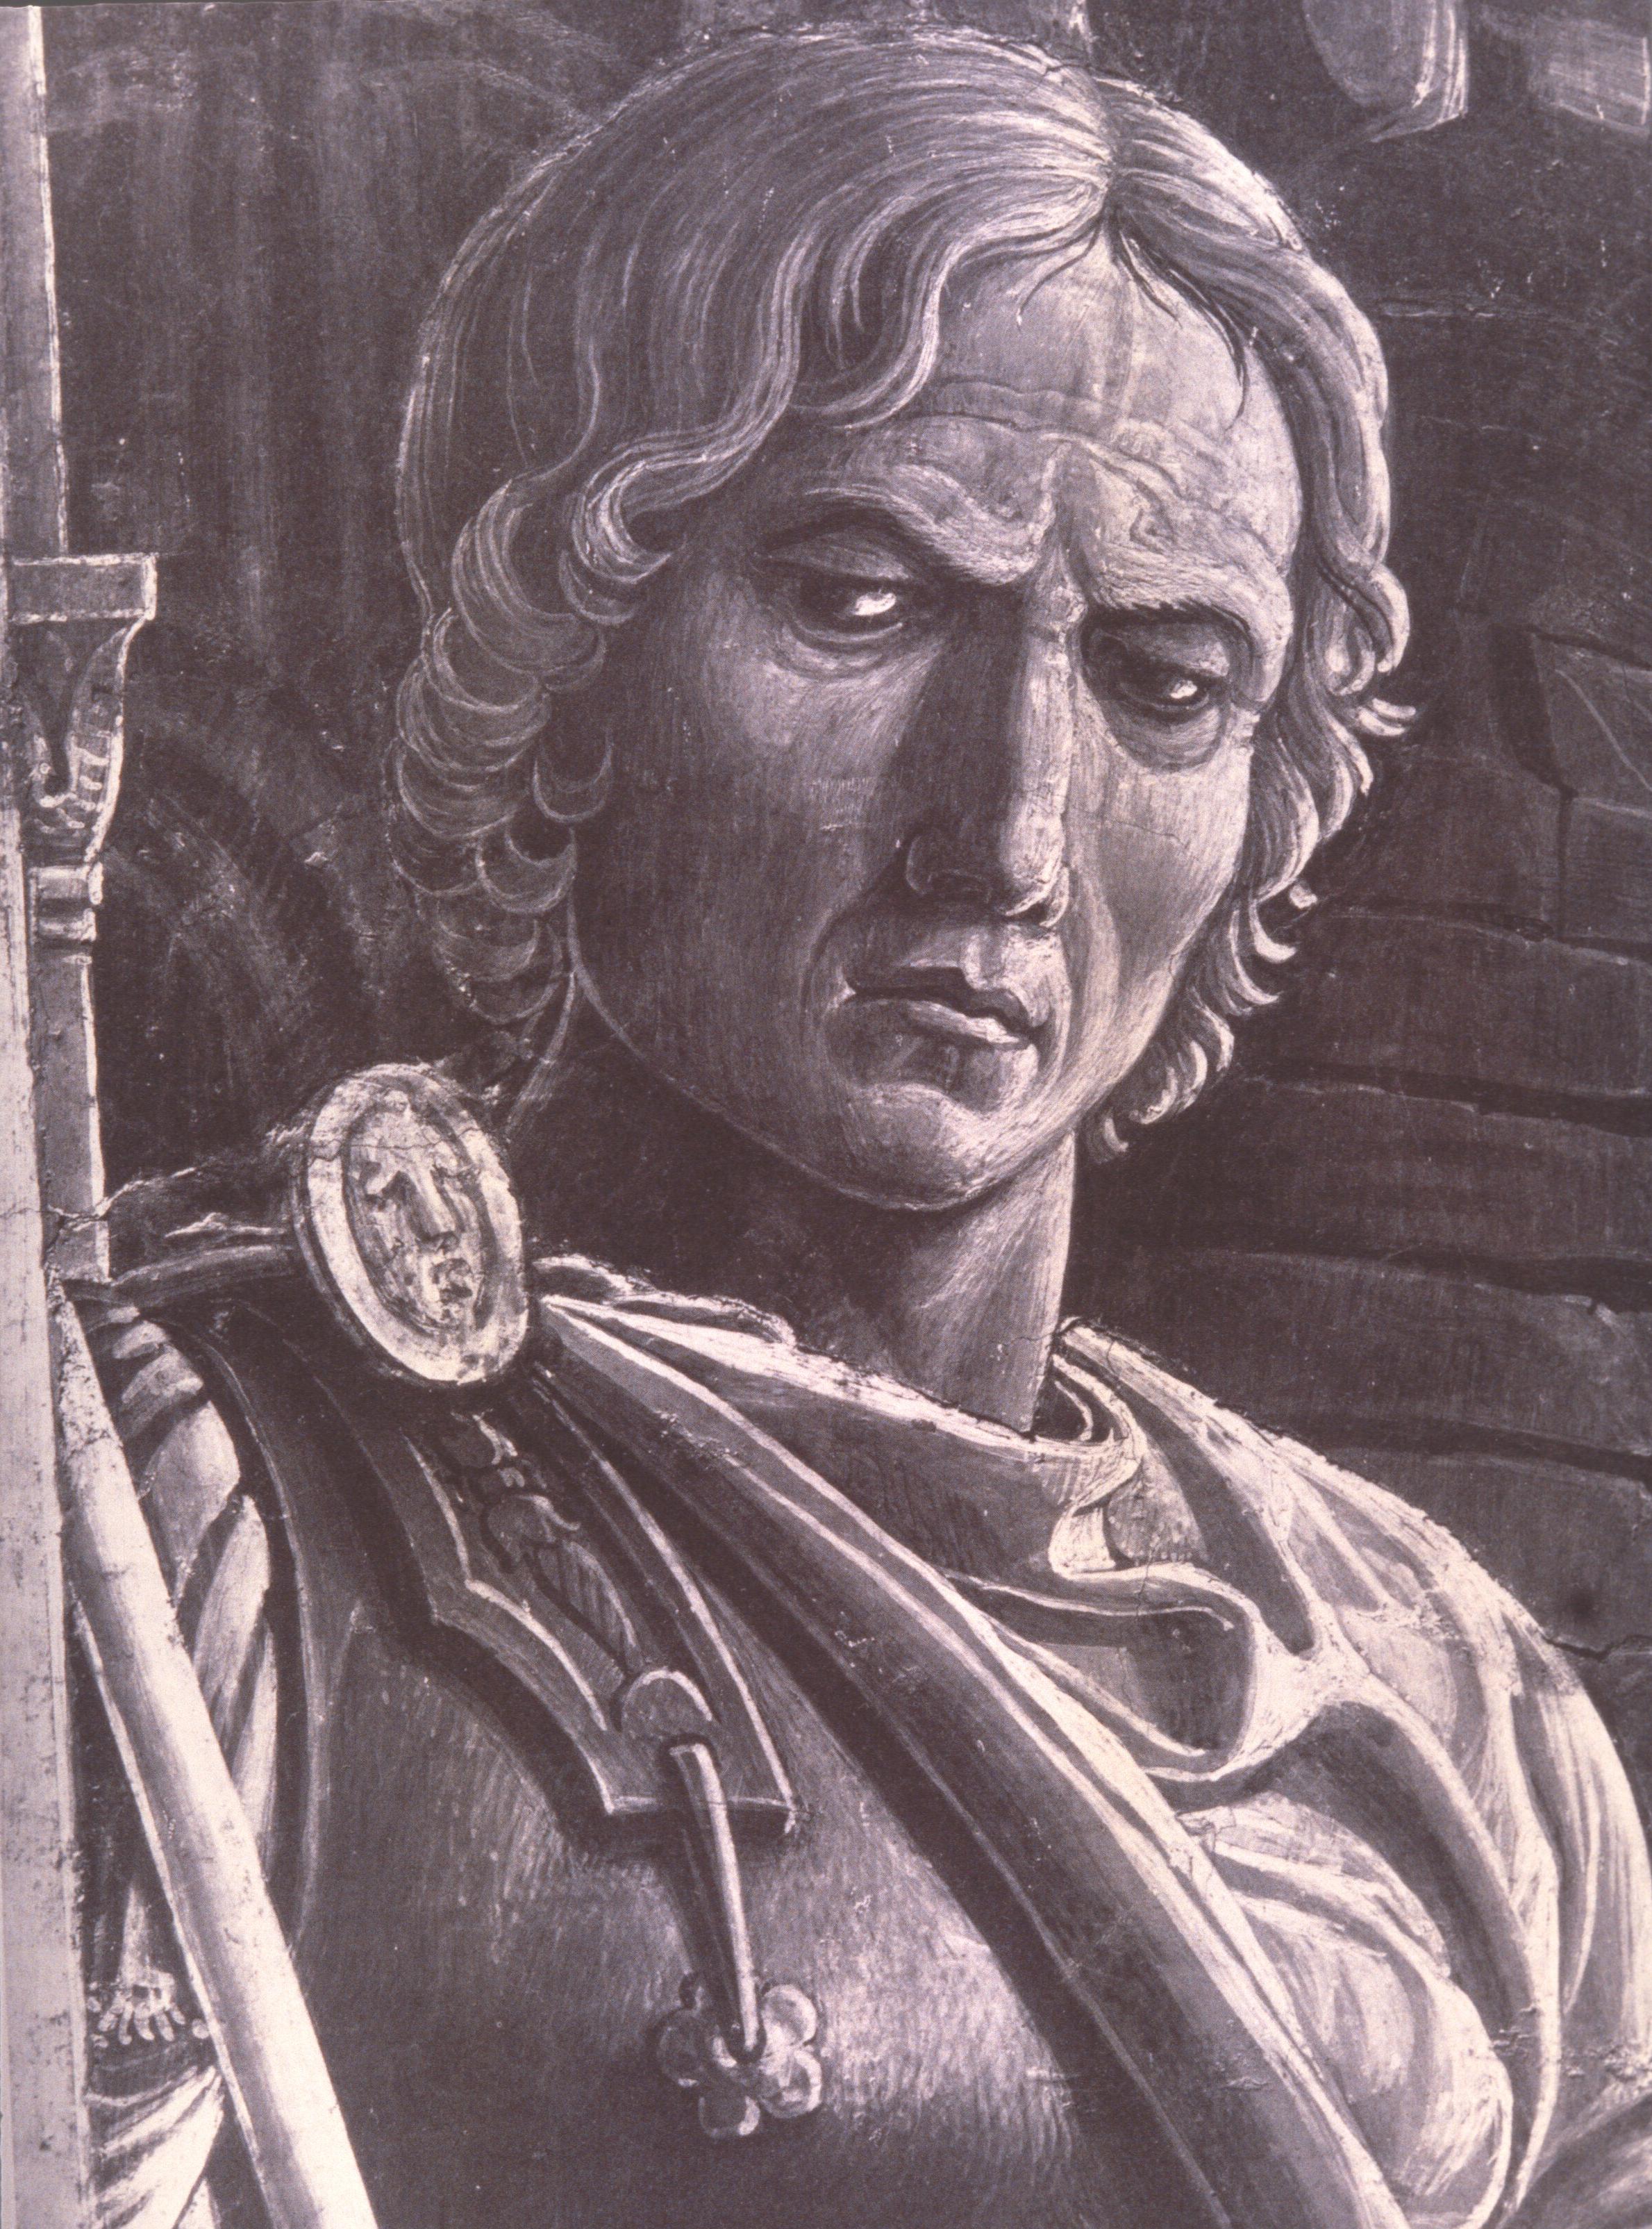
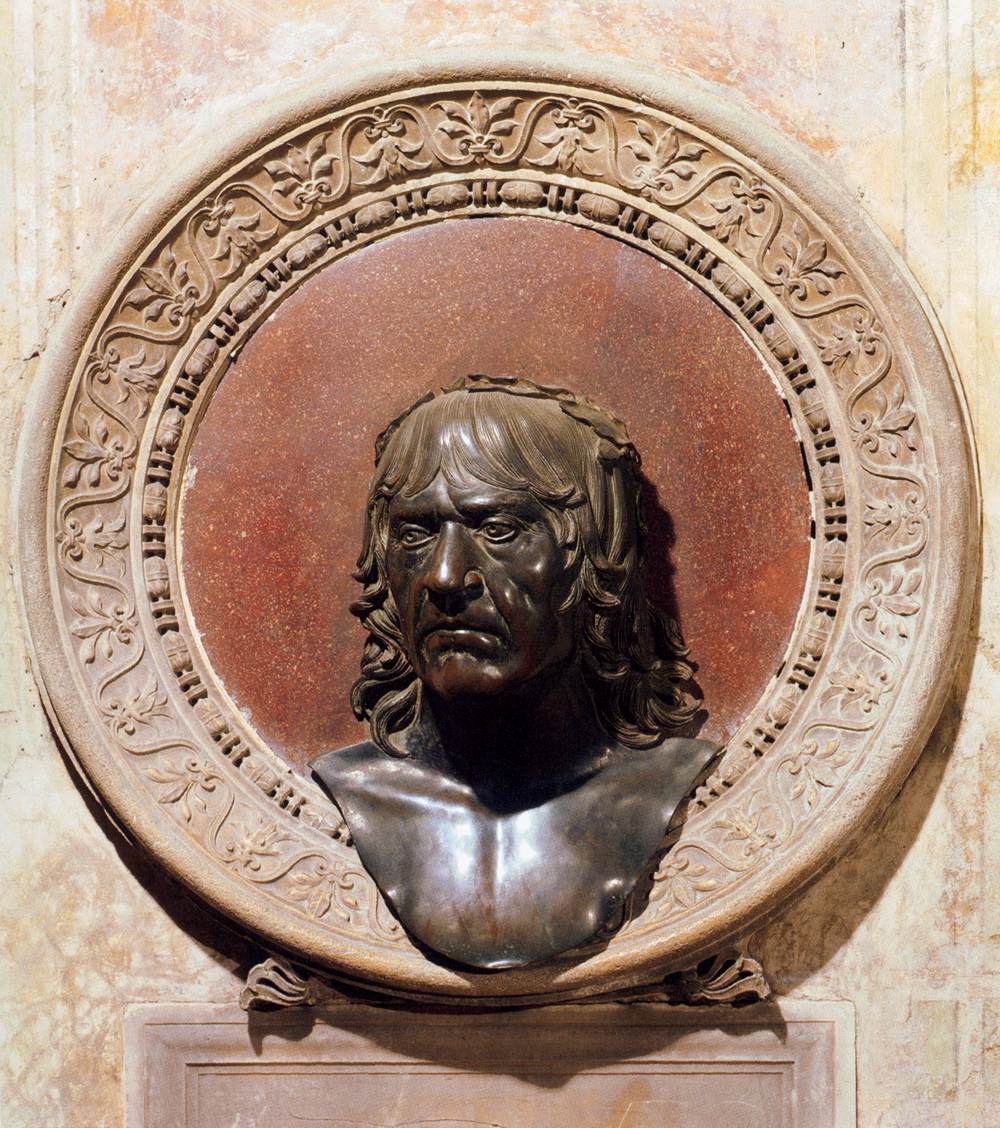
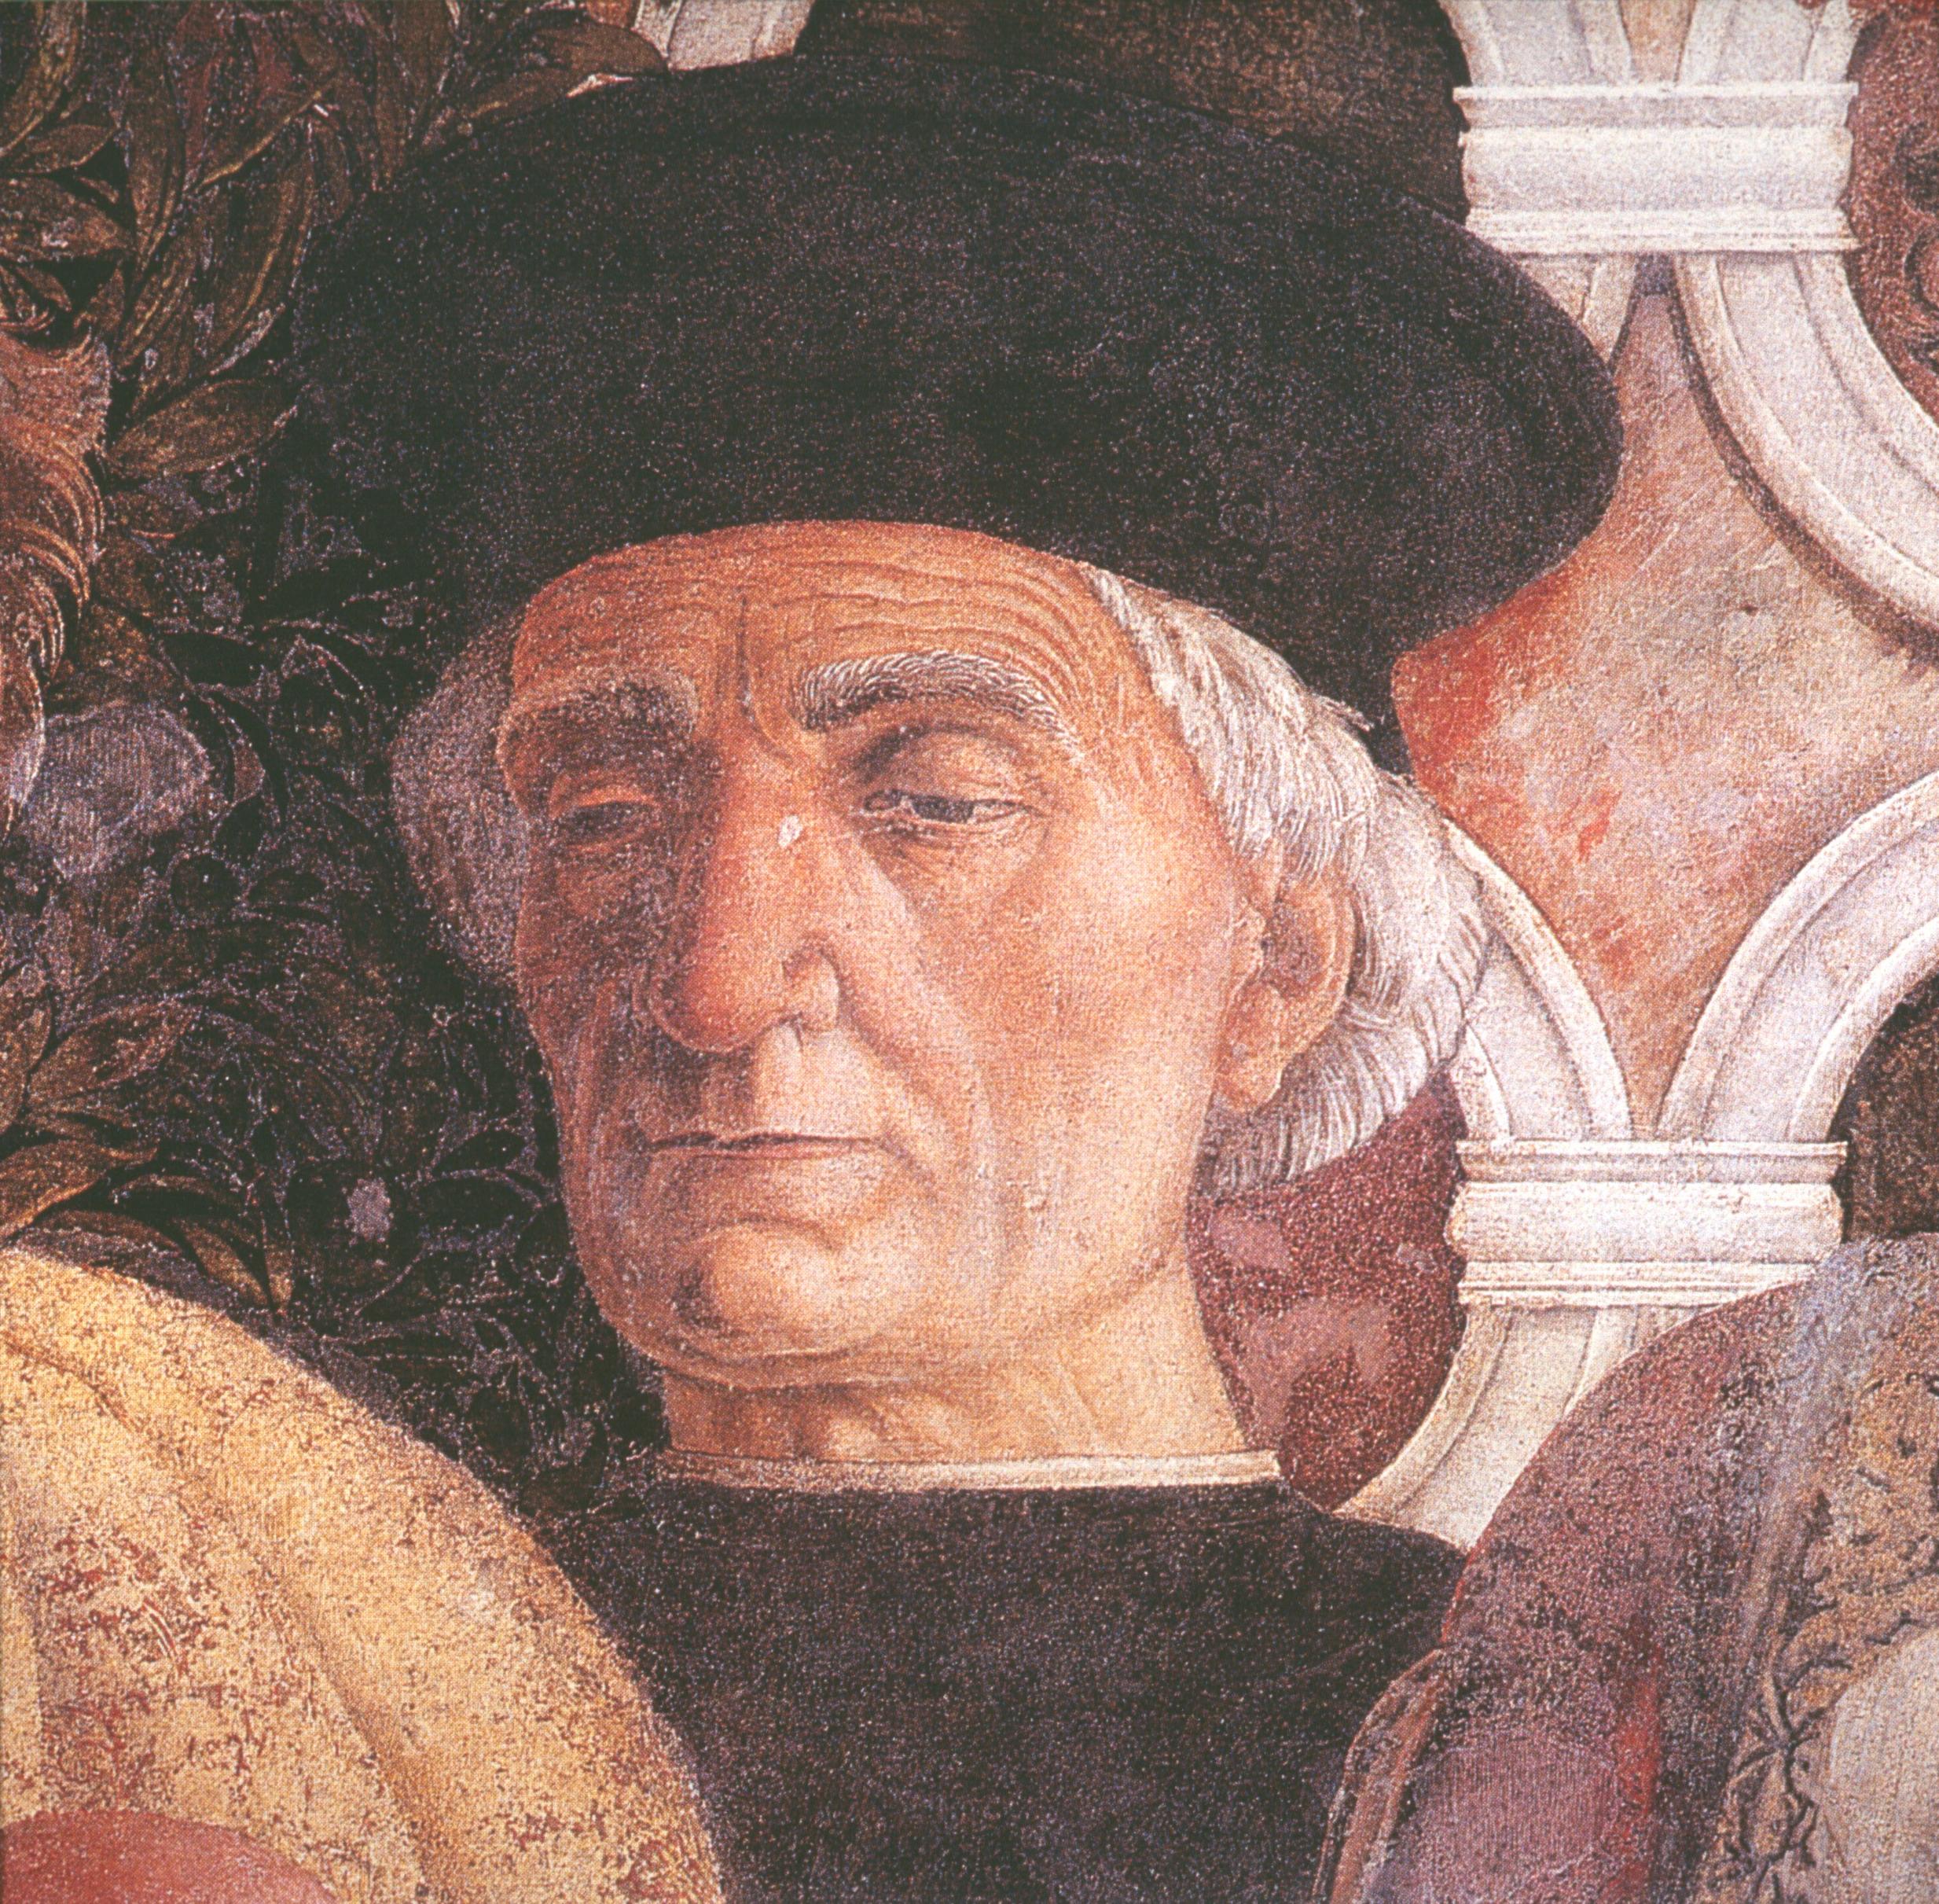
The first was done in his early twenties (the detail being a probable self-portrait from this cycle). By the time of the second he was in his early forties; while the third was started when he was coming up to the age of sixty, by which time he must have looked liked the bronze bust (in the lower image) that he himself modelled for his tomb in Mantua.
The rather ferocious expression on both likenesses is characteristic, for Mantegna was known to be extremely ‘prickly’ not to say, cantankerous, all his life.
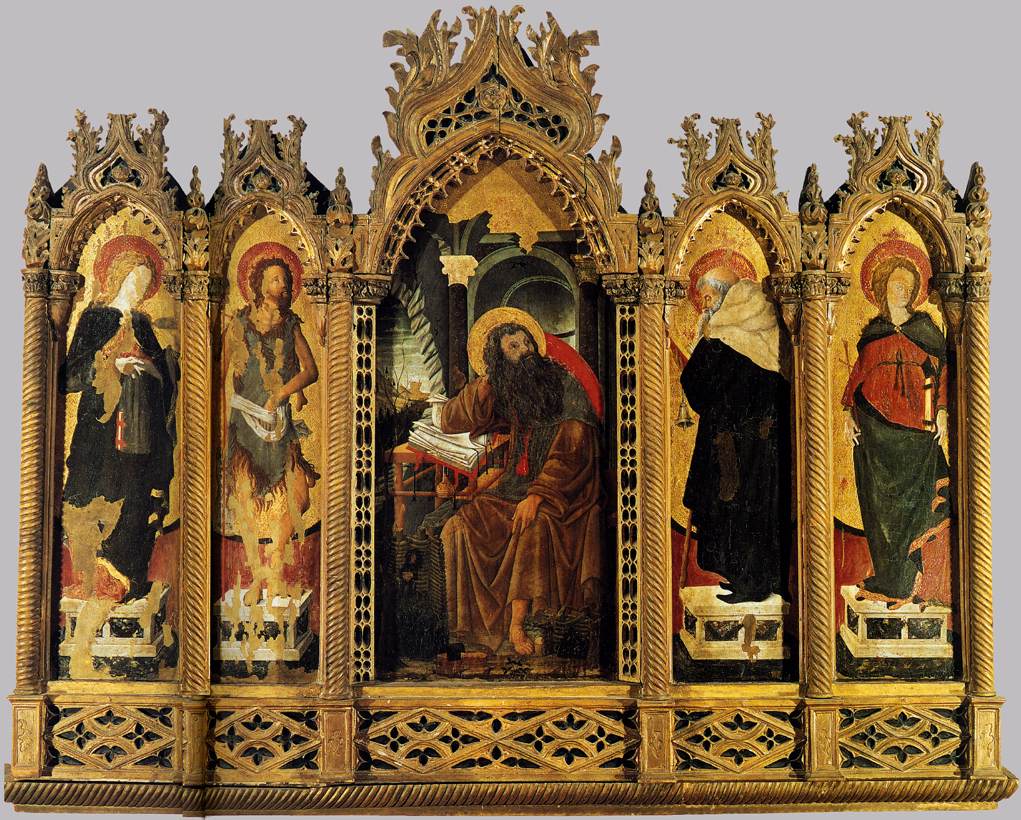
In Padua, we meet him first as the adopted son of a remarkable individual called Francesco Squarcione. As a painter, Squarcione was rather backward-looking (as you can see in the colours and design of the narrow Gothic side-panels in this polyptych, with a vigorous St Jerome in the centre), but he was great talent-spotter and trainer; and his extensive business interests (he traded in classical antiquities) were to leave a life-long mark on Mantegna and make him well-known among the local humanists.
Mantegna was very receptive to the new influences from Florence, and to Donatello in particular. He was also very precocious and still only seventeen when he received a commission to decorate a chapel in a huge church in Padua, that of the Eremitani, just north of the civic centre.
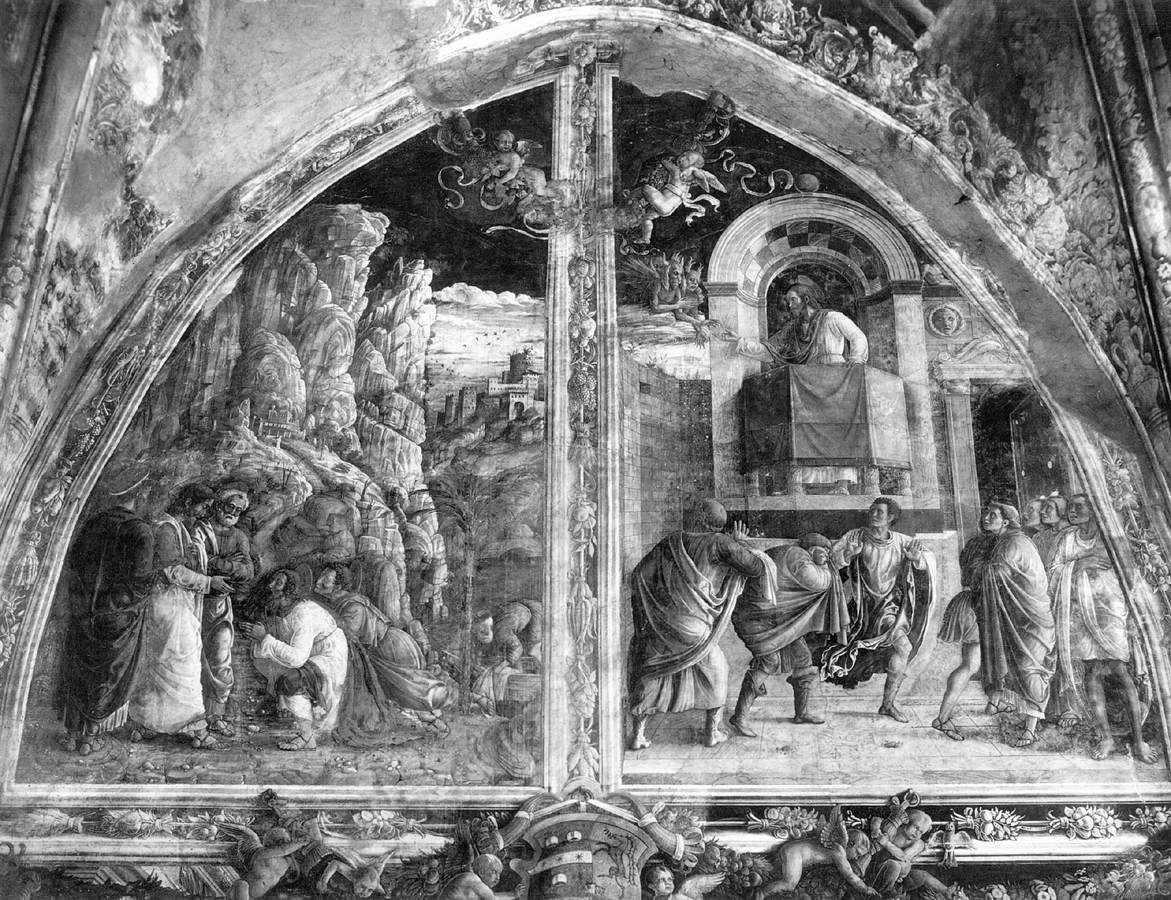
It took him six years to complete the frescos (there are three registers from top to bottom on either side of the narrow chapel) and it is fascinating to trace his progress and recognise the hallmarks of his later style in the six Scenes from the Life of St James.
But the frescos suffered badly from damp long before church was bombed in 1944; and we know them only from ‘technicolour’ photographs taken days before the fatal air raid (which mercifully spared Giotto’s frescos in the Cappella degli Scrovegni a few hundred yards away).
It seemed a shame to blunt your appetite for the two main courses (so to speak) by feeding you with faded images of works which no longer exist, so I have placed my introduction to the first narrative cycle at the end of this lecture.
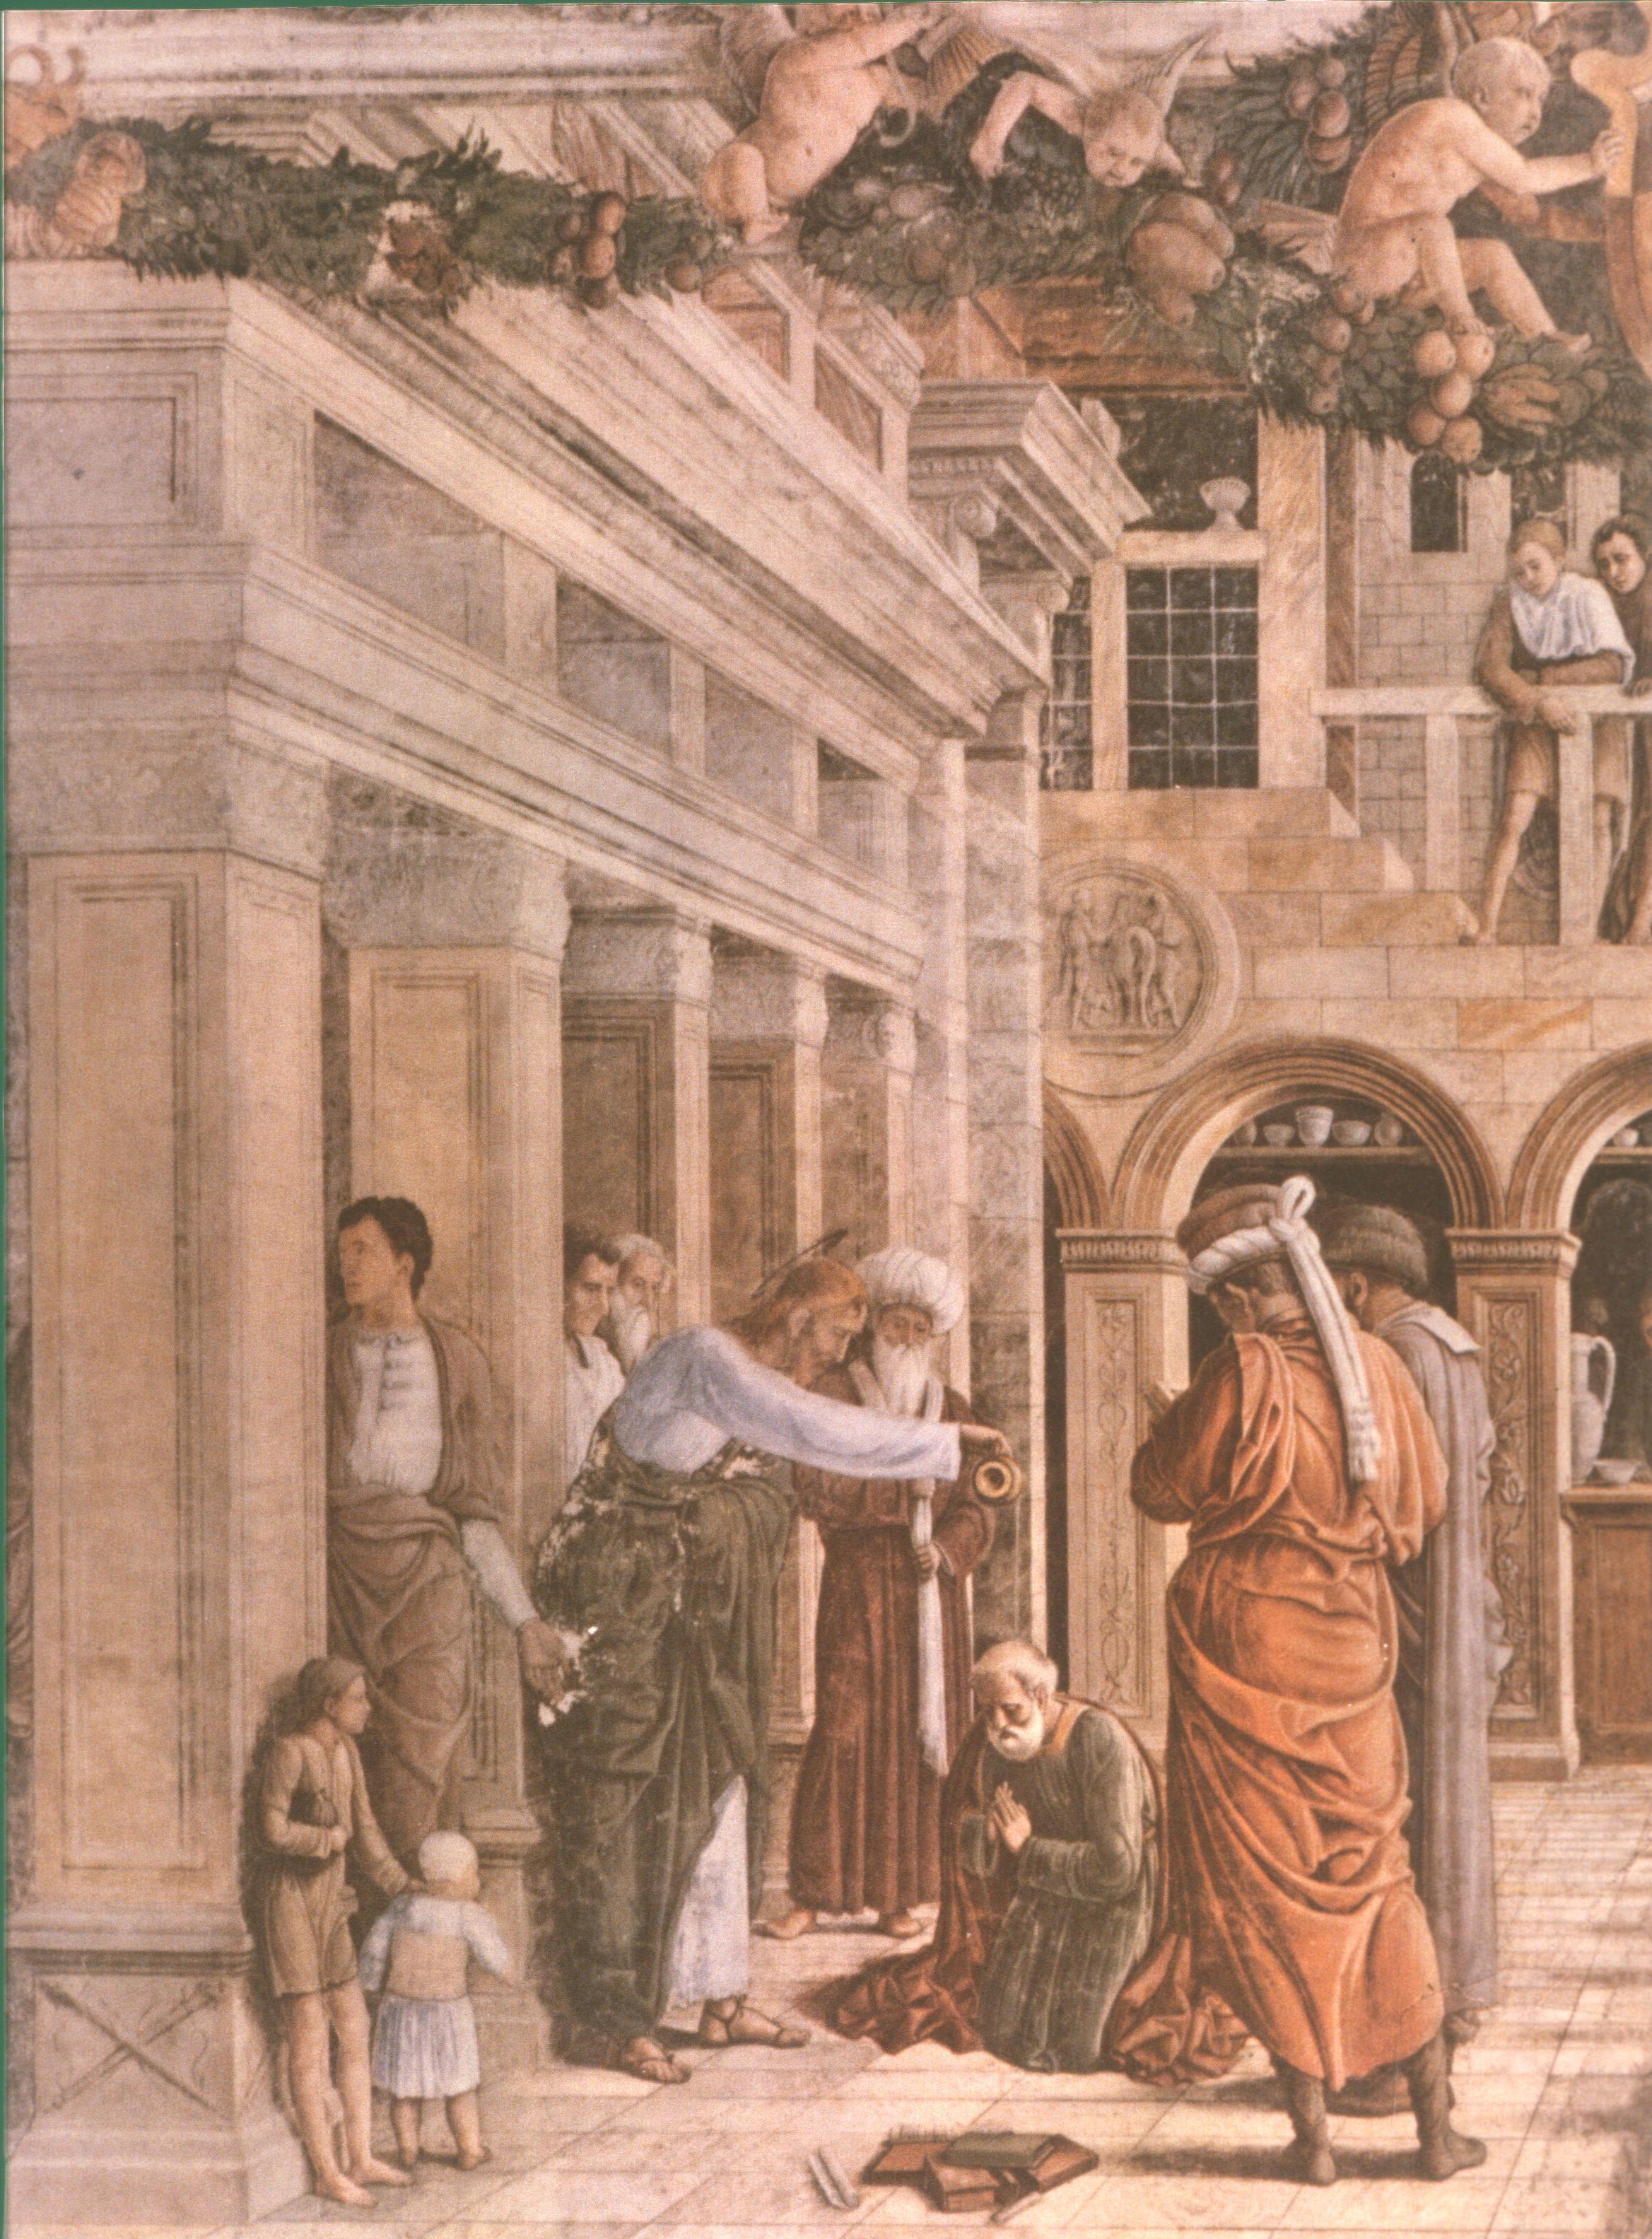
For the moment, then, please pause briefly to take a quick look at the architecture and the children in the foreground of the third scene in the St James cycle (The Baptism of Hermogenes)—executed when Mantegna was twenty-one or twenty-two—before jumping forward 15 years and travelling 55 miles from Padua to Mantua.
(If you prefer to study the evolution of Mantegna’s art in chronological order, you can go straight to Padua, returning effortlessly by a similar manoeuvre.)
By the age of twenty-four, Mantegna was already a master of the innovations coming from Florence, and a notable expert on classical architecture and all things Roman. He was newly married into the Bellini family, and he was therefore brother-in-law of both Gentile and Giovanni Bellini.
We jump forward now into the late 1460s and early 1470s, to a period when he was in his late thirties and early forties, finding him as the established court painter of Lodovico Gonzaga, whose family had ruled the Marquisate of Mantua for about a hundred and fifty years.
Mantua, you remember, lies about fifty miles west south-west of Padua, around and between three swampy lakes which are formed by the river Mincio.
(I show you two of the lakes in the modern photograph, while in the detail you see Mantegna’s painting of the central bridge of San Giorgio.)
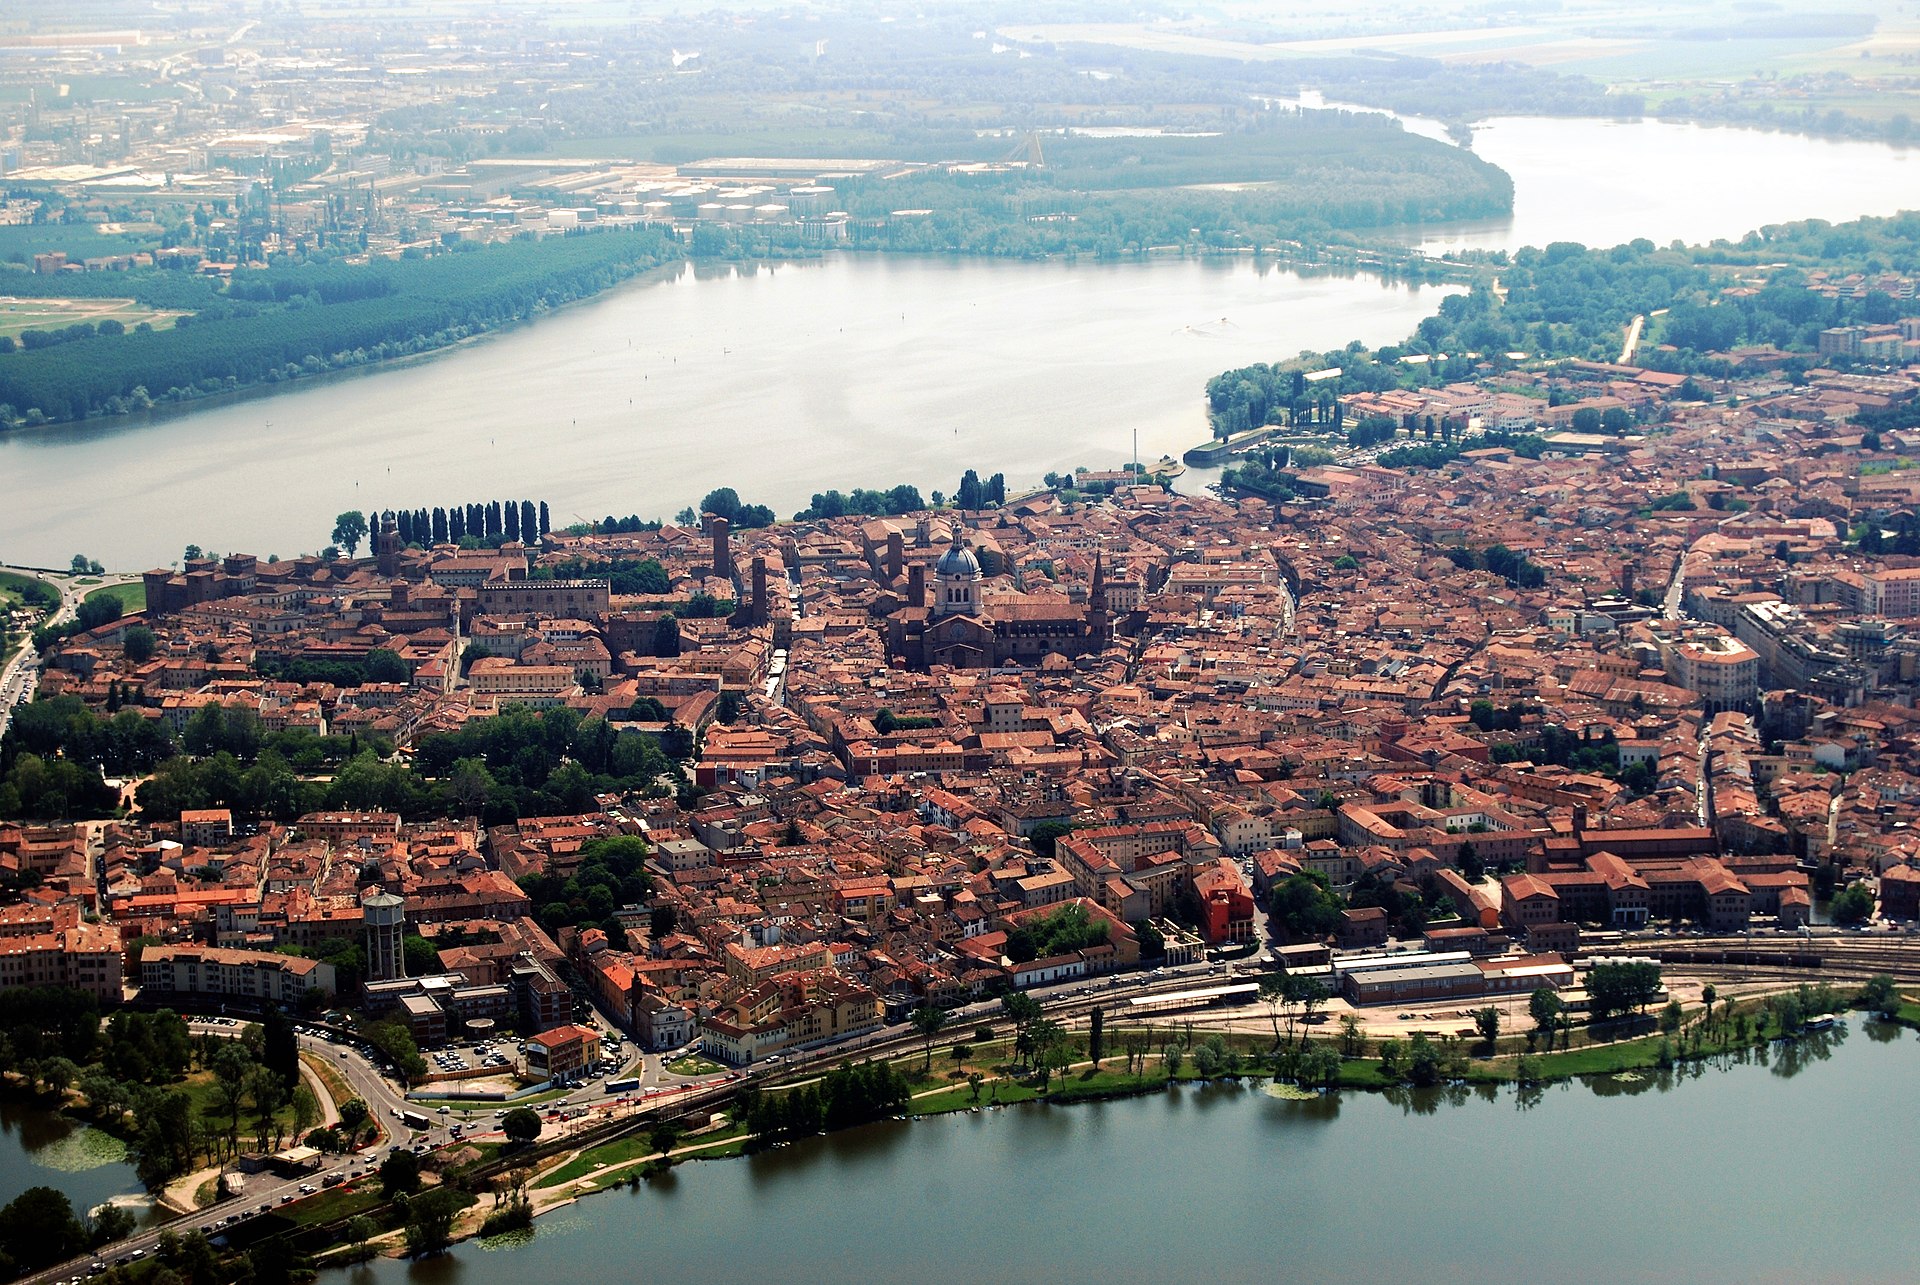
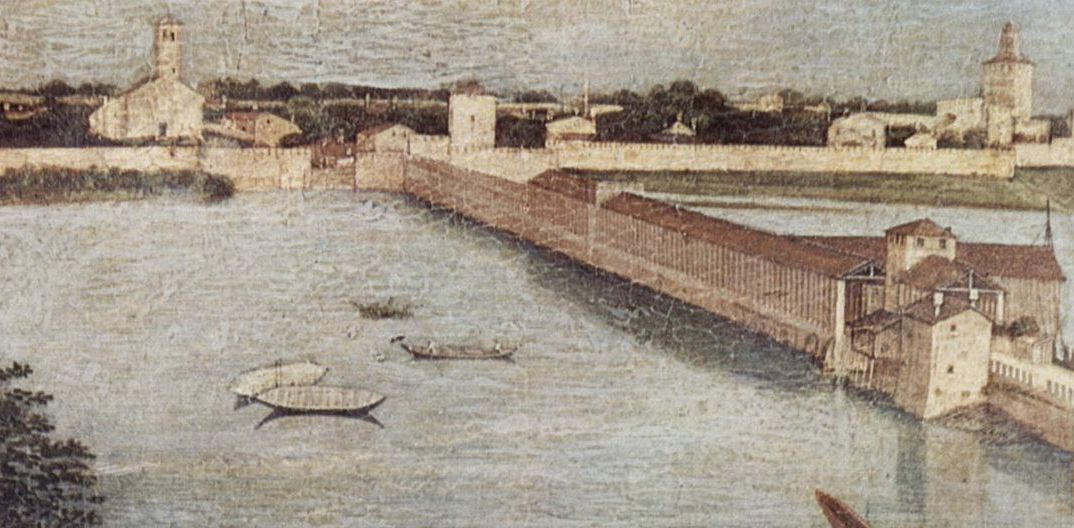
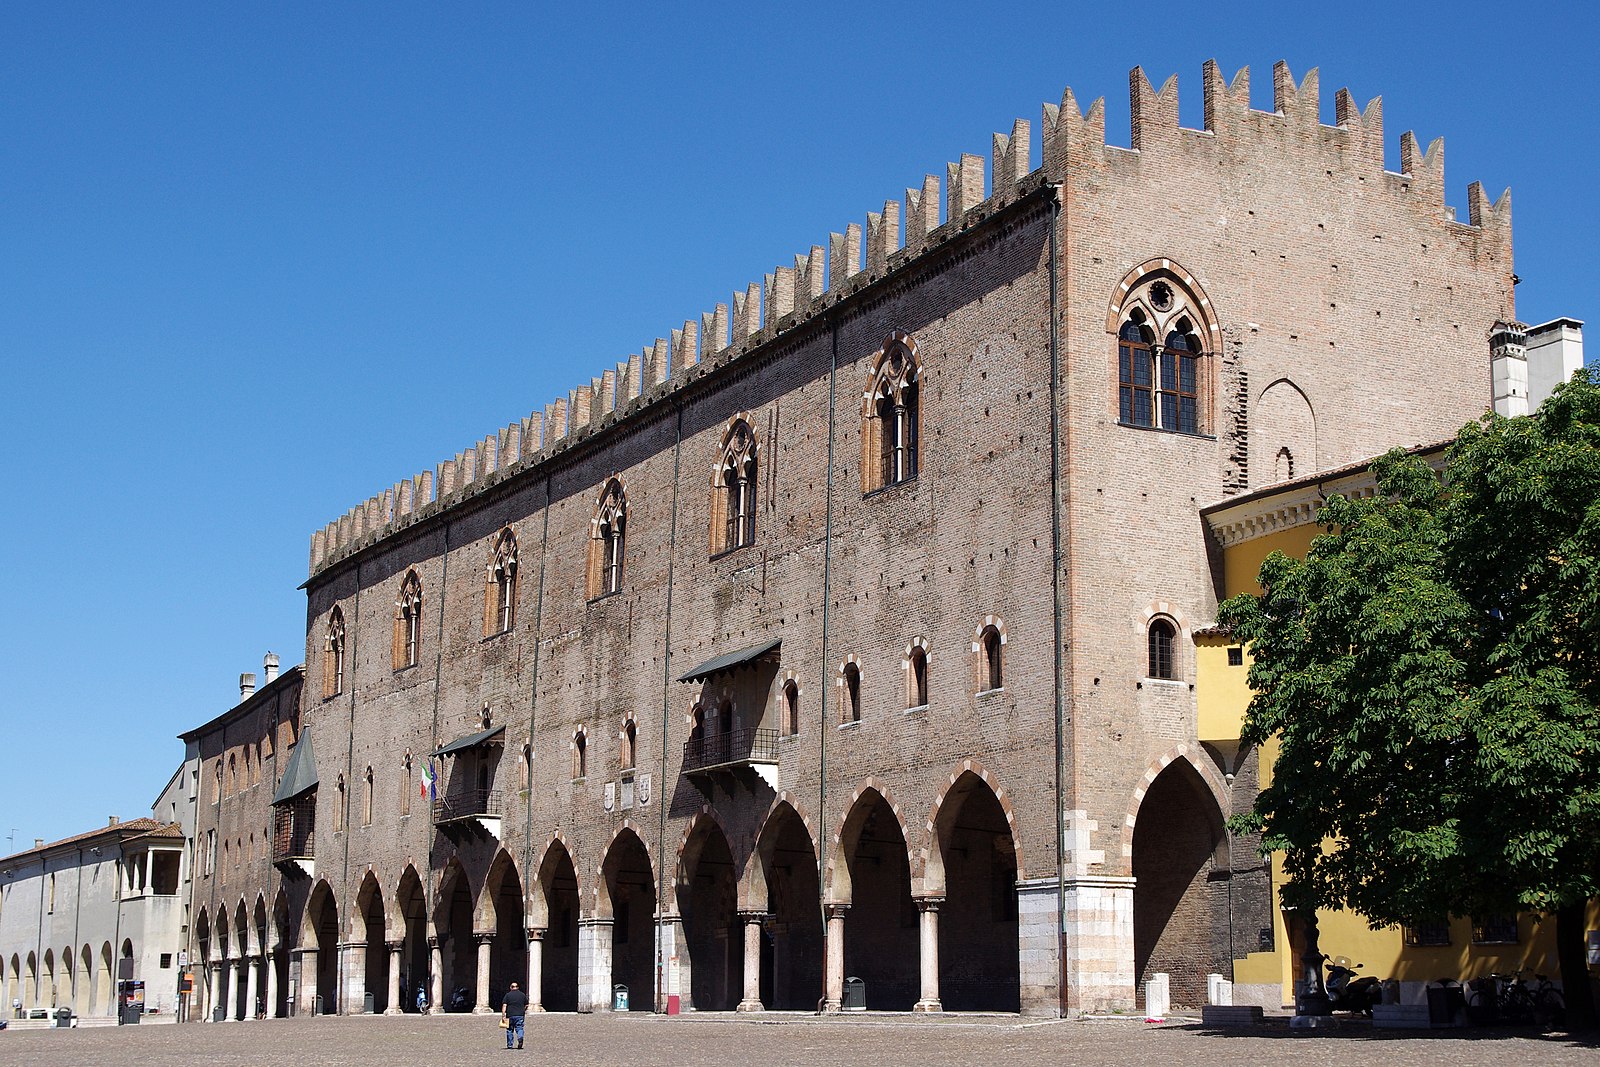
The dominant buildings are the Cathedral (rebuilt to plans by Alberti in these very years) and the Gothic palace of the ‘Captain of the People’, which is linked by various buildings to a massive brick fortress (characteristic of nearly all the cities in the Po valley), known as the Castle of St George.
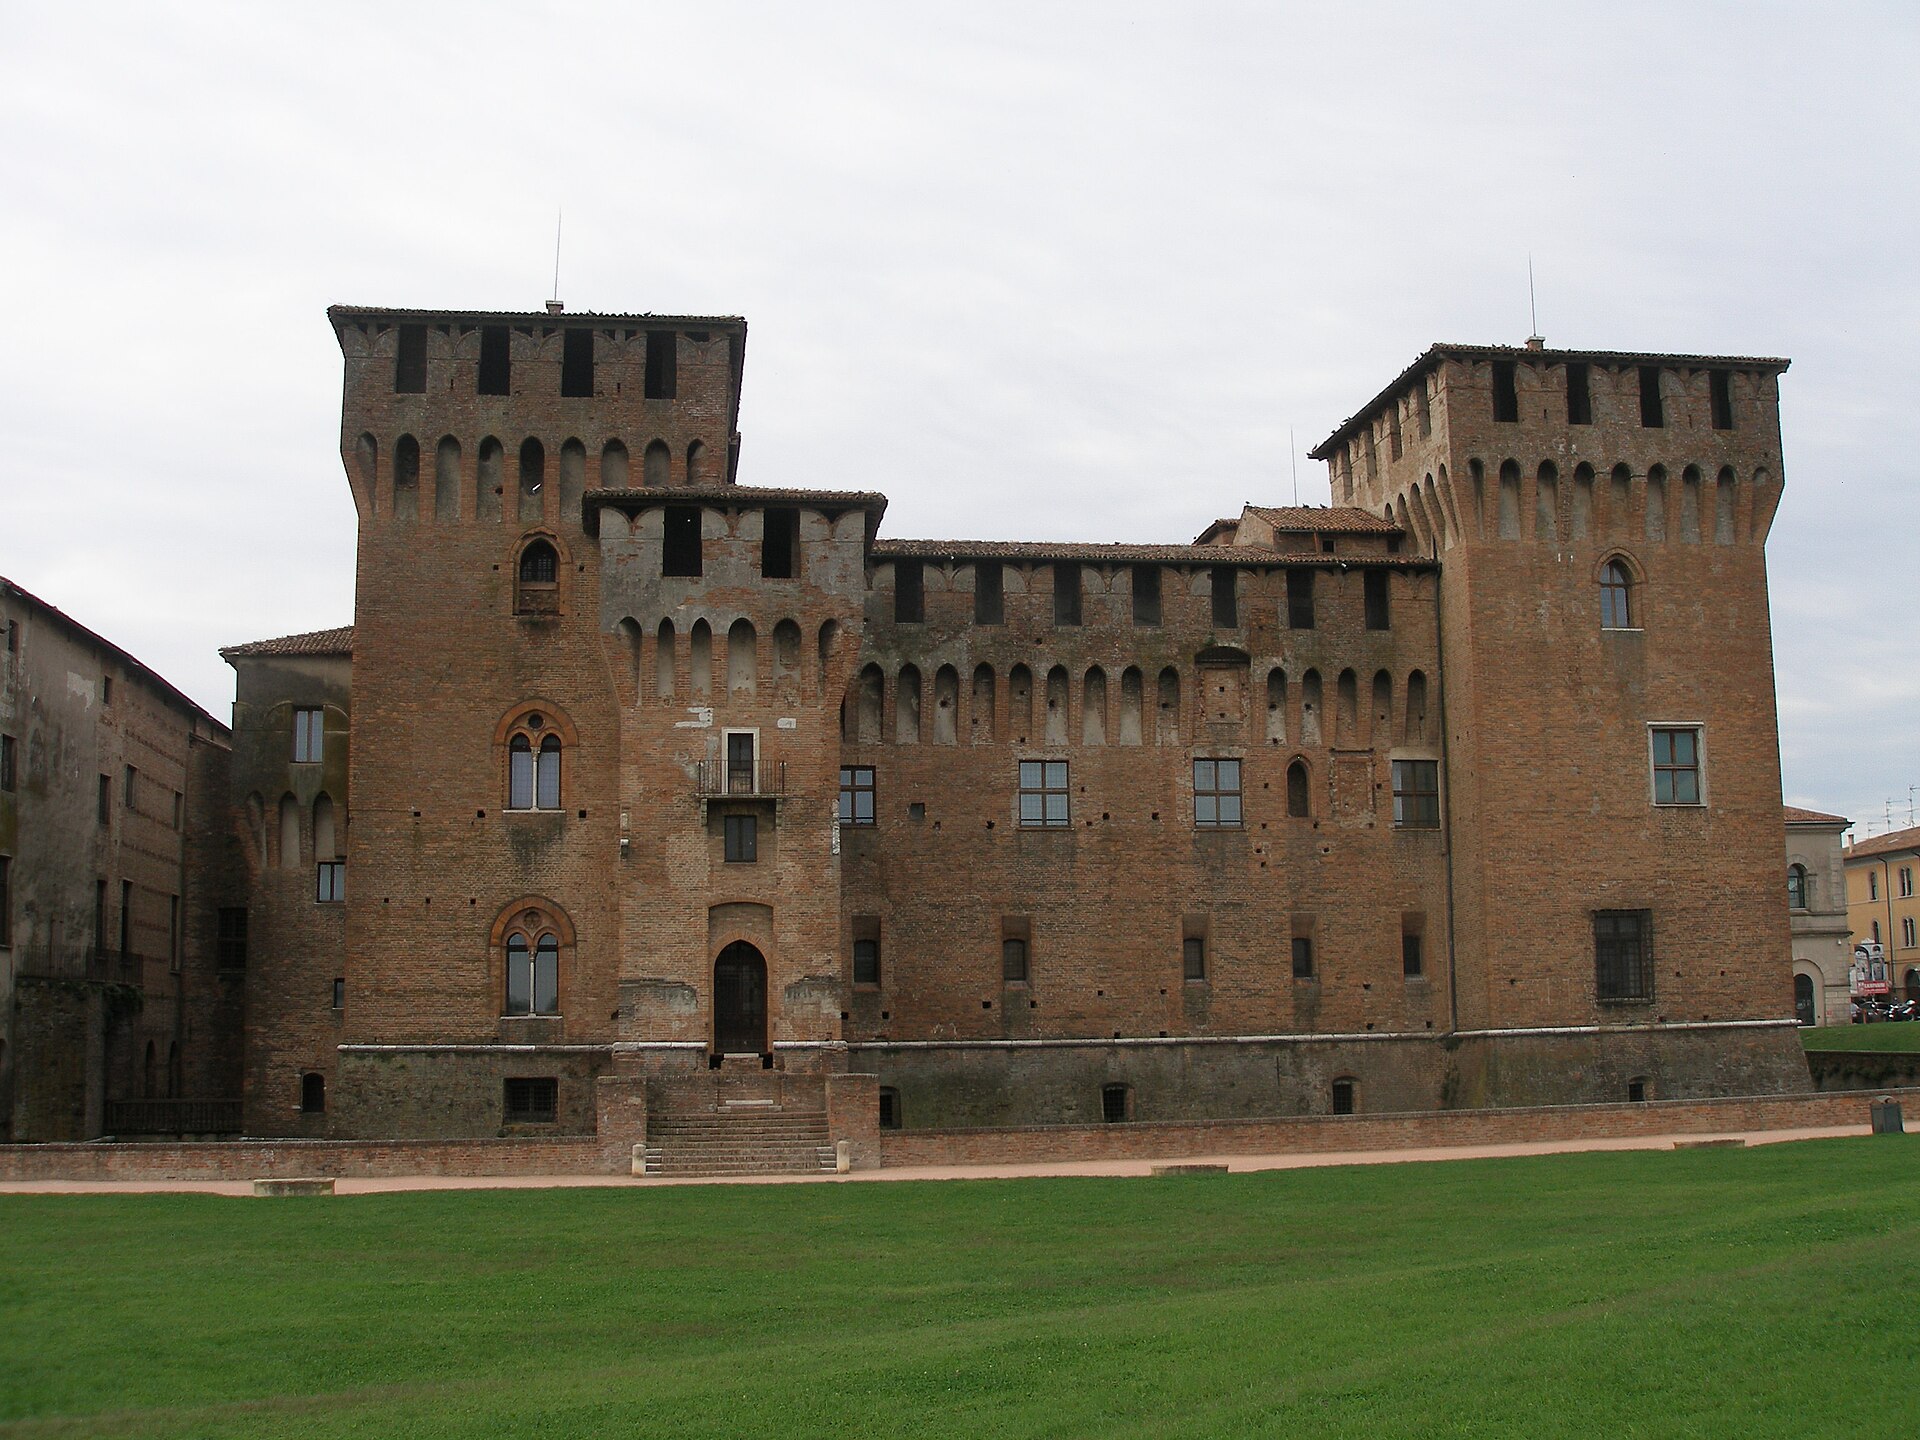
In 1465, Marquis Lodovico decided to transform one of the existing rooms in the Castle into a bedroom and state apartment which would be both intimate and formal, decorating it with suitably impressive paintings by his court painter.
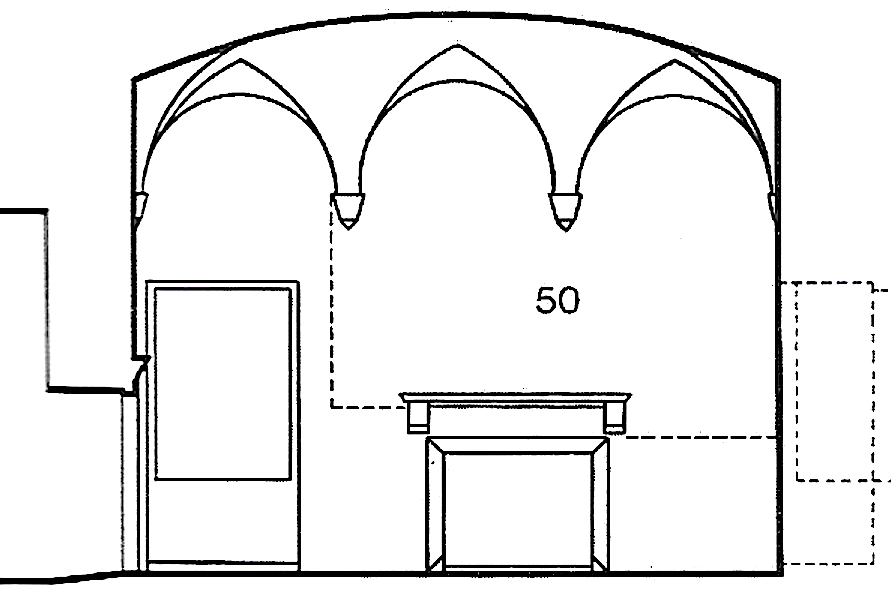
We do not know exactly when Mantegna began his work, but we know that it was not completed until 1474. The room in question—now called La camera degli sposi, (‘bridal chamber’), but then known simply as ‘the Painted Chamber’—is almost a perfect square, as you see in the plan, and not very big, since each side measures only about twenty-six feet.

More important, it is almost a cube, since the walls, as you see here, rise to just over twenty feet, and the ceiling curves gently up to reach twenty-three feet.
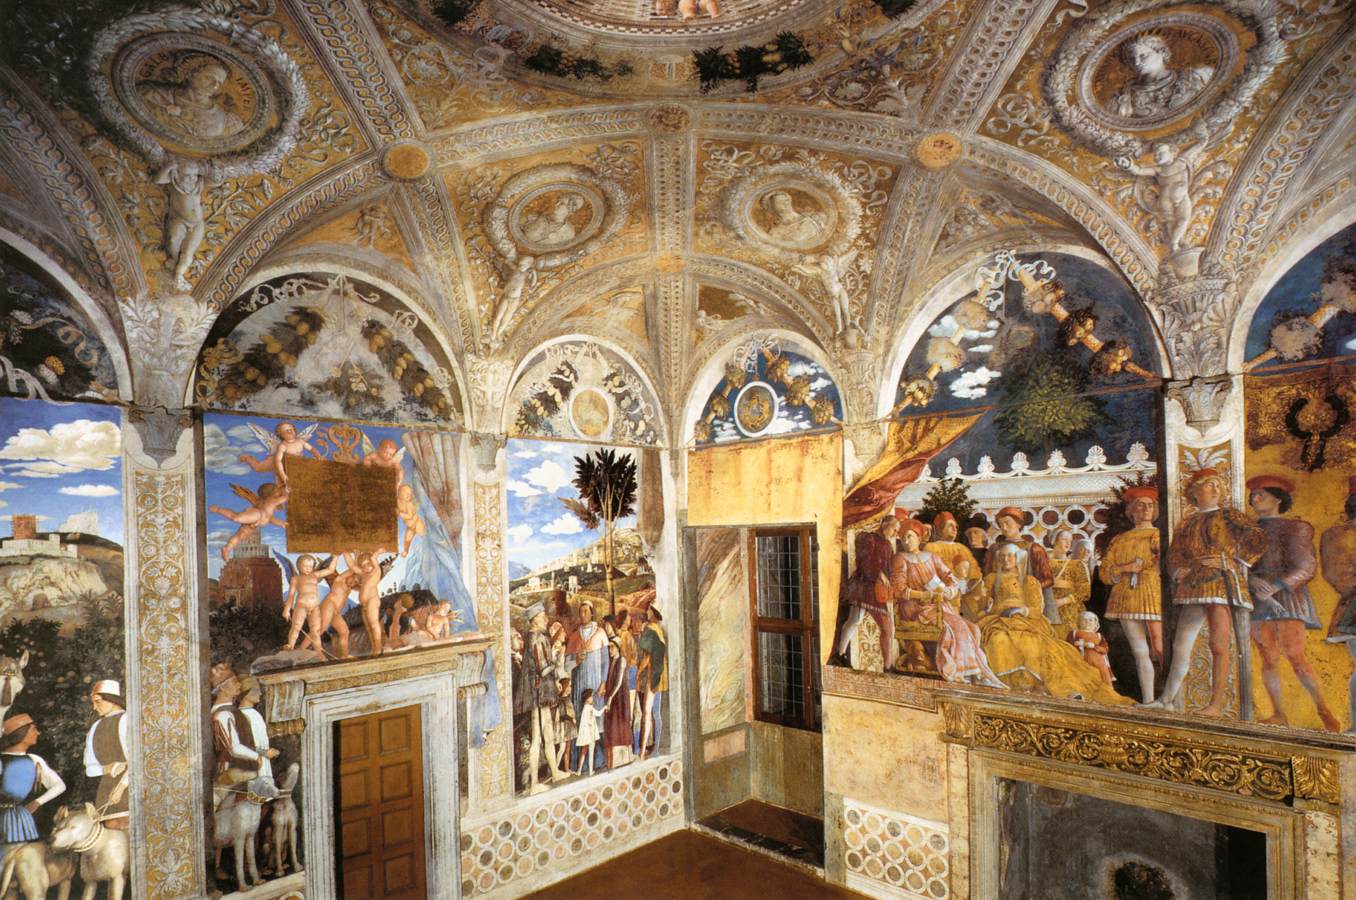
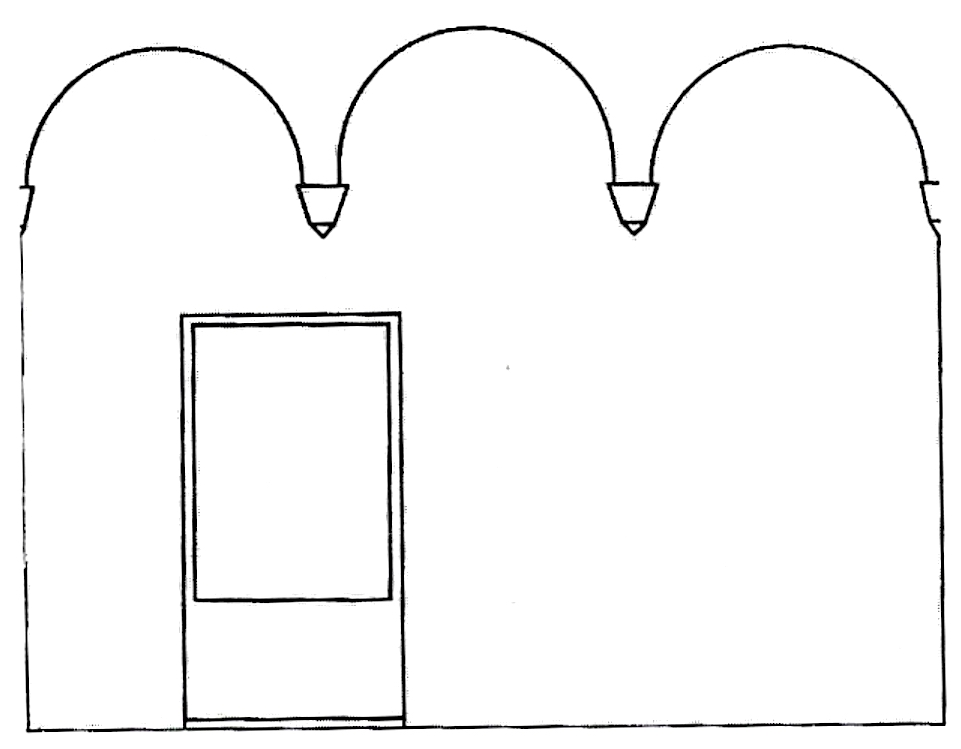
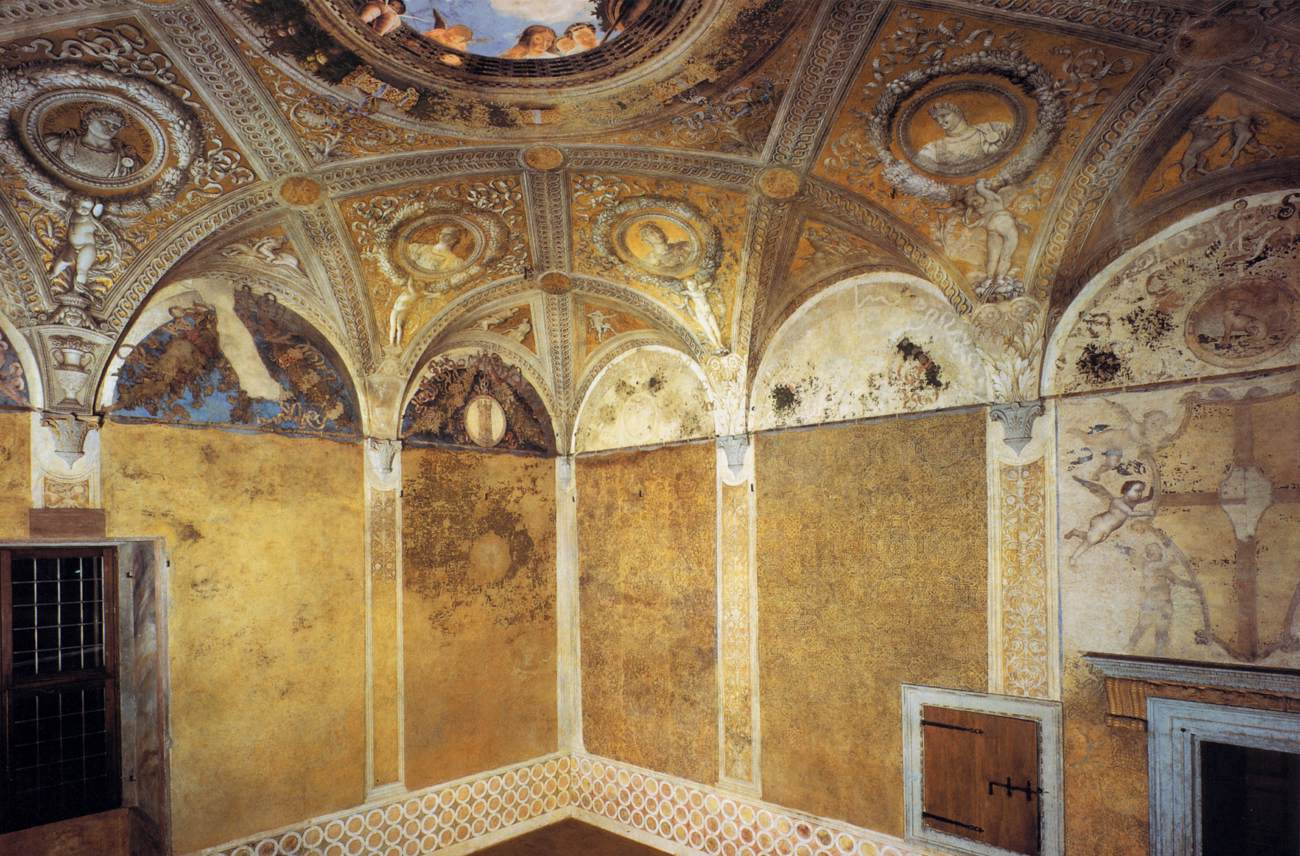
It has doors on each of the internal walls (that is to the south, and to the west, which acts as the main entrance), and one window on each of the external walls (to the east and the north). The diagram is actually of the north wall, where you can see that there is also a large fireplace. The Marquis would normally have sat in the corner facing the north and the west wall, and once Mantegna had finished the work in 1474, this is what he would have seen (with the north wall lying to the right):
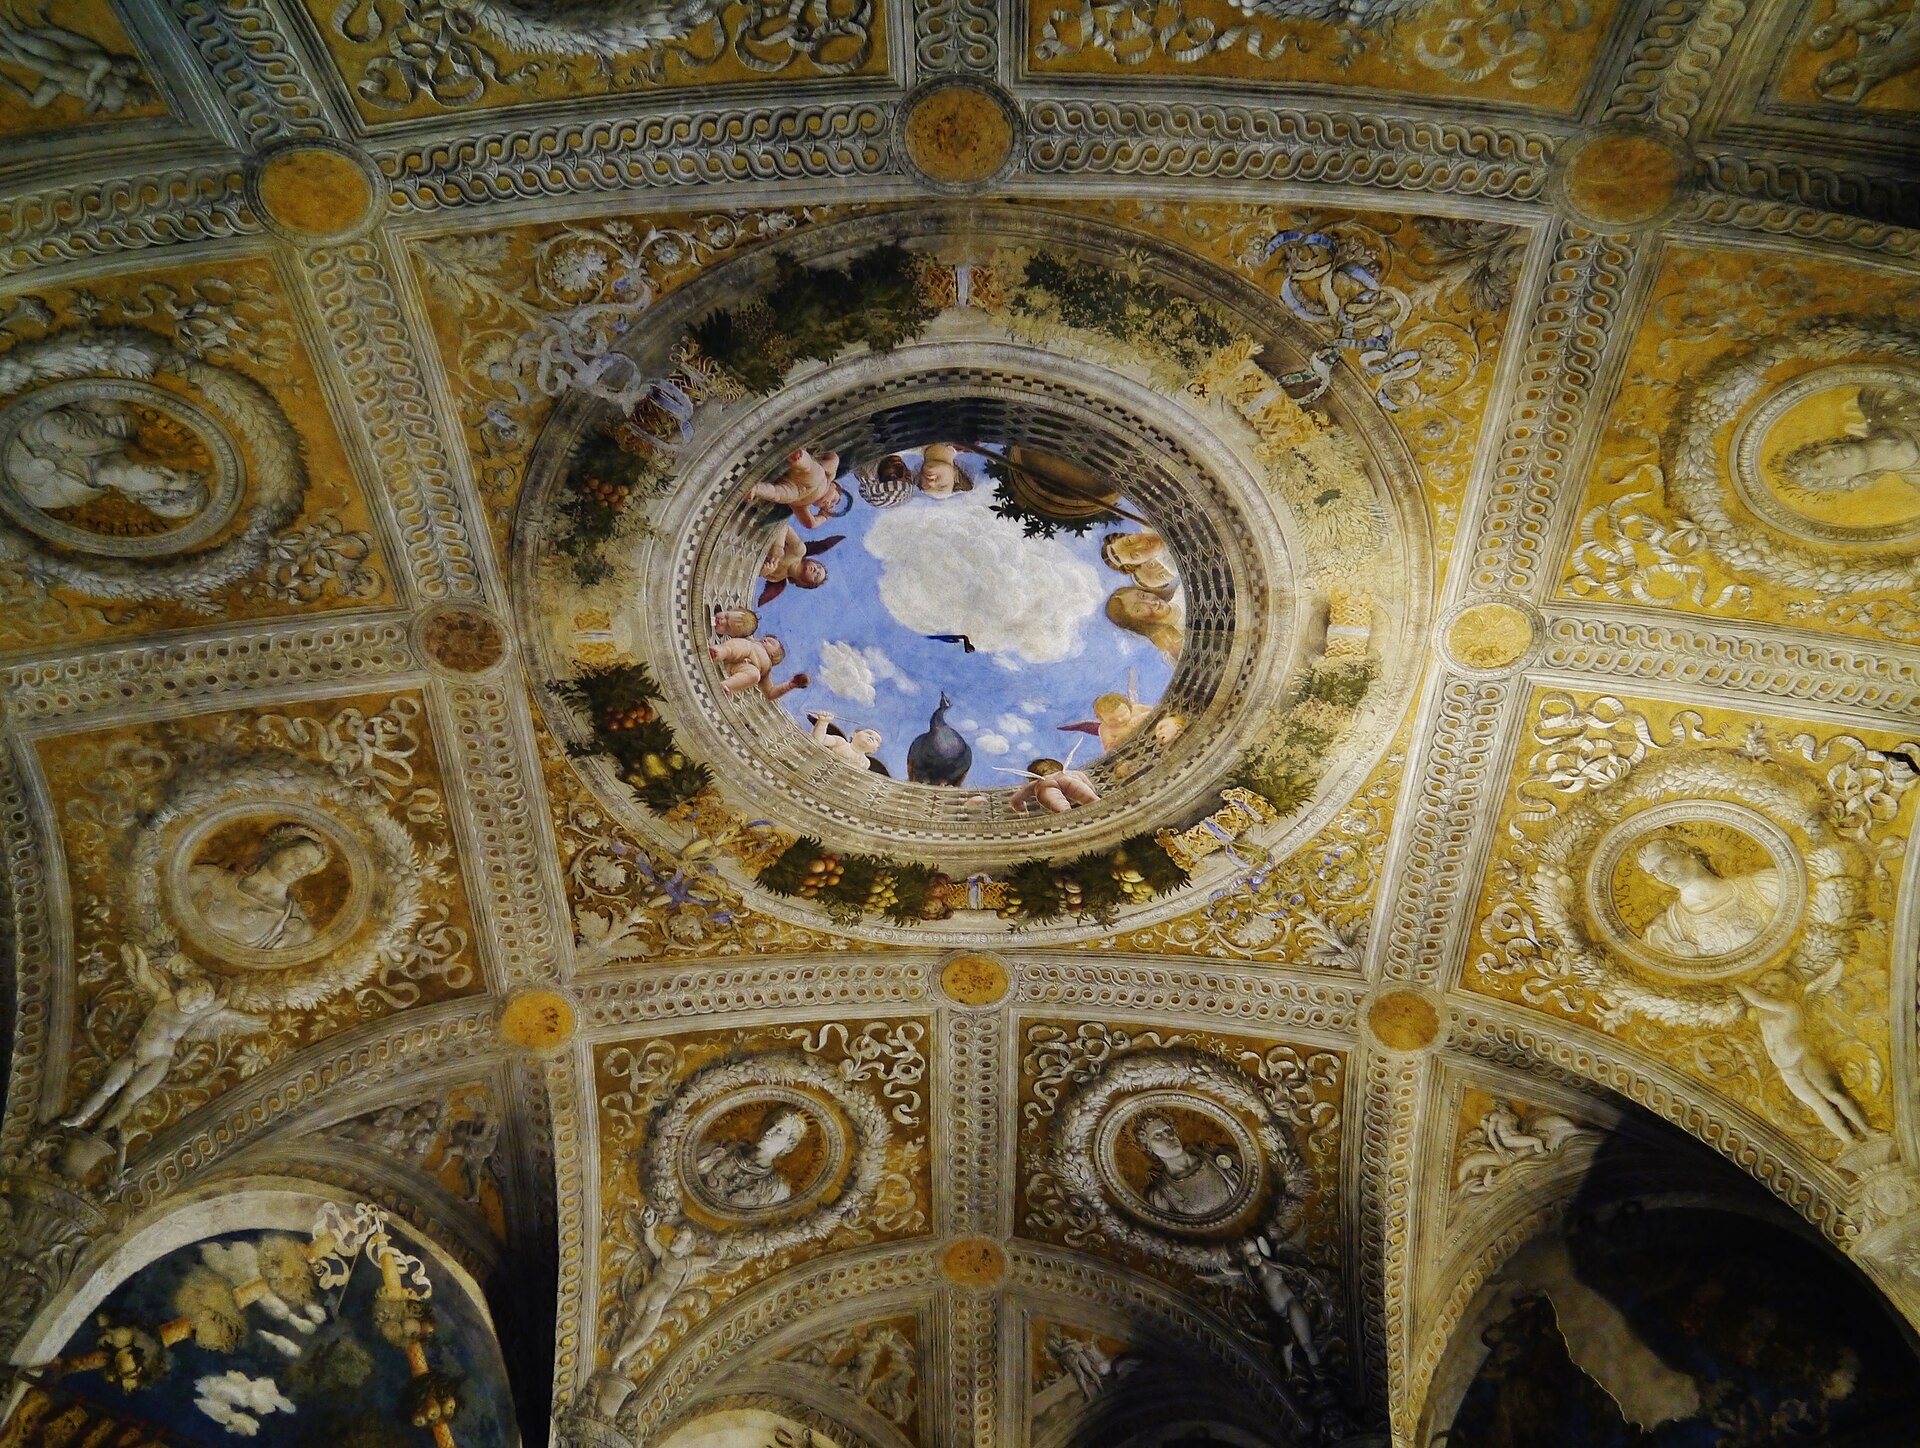
As you can see, even at first glance, Mantegna has completely transformed the appearance of the ceiling and the walls, disguising the architectural realities with a brillant tour de force of illusion.
What he does with the ceiling is to paint a most elaborate pattern of ‘ribs’ (best appreciated in a diagram), so that the flattish ceiling actually looks like typical Gothic vaulting.
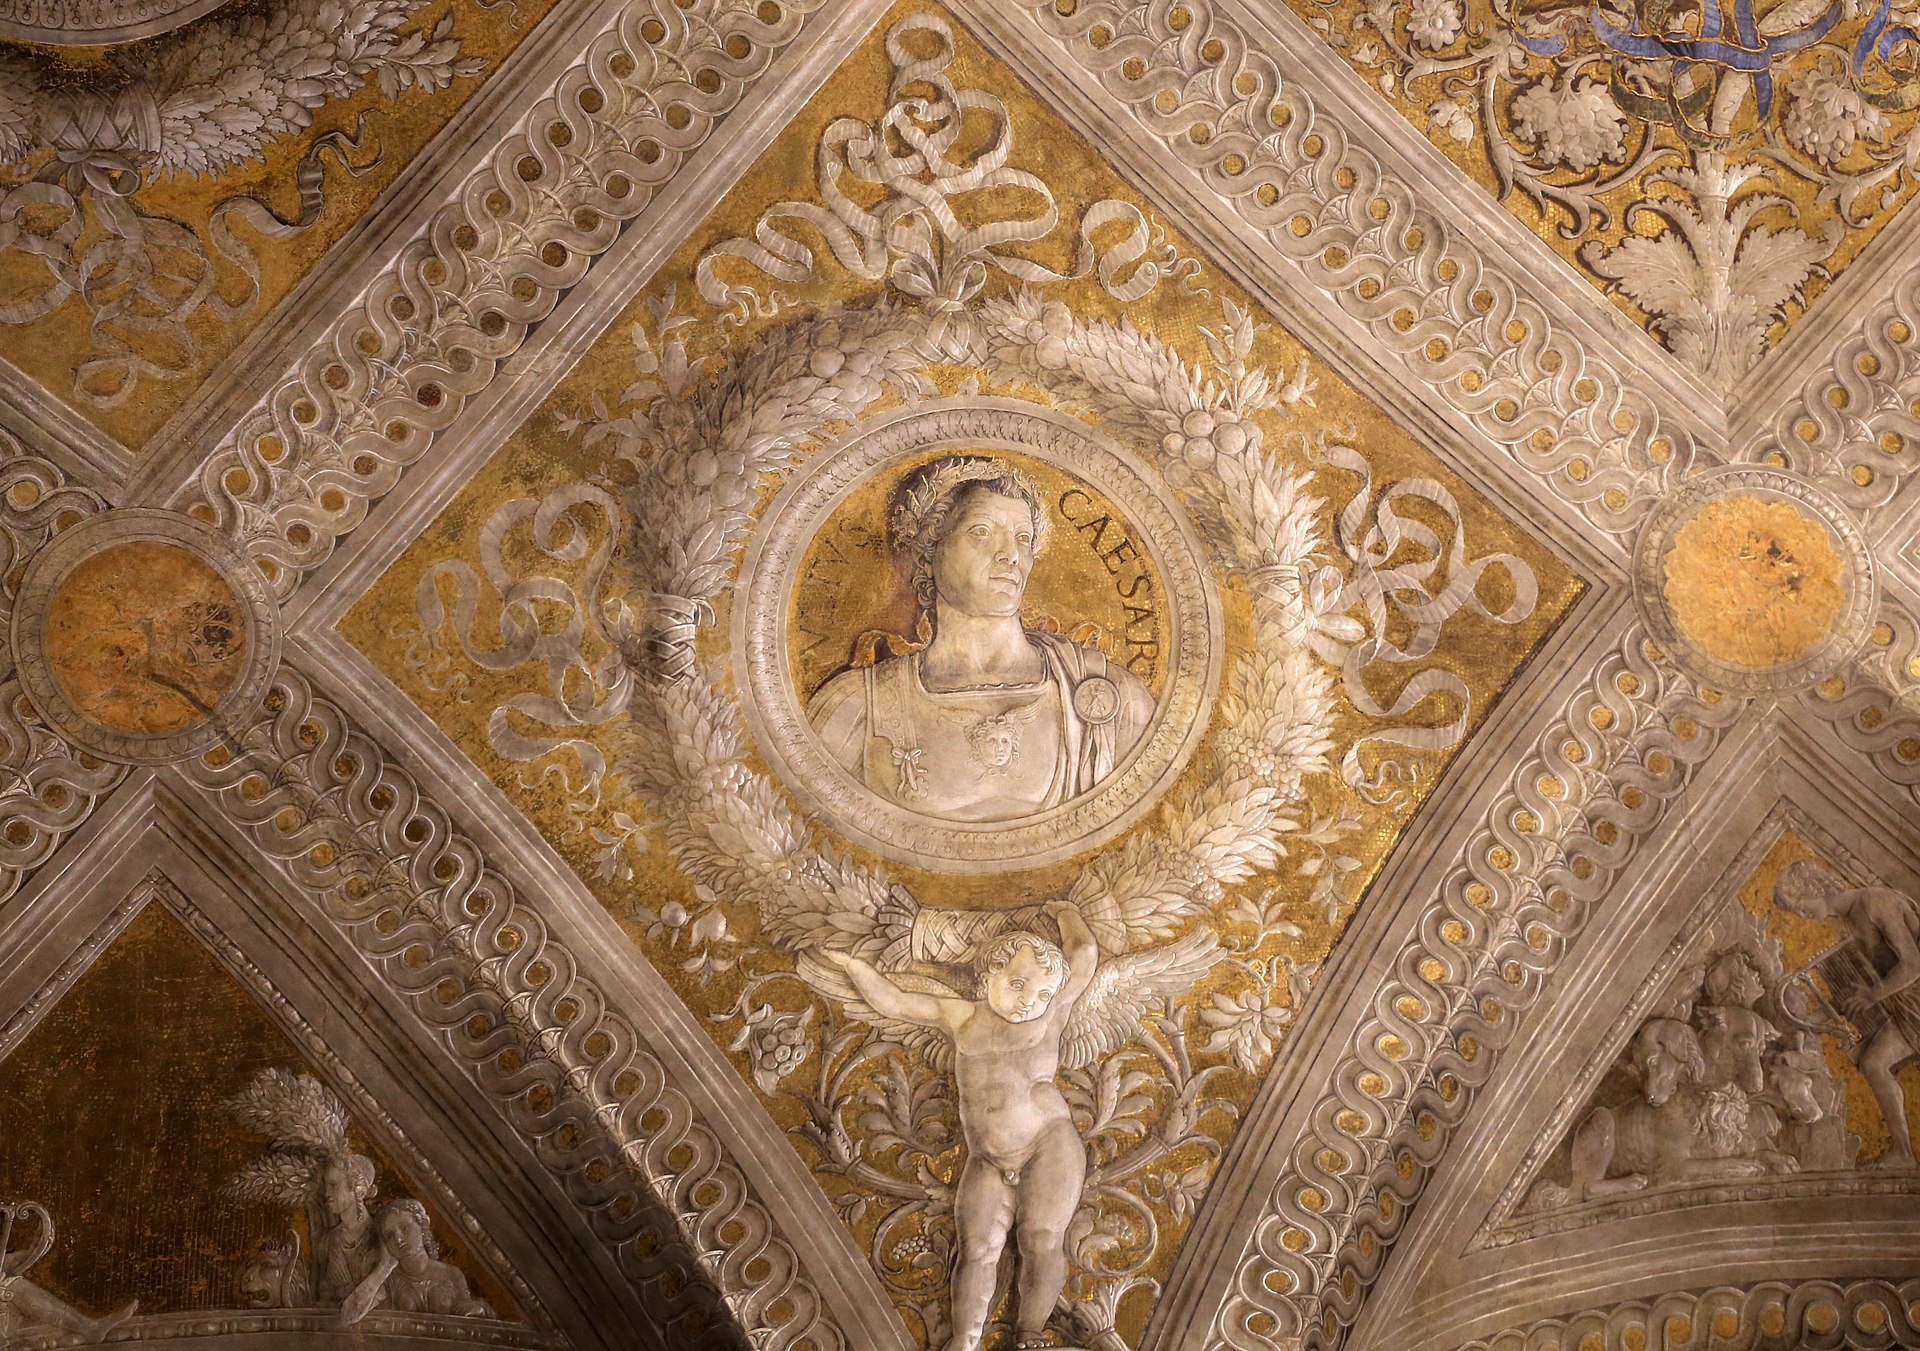
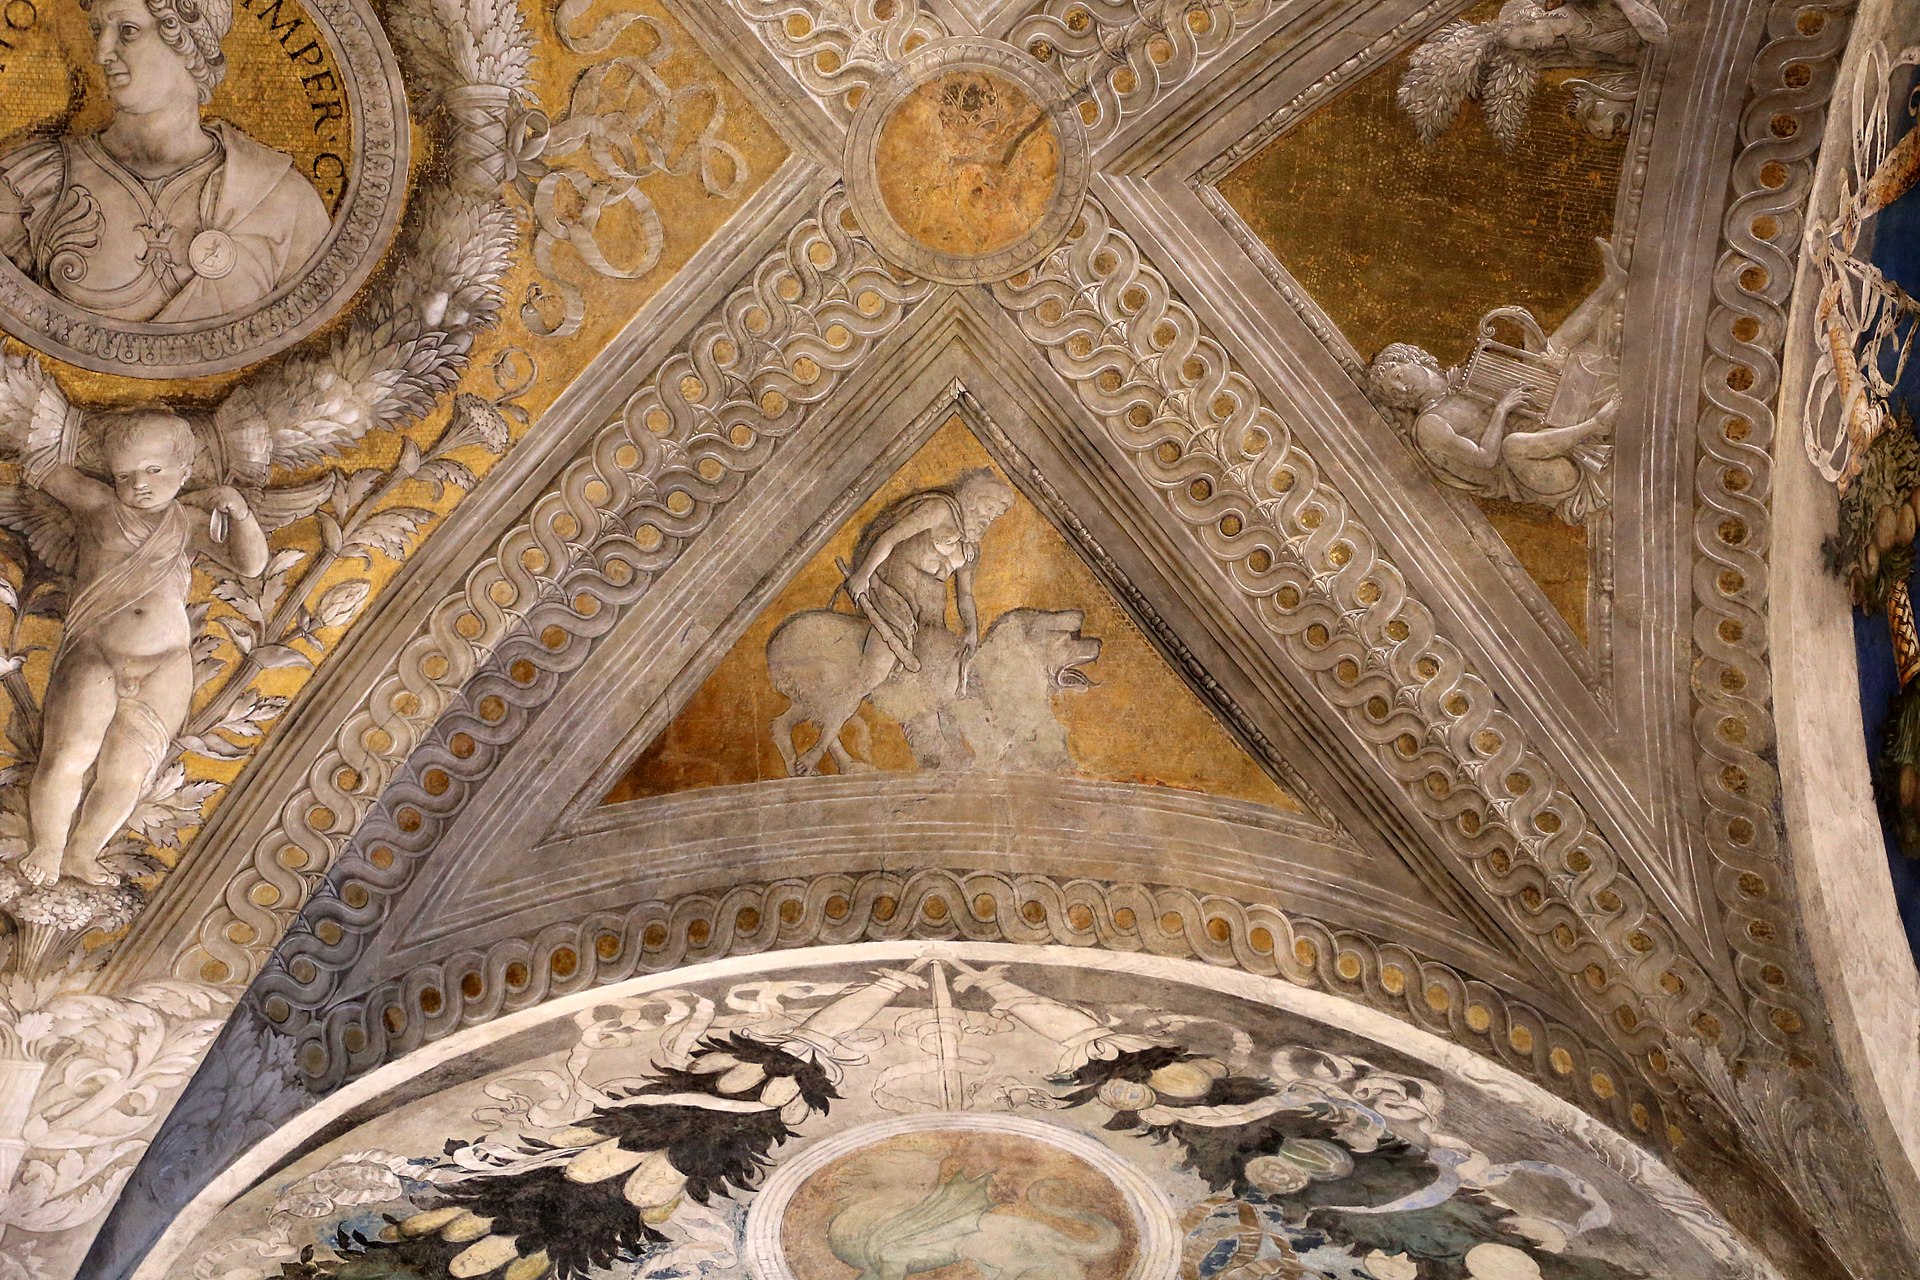
The ‘ribs’ themselves are apparently richly decorated with stucco, and the spaces between them are filled with eight medallions, apparently containing relief busts of the first eight Roman emperors.
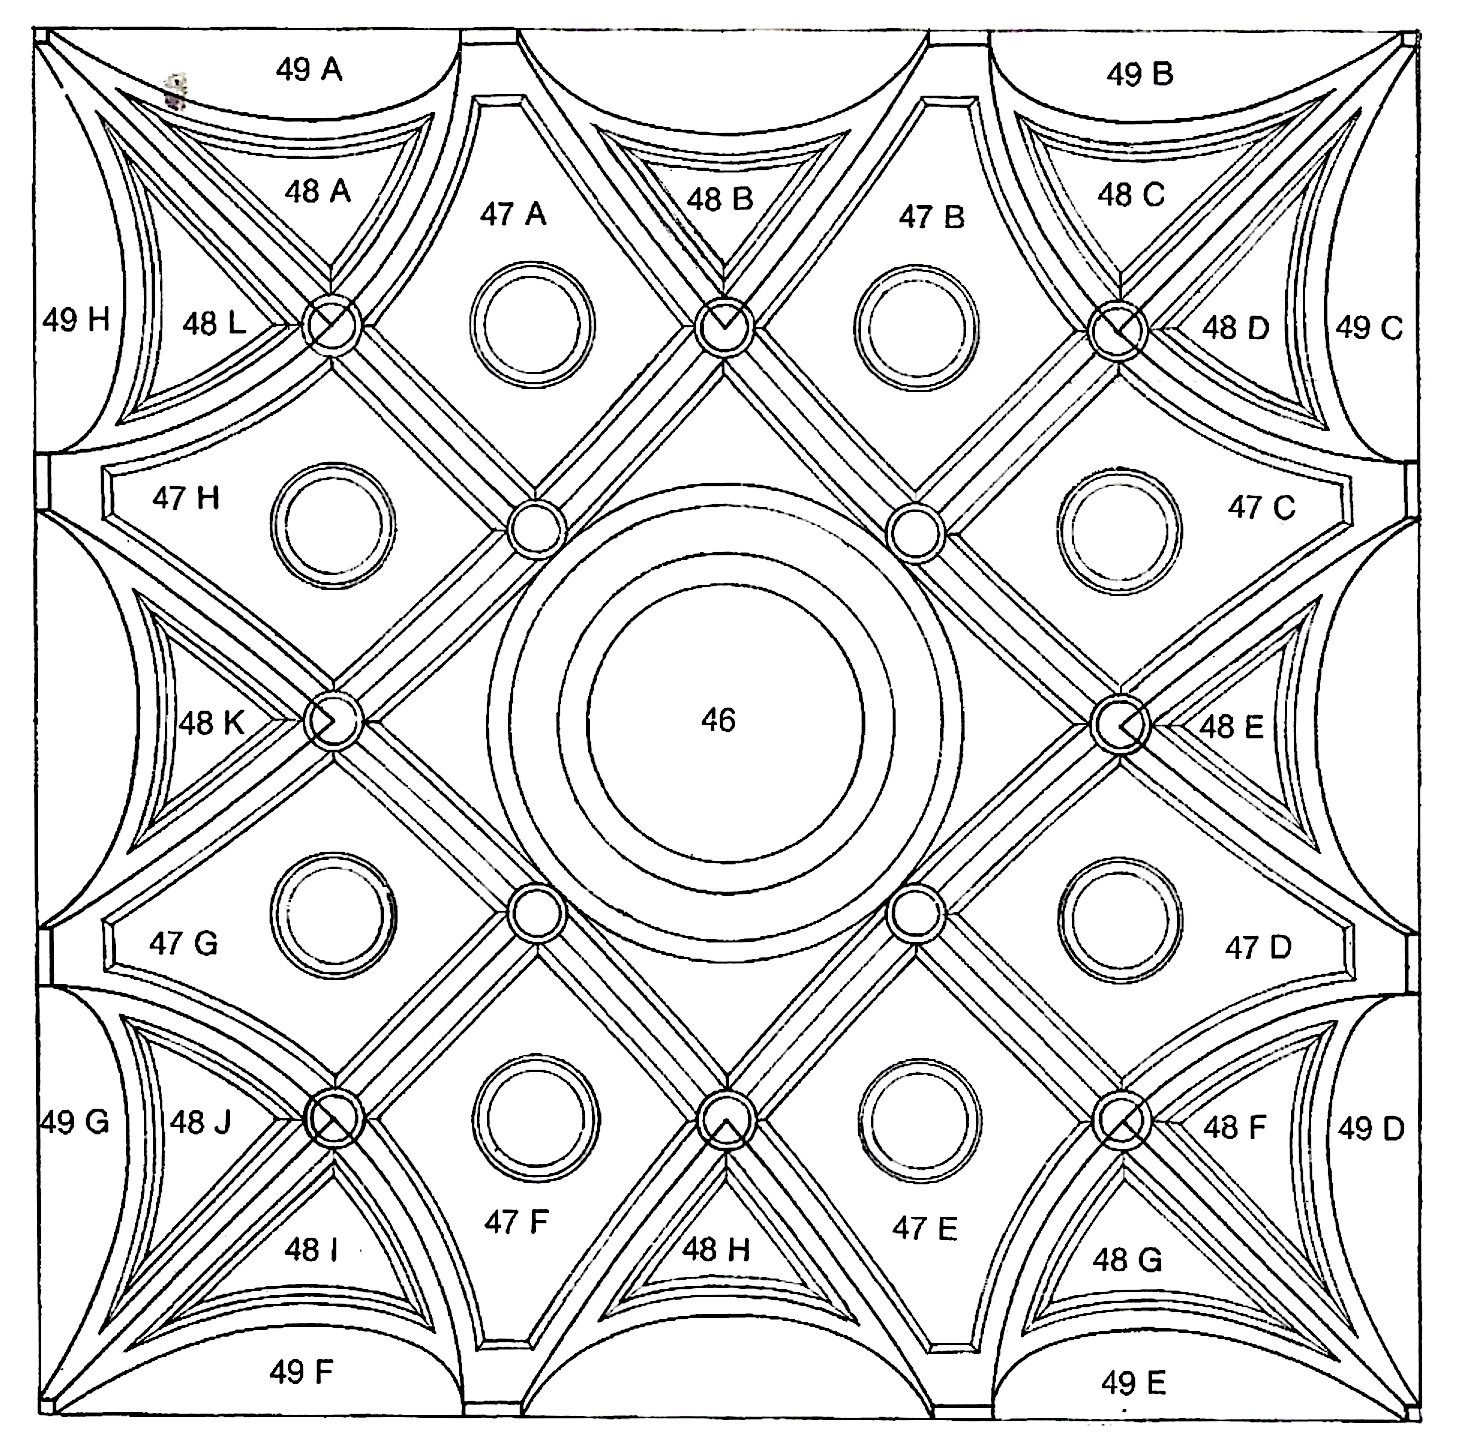
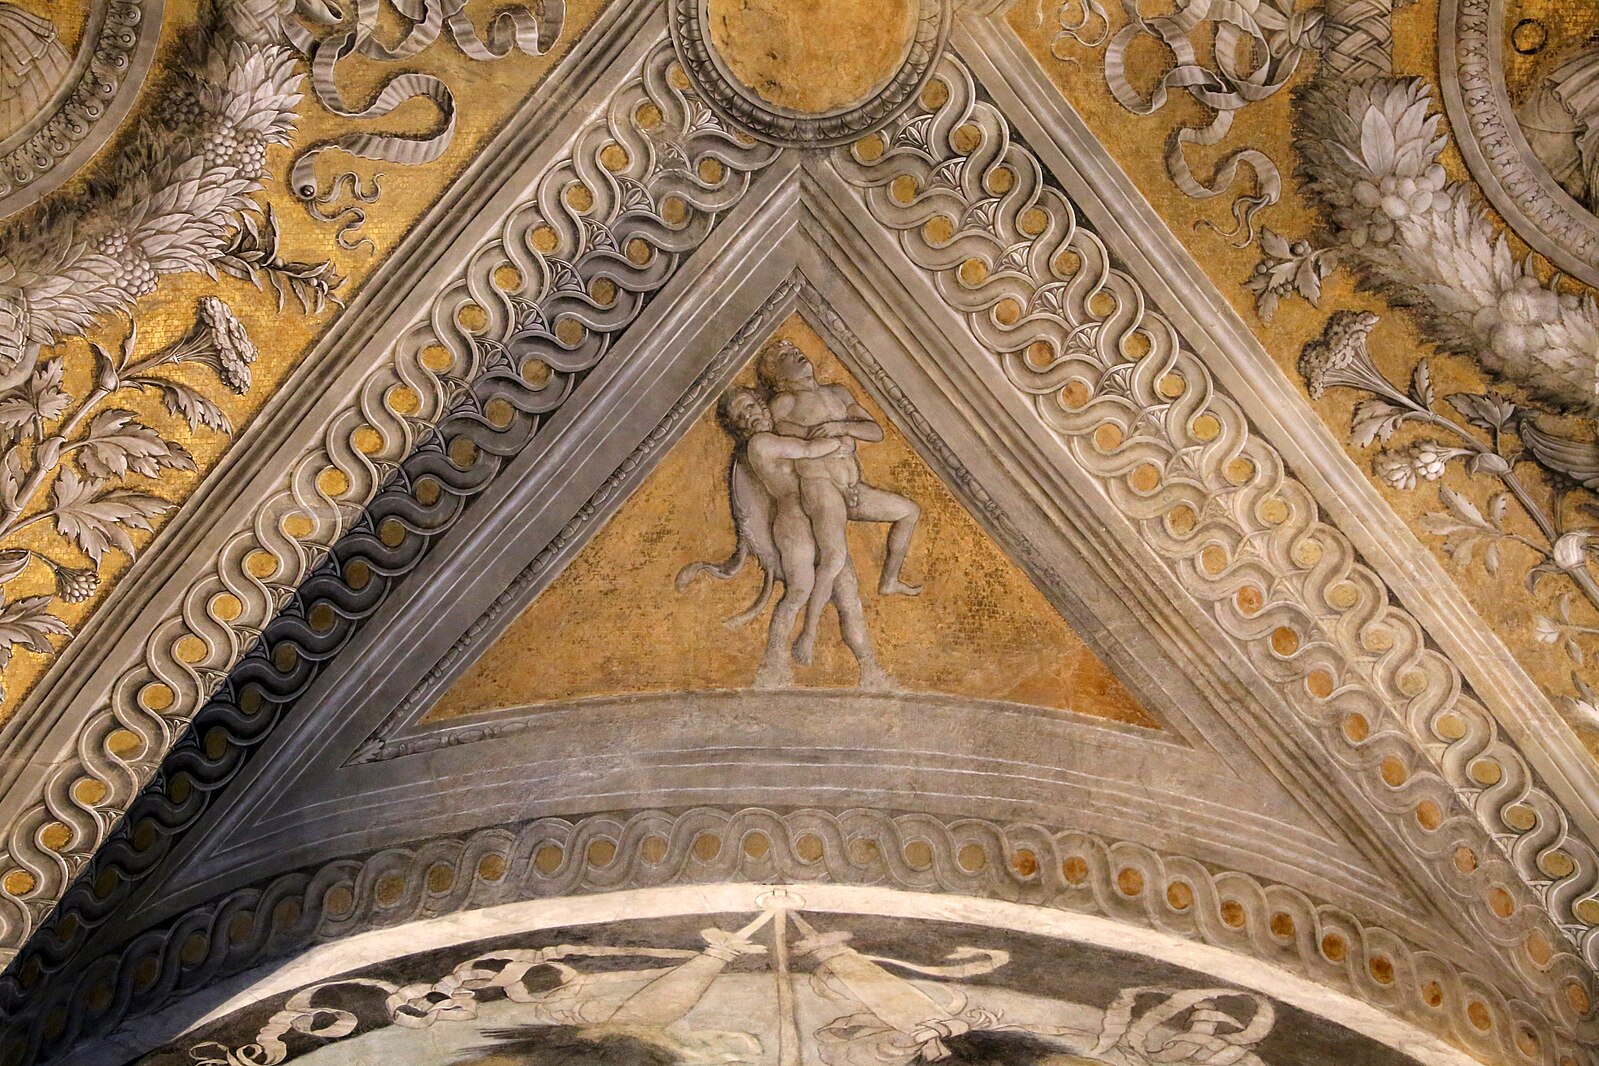
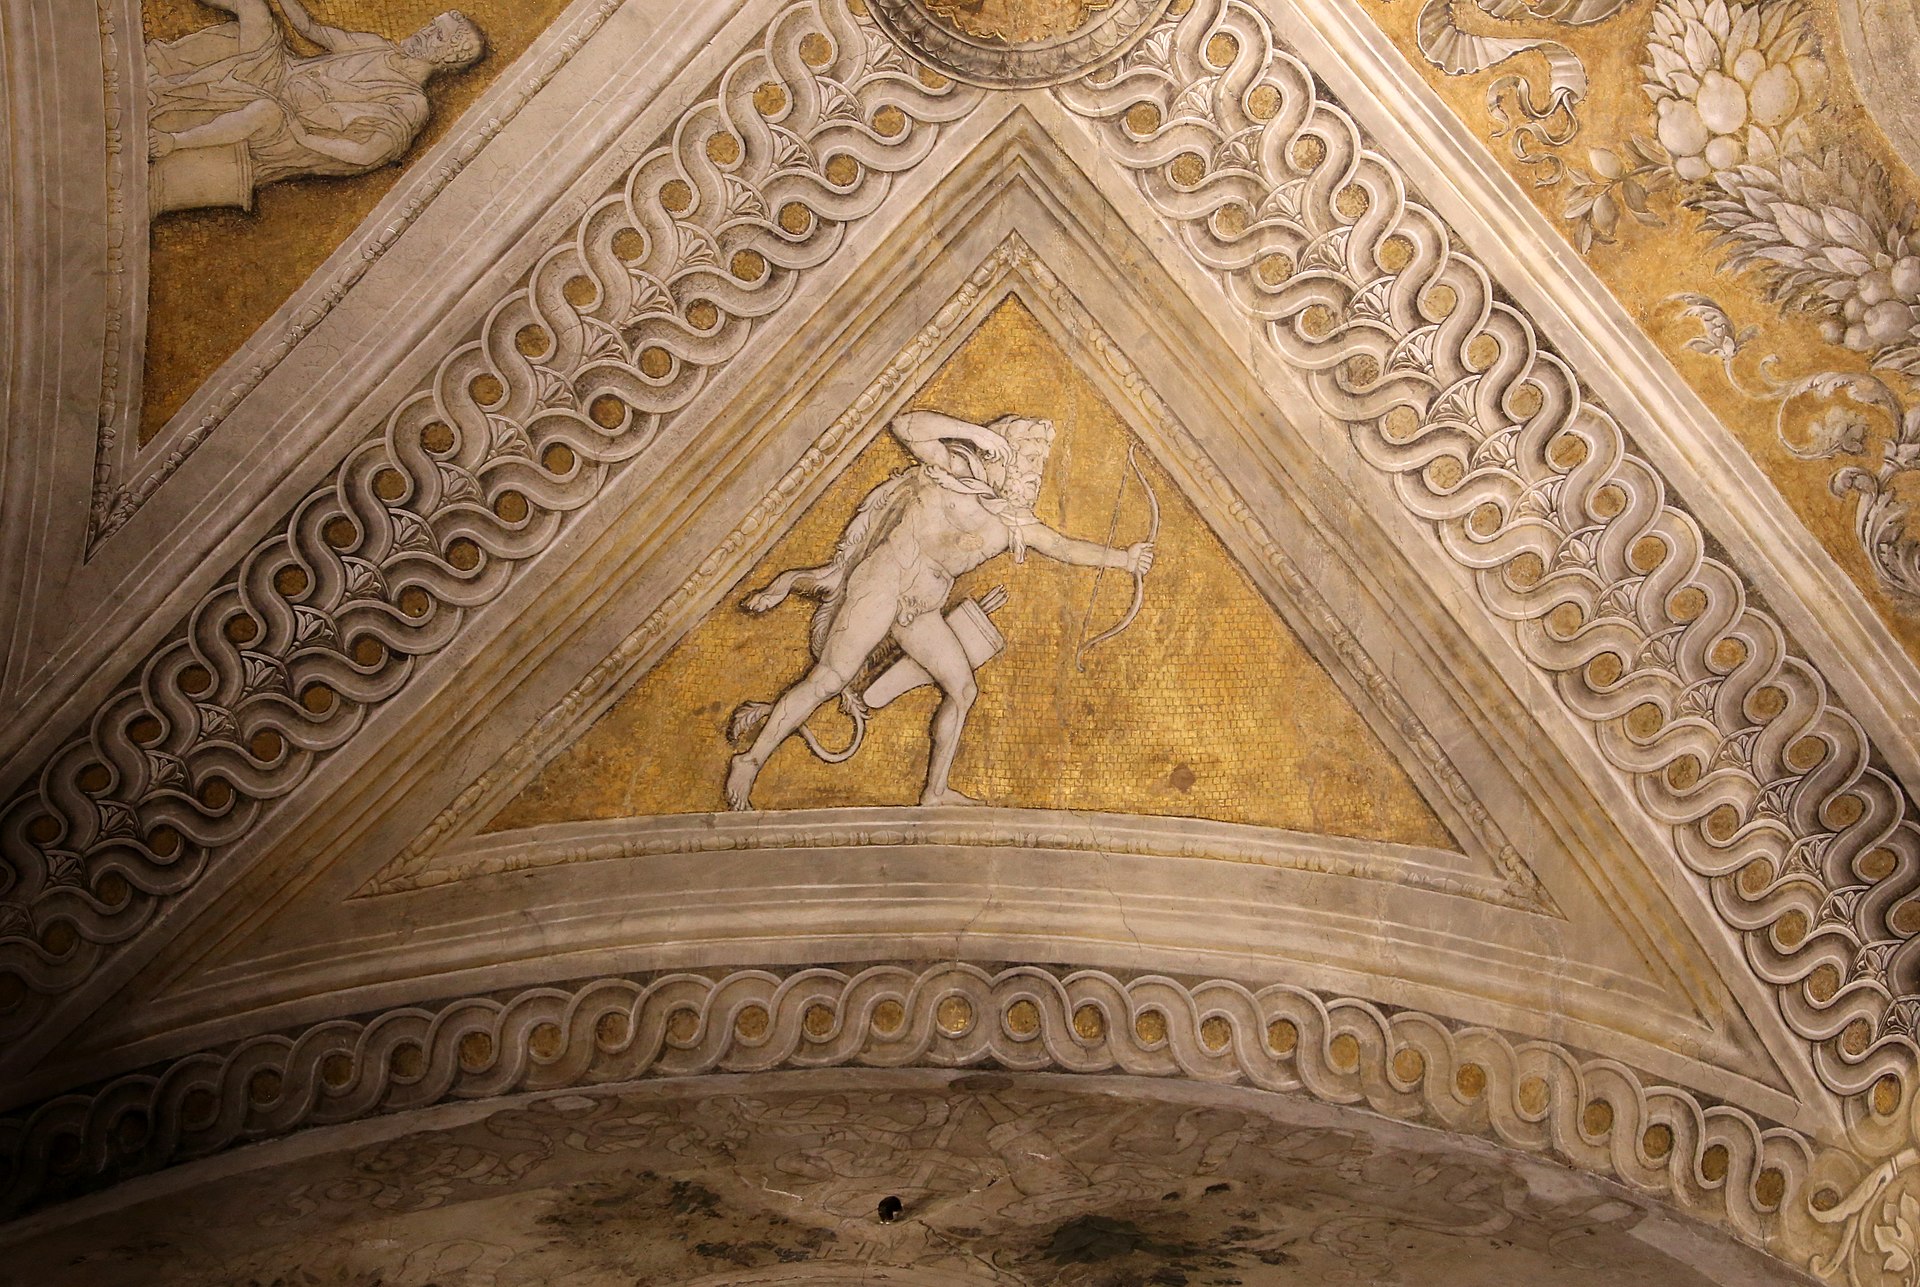
In the pseudo-pendentives meanwhile, there are twelve mythological scenes—also apparently in relief—such as these three exploits by Hercules (triumphing over Antaeus, the Stymphalian birds, and Cerberus).
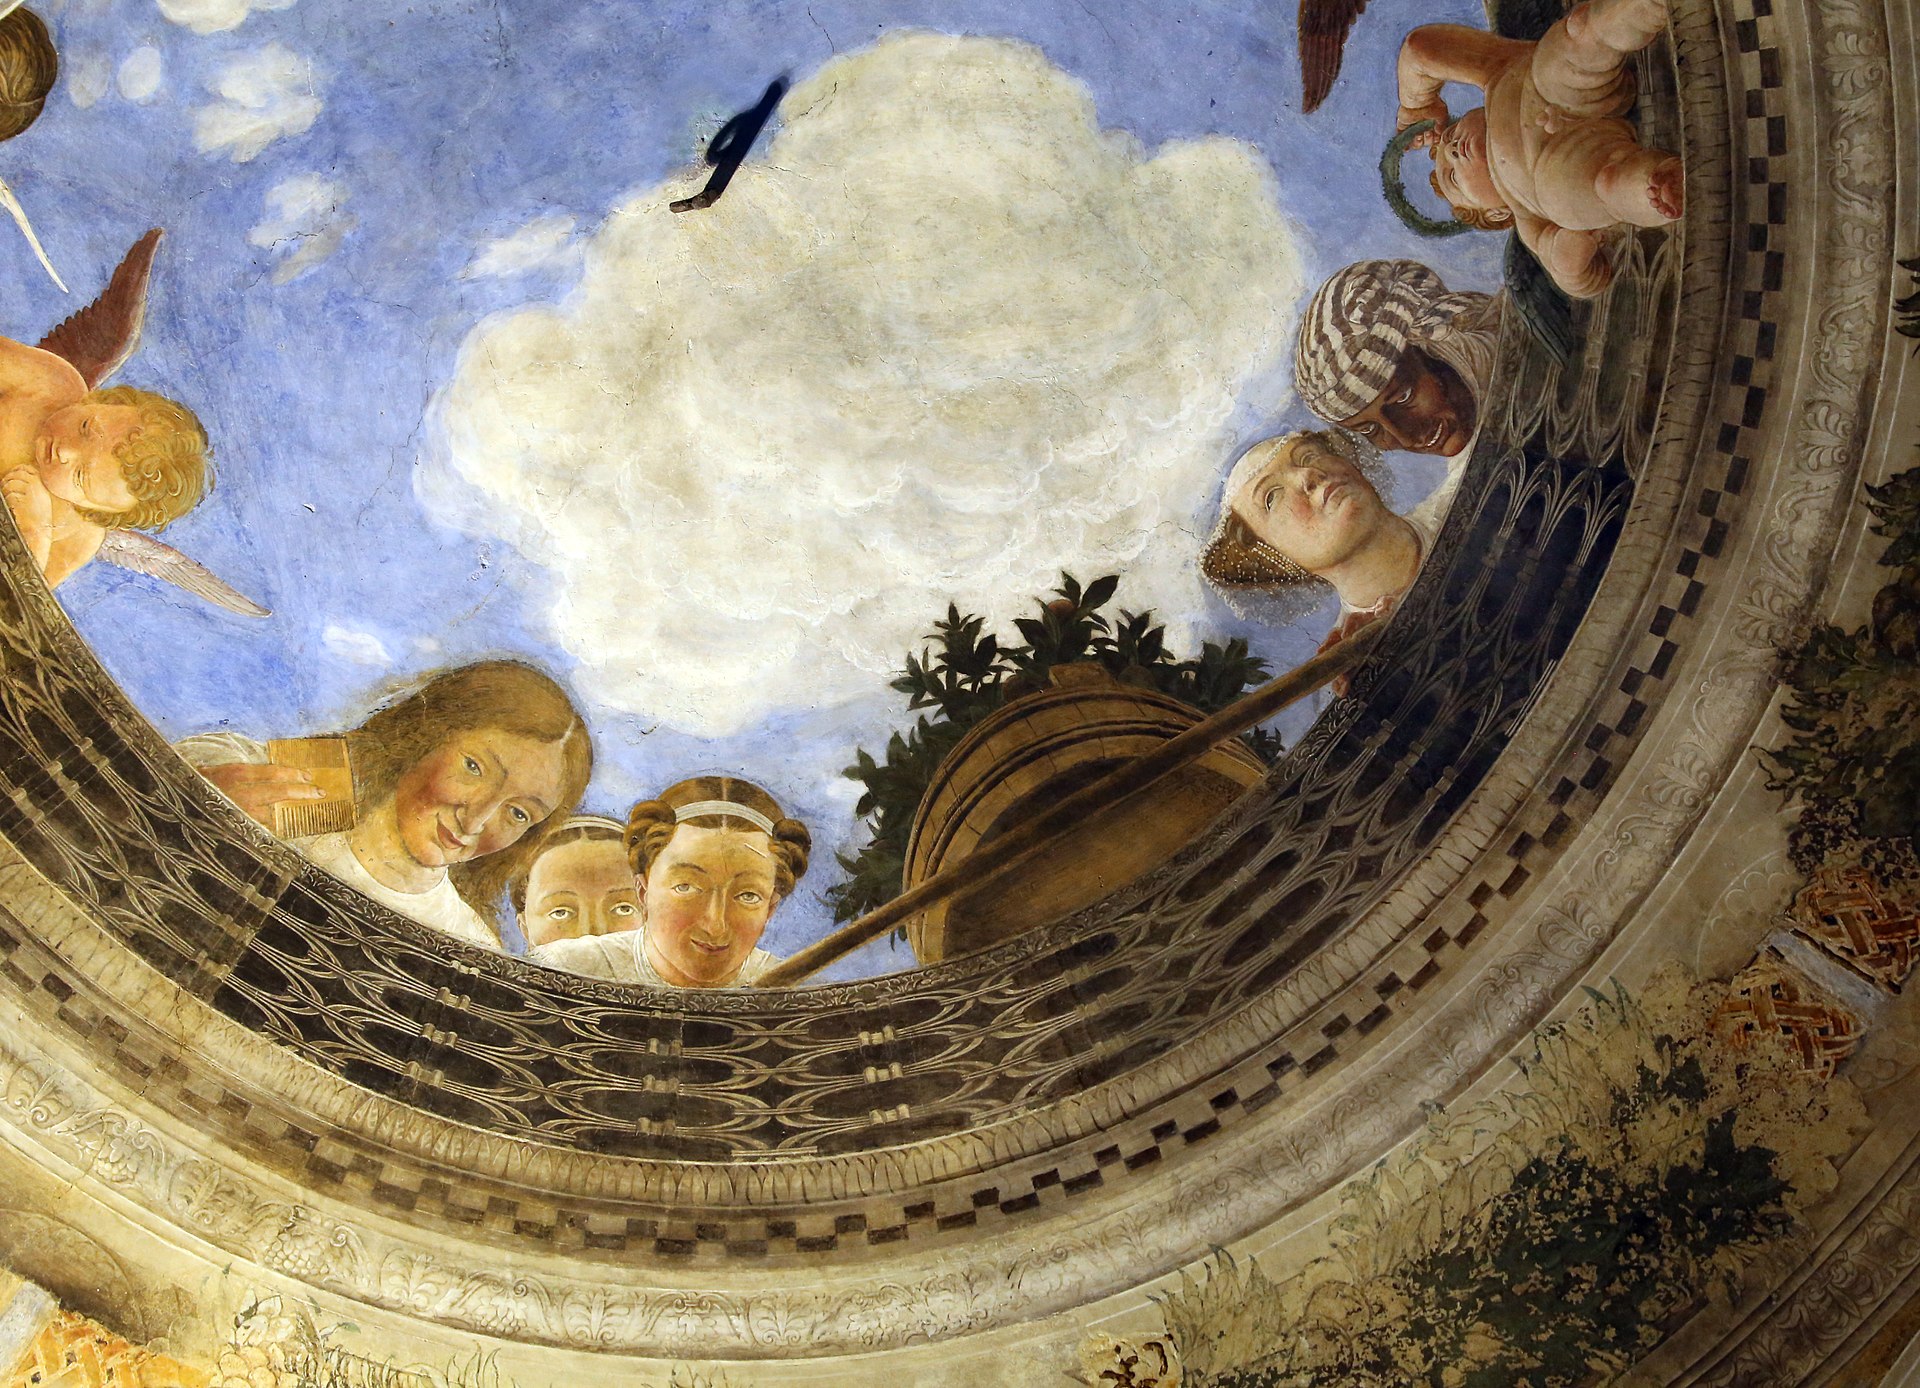
This central, flat part of the ceiling—within the area defined by the fictive ‘ribs’—is celebrated as the most amazing feat of illusionism, not only in this room, but in the whole of Italy in the whole of the fifteenth century.
Mantegna makes us believe that it is a cupola, or, rather an oculus, an ‘eye’, which is open to the sky; and he makes us believe that there is a flat roof above, with a terrace garden and flower tubs, from which one can peer down into the room.
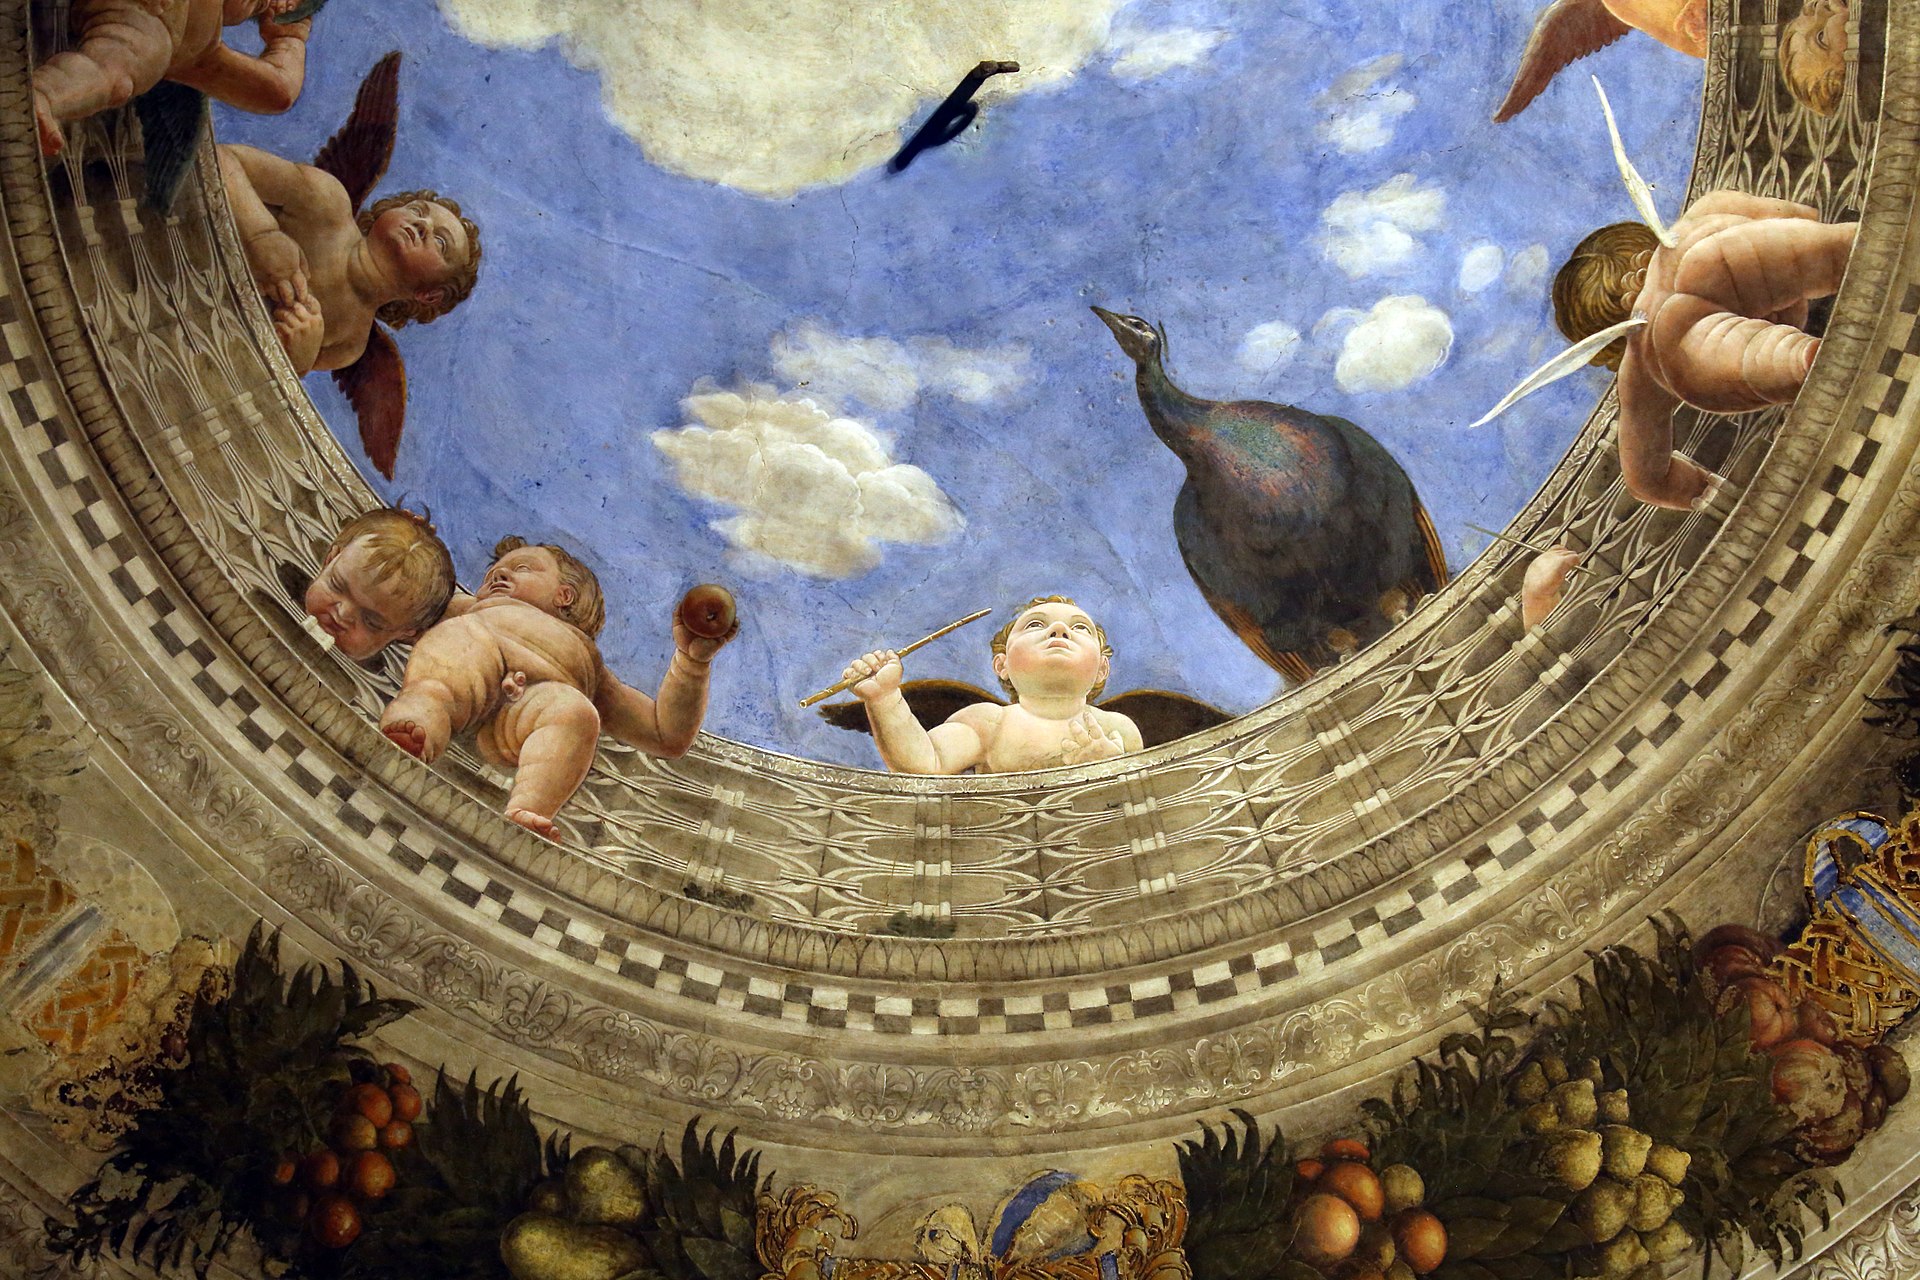
In this absolute tour de force of perspective and foreshortening, he shows us a huge flower-tub with a lemon tree, balanced right on the edge.
Perching opposite, there is a splendid peacock.
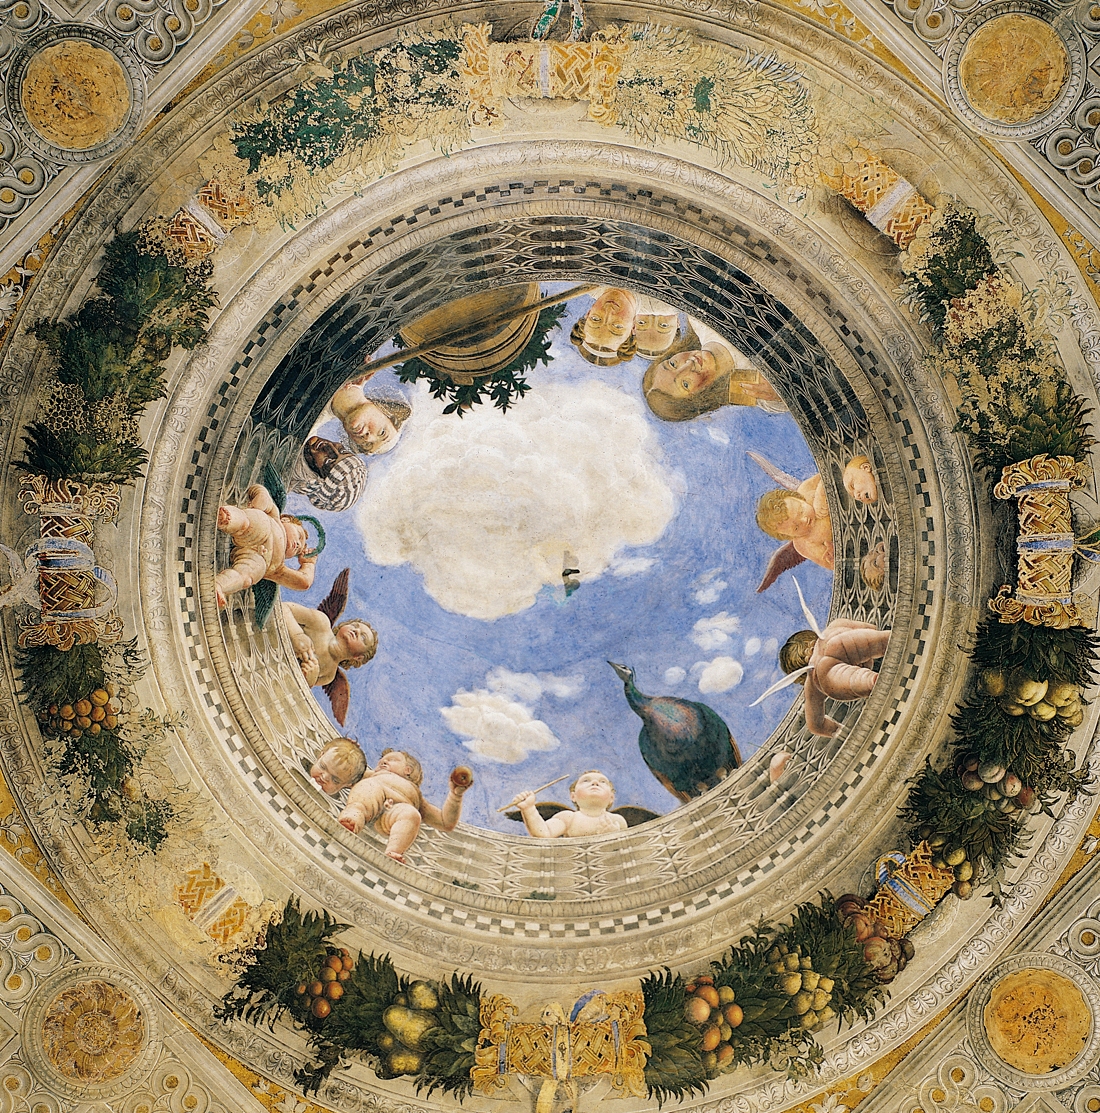
Meanwhile, little winged Cupids, or putti, are floating up and down (another amazing study in foreshortening) and one of them is prodding the peacock with a stick, while on the other side, a Moorish slave with an appropriate headdress peeps over, crouching next to her young mistress who is holding a pole, the other end of which is held by the girls on the other side of the tub.
Now, at last, we realise that they are all merrily threatening to lever the huge tub over, so that it will fall down into the chamber below.
Well may the girl comb her hair and smile!
Now we come to the decoration of the walls.
Each of them is divided by the ‘fictive’ architecture into three bays, as in this diagram of the east wall.
In each of the lunettes, Mantegna will paint a simulated hook, supporting a festoon of fruit and foliage.
Below these, simulated rod supports simulated wall-hangings, which are apparently made of leather, with gold decoration.
And on the south and east walls, that is all there is.
On the other two walls, however, the situation is far more complex.
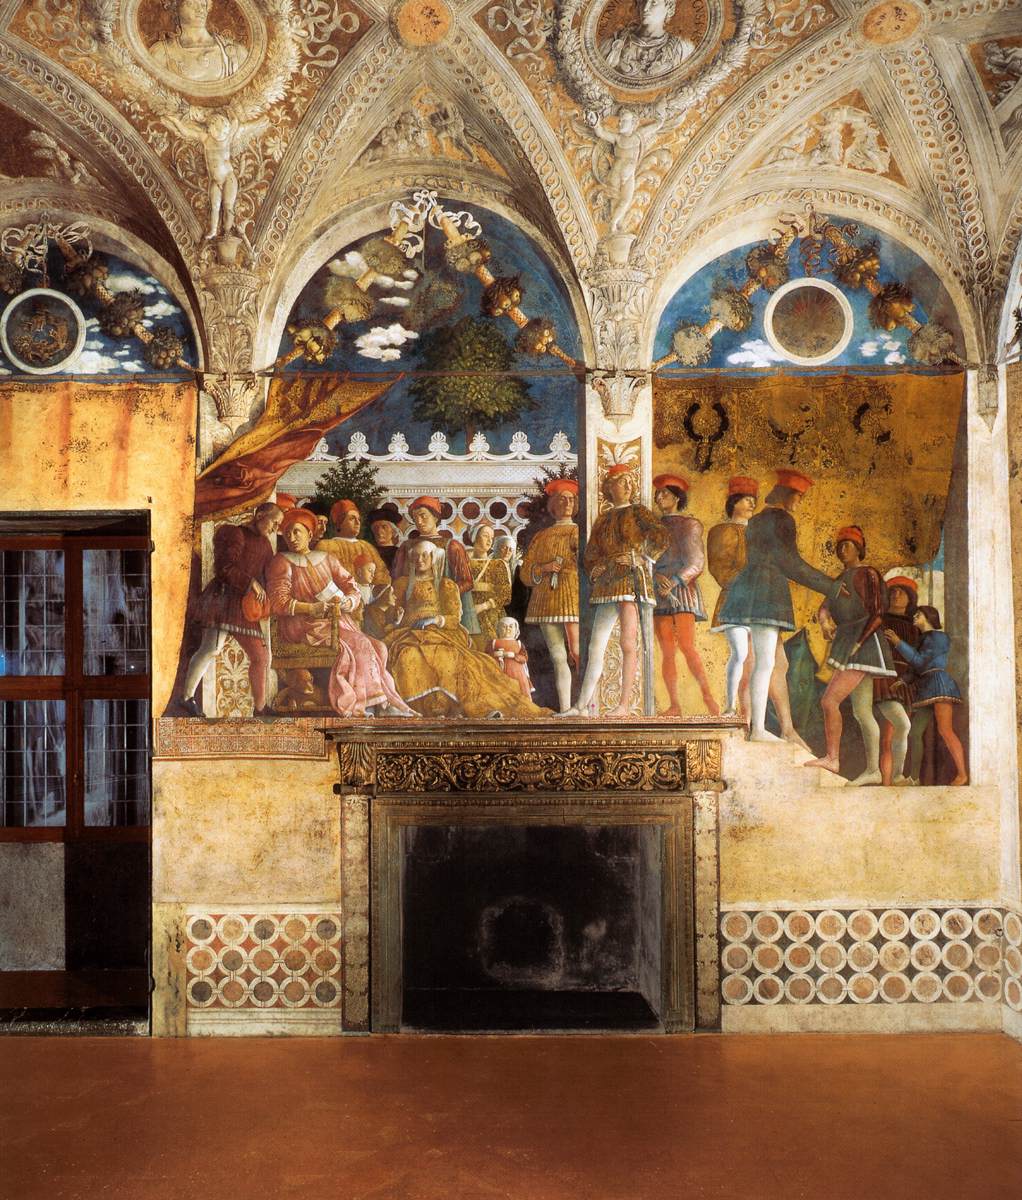
On the north wall, we see a group of men and women apparently sitting on a mezzanine floor within the room, while the wall-hangings are partly drawn back to reveal a balcony garden and a glimpse of the sky.
Notice, before we look closely at the members of the group, how cleverly Mantegna has avoided the real window on the left; how he has used the real mantelpiece as his fictive floor, and how he has painted steps leading up to it on the other side of the real chimney piece.
Notice, too, how the vanishing point of the perspective once again coincides with that of our viewing point, as spectators, standing on the real floor in the room, exactly as was the case in the lowest frescos in the chapel in Padua.
At this point, I have to admit that there is not much by way of a story in the Camera picta.
Something is clearly happening, even if it is only the giving or receiving of a message. The received interpretation is that this scene took place on a specific day in 1461, when Lodovico was given the news that his fourth son had been made a Cardinal; and that it is closely related to the scene on the adjacent west wall which shows how Lodovico rode out to greet the said son at the family estate of Bózzolo.
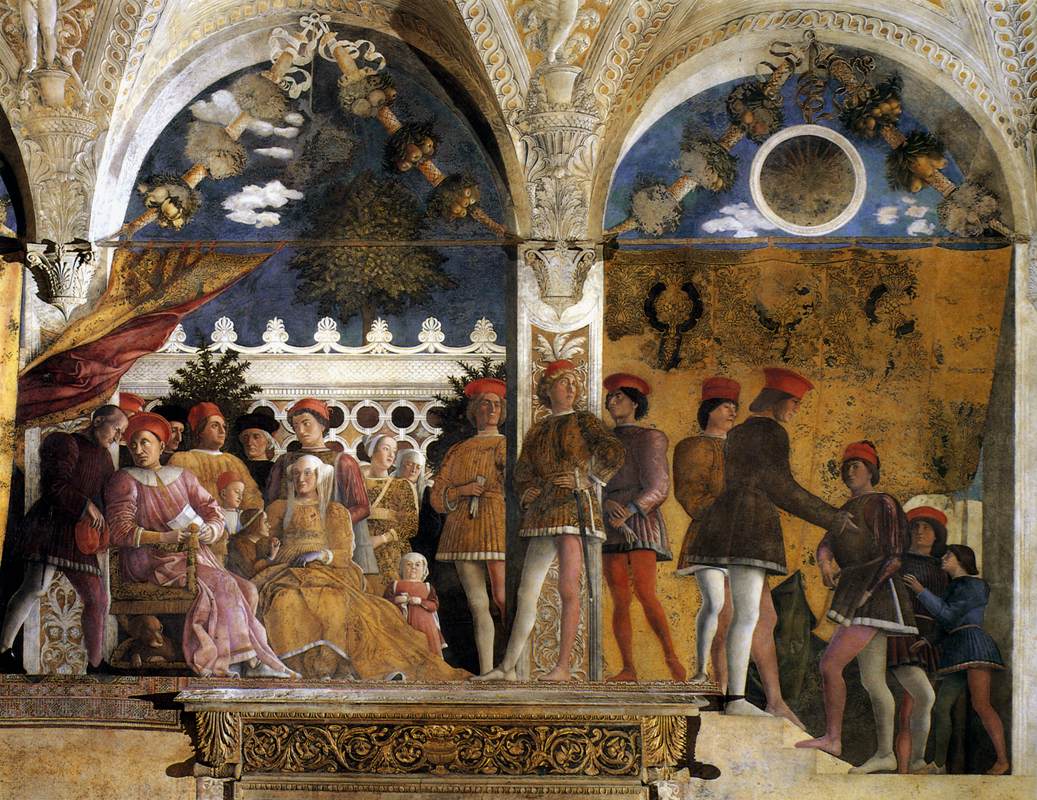
Before hearing the good news, Ludovico and his family have assembled (in this very chamber), preparing to receive a not very grand delegation—an envoy from neighbouring Ferrara, perhaps, with a modest retinue. The delegation have come into the residence from the main entrance and are now being kept waiting on the stairs.

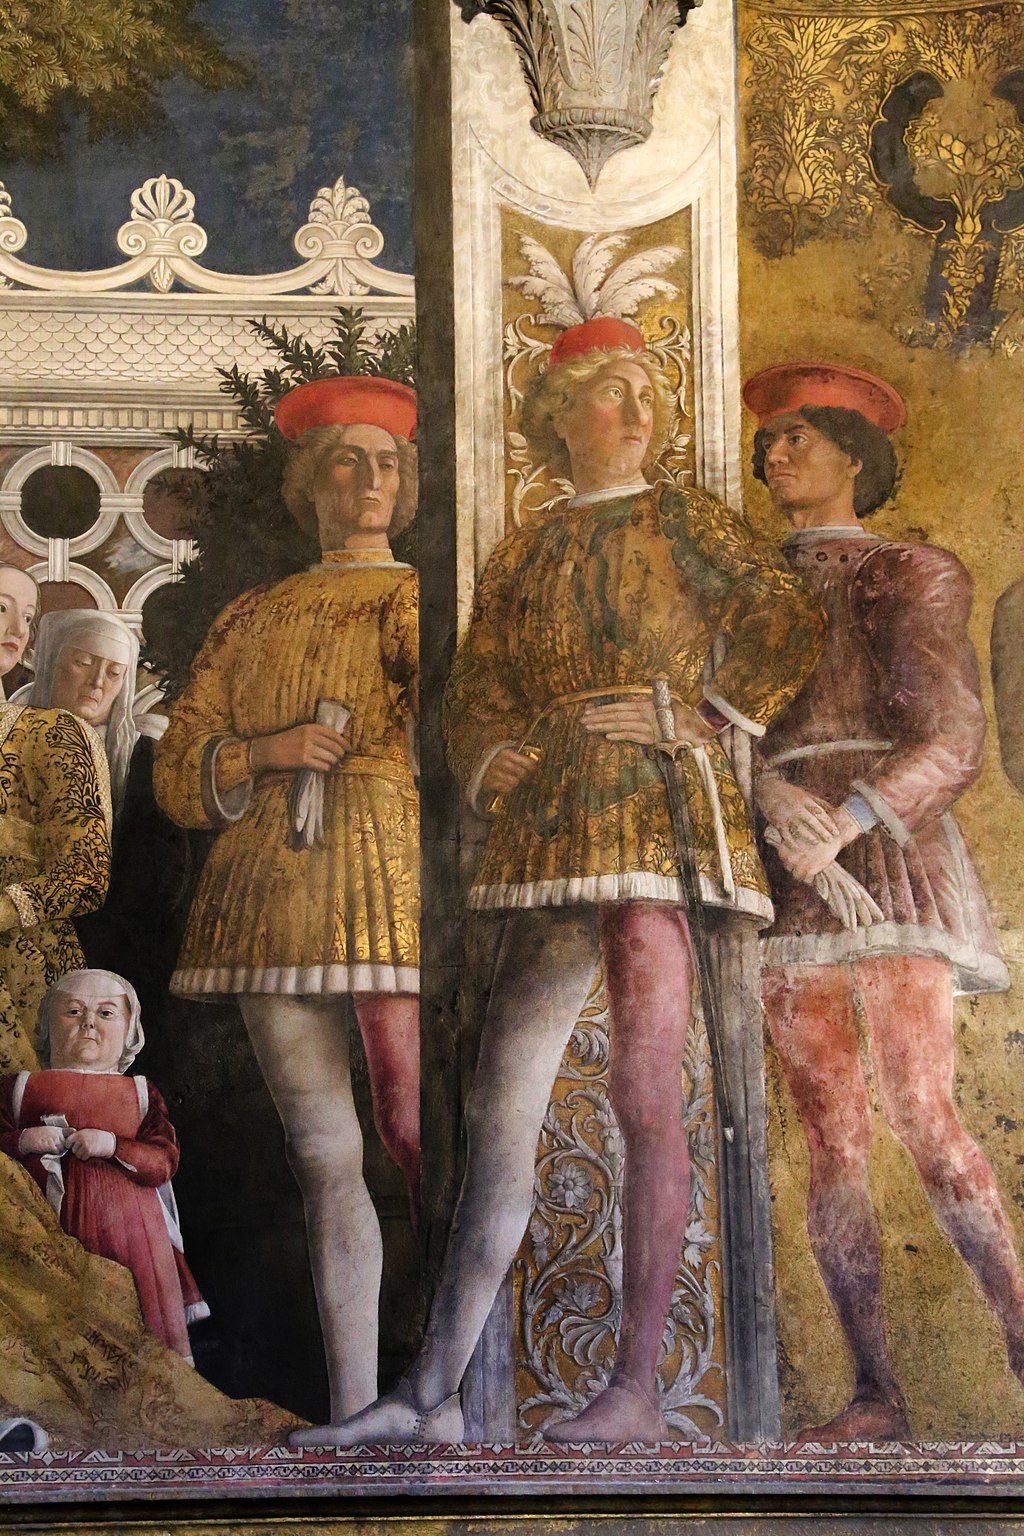
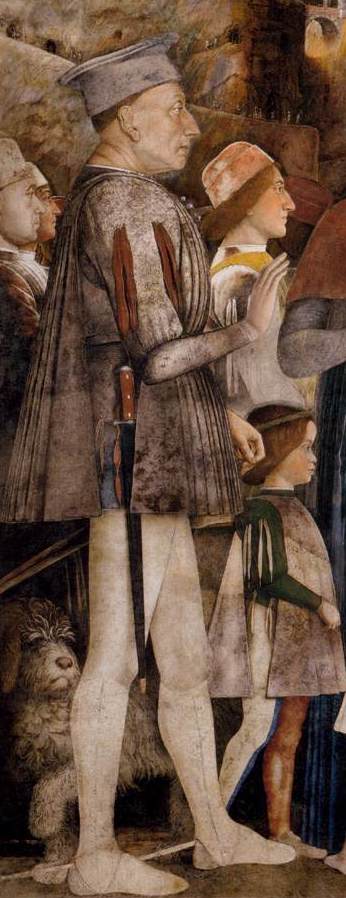
The most recent restoration has brought out the beauty of the group at the head of the stairs, with three male ‘fashion-models, standing stock-still as if for a ‘fashion-photographer’, in varied and dignified poses.
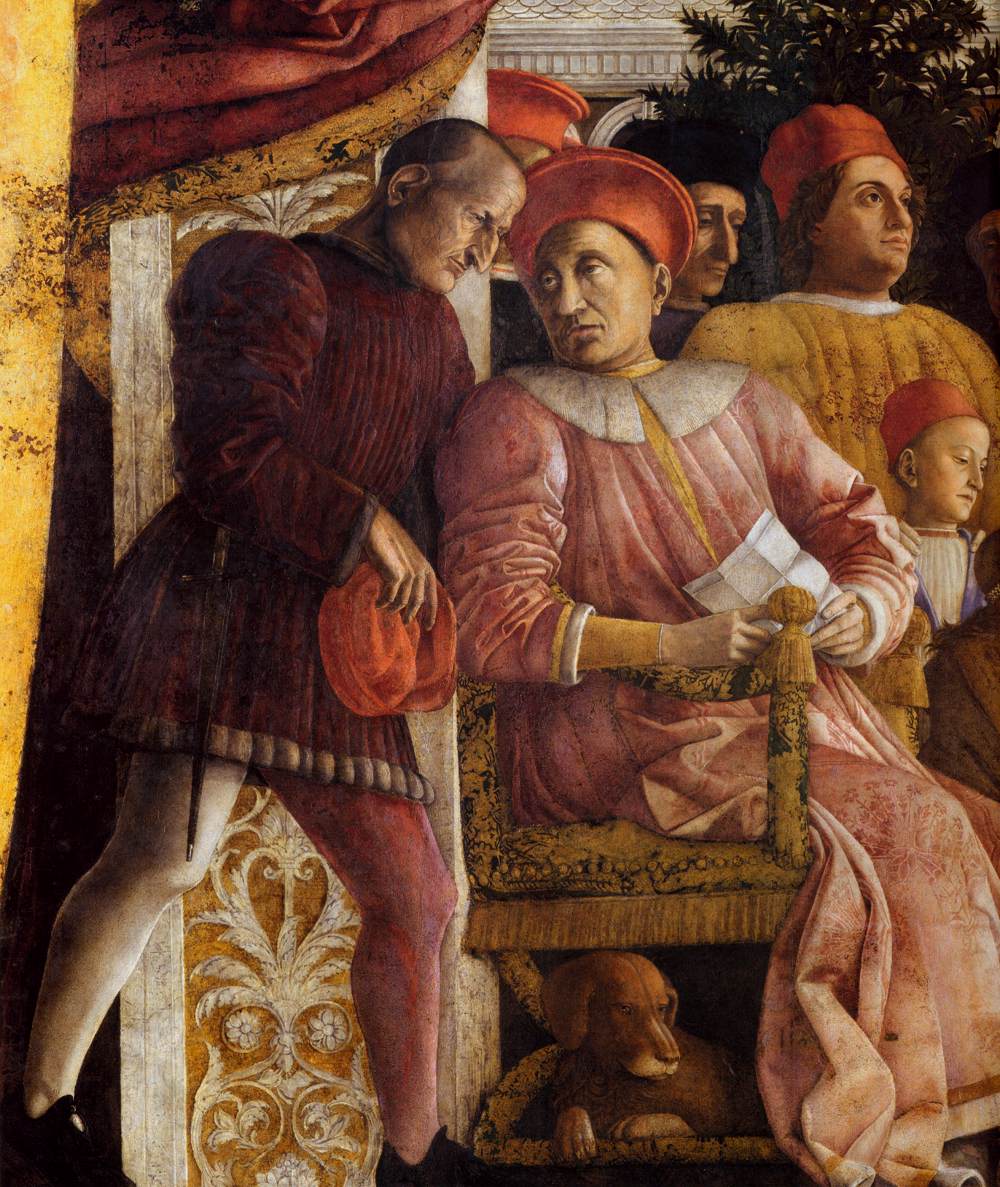
The slight delay in admitting the delegation will have been caused by the letter (containing the announcement of the Cardinalate), which the Marquis has been handed by his agent, who has come into the chamber using the back stairs, and causes the Marquis to turn round and whisper a reply.
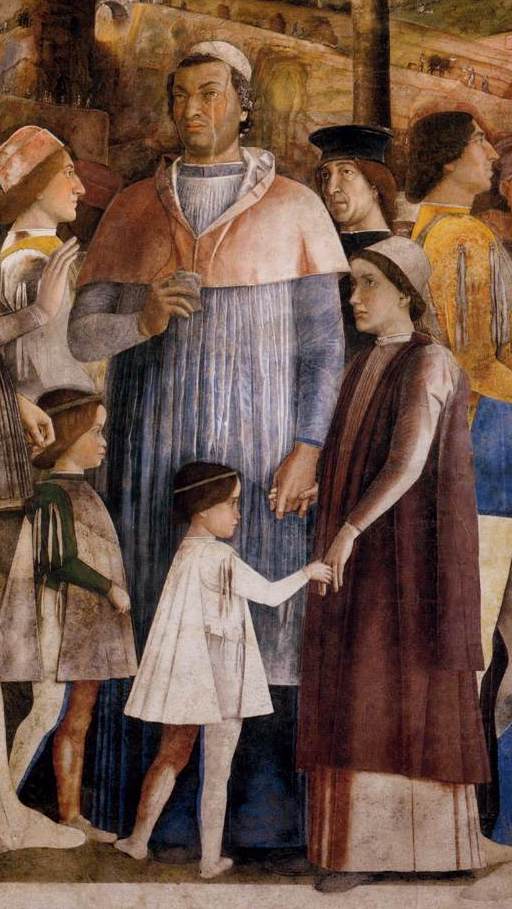
The chief interest in the fresco, however, lies in the uniquely intimate portrait of the Gonzaga family.
Lodovico has ruled Mantua for the past thirty years and will continue to do so for a long time (he would die as late as 1478). He is portrayed as a man of authority, but very homely. His bare foot (just cut by the detail) is in a comfortable slipper; his favourite dog is under the chair; and he is clearly on very easy terms with the well-characterised steward, who, we feel, may have been working with his master for most of those thirty years.
Next to the Marquis stands his heavily-built second son, Gianfrancesco.
He is looking towards the visitors (and towards the source of the light, which is imagined as coming from the window in the east wall), and resting his hands affectionately on the frail shoulders of his youngest brother, also called Lodovico, who had become a cleric at the age of nine, and was Bishop-elect of Mantua.
The third son, Rodolfo, also a grown man and also heavily built, stands behind his mother, the Marchioness.
Her name was Barbara, and she was a princess of the Hohenzollern family. She sits front on, under her matron’s headdress, with her splendid robe stretching out to the right, while her eyes slip left to her husband and to the letter.
She is flanked by her daughter, Paola, kneeling in profile (perhaps a problem child, since she seems a little old to be posed with an apple) and by her dwarf (who seems very pleased to be included in the portrait, and is clutching her right forefinger with her left hand); while behind her we see the daughter of marriageable age, called Barbara, like her mother, whose attention strays towards the waiting envoy.
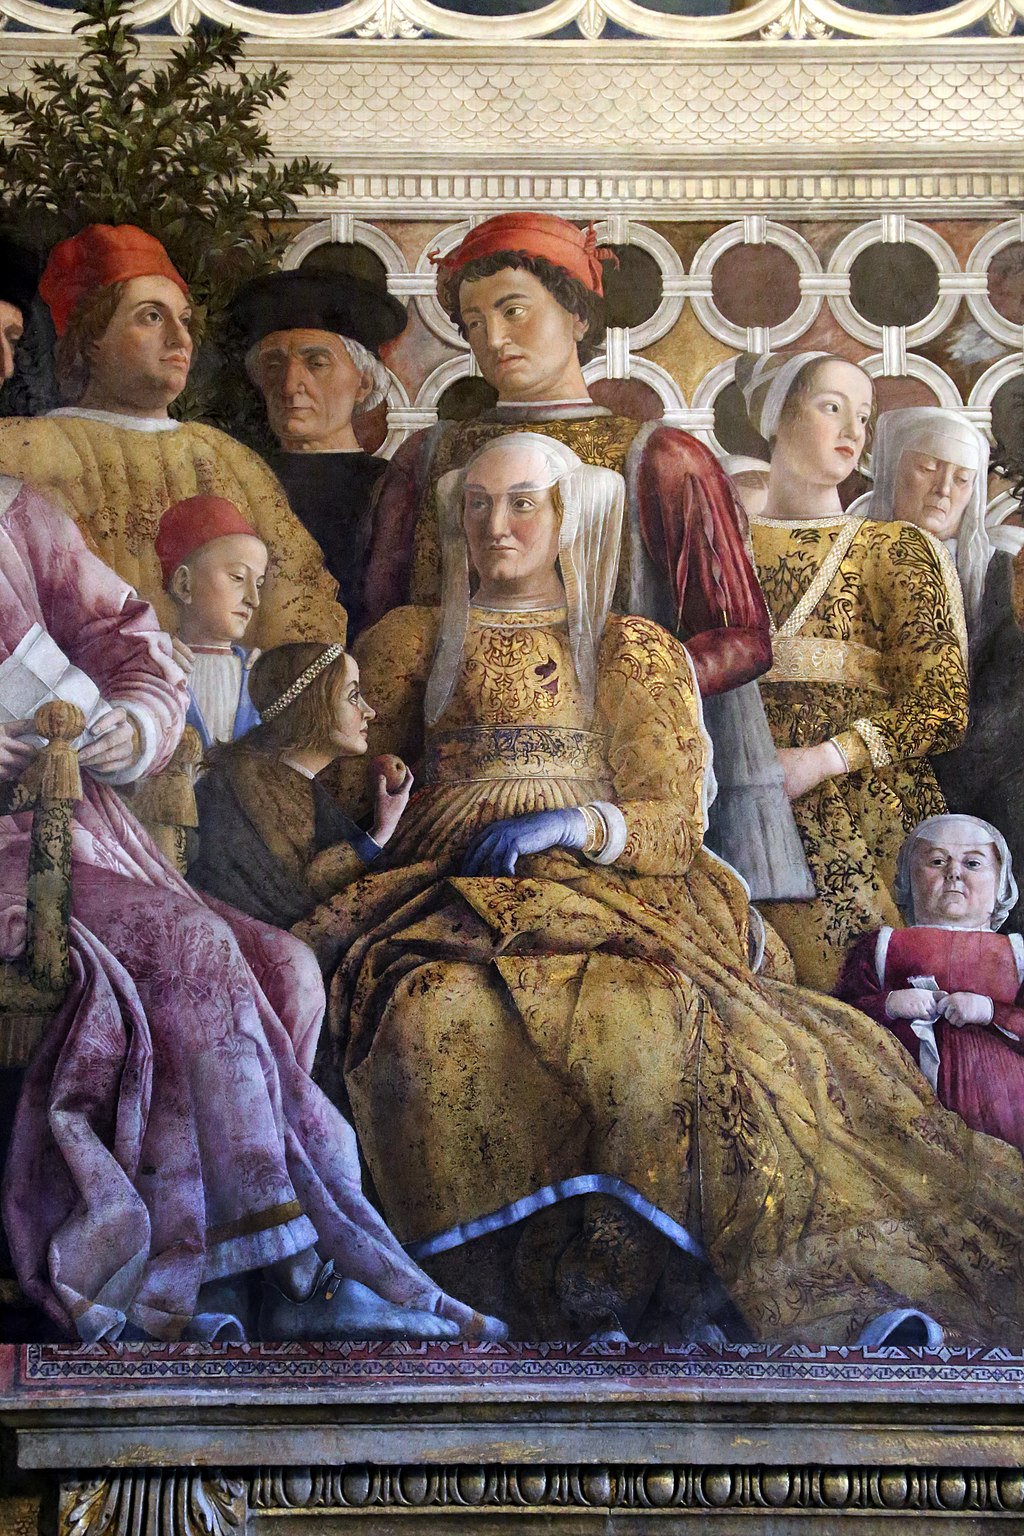
This close-up of Barbara (with her duenna standing behind) is a distillation of some of the main components in Mantegna’s art: his exploitation of a low view-point; his radical simplification of the features of his sitters (which is not incompatible with the careful characterisation of each individual); and the immense care he takes to render the grain of the coloured marble, the pattern of the dresses, and the elaborately-simple twist of the headband compressing the girl’s hair.

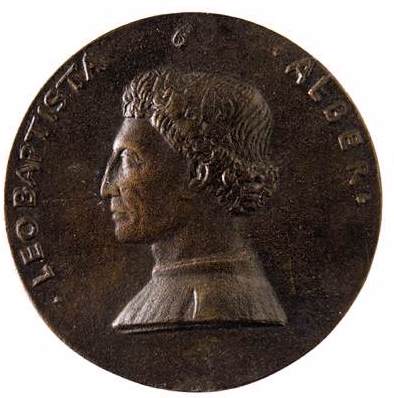
The man in the black hat has been identified as no less a person than Leon Battista Alberti. (It is known that he asked for no other reward from the artists who profited from his works than that they should include his portrait among the bystanders in their historical scenes.)
In his later years, he was portrayed in a medal by Matteo de’ Pasti; and you can see that the eyebrows and the curl of the side of the nose do seem to match up with the detail from the fresco.
Alberti, I remind you, was one of the greatest men of his time. He had worked on the Cathedral in Mantua, and Mantegna used his method of perspective. And as an admirer and imitator of the Greek satirist Lucian, Alberti may well have influenced the very conception of the Camera picta by calling attention to Lucian’s description of a splendidly painted, cubic, audience-room…
Such, then, are the artistic riches of this single scene on the north wall, showing the Marquis of Mantua doing business, in the company of his wife, two of his daughters, and the three less important sons.
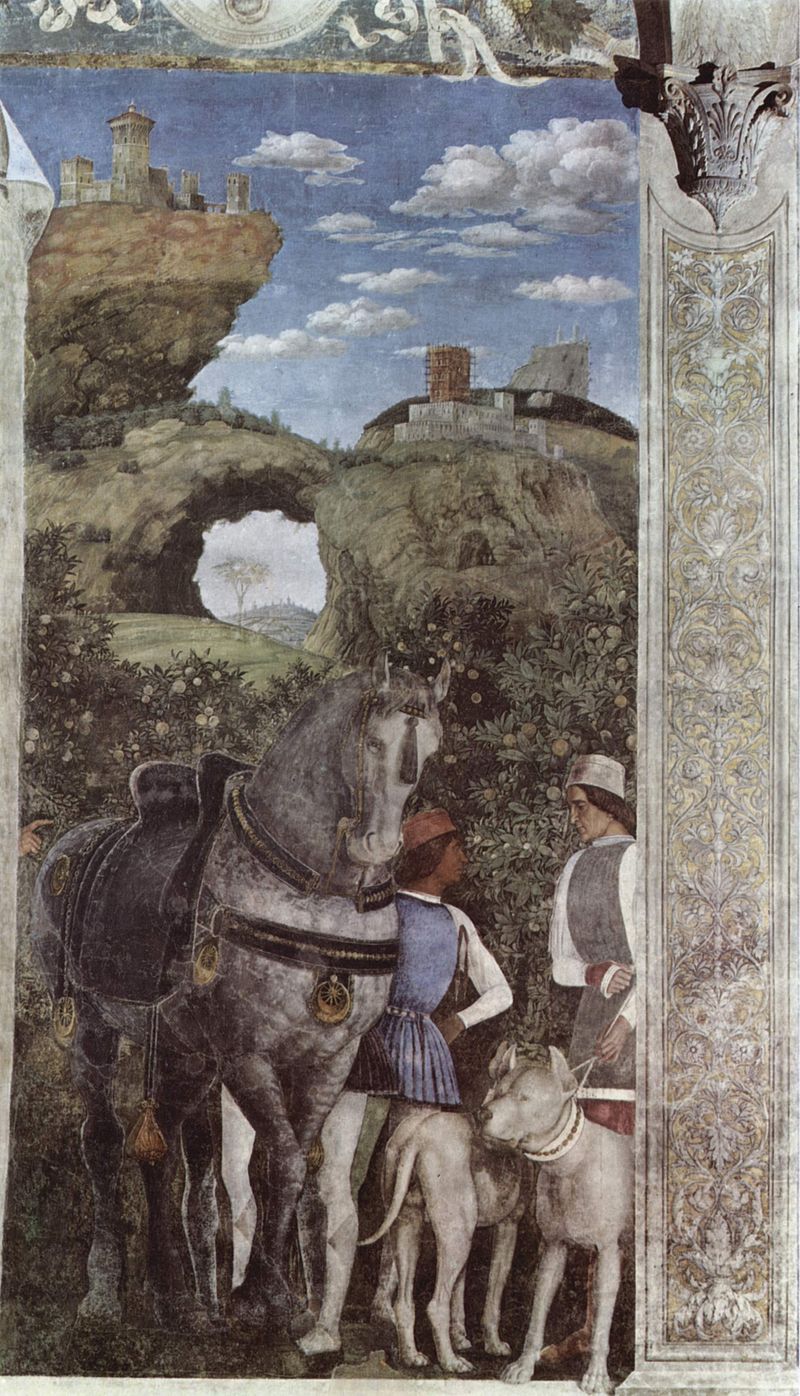
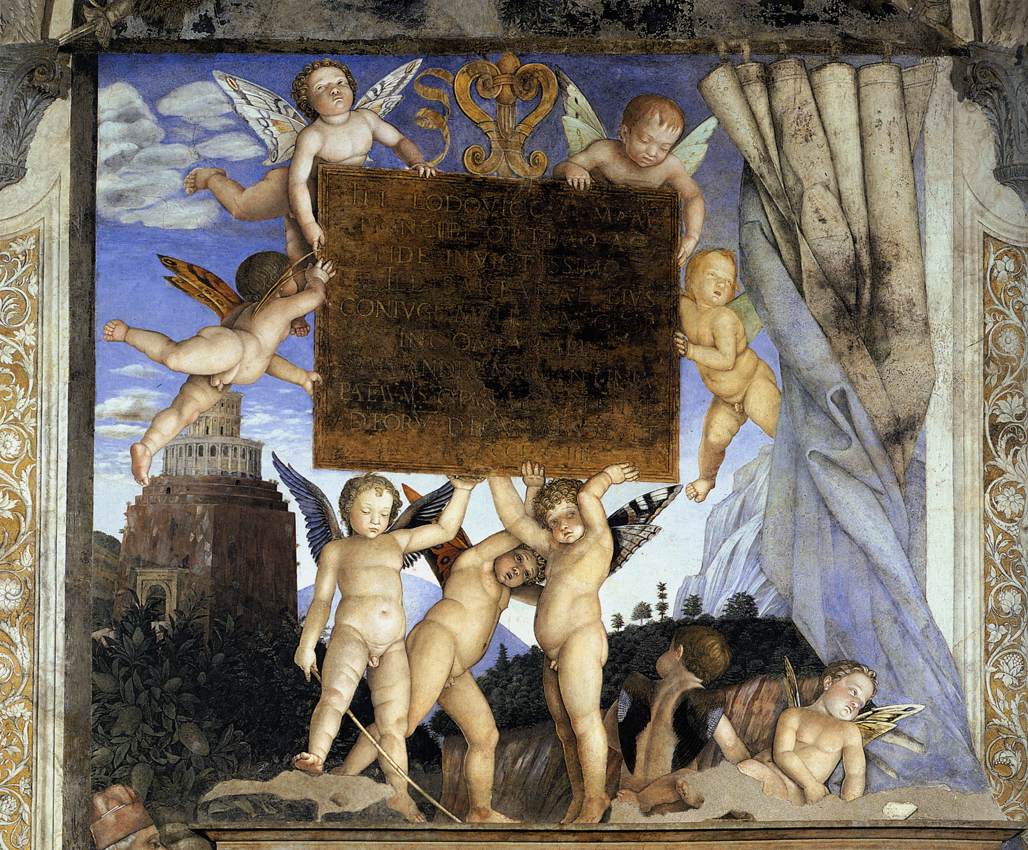
We now move sideways to look at the west wall, where the simulated hangings on the two French windows (so to speak) are drawn up to reveal horses, dogs, and men standing just outside the building, silhouetted against a hilly and utterly un-Mantuan landscape.
We are meant to assume that this landscape is ‘continuous’: that is, we are meant to believe (or not to disbelieve) that we are looking at just one scene, part of our view being blocked by two simulated pilasters, a real door, and a kind of ‘notice-board’ held high by standing or flying Cupids.
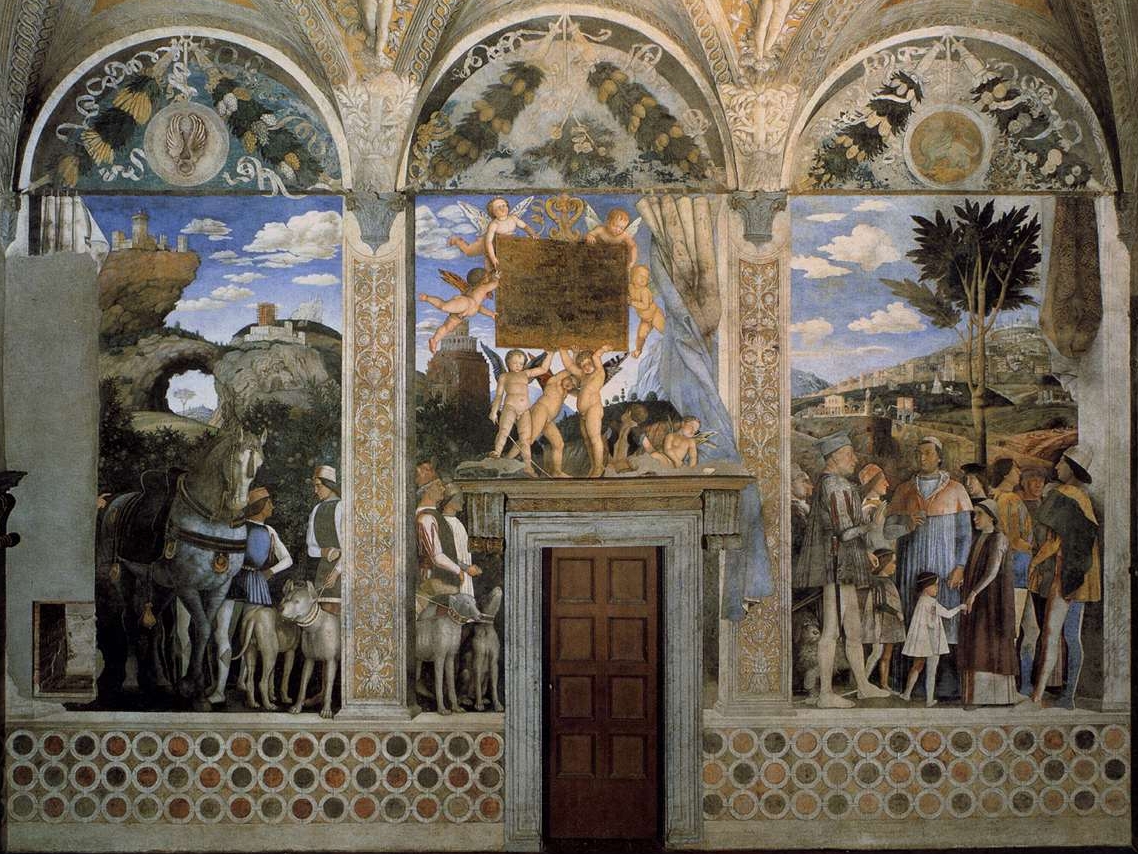
To the left, we see improbably precipitous crags (but apparently not too steep to preclude massive buildings and new building-works); while, very close to the window, between us and the orange trees, grooms are holding the Marquis’s splendid horse and his two mastiffs. (The emblem of the sun on the harness confirms that horse is his.)
Our view of the centre of the landscape is largely obstructed by a group of winged Cupids, nine in all, of the kind we saw in the oculus and also in the Ovetari chapel at Padua.
They are holding up a most unusual dedication which says, very simply, ‘From Mantegna to Lodovico and Barbara’.
Meanwhile, to the right, next to the main group on the north wall, we find another family portrait.
Lodovico appears again, this time with the two more important sons who did not appear indoors, and three of his grandsons.
He stands in profile on the left while his eldest son, Federigo, again in profile, faces him on the right.
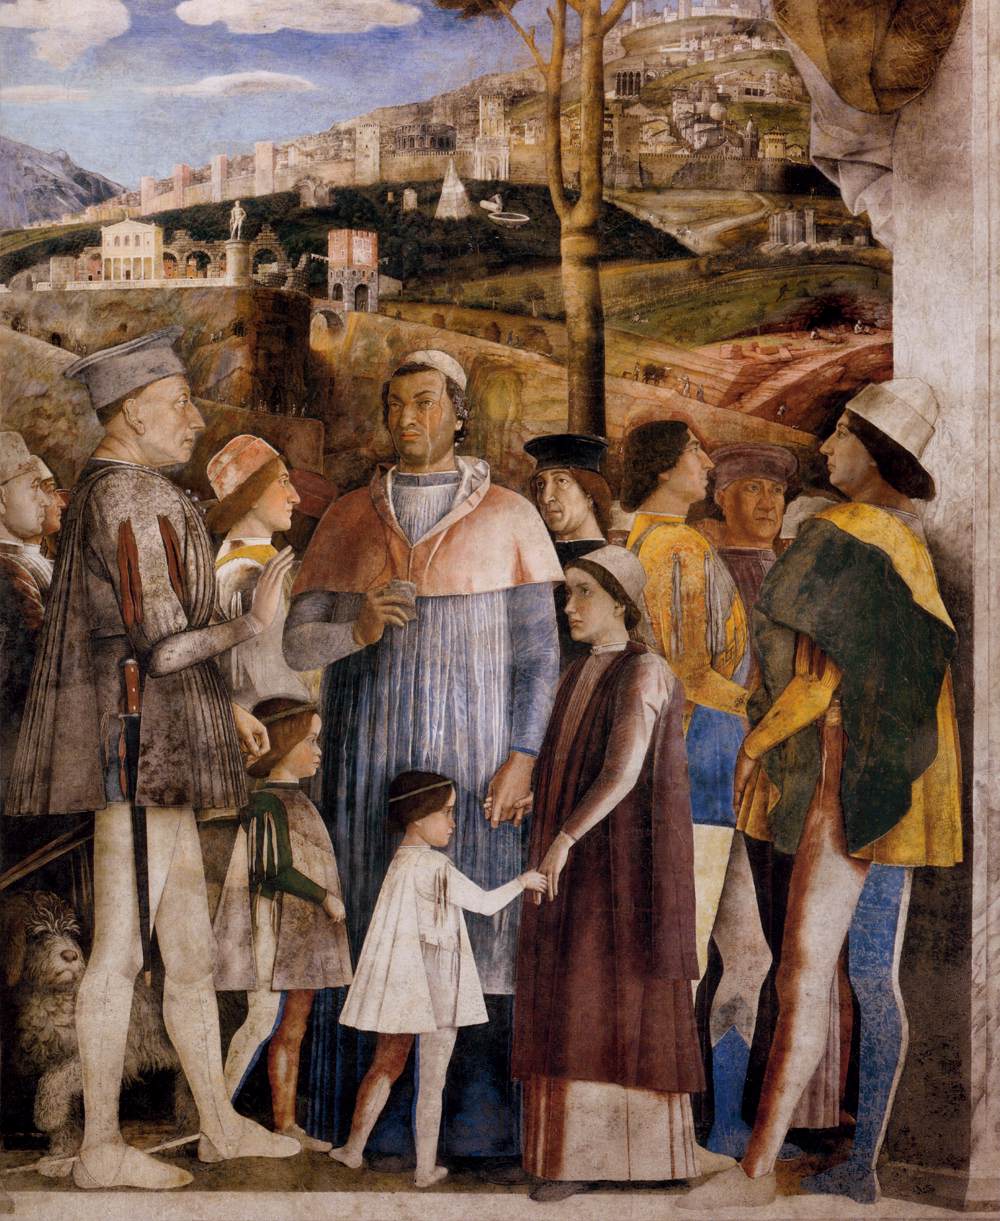
Lodovico, in his hunting clothes this time, with a sword at his side, is proudly displaying his thick neck, huge ear, and heavy jaw.
(This is a portrait ‘with warts and all’, in Oliver Cromwell’s famous phrase.)
Between the ruler and his heir stands Lodovico’s ‘man in the Vatican’, that is to say, his fourth son, the new Cardinal, Francesco—a worldly prelate, to judge by the portrait, and a good friend of Mantegna’s. (The note he clutches says, very simply, ‘Andrea painted me’.)
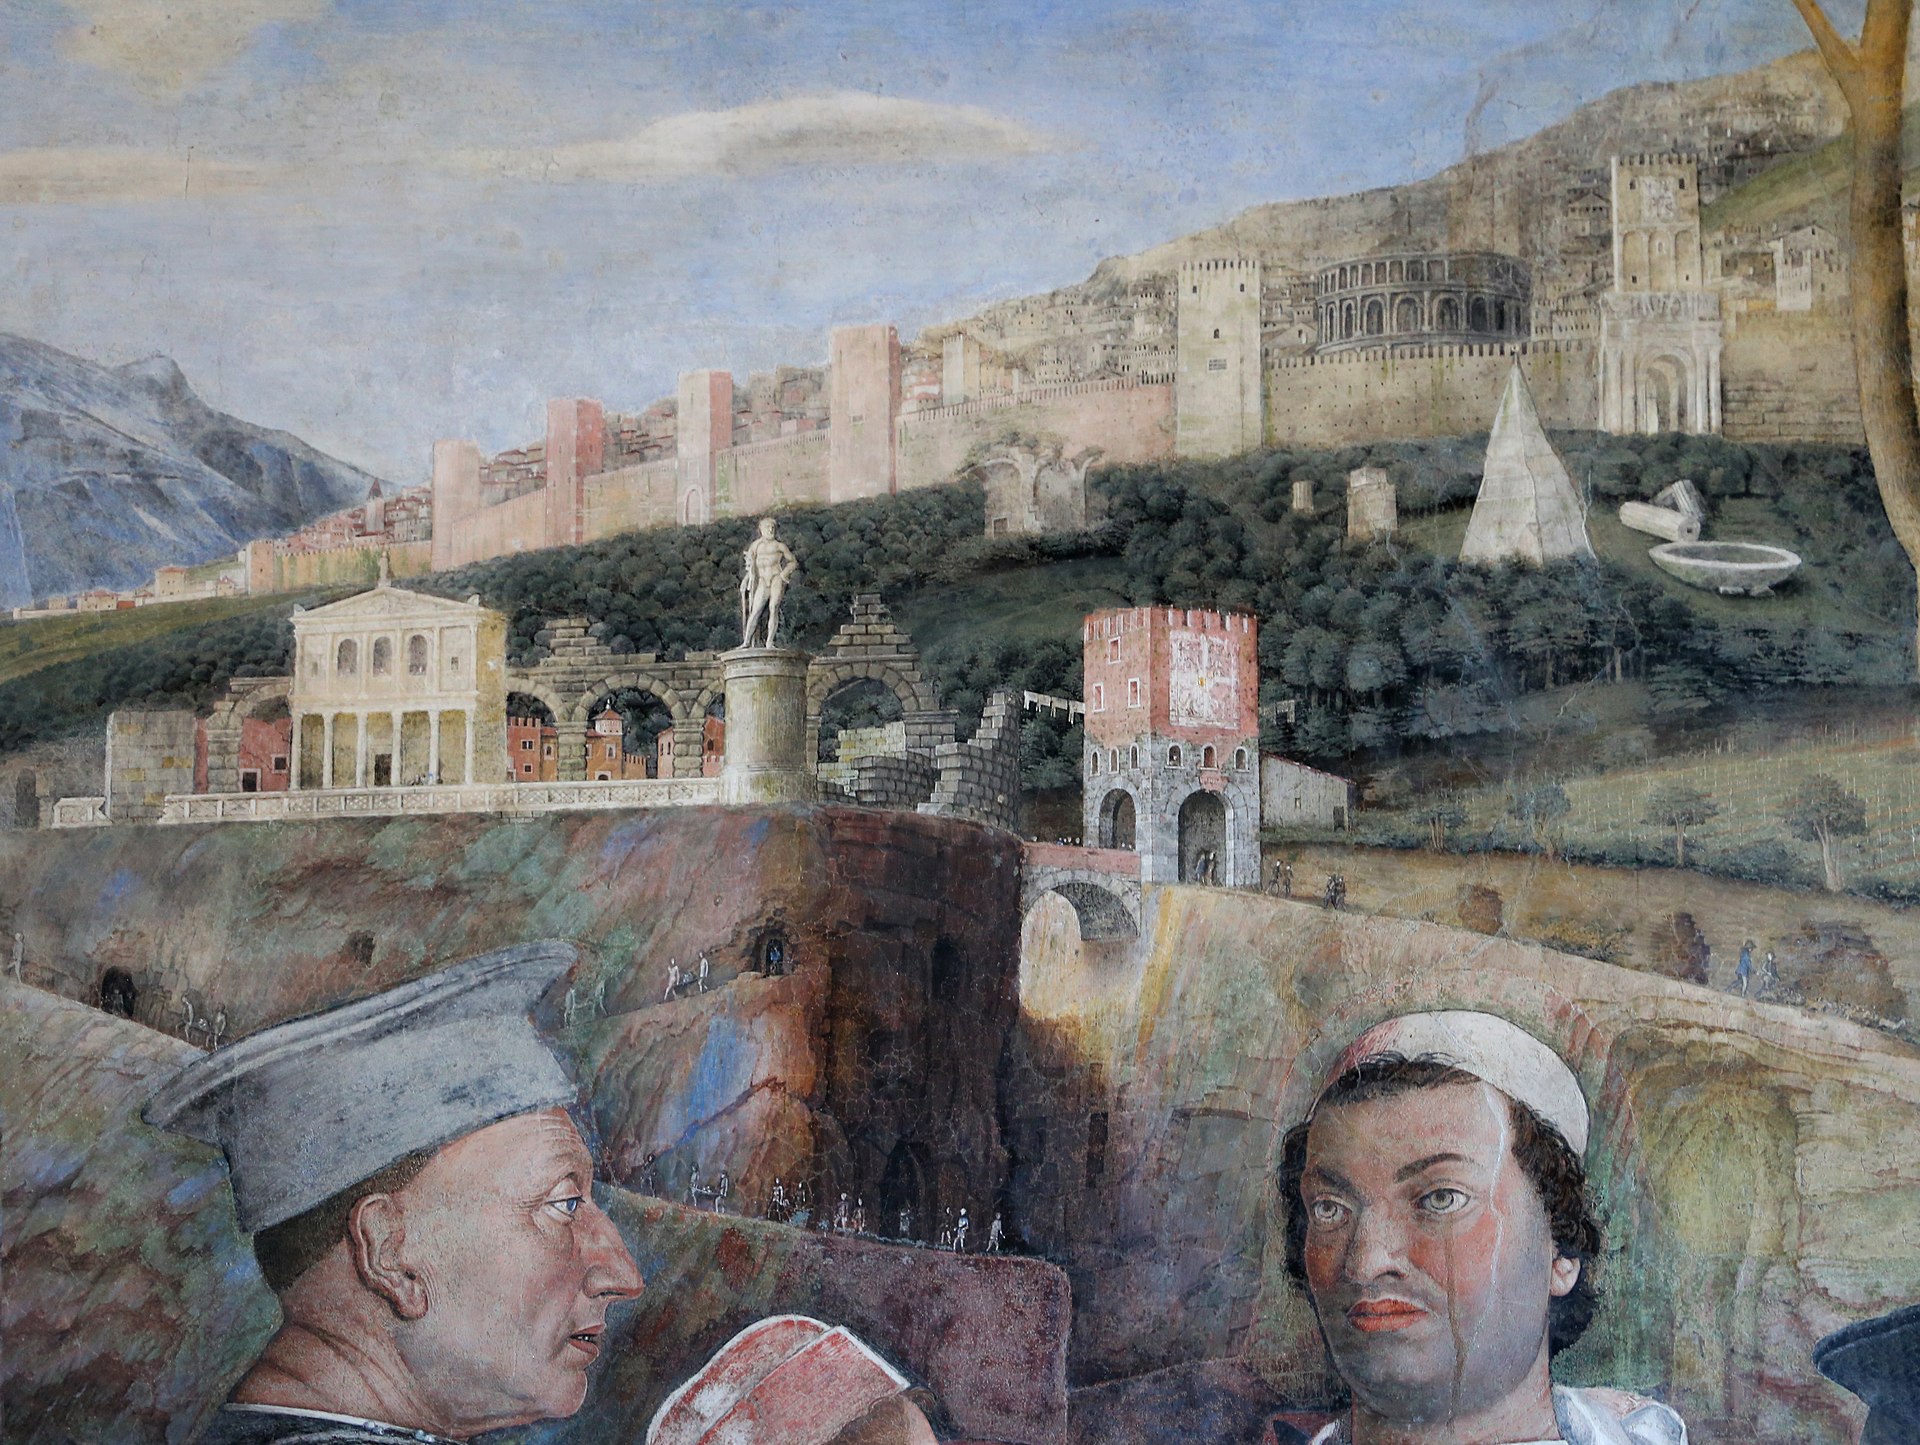
The romantic landscape is vital to the political message of the fresco, because the buildings represent, beyond all doubt, the city of Rome, with the Aurelian walls, the Colosseum, and the Pyramid of Gaius Cestius.
On the red-brick, castellated building at the foot of the bridge, Mantegna has painted the arms of the Gonzaga family, who have now ‘arrived’.
But back to the portraits.
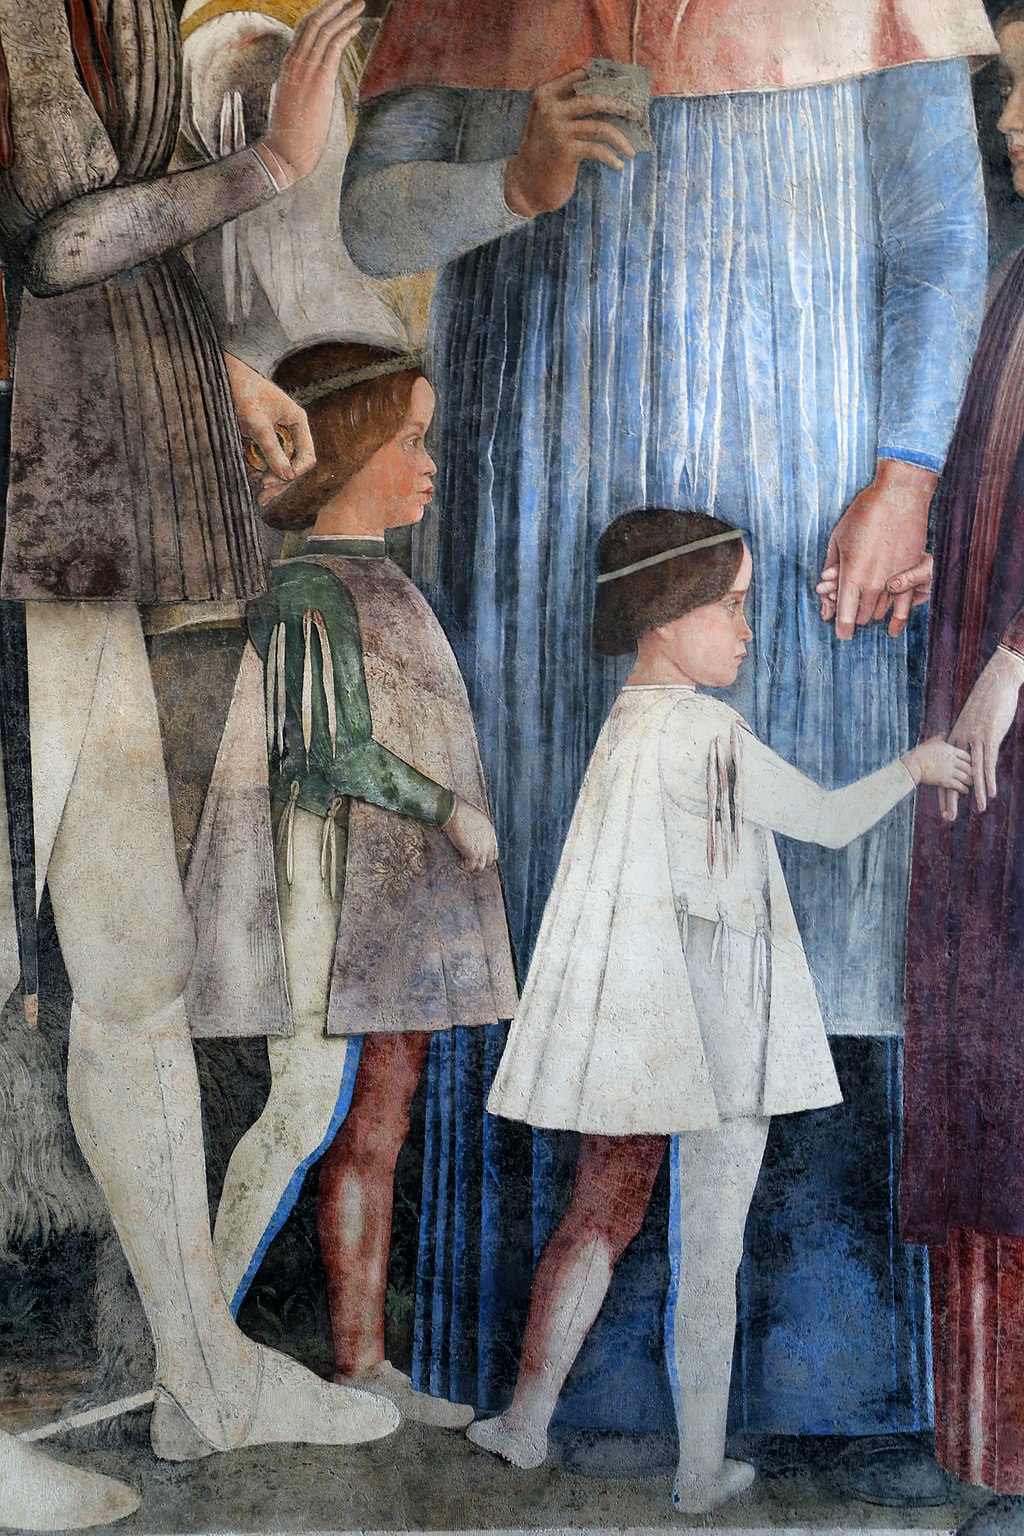
Francesco is holding his younger brother by the hand (this is the younger Lodovico again, the Bishop-elect of Mantua); and he in turn is allowing their nephew Sigismundo to grasp his fingers, to indicate that this boy too (Federigo’s third son) was destined for the Church. (Indeed, he too would become a Cardinal).
In his major monograph on Mantegna, Ronald Lightbown argues against the traditional interpretation that this scene represents the meeting at Bozzolo back in 1461, when the father rode out to congratulate his son. Rather, he suggests, it is better to think of it as a day in 1472, during a rare but prolonged visit by Francesco.
However, the exact occasion and year do not matter all that much, since there can be no doubt that any visitor to the ‘painted chamber’ in the 1470s would have understood the fresco as a reminder that the Gonzagas had influence in high places and that they were a dynasty destined to last.
We see not only Federigo, Lodovico’s heir, who would rule from 1478–1484, but also another boy standing close to Lodovico who is Federigo’s eldest son and heir, Gianfrancesco, who would rule for twenty-five years, right down until 1519.
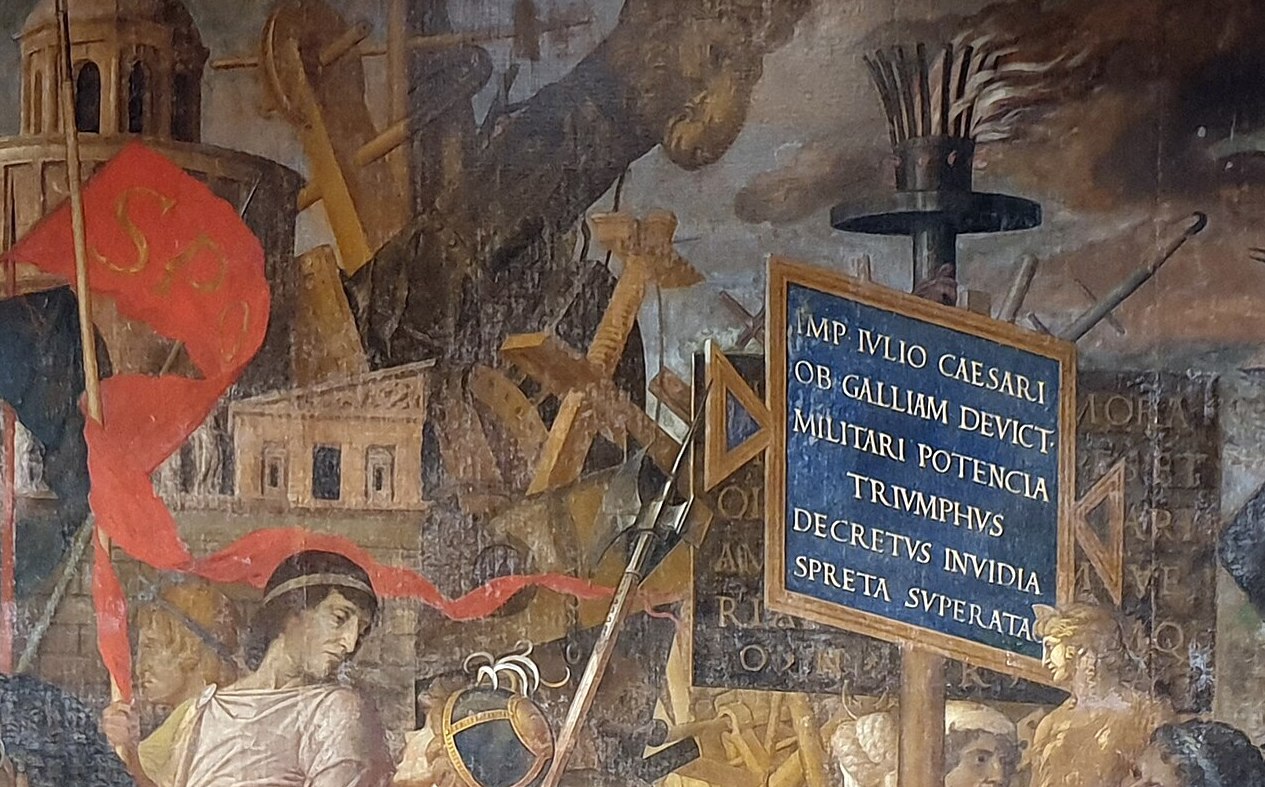
Lastly, a quick glance at the placard in the middle of this west wall.
Even after the last restoration, it is not all that easy to decipher, so I give you the transcription here, along with a translation:
ILL(ustri) LODOVICO II M(archioni) M(antuae)
PRINCIPI OPTIMO AC
FIDE INVICTISSIMO
ET ILL(ustri) BARBARAE EIVS
CONIVGI MVLIERVM GLOR(iae)
INCOMPARABILI
SVVS ANDREAS MANTINIA
PATAVVS OPVS HOC TENVE
AD EORV(m) DECVS ABSOLVIT
AN(n)O MCCCCLXXIIII
For the illustrious Lodovico
most excellent prince and unsurpassed in constancy,
and for the illustrious Barbara,
his wife, glory of women and beyond compare,
their Andrea Mantegna,
from Padua, completed this slight work
in their honour
in the year 1474

We shall now make our third and last major leap in time, coming forward to a series of nine scenes, painted on canvas this time, that were commissioned in the mid 1480s and completed only just before Mantegna’s death in 1506.
These were done for Lodovico’s grandson, Gianfrancesco (the same little boy we have just seen), who succeeded his father Federick in 1484, when he was only eighteen. He became a professional soldier, like his grandfather; and he married one of the leading patrons of the Arts at the end of the century, Isabella from the Este family, in the neighbouring Duchy of Ferrara.
These two facts alone are enough to explain why he commissioned Mantegna to paint a Roman triumphal procession.
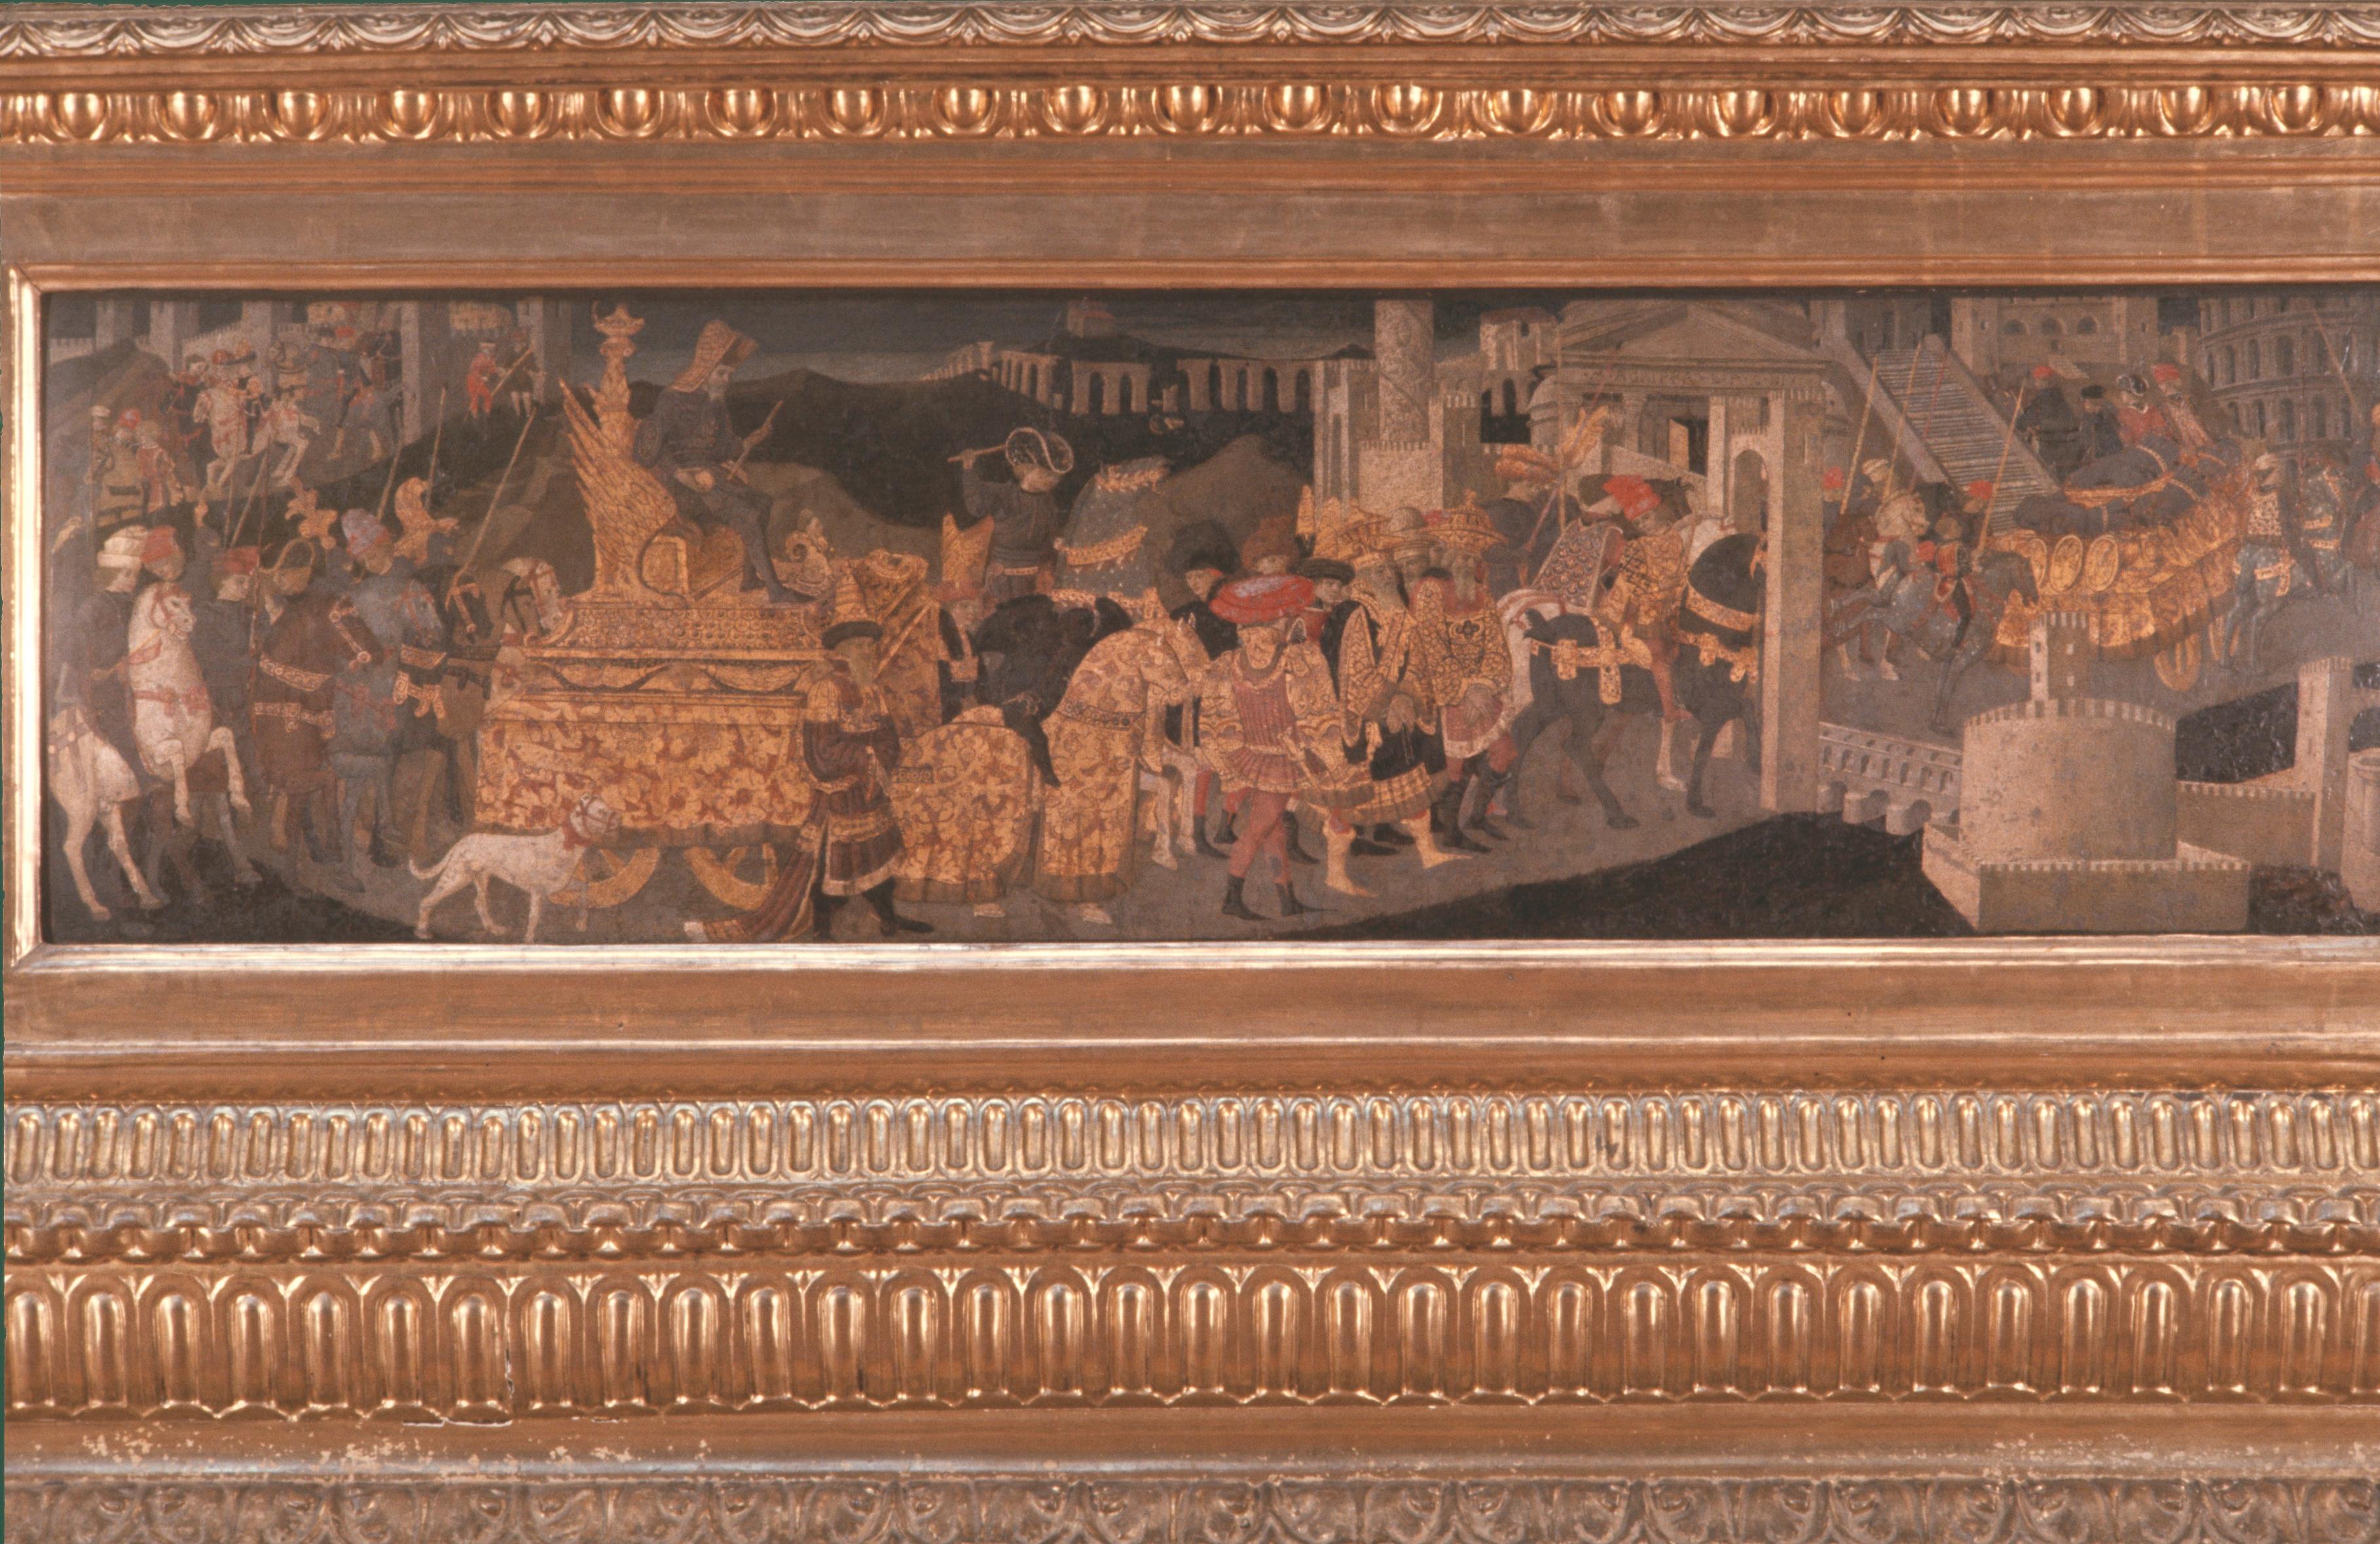
This kind of subject had long been popular in fifteenth-century Italy, a fact of which I remind you by showing you an image of a cassone panel (now in the Fitzwilliam Museum), painted in about 1460, which shows Scipio Africanus entering the city of Rome, behind his troops, in a long column with their booty and captives.
Gianfrancesco chose the greatest general of them all—Julius Caesar. And Mantegna conflated the two triumphs that Caesar celebrated for his victories in Gaul and in Asia Minor, using every scrap of literary and archaeological evidence then available to make his reconstruction of a Triumph as full and as accurate as was possible at the time.
There have been long and learned arguments about the precise setting for which the nine canvases were originally intended within the complex of buildings at Mantua.
In 1986, Lightbown argued for the three sides of a state-room, next to the Camera picta in the castle.
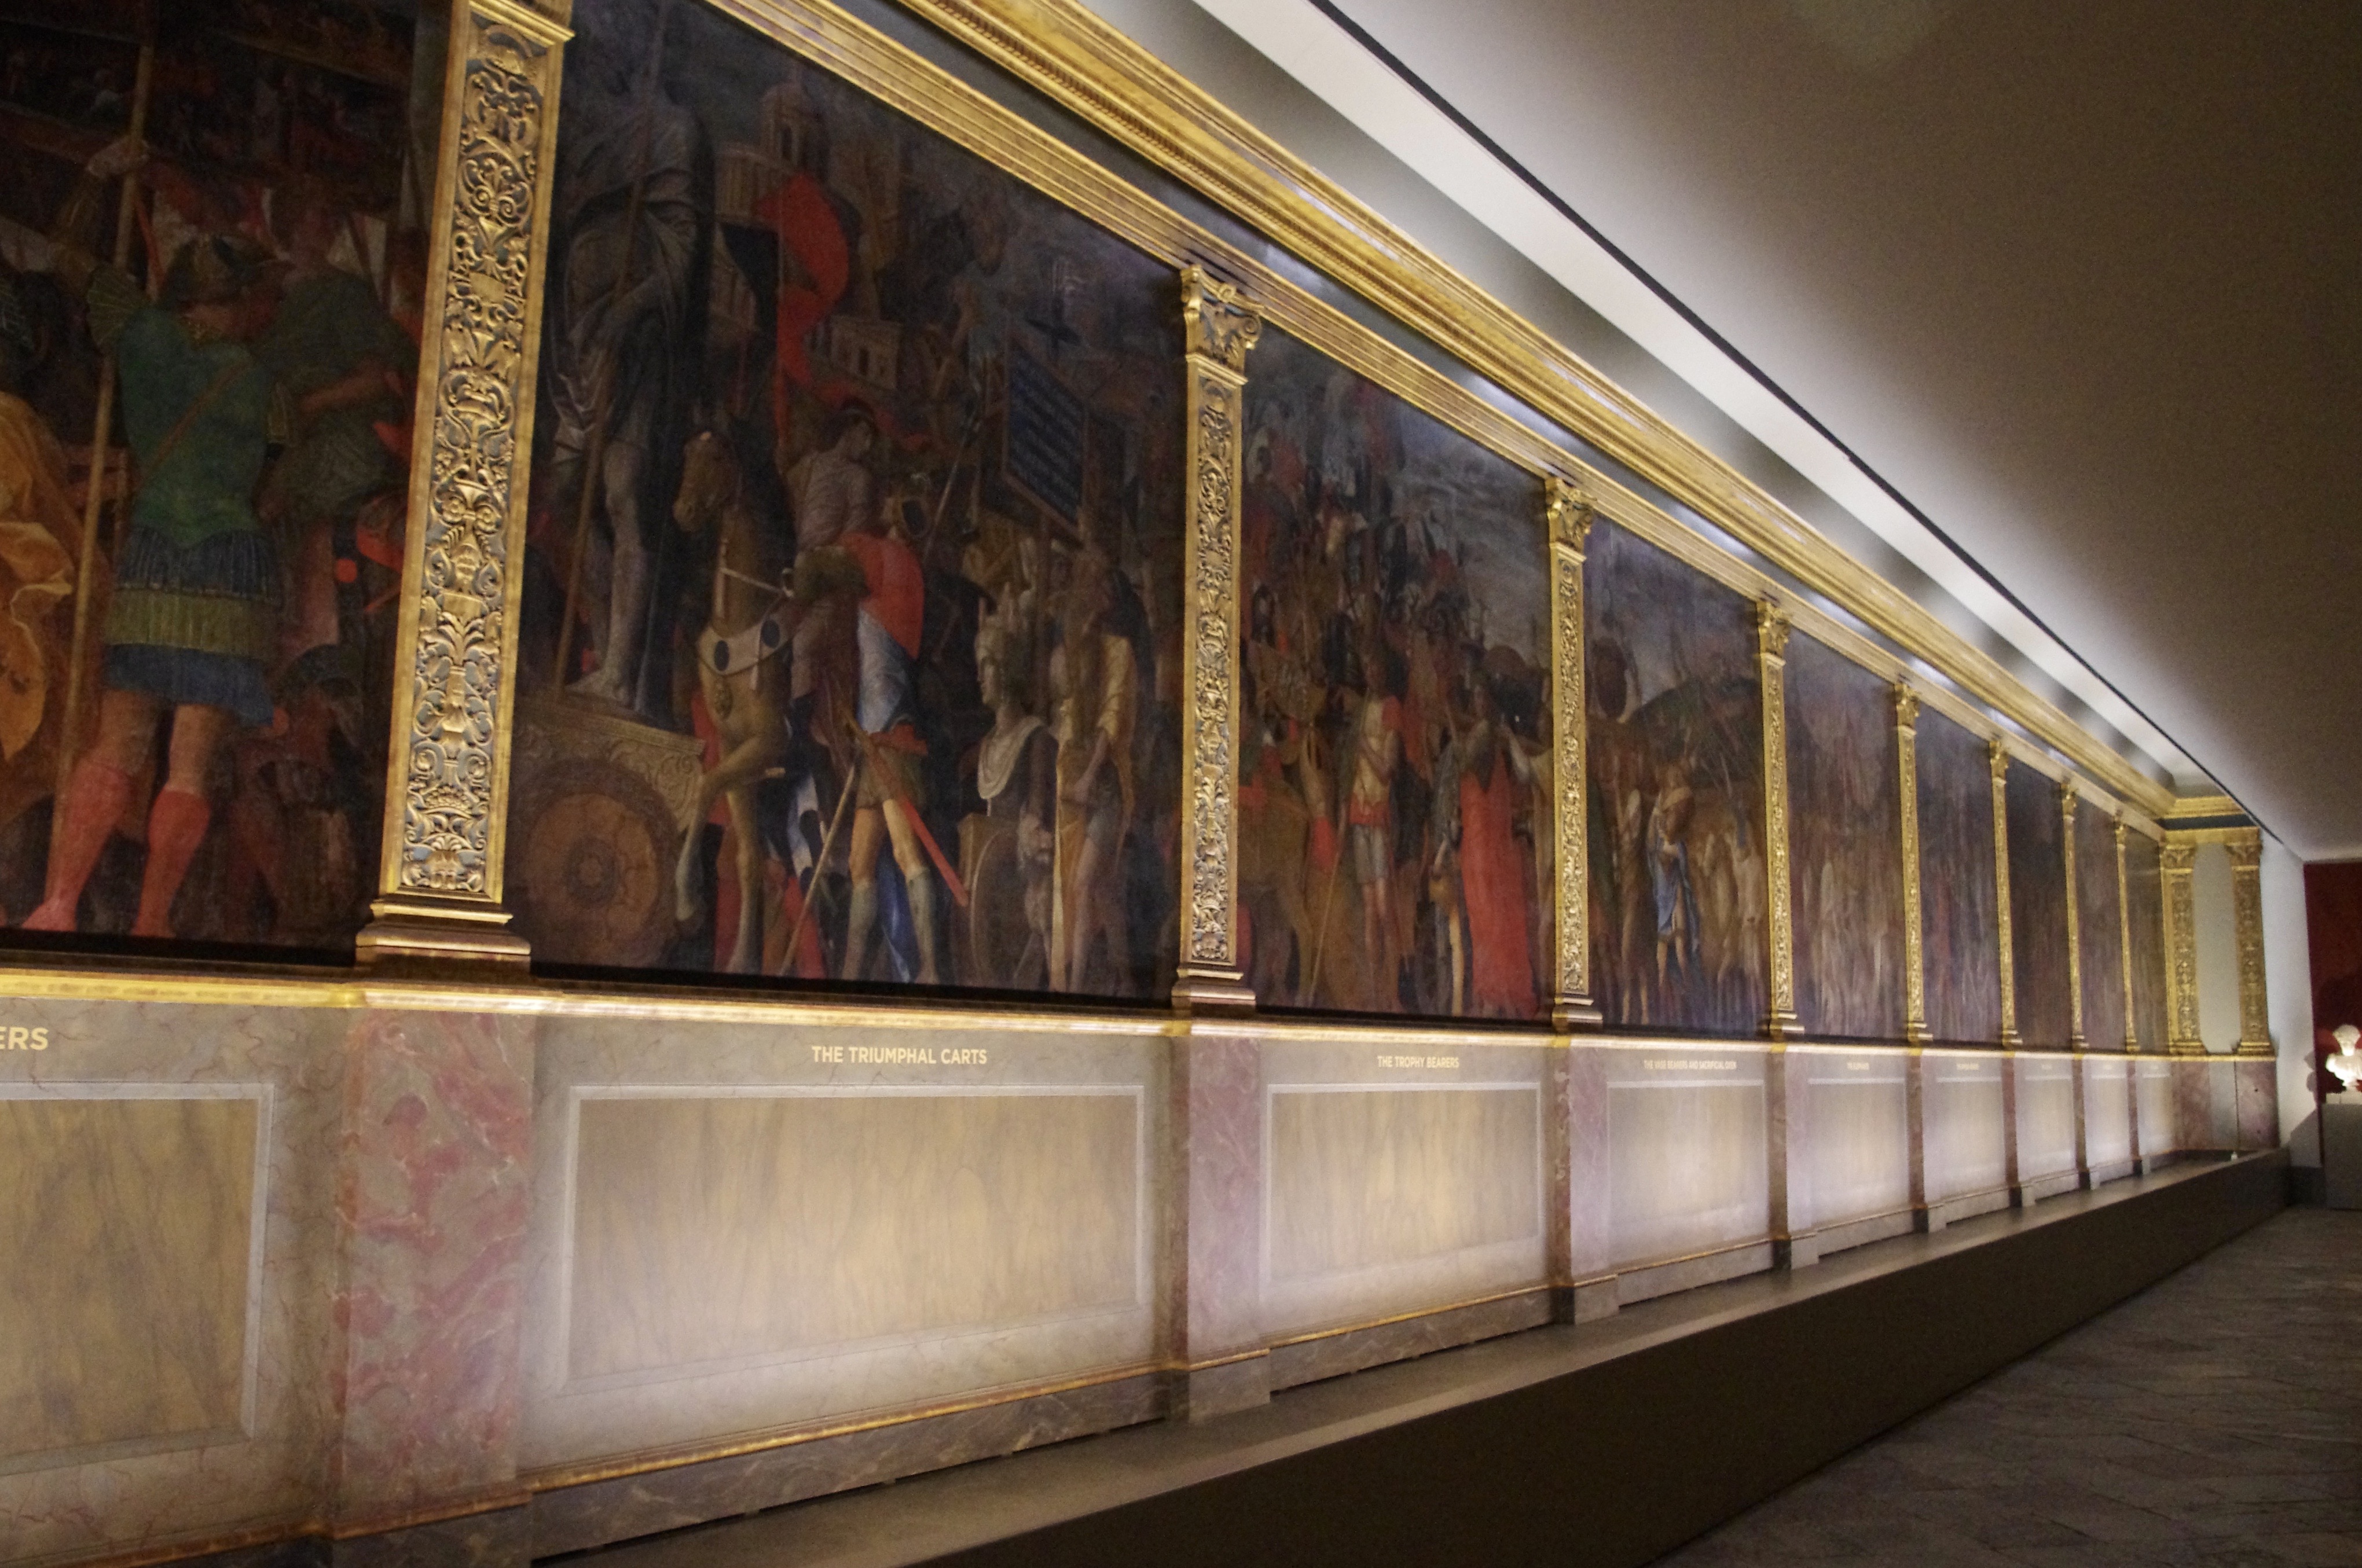
In 1901, Kristeller had argued for an arrangement along a single wall, with the light falling from windows behind the spectator.
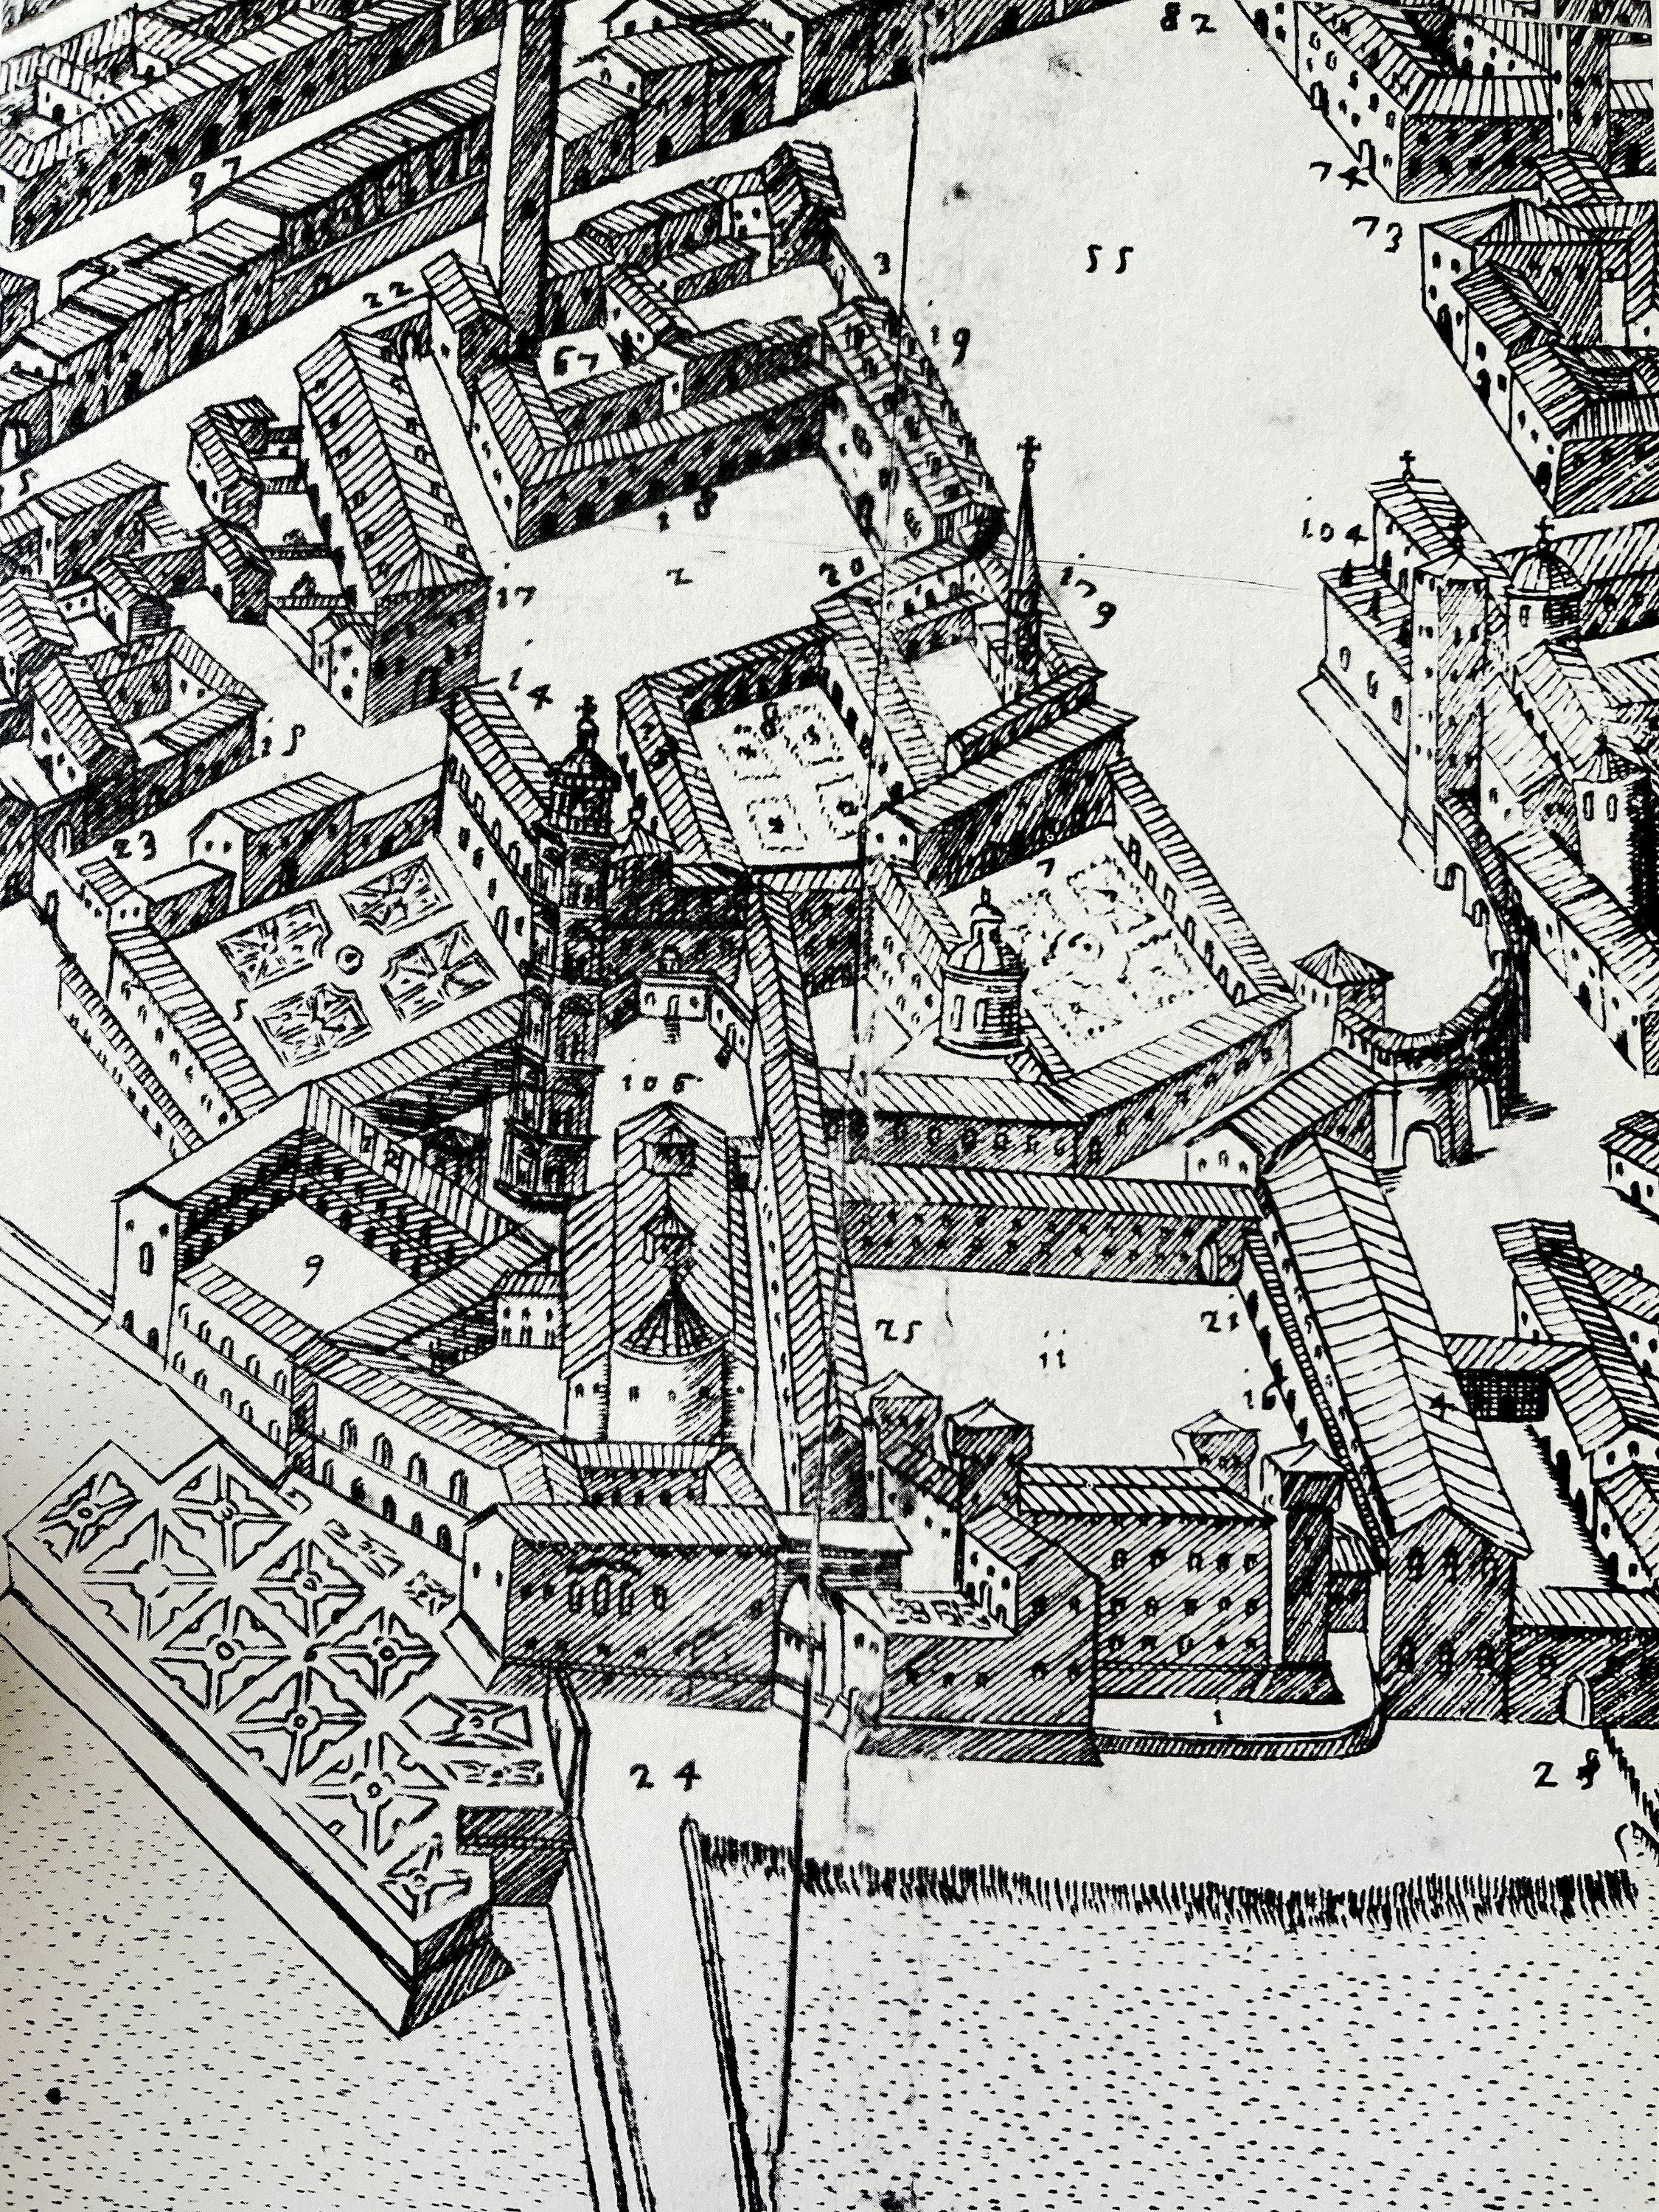
In 1979, Andrew Martindale suggested that they may have been intended for the corridor or passage in this photo, which is in the Gothic Palazzo del Capitano that you saw earlier.
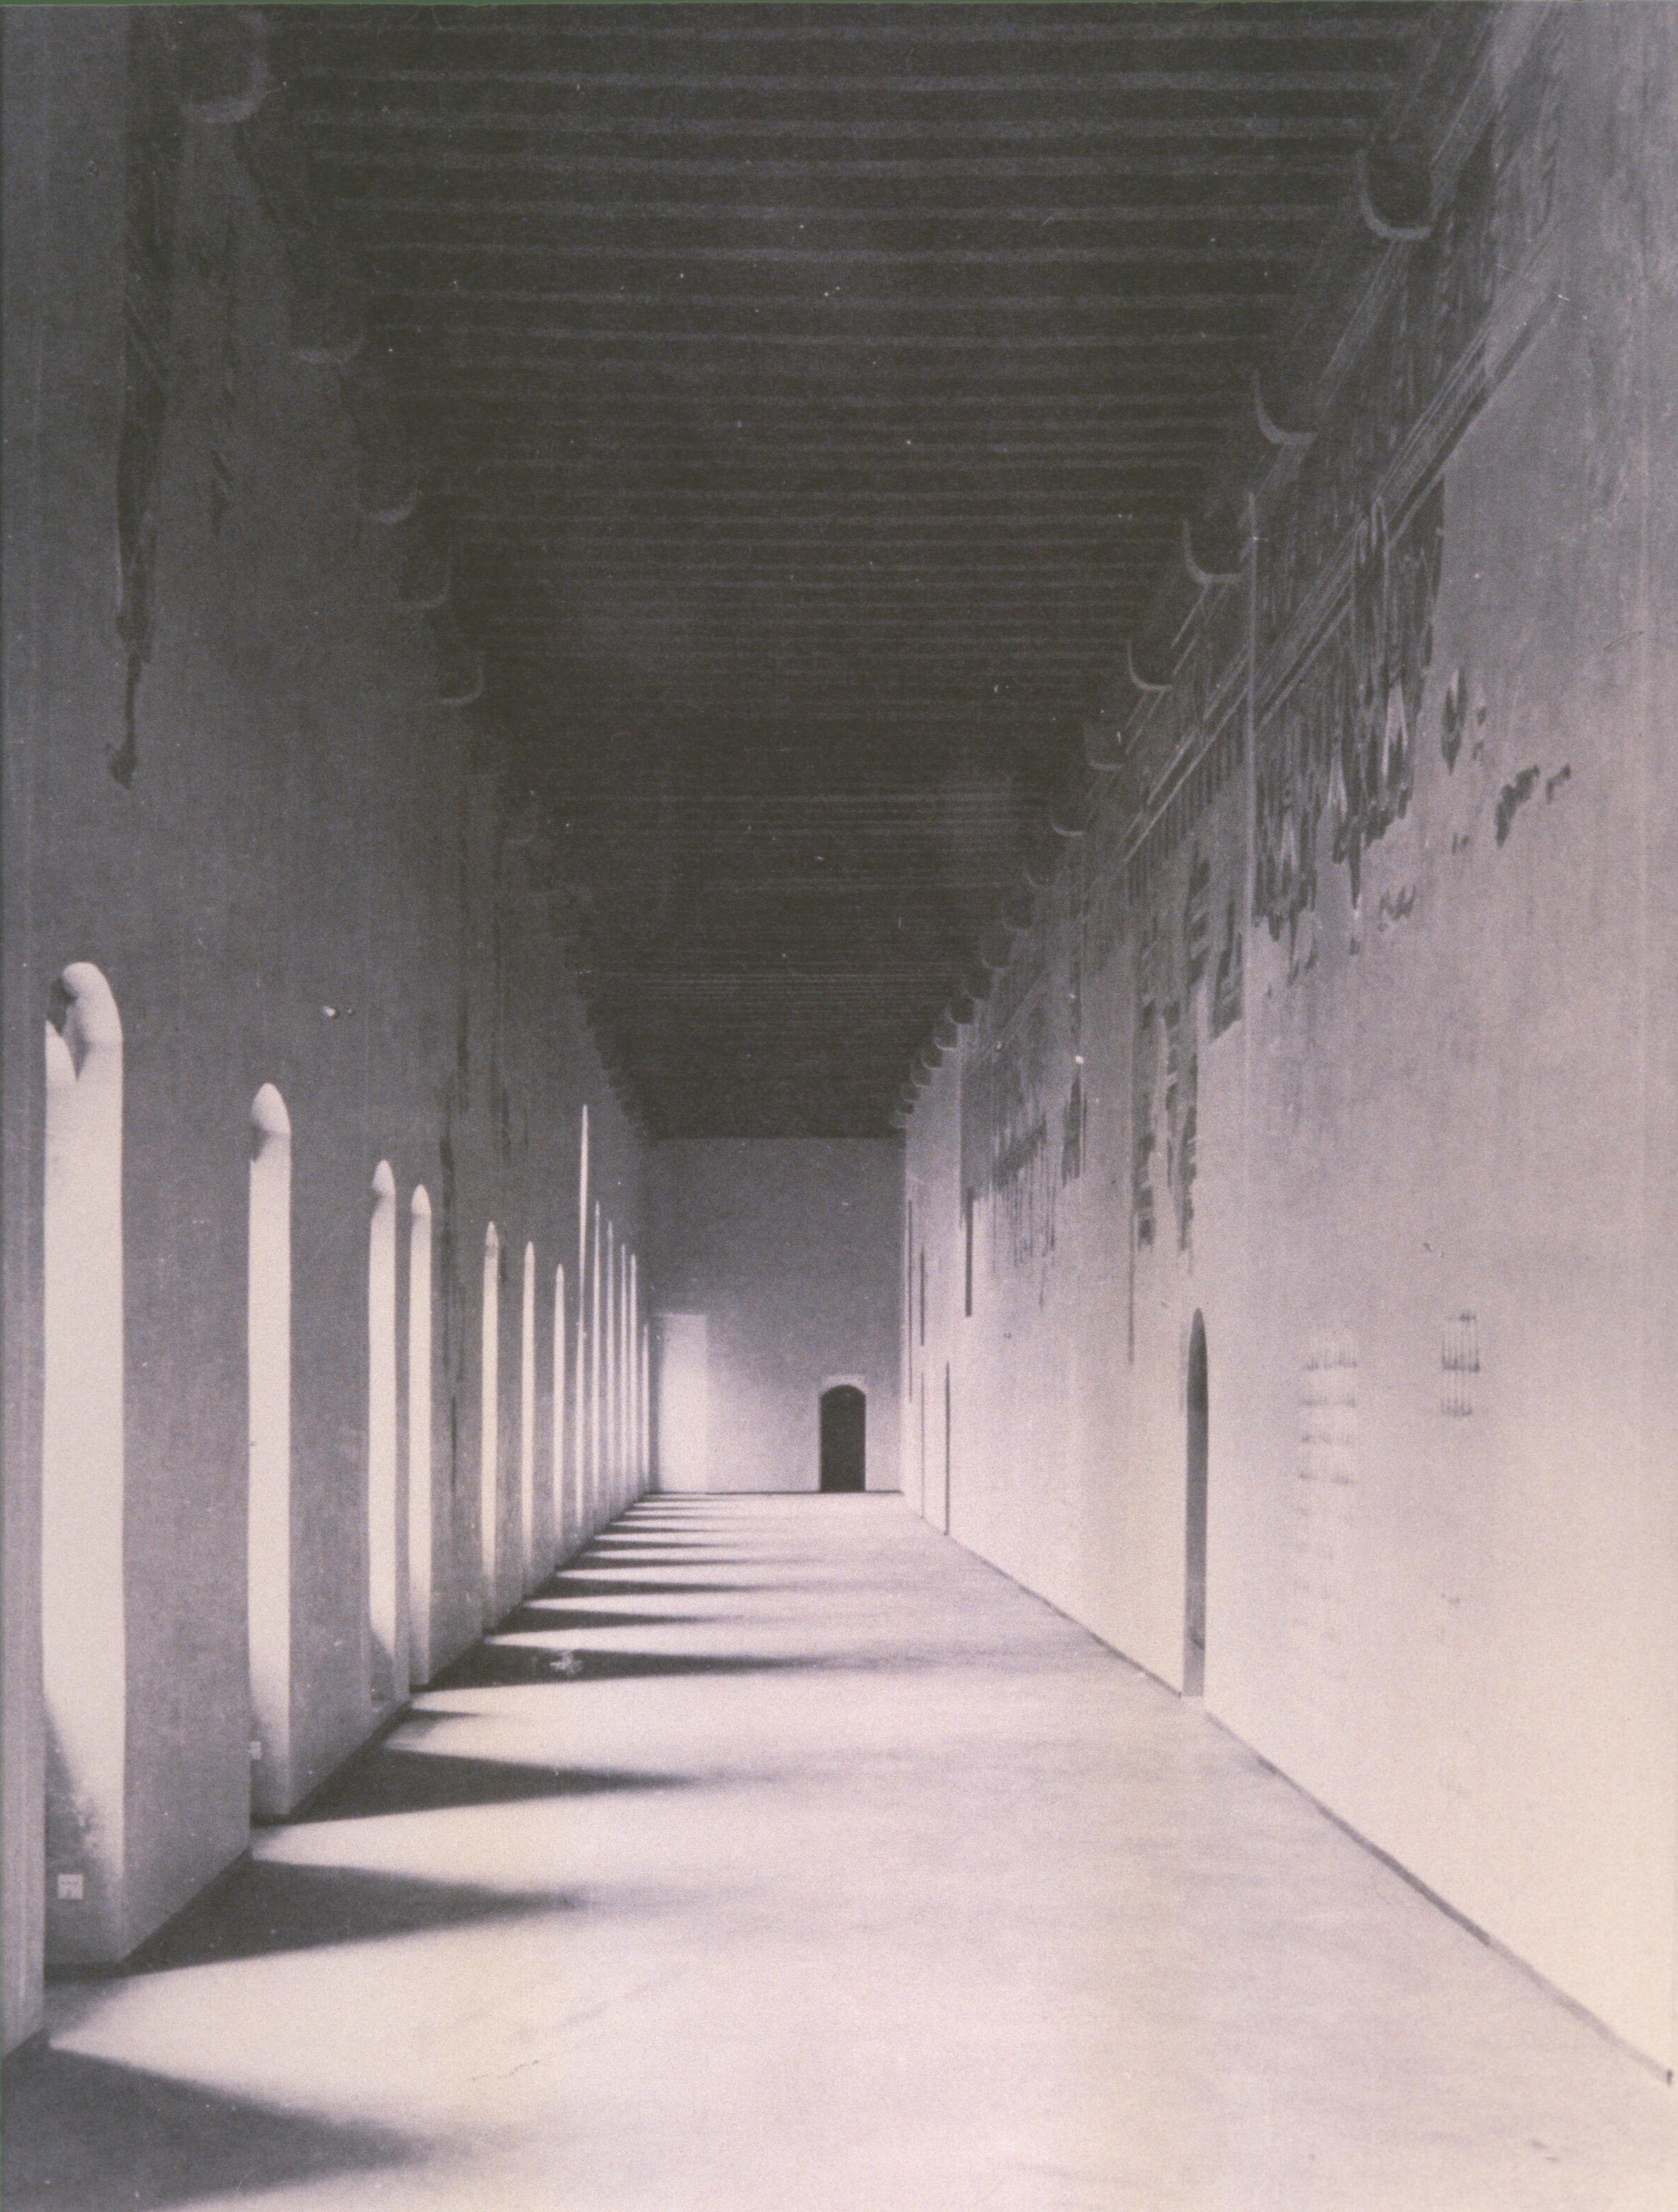
It was Martindale’s view that prevailed when the canvasses, which had suffered terribly from damage and overpainting, were cleaned and restored by a single man, working for a period of twelve years, and then put back on view in the Orangery at Hampton Court.
What is certain is that, despite the late date there are striking continuities in composition and style with the works we have seen.
Each canvas is nine feet square, the same sort of size as the frescos in the Ovetari Chapel.
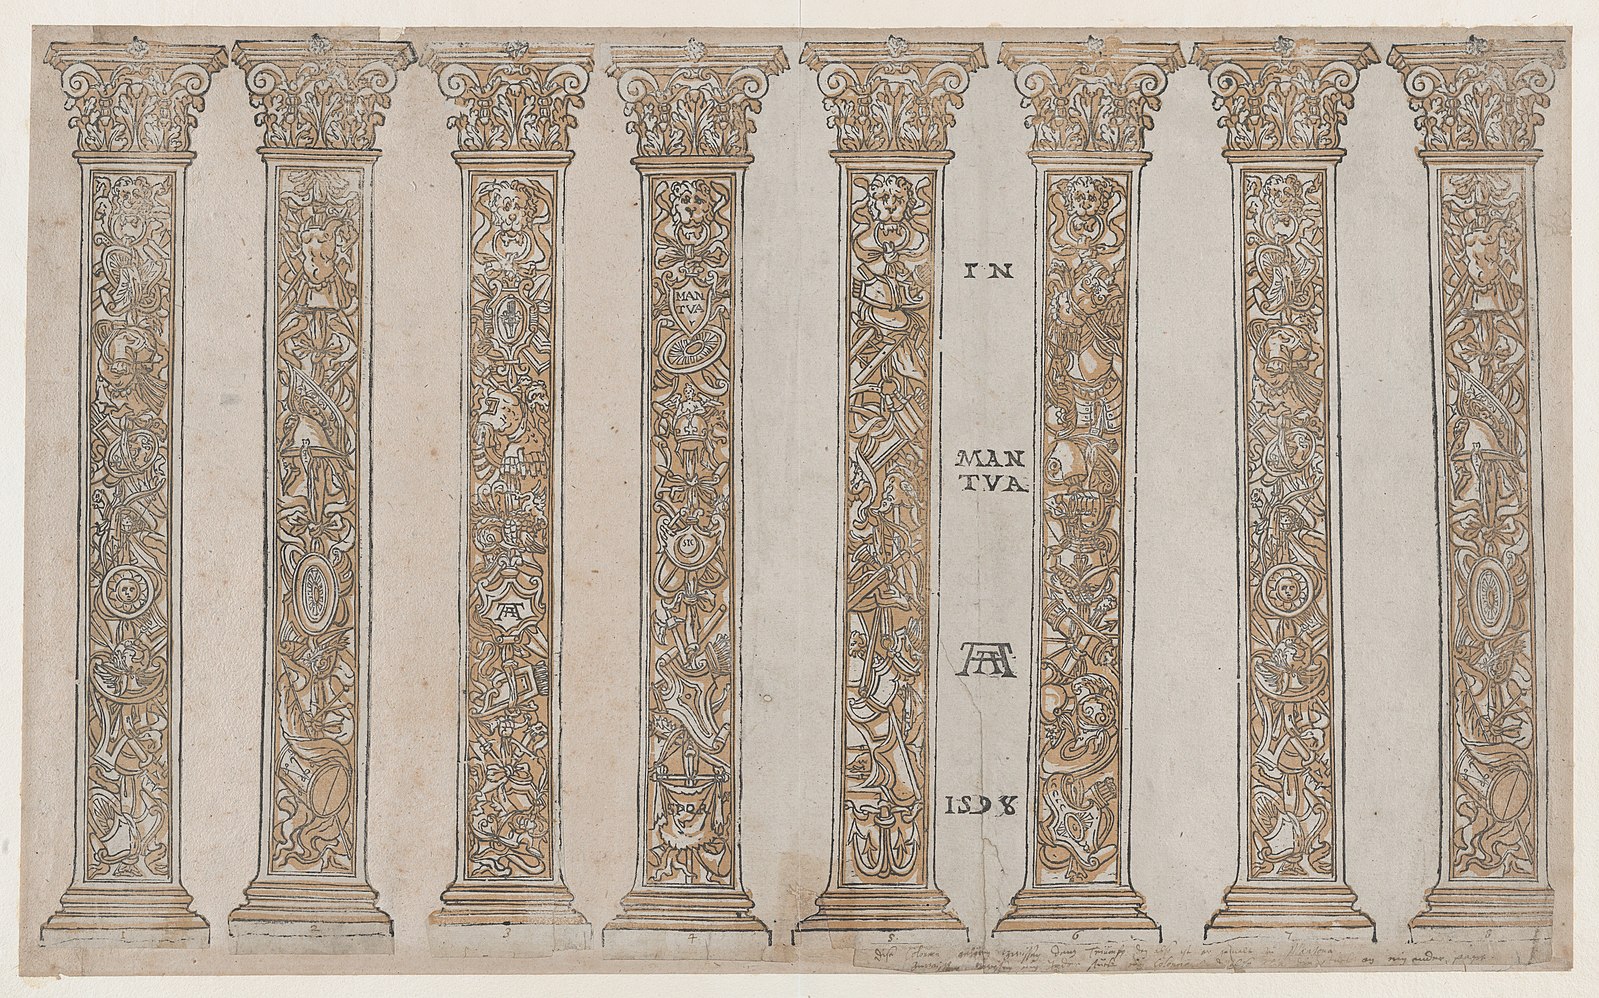
They were meant to be framed by pilasters decorated with classical motifs, like those in the photograph here (woodcuts of the sequence printed in 1589). These pilasters would once again seem to cut off the figures, apparently interrupting our view of a continuous space, just as in Padua and Mantua.
The viewing level (and thus the height of the vanishing point in the perspective) is, once again, close to the bottom of the frame, so that we seem to be looking up to the foreground figures, whose feet we could almost touch with our hands—everything and everyone being foreshortened from below.
There is not really any ‘story’ to tell, so I will be content to more or less allow the procession pass by, like ‘floats’ in a Carnival or at the Lord Mayor’s show.
Here is the first canvas, showing the front of the triumphal procession.
Trumpeters lead the way, dressed in long robes and wearing boots, their brows crowned with laurel, their cheeks puffed out, and the long trumpets making an angle of about thirty degrees.
Behind the trumpets, making an angle of about seventy degrees, you can see a half dozen scarlet and green poles, with banners or standards which reach right up to the top of the canvas.
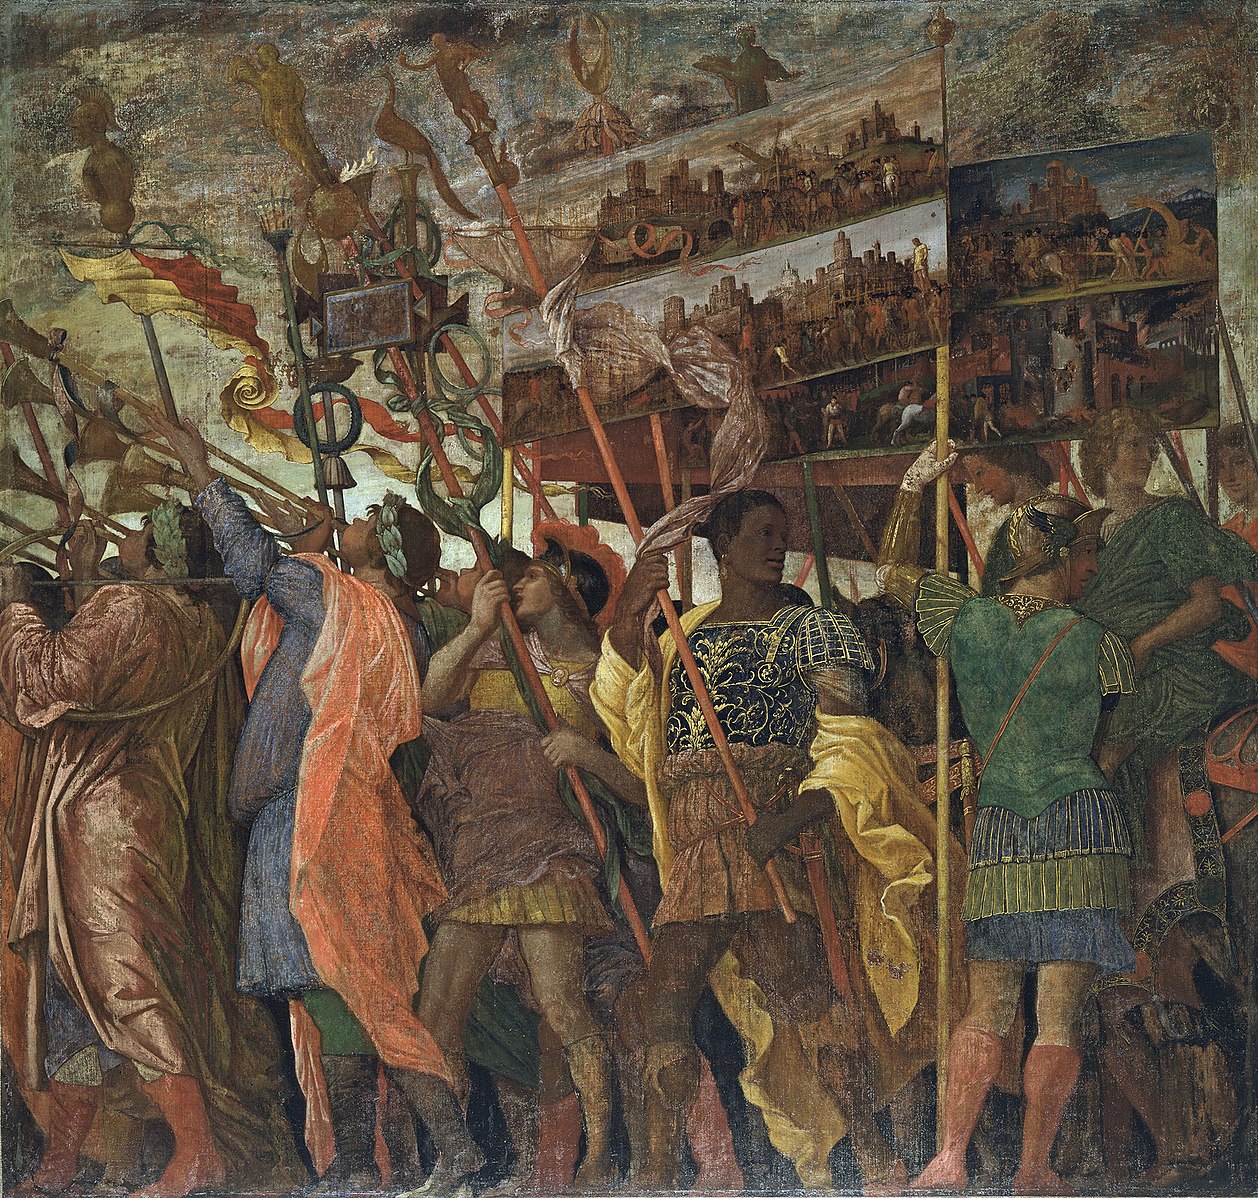
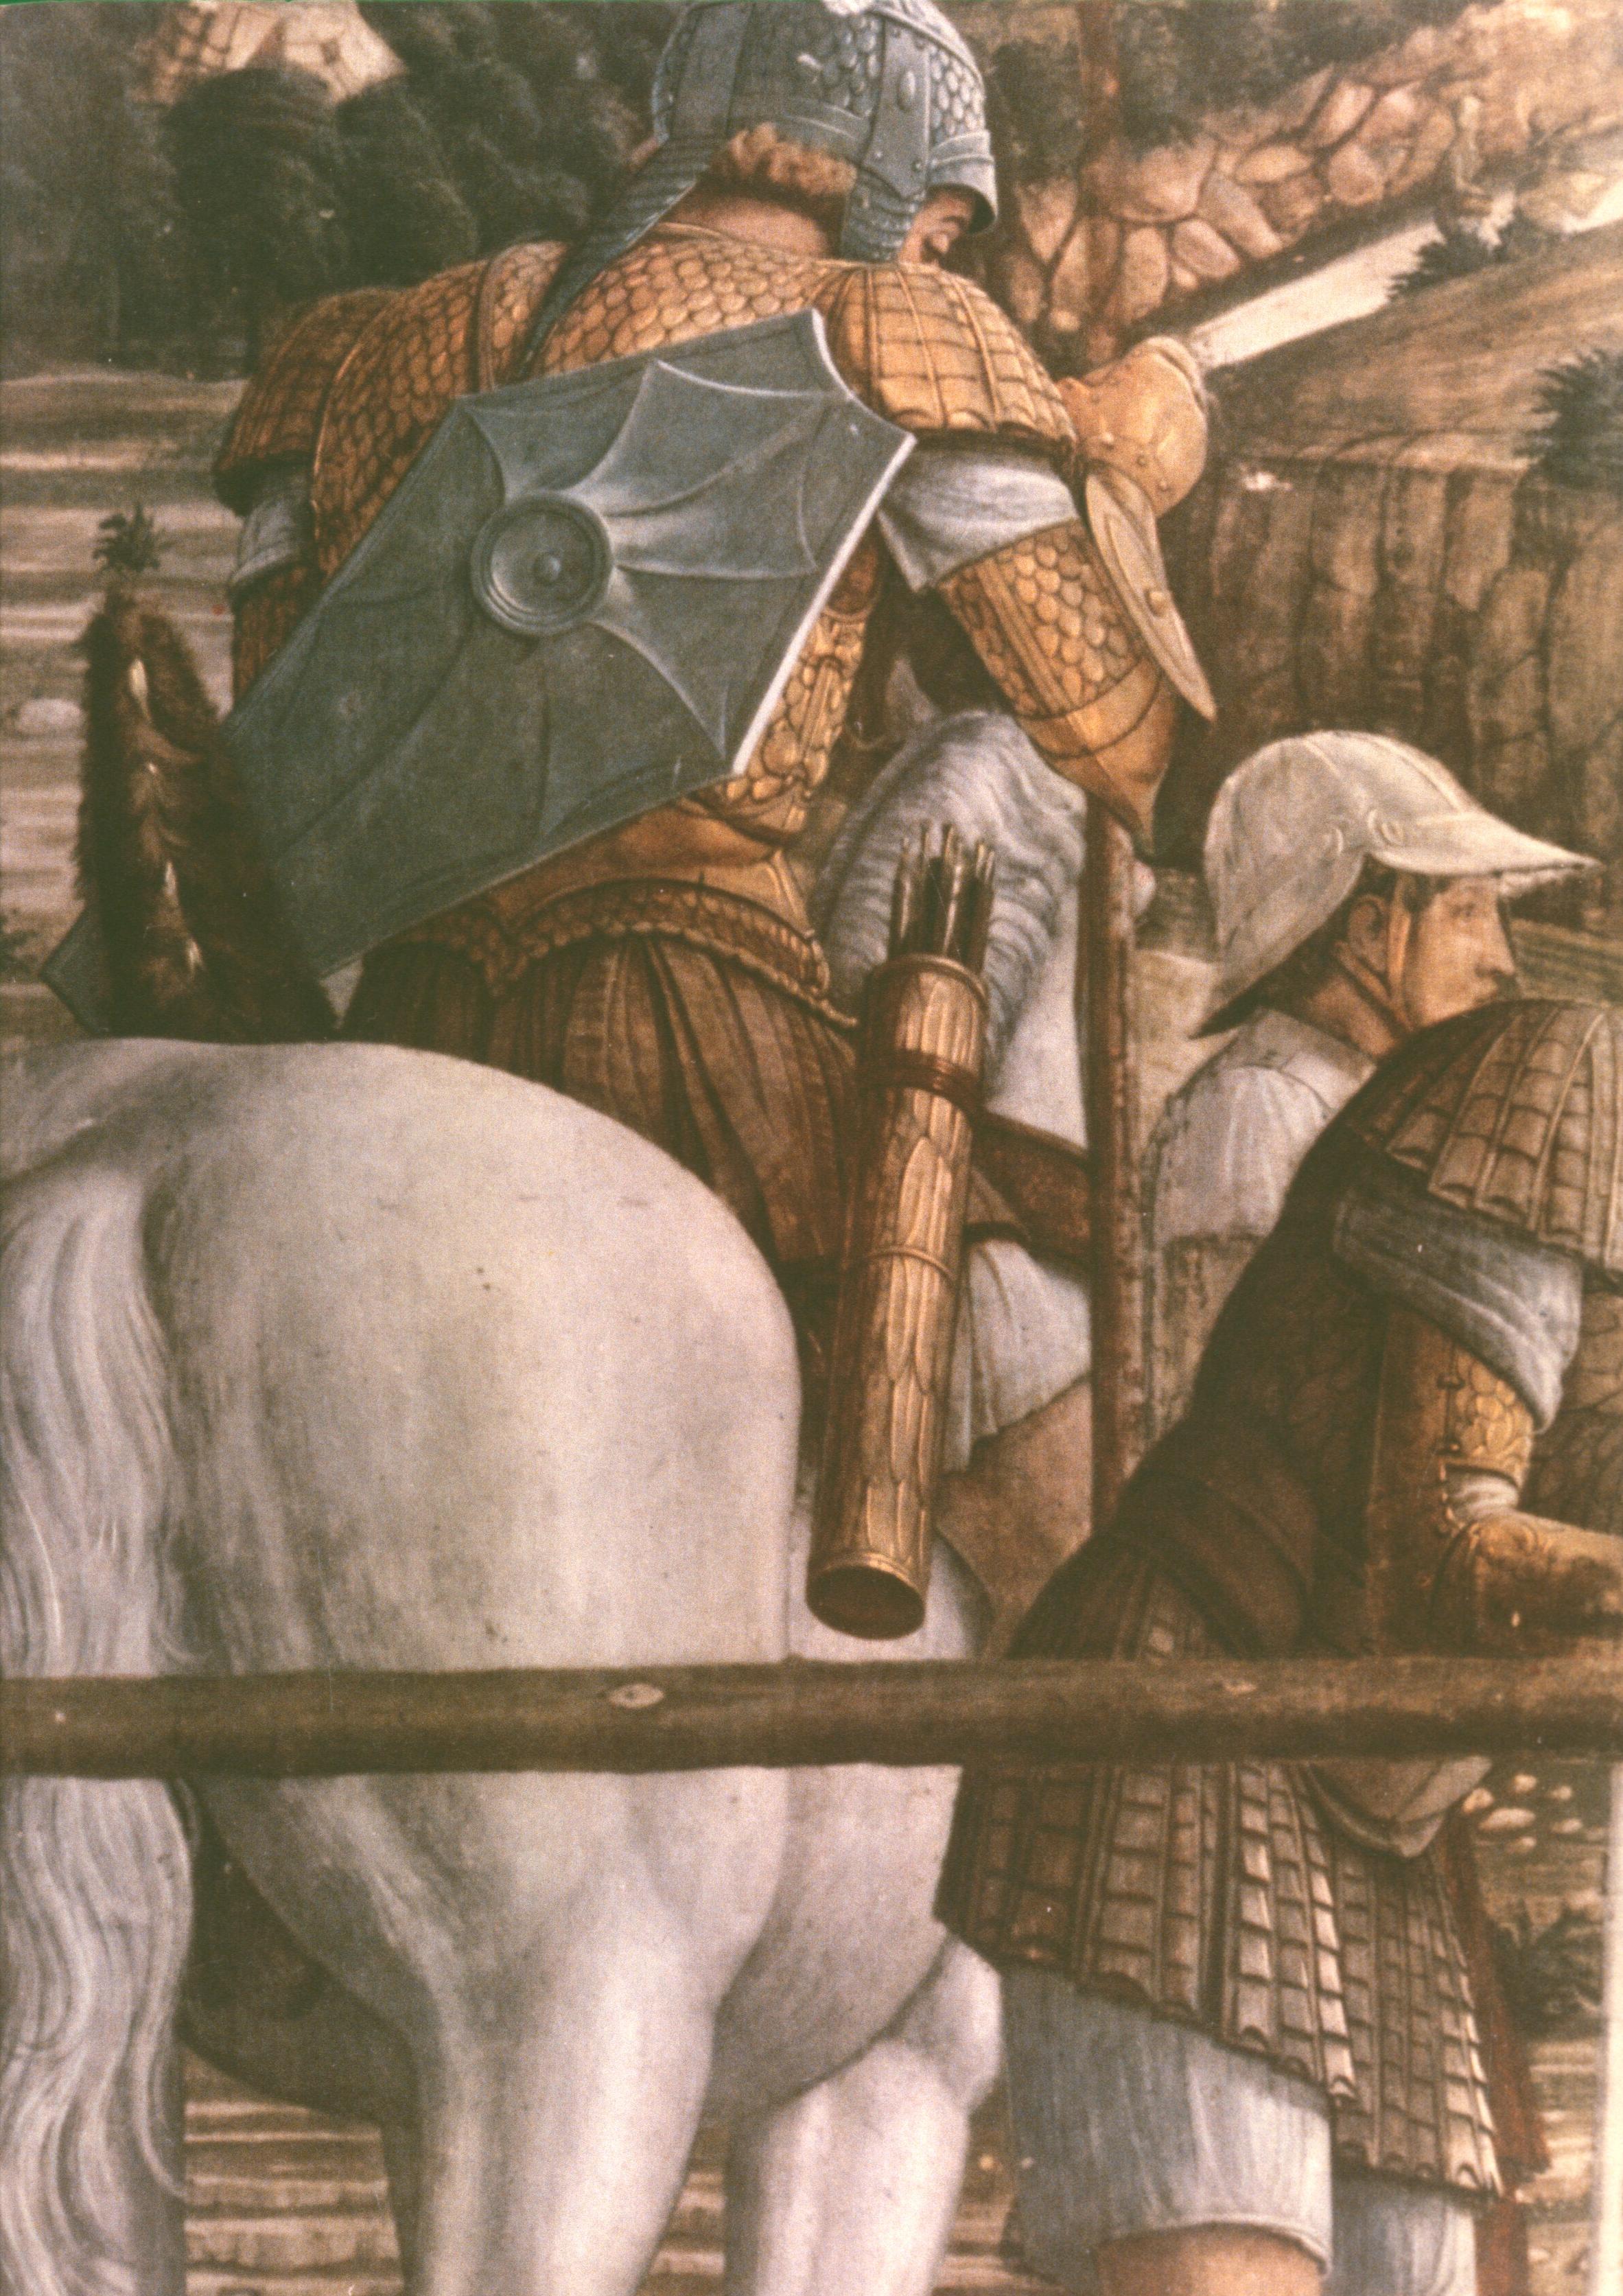
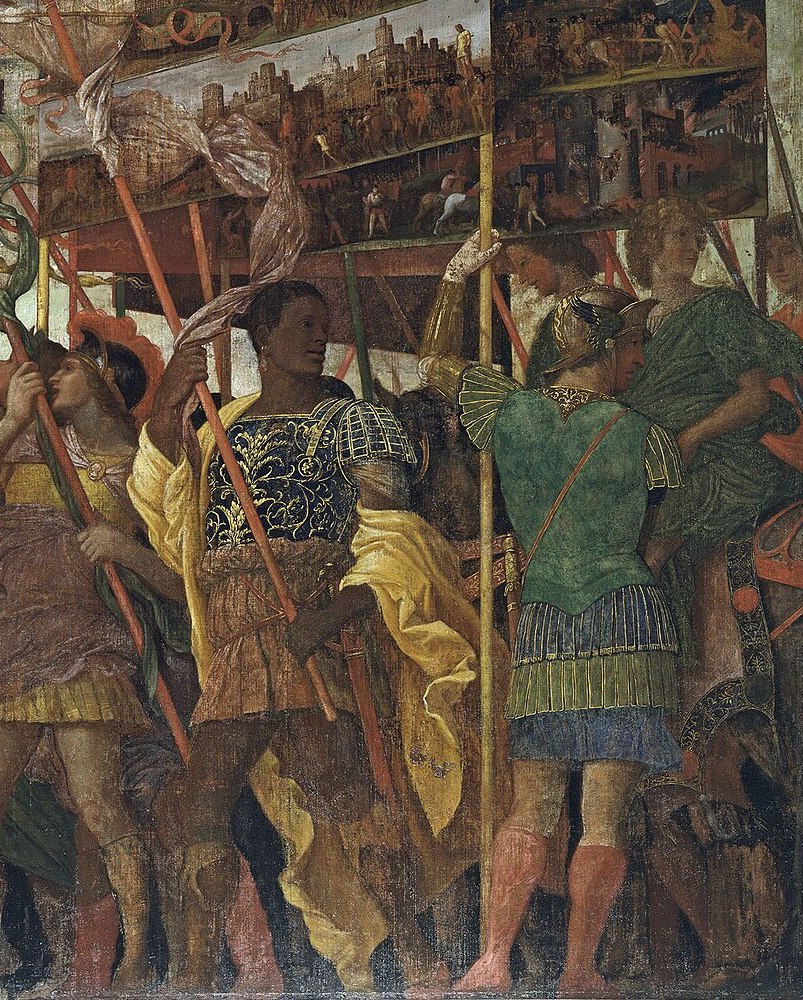
Behind the banners, on yellow poles, held vertically, in pairs, there are huge pictures of the captured cities, which are stretched right across the width of the marching column, and would have been almost invisible, because sideways on, were it not for the fact that the soldier in green has checked his stride, looking behind him (that is, in the same direction as the mounted officer and the splendid African soldier, with his ornamental breastplate, and very flattering yellow robe).
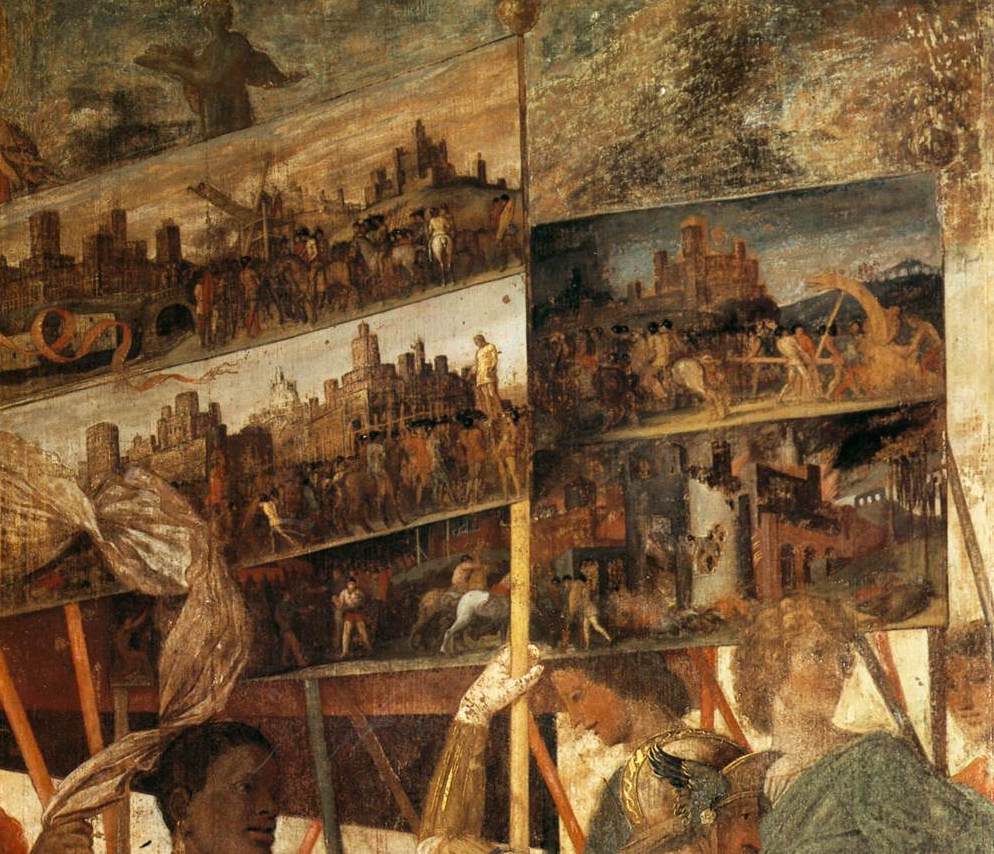
All three soldiers are directing our gaze to the second canvas, where the sky is the same evening sky (specified by the historian Suetonius for Caesar’s Gallic triumph), which explains why there is a huge torch illuminating the foremost of two inscriptions, which announces:
a Triumph,
decreed for Julius Caesar,
because of Gaul conquered
by military might…
This part of the procession is reserved for captured statues of the defeated gods.
One of the statues is a huge bust of Cybele; another is a full-length bronze of a female deity, about three foot high, carried by the soldier in yellow; and the biggest is a marble statue of a bearded god, standing high on a cart.
Notice here that there are only two pairs of human legs visible in the foreground plane, because this is an area of wheels and of animals.
Indeed, it is a carved animal head that towers over the upper register here, this being the gigantic head of a ‘battering ram’, which appears among other items of siege equipment and models of captured buildings.
To the very right, you see helmets and shields; and it is the captured pieces of armour that will dominate the sky in the third canvas.
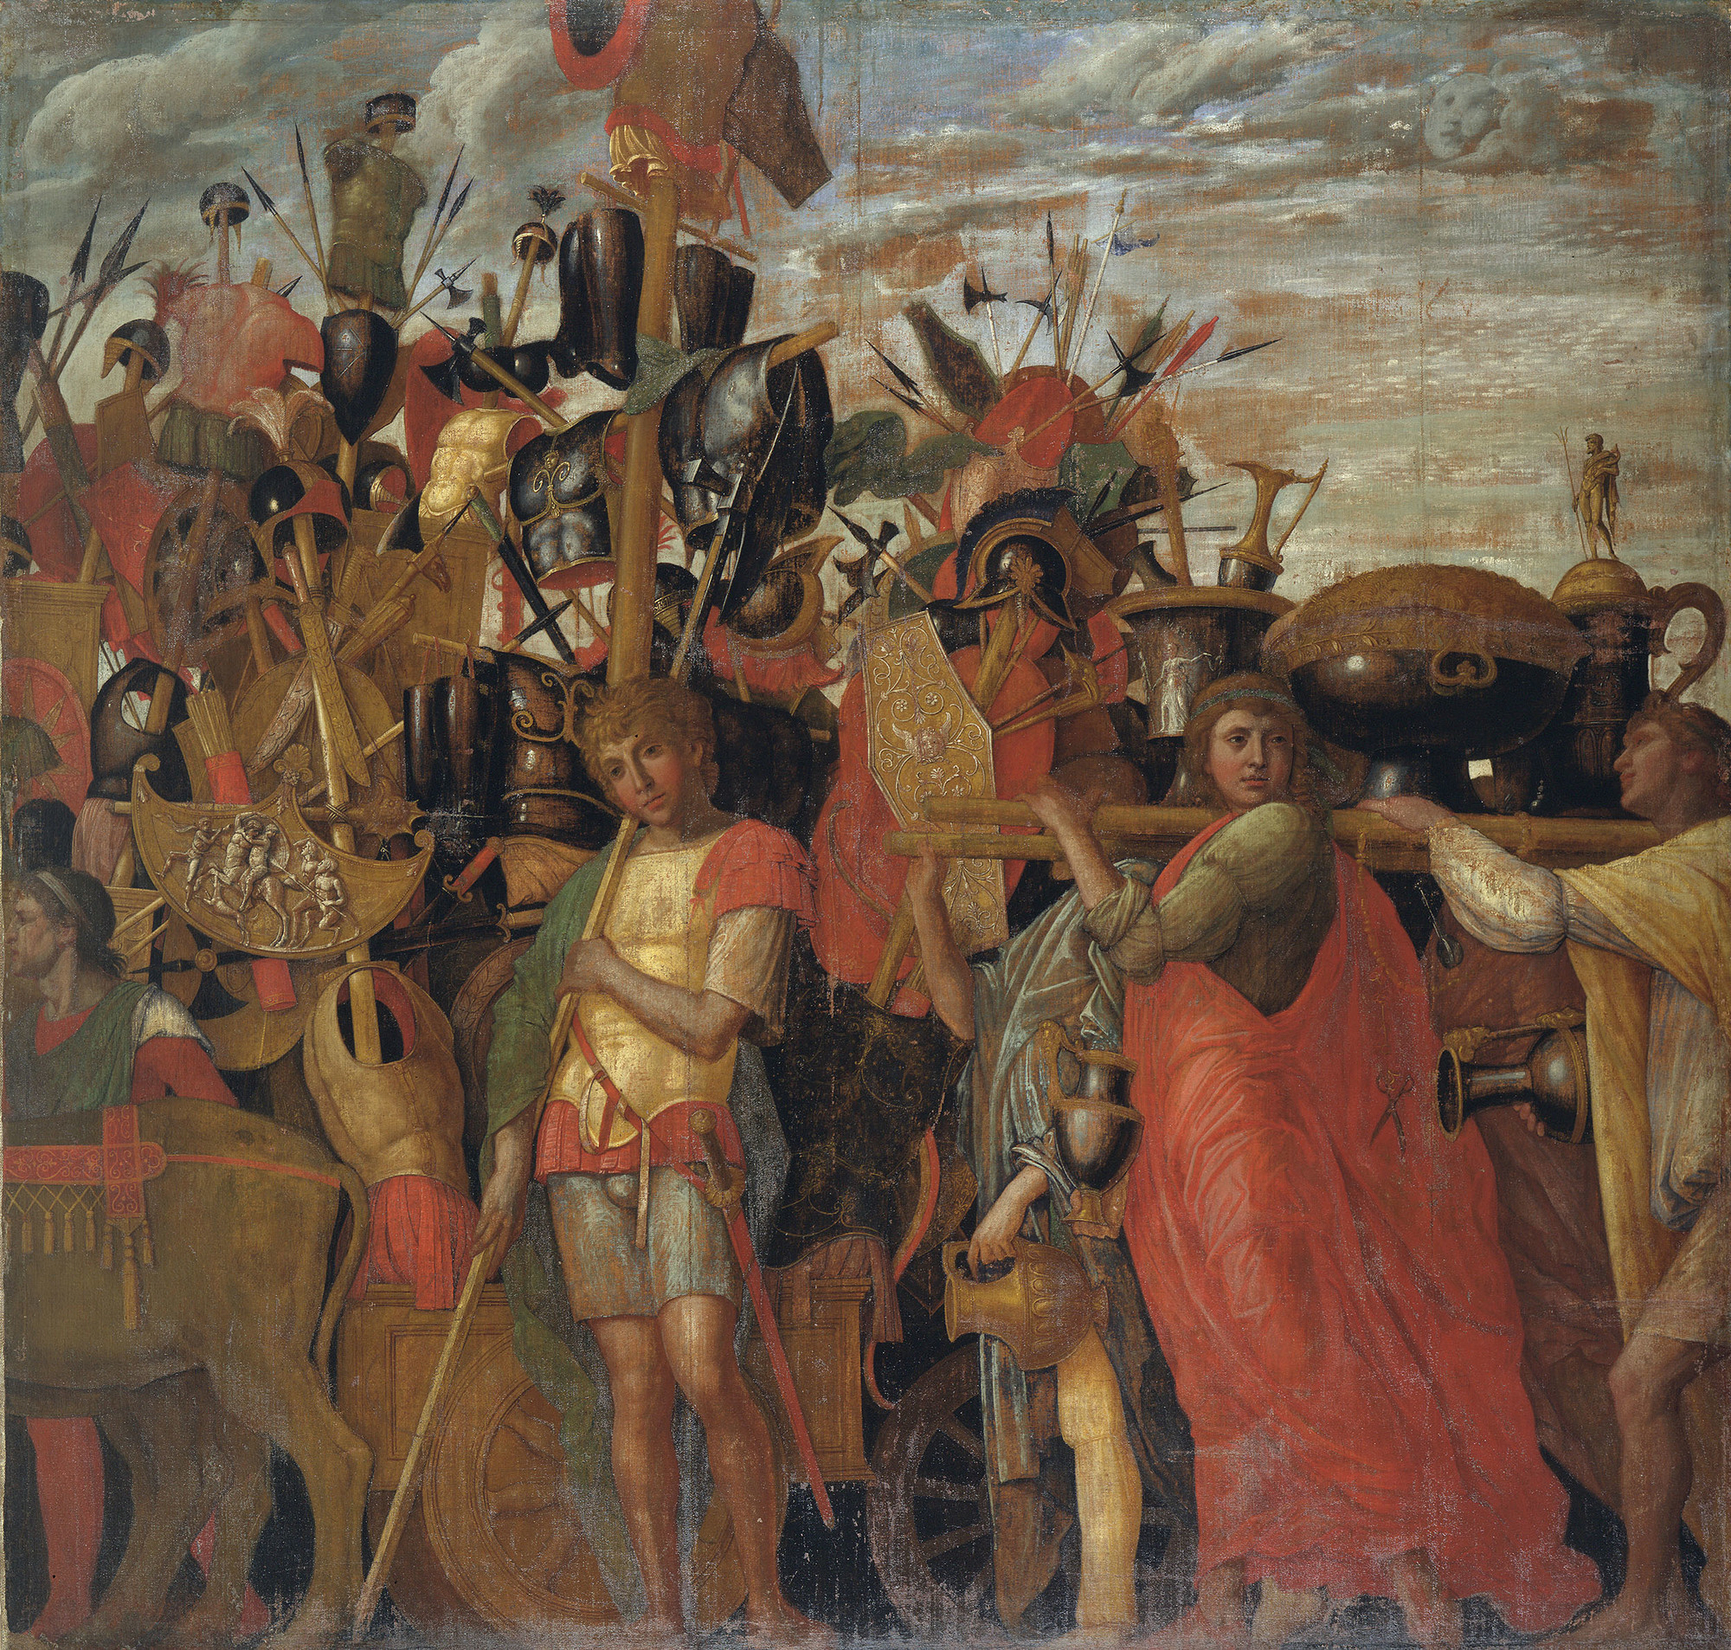
The third canvas has suffered quite a lot from abrasion and earlier restorations, but it has many disparate things to enjoy.
The sky is brighter (the face of a wind-god seems to be dispersing the clouds), the youths in the foreground are dreamier, the colours of the vast red cloak and the yellow breastplate are warmer; the higgledy-piggledy pieces of armour and weaponry are displayed with careless abandon like second-hand clothes in a charity shop; the vase on the front of the litter is being used like a waste-paper basket in which to stand two narrower pots, while at the rear there is something that resembles a huge Bavarian beer-mug, with the slim figure of Neptune on top of the lid—while between these is a large gleaming bowl that would fetch many thousands in an auction house.
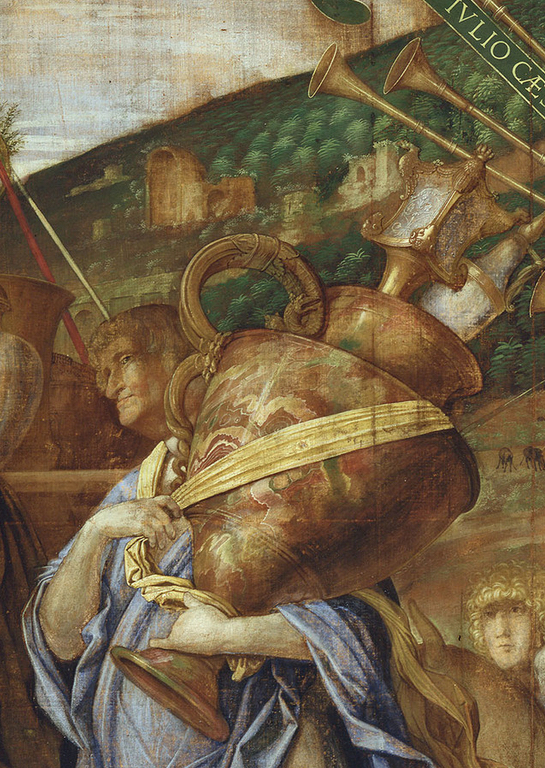
The cut-off rear of this first ‘litter’ provides continuity with the cut-off front of the second in the following canvas, where an equally valuable funeral urn rests on an elaborate stand with classical arches.
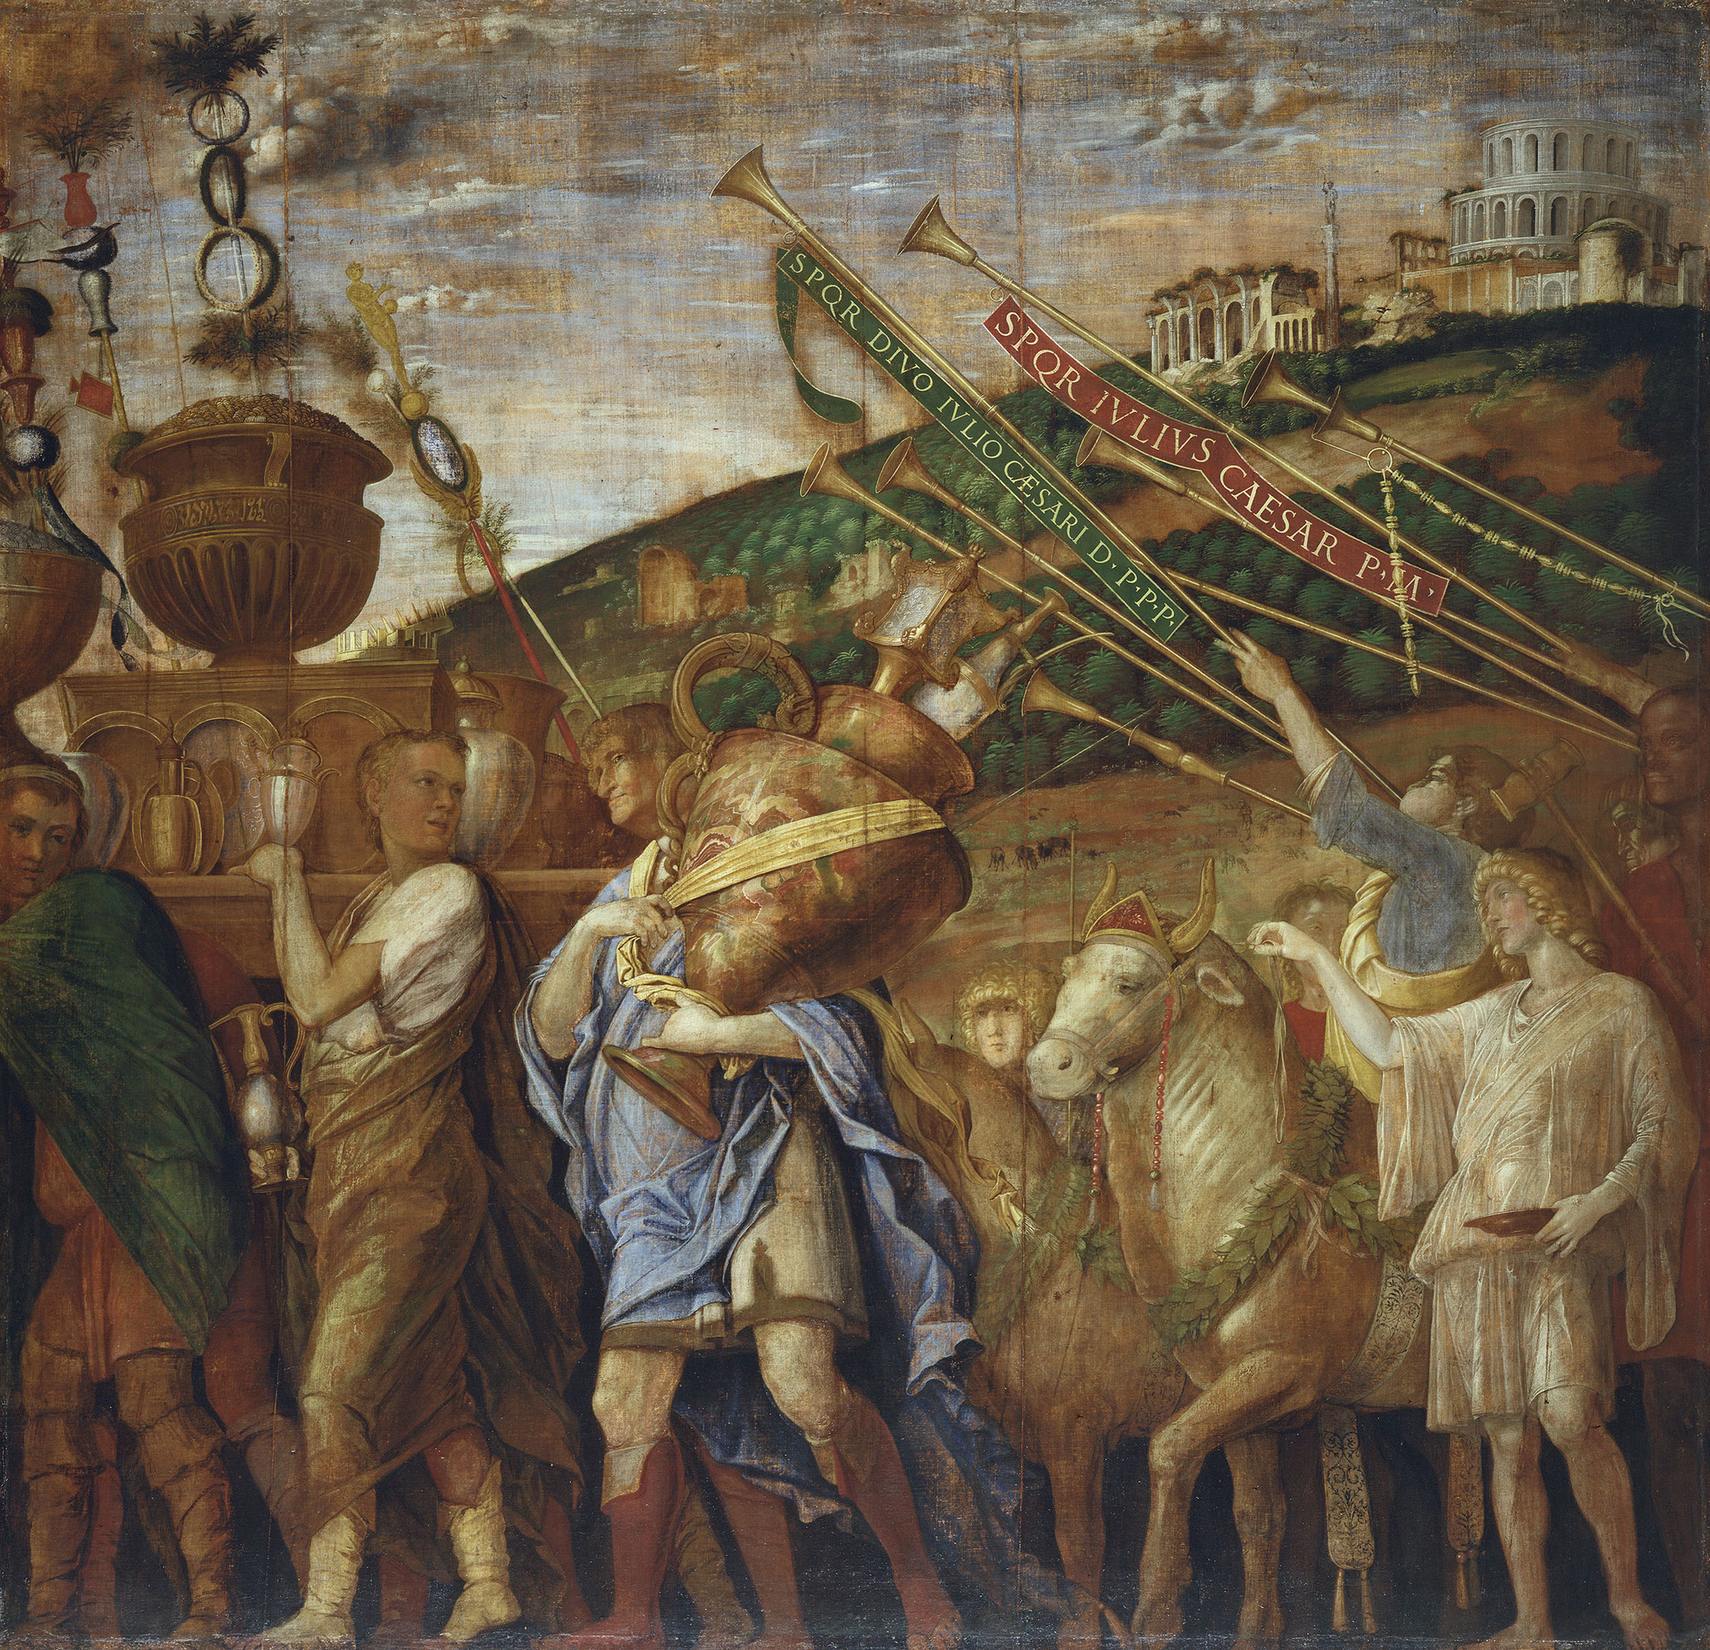
The most gorgeous example of the potter’s art is being carried with great care (look at the fingers on his left hand) by the older man, on foot.
(It is still loot, however, and it is still being used unceremoniously as a convenient receptacle to carry other exotic pieces.)
A second group of military musicians are tracing another pattern of long, slender trumpets, to which are attached banners that remind us of the Senatus populusque Romanus (SPQR), and, of course, of Julius Caesar.
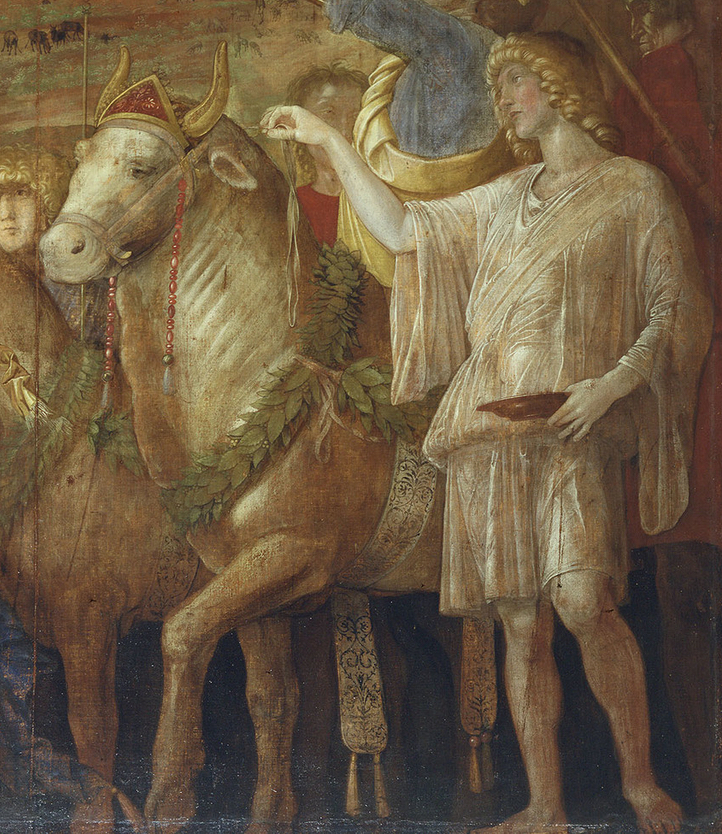
But our eyes are drawn to the right foreground, where the same ray of sunlight that flashed across the surface of the vase illuminates a youth who is escorting the first of two oxen, which are clearly not just beasts of burden, but victims garlanded for a solemn sacrifice. (The attendant is delicately plucking hairs from the ox’s head, no doubt as part of a prescribed ritual.)
(The second sacrificial ox will appear in the next canvas, where, once again, Mantegna will take pains to make us believe in the continuity of the space between the (invisible) ‘pilasters’ that ought to interrupt and punctuate our view of the long triumphal procession.)
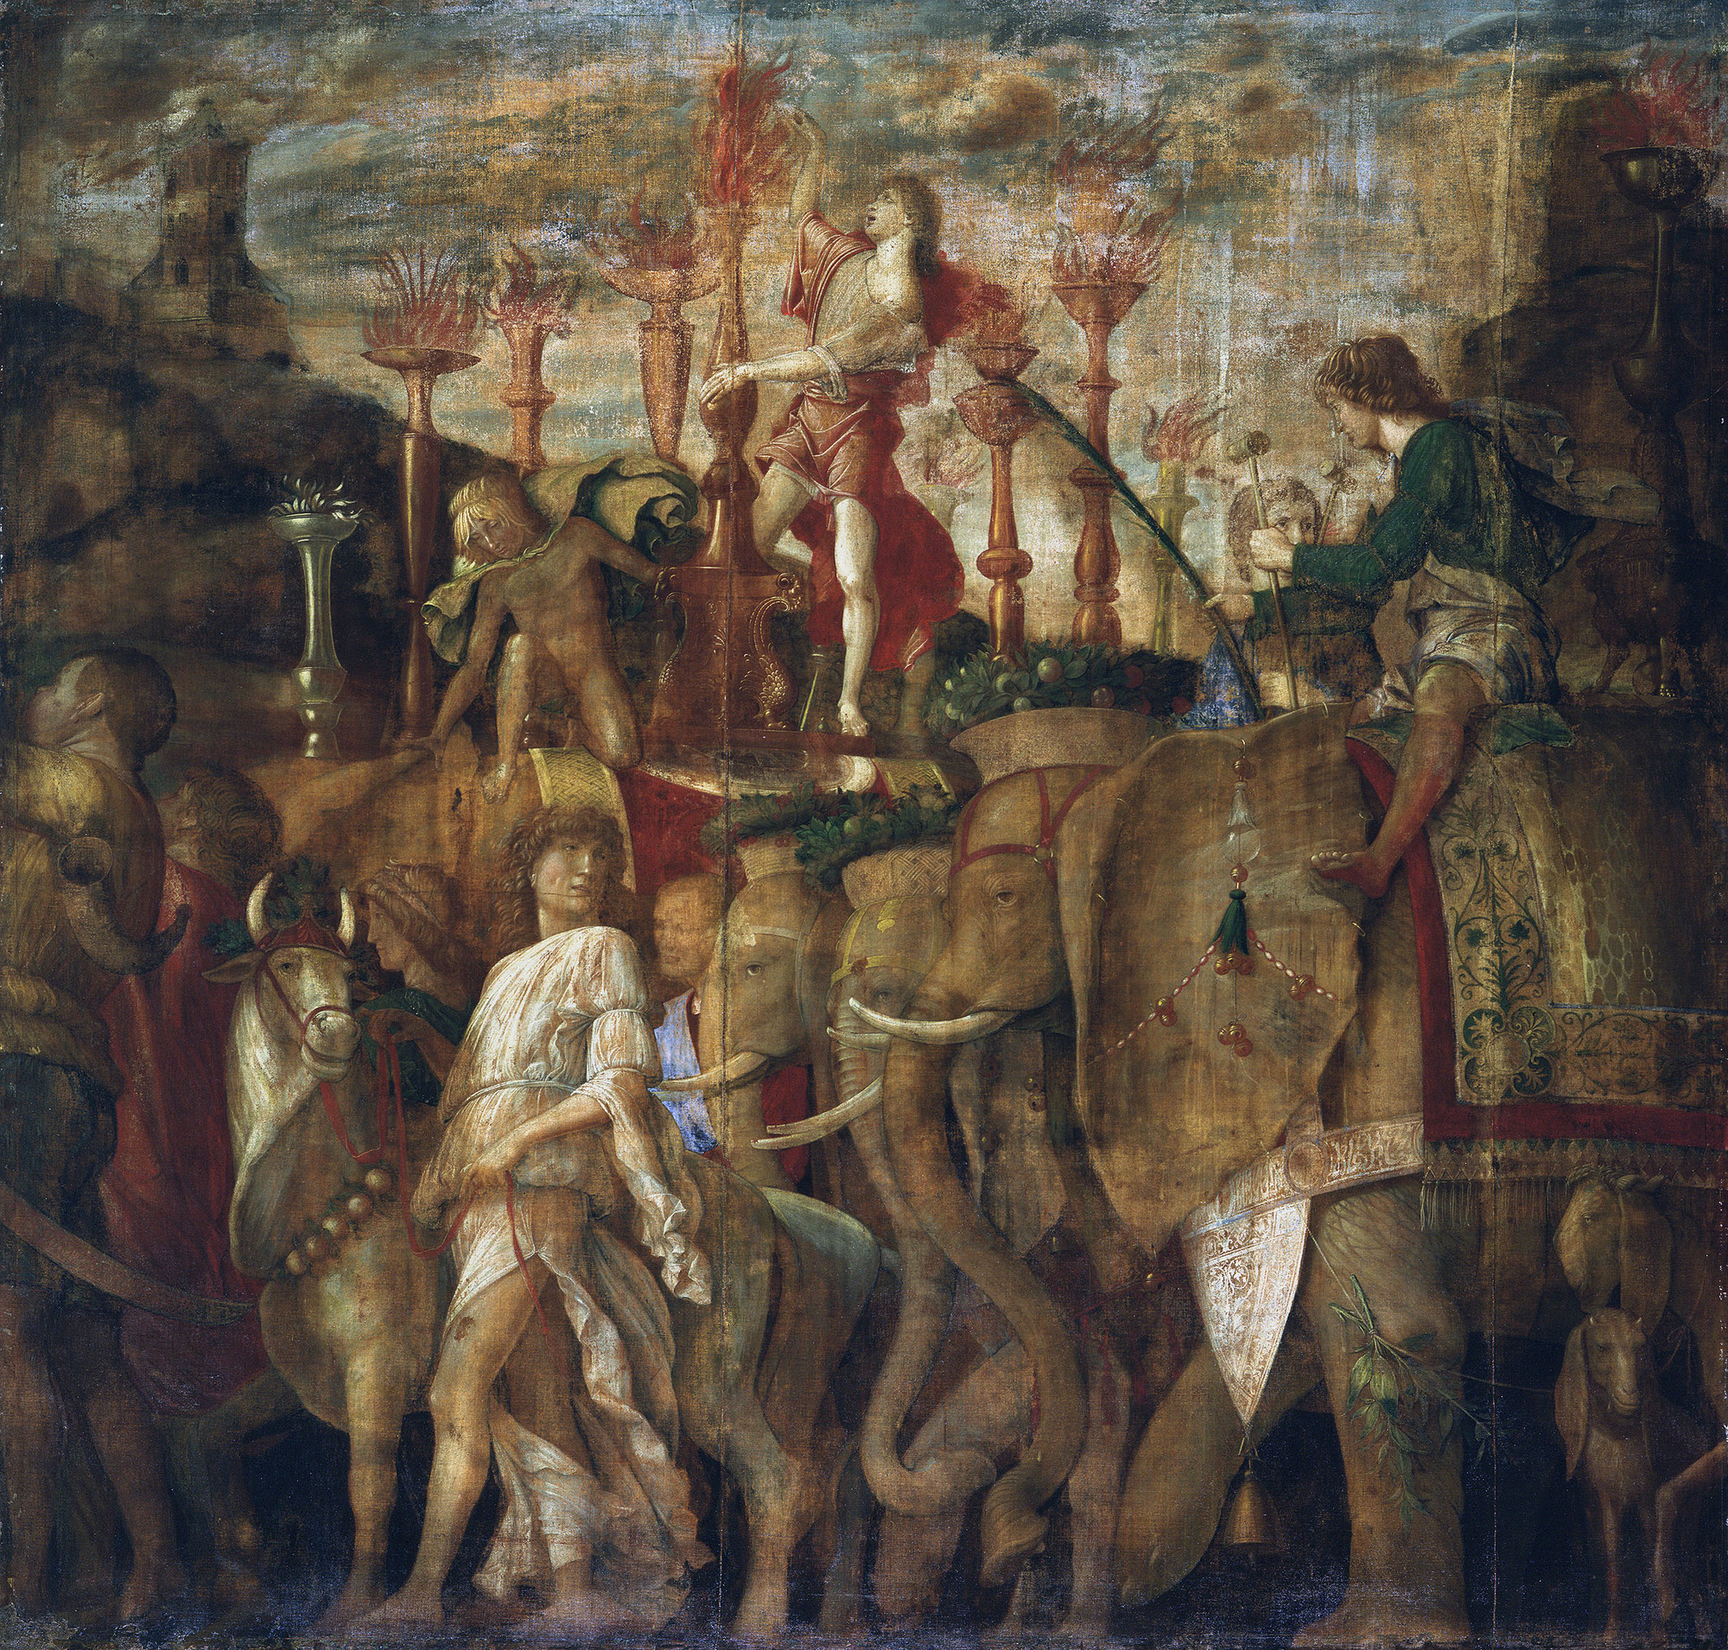
The skyline in the fourth canvas, which had climbed high to give prominence to classical buildings near the crest of a hill, now reveals a much more medieval-looking tower, before dipping to show us the evening sky.
But look at the foreground first. Notice how the low shaft of sunlight which lit up the first sacrificial ox and its attendant in the previous canvas now lights up the second, and how both ox and youth are twisting their heads to direct attention to animals that are a great deal more exotic than dogs, horses or oxen.
What we see are elephants—African elephants—with huge ears, ridden by mahouts (two of whom are deep in conversation), and caparisoned in splendid hangings.
An agile youth has sprung up on the back of an elephant to refuel one of the the torches or adjust the height of its leaping flame.
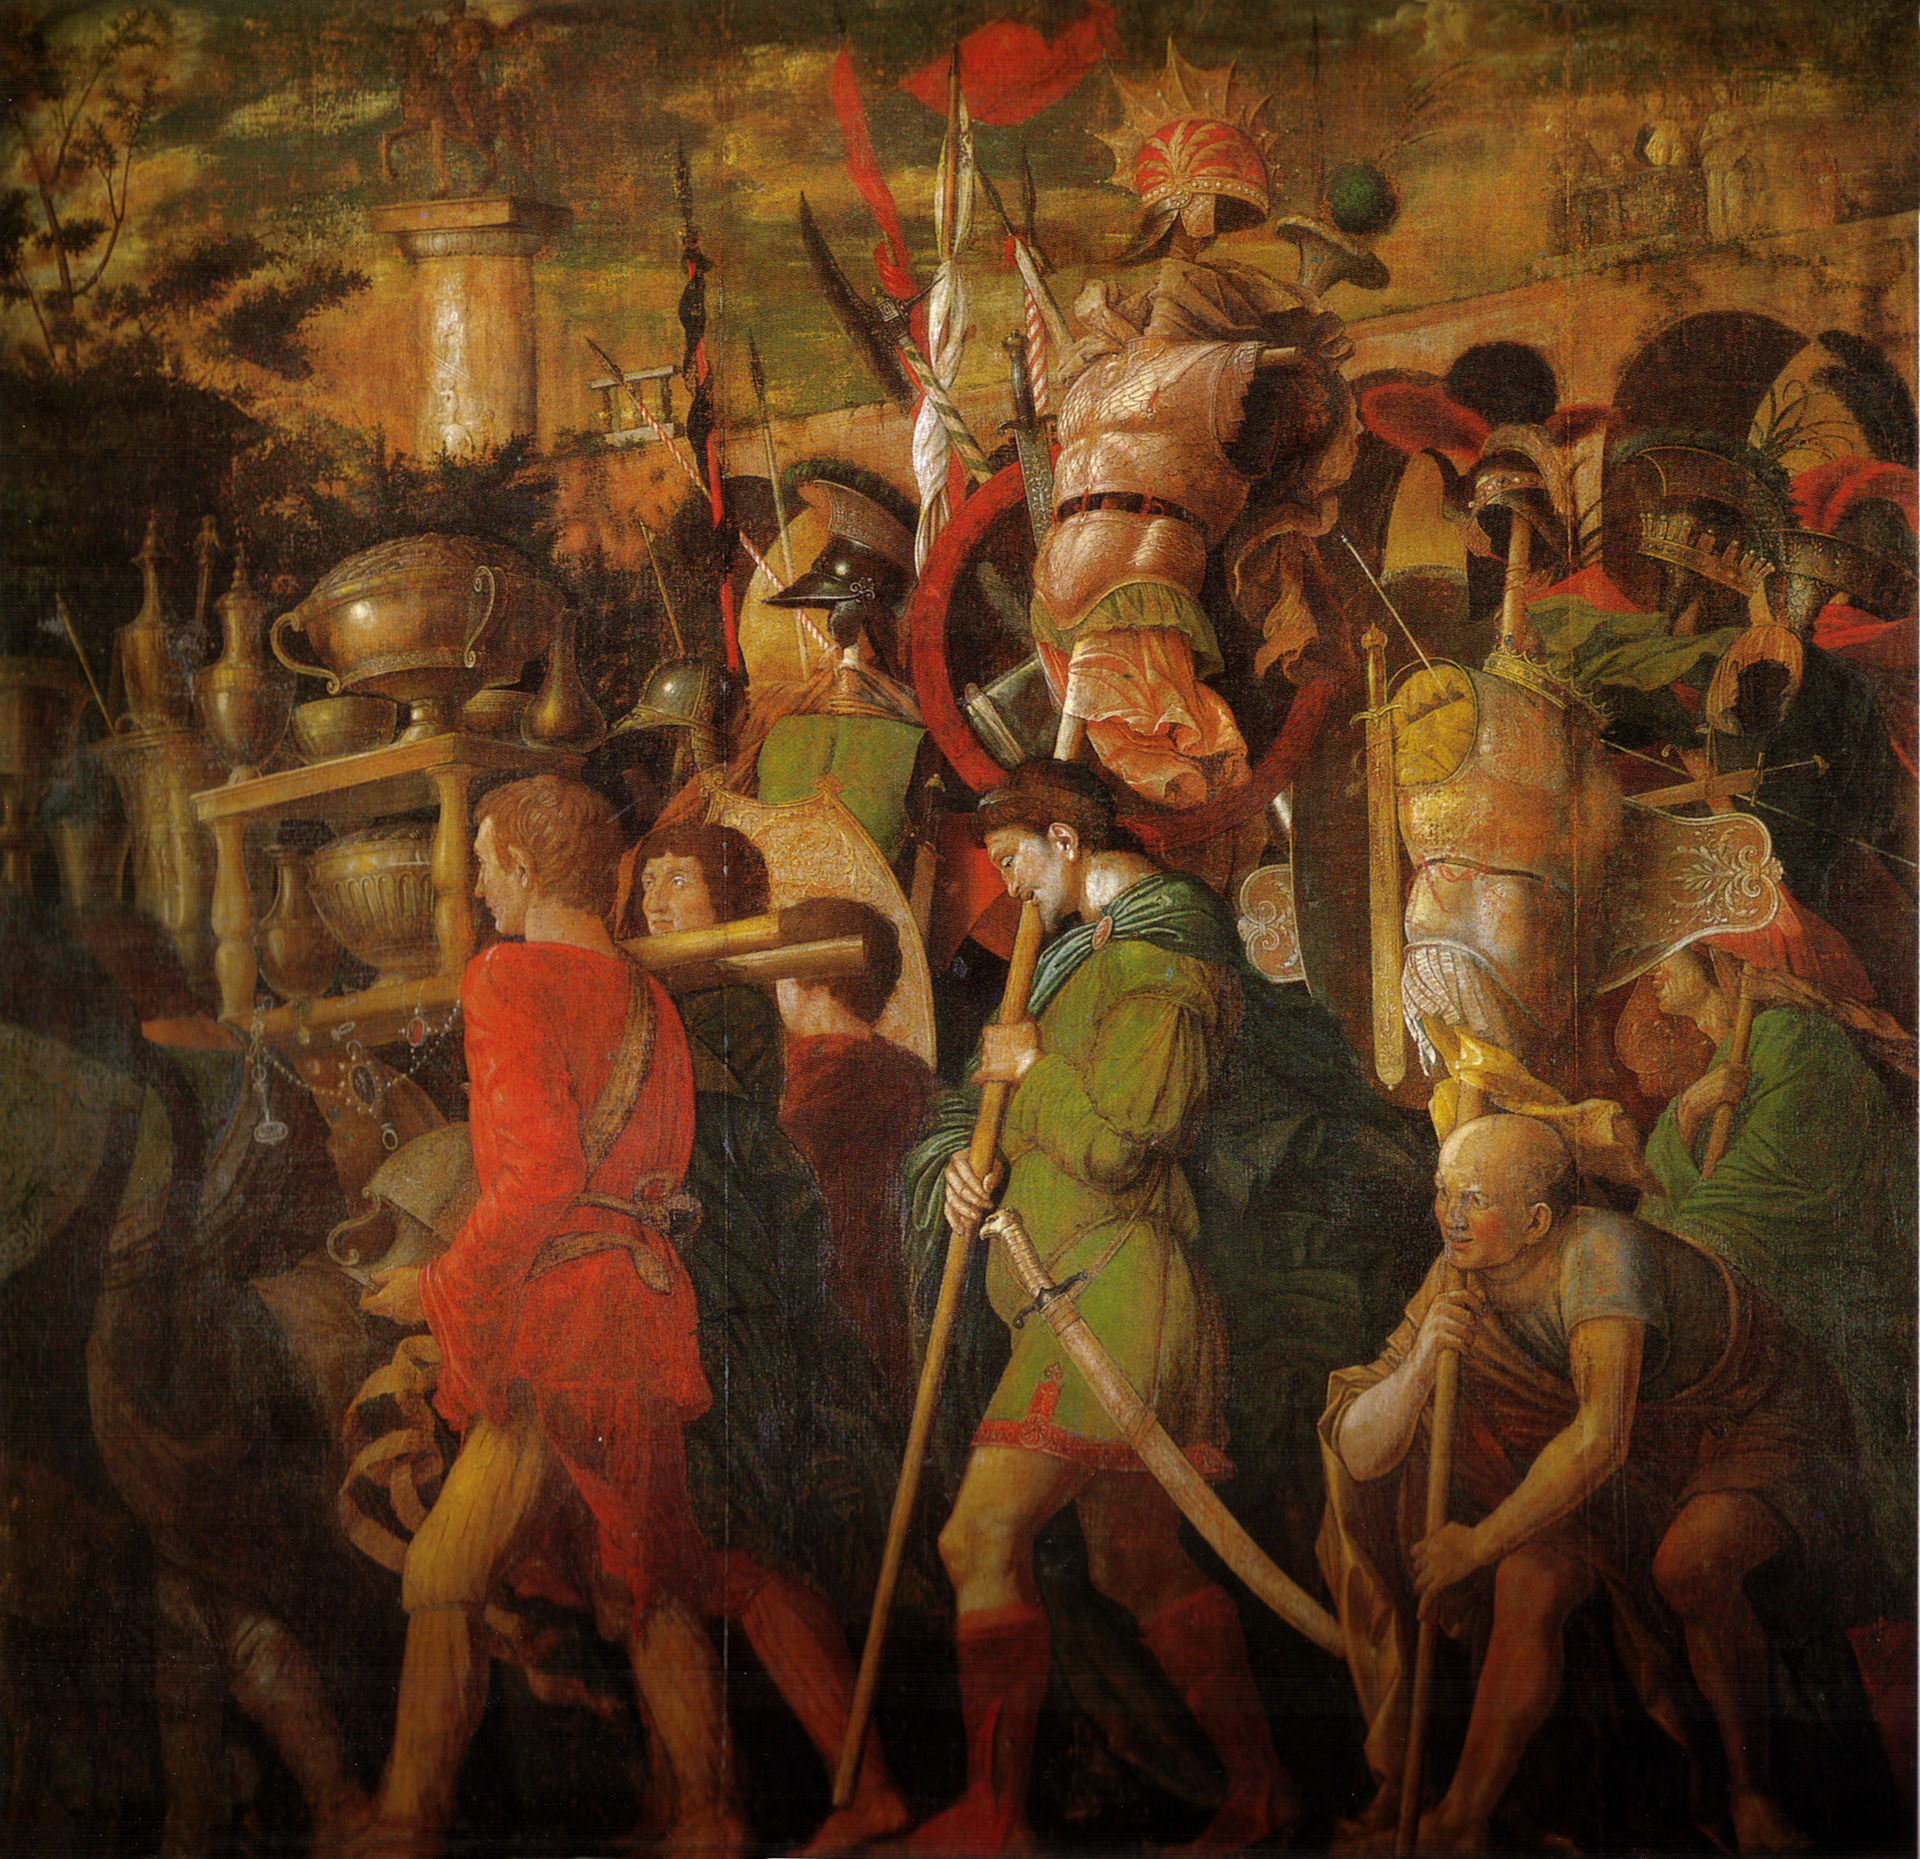
The sixth canvas maintains the illusion of ‘interrupted continuity’, as we are shown the rump of a retreating elephant, and more high ground to the left. However, the skyline is varied dramatically in favour of the straight line of a Roman aqueduct, from which tiny spectators are looking down on the procession—and down on us.
The aqueduct is not parallel to the picture plane, and Mantegna introduces yet more variety by making it seem as if the marching column has come through one of its arches towards us and is now turning a corner to march along on the road beside it.
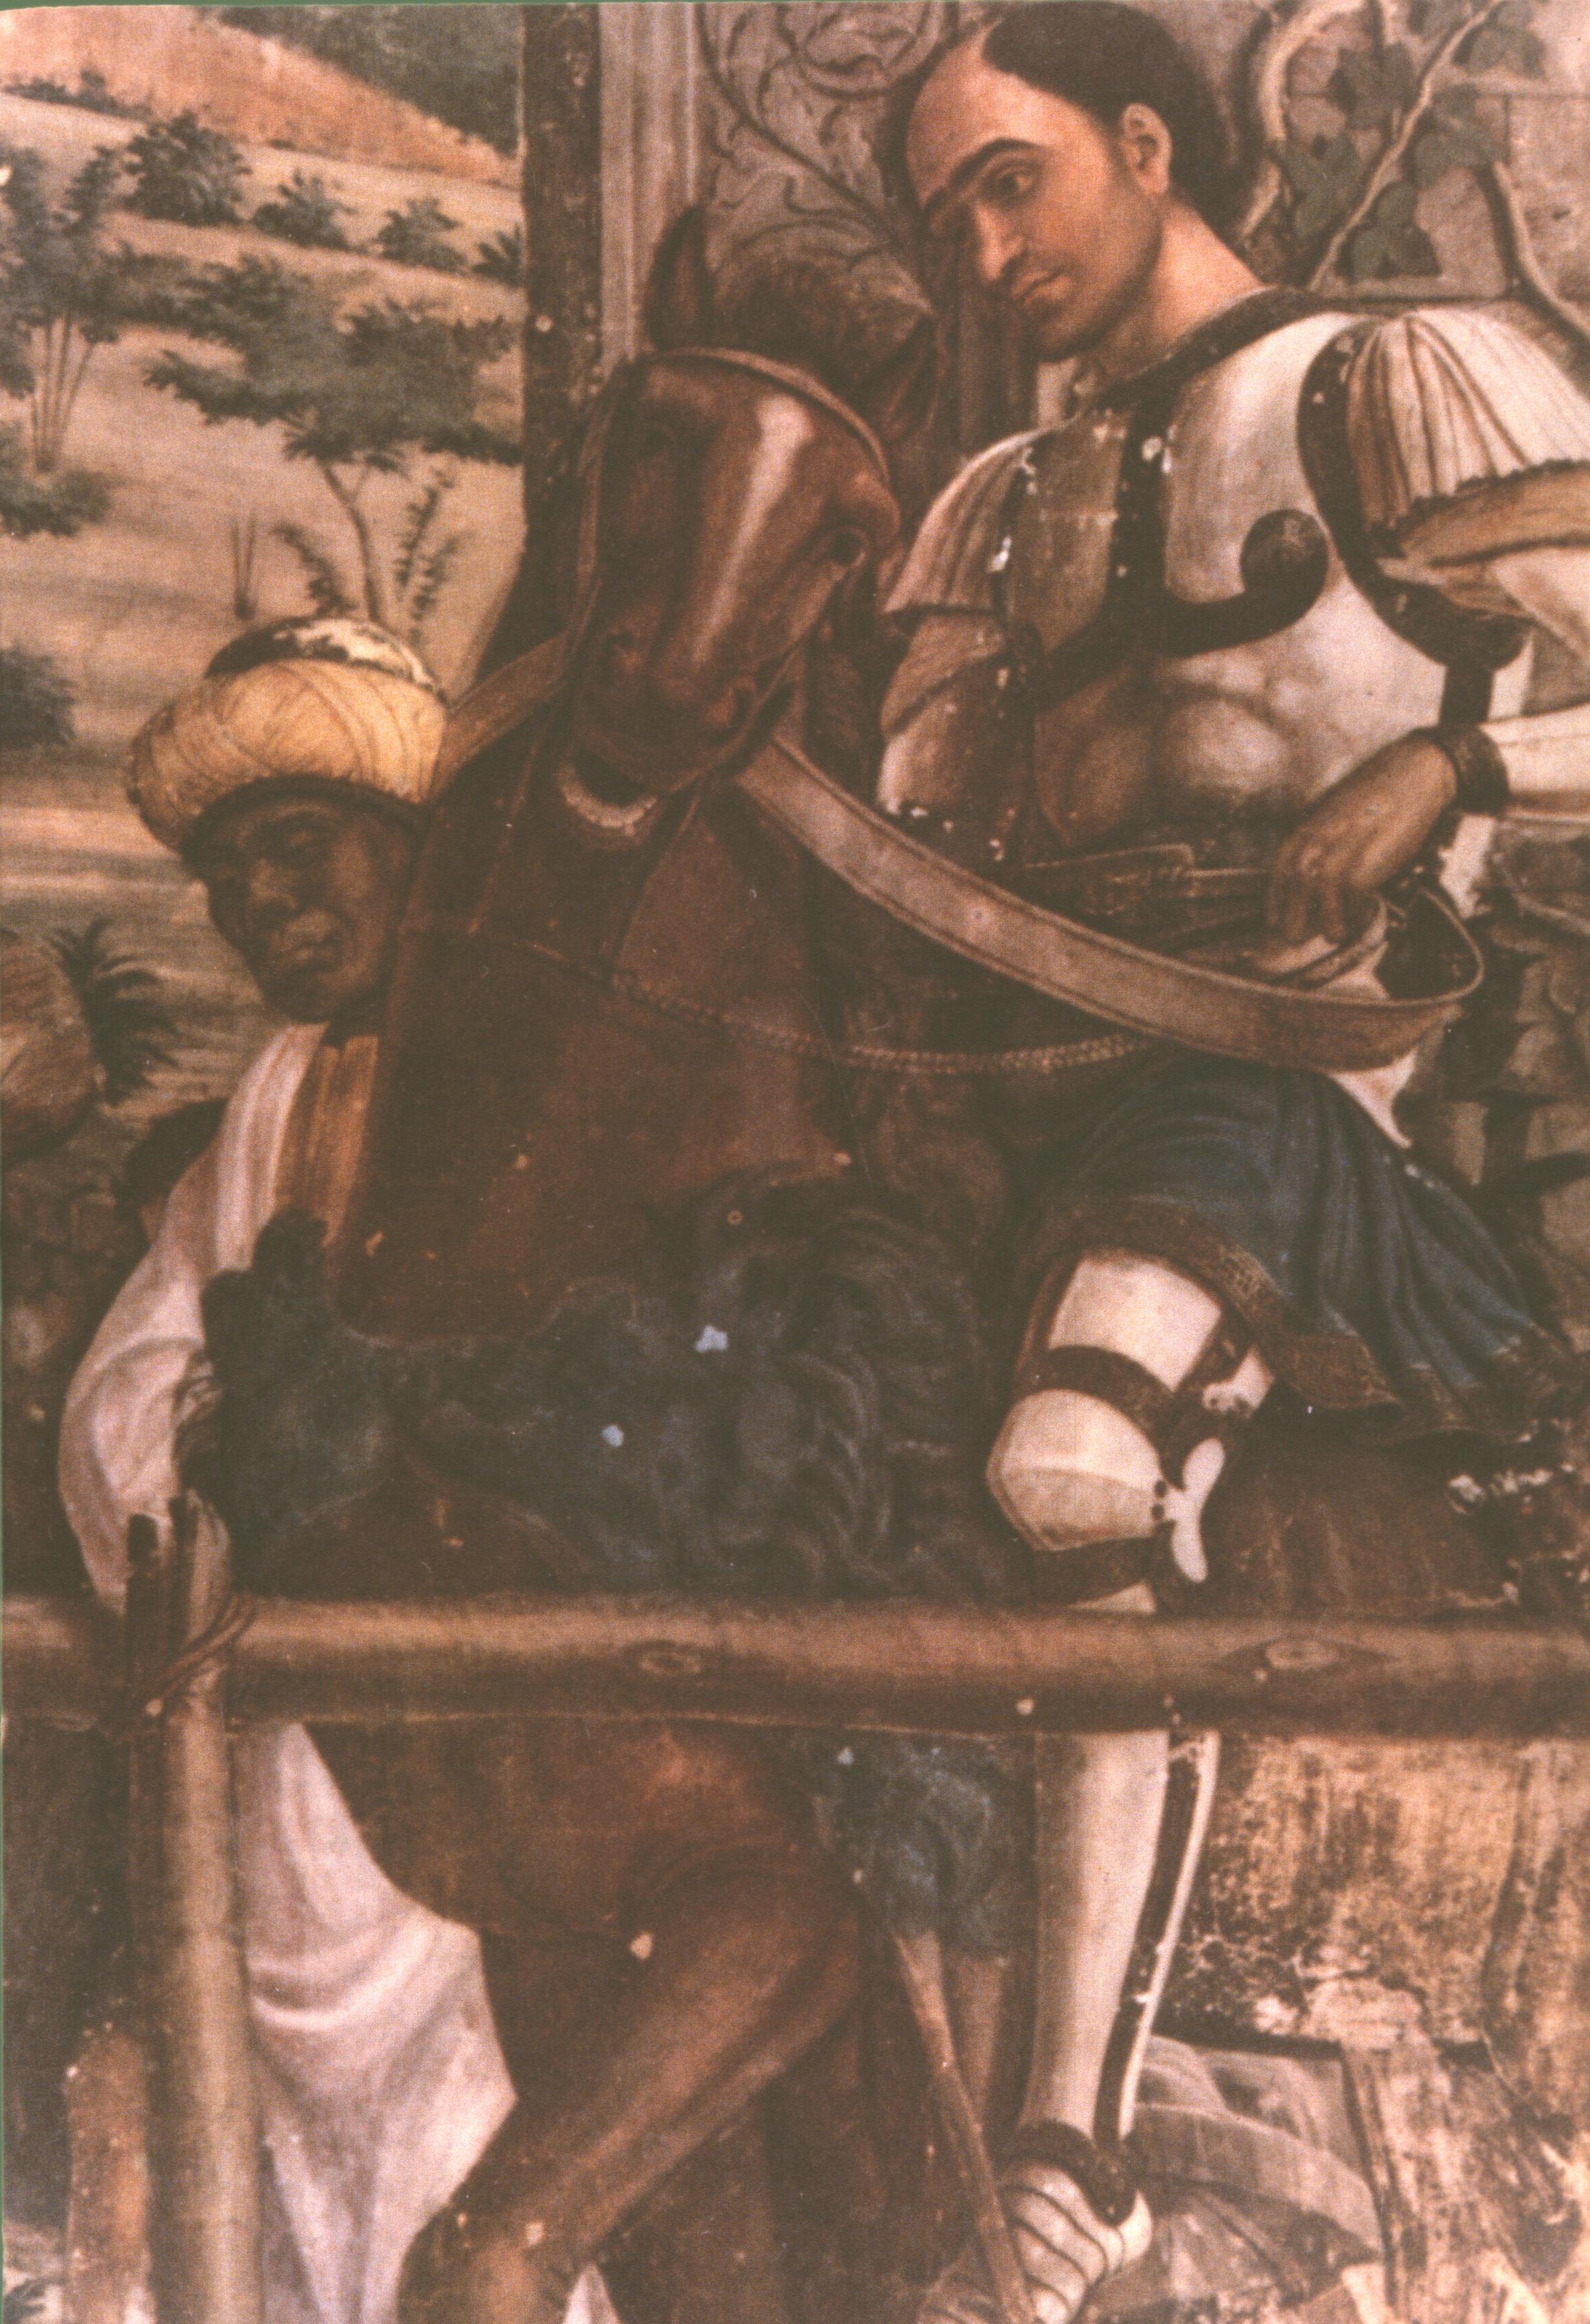
The three men in the foreground are well contrasted in their ages and their attitudes. The central figure, with noble features and bowed head, bearded, dressed in green, is particularly impressive. (It is plausible that he is a captured Gaulish general (Romans were beardless) who has been allowed to retain his long, curving sword (Romans used short, straight swords), but forced to carry his own resplendent corselet and helmet. Other captives with beards and bowed heads follow in the next canvas.)
Once again, though, some of the most memorable features in this section of the Triumph are to be found neither in the background nor in the foreground—not in the architecture or the human beings—but in the countless still-lifes, with their complex, multi coloured surfaces caught by yet another ray of the setting sun on the third litter, where we see vases, plate and jewels, and, most strikingly of all, complete suits of parade-ground armour—‘trophies’ in the original sense of the word—especially, the corselet and helmet carried by the figure in green.

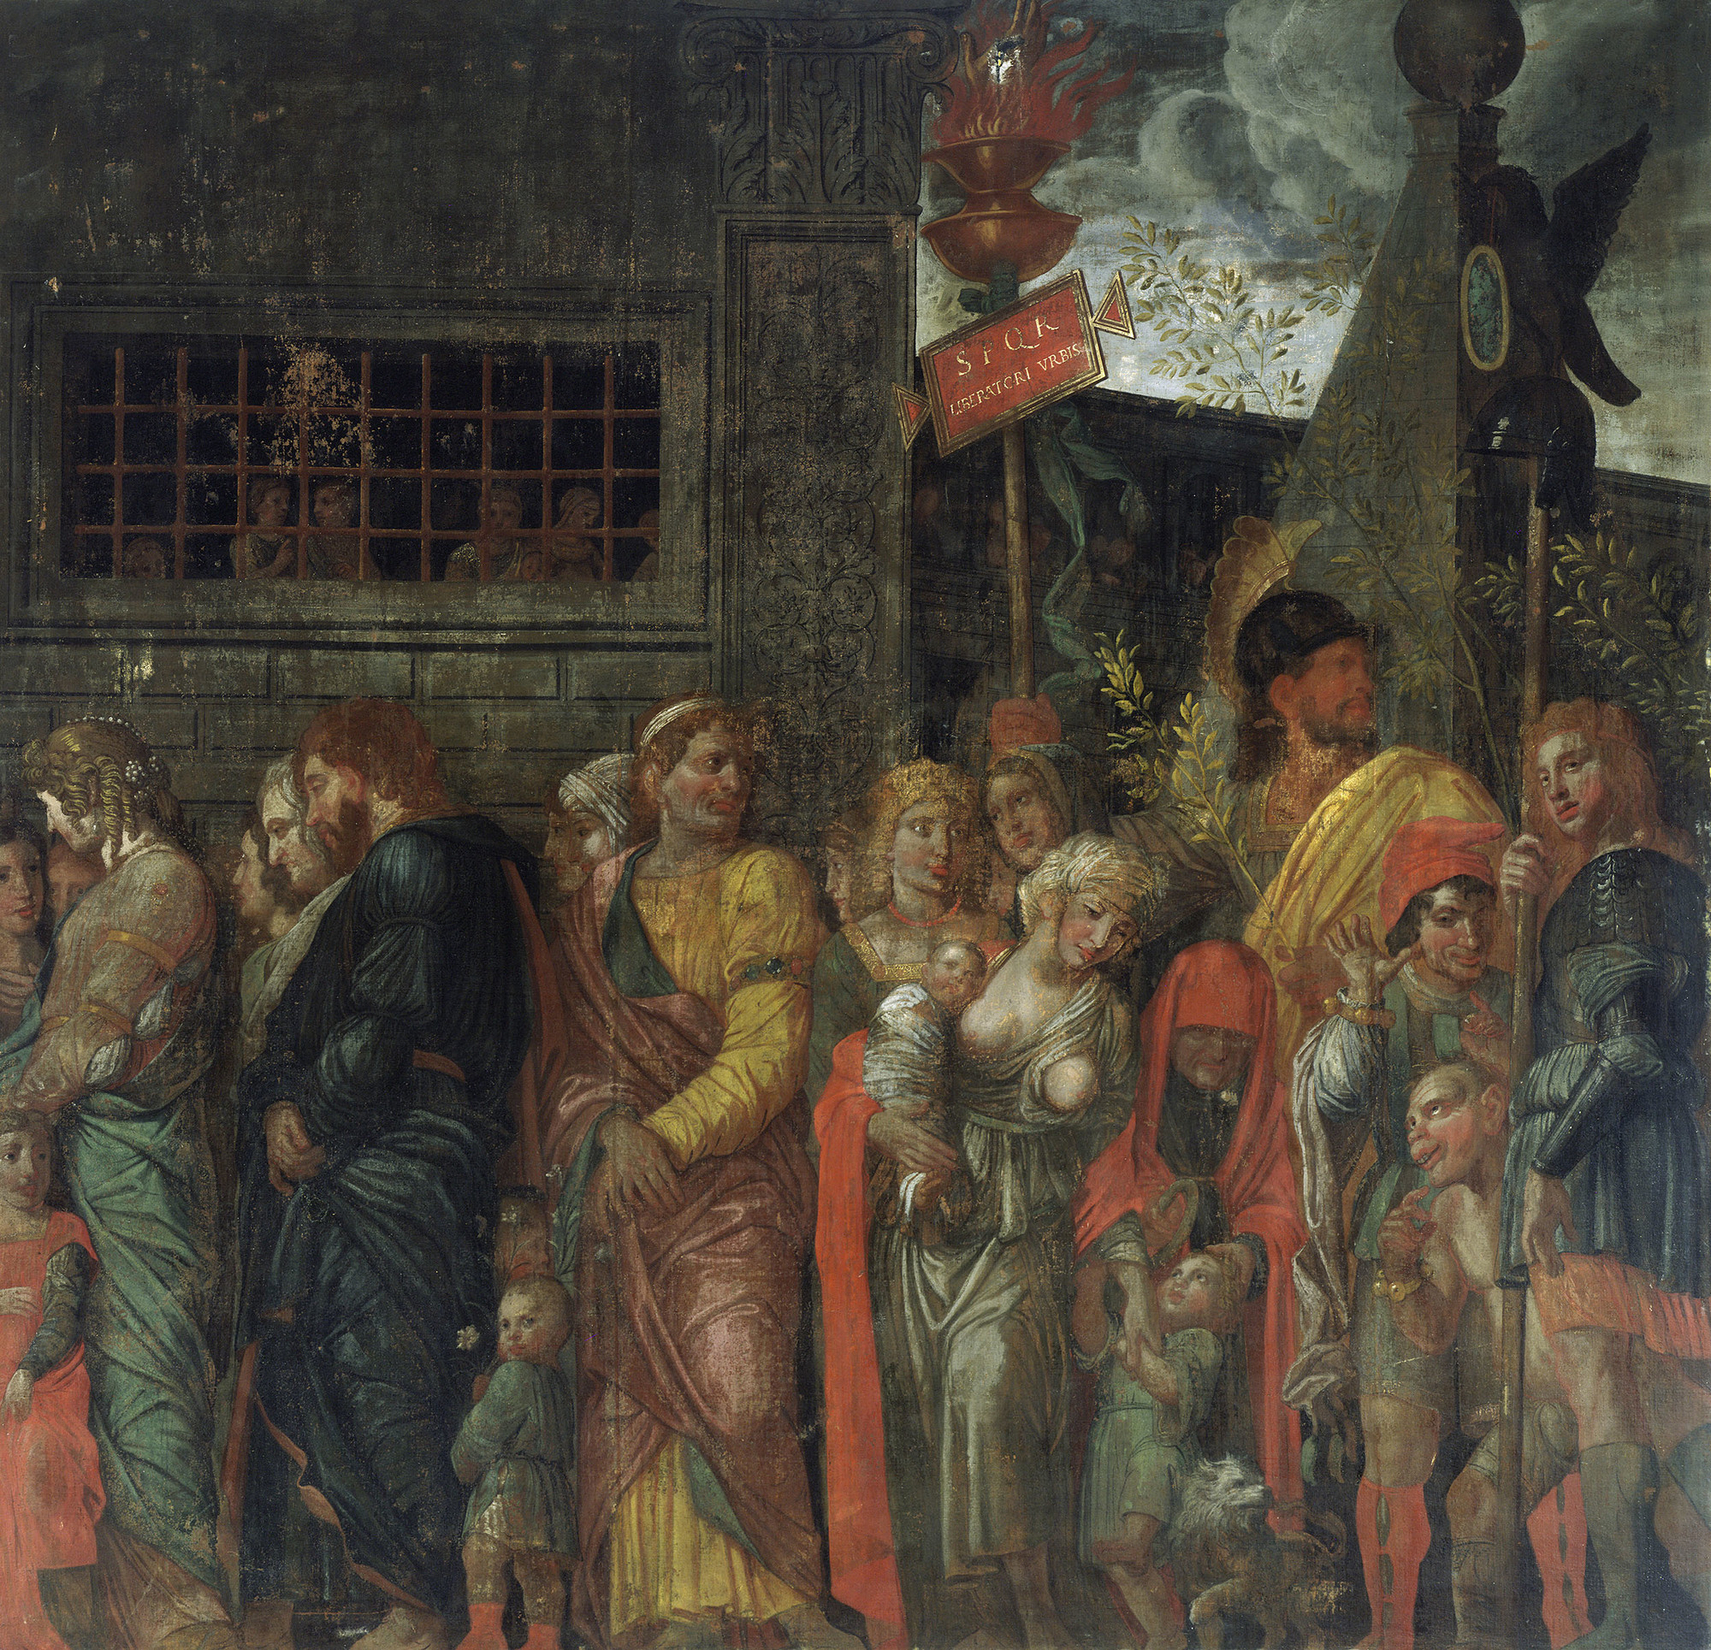
The next canvas shows the captured leaders and their families, and it was greatly admired by Giorgio Vasari. But it has suffered so badly over the centuries that it has been taken out of the procession at Hampton Court, and I will do no more than include this photograph before moving on to the next ‘float’ in the procession.
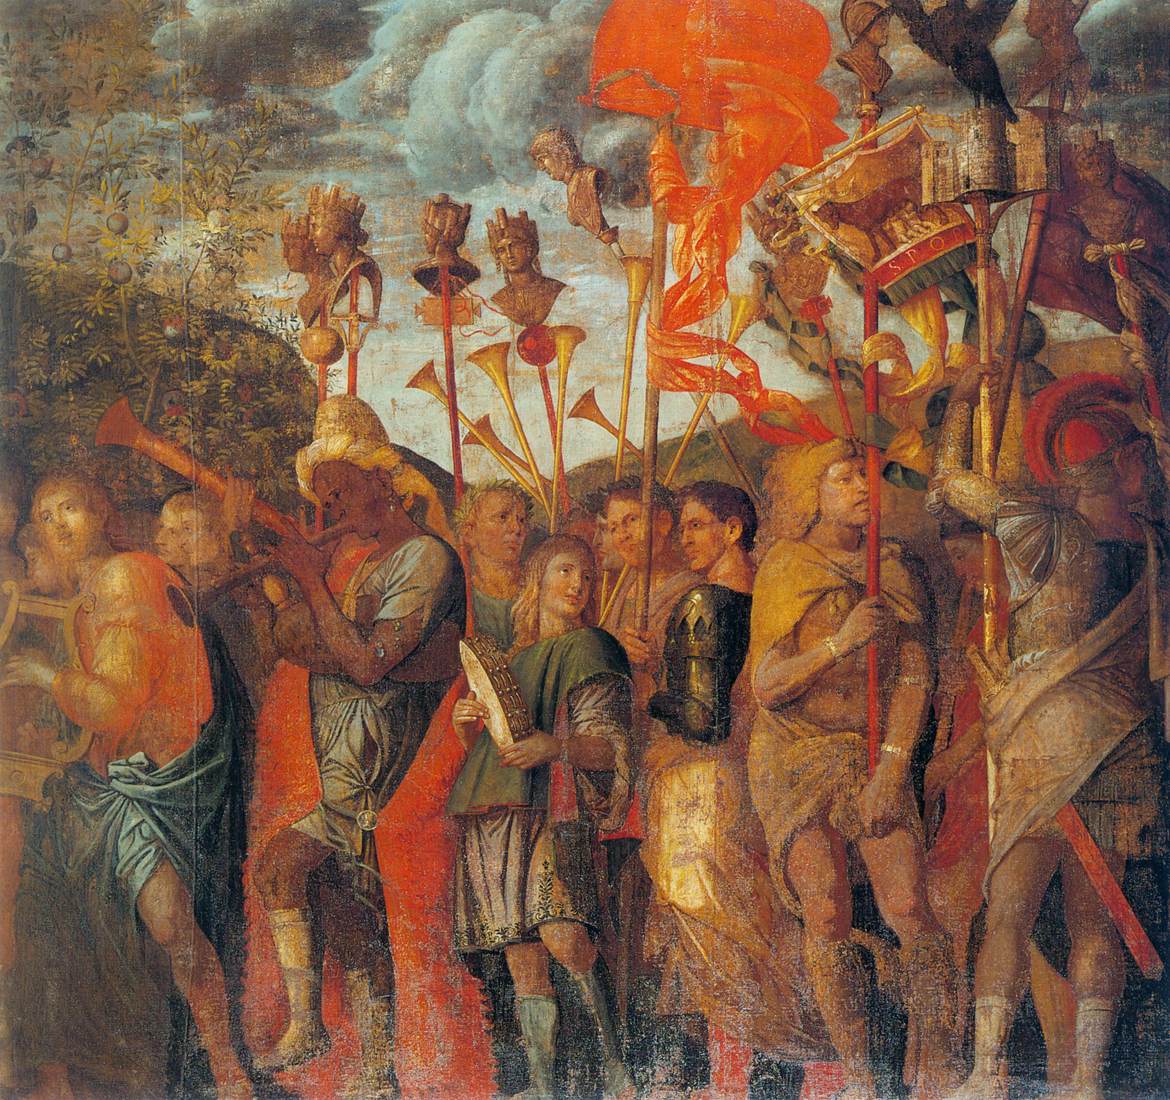
The scene in the penultimate canvas (weaker in composition and heavily overpainted) is as an ‘intruder’, so to speak, from Caesar’s second and almost contemporary Triumph, which was awarded for his three-day victory in Asia Minor. (This was the ‘Blitzkrieg’ of which he gave the famous description: ‘I came, I saw, I conquered’).
This explains why we see no fewer than four heads of the goddess Cybele; why the musicians are playing a lyre and a timbrel; and, why, behind the dancing oriental figure, who is playing a fife, someone else is playing a loud and raucous shawm.
Once again Mantegna is concerned with the link to the following and final canvas. This third group of musicians herald the coming of the triumphal chariot itself, whose rumbling wheels are clearly catching the attention of the two soldiers, who are supporting more banners, standards, and images of captured cities.
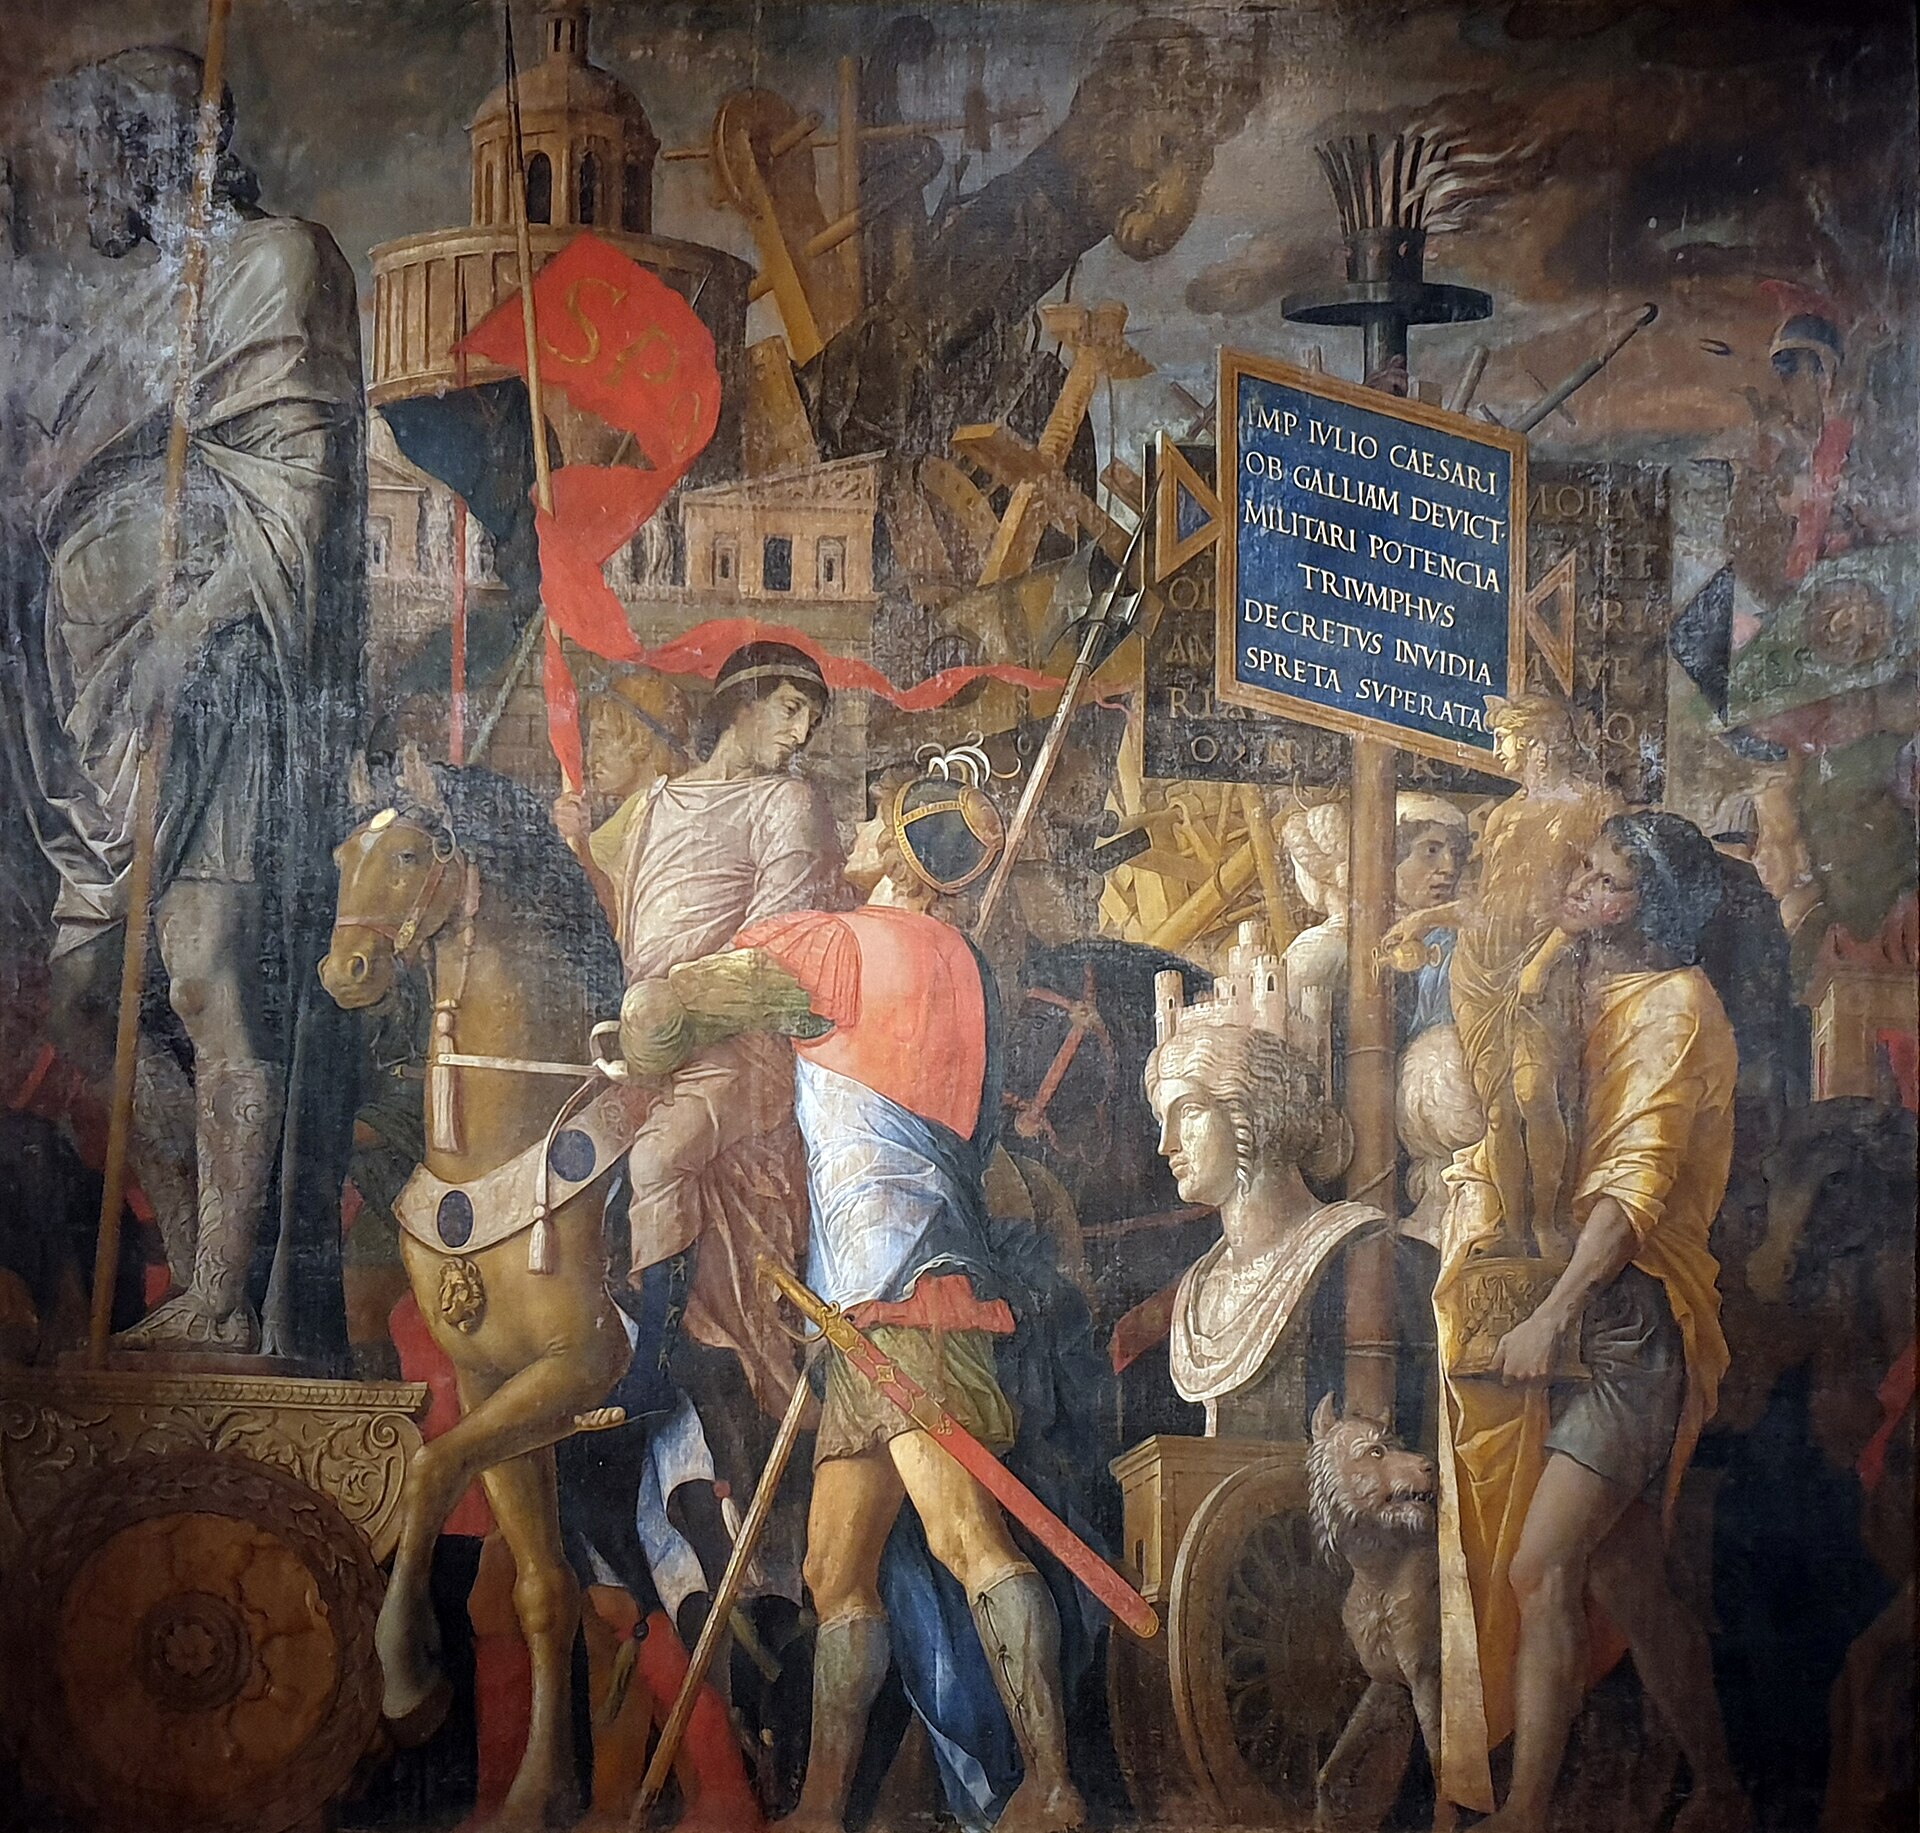
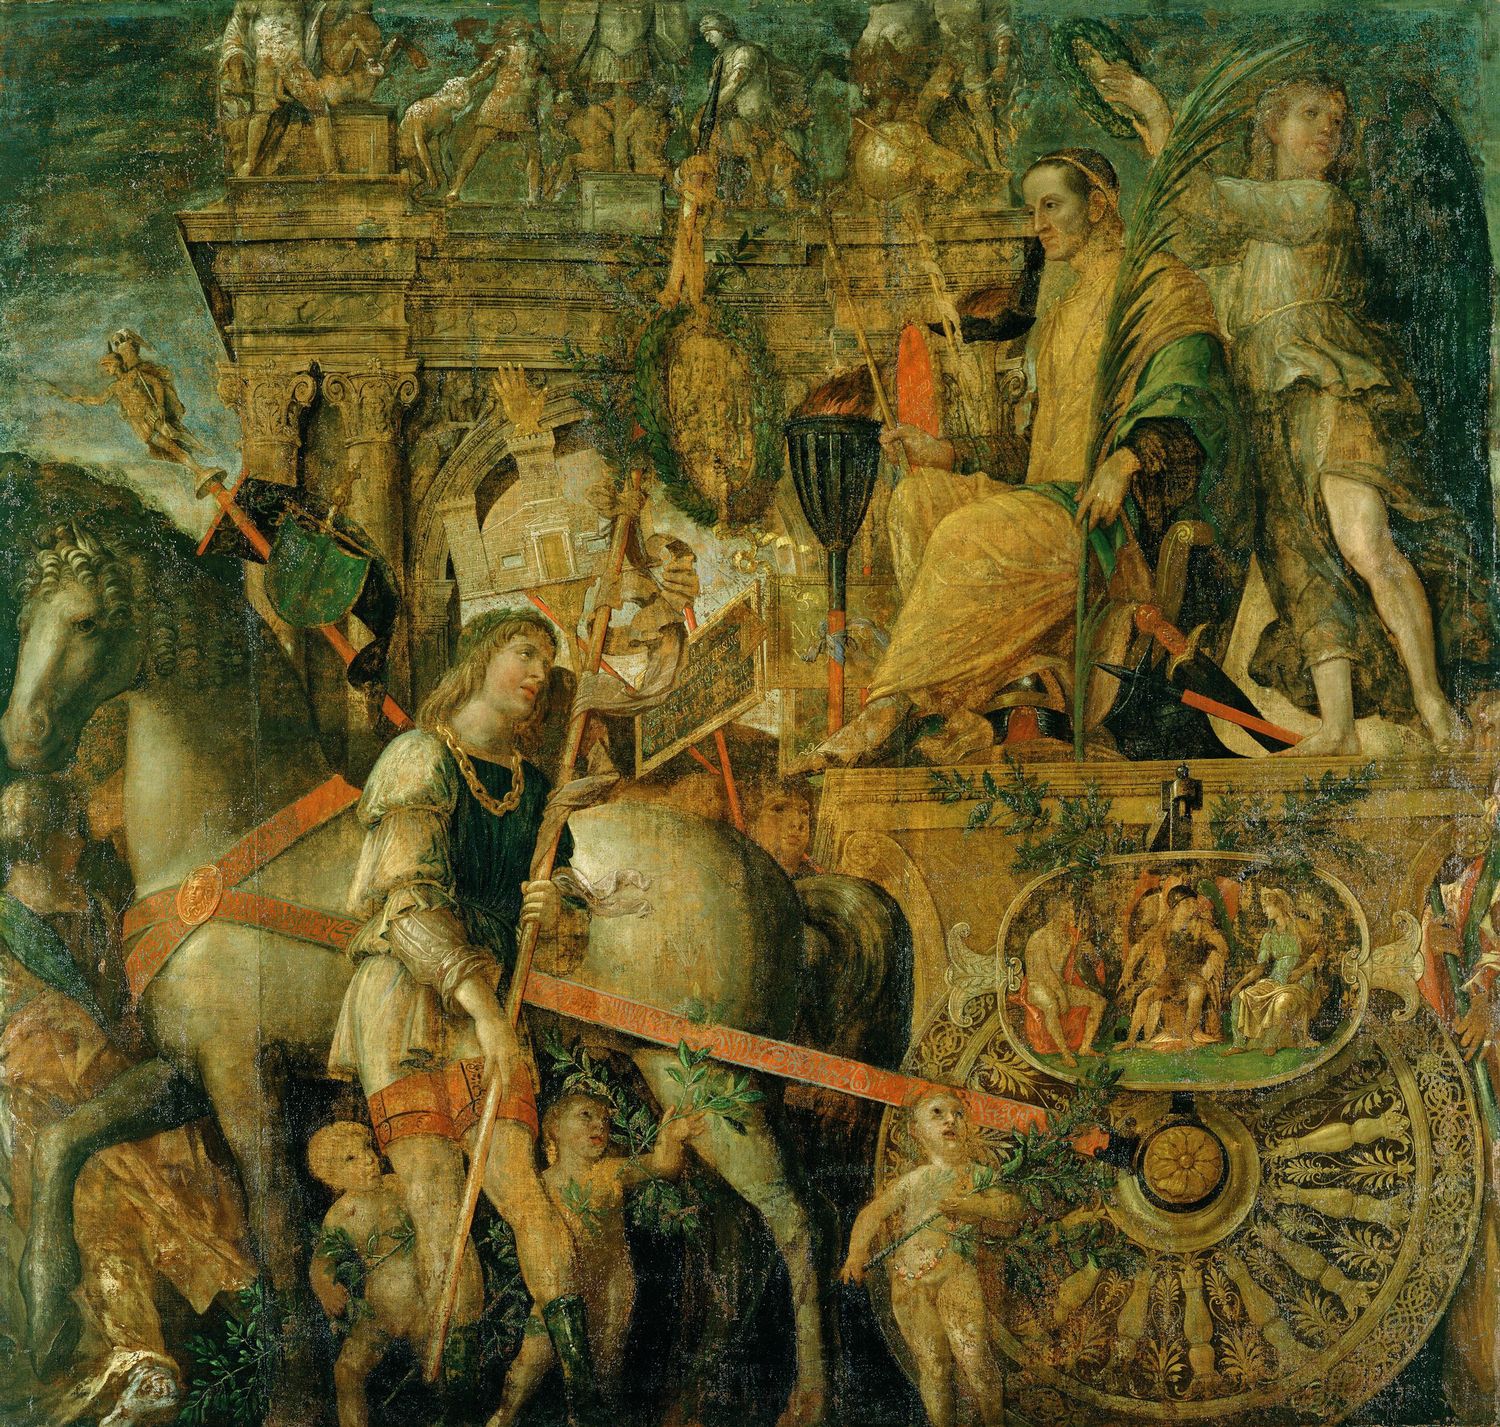
The direction of their gaze is reinforced within the final canvas by a handsome youth who forces our eyes upwards—past the splendid horse and the extraordinary spokes on the wheel of the lofty chariot—towards Julius Caesar.
(The tilted placard, held over the horse’s rump, bears the famous words: Veni, vidi, vici, confirming the ‘conflation’ of material properly belonging to the second Triumph.)
Caesar is holding a sceptre and a palm branch, while the imperial crown is being held over his balding head by an attendant; and it will not surprise you that Mantegna reserved for this last scene the architectural structure which was most closely identified with Victory and with Rome—the ‘Arch of Triumph’, which had haunted his imagination since he started painting in his native Padua forty years earlier.
QED
Are you puzzled by this page?
If you followed the advice to postpone the study of Mantegna’s scenes from the Life of St James (1450s) until after you had enjoyed the Camera Picta (1470s) and the Triumph of Caesar (1490s), you now have a chance to study the earliest of Mantegna’s narrative cycles in the same kind of detail.
Read on.
(It should make perfect sense as an Appendix. Indeed, in some ways it will be easier to follow the commentaries if you are already familiar with the later evolution of Mantegna’s art.)
Mantegna was very receptive to the new influences from Florence, and to Donatello in particular.
He was also very precocious. He was still only seventeen when he received a commission to decorate a chapel in a huge church in Padua, that of the Eremitani, just north of the civic centre, only a few hundred yards from the Scrovegni Chapel.
This commission came as a result of provisions in the will of a local nobleman called Antonio Ovetari, who died in 1448; and the chapel is always known as the Ovetari Chapel. You can still visit the church and the chapel after you have been to see Giotto’s work in the Cappella degli Scrovegni; but, alas, they were severely damaged in a bombing raid in 1944, and the only parts of Mantegna’s frescos to survive did so because they had been in such poor condition that they had already been detached and removed.
The surviving areas lie at the bottom of the right-hand wall (one detail of which is shown here), but the frescos I am going to show you were all on the left-hand wall, and we now know them only through photographs.
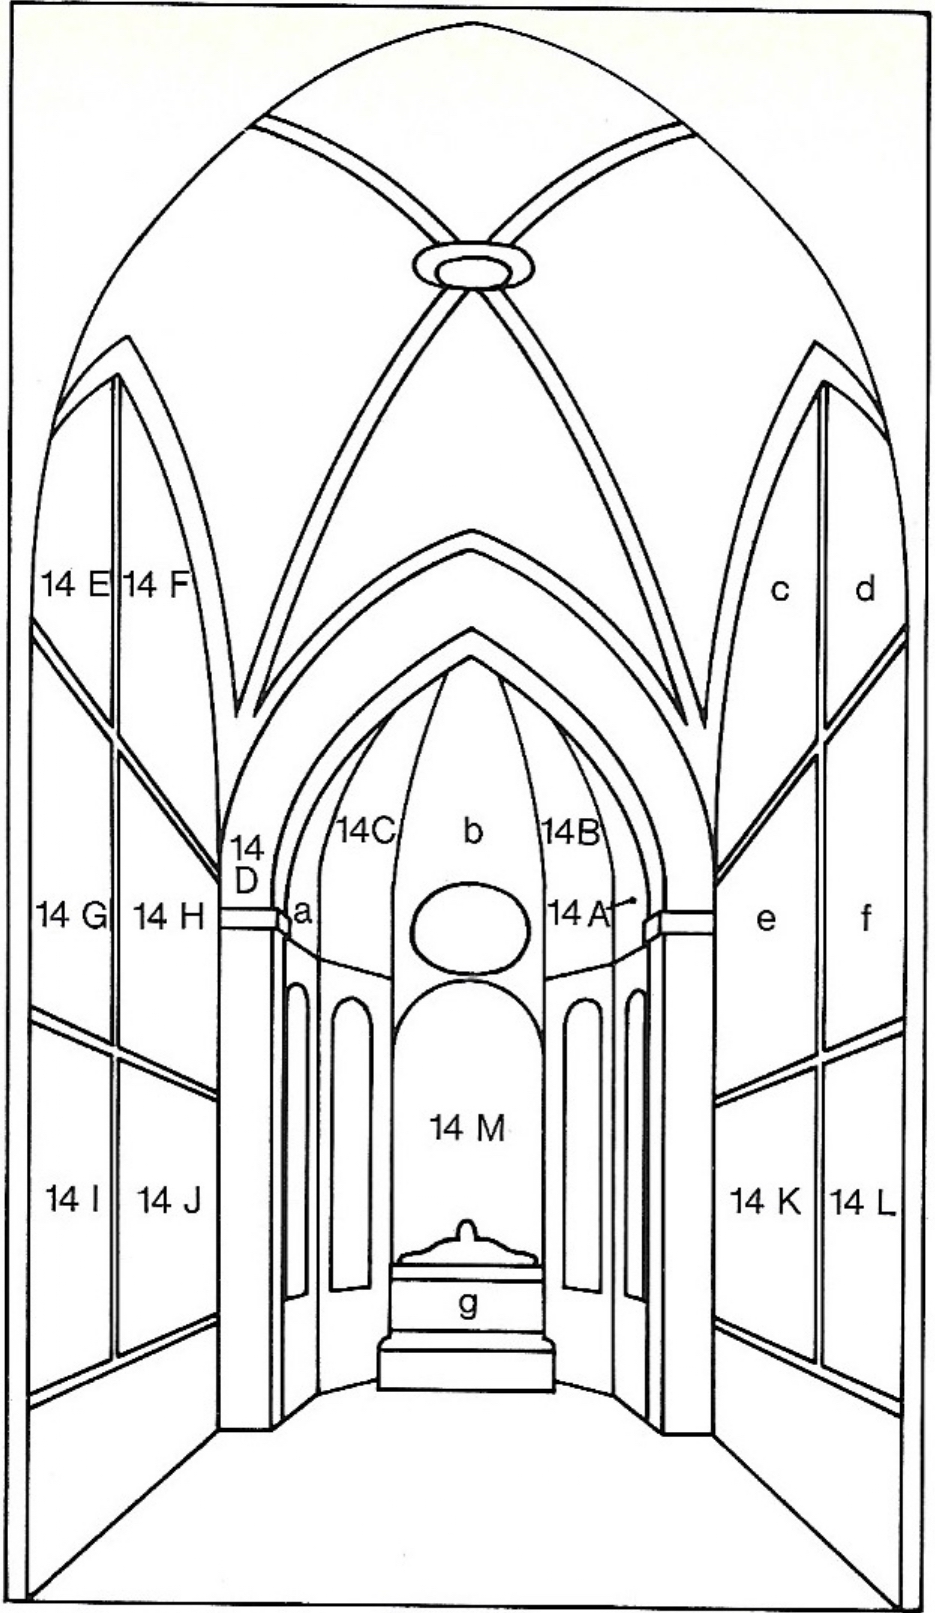
The chapel is a typical Gothic construction (as you can see in this diagram), measuring about thirty-six feet deep by twenty-eight feet wide.
The frescos were laid out in the typical fourteenth-century way, with an Assumption of the Virgin behind the altar, Apostles and Fathers in the vaults above it, and scenes from the lives of the two saints to whom the chapel was dedicated laid out on the side walls, to be read from left to right and from top to bottom.
The saints in question both have the same feast day—July 25th—and they are, on the right wall, St Christopher, and on the left wall, St James—James the Greater.
These are the frescos we are going to examine as best we may.
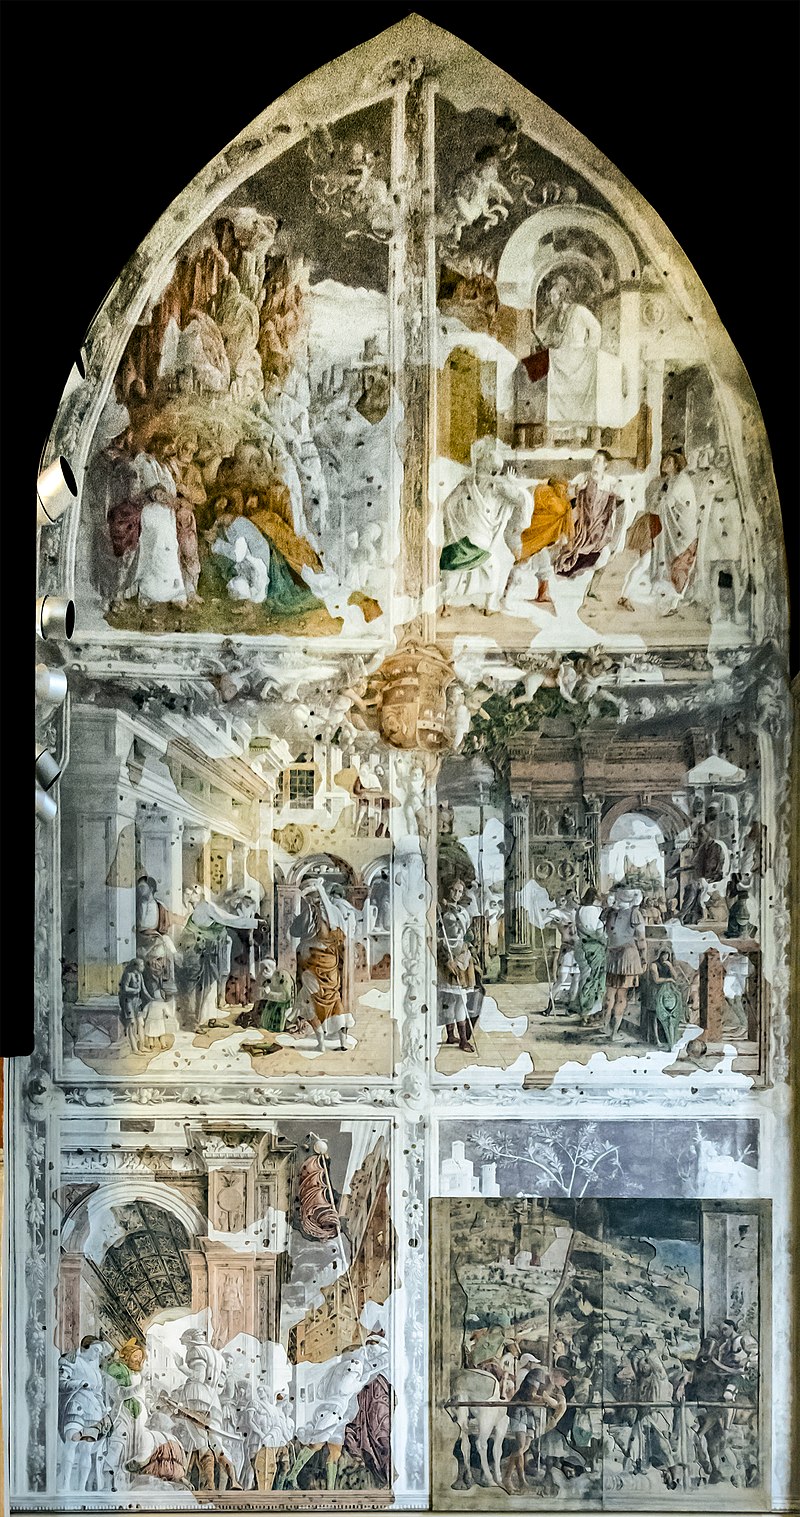
Work on the commission dragged on for six years from 1449 to 1455, with the result that there is a very marked evolution in Mantegna’s style from the upper pair, begun when he was eighteen, to the lower pair, done when he was about twenty-four. But before we trace that development, let us take in two features of the general layout that are going to be typical of Mantegna throughout his long career.
The framing and dividing strips are painted to resemble pilasters or cornices, decorated with classical motifs; and they act like the proscenium arch of a stage, apparently cutting off buildings and figures in order to suggest further, unseen spaces to the left and the right.
There is also a good deal of illusionistic painting of objects or figures that seem to exist on the spectators’ side of the wall: here, as so often, we have festoons of leaves and fruit, a family coat-of-arms, and cherubs floating or fluttering—all of them out in our space.
I will not say more than a few words about the first pair of scenes, since they are relatively immature and the photographs are in black and white.
On the left, you see the only scene taken from the Bible—the ‘Calling’ of the apostle, as narrated in the gospel of St Matthew (4. 18-22).
Jesus is flanked by Peter and Andrew (whom he has already called from their boats to make them ‘fishers of men’), while the sons of Zebedee (John, and our hero, James) are kneeling before him.
On the right, meanwhile, we see an illustration of the first major episode in the version of St James’s life given in The Golden Legend for July 25th. He was preaching in Judaea, which was then a Roman province (as the architecture reminds us), when he was disturbed by demons (top left), to the evident consternation of his audience. The demons had been sent by a sorcerer called Hermogenes, whose disciple (or sorcerer’s apprentice) James has already converted to Christianity; and the demons have orders to bring back the saint and the ex-disciple bound in chains.
James, however, sends the devils packing—with orders that they should bring Hermogenes to him, bound in chains.
There is quite a lot more I would like to say about this picture, but let us press on with the story of Hermogenes, moving into the middle register, and into colour—these photographs having been taken just a few days before the chapel was bombed.
In this scene, Hermogenes has already been set free from the demons’ chains by his ex-apprentice (who is, possibly, the young man standing behind the saint).
Having forsworn his books of magic (they are lying on the ground, as you can see in the detail), he asks to be ‘received as a penitent’.
Mantegna shows James in the act of baptising him, adopting the position in which, in Christian art, John the Baptist baptised Jesus.
This superbly confident fresco was painted two years after the first pair, and, as you can see, Mantegna is now applying the new methods of strict geometrical perspective formulated by Alberti fifteen years earlier, using the converging orthogonals and the diminishing intervals of the arches and paving stones to construct a convincing ‘box set’ for a ‘theatre’, and keeping his ‘horizon’ at the comfortable height recommended by Alberti (which coincides with the heads of the standing figures).
But notice that he places the vanishing point to the right, outside the picture, inside the frame, and that he uses the pilasters of the frame (which you must mentally supply as you look at the illustration) to ‘cut’ the composition, and so to suggest that the street extends to the left and the right—a feeling which is helped by making one figure look off-stage into that imaginary space.
The other figures (a turbaned oriental, the two men with their backs to us, and two youths on the balcony) are intended to direct our eyes to the central scene, although it has to be admitted that the two foreground figures are perhaps a little distracting, since we empathise with the bare-footed, bare-legged boy clutching a gourd (the colours and lines of which are echoed in his doublet), while he gently restrains his toddler-sibling, in his or her tight fitting bonnet and cummerbund (I love this detail).
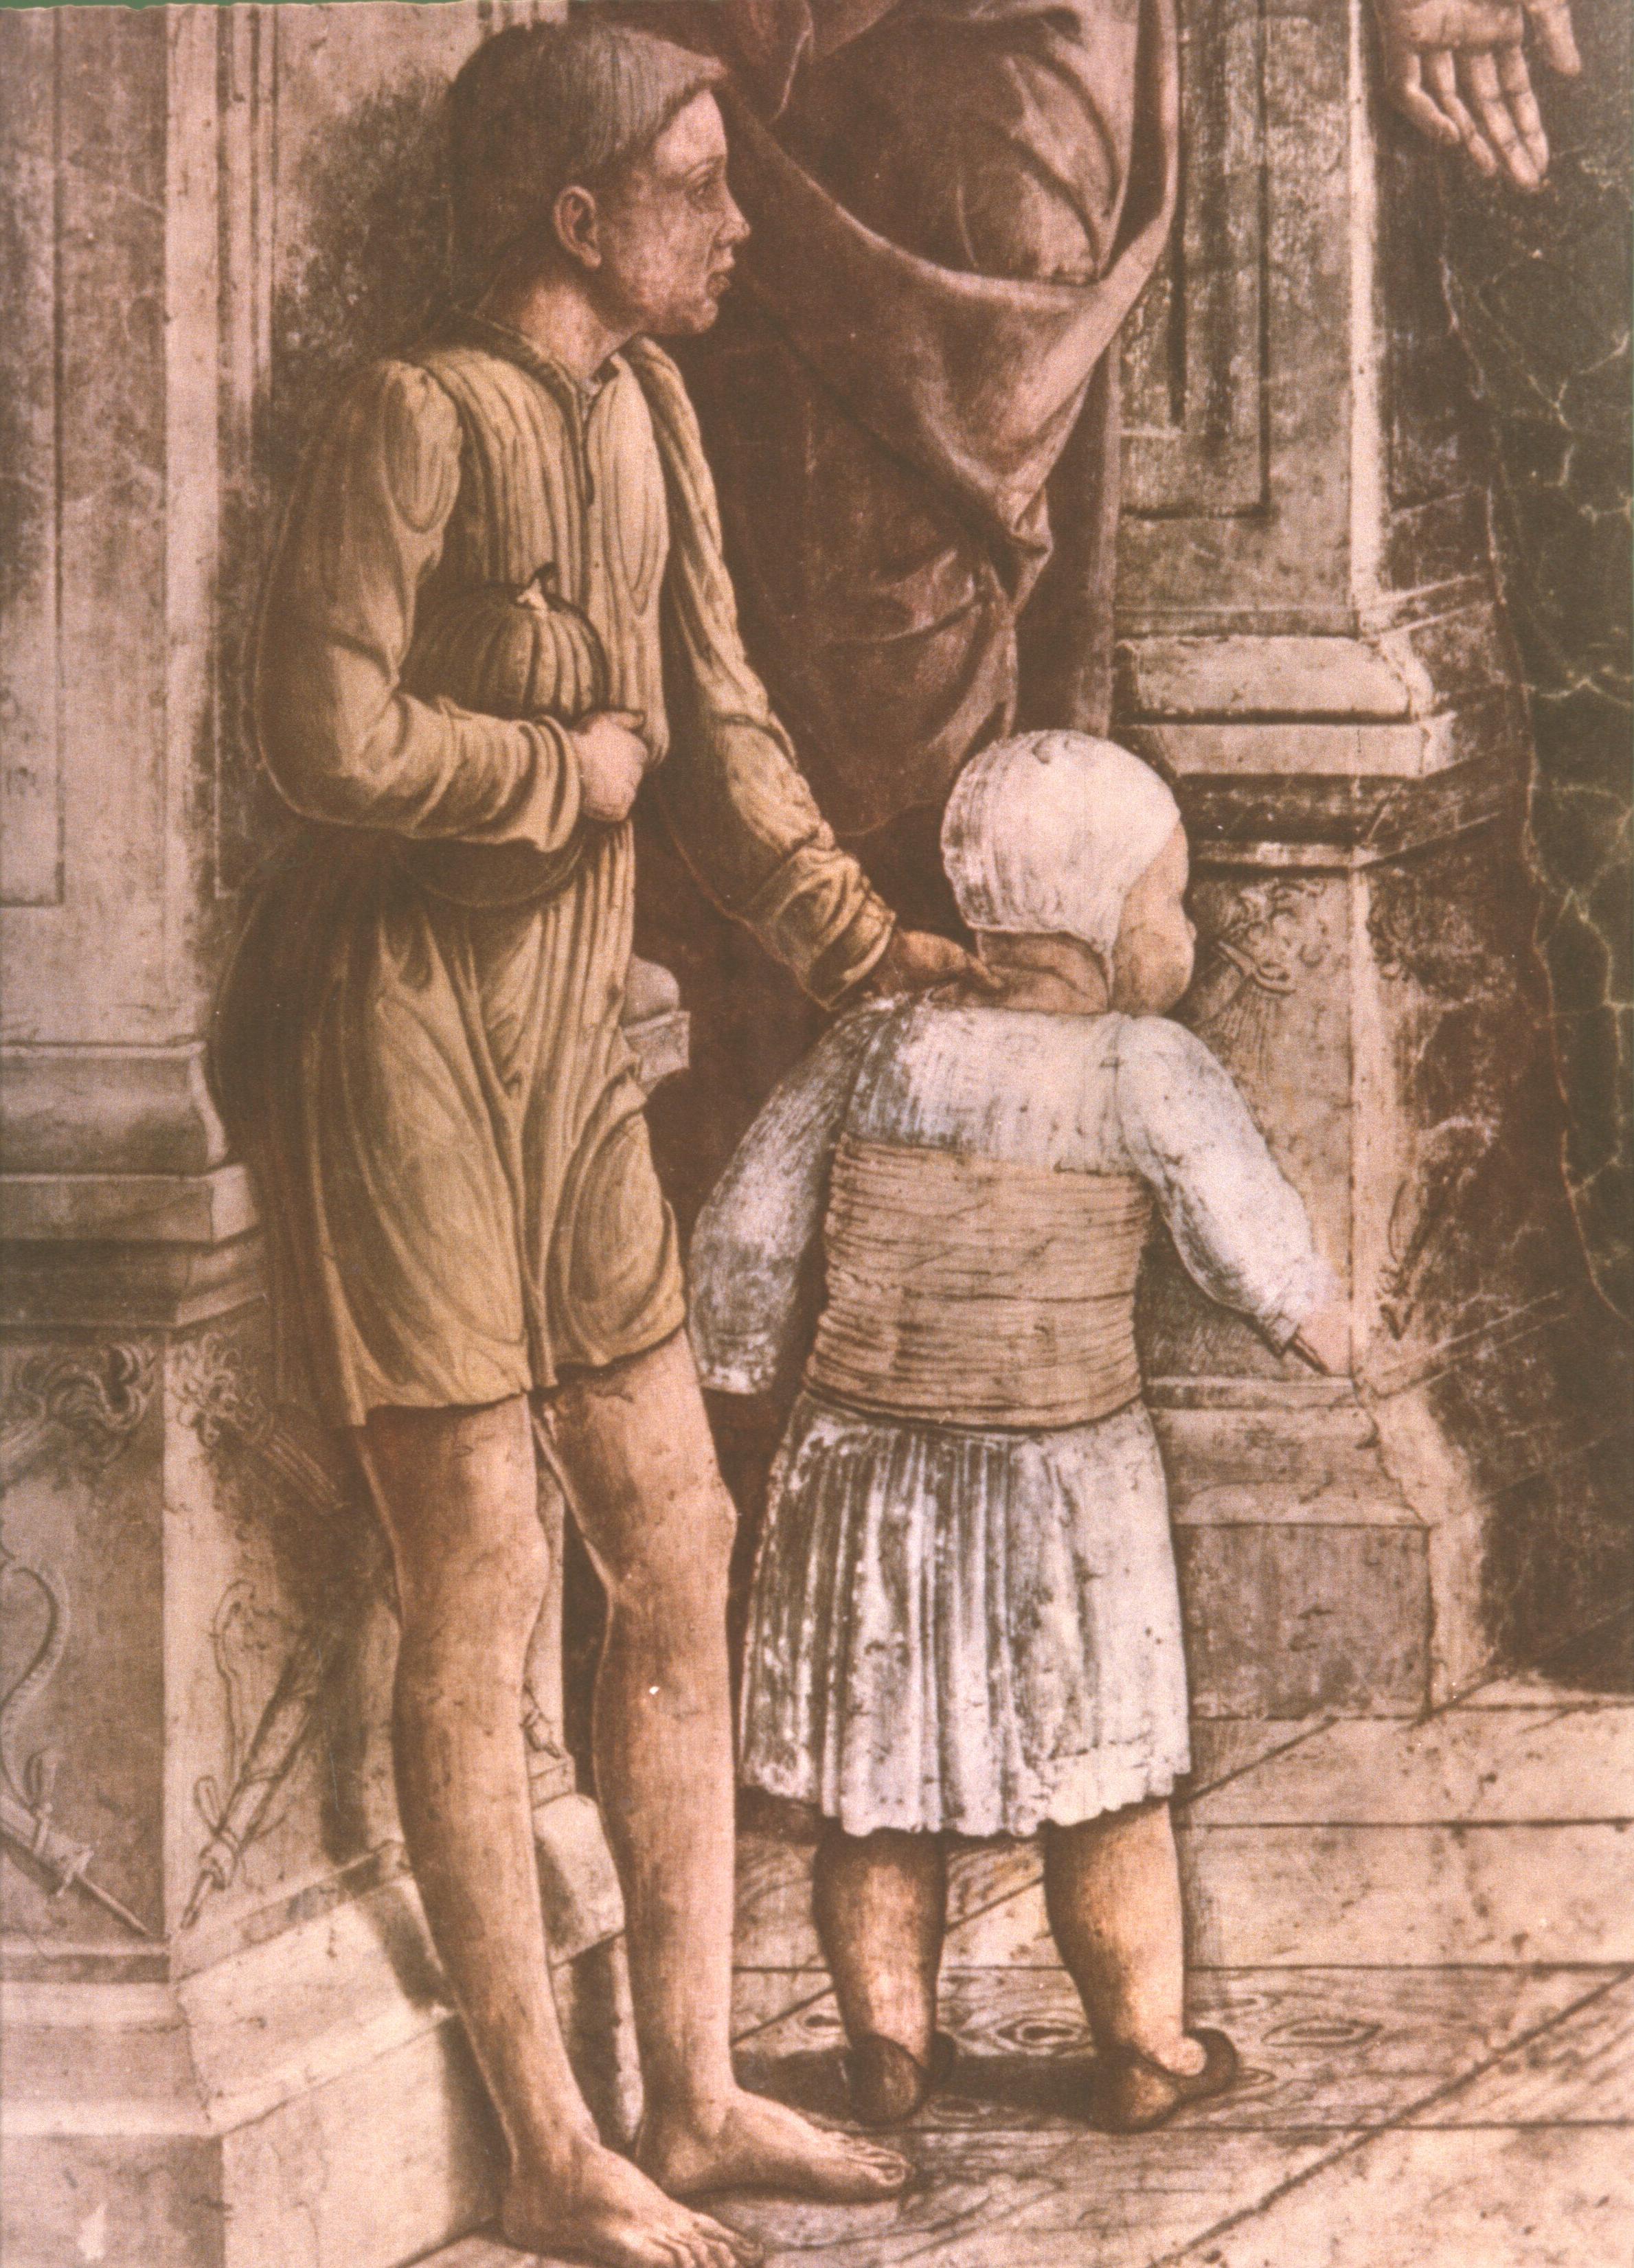
The scene immediately to the right has the same paving stones, converging on the same vanishing point located in the central pilaster; and the scene is lit in the same way (look at the shadows), with the source of the imagined light made to coincide with that of the real light in the chapel, coming from the windows near to the altar to the right.
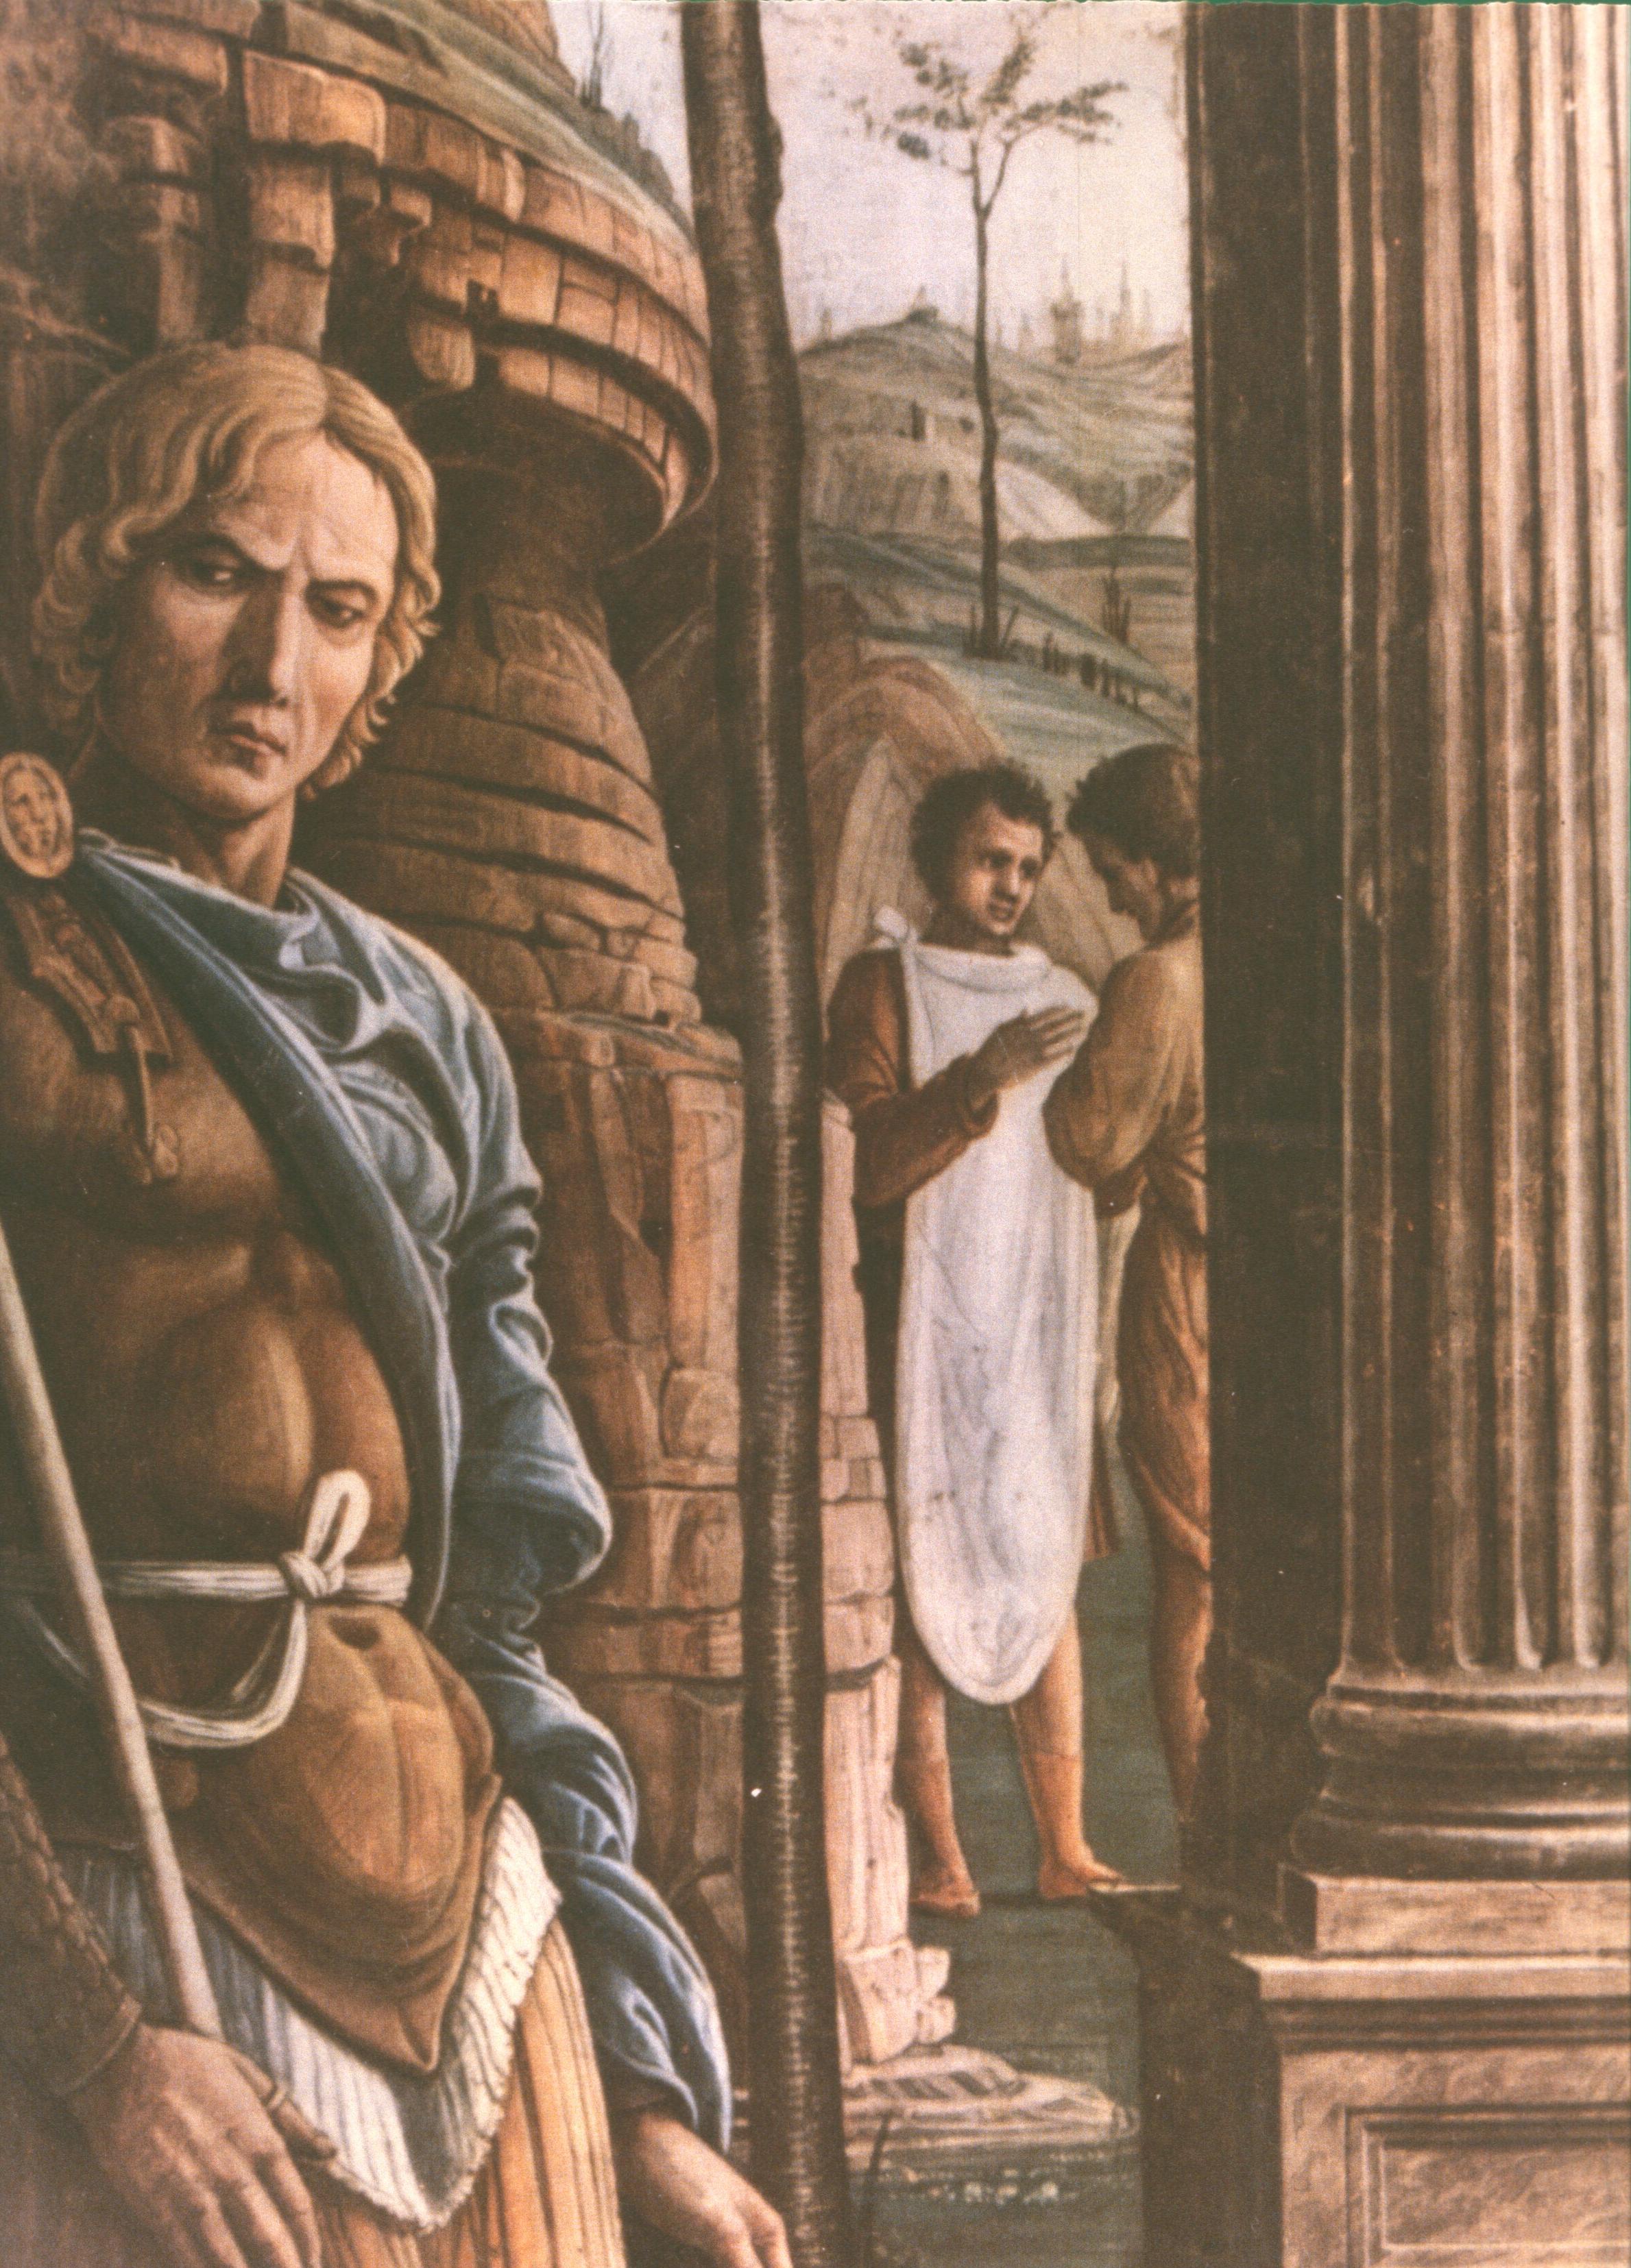
Here, too, there are various invitations to ‘distraction’: for example, in the little-boy sentry in the foreground, under his man-sized helmet, next to a sentry resting his weight on his elbow; or in the third sentry (the possible self-portrait) looking down at us; or in the figures conversing to the rear.
But our gaze is nevertheless compelled by that triumphal arch (lovingly and accurately observed from an arch in Verona), with its portrait medallions and relief sculpture. And this is as it should be, for the arch is a symbol of Roman authority, which is also embodied in the youthful figure of the tetrarch, who is holding his staff of office, and leaning forward from his raised judgement-throne, with its very convincing marble sphinx on the side, under its anachronistic baldacchino or canopy.
The story here is taken from Golden Legend which tells us (in an episode clearly imitated from Christ’s appearance before Pontius Pilate) how ‘Abiathar, who was high-priest of the year, incited the populace to riot, caused a rope to be thrown about the apostle’s neck, and had him dragged before [Herod] Agrippa, who condemned him to be beheaded’.
This further detail shows the moment when St James hears his sentence of death.

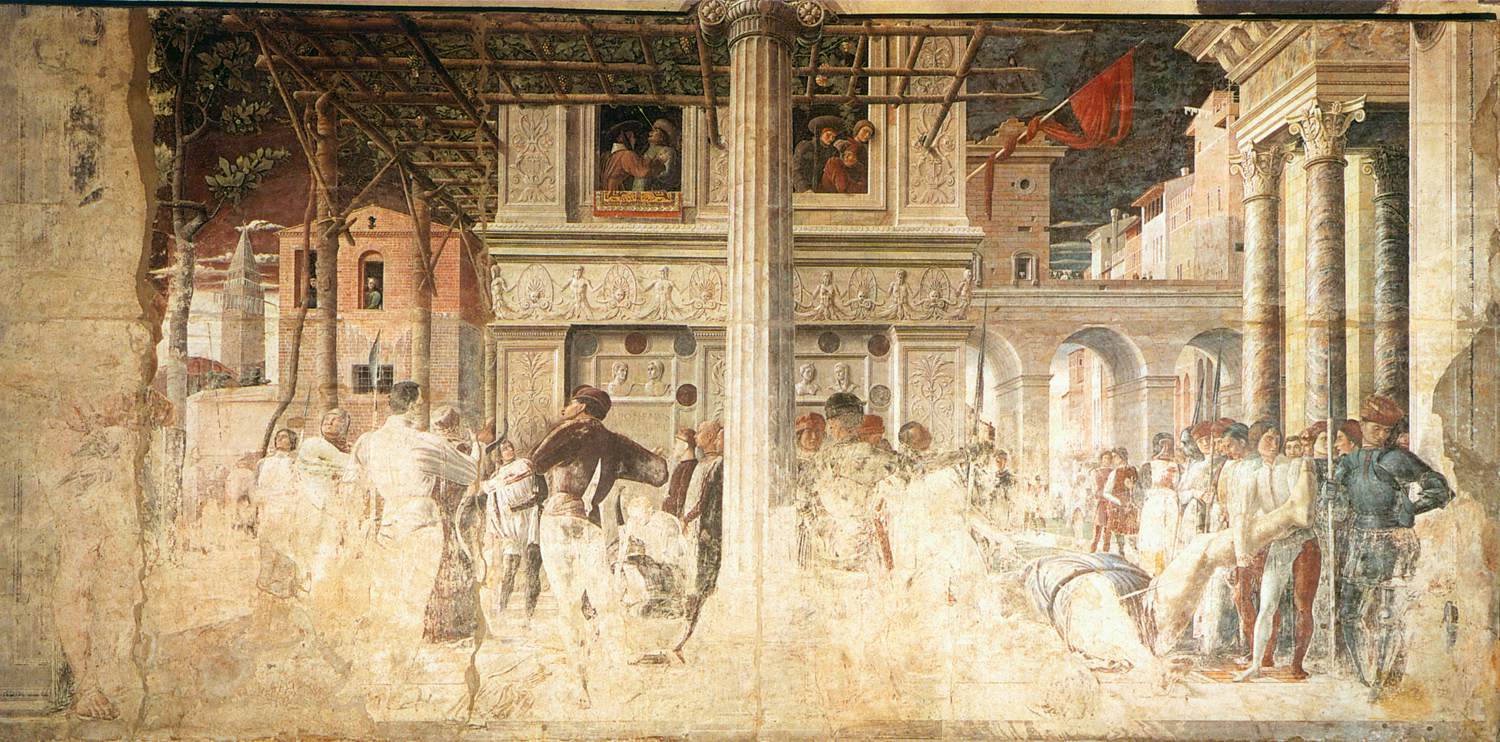
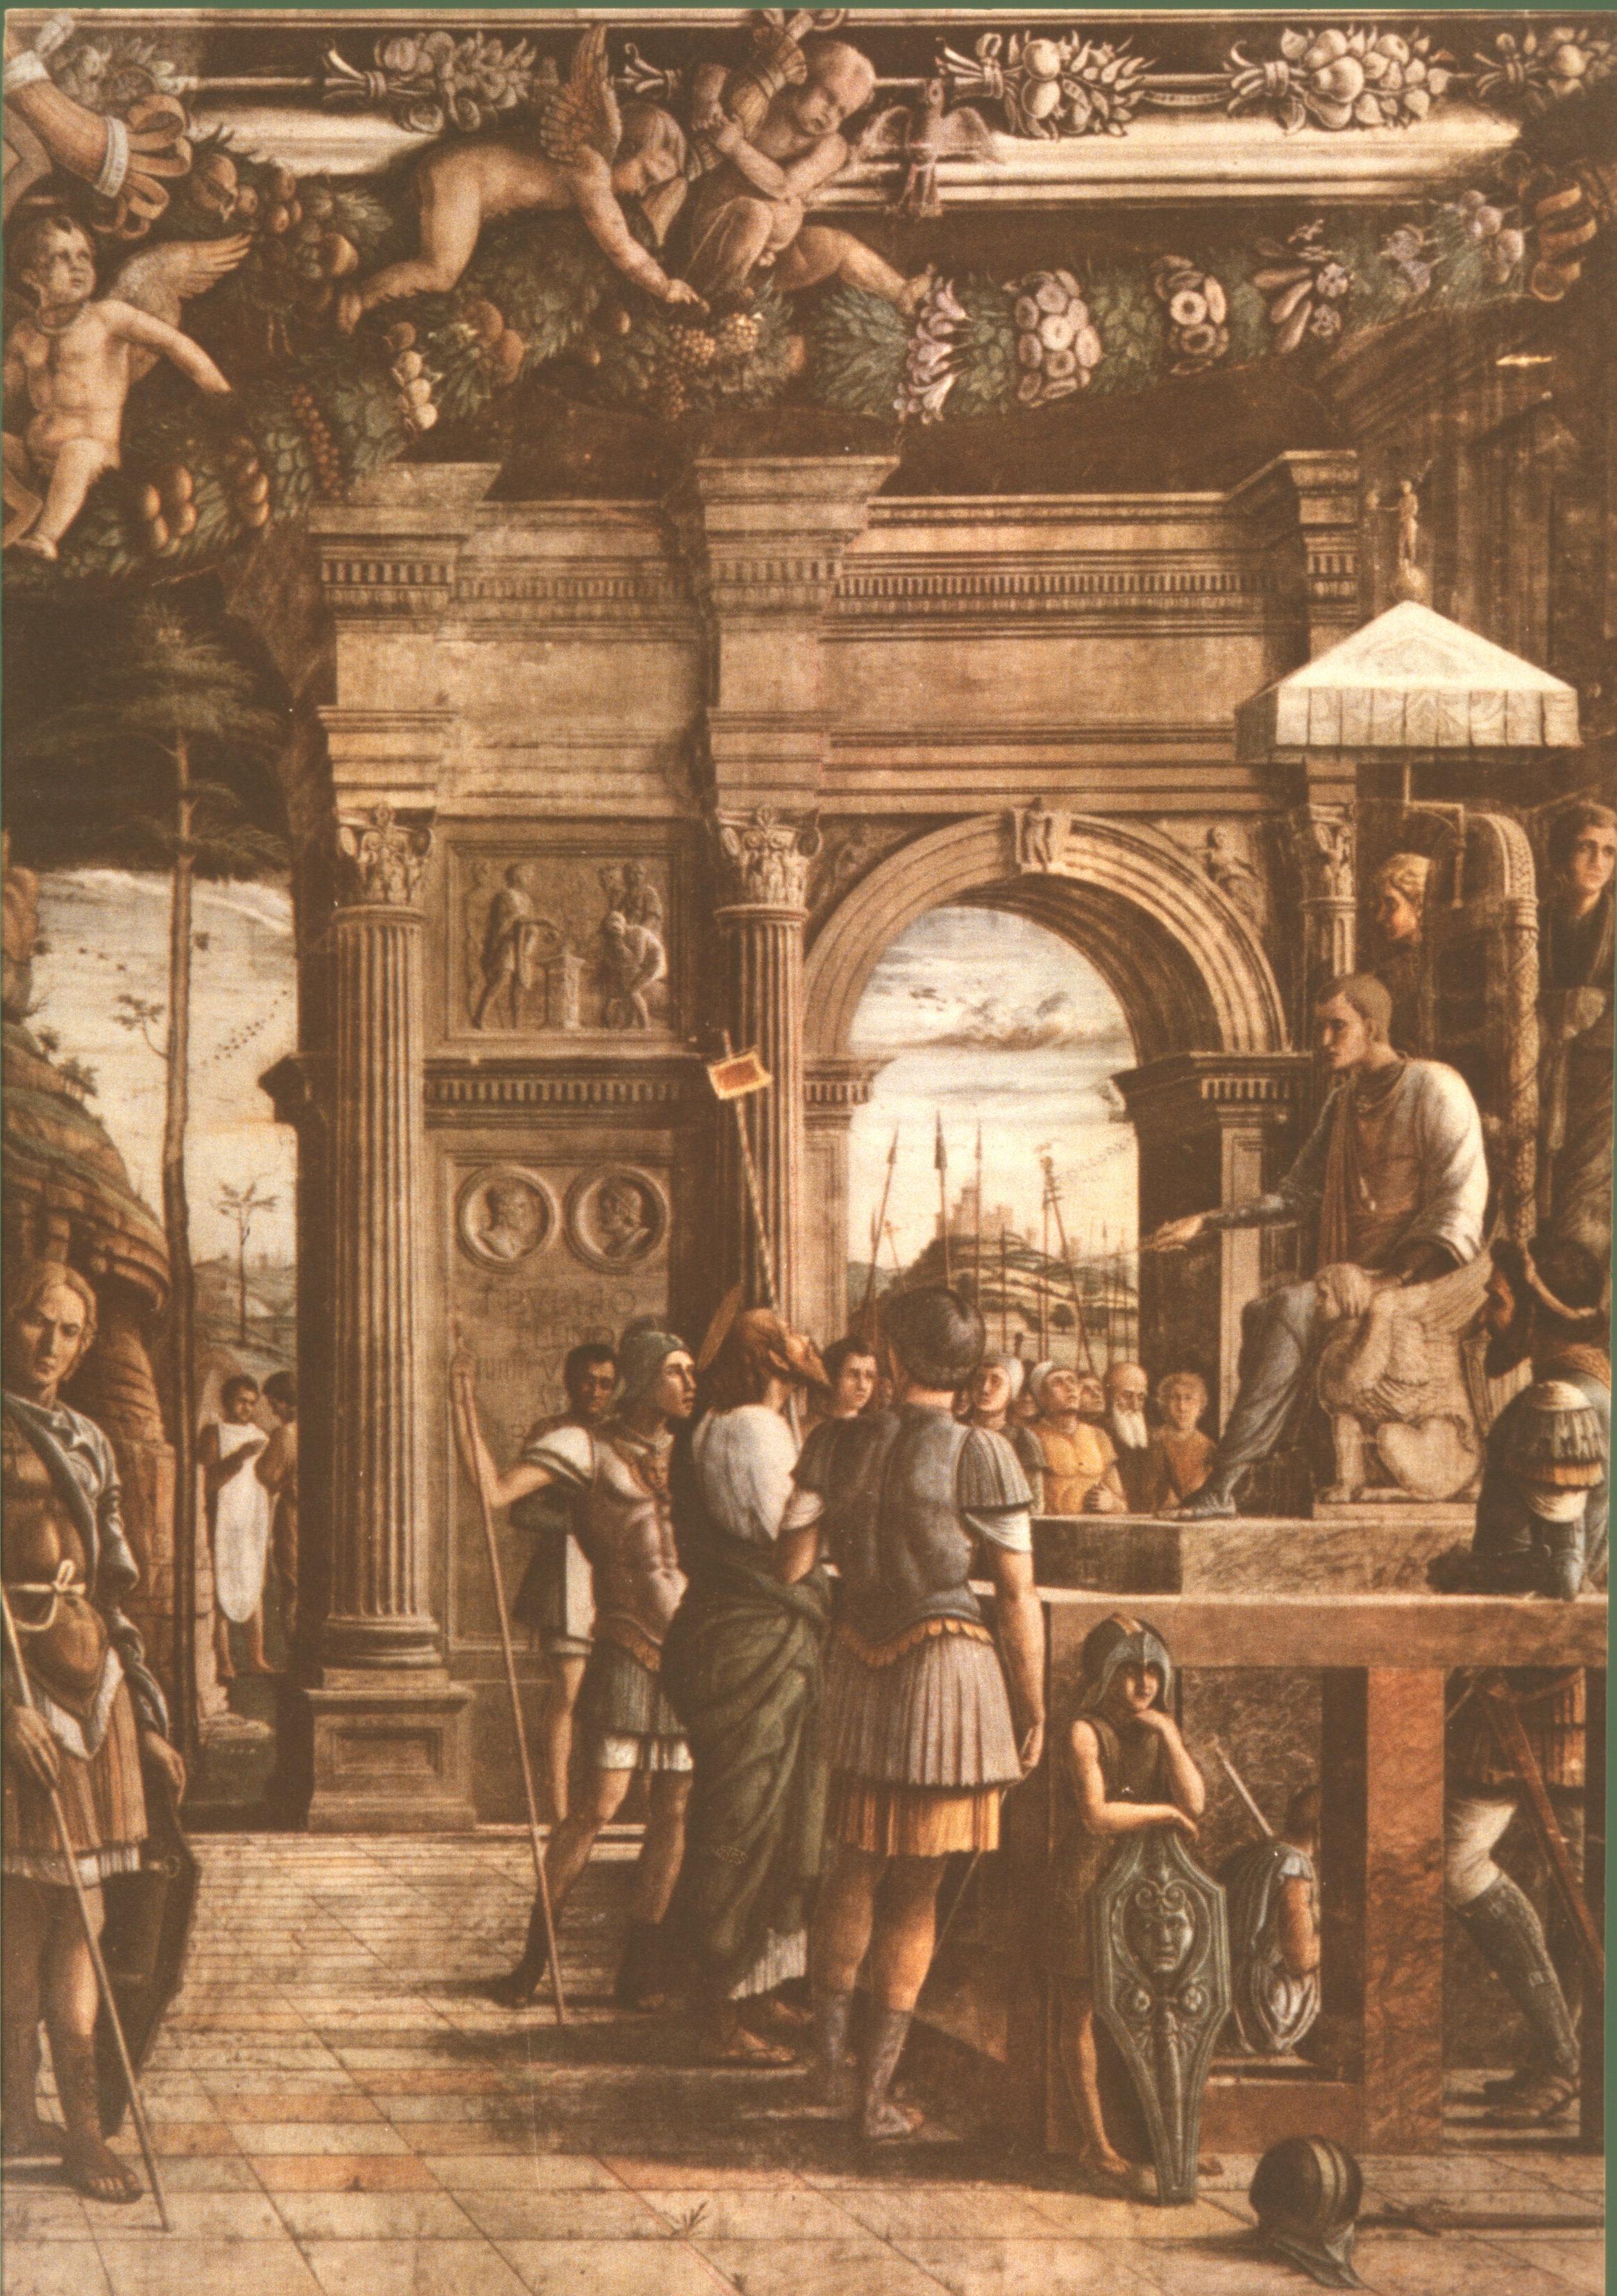
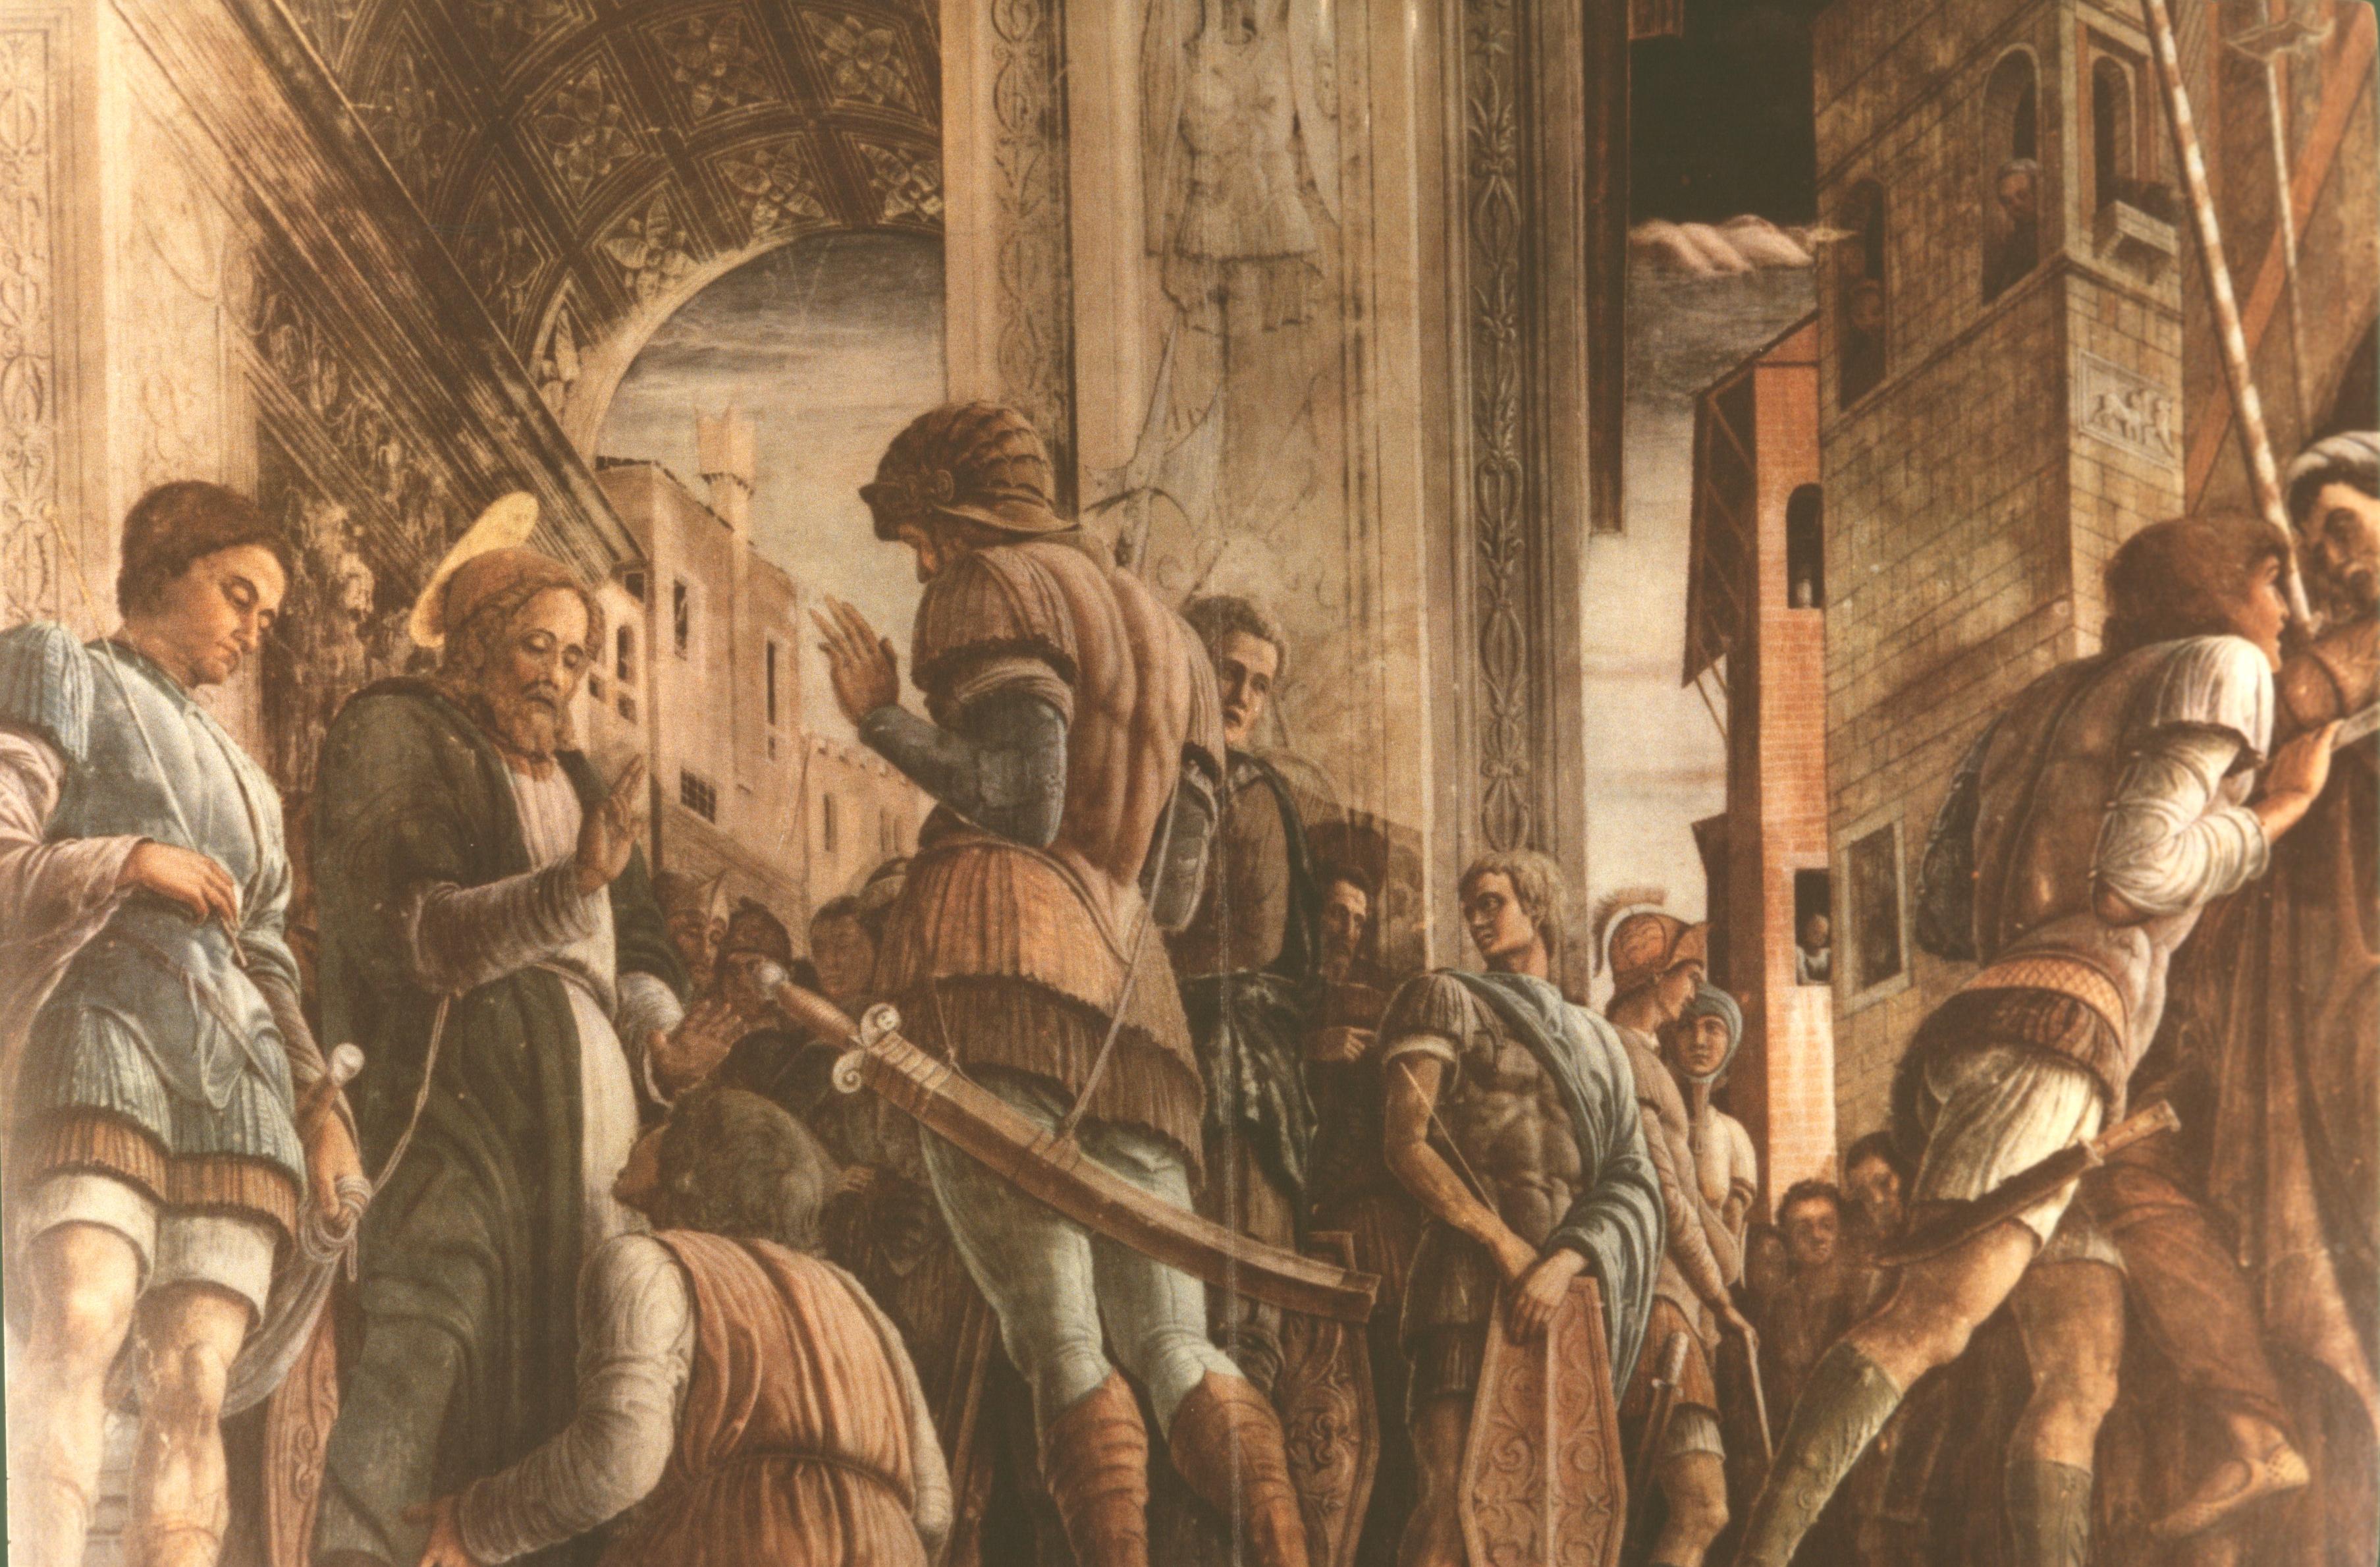
At this point, we must take another look at the whole wall, to see how the two scenes with the common vanishing point ‘balance each other’, and to remind ourselves of the position of the fifth scene, which follows without a break in the story, but was probably painted after an interval of two years (as late as 1454) and is very much bolder in its exploitation of the Albertian perspective.
The bottom of the fifth scene lay at about six and a half feet from ground level—that is, about a foot above the head of a real spectator in the chapel.
Mantegna has placed the vanishing point of his virtuoso construction at our eye-level, just off centre, so that the ‘horizon’ is actually below the frame of the fresco.
As you can see, the result is that the five almost life-sized figures in the foreground tower over the viewer with disturbing effect, and the great curve of this second triumphal arch, steeply and dramatically foreshortened by the low viewing-point, gives great impact to the saint, his guards, and the convert at his feet, in a way that outdoes anything achieved by Donatello and Masaccio.
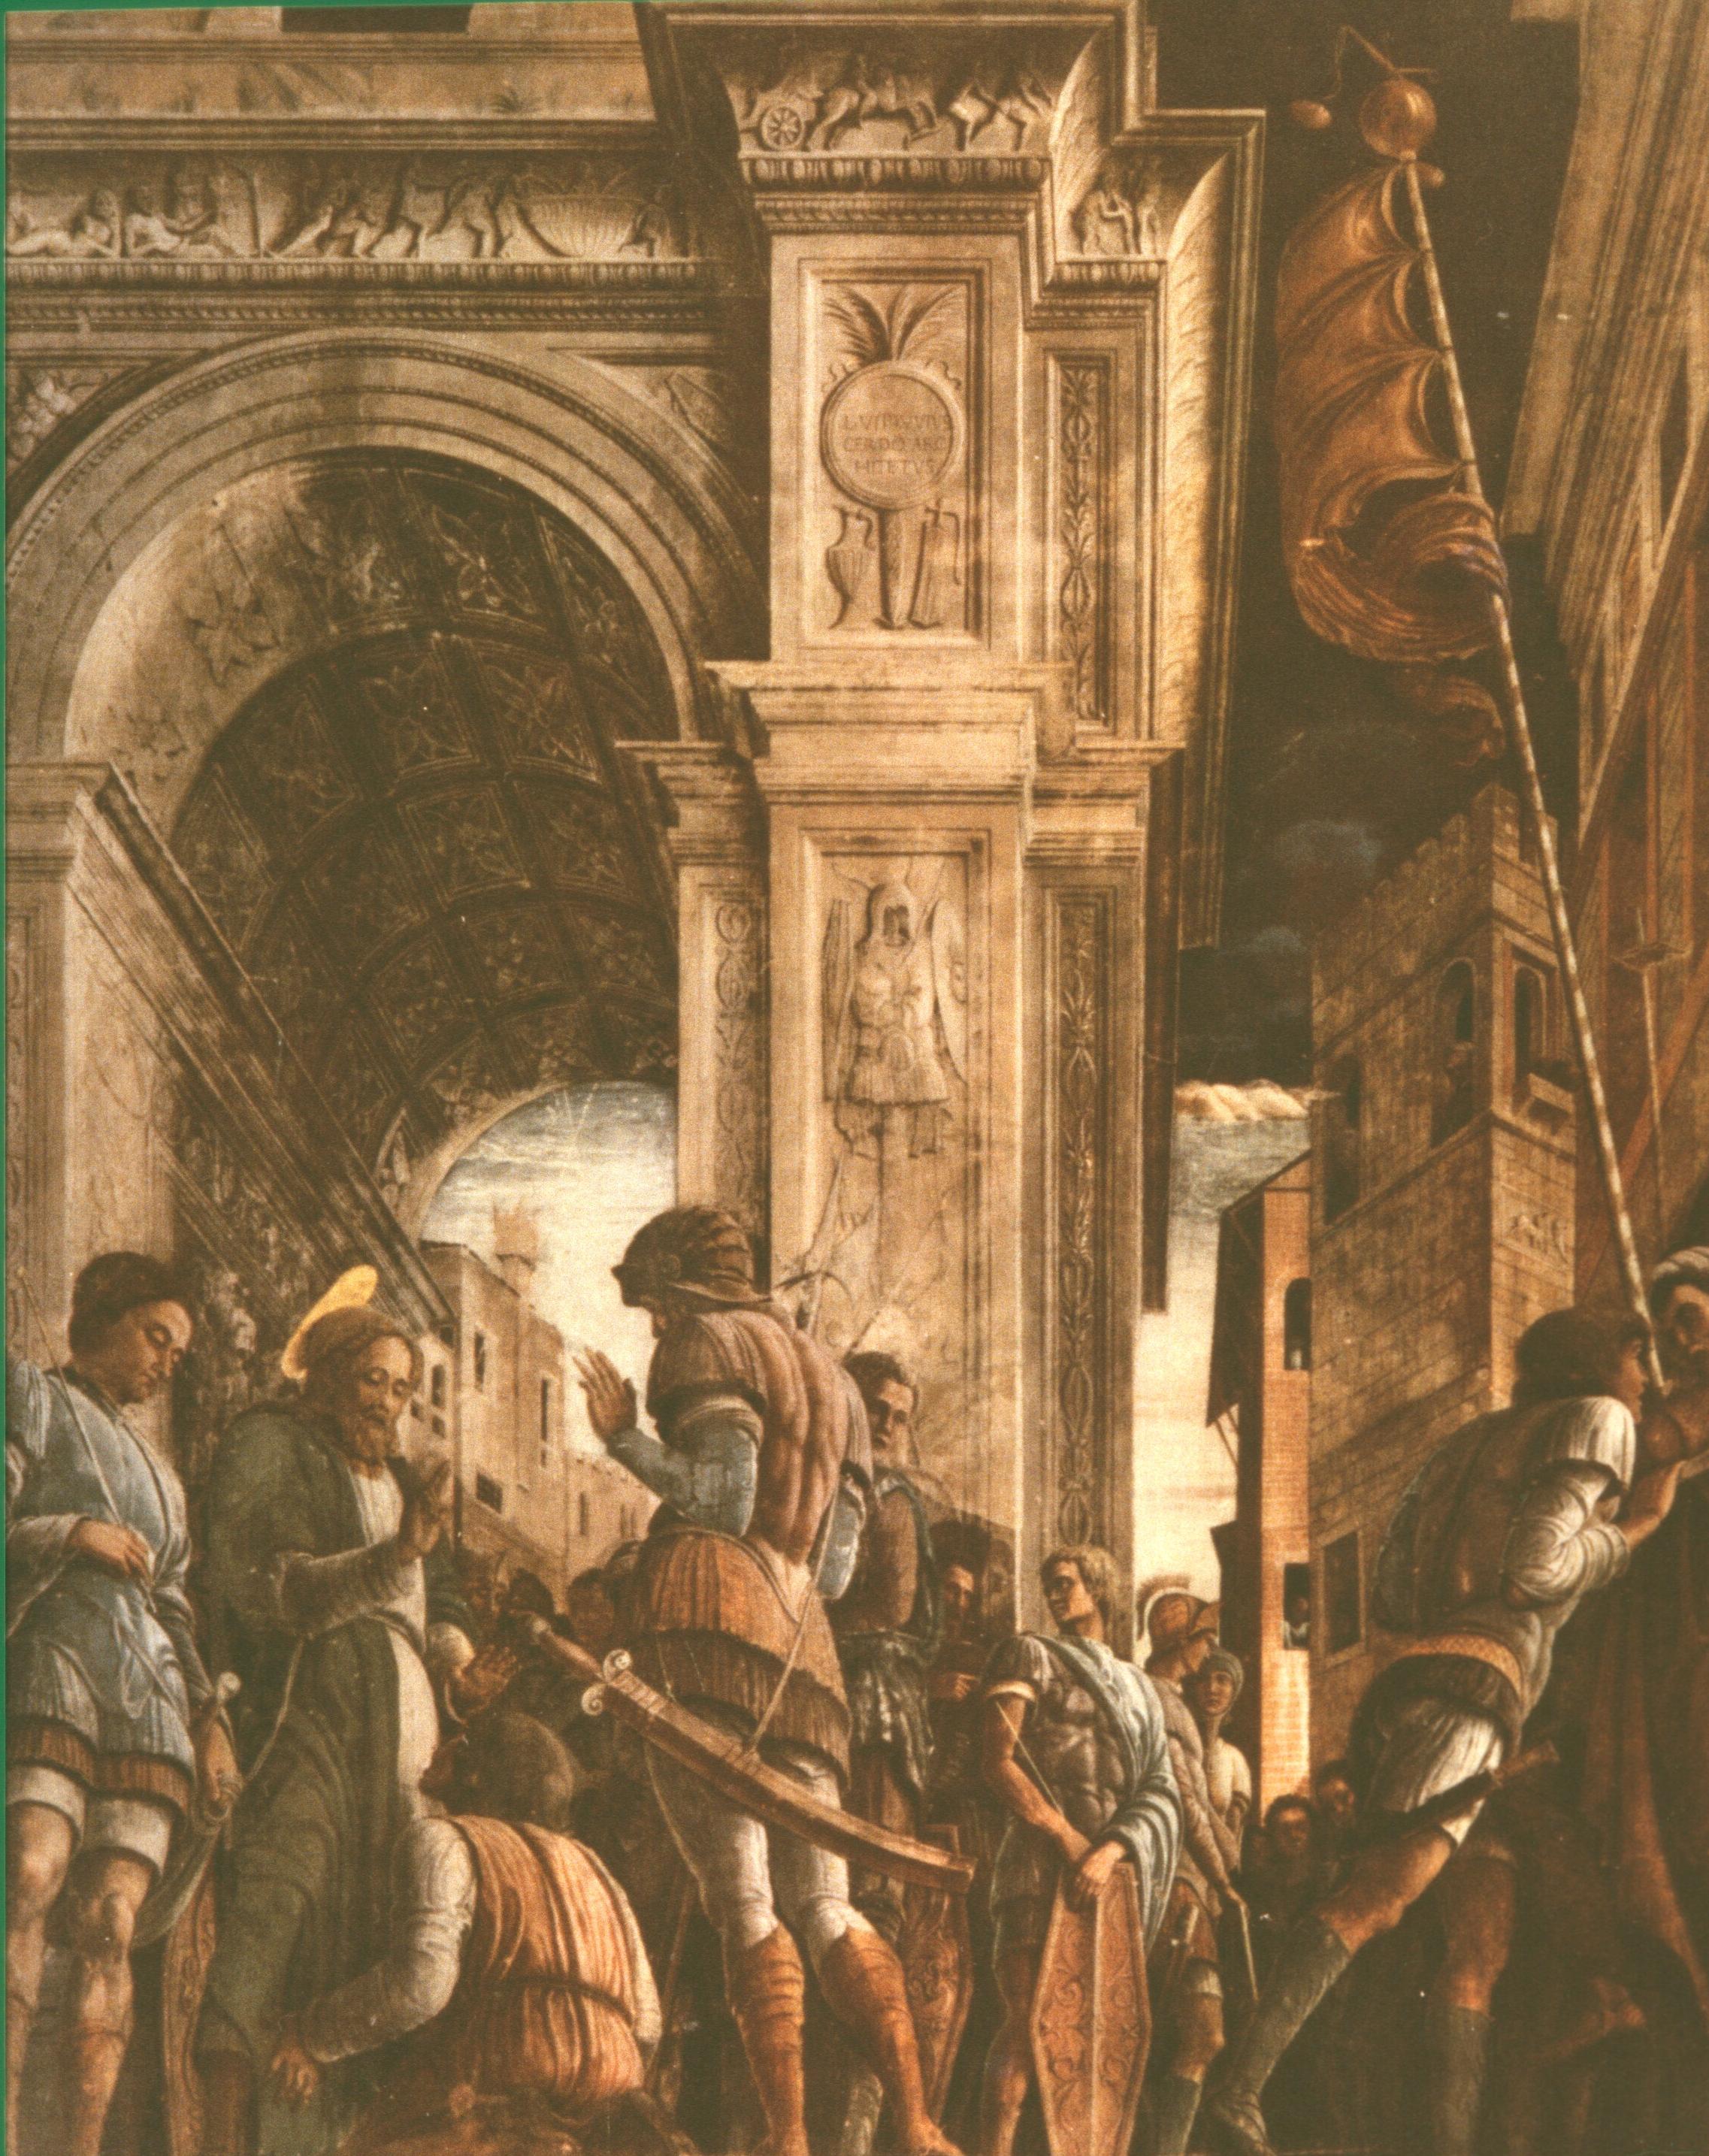
James is being led to his execution, escorted by Roman soldiers, who keep the crowds back.
Nevertheless, he finds time to miraculously heal a cripple by the roadside (the kneeling figure), and to convert and baptise an accompanying secretary who witnessed the miracle—the man to the left with the inkhorn.
The final scene is once again set in the open air. High on the hill, we see part of the city of Jerusalem (lurking behind the huge marble gate in the brick-wall), from which minuscule travellers are walking towards us down the road.
A lopped sapling forms a cross with the pole of the improvised crowd barrier, which is placed right in the foreground, where it could only serve to keep us back from the execution.
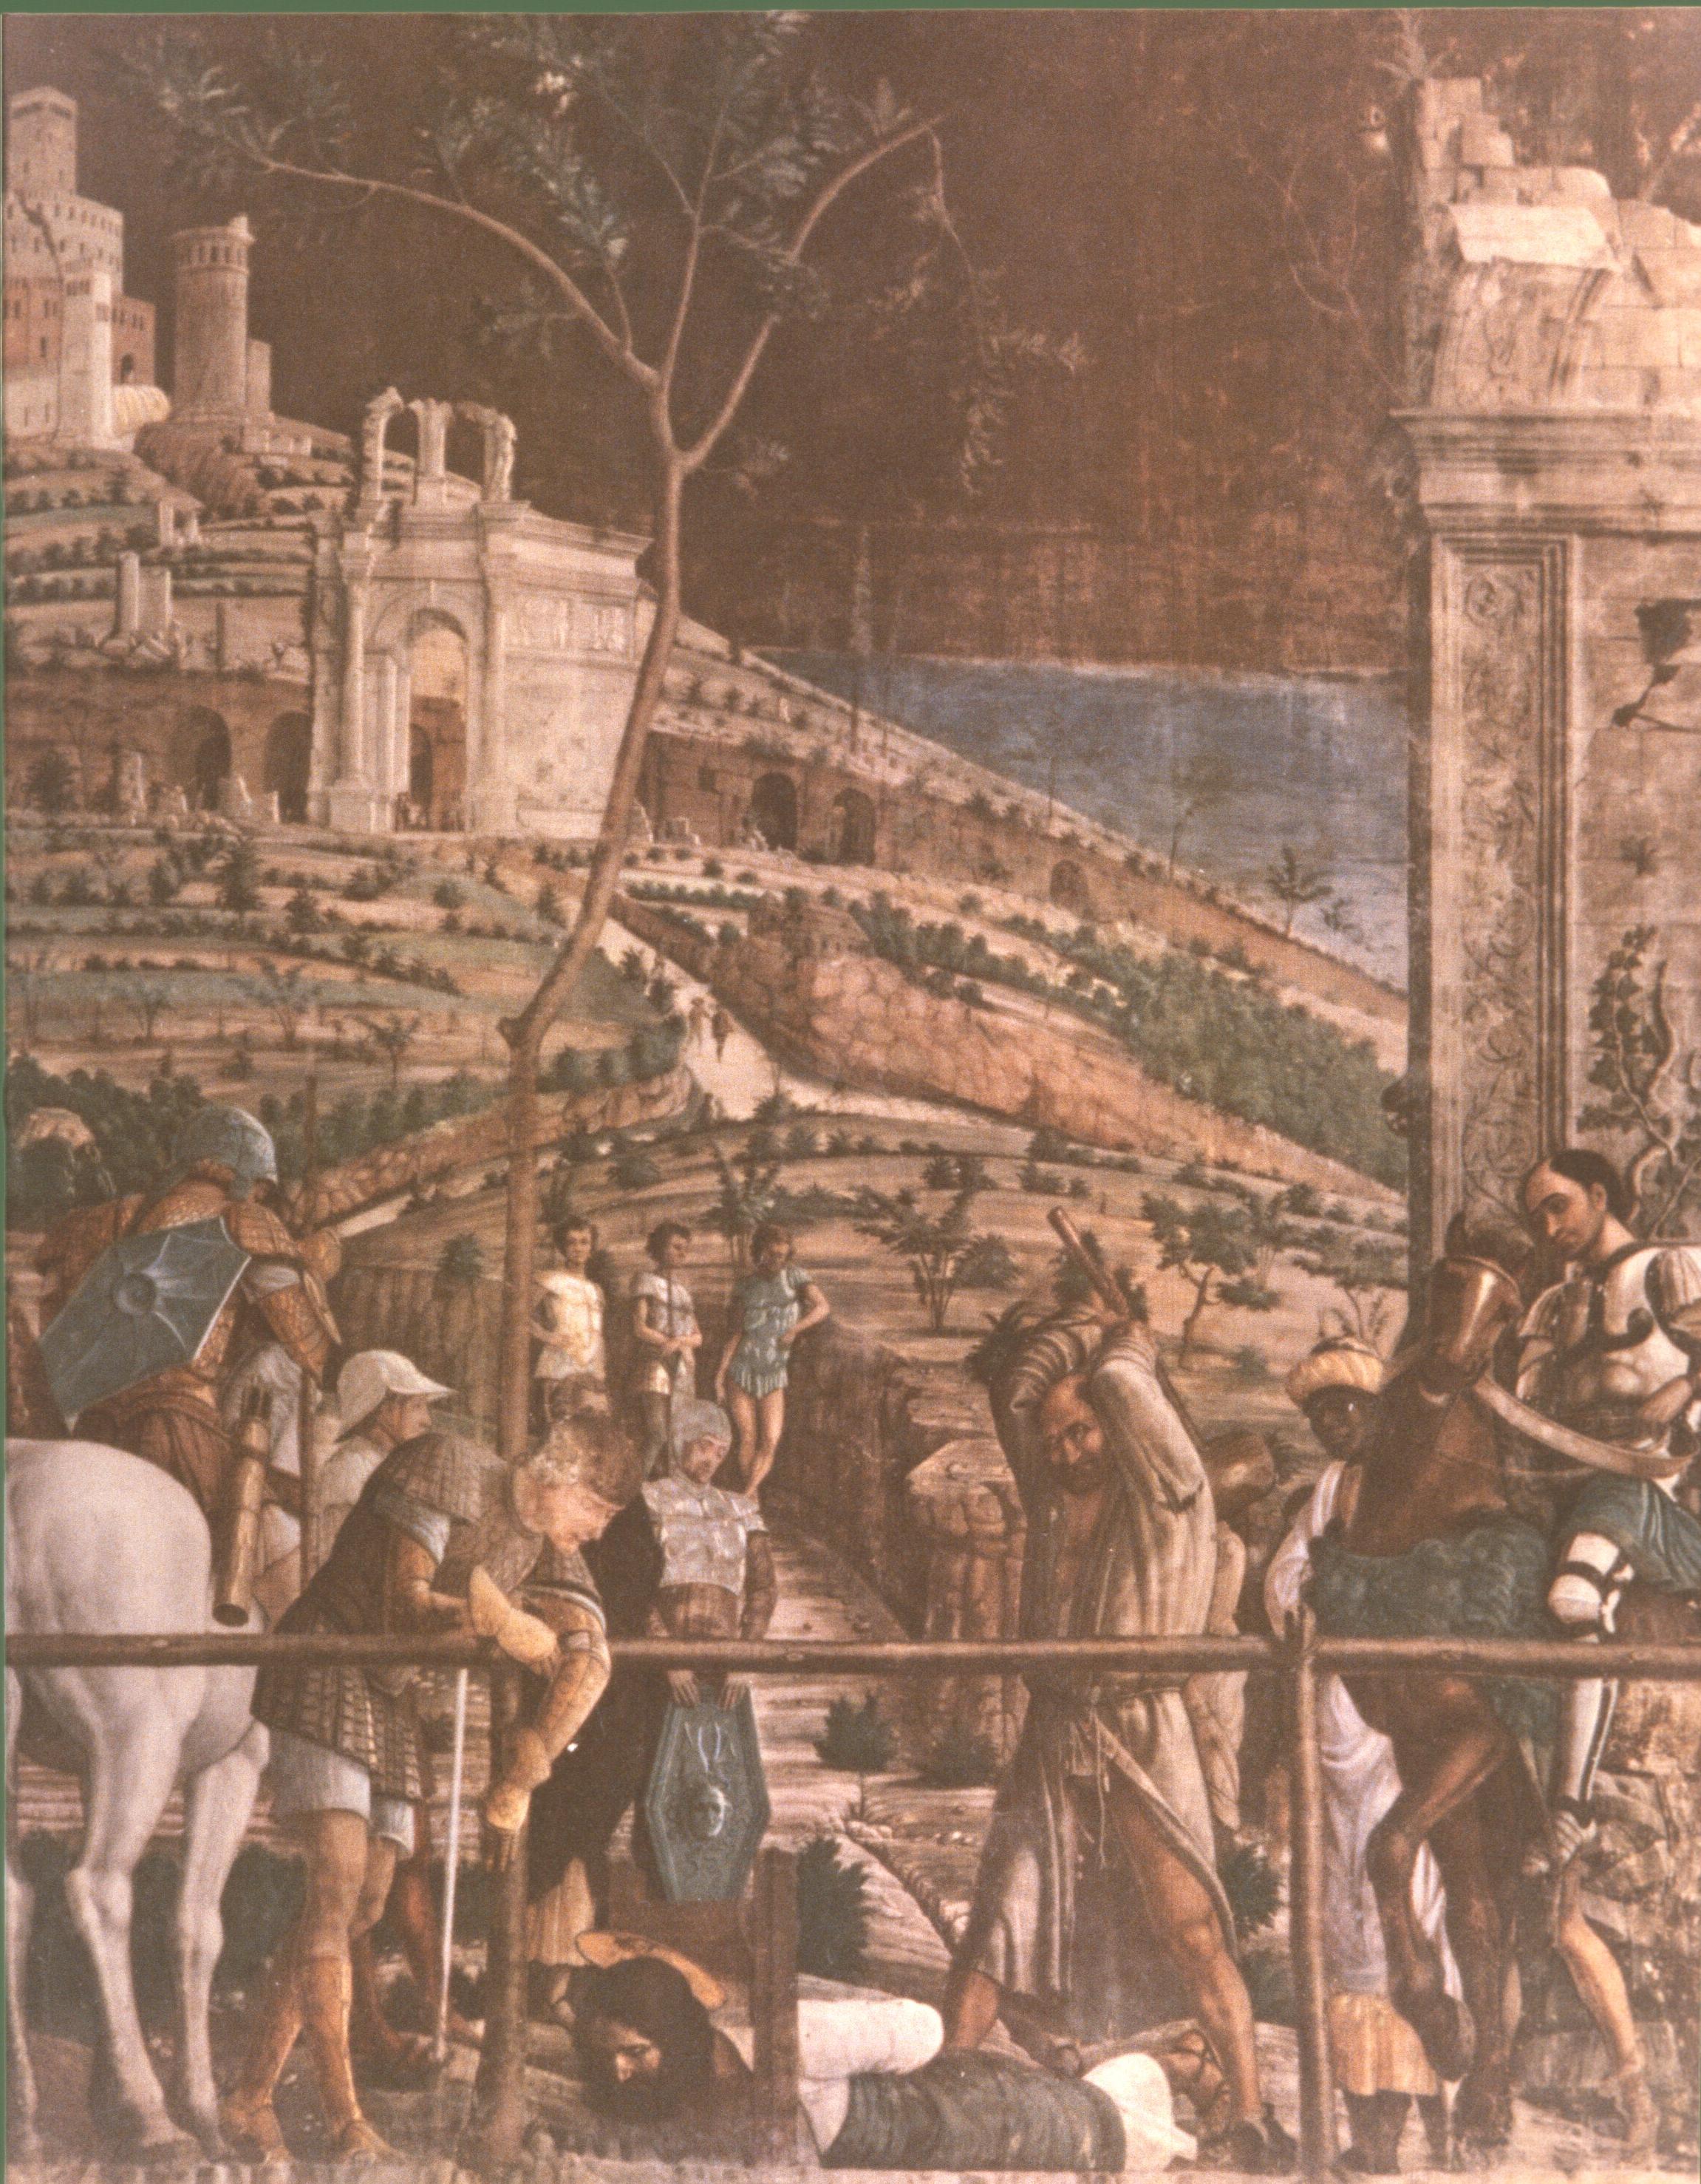
Once again, the foreground figures are placed very close to the picture plane—indeed, the visual logic of the intersecting sapling and pole means that the soldier’s left arm is actually in our space—and the horizon is once again very low.
But the fact that the horizon lies just above the frame, and the absence of any foreshortened architecture, means that the figures do not ‘press down’ with the same dramatic intensity as in the fifth scene alongside.
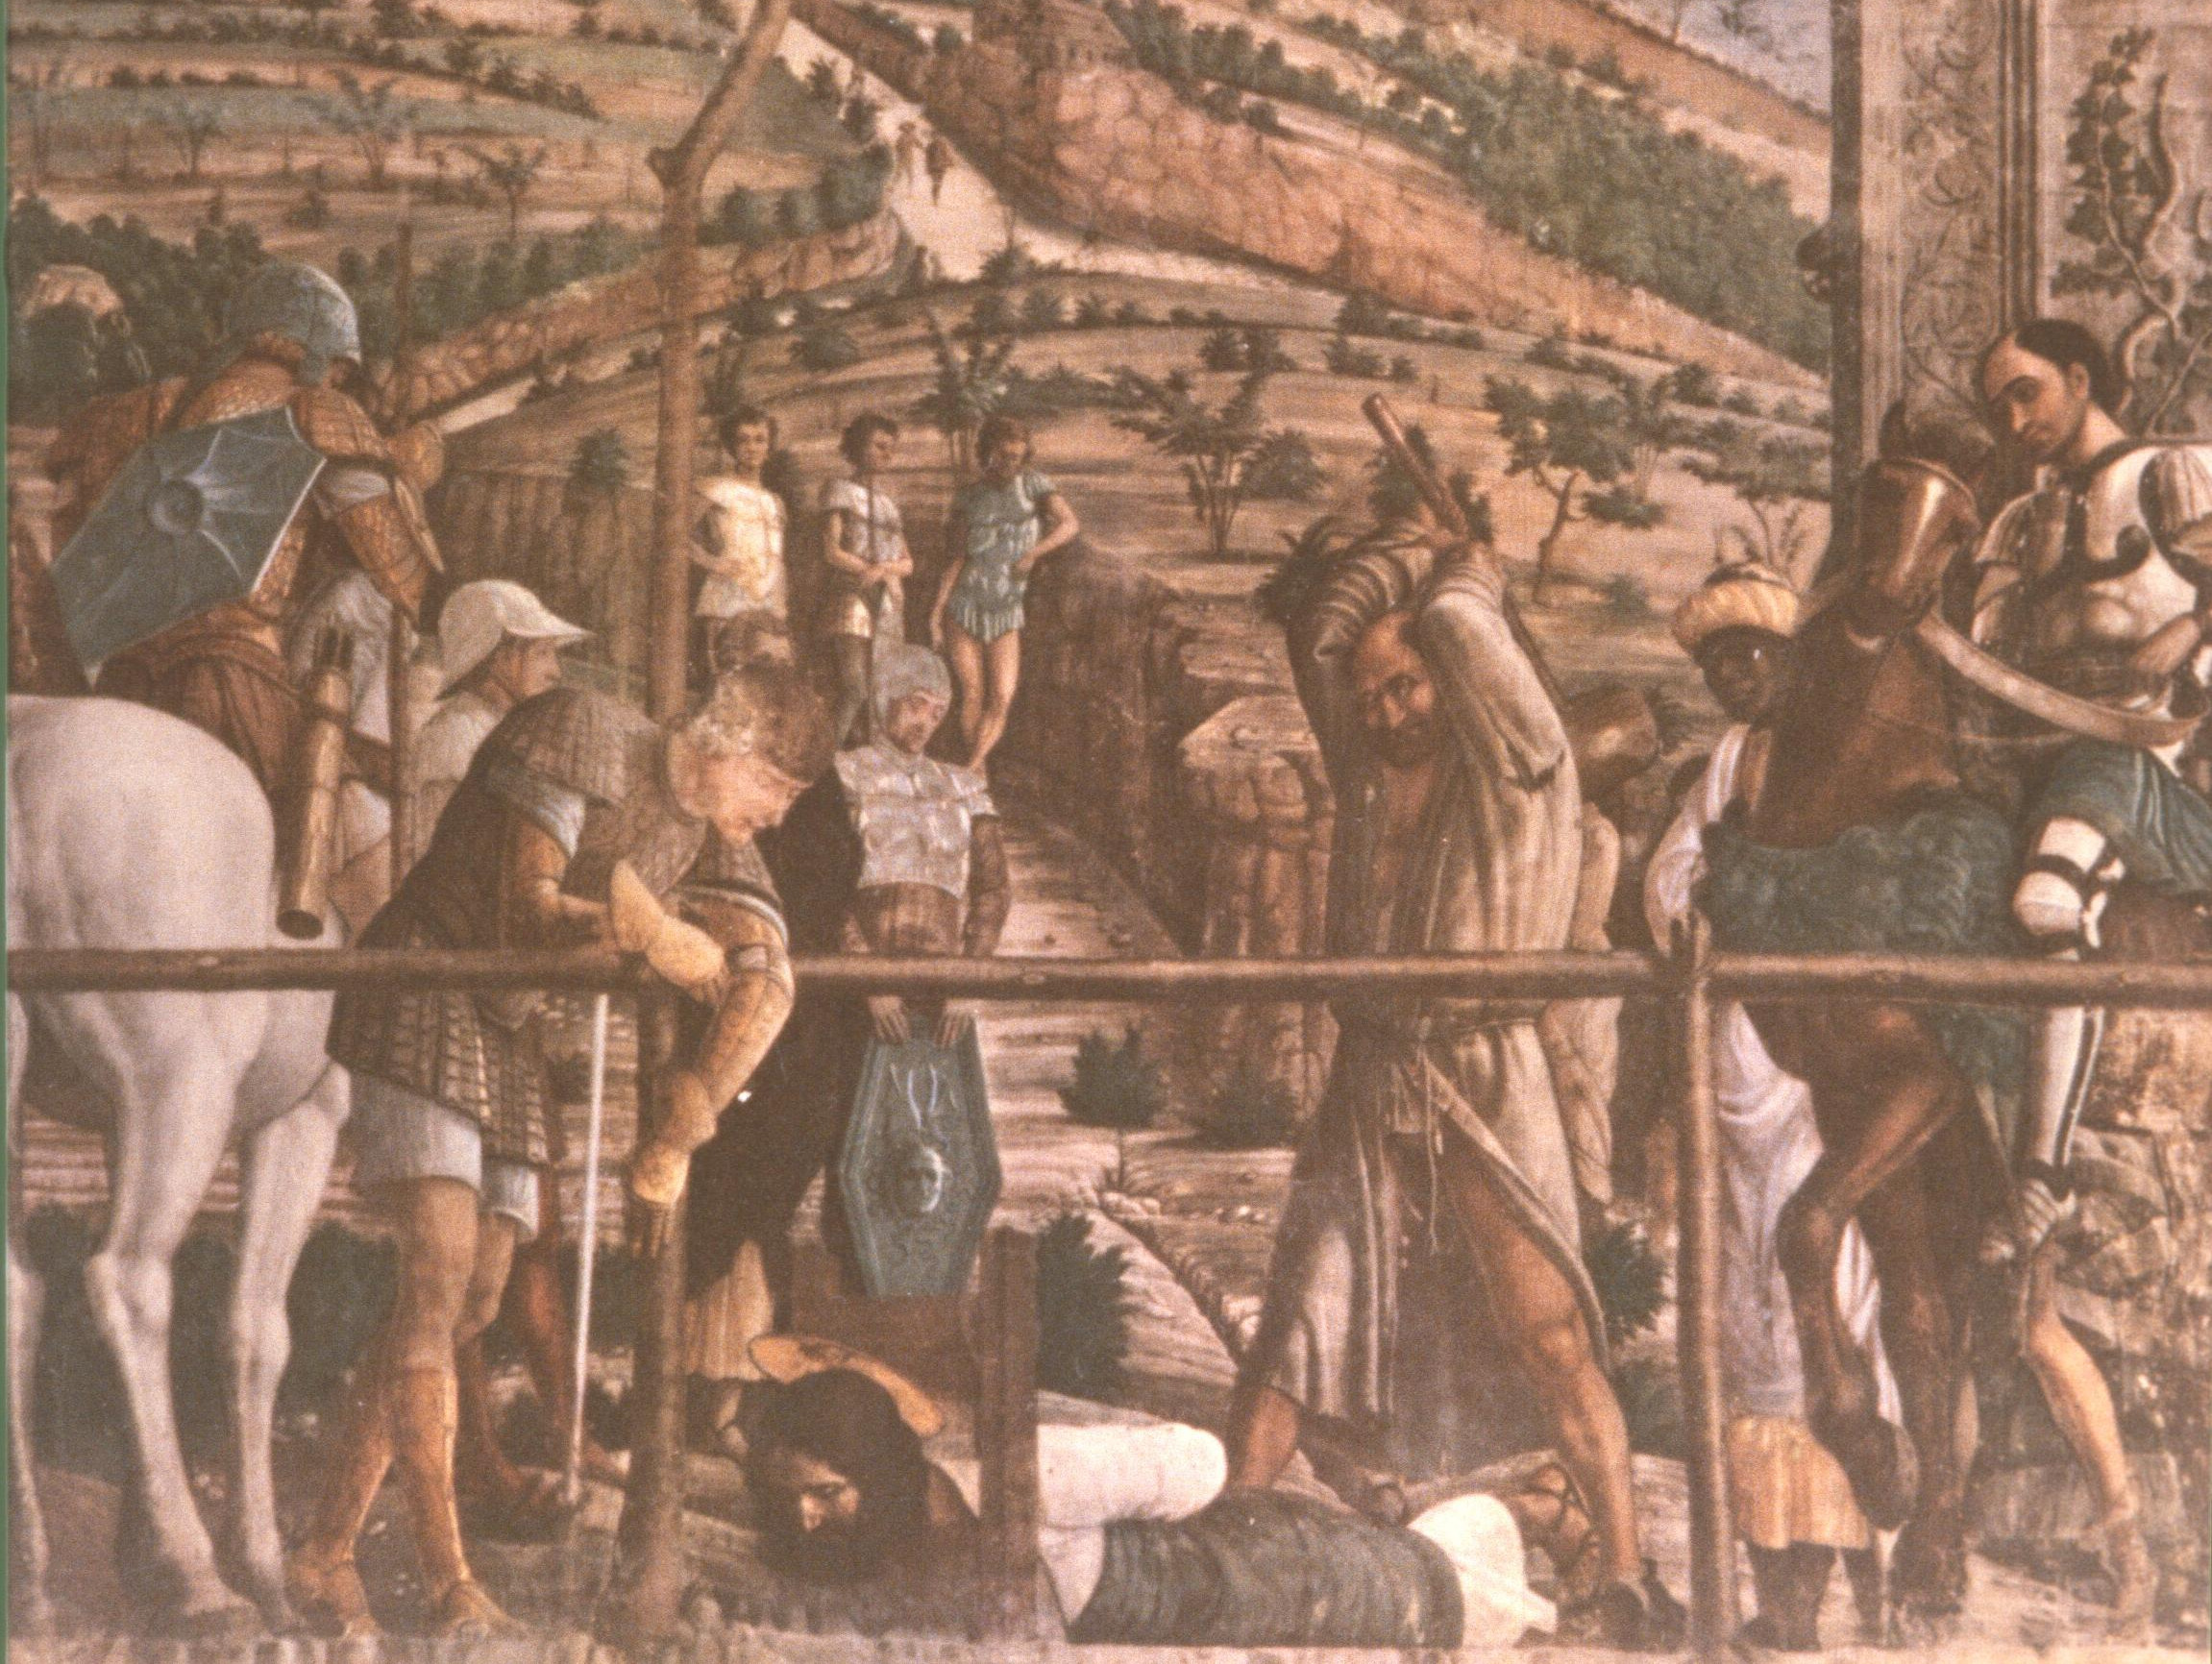
The saint is about to be beheaded by a rather nasty instrument—because the executioner is going to bring his mallet down onto the blade of a ‘baby-guillotine’, which will sever the head and the halo, and cause them to drop into the chapel!
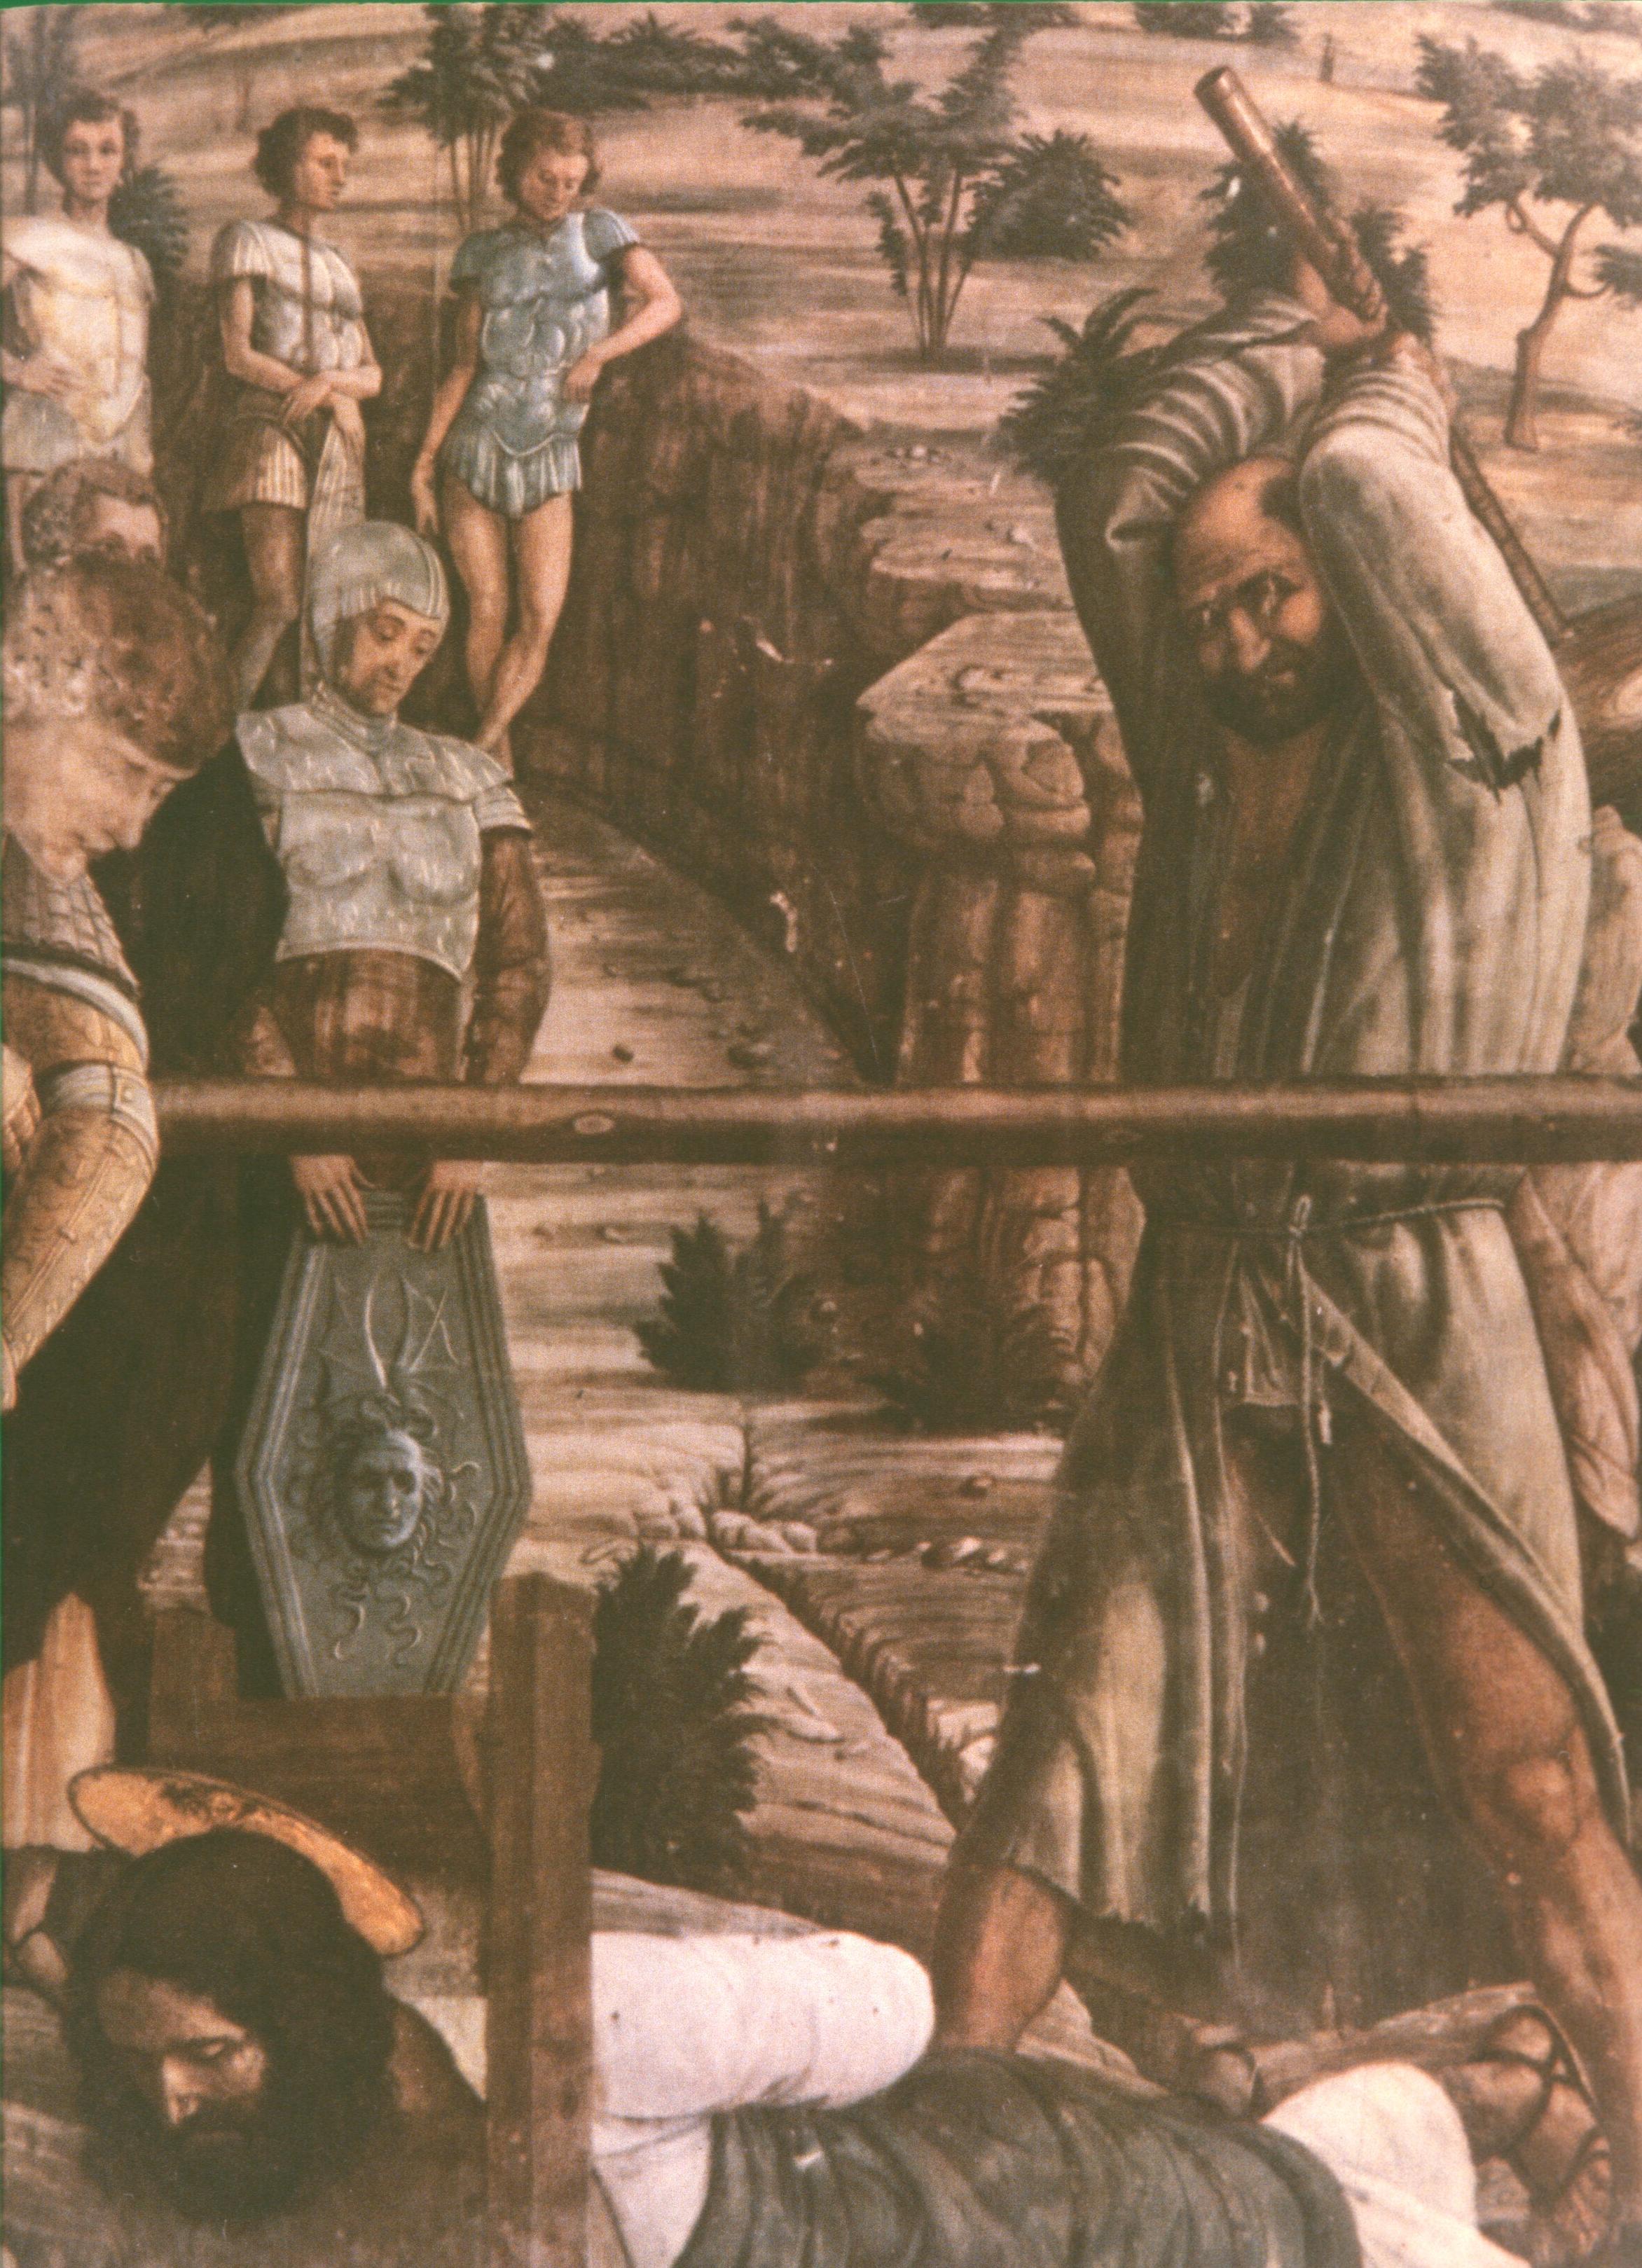
We remain as detached as the three helmet-less soldiers, or the young knight on his white horse (whom we admire for Mantegna’s sheer technical skill in drawing the complex form of the shield), or the balding captain with his five o’clock shadow, who is part portrait and part derivation from Donatello’ equestrian statue of Gattamelata, as he looks down impassively, indifferent to the saint, and indifferent to his rearing horse.
(You can now follow Mantegna to Mantua.)