Carpaccio: The Lives of St George and St Jerome
Mantegna’s Mantua and Carpaccio’s Venice were both surrounded by a great deal of water, but from every other point of view they were very different. The inland city of Mantua had only about 25,000 inhabitants in 1500, and the little Marquisate was ruled by members of one family, the Gonzagas, for about three hundred years from 1330 to 1630.
The maritime city of Venice had as many as 110,000 inhabitants at this time. It was extremely wealthy, thanks to a virtual monopoly in luxury trade with the East; and in order to protect its trade routes, it possessed a kind of ‘ribbon-empire’, extending down the coast of Dalmatia, and taking in the islands of Rhodes, and, from 1489, Cyprus—whence, I remind you, the plot of Shakespeare’s Othello, the Moor of Venice.

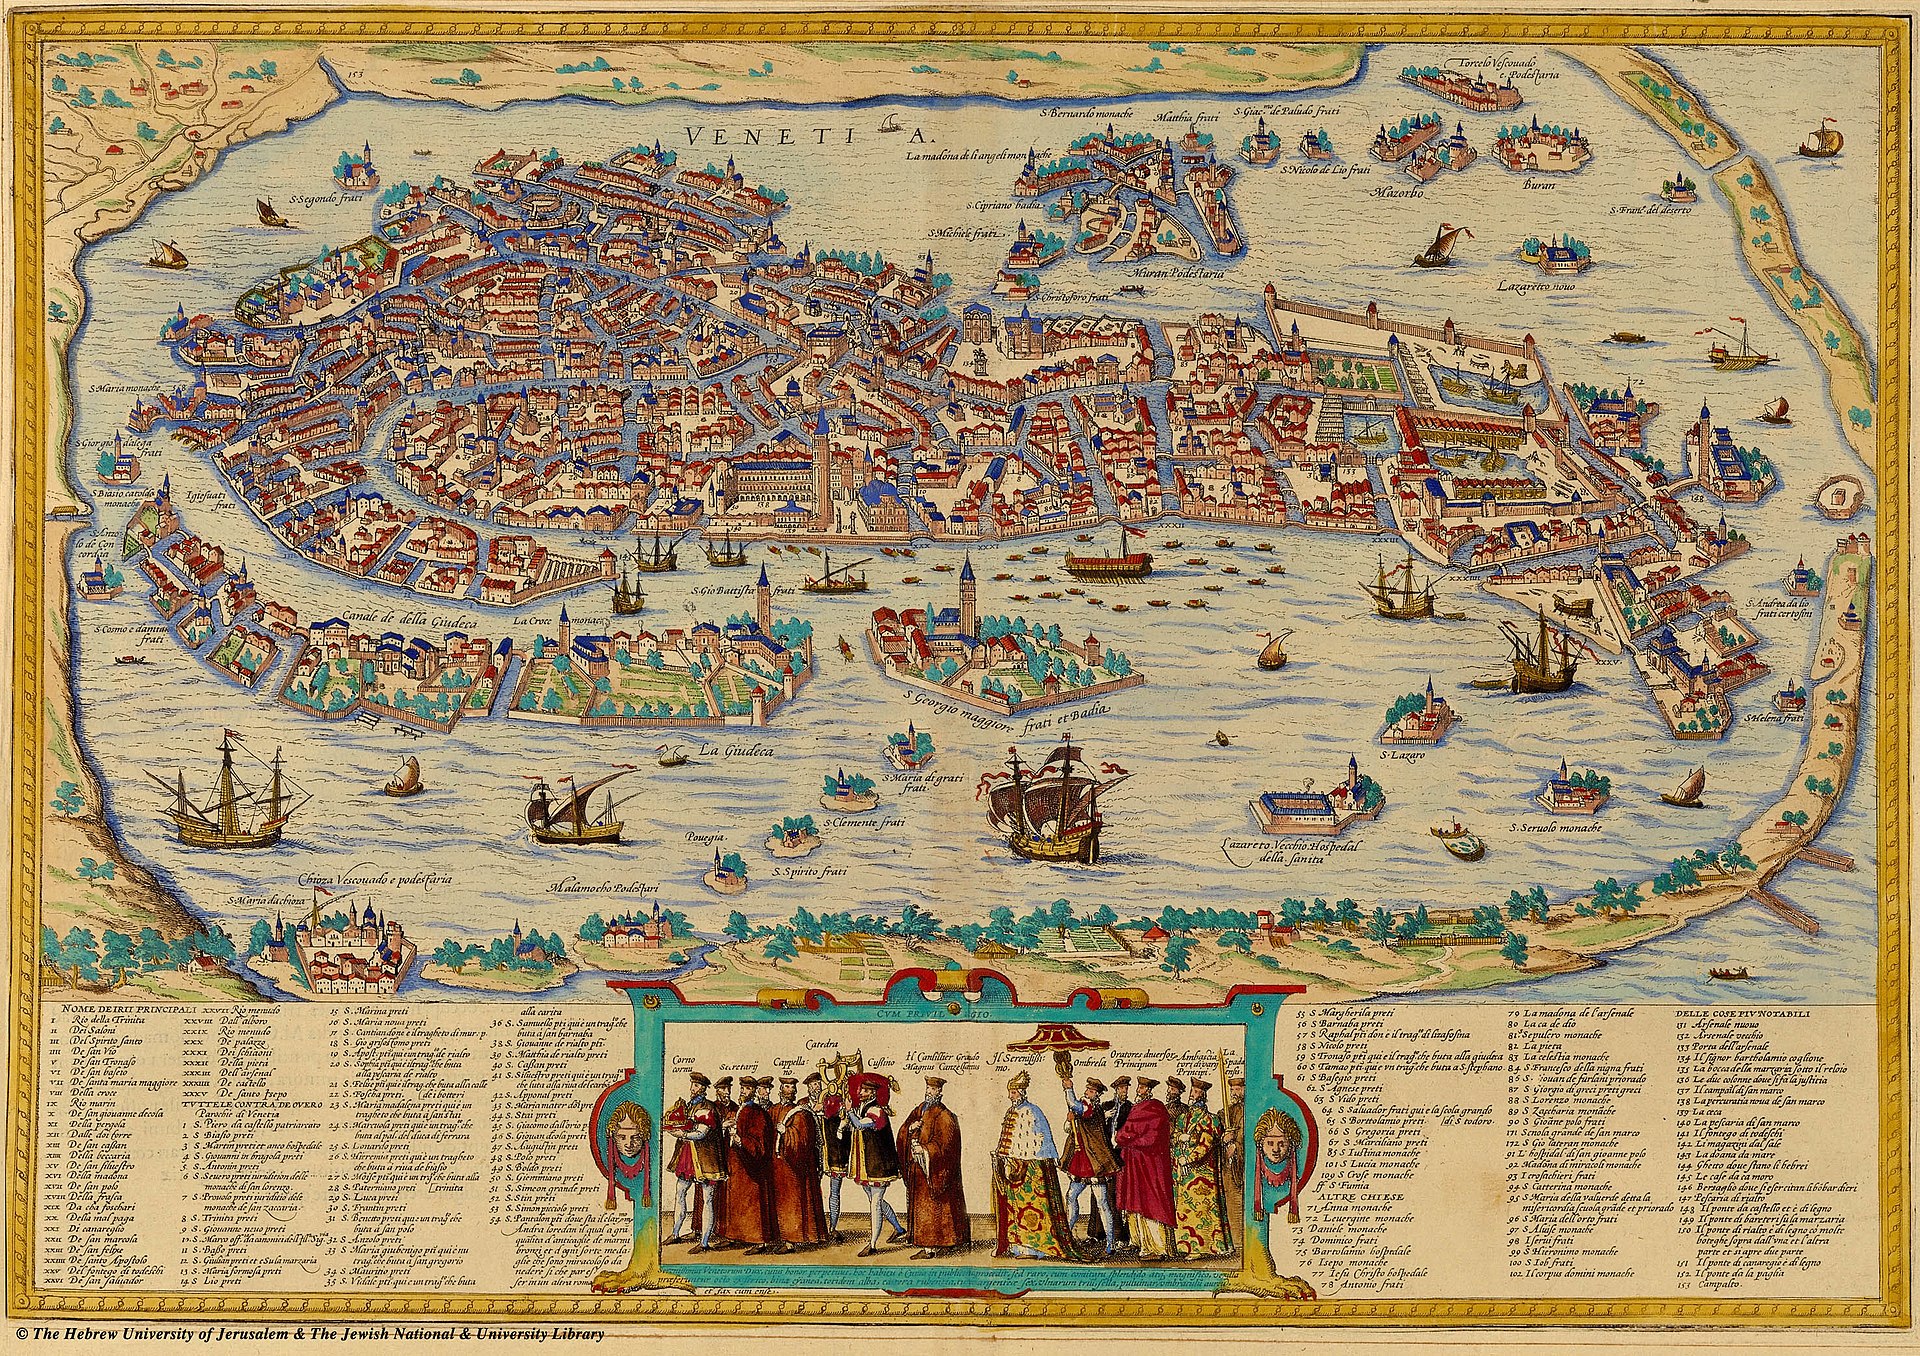
In the early fifteenth century, the Lion of St Mark ‘stepped ashore’ (as they said euphemistically), and Venice extended her rule over the vast area of the hinterland which is coloured red on the map. And far from having a hereditary ruler, Venice was a republic, in which the political power—and membership of the various Councils—was spread among the two hundred families who constituted the noble class. Even more strikingly than any other medieval or early modern city, Venice consisted of a complex series of interlocking and overlapping communities and corporations.
Certain areas of the city were dominated by people of one ethnic origin, as the place-names still tell us: for example, the Giudecca, the island where the Jews lived; and, next to the palace of the elected Head of State (the Doge), the Riva degli Schiavoni (Slavs), with, at right angles to it, the Rio dei Greci (Greeks), where we shall find the School of the Dalmatians. There were many associations based on trade or profession—the Guilds; there were the so called ‘Companies’ of Nobles; and there were, of course, a great many religious communities in the countless churches and convents.
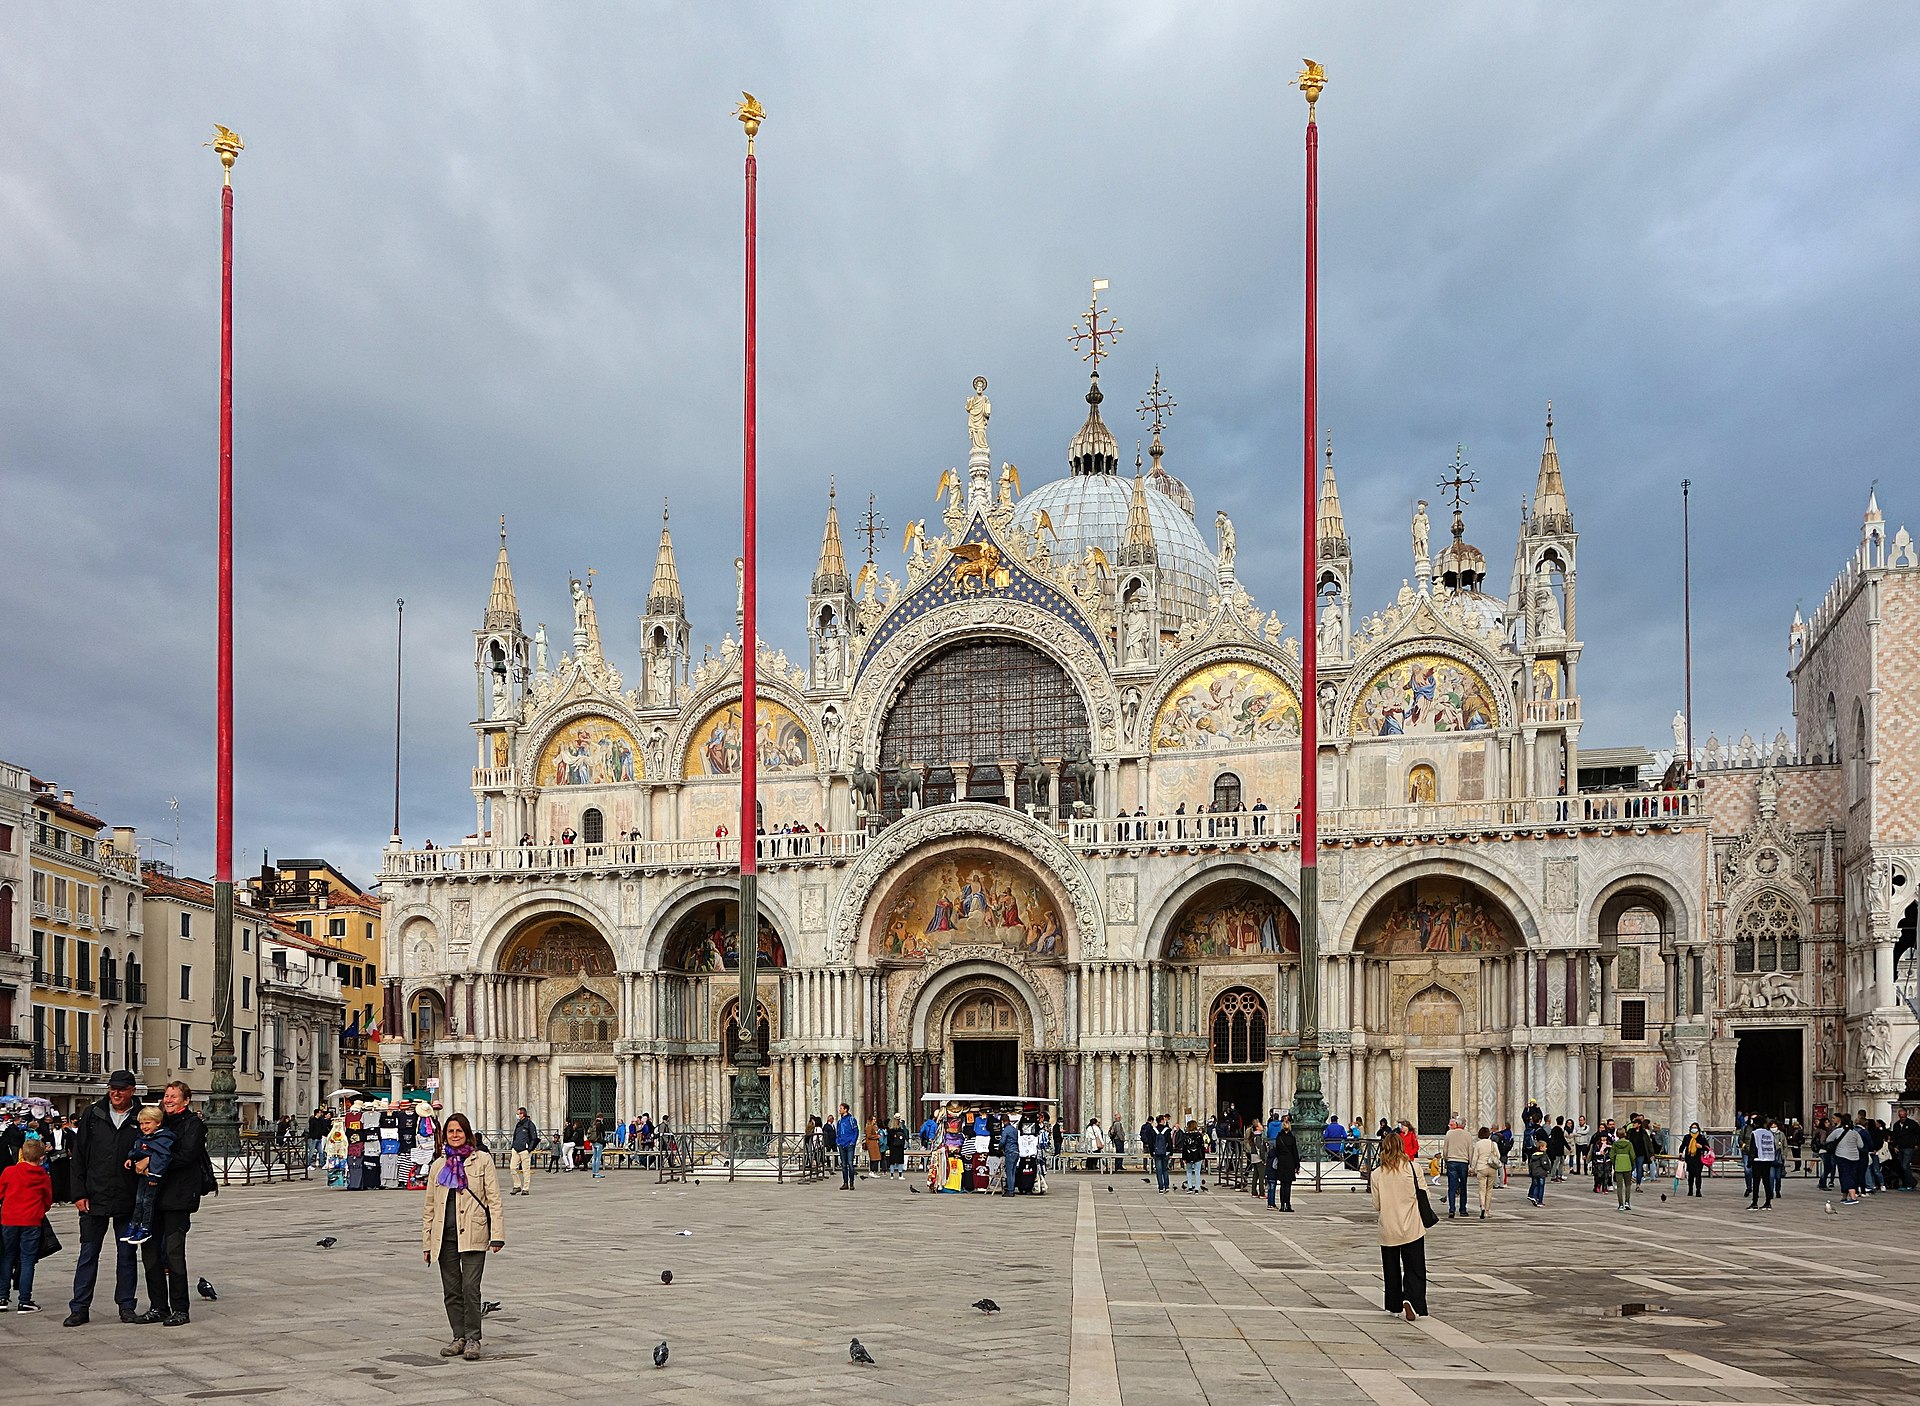
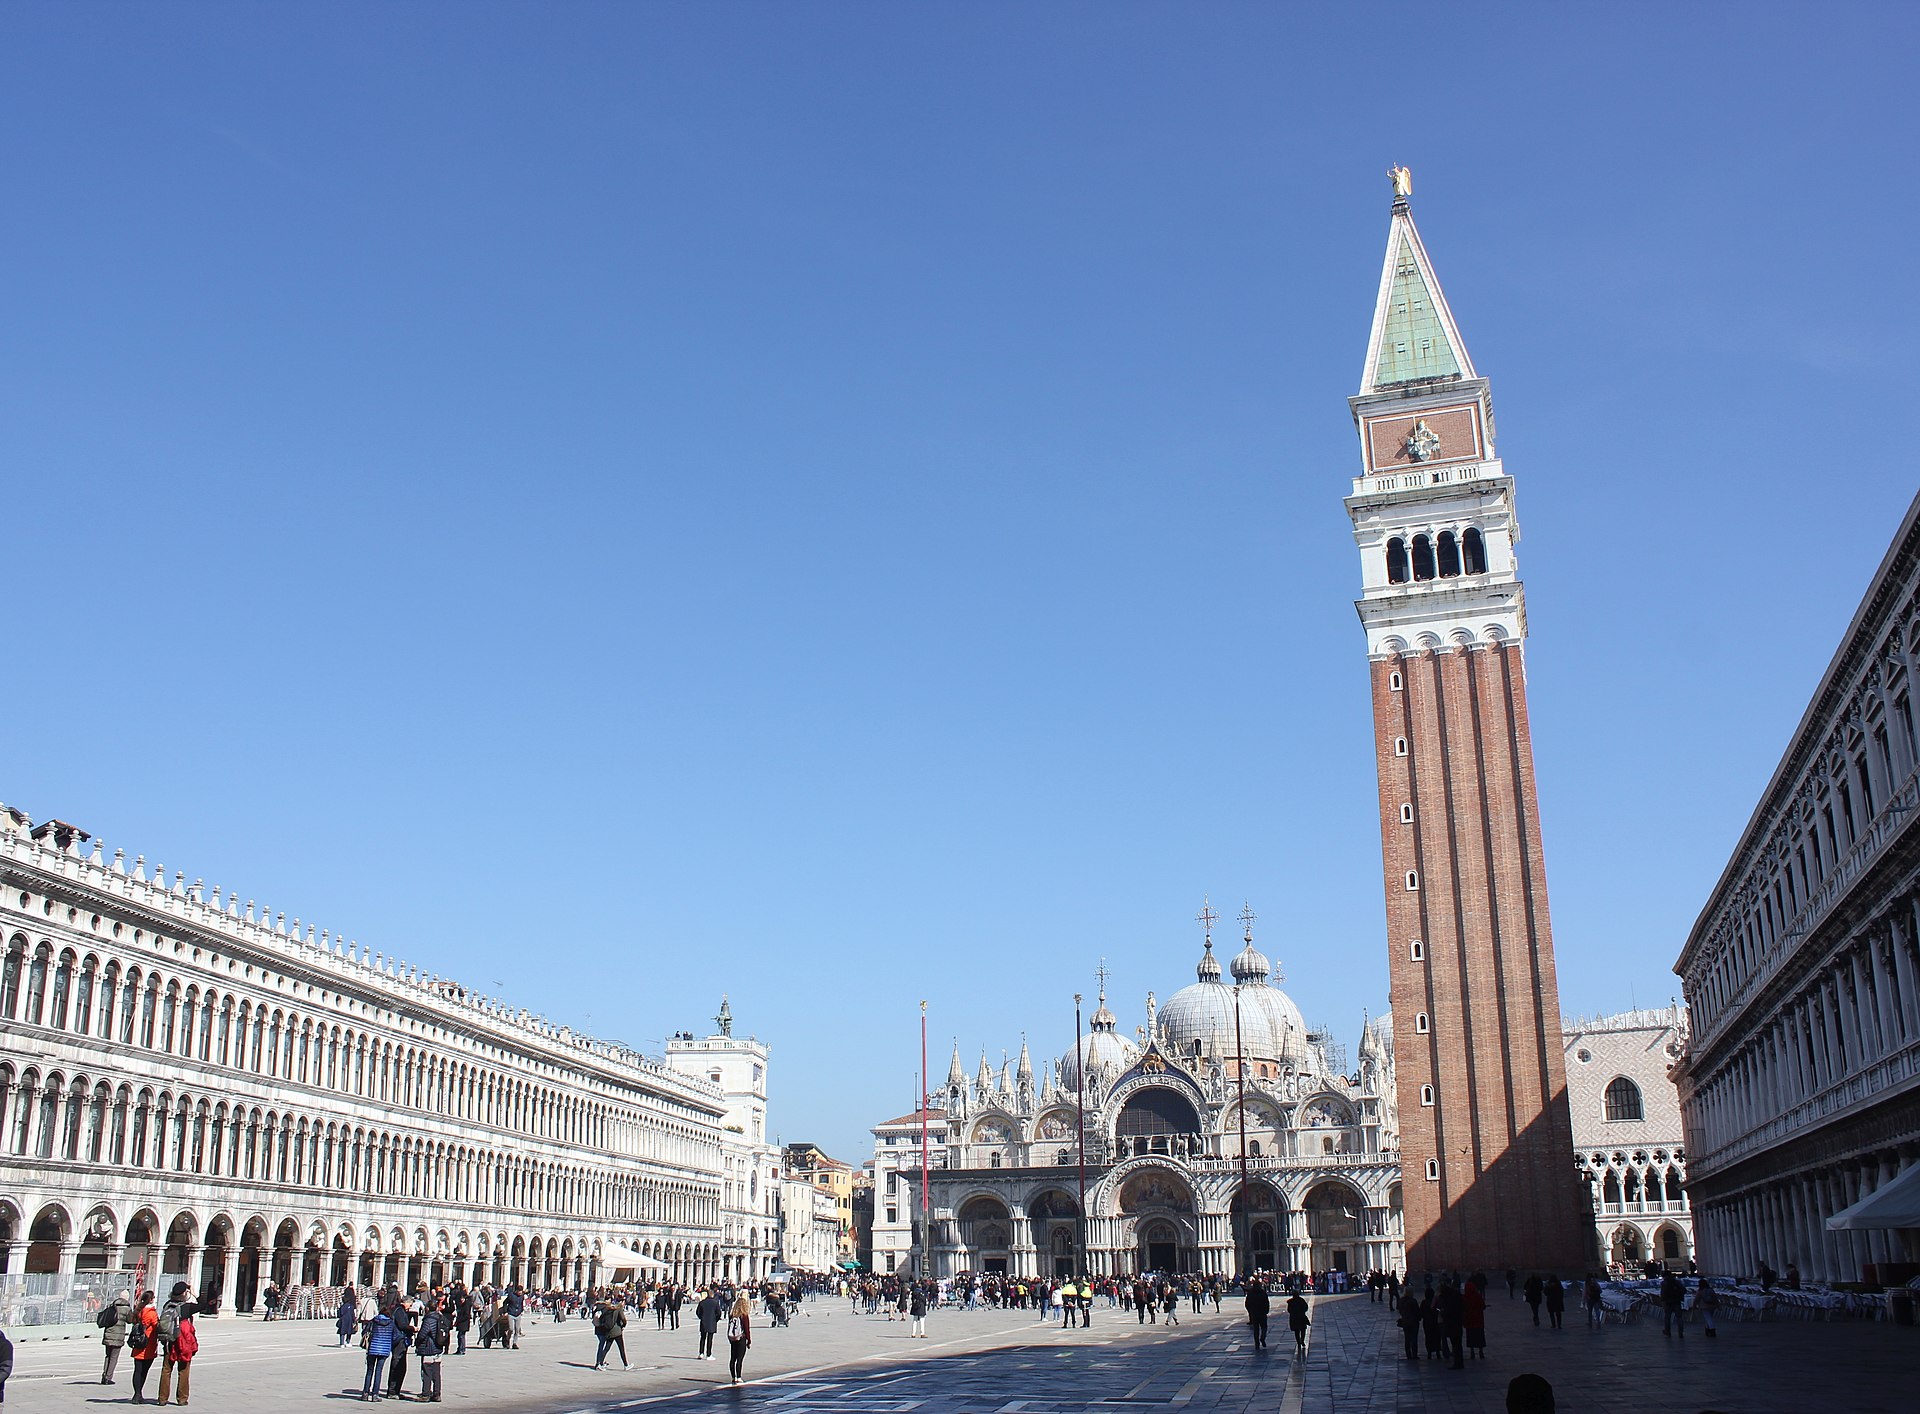
This is a good point to remind you that Church and State, or Church and Society, were very closely bound up at all levels of activity; a feature which is nicely symbolised in the fact that the great Church of the Republic’s patron saint—not the ‘Cathedral’ at this time—that is, St Mark’s, lies between the Palace of the Doge to the right, and the central administration or ‘Procuratie’ to the left.
But the most characteristic of all these ‘societies-within-a-society’ were the ‘Confraternities’ or ‘Friendly Societies’, which, in Venice, were always called ‘Schools’—‘Scuole’. These were formed by laymen for a mixture of purposes, inseparable, but varying in relative importance: for religious worship and religious instruction; to ensure respectable, well-attended funerals; for charitable help to members and their families who were ruined or fell ill, or to those who were widowed, or left as orphans. They also gave charitable help to the community at large: to the sick, the old, the paupers and the prison population.
There were more than two hundred of these ‘Schools’ in Venice, and it has been estimated that around two-thirds of the male population belonged to one or other or them; the choice depending on their wealth, their profession, their class, and also where they lived.
The point of telling you of all this is that some of the ‘Scuole’—especially the six ‘major’ schools, known as ‘Scuole Grandi’—became patrons of the Arts, particularly in times of prosperity, hiring architects to build or to rebuild their headquarters or perhaps the church with which they were associated, and hiring painters to decorate the walls of these buildings, in rivalry with each other, and with the State and the ecclesiastical establishment.
This lecture falls into two distinct parts. In the first, we shall look at three cycles of canvasses which were commissioned for and by the Venetian Schools between 1490 and 1505 and which offer a very clear account of their ethos and characteristic activities. In the second, we shall concentrate on one long and sustained narrative, dating from much the same years, illustrating the life and martyrdom of the patron saint of a minor School: the Legend of St Ursula by Vittore Carpaccio.
We begin this first part, then, with some important canvases painted for a major School—including one by Carpaccio, and two by the older painter Gentile Bellini, who was the elder brother of the more famous Giovanni and therefore brother-in-law of Andrea Mantegna.
Very often (as we shall see with regard to St George and St Ursula), the subject of the paintings commissioned by a School was the life of its patron saint. But in one very interesting case—the major School of St John the Evangelist—the Council of the Confraternity chose to represent and celebrate the miracles which had been worked by a sacred relic in their possession: miracles which had happened in Venice, some of them within living memory, to members of the School. As a result, their paintings give a fascinating glimpse of the social world for which all these ‘School-paintings’ were commissioned.
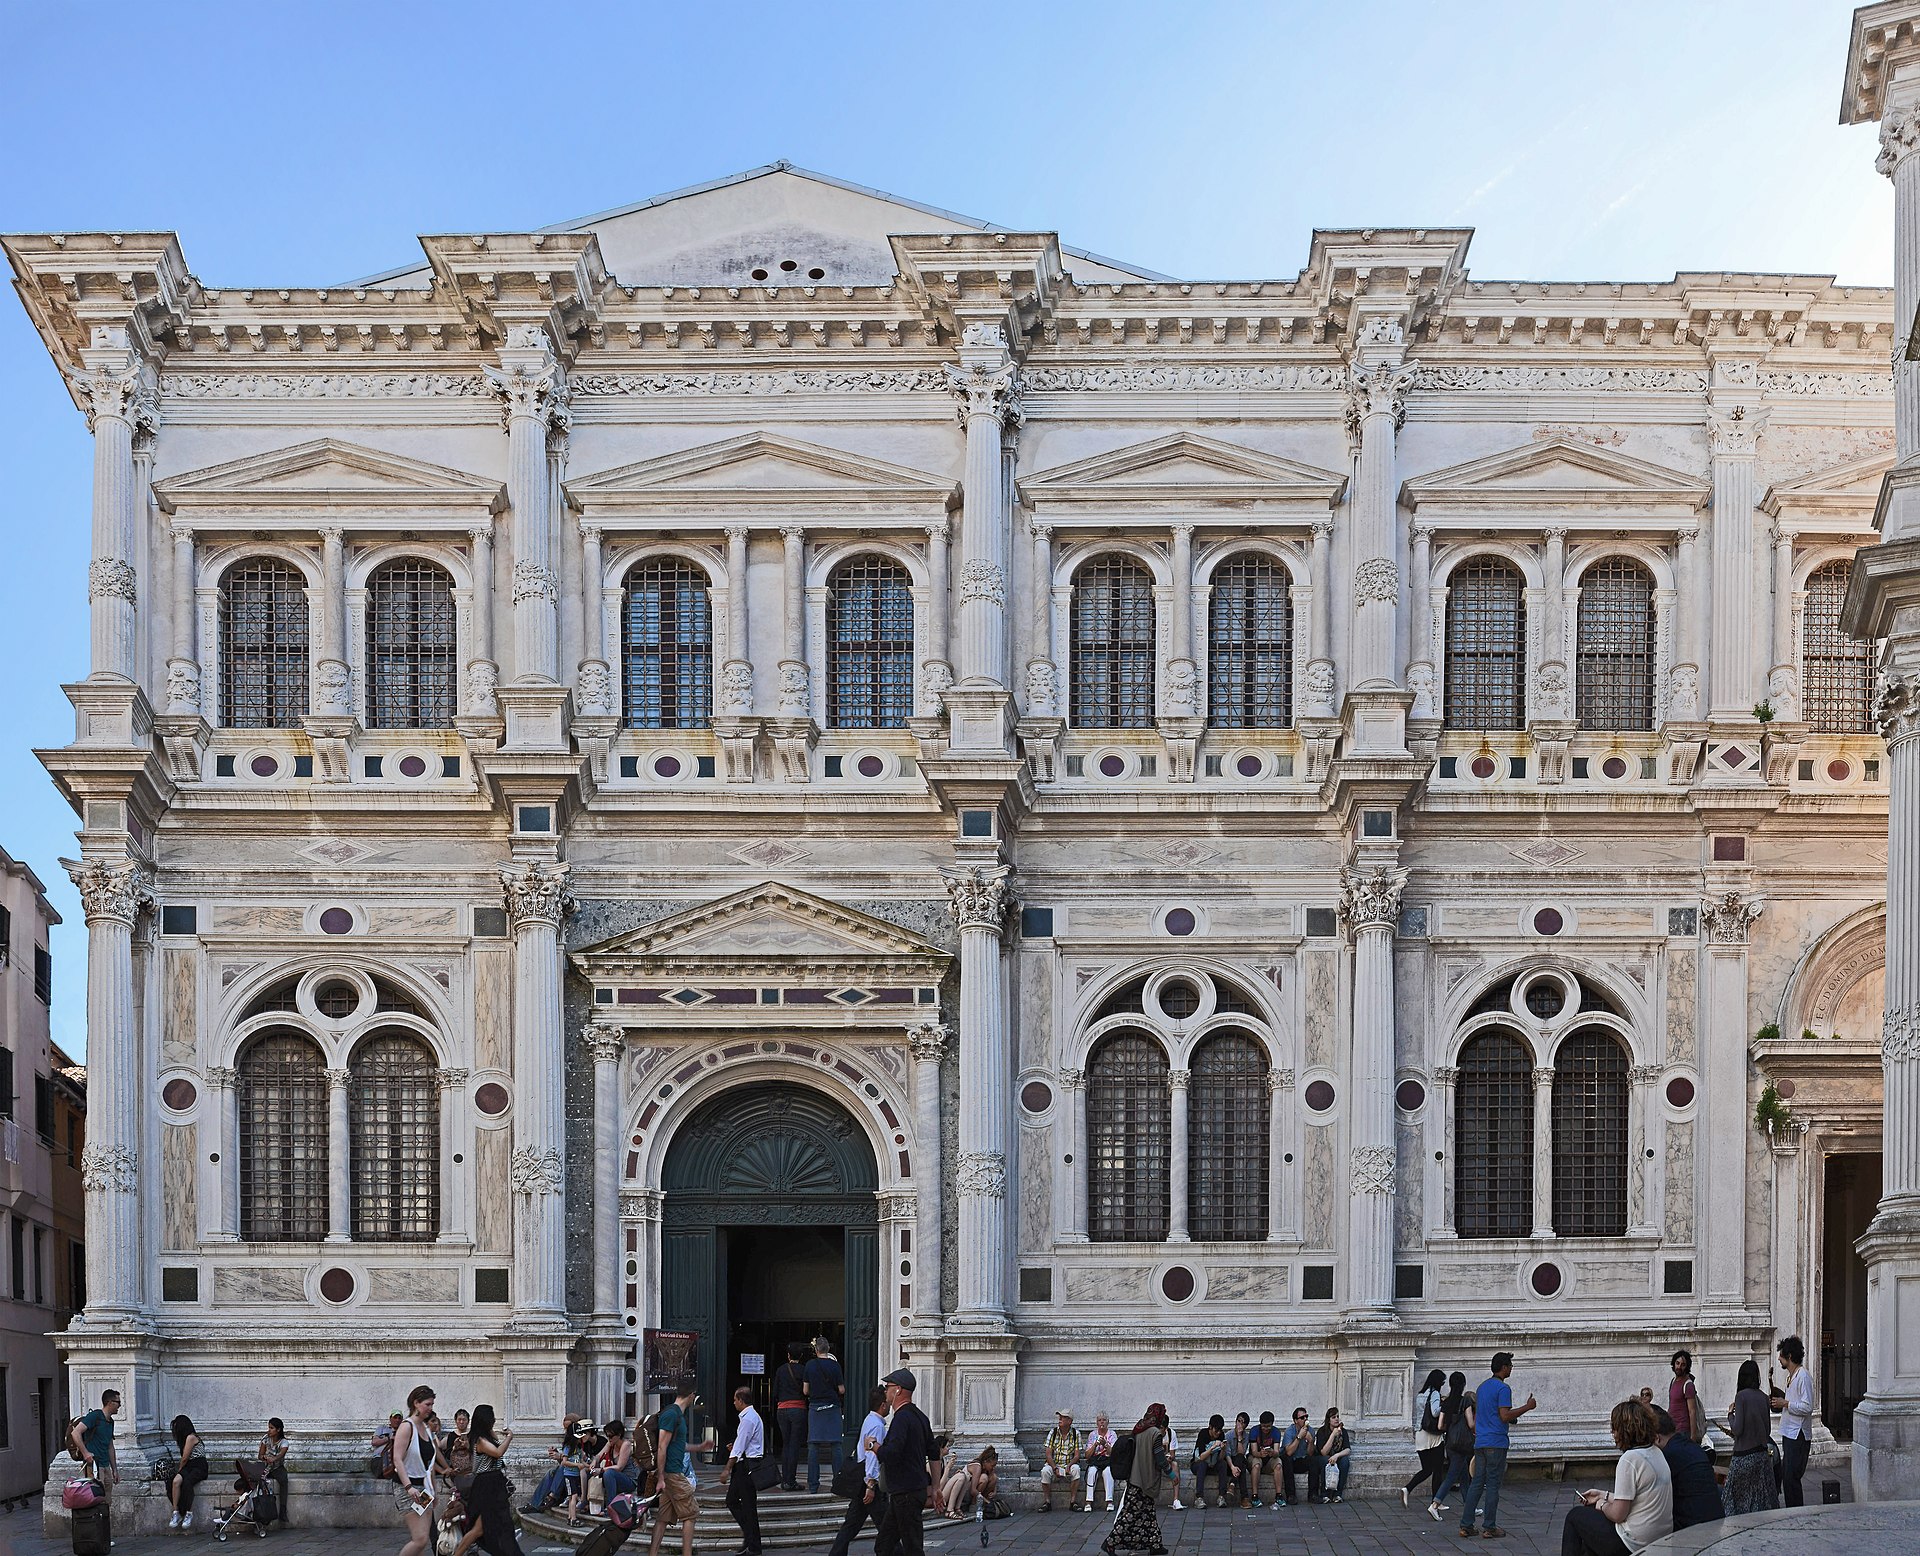
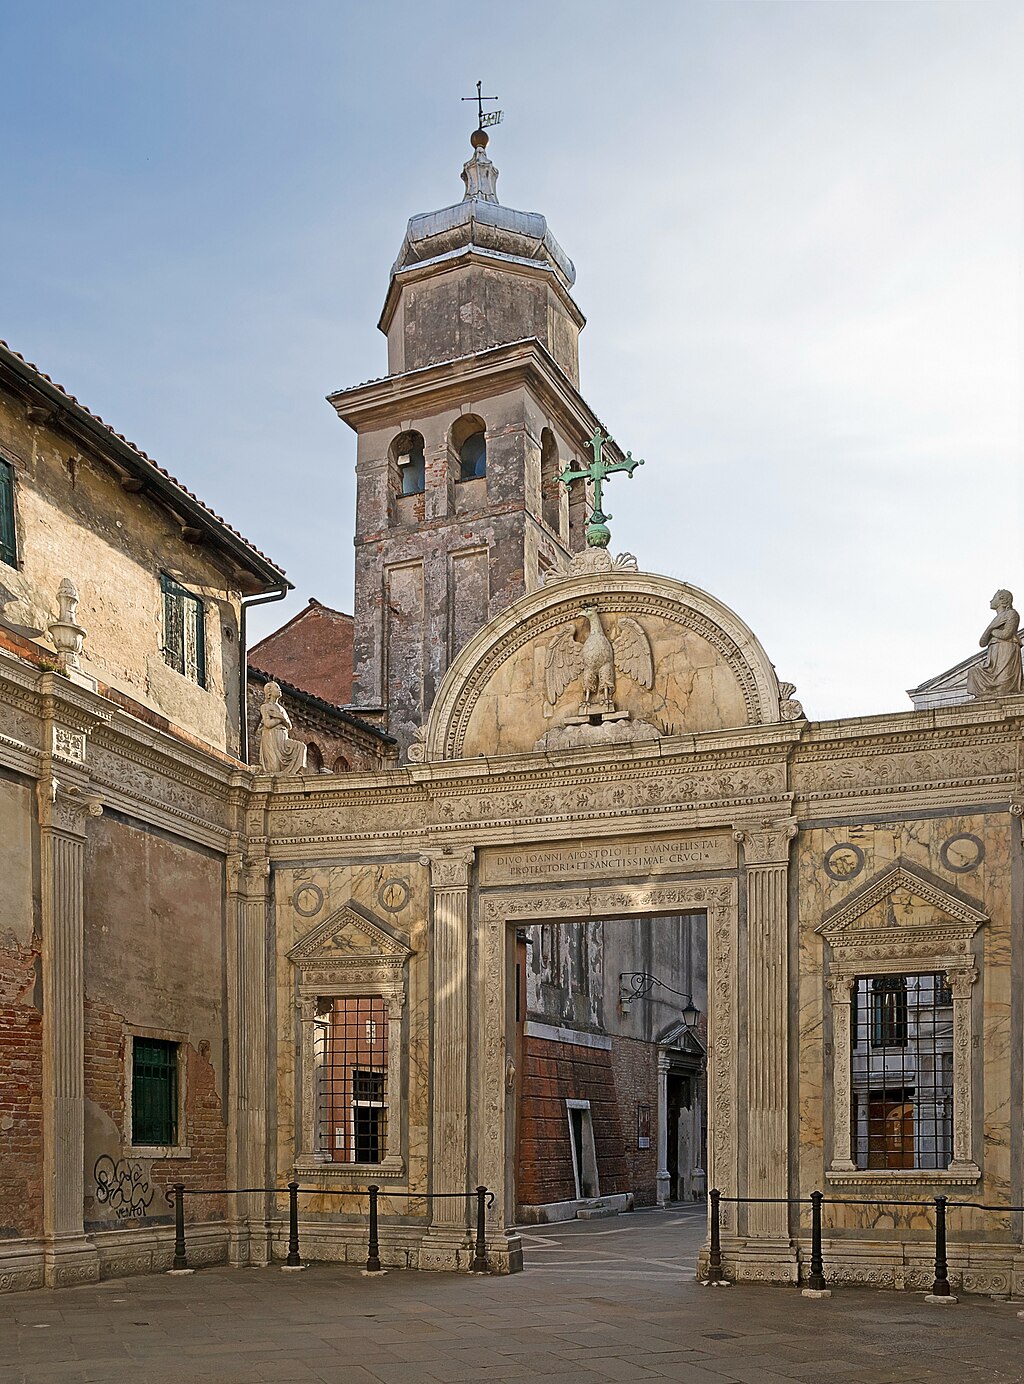
The church of St John the Evangelist stands on the left of the Grand Canal, at the point of the green ‘arrow’ in Figure 00 FIXME; very close, as you can see, to the huge church of Santa Maria dei Frari, and to the School of San Rocco which we shall visit in two weeks time. In the 1490s the church looked like this (Figure 00 FIXME): that is, it had a brick façade, with a very handsome portico and five statues.
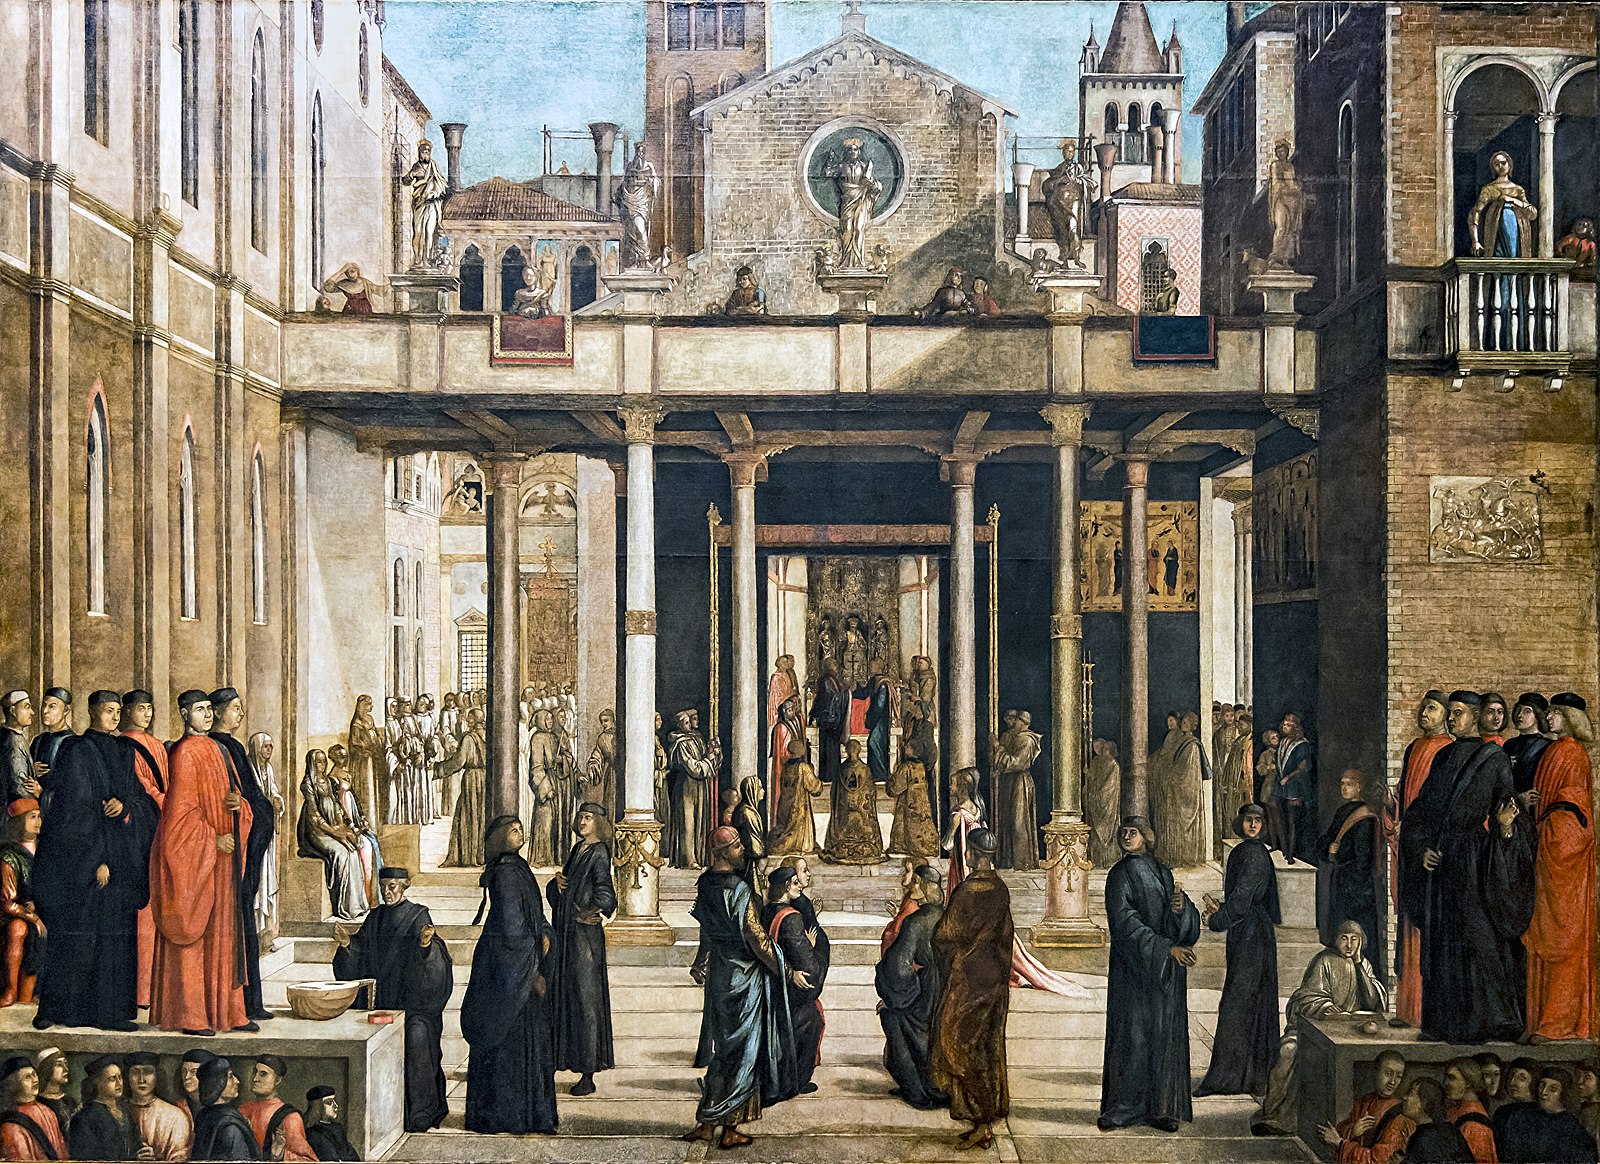
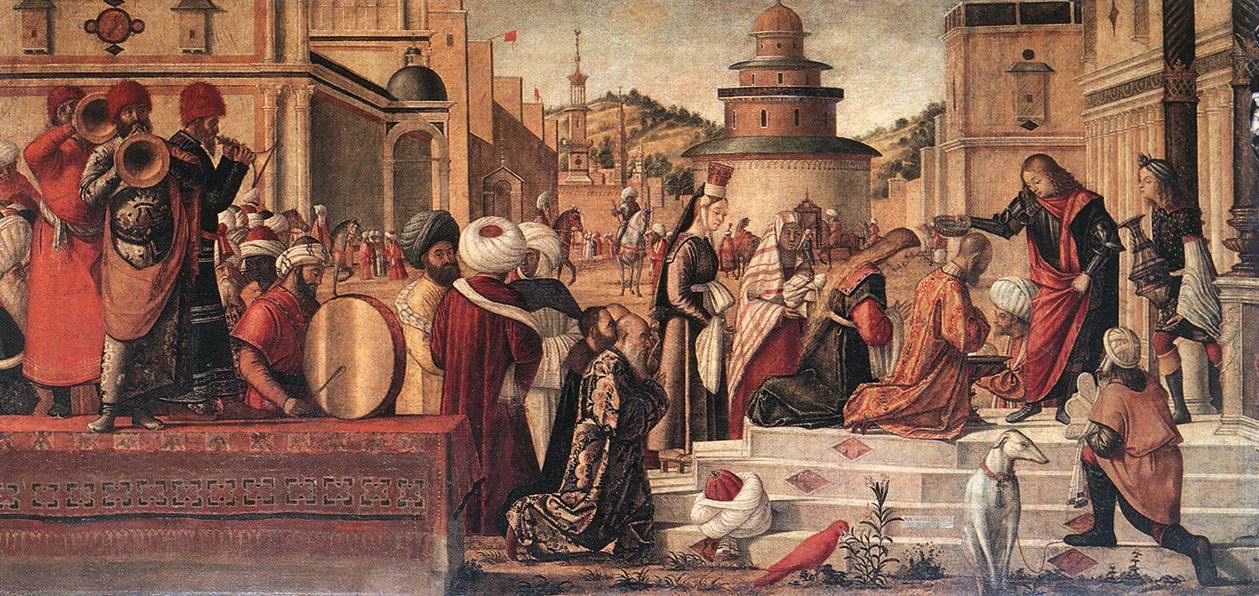
The Confraternity of St John had been founded as a community of flagellants back in 1261. Its members had rebuilt an alms house as their headquarters in the neighbourhood of this church in the 1340s; and they had obtained the cause of their future prestige in the year 1369, when the Grand Chancellor of the King of Cyprus gave them a piece of the True Cross, that is, a fragment of the cross on which Jesus was crucified. The picture above, which is one of the cycle, shows the relic being received into the church.
To house this precious fragment, they made a reliquary of crystal and silver in the form of a cross; and in the picture above, you can see a picture of that cross by Titian. The other canvasses in our cycle—there are nine in total [FIXME: check number]—all represent miracles that were attributed to the reliquary and its fragment.
The Confraternity became wealthy and prestigious: in short, it became one of the major Schools. In the thirty years between 1480 and 1510, they built a new gate to their courtyard, and a new portal to their entrance;
They followed these works with a new ceremonial staircase that led up to the two principal rooms on the first floor; one of them being the main meeting room (always known, in every School, as the Sala dell’albergo), the other being a much smaller committee room and sanctuary, measuring about forty-five feet by twenty-five feet. It was here that they kept their reliquary, and which became known as the ‘Room of the Cross’, ‘Sala della Croce’.
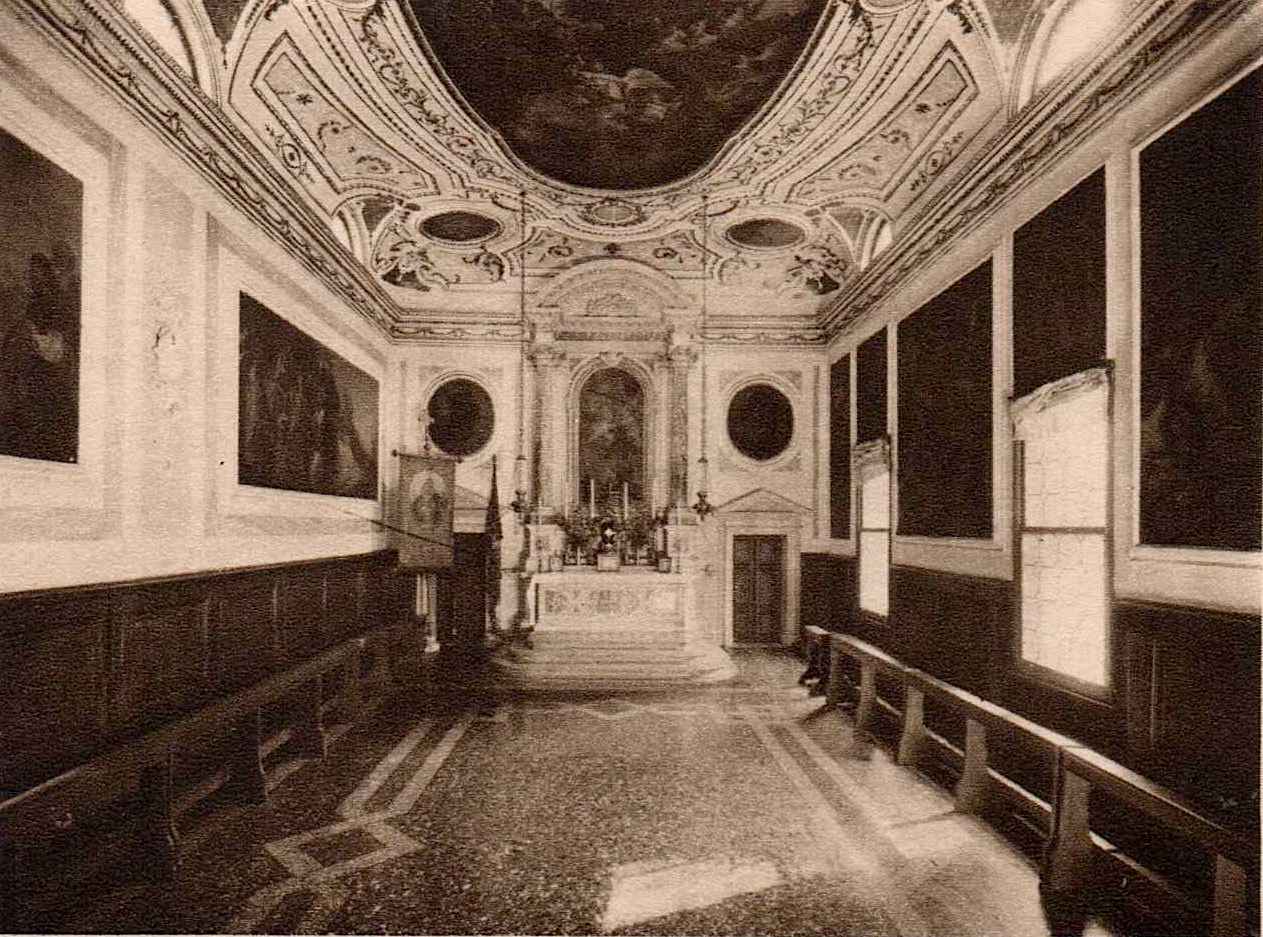
Apart from making these structural alterations, they had the larger room sumptuously redecorated, and in 1494 they placed an order for the eight canvasses which make up our cycle to decorate the smaller ‘Room of the Cross’, giving the commission to Gentile Bellini, whose father had been a member of the Confraternity, and who was by then about sixty years old.
Gentile, as was common practice, painted three of the canvasses himself, and subcontracted the other five to other younger artists (we shall look at one by Bastiani, and another by Giovanni Mansueti). However, Gentile clearly imposed certain conditions or conventions on his collaborators in order to unify the pictures. We shall see that the vanishing point is always placed about half way up the canvas, and, more importantly, that the artist is ‘viewing’ the scene as if he were looking through a window on the first floor, some fifteen to twenty feet above the ground, so that we are always looking down on standing figures.
The canvasses are no longer in the room for which they were intended, but they are at least all together, in a room of the right size, in the Accademia, where they were taken in the year 1806, when Napoleon closed all the schools down.

The Accademia, I note in passing, is only half a mile away from the School, and it remains open for longer hours than the School of St John; it also houses Carpaccio’s Legend of St Ursula. The miracles attributed to the Holy Cross were all local, and that they took place within about ten minutes walk of the Scuola itself.
One of the miracles occurred in the square outside the Church of San Lio, another on St Mark’s Square, another in the Rio di San Lorenzo, and another next to the Rialto. It is this ‘local-ness’ that makes even the lesser paintings in the cycle so fascinating.

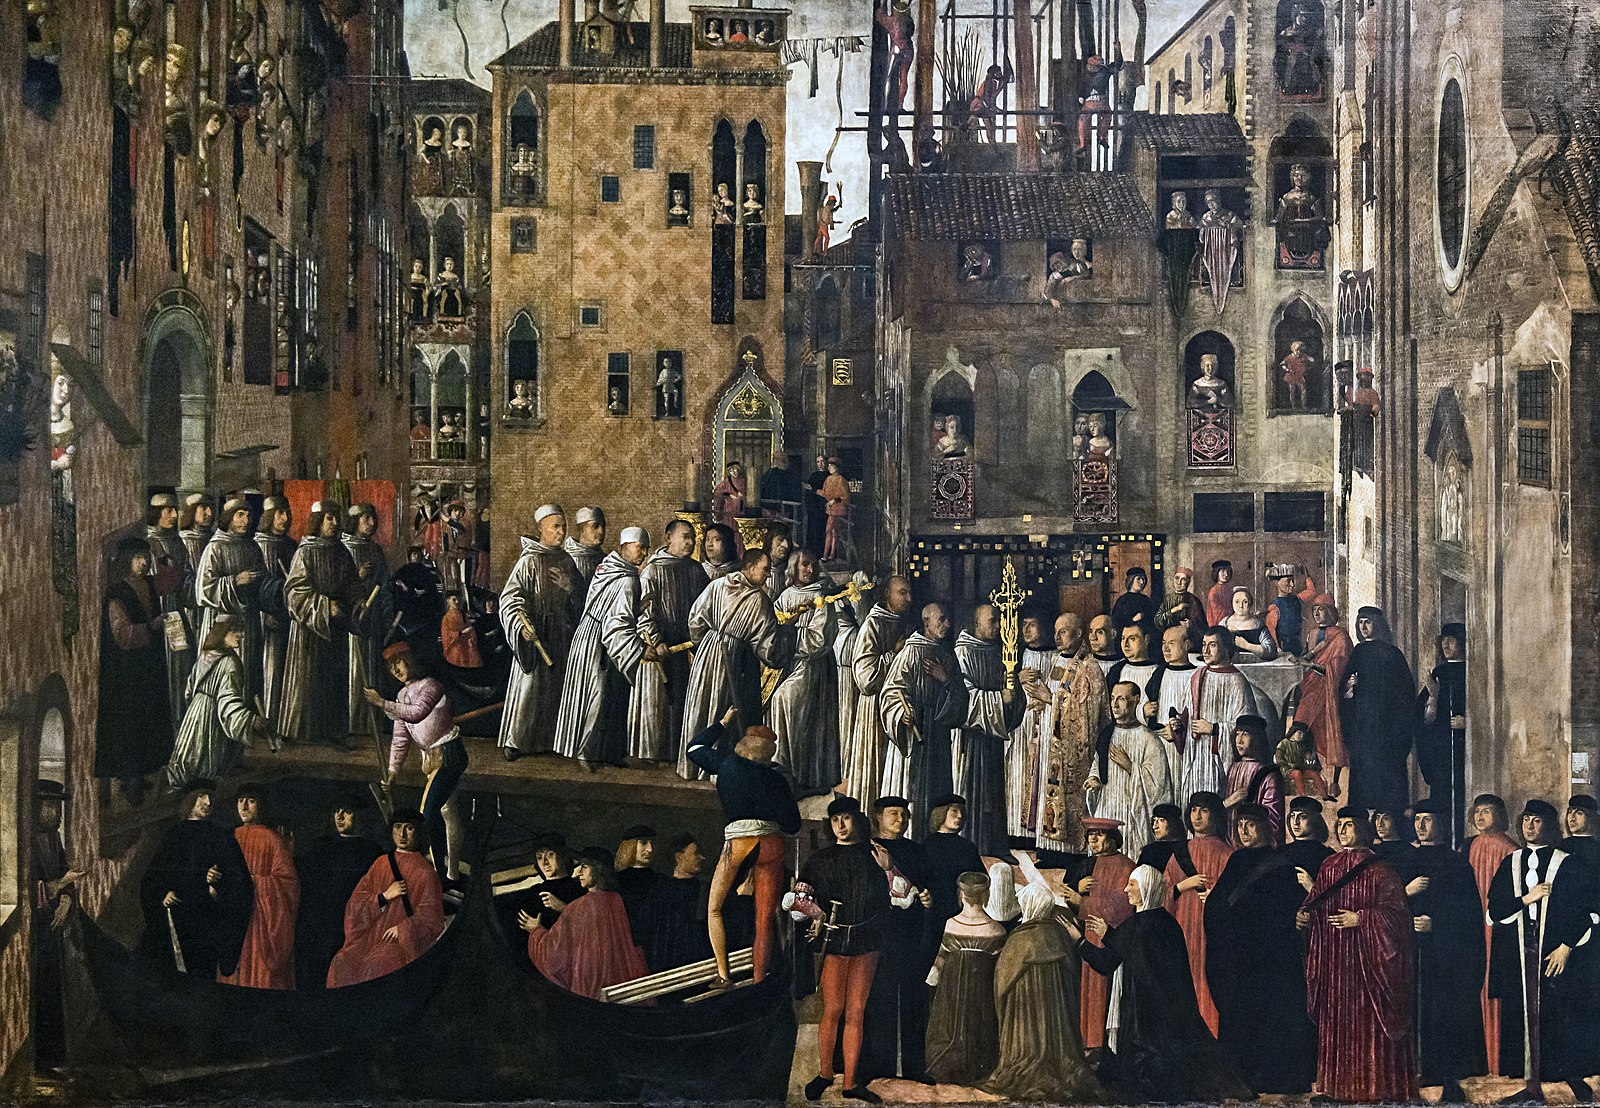
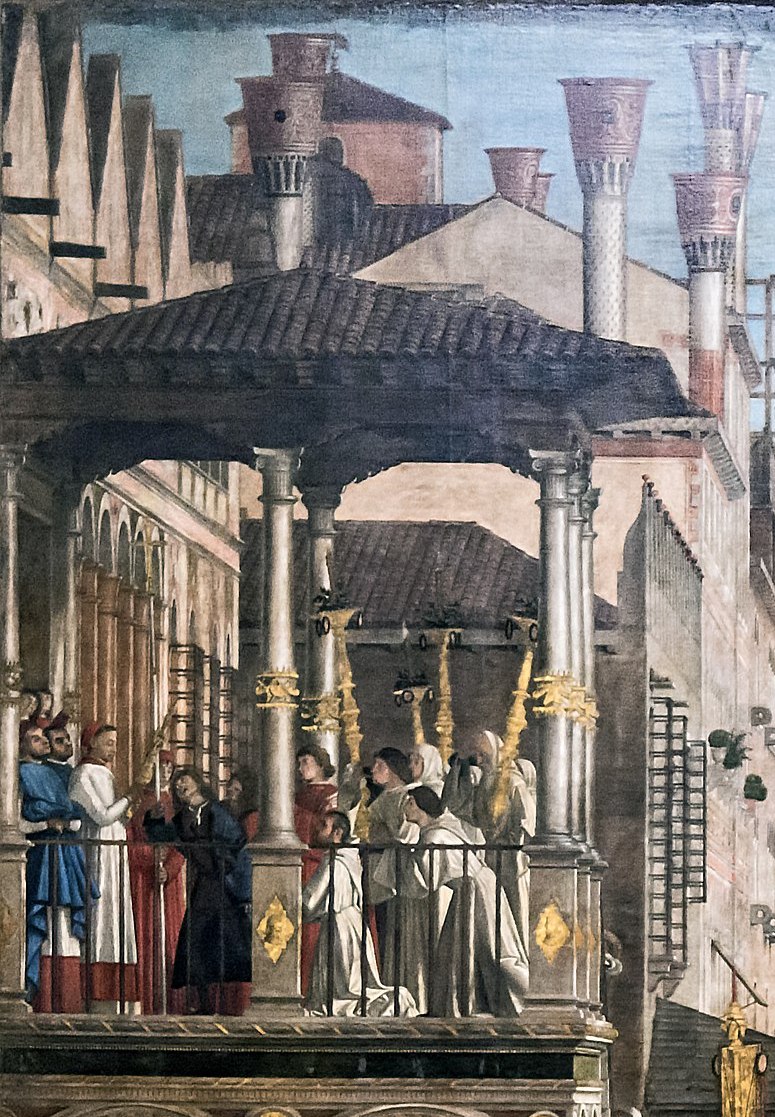
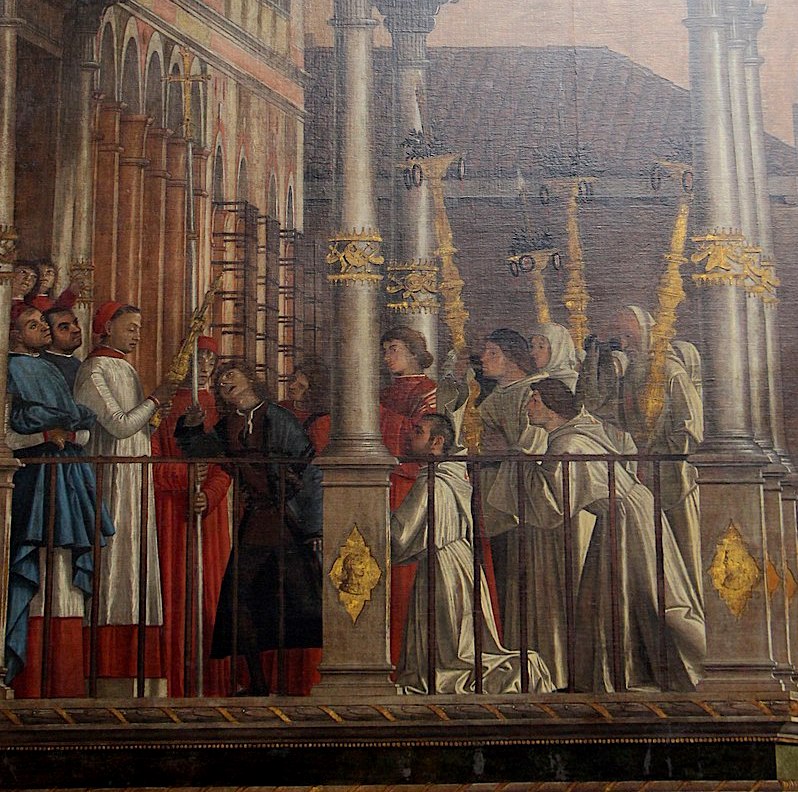
The canvas by Bastiani does not represent a miracle, but the condition sine qua non, that is, the ceremony, back in the year 1369, when the precious relic was entrusted to the Church of St John. I will say no more than that the picuture is about twelve feet high by nearly sixteen feet wide, and that it lies to the centre-right of one of the longer walls, the one which would originally have been on your right as you faced the altar, but now stands on your left as you go into the room in Accademia.
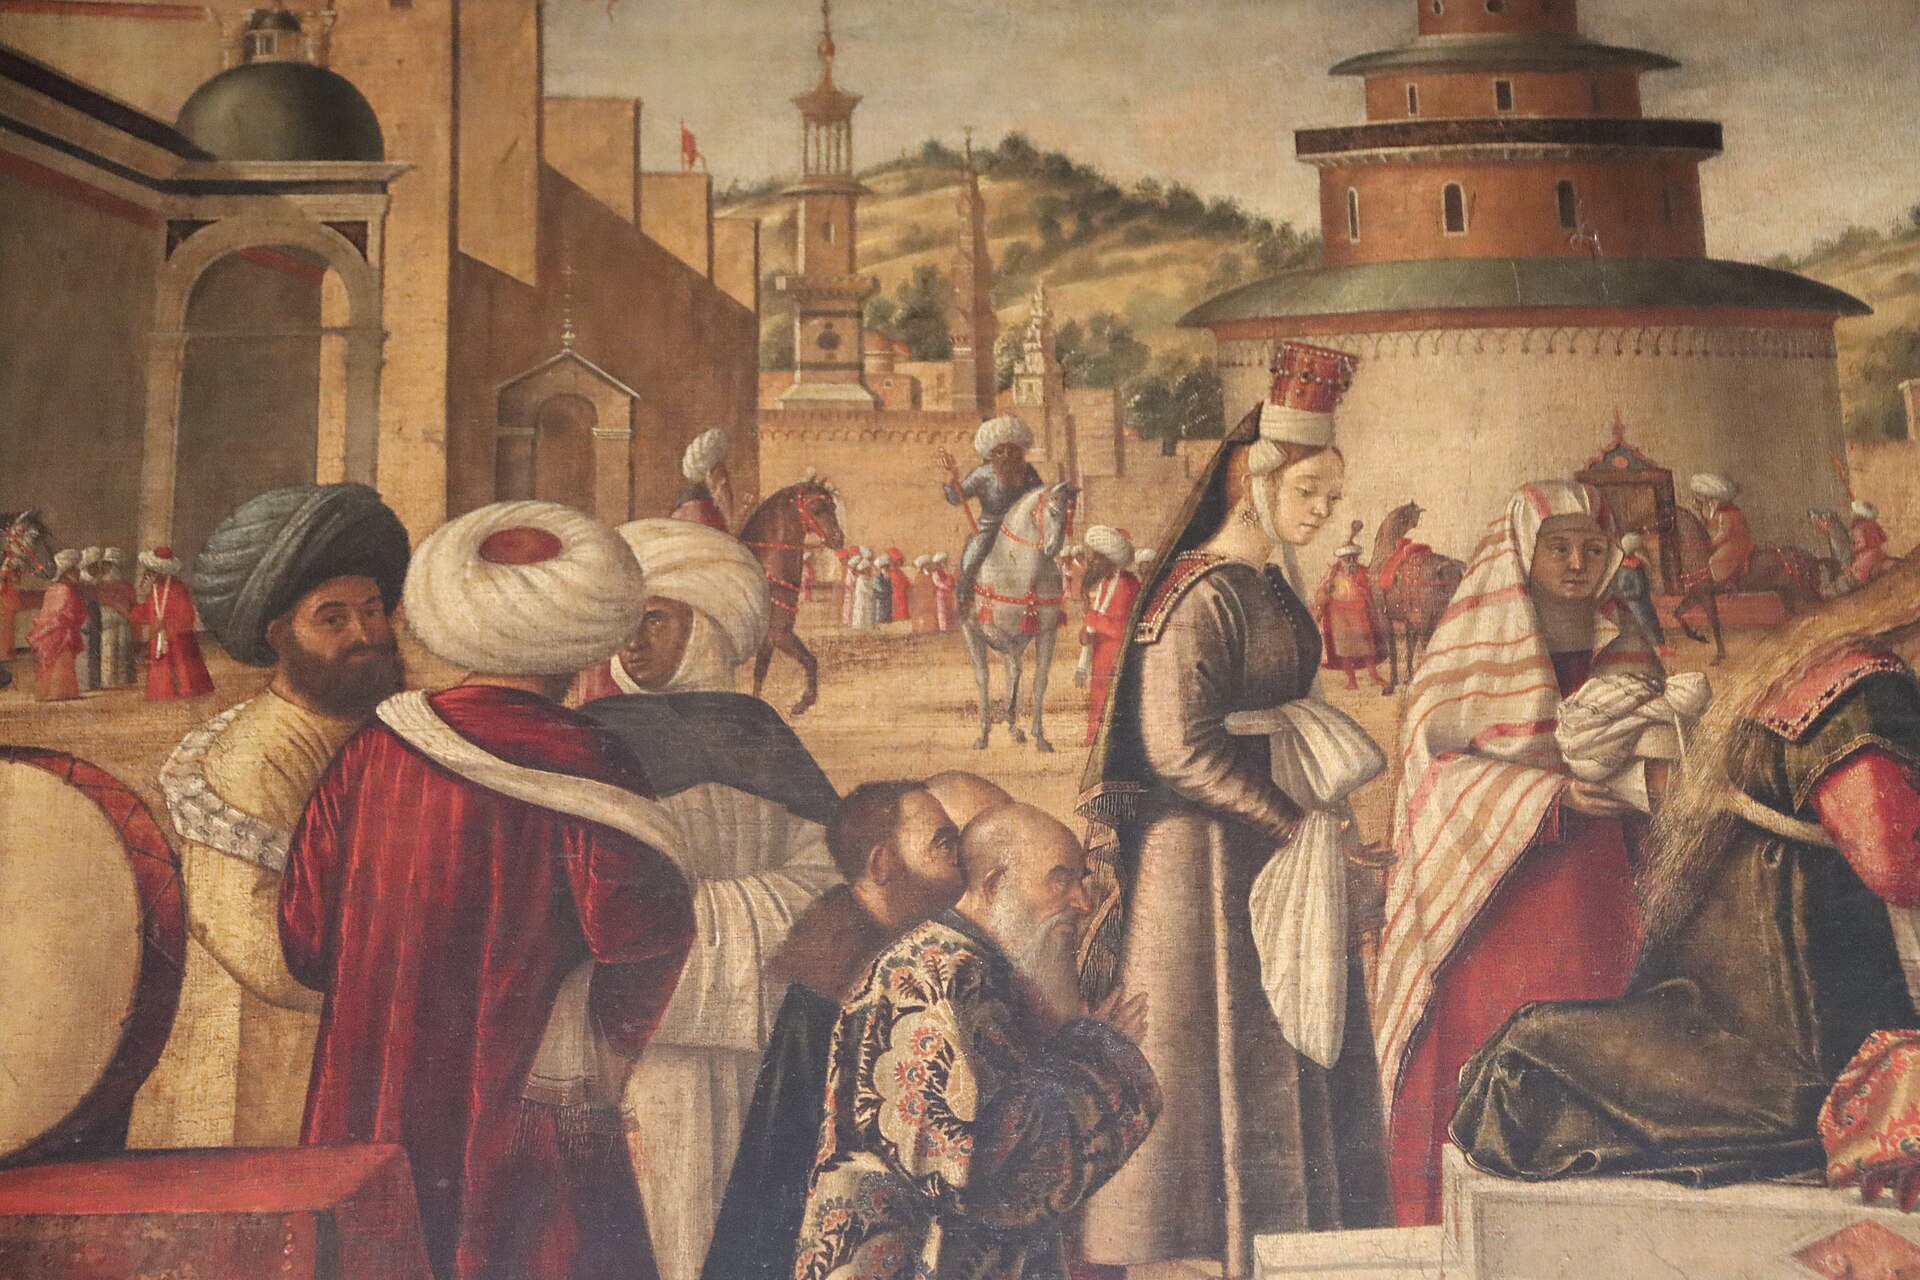
The miracle which is recorded in the first picture in the cycle as you now see it in the Accademia (it lies to the left of the Bastiani) took place in the Campo di San Lio. It was entrusted to another minor artist, called Giovanni Mansueti, in the following canvas (Figure 00 FIXME), measuring about ten feet by fourteen feet:
The main building is the Church of San Lio, with the square or ‘Campo’ compressed between it and the canal. The year is 1474—that is, only about twenty-five years before the canvas was painted; and I stress the date because the miracle may strike you as decidedly odd. The relic, inside the cross-shaped reliquary, was to have been carried to the Campo San Lio, to the funeral to one of the brethren. But this brother had been guilty of some irreverent remarks about the relic; and so, when the brethren tried to pick up the reliquary, it became too heavy for them to carry, and they had to find another cross in its place.
Alas, or thank goodness, Mansueti does not show the miracle—the breaking of the normal rule—but the norm itself. A procession of the ‘Confratelli’, wearing the robes of their School, carry the substitute cross over the bridge to the Campo, where the family kneel beside the coffin, below us, while other mourners are arriving either on foot, or by one of the two gondolas.
The perspective of this scene is rather primitive for a painting done in about 1500, because Mansueti has ignored the two most simple of all Alberti’s rules: namely, that there should be a common scale for buildings and for human figures, and that figures diminish in proportion to their distance. As a result, there is simply not enough space in the picture. But even in this ancient black and white photo, you can see that Mansueti must have rendered the brickwork of the Palazzo very carefully; and his representation of the windows, the hangings, and the costumes is so careful that the painting is well worth close attention when you are actually in the room in the Accademia.
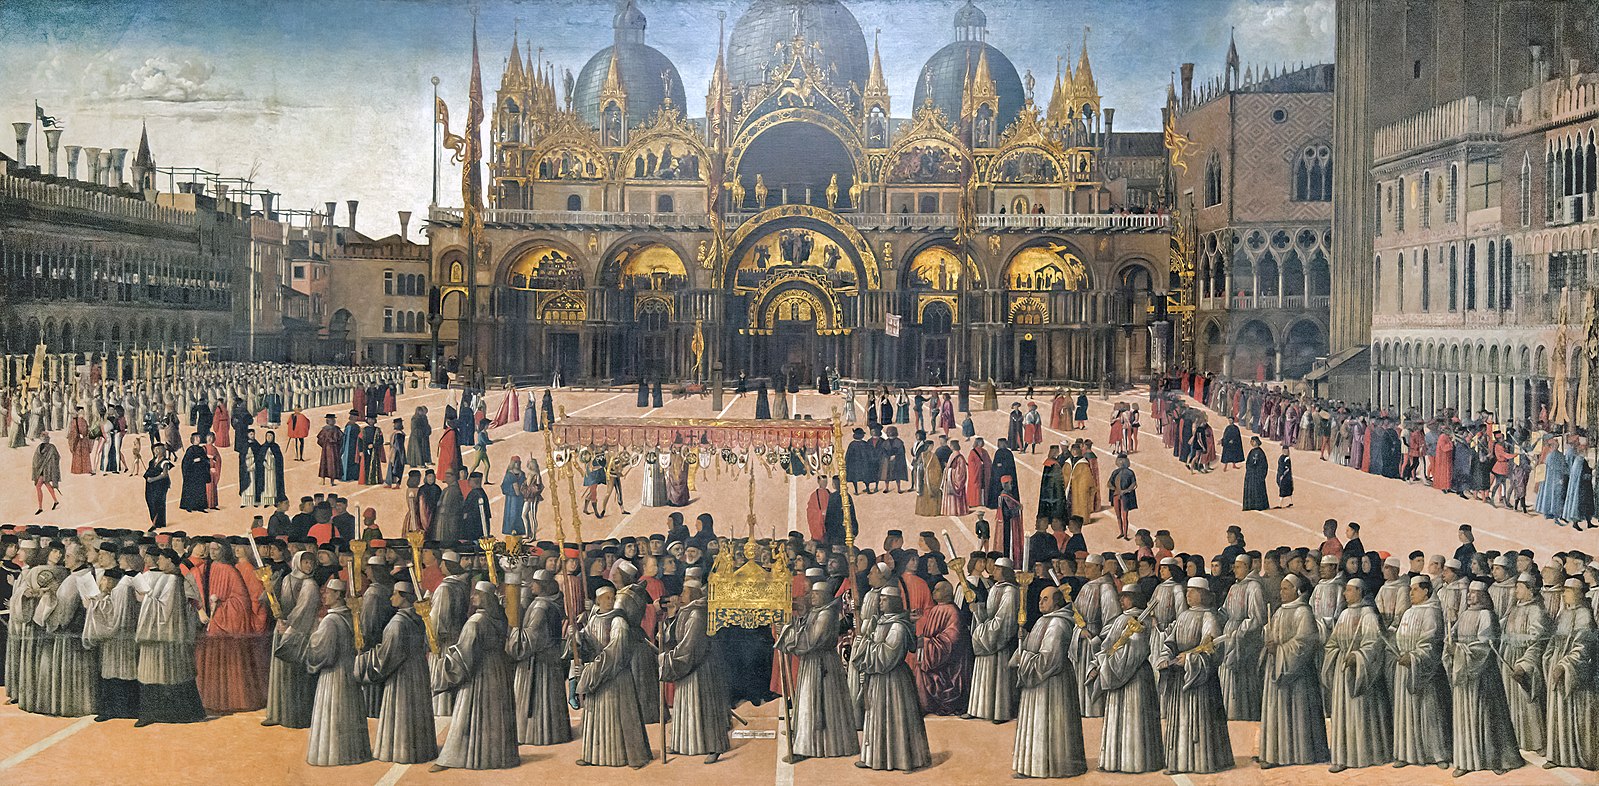
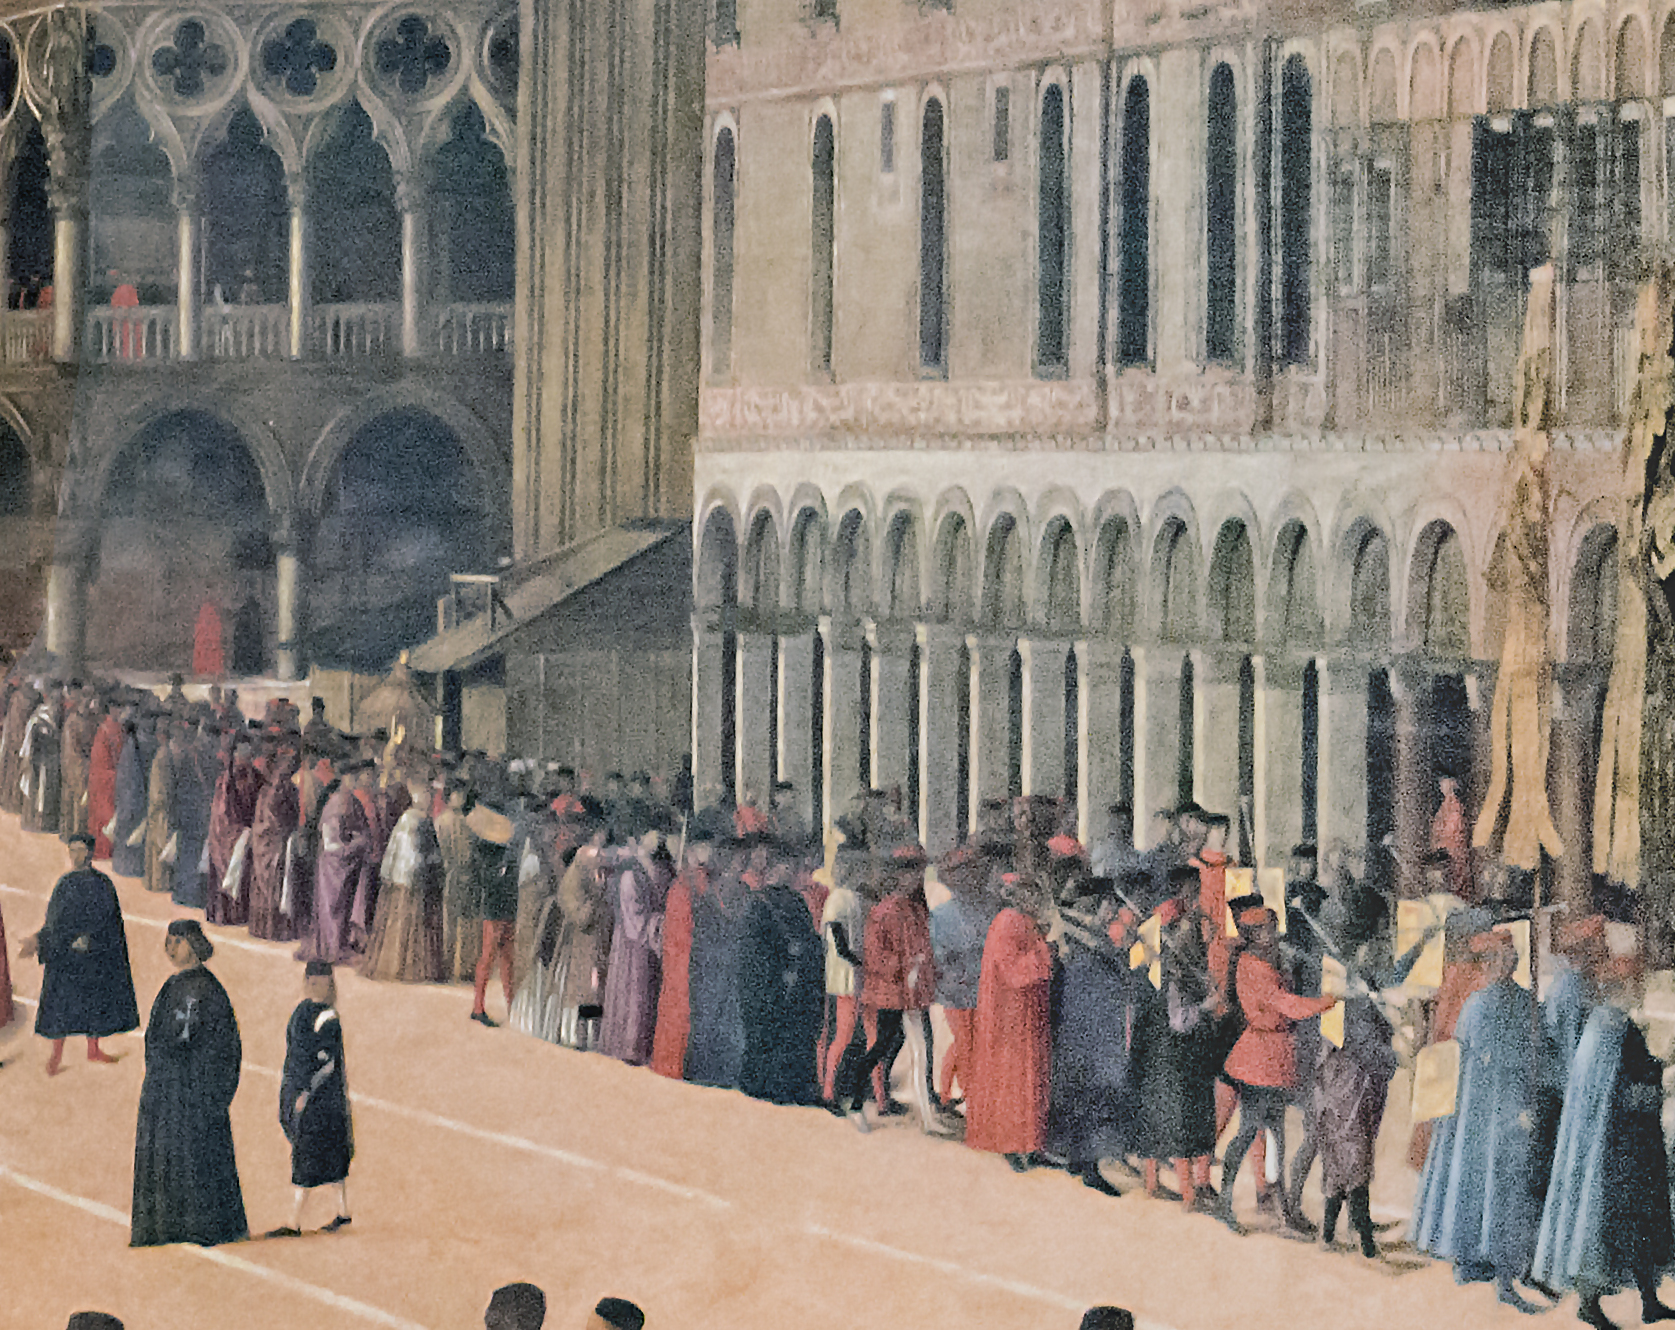
The only trouble with this advice is, that, once in the room, your eye goes straight to the painting in Figure 00 FIXME—a single, huge canvas, measuring eleven feet by twenty-four, that occupies the whole of the shorter wall facing you. This is by Gentile Bellini himself, who succeeds in suggesting the vast expanse of the Square of St Mark’s just as effectively as a modern photograph does, while also giving us a superbly detailed, highly accurate account of the elaborate façade of the main civic church, with its cupolas, the four horses, the original mosaics, and the five arches.
He also shows the two flanking buildings that I have mentioned, the Procuratie and the corner of the Doge’s Palace, with its beautiful arches and ornamental brickwork.
The bottom of the campanile or bell-tower is also shown; and if you know Venice well, you might ask, ‘Where is the clock-tower?’. To this, there is a simple answer: it had fallen down, and was not rebuilt until after this picture was painted.
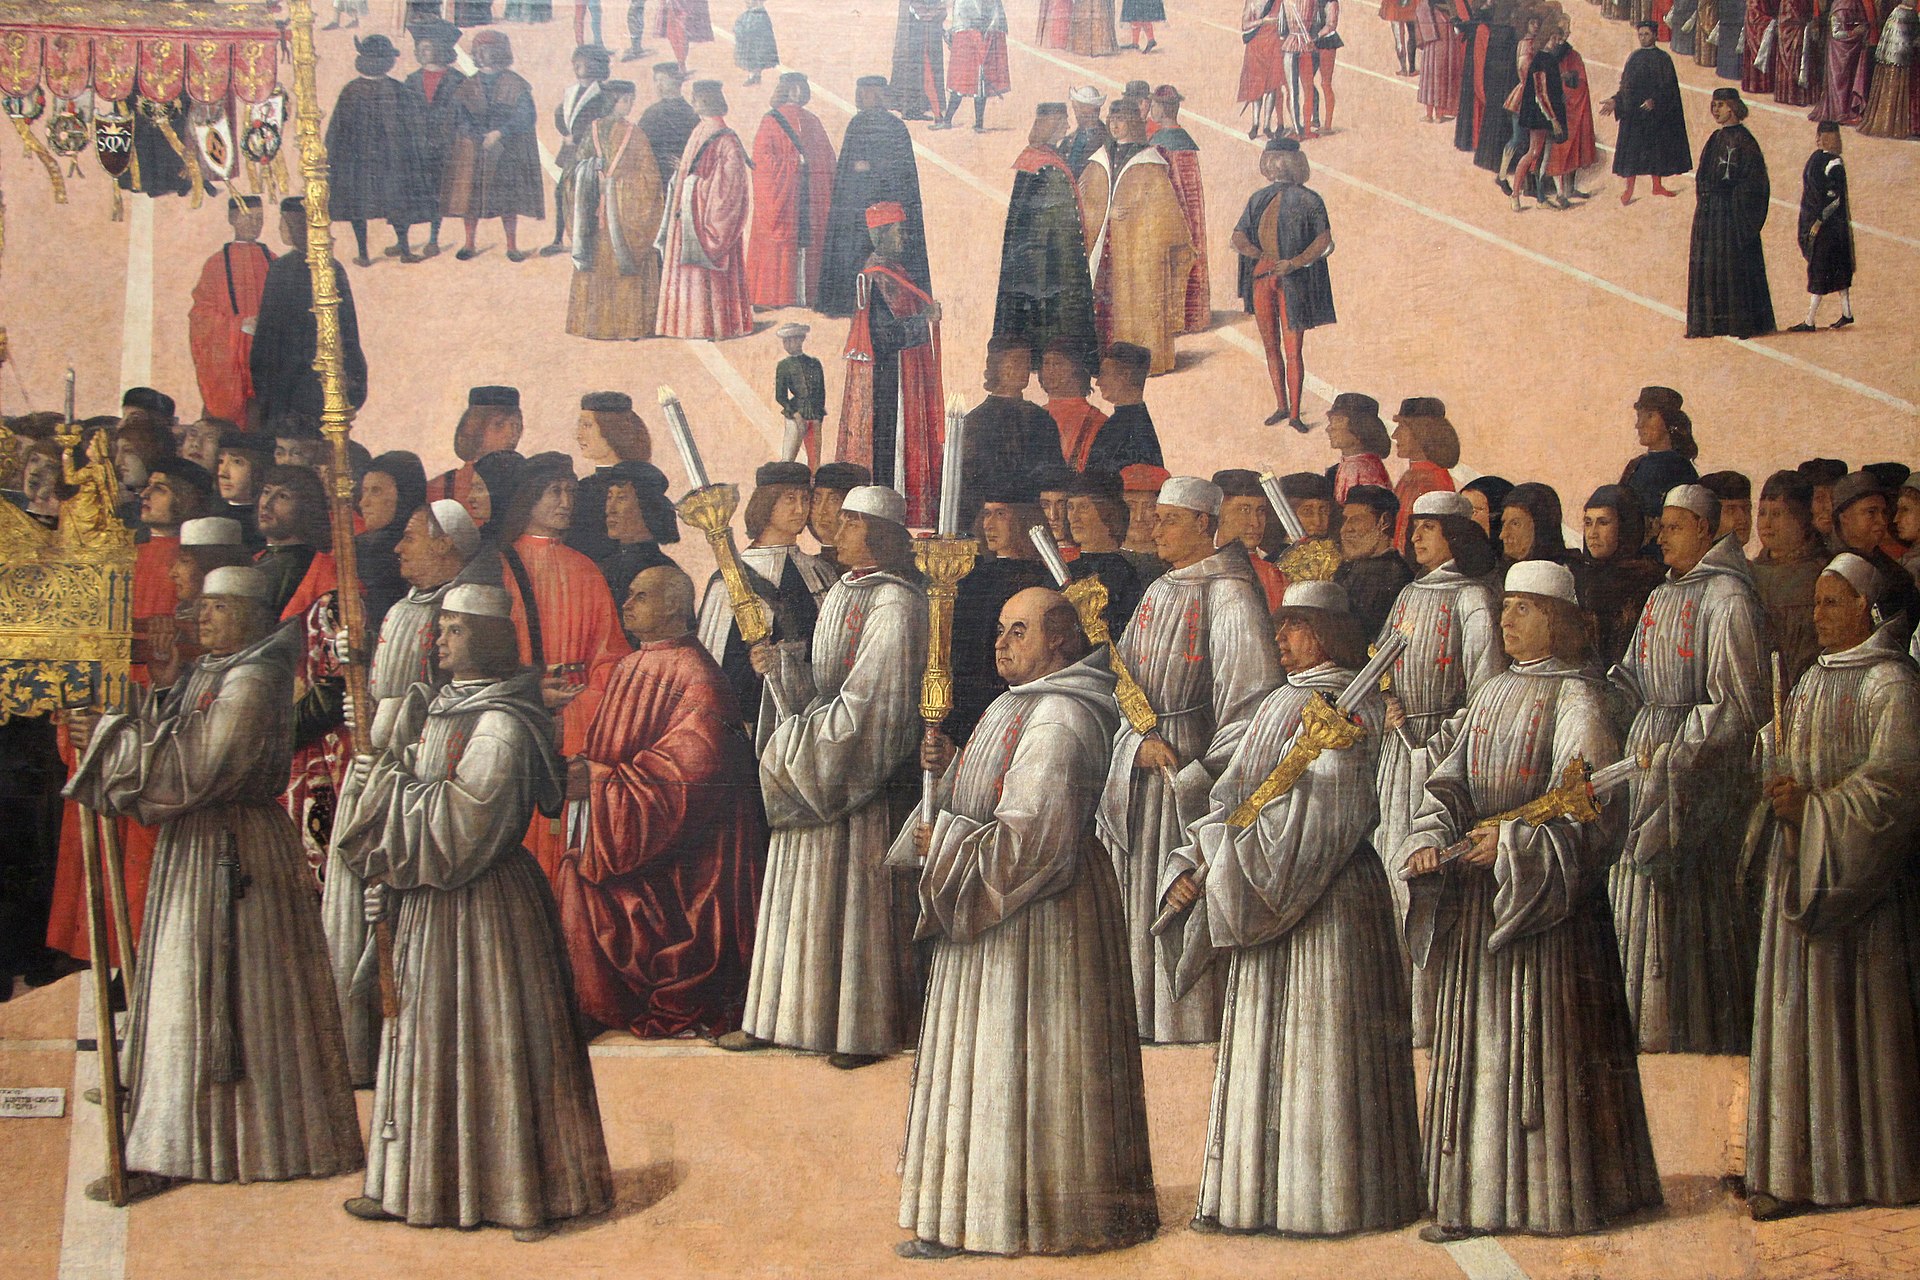
What we see in this scene is a procession on a far greater scale than that of a mere funeral like that in the Mansueti. We are looking at the real relic and reliquary, carried under a superb baldacchino. All the members of the School are there on parade, since the leaders have already gone across the Square.
The day is the Feast of St Mark on April 25th. The second procession, which is shown emerging from the Doge’s Palace, is headed by the Doge himself; and the School is here affirming its own central role in the civic and religious festivities of that day.
It may therefore seem rather pedantic to record that this particular procession is supposed to have taken place in the year 1444, and that the kneeling figure is a merchant from Brescia, a certain Jacopo De’ Salis, who made a vow to the relic on that day—a vow which resulted in his son’s recovery from a serious wounding.
The picture is inscribed with a significant phrase: ‘The work of Gentile Bellini, Knight of Venice, inflamed by love of the Cross’, ‘amore incensus’.We cannot understand the phenomenon of the Schools, unless we understand this mixture of social display, popular religious feeling and personal belief; just as we cannot enjoy this picture, if we do not appreciate the mixture of stiffness and naivety in the figures, and the quite extraordinary sophistication of the perspective and the rendering of the play of light, which are already pointing the way forward to Canaletto 200 years later.
Notice the candles close to the reliquary in particular, because they are to become the ‘carriers’ of the healing power of the cross in two of the miracles on the third wall, that is, the other longer wall, which you see below.
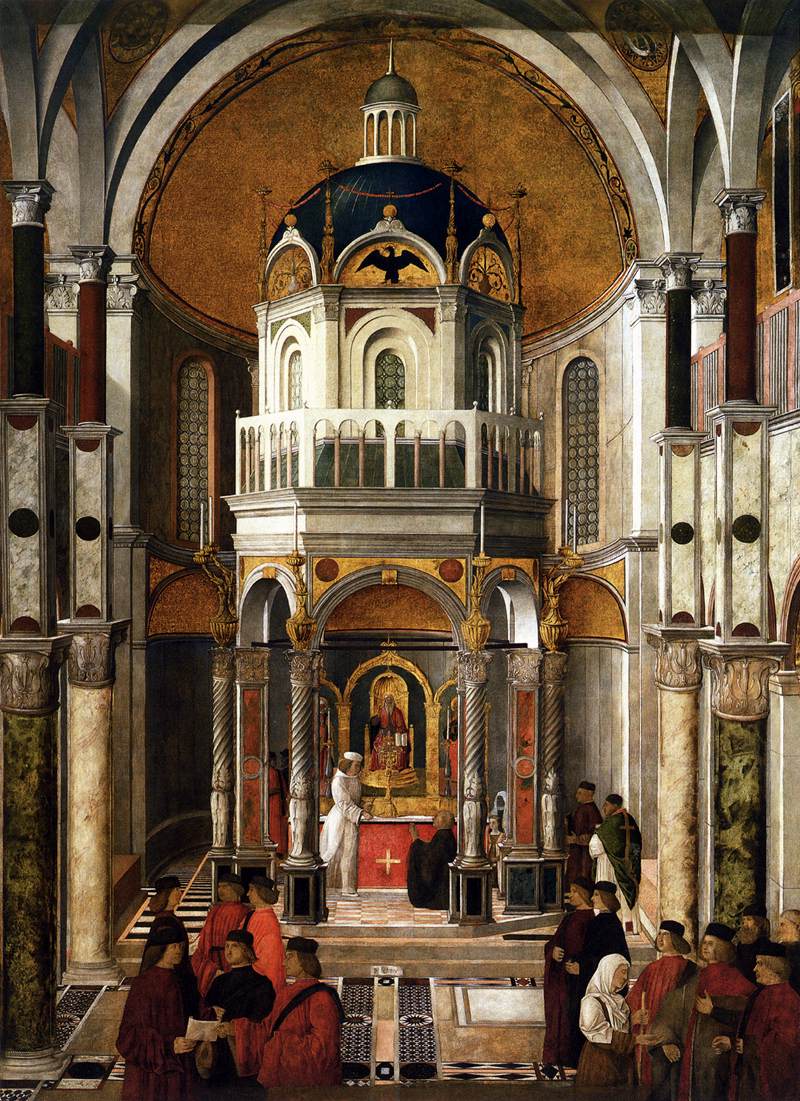
The first canvas is about six feet wide and it is by Gentile Bellini again, while the other, placed at the other end of the wall, is about seven feet wide, and is by Giovanni Mansueti. Both illustrate very strikingly the point made earlier about the high point of view which is common to all the paintings. I will not spend long on these two ‘indoor’ scenes; but in the first we should note, at least, the eagle of St John on the superb ciborium above the altar (splendidly lit from the high source of light in the windows, out of sight to the left, which suggests that this is intended to be the interior of the Church of Saint John). Notice too that the so-called ‘miracle’ is once again a relatively minor one: Pietro de’ Ludovici was cured of the quartan agüe when he was touched by a candle that had been near the cross.
The same sort of comment is required for the canvas by Mansueti (Figure 00 FIXME). Even if we ignore the gondolas and the cramped space in the lower half, and concentrate on the splendid hall—the hall of the house of Ser Nicolò Benvegnudo, with the light streaming through the marble columns—and even if we go into colour (Figure 00 FIXME), and look hard at the principal figures, I would defy you to work out for yourselves that Benvegnudo’s daughter, an invalid from birth, was cured of her ailments in the year 1414, when she touched three candles which had been in contact with the reliquary.
Let us go back outdoors again, and back to Gentile Bellini, for the central picture on this wall, which measures eleven feet by fourteen:
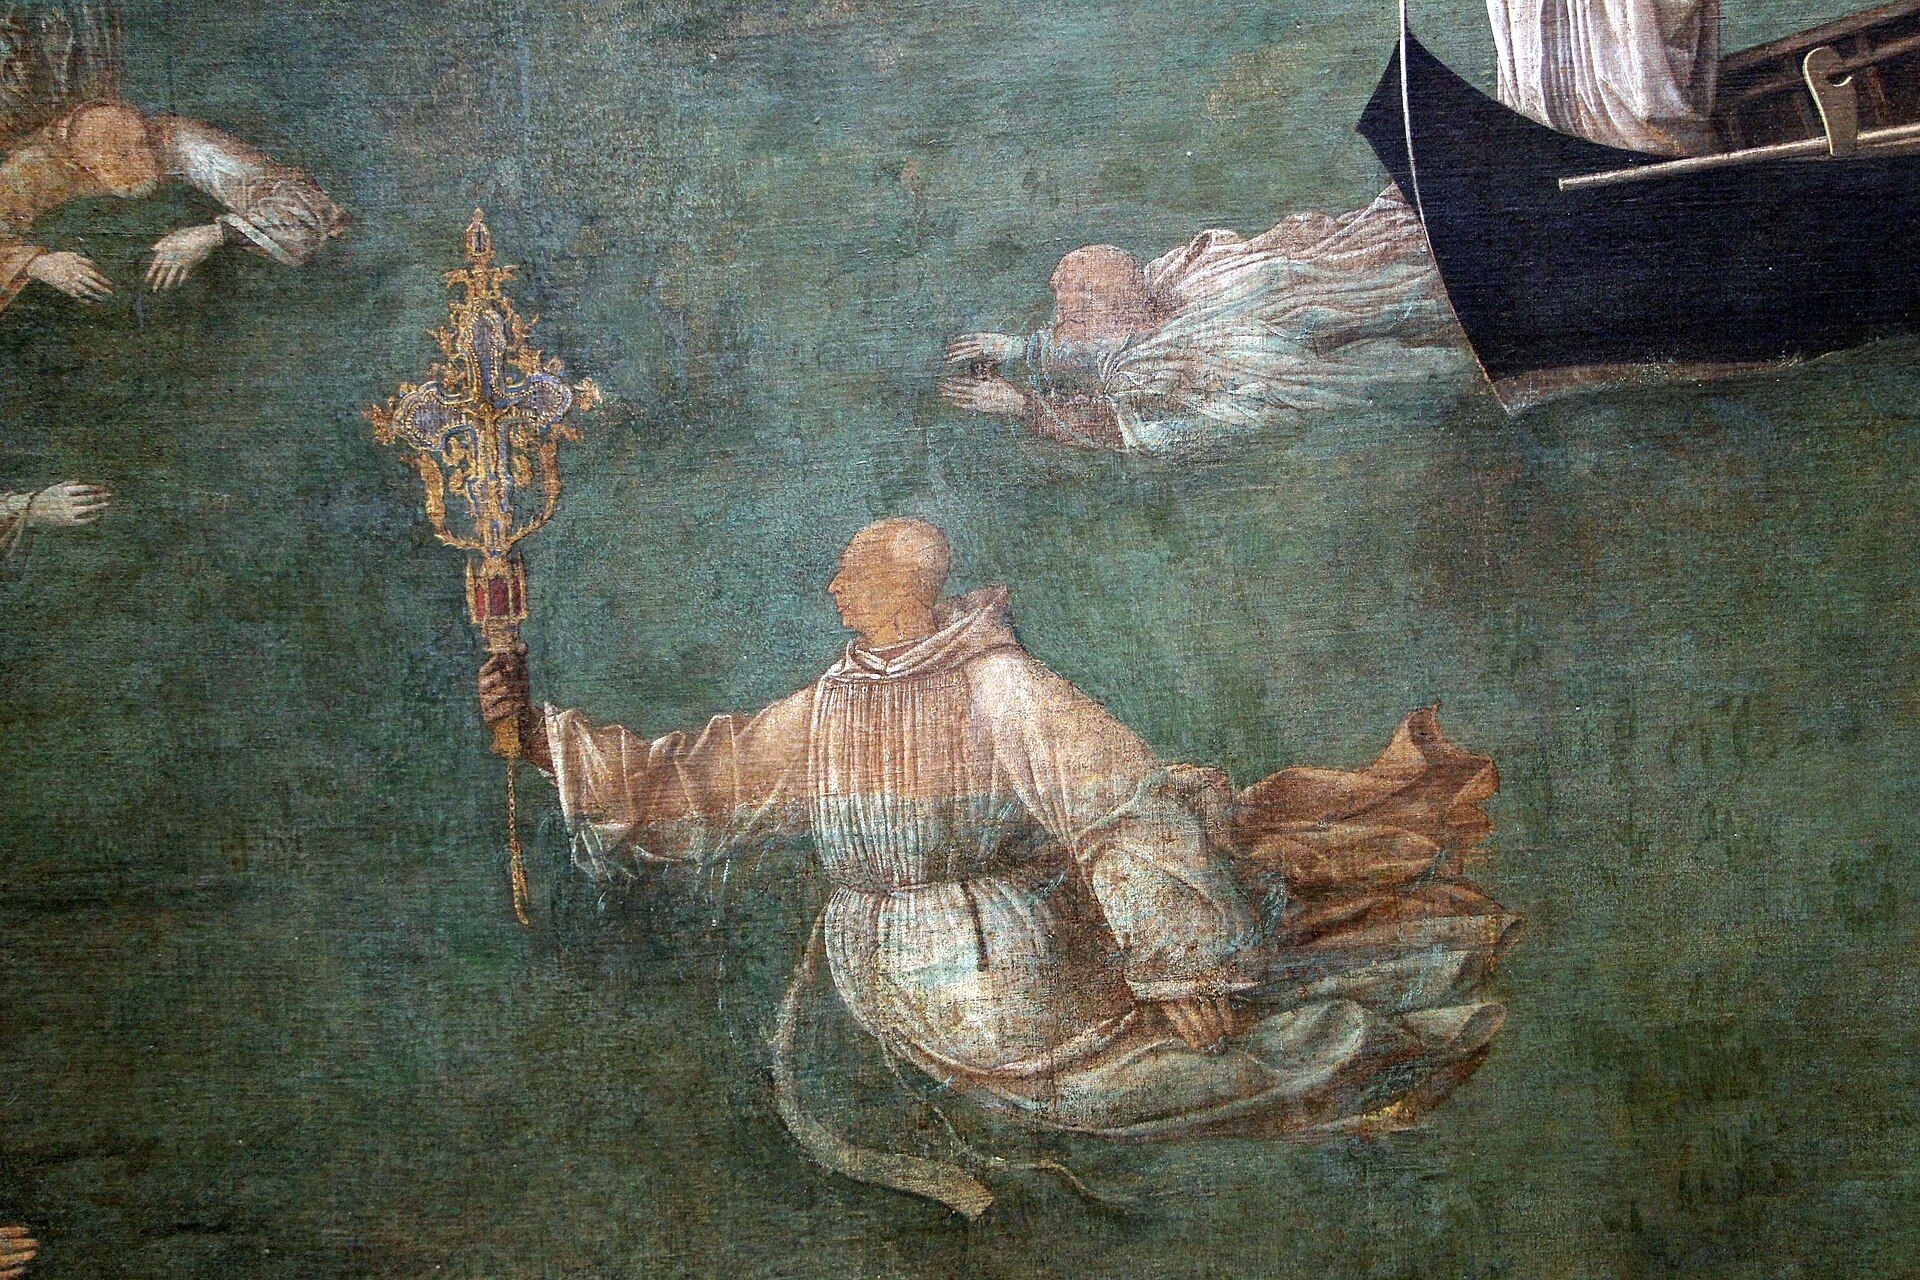
This is the only picture to make the miracle the central event. We are in front of the Ponte San Lorenzo, crossing the Rio San Lorenzo, near the church of that name, north of the Riva degli Schiavoni.
We are supposed to be back in the period between 1370 and 1382, just a few years after the School received its precious relic, and we are witnessing the first, and the most bizarre, of the recorded miracles. The relic was being carried in procession by the brethren (as we have seen twice before), but, as they were crossing the bridge, the relic fell into the water. Various people stripped off and plunged in to rescue it, or, at least, were preparing to take the plunge:
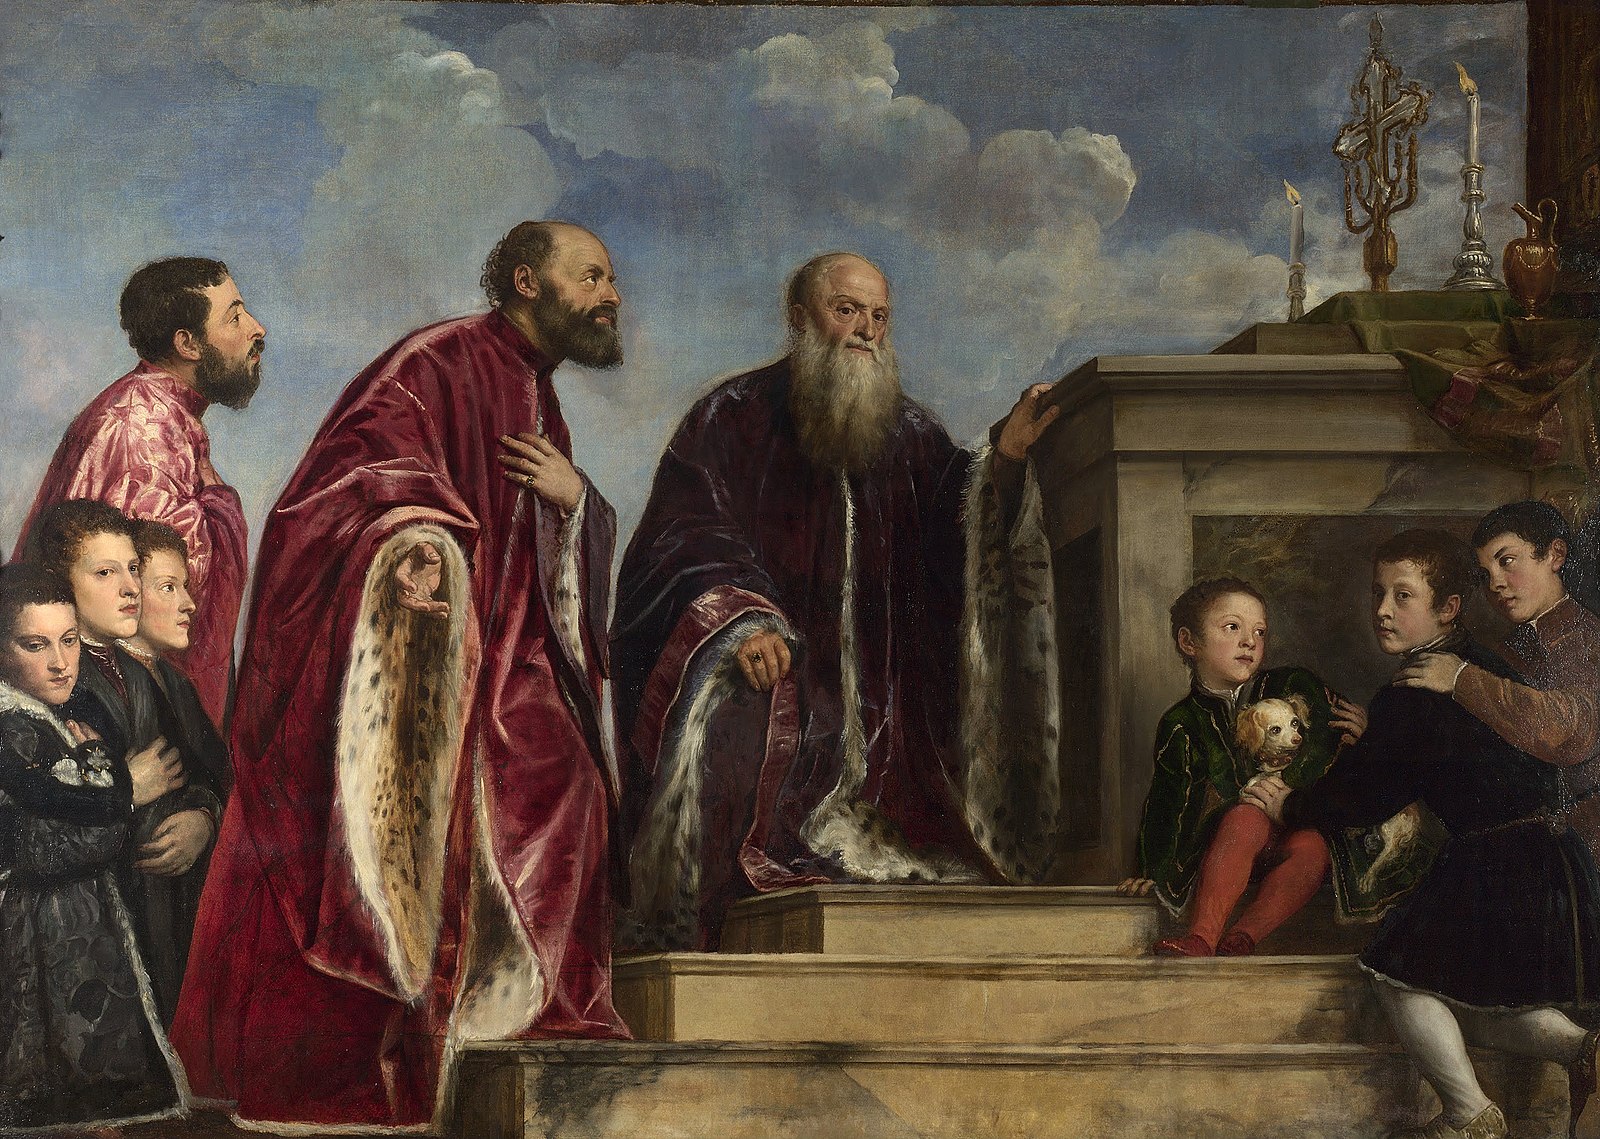
The cross, however, ‘dodged’ them all, and would allow itself to be saved only by the Guardian General of the School, who in those years was a certain Andrea Vendramin, obviously the man pictured fully dressed, but not weighed down:
The family was very proud of this event, and when Titian painted a later Andrea Vendramin with his father and his sons in the mid 1540s—in the following work, now in the National Gallery—he painted the family revering the relic in the reliquary on the altar:
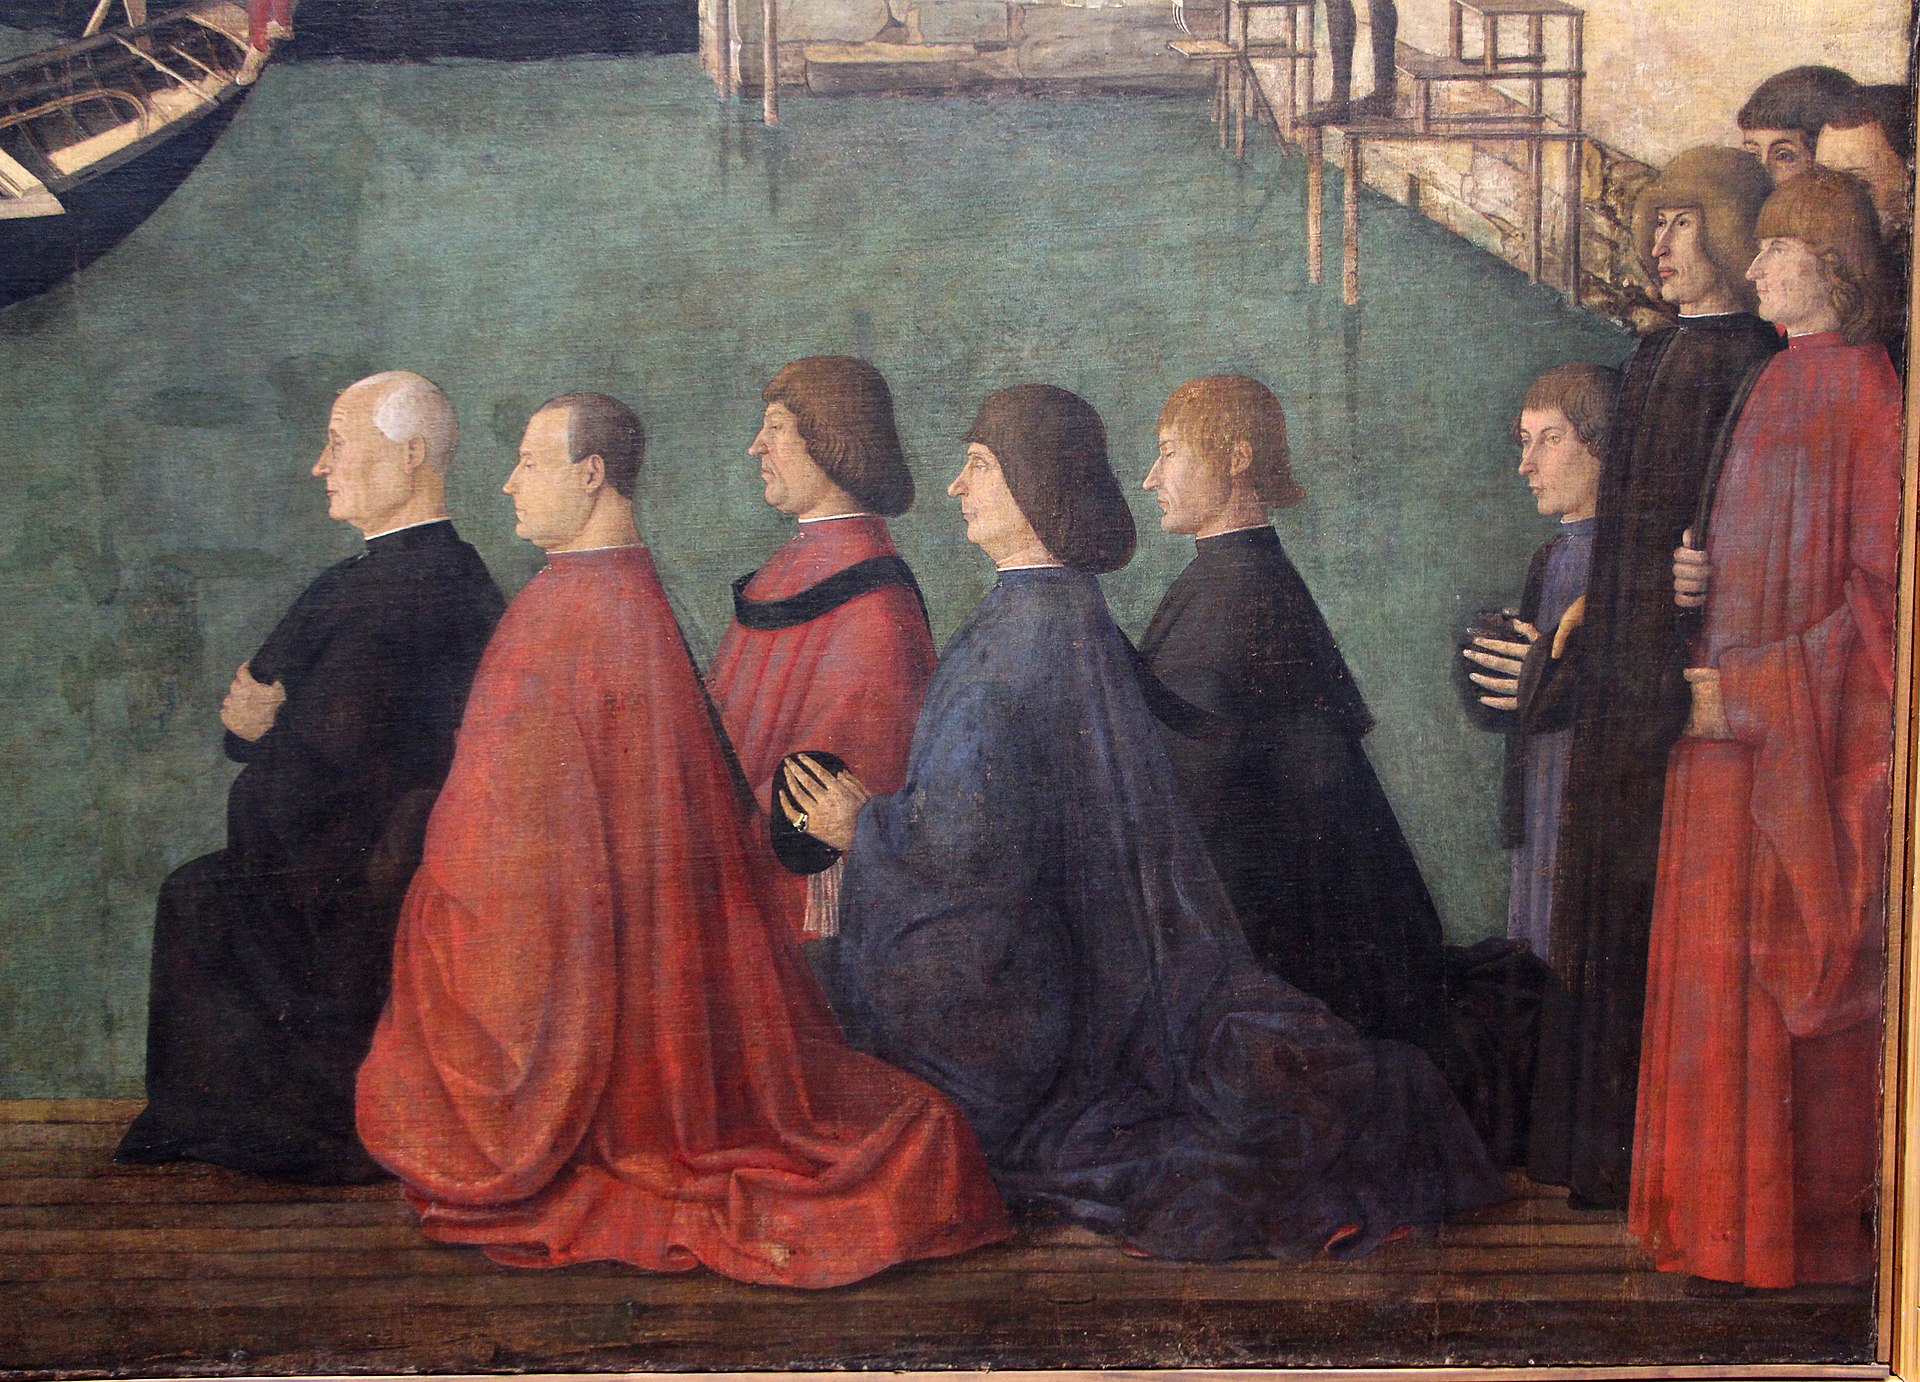
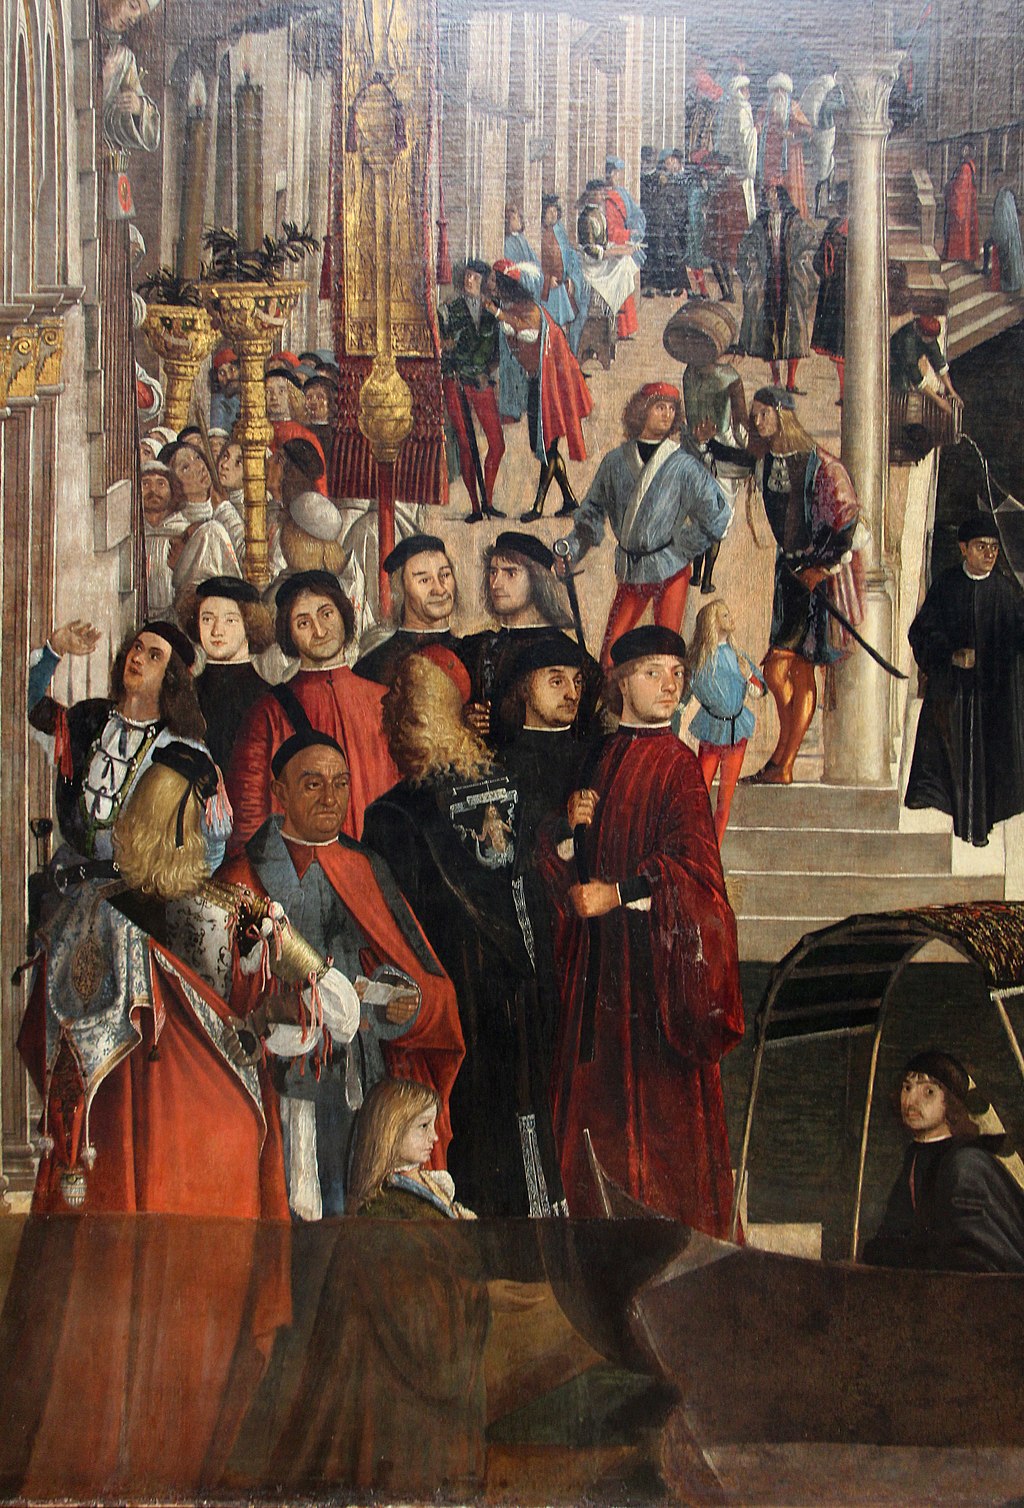
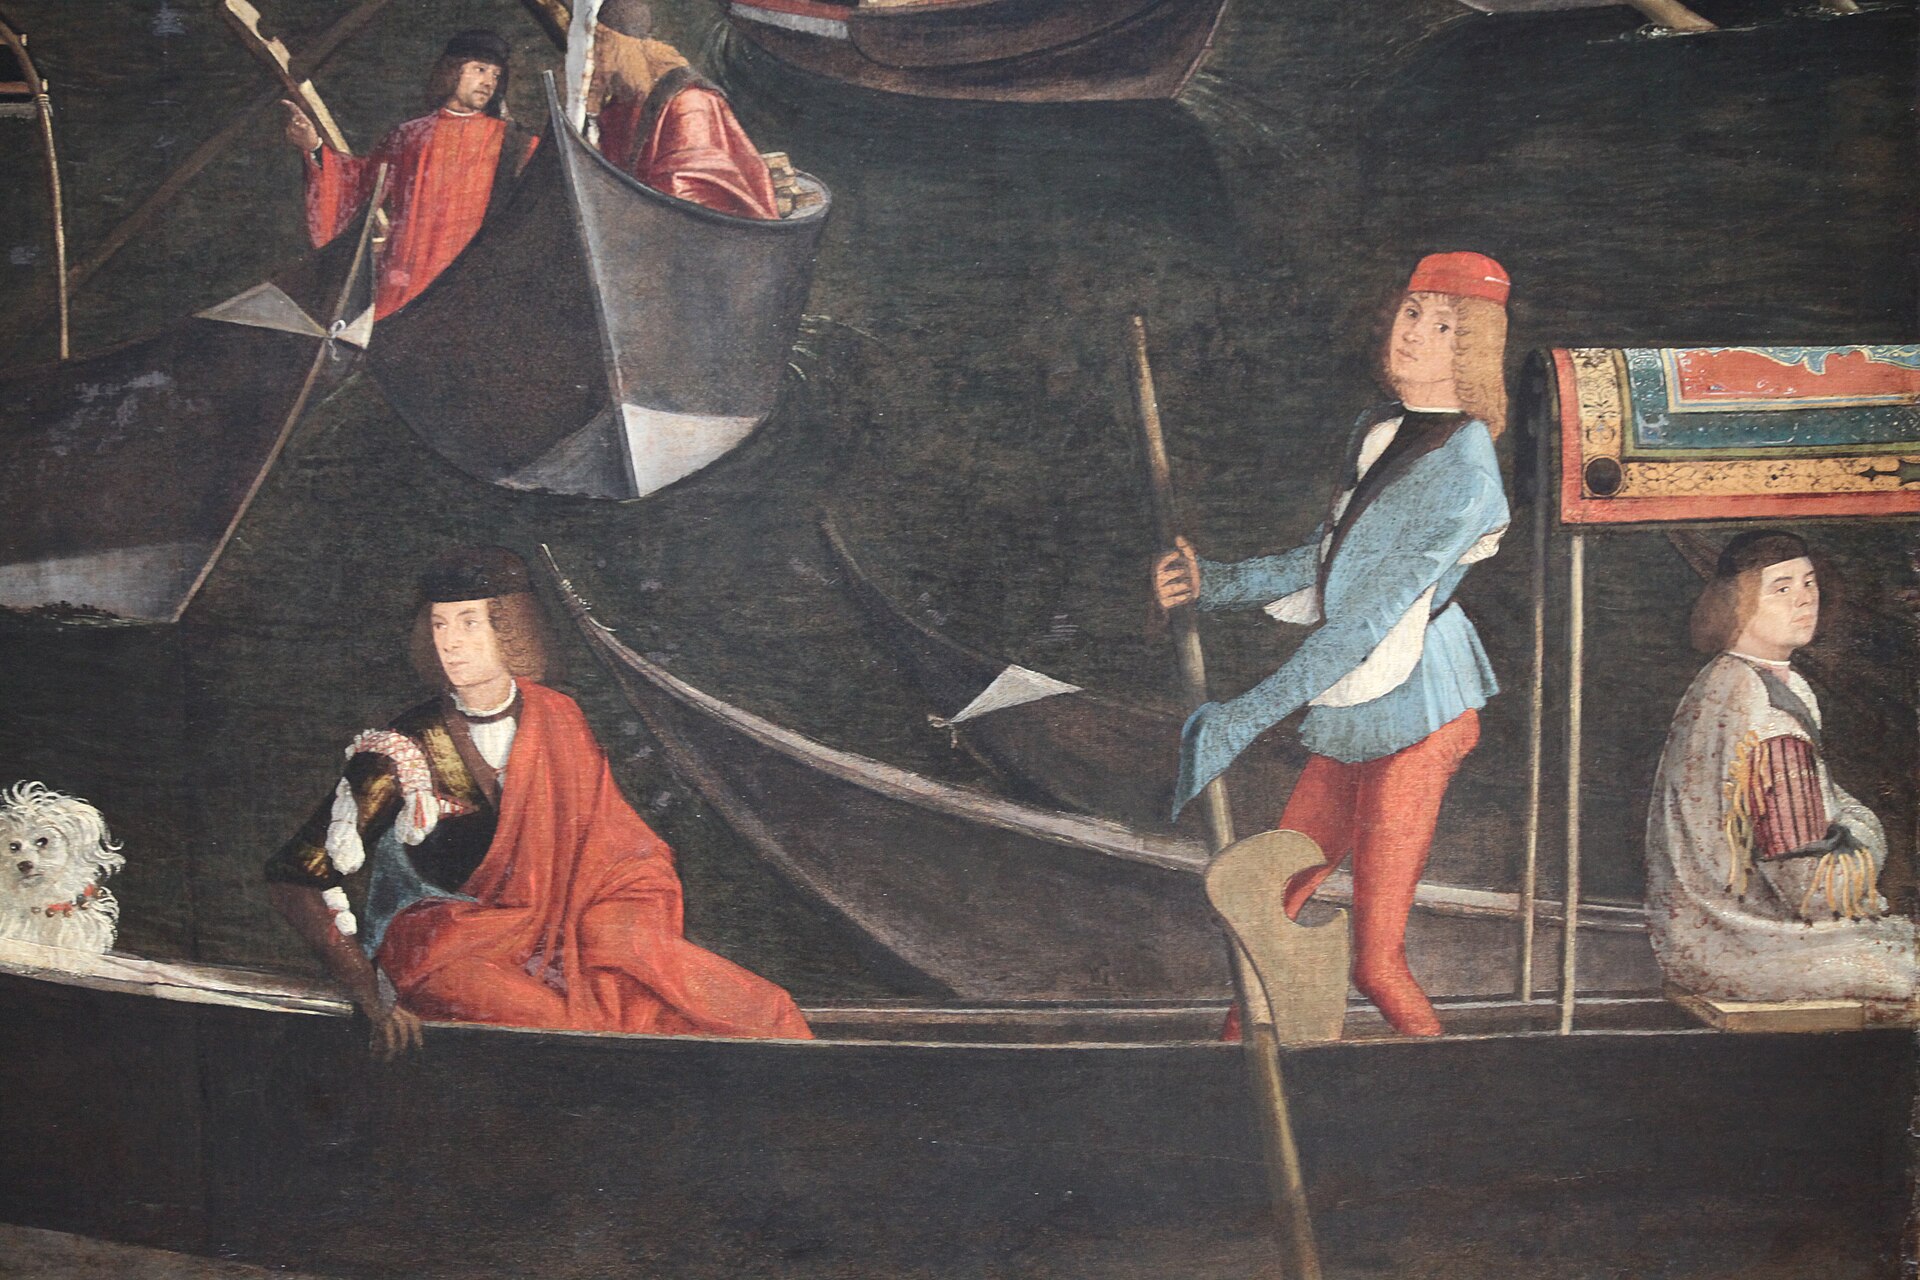
The rendering of space and architecture in the Bellini is once again wonderfully convincing—these Rios really do work as pictures of reality, and the one shown below is a mere 300 yards away from where the painting now hangs:
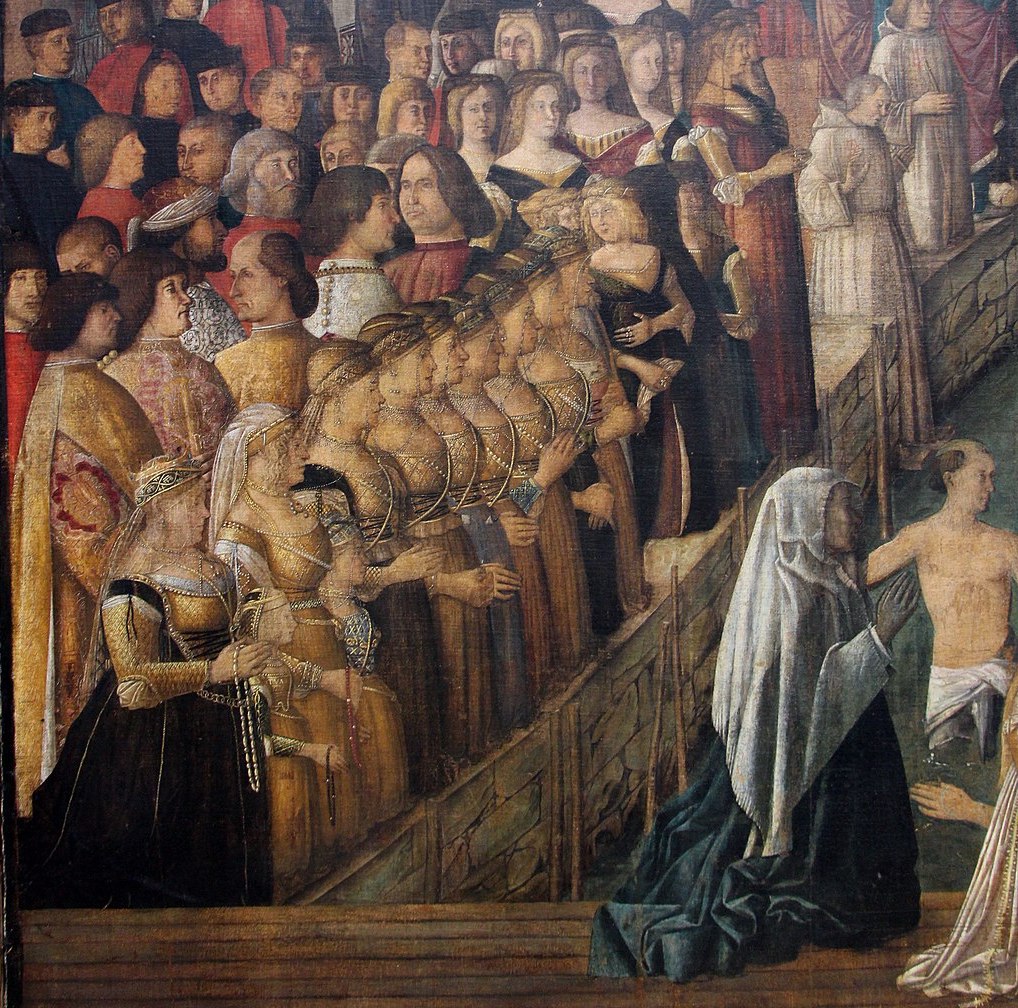
In this case, though, the human figures in the foreground are also particularly interesting. Ridolfi, writing in 1648 and usually well-informed, says that the kneeling men on the right are portraits of the Bellini clan: perhaps, Jacopo (portrayed posthumously), Gentile, Giovanni, son-in-law Mantegna, together with a grandson.
Similarly, it is well-known that the ladies on the left represent Caterina Cornaro and her retinue, she being a Venetian noble-woman who married the King of Cyprus in 1472, and ruled Cyprus as its Queen on his death in 1474, until she ceded the island to Venice in 1489—that is, only eleven years before this was painted, for it is dated 1500.
Thus we come, last but not least, to our last painting from the School of St John, which now occupies the whole of the entry wall (it measures eleven and a half feet by twelve and a half), but used to be in the position of honour above the altar.
It was painted in the year 1500 by Carpaccio; and hence it is more or less contemporary with the finest paintings in his Ursula sequence (to which we shall come in the second part), and hugely enjoyable for the very same reasons.
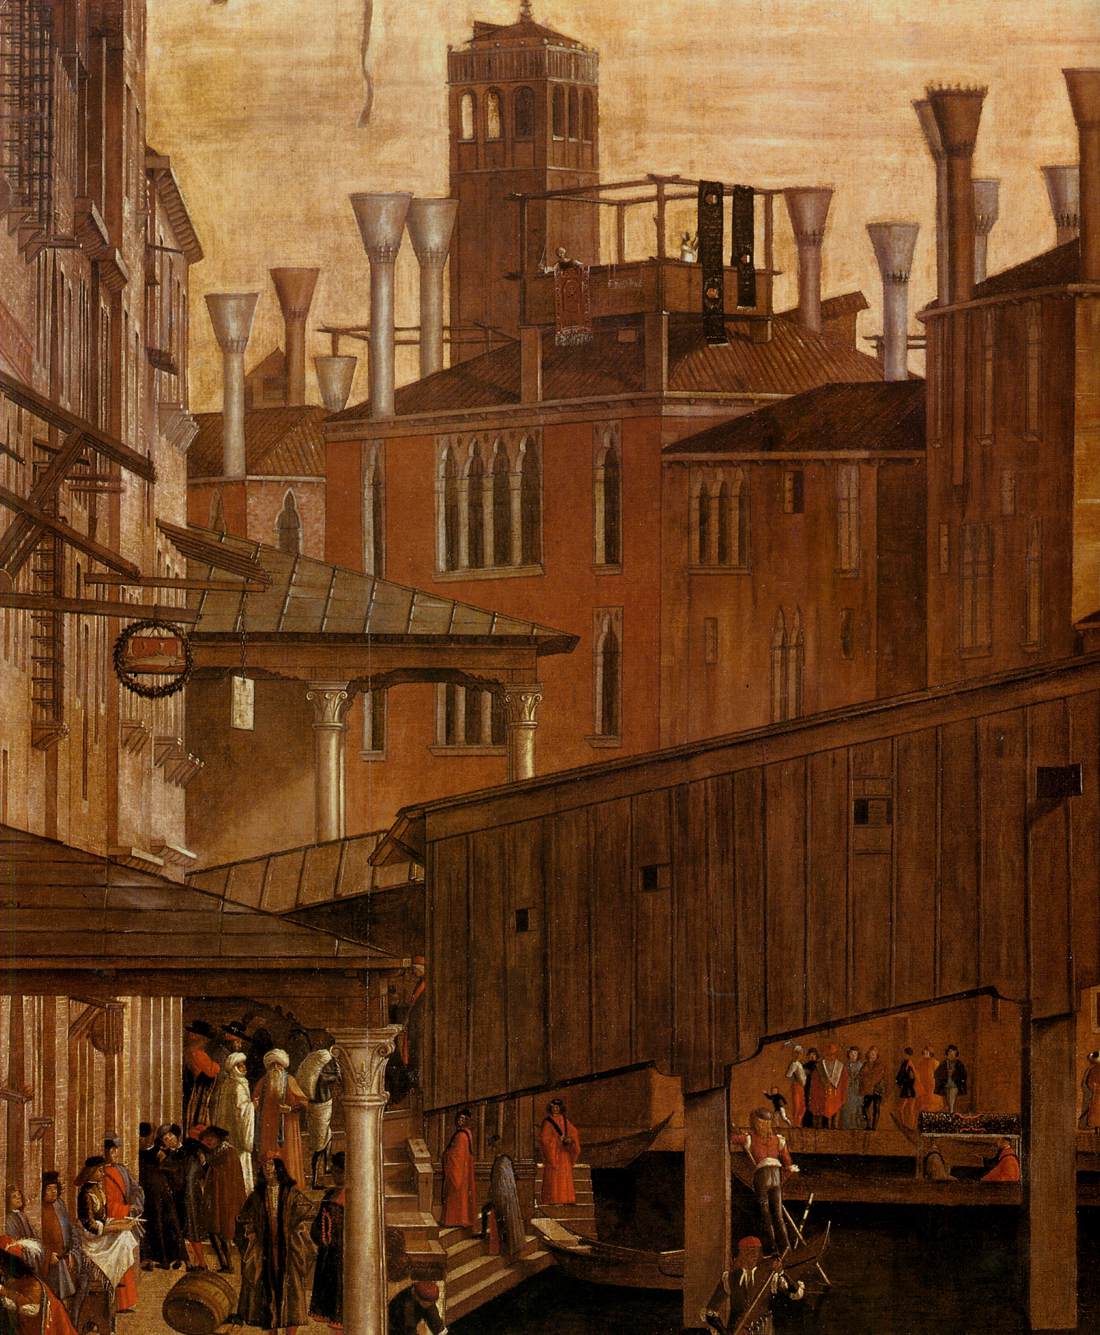
It shows the left bank of the Canal Grande (with the Riva del Vin), looking north-east, just before the Canal swings through 90 degrees to the north-west on the other side of the Rialto. The bridge is the wooden predecessor of the stone bridge that was erected in the 1590s.
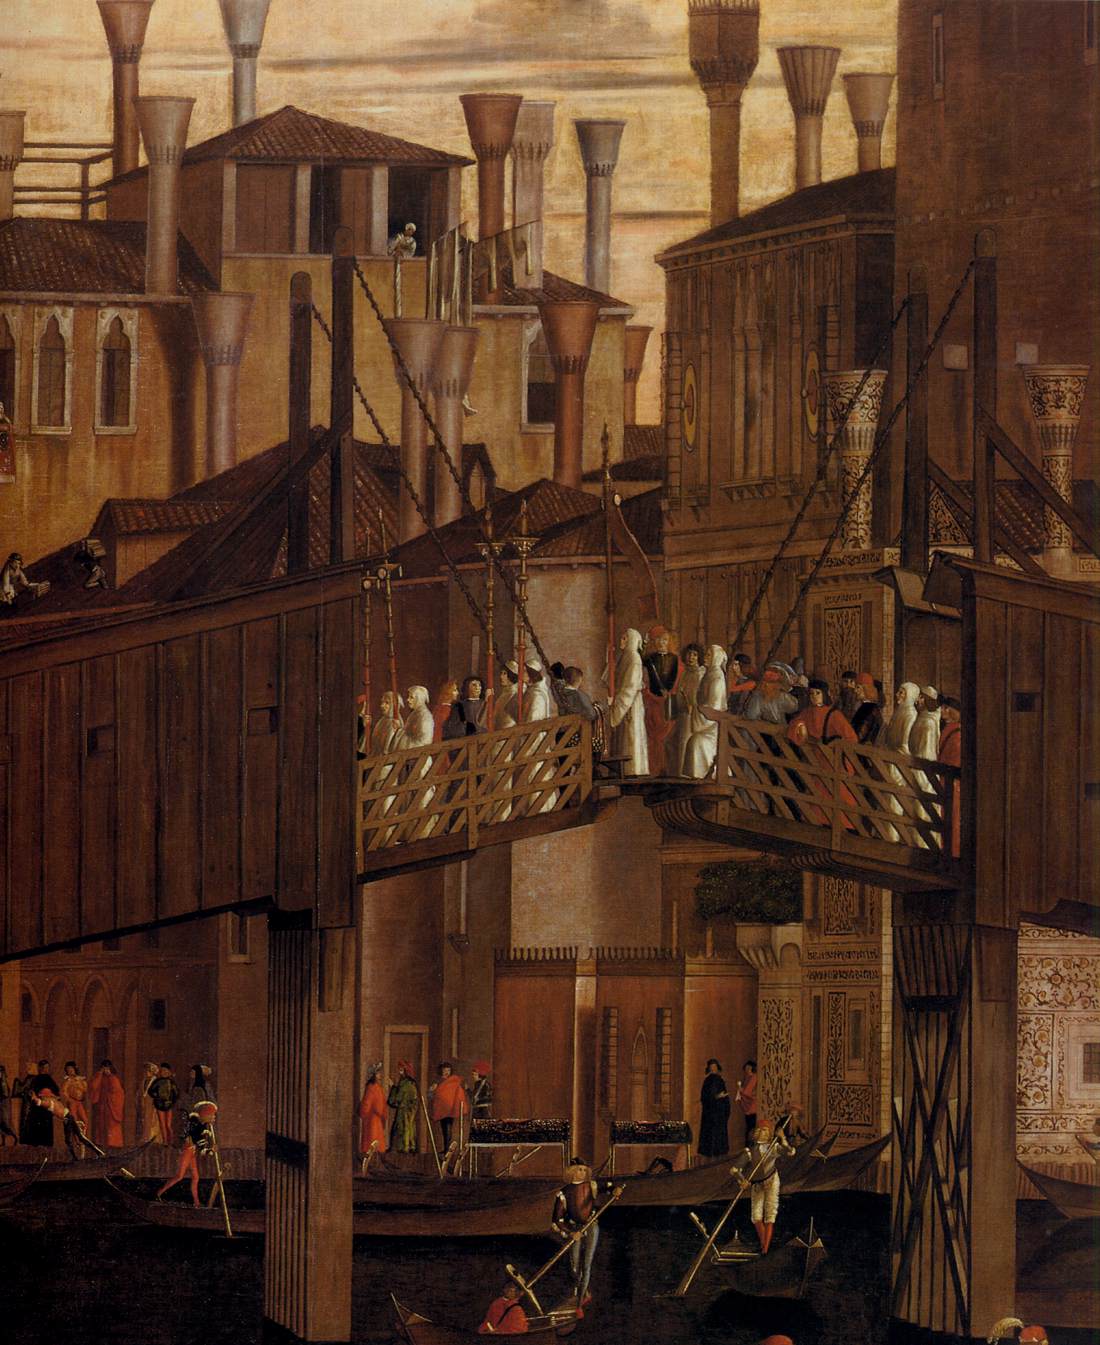
The miracle represented was the most recent of all, since it took place in 1494. The loggia represents the town palace of a certain Francesco Querini, a high ecclesiastic, patriarch of Grado (a town on the coast near Trieste).
It is he who has just used the relic to perform an act of healing. Earlier we saw a wounding, a fever (the quartan aigue), and an unspecified hereditary complaint. This is a case of mental illness; and the power of cross is here casting out an ‘unclean spirit’ that had possessed the patient in black.
It is a wonderful picture, full of detail (like those by Gentile) which really give us an idea of how Venice looked in the 1490s—from the pub sign of a famous inn called the Sturgeon; to the skyline with its characteristic chimneys and the campanili of St John Chrysostom and the Santissimi Apostoli; to the rickety old Rialto bridge, with members of the Scuola crossing over; to the splendid costumes and portraits in the area to the lower left. Yet perhaps it is memorable above all for the tiny gondolas, criss-crossing on the dark waters of the Grand Canal.
Carpaccio painted this superb record of Venice between 1496 and 1500, when he would have been coming up to forty years of age (we do not know his exact date of birth). We shall follow him now into the next decade, the years between 1502 and 1507, when he was asked to evoke scenes from the distant past (the third and fourth centuries), and distant also in space, since they are set in the Near East. This time he was working for one of the minor Schools, whose premises lie to the north of the Riva degli Schiavoni, not very far from San Lorenzo (and not very far from the minor School of St Ursula).
The Scuola was for a community of non-Venetians, specifically, Dalmatians or Slavs (‘Schiavoni’). It was founded in 1451 to protect the interests of this community, and, in particular, to act as a kind of ‘Mission to Dalmatian seamen’ in order to ensure that they were looked after in illness and old age, and that they were given a Christian burial. The Dalmatians had no fewer than three patron saints—George, Jerome and Tryphonius—but the community was usually known as the School of St George. They were given the lease of a former hospice, or hospital, dedicated to St Catherine, the hospital having been the property of the ‘Knights of Jerusalem’, who were the successors of the ‘Knights of the Temple’, or ‘Templars’, who were based at the neighbouring church of St John of the Temple.
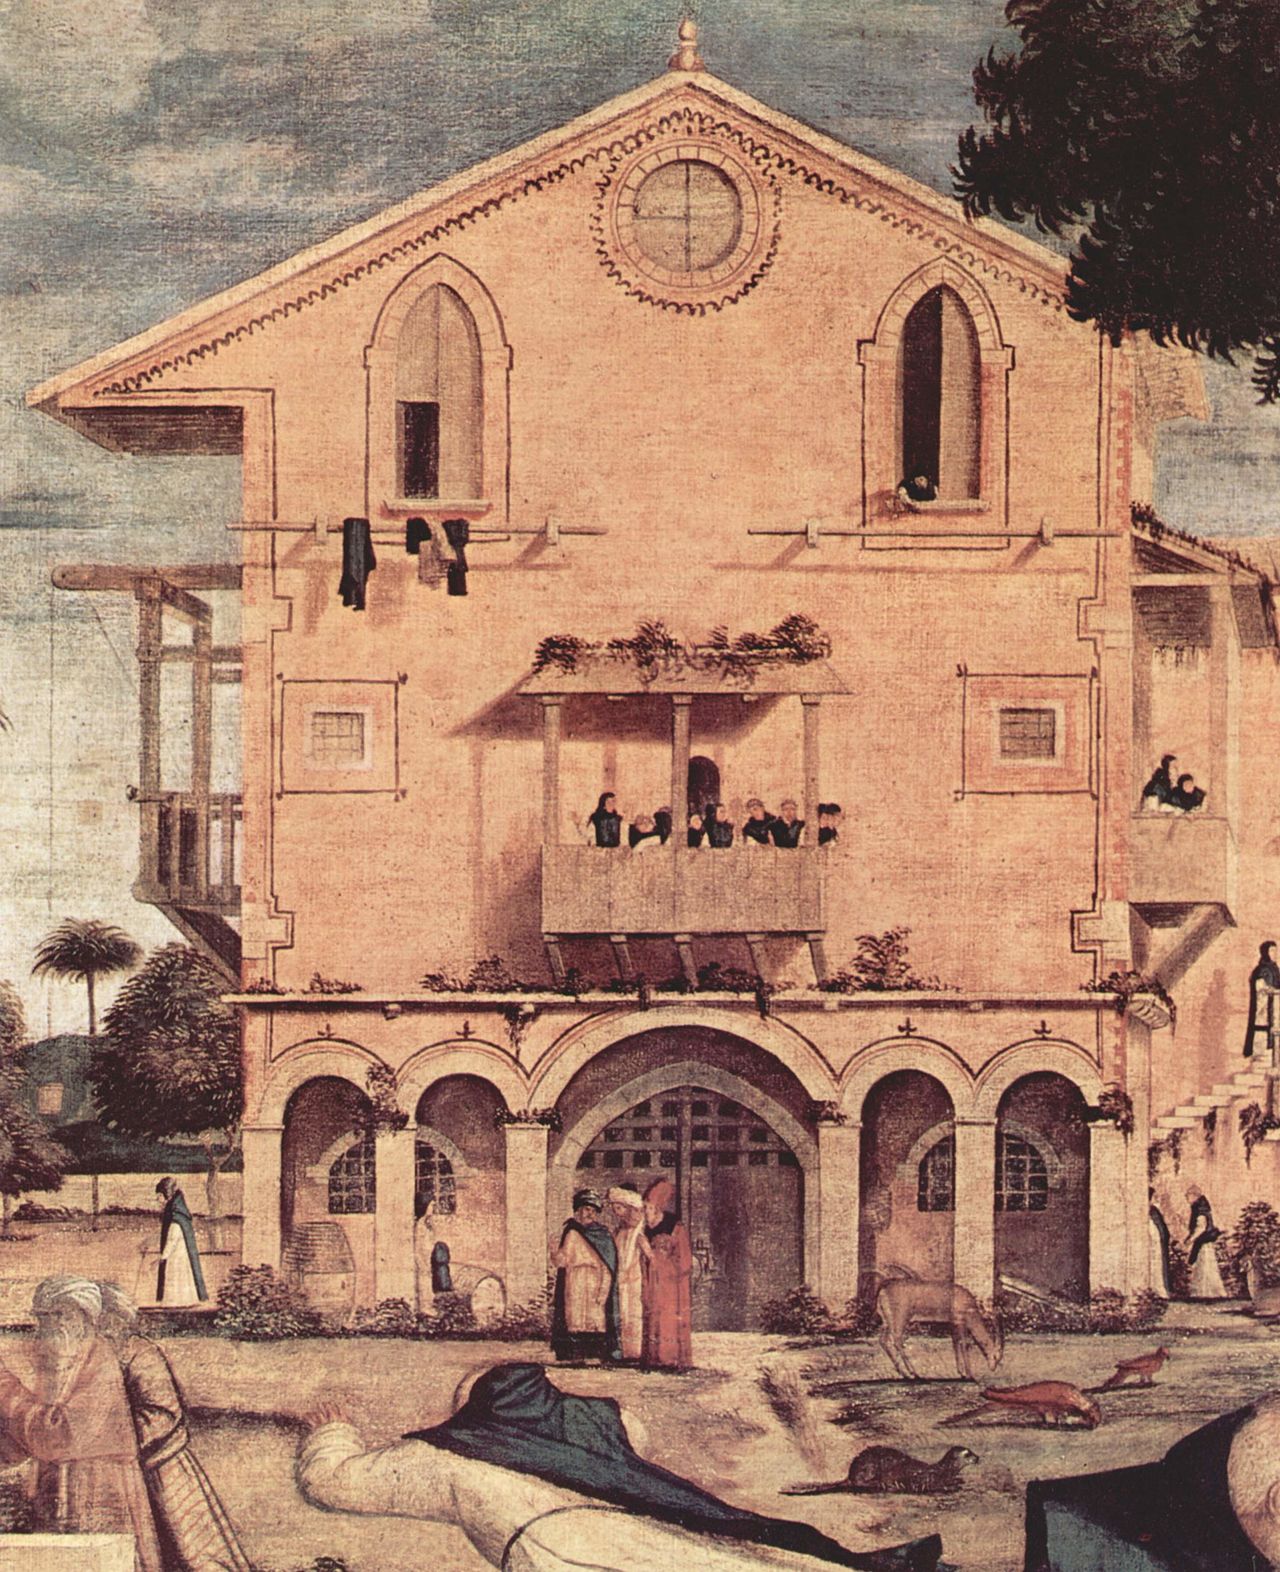
The detail above, from the famous woodcut of 1500, shows you the church and the building beside the canal which the School of the Dalmatians shared with a very much smaller, minor School of St John.
The building was about forty feet wide and about sixty-five feet long on the canal side. Notice that it had a pitched roof, with a rose-window flanked by two Gothic windows, and square grilled windows on either side of the door; it also had two stories, the ground floor being the Oratory, and the upper floor the Sala dell’albergo.

The community prospered in the second half of the fifteenth century, and then, in 1502, the School had a special piece of luck analogous to that of the major School of St John. They received, from the Patriarch of Jerusalem, a precious relic of St George, which they installed in a place of honour in the upper room, the Sala dell’albergo. It was probably the arrival of the relic which led the Guardians of the School to commission paintings from Carpaccio representing scenes taken from the lives of their three patron saints, in order to adorn that upper room.
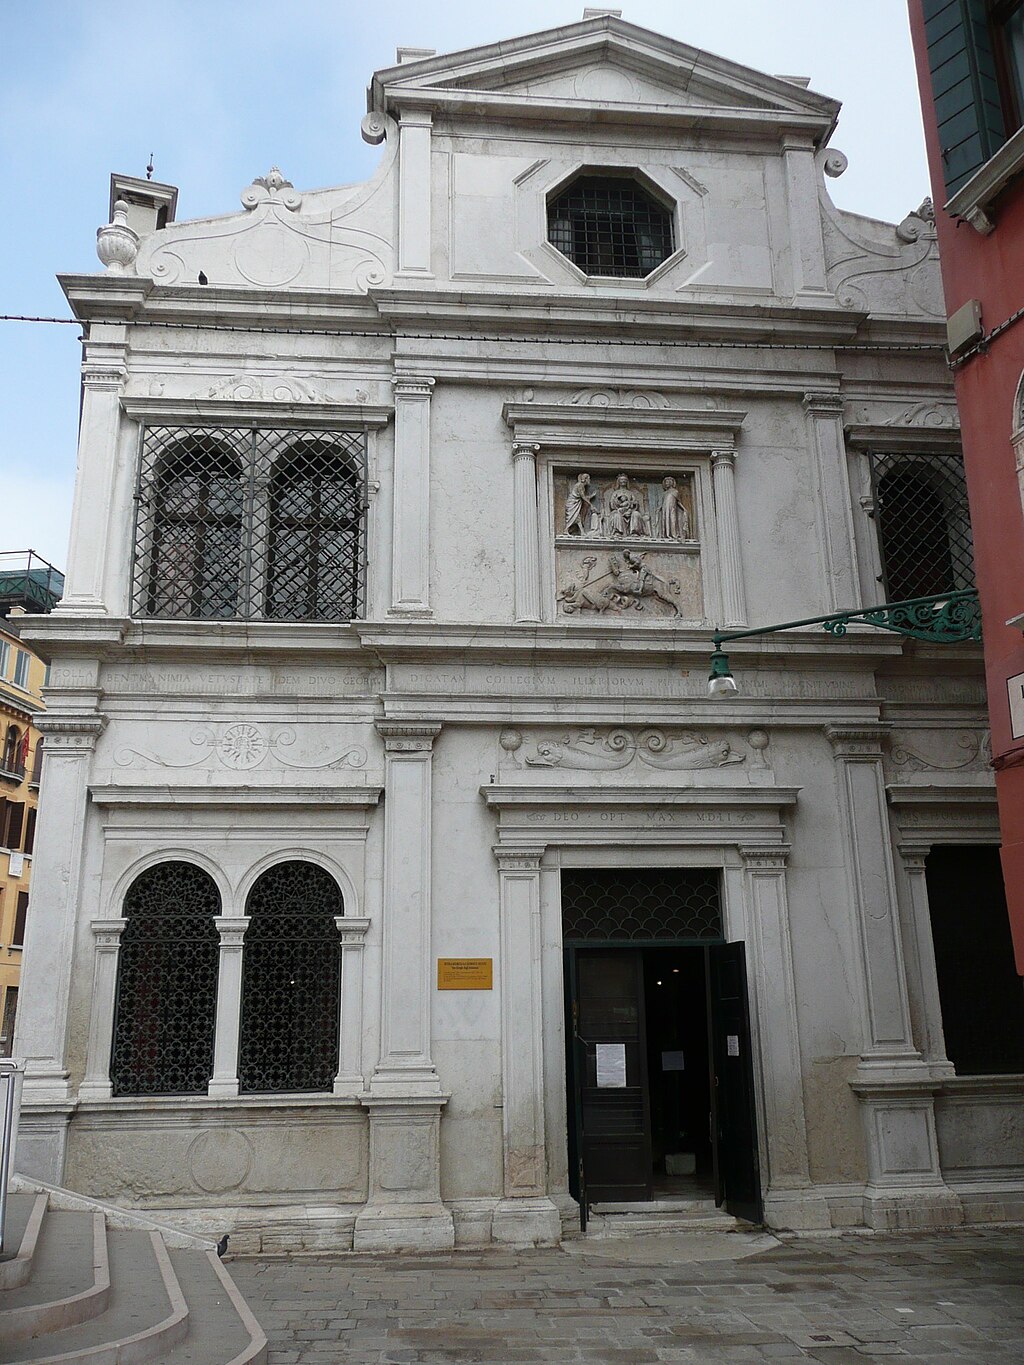
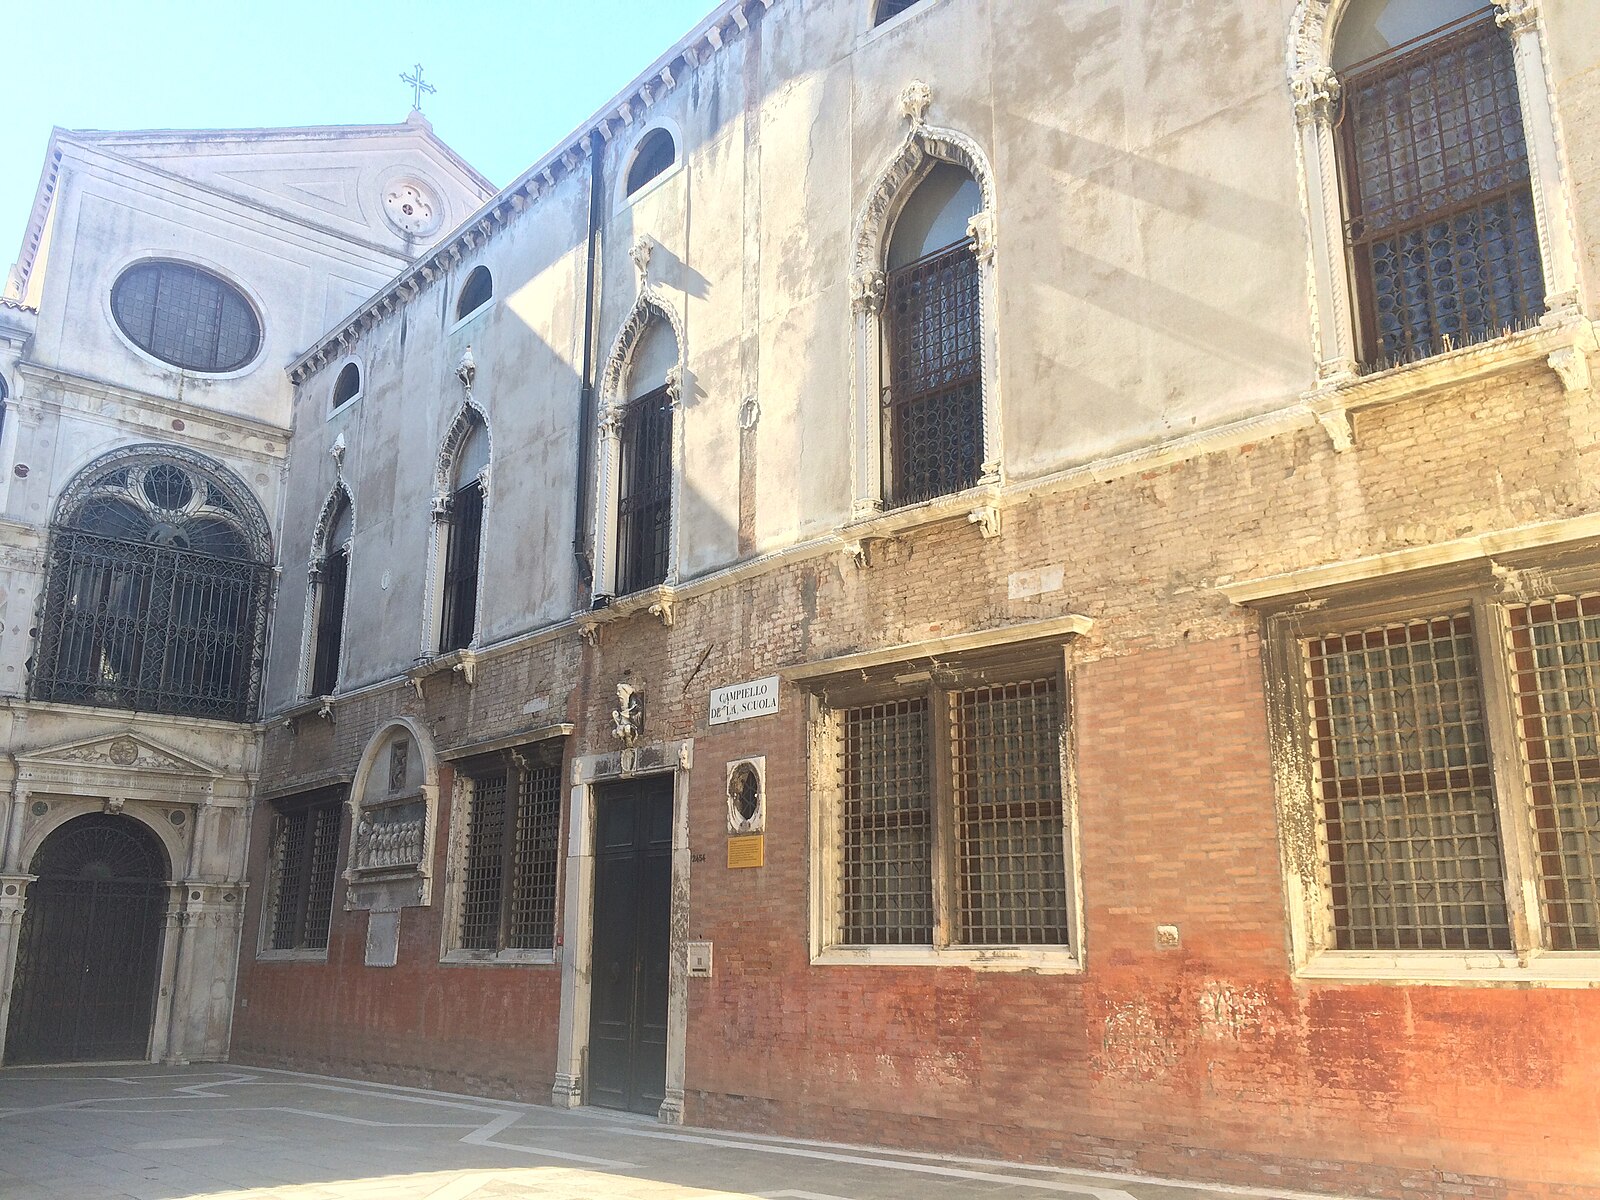
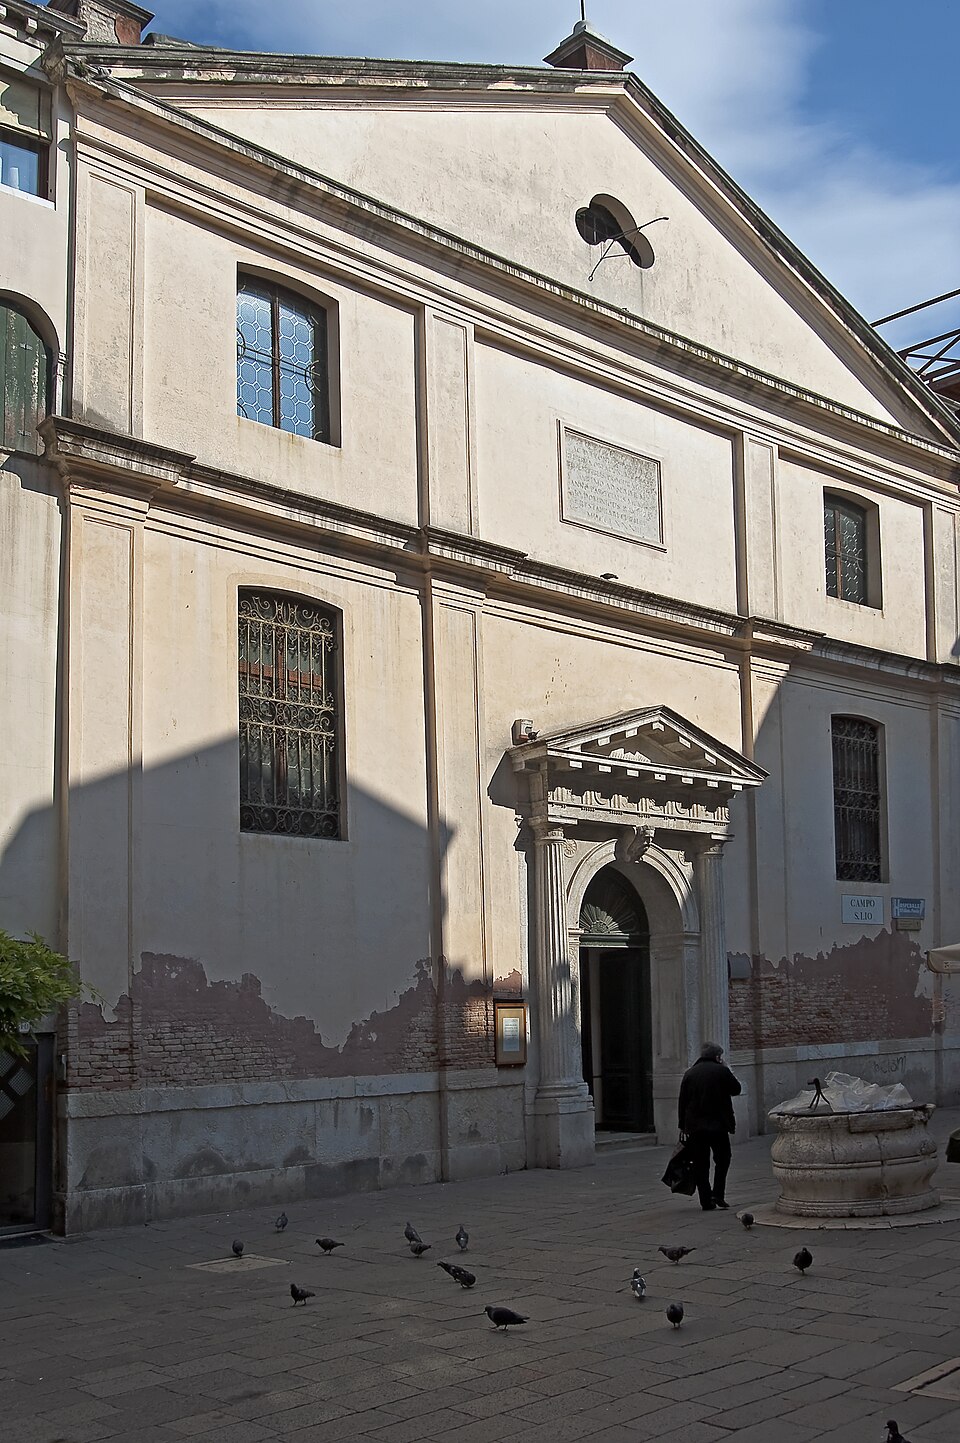
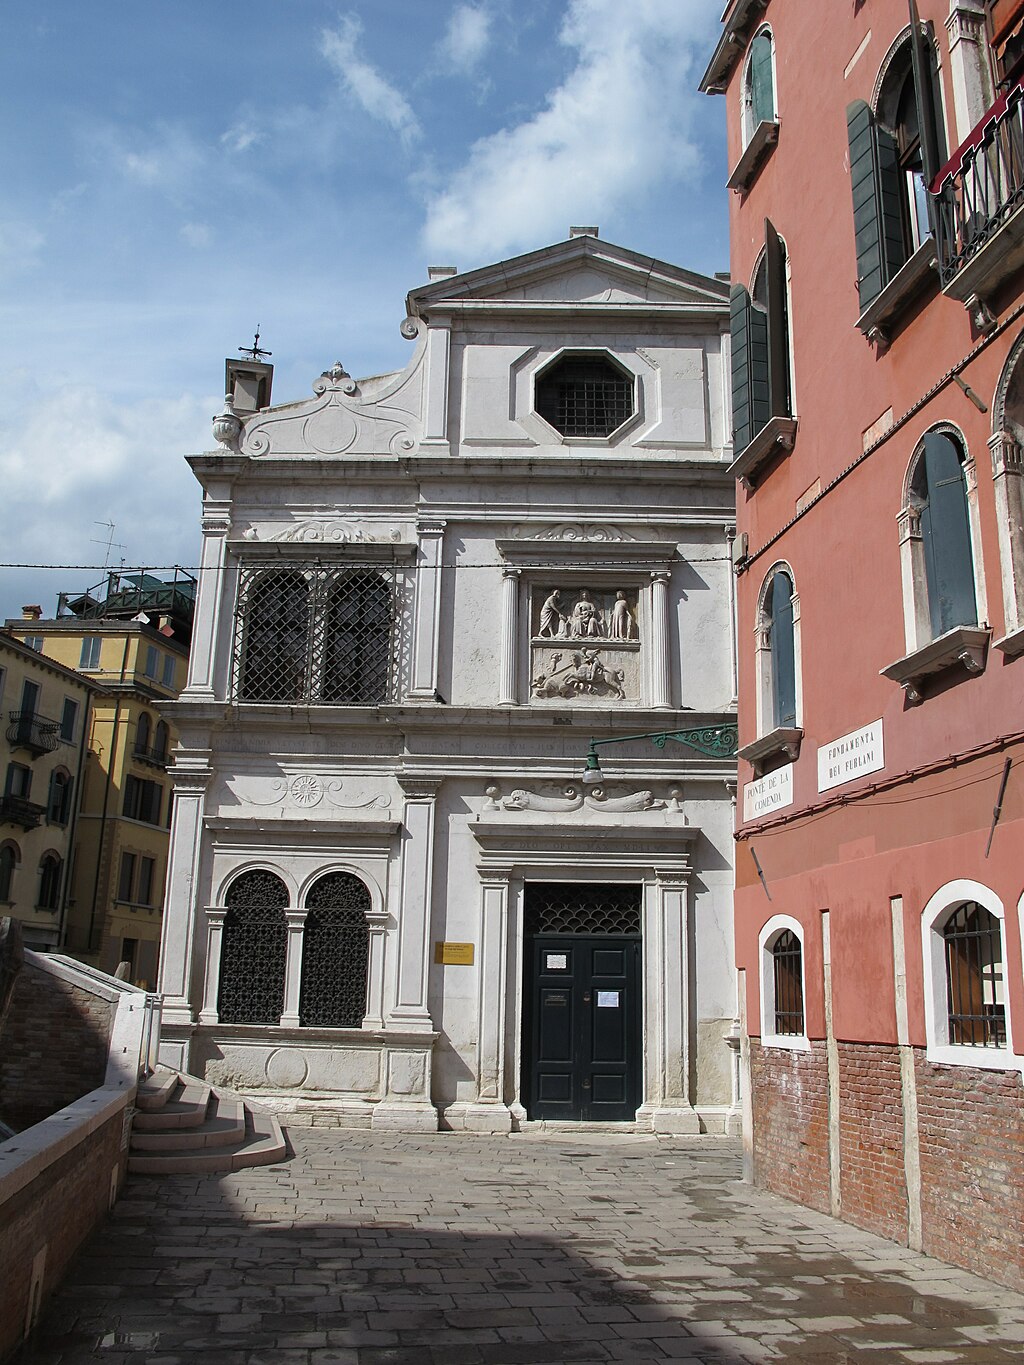
By 1551, the old building of the School was collapsing, and so the brethren rebuilt it on the same site, giving the new two-storey building the handsome façade which you see above (Figure 00 FIXME). Unfortunately, the layout and dimensions were not identical, and they moved Carpaccio’s canvasses down to the ground floor:
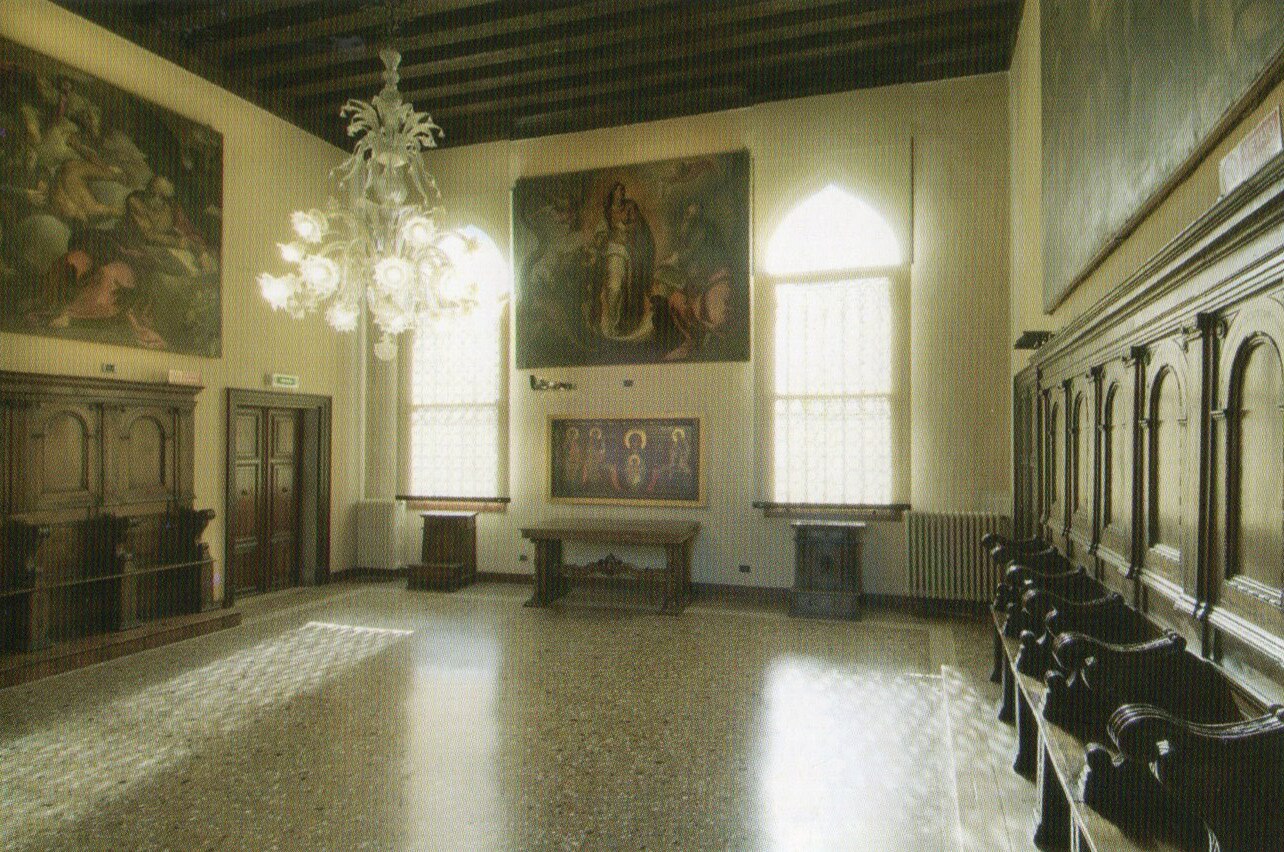
They were installed in this room, which you enter directly from the main door, and which measures thirty-eight feet by twenty-seven. It has a very low ceiling; and the canvasses were trimmed, filled out, and rearranged with respect to the original sequence.
This is the ground floor room as it now appears, looking towards the altar, with the canvasses in the positions they had received by 1557.
As we work our way through the paintings, remember that it is not the right room (it should be upstairs), nor the right layout of the pictures, but that it is the right building, on the right site, from the right century, and the pictures are arranged at the right height—that is, beginning about six feet from the ground.
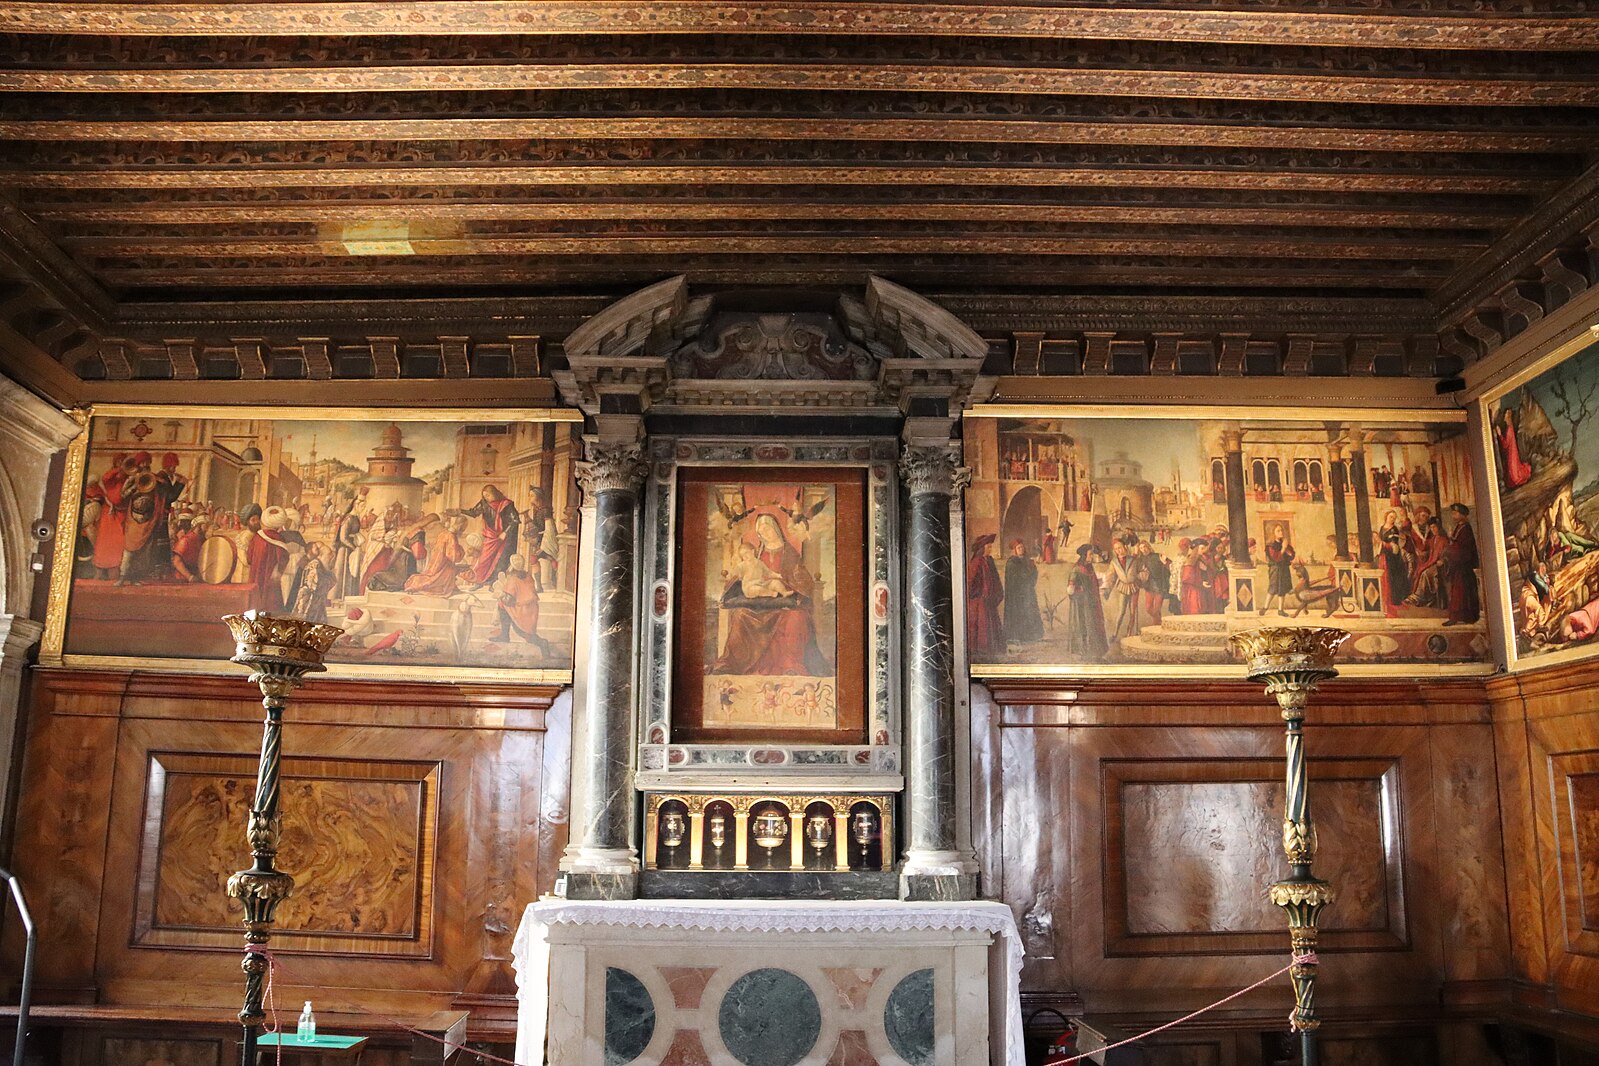
There are nine paintings by Carpaccio in the room, each a little over four feet high; two of them being devoted to Jesus, one to Tryphonius, and three each to George and Jerome.
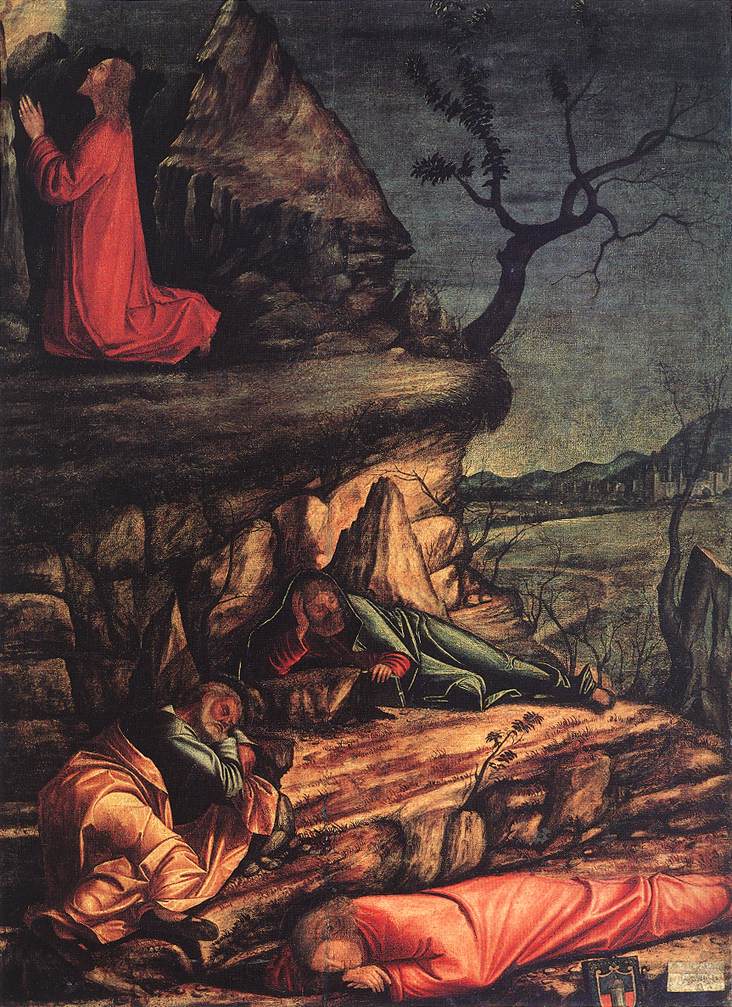
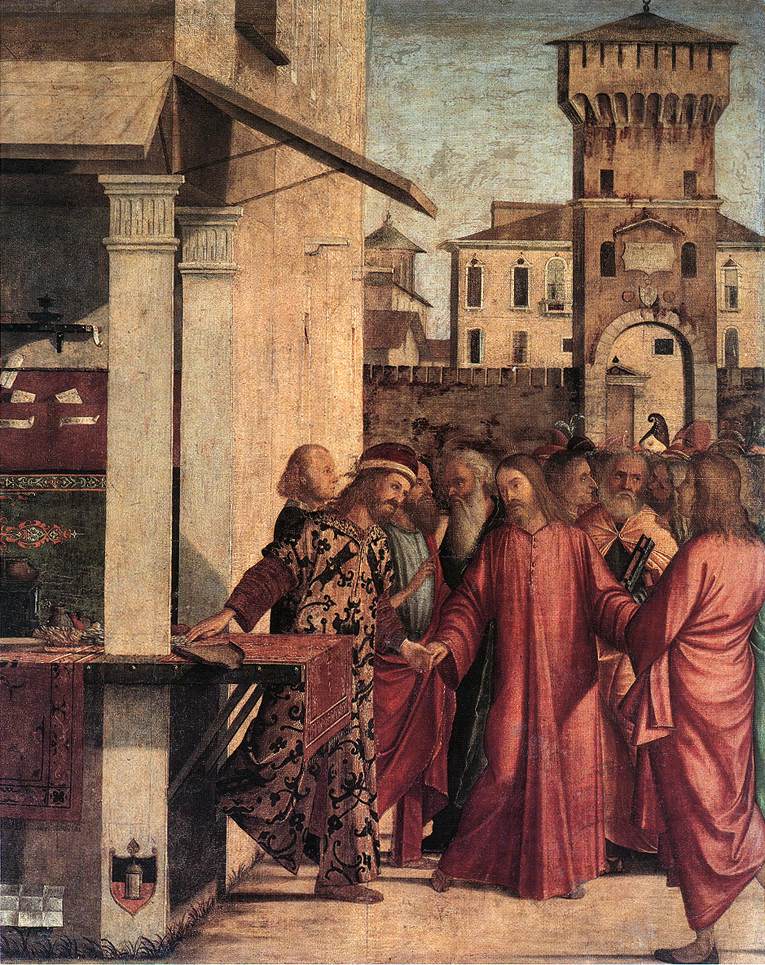
The New Testament scenes, relatively narrow and now placed on the right hand wall, probably lay on either side of the altar in the original, upper room:
They show the ‘Agony in the Garden’ (probably an already existing, earlier piece) and the ‘Calling of St Matthew’, a splendid picture where Matthew, the tax-collector, is shown as a contemporary Venetian money-changer with a scoop for the small coins, seen against the background of a tower from the Jewish ghetto in Venice.
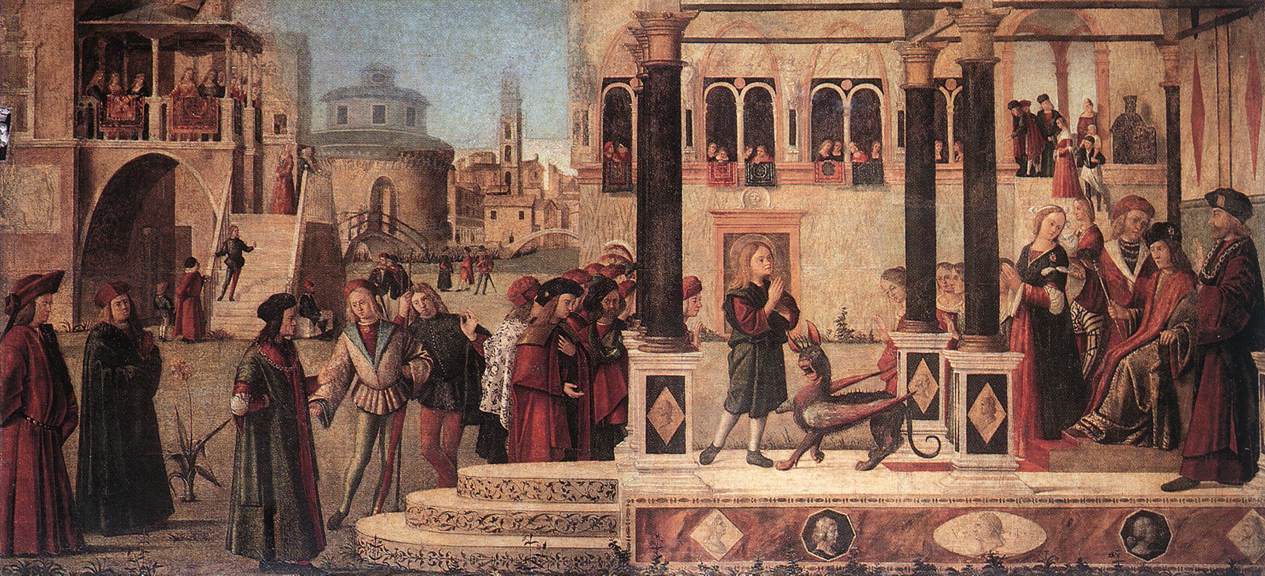
Opposite the altar wall in that original layout—now it is on the right of the altar–there probably lay the following canvas (Figure 00 FIXME), which is the same height but fully ten feet wide, and was almost certainly wider still originally, since it seems to have been cut down on the left (the vanishing point of the perspective having probably been in the centre):
It was the last to be painted; it is based, compositionally, on the opening scene of the Ursula Legend; and it seems to have a lot of workshop in the actual execution. For these reasons, I will not look at it in detail, but merely explain that Tryphonius was a twelve year old duck-herd, with a reputation for casting out evil spirits:
When he was summoned by the Emperor Gordian to exorcise his daughter, the evil spirit fled even before his arrival. At the Emperor’s request, however, the boy called back the evil spirit or demon, who ‘reappeared immediately amid the crowd’ in the form of a ‘black dog, with eyes of flame, dragging its head along the ground’ (Carpaccio makes him a basilisc, with its head held high). The spirit then held a charming conversation with the young saint, which led to many conversions.
On one of the side walls in the original Upper Room (the long wall which certainly had a door), there came the three canvasses devoted to St George, which were in the same sequence as you see them now, but presumably all on the same wall.
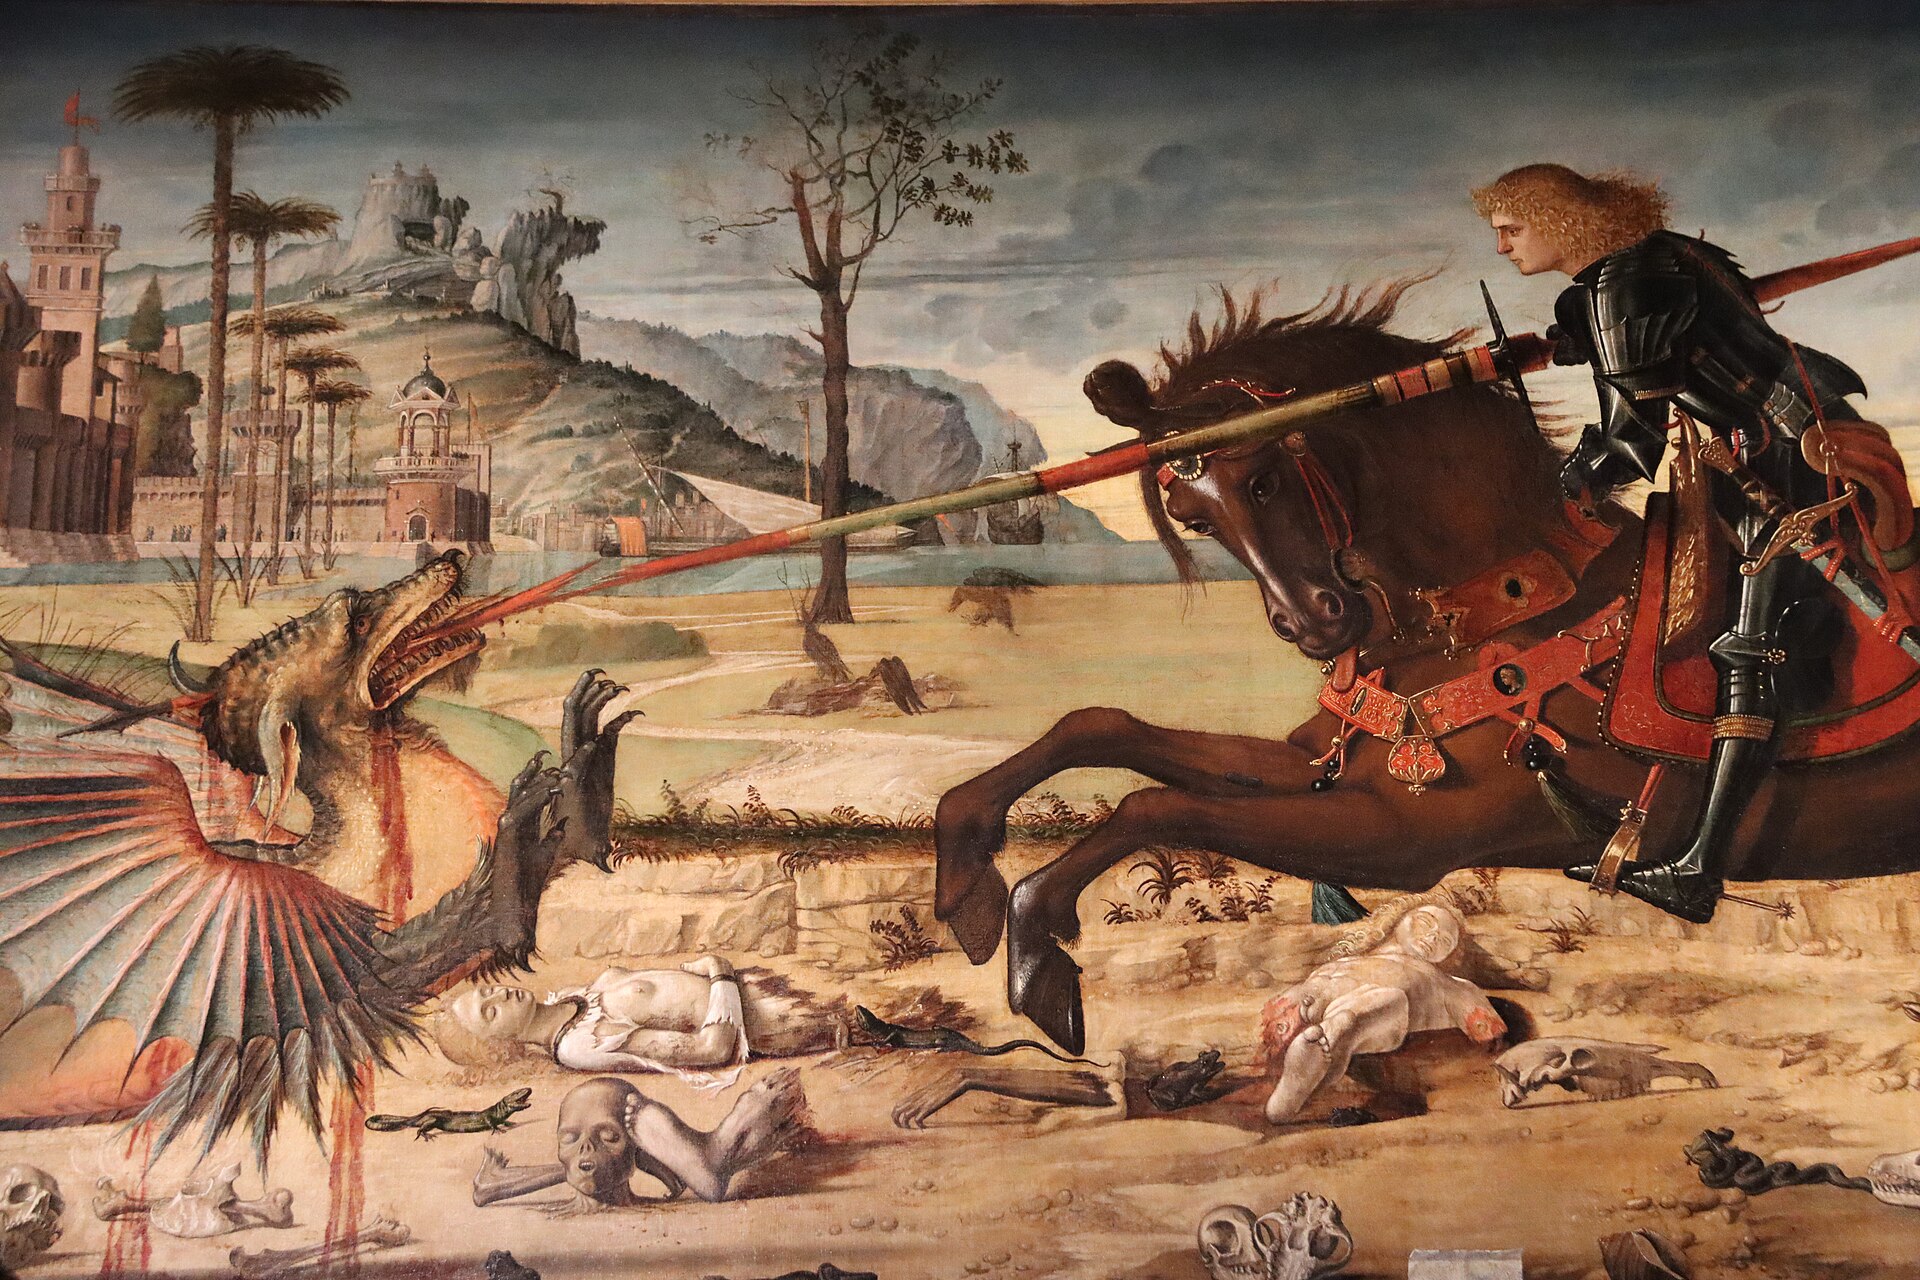
The first one measures a little over four feet by nearly twelve, and of all the pictures I shall to show you in this series, this one has the least need of any explanation. Nevertheless, I still think that it will be worthwhile to focus on a few of the details that Carpaccio took over from the Golden Legend version of the story. (It should be borne in mind that the Council of Nicea had rejected the whole Legend of St George as apocryphal and that there were several conflicting versions in circulation).
‘George was a native of Cappadocia’ (hence the link with Dalmatia), ‘and he served in the Roman army with the rank of Tribune’. A chance journey took him one day into the neighbourhood of Silena, a town in the province of Libya. ‘Near this town, in a lake as large as an ocean, there dwelled a horrible dragon. In order to appease the monster, the citizens had been offering him two sheep a day. But in time the number of sheep was so depleted, that they offered him one sheep and one human being, chosen by lot. By the day St George reached the city, nearly all the young people in the town had been eaten up.’
‘And on that day, the lot had fallen on the only daughter of the King; and she had walked towards the lake where the dragon dwelt’.

You will notice just how much information Carpaccio has put into the setting:
you see a desert, in Libya, strewn with human remains; trees blasted by the dragon’s poisonous breath; the eastern city of Silena (with the town-gate modelled on drawings of the town-gate at Cairo); a lake, which is big enough to take large ships; and a princess, who has gone out to meet her fate.
Carpaccio solves the problem of the awkard dimensions (the painting is very long and thin) here by putting the very heraldic dragon in profile, except for his tail; by giving George a lance, instead of the sword mentioned in his text; by putting the horse too in profile, except for its head; and by stretching out the front legs and tail of the horse as far as they will go.
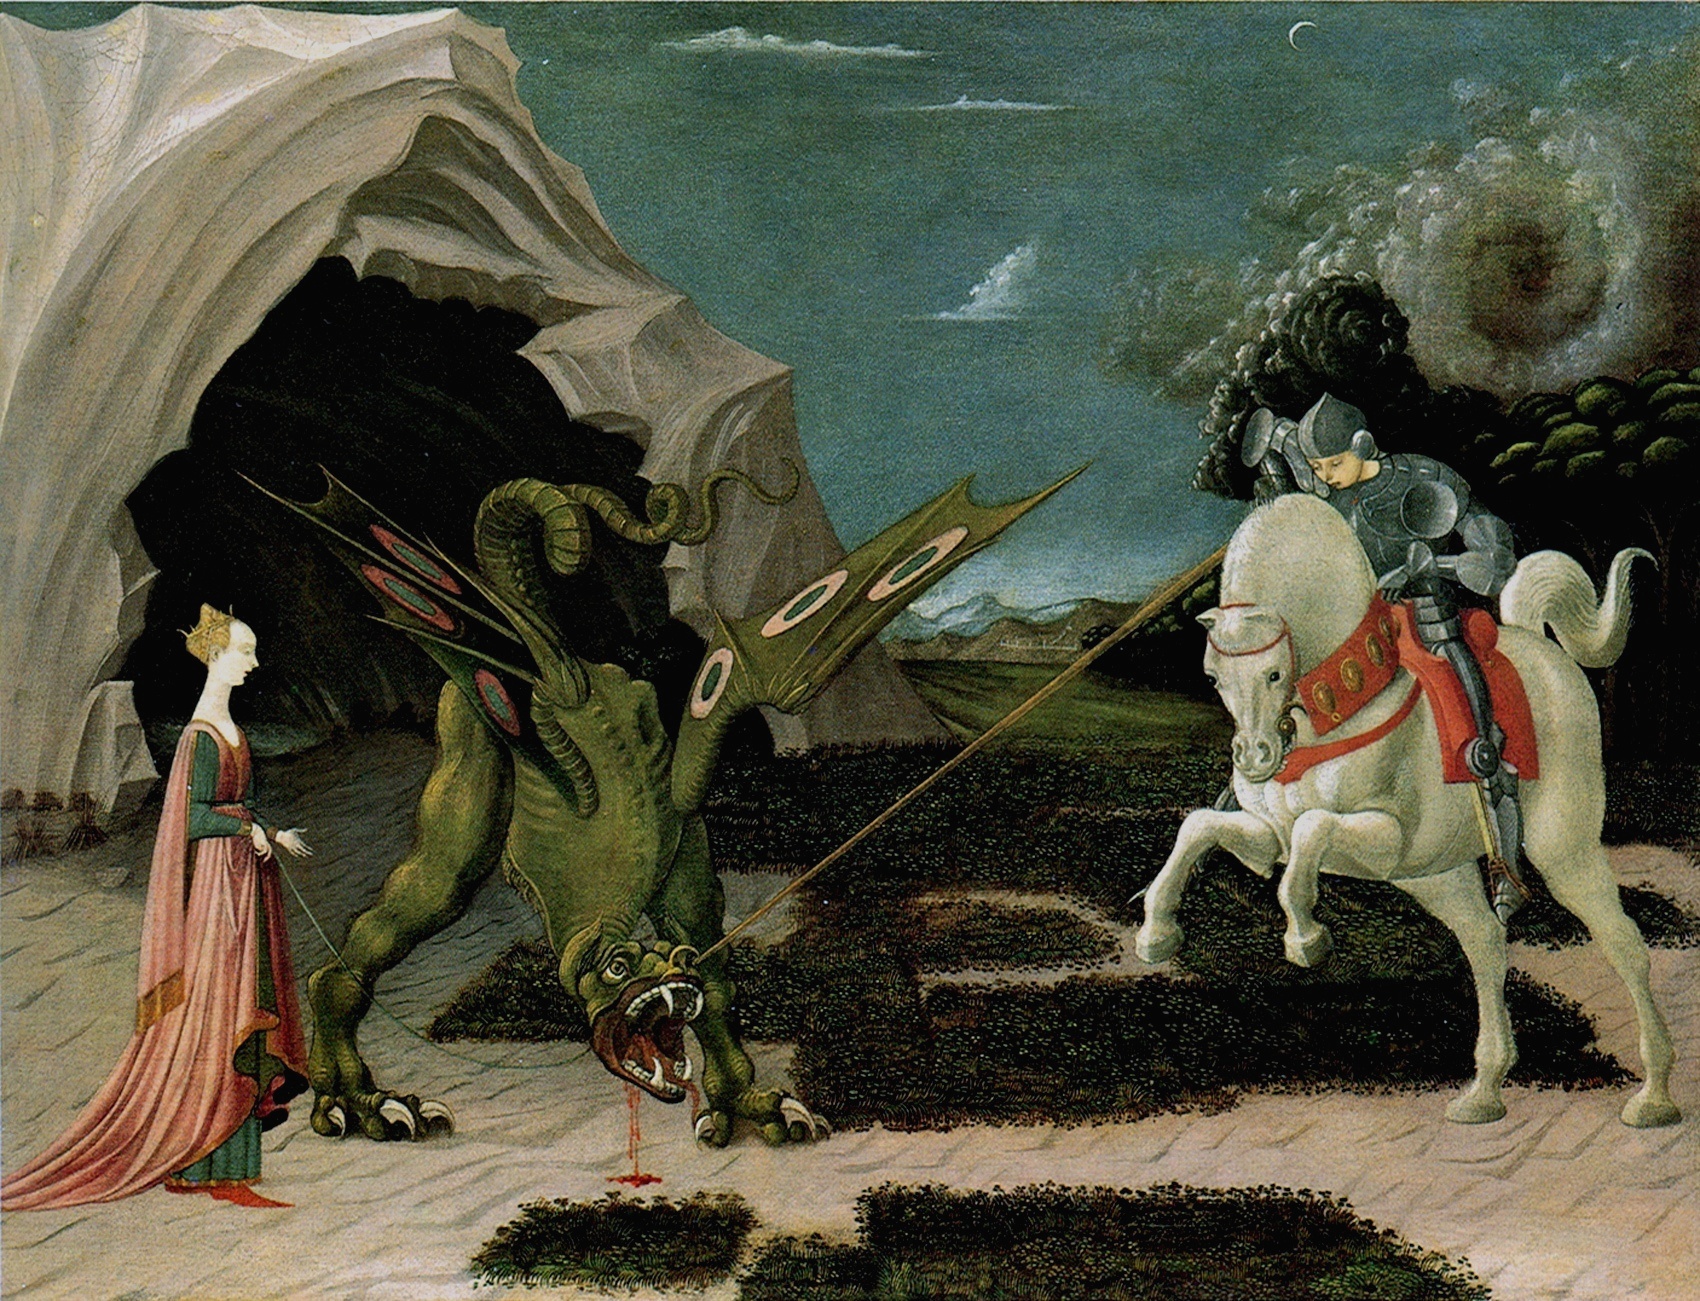
As you can see, the spear goes right through the dragon’s head. But in the Golden Legend version of the story, it is important that George does not ‘slay’ the dragon there and then. Instead: ‘He dealt the monster a hurt that threw him to the ground. Then he said to the princess: “Fear nothing; put your girdle about the dragon’s neck”. This she did, and the dragon followed her like a little dog on a leash’. (Paolo Uccello, in the version in our National Gallery, was to ‘telescope’ these two moments in the story.)
The next scene in Carpaccio’s cycle (Figure 00 FIXME) is exactly the same size as the first one.
It is set in the main square of the city of Silena, and the simple story goes like this:
‘When the people of the city saw them drawing near, they fled in panic. But St George signed to them to come back, and said: “You have nothing to fear, for the Lord has sent me to deliver you. Believe in Christ, be baptised, and I shall slay the monster that persecuted you”. Then the King and all his people were baptised. And George, drawing his sword, slew the dragon’.
One of the fascinating things about this picture is the way in which Carpaccio looked for real oriental models for the buildings in Silena, finding them in a series of woodcuts of buildings in the Holy Land. You will see that the building in the centre is imitated from the so-called ‘Temple of Solomon’ in Jerusalem, a building which had already been used in a Crucifixion scene by the painter Alvise Donati.
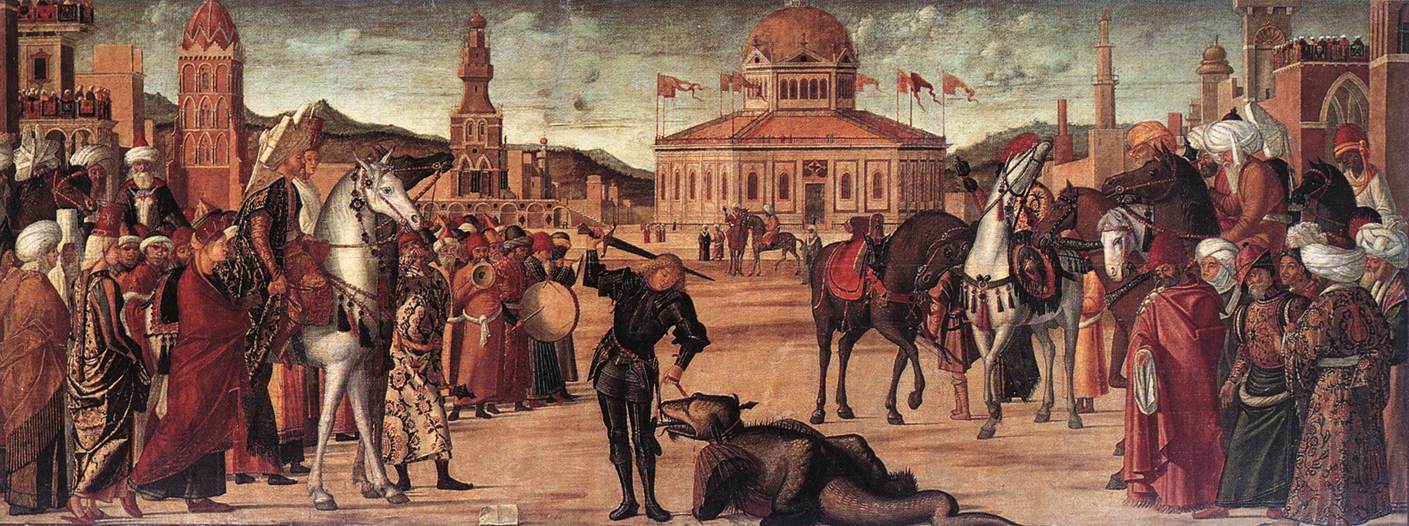
For me, the charm of the picture lies not in the composition as a whole, but in the details. For example, on the left, look at the oddly proportioned horse, of which one could say either that Carpaccio left it to one of his assistants, or that the horse’s mother had been too friendly with a camel. Or, on the other side, take in the contrast with the rearing white horse and with what is presumably George’s horse (who also seems a little restive in the presence of the dragon).
Other good examples of Carpaccio’s taste for detail can be found in the loving representation of oriental costumes, especially the turbans, which derive from various sources, including the same book of woodcuts.
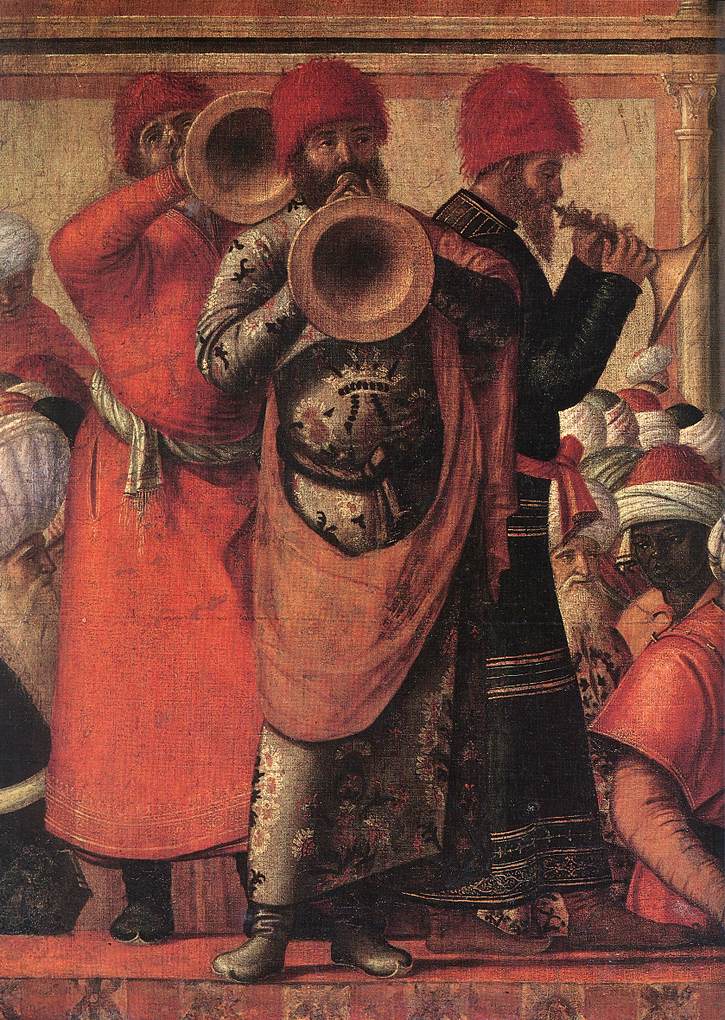
Last in this series (Figure 00 FIXME), we have the musicians—whom we shall meet again in a detail from the next scene. The light in this canvas is imagined as falling from the left (hence the shadows lie to the right), just as it had done in the first canvas and as it will do again in the final scene, a fairly clear indication that all three canvasses were intended for the same wall on the Upper Floor, and that they did not ‘turn the corner’ as they do in the present layout on the Ground Floor.
It is also clear that this one has been cut down by about two and a half feet, on the right this time (for once again, the vanishing point of the perspective must have been central), and that it was originally designed to fit over a door (the area beneath the musicians being a later addition).
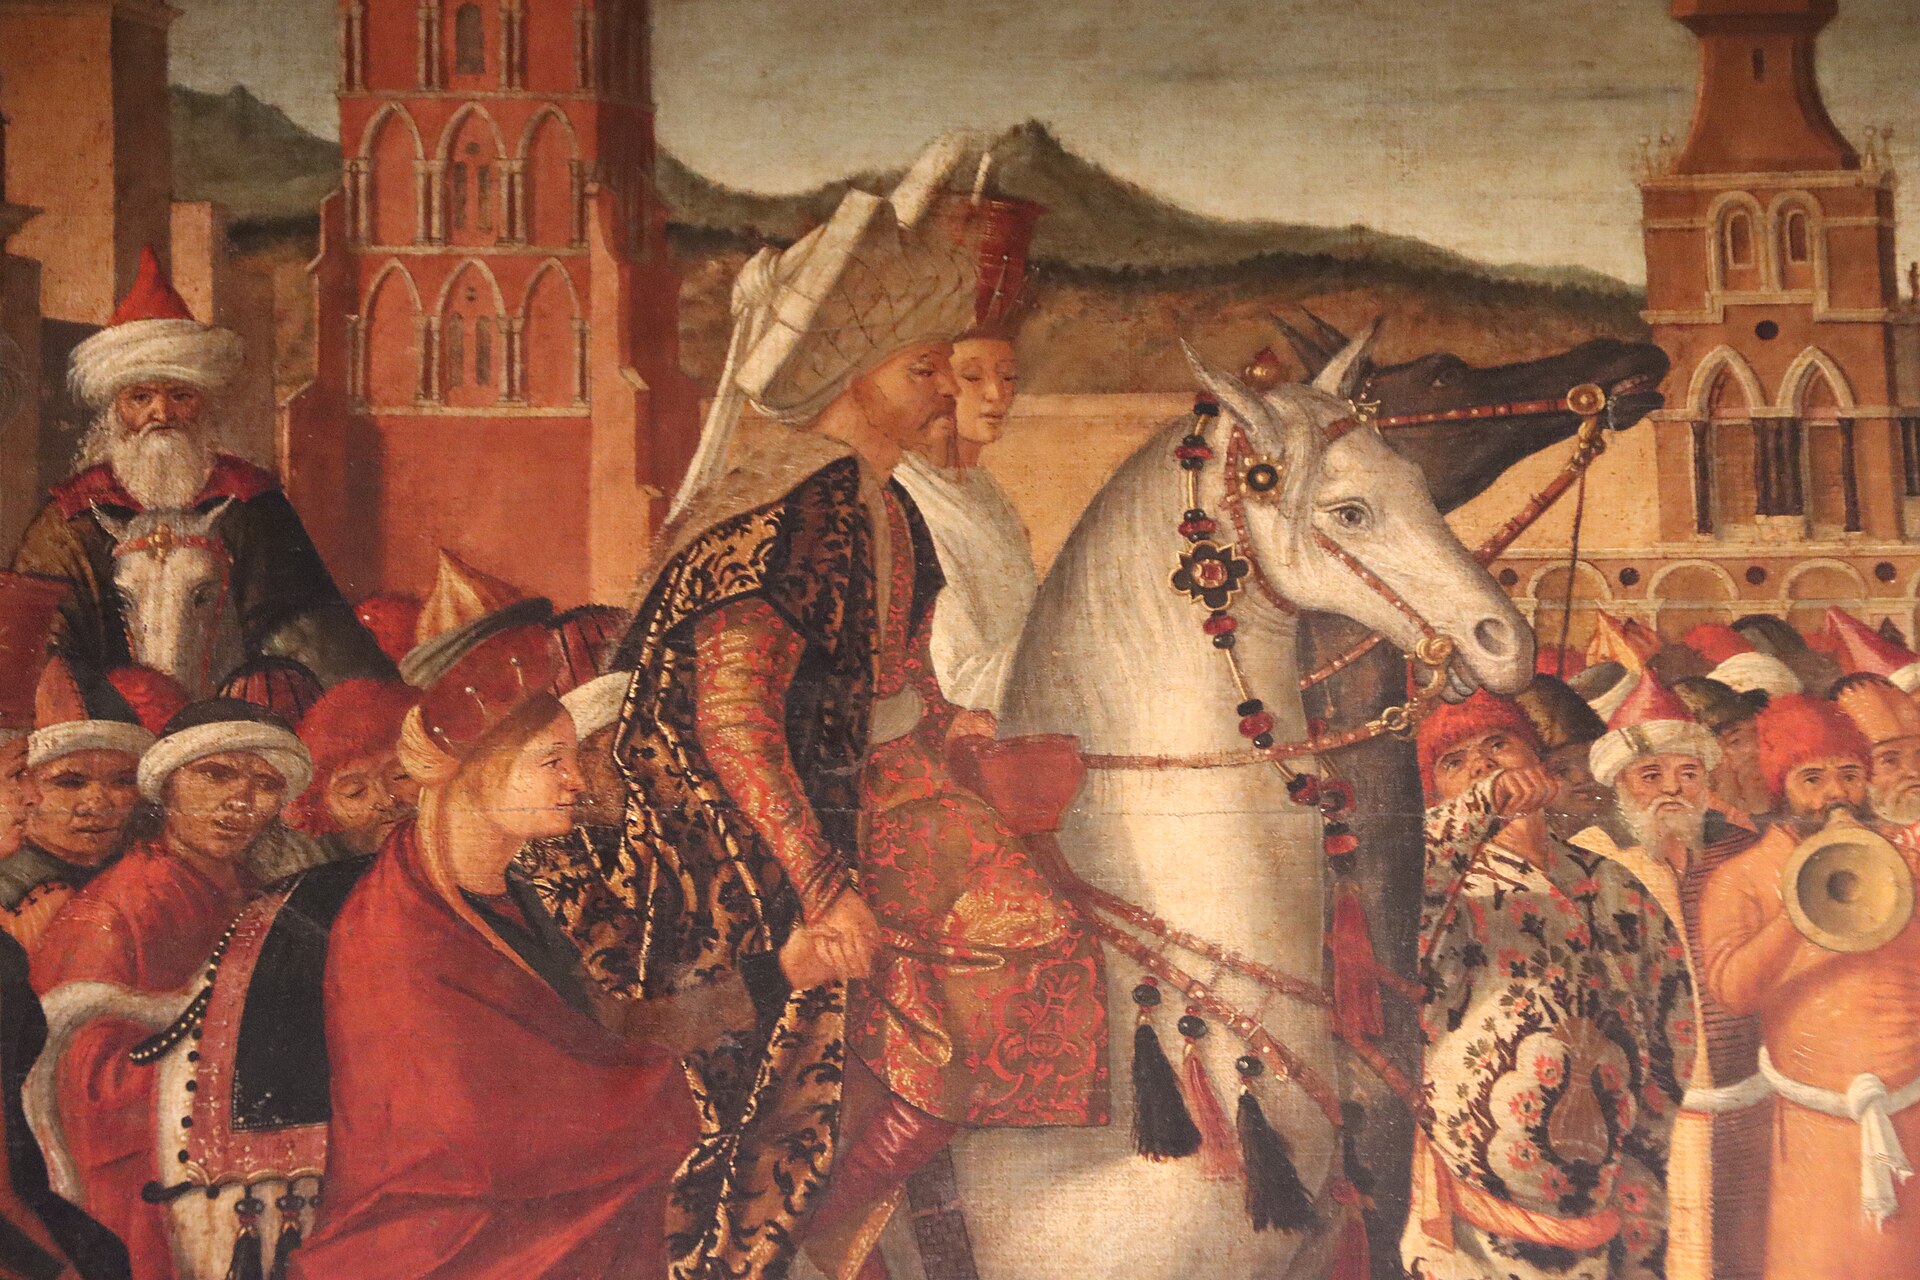
There is little to add with regard to the story: what we see is the baptism of the citizens of Silena (‘twenty thousand men, and a multitude of women and children’, according to the Golden Legend), their baptism being, you remember, the pre-condition of George’s killing the dragon.
So, what you see is George himself, still wearing his black armour under a cloak, who is beginning the work of baptism with the kneeling king and queen, while the rescued princess assists him by holding a pitcher of water.
Again, the pleasure lies in details—the long wall of the Palazzo to the left; the circular pagoda; and the head dresses, either actually on people’s heads, or abandoned on the steps, and casting a lovely shadow near the parrot.
And, of course, the musicians. The superb detail in Figure 00 FIXME below allows us to enjoy the different textures of the red busbies and the embroidered coats, the implausibly short stem of the shawm and its implausibly large bell, and the way in which the pot-bellied man at the rear is ‘getting into the groove’, while the musician in the centre, very cool, is lifting his right foot only just enough to keep time:
For the last saint in this part, we pass from a fairy tale hero (who has now been removed from the Roman Catholic calendar despite the fact that he is the patron saint of England), to one of the best documented ‘fathers’ and ‘doctors’ of the Church, the man who re-translated the Bible from the Hebrew and Greek to give us the Latin Vulgate—St Jerome (you see him in Figure 00 FIXME as he appears in one of the jewels of our National Gallery, a tiny painting by Antonello of Messina, which is a mere eighteen inches high):

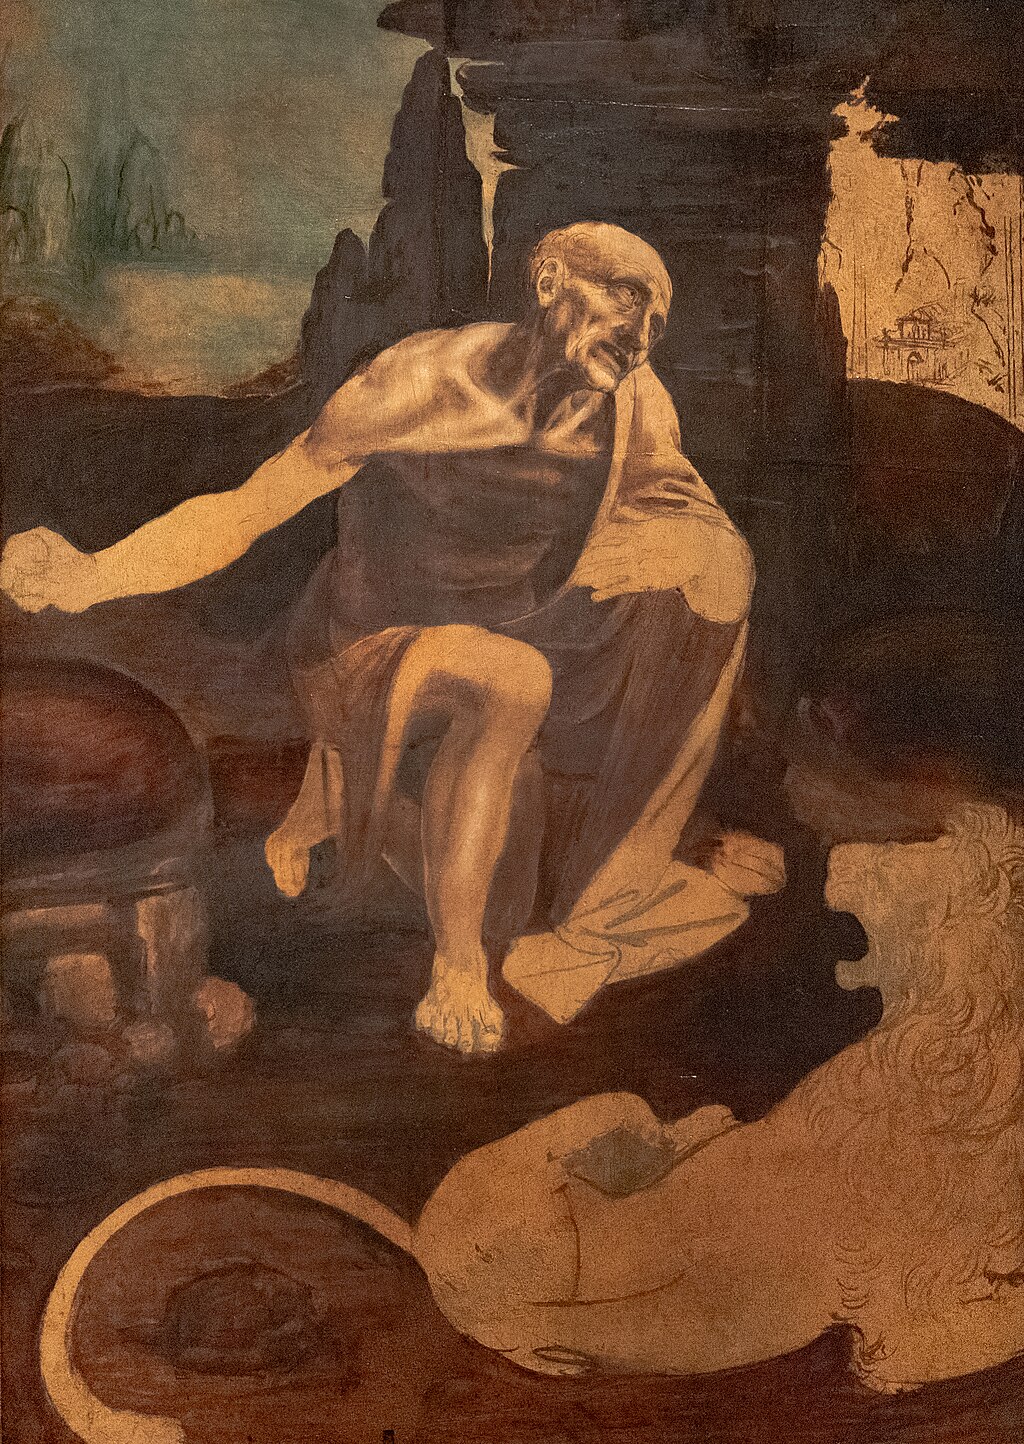
The reason for his association with George and Tryphonius in this School of the Dalmatians is explained in the Golden Legend, where we read that he was born in the town of Stridon on the borders of Dalmatia and Pannonia. The Golden Legend tells of his early studies, and of his famous dream, when he heard God accuse him of being ‘not a Christian, but a Ciceronian’. It tells too of how he was made a cardinal at the age of thirty-nine, how he was a hot favourite for the Papal tiara, but was ‘framed’ in a sex scandal, and then spent four years of abstinence and penitence in the wilderness—which is where he is portrayed by Leonardo in this unfinished panel (Figure 00 FIXME), dating from about 1480:
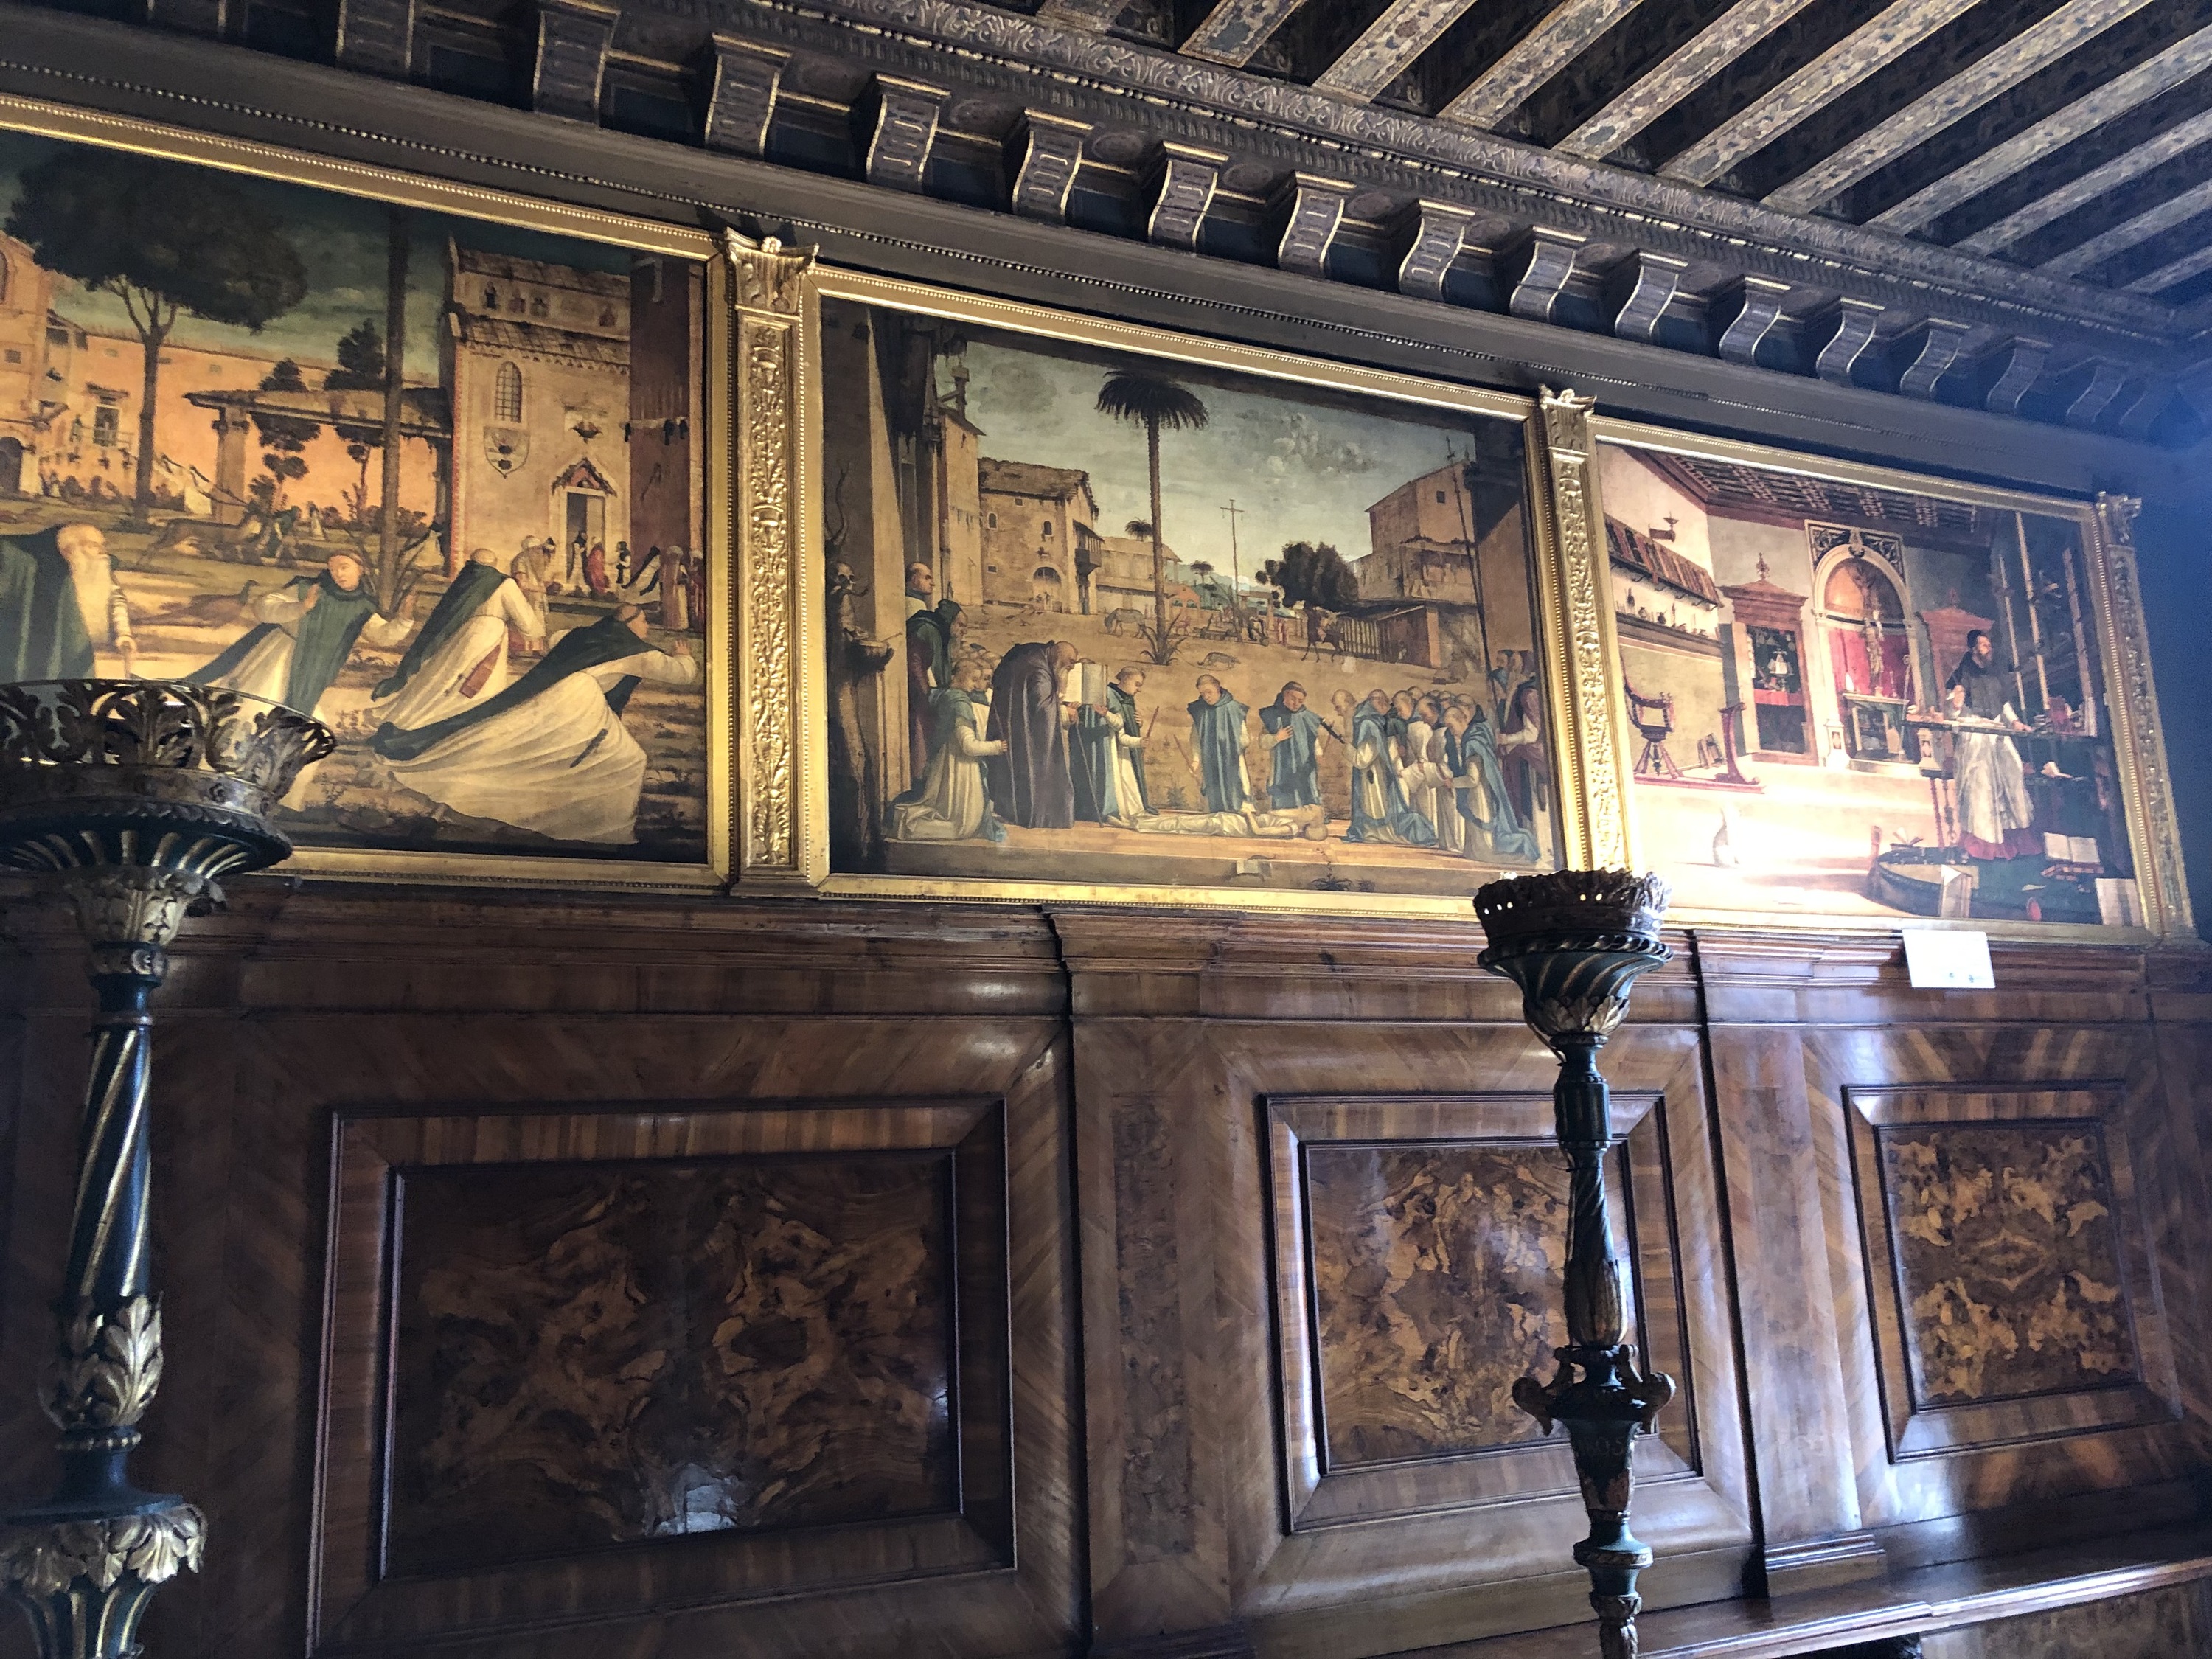
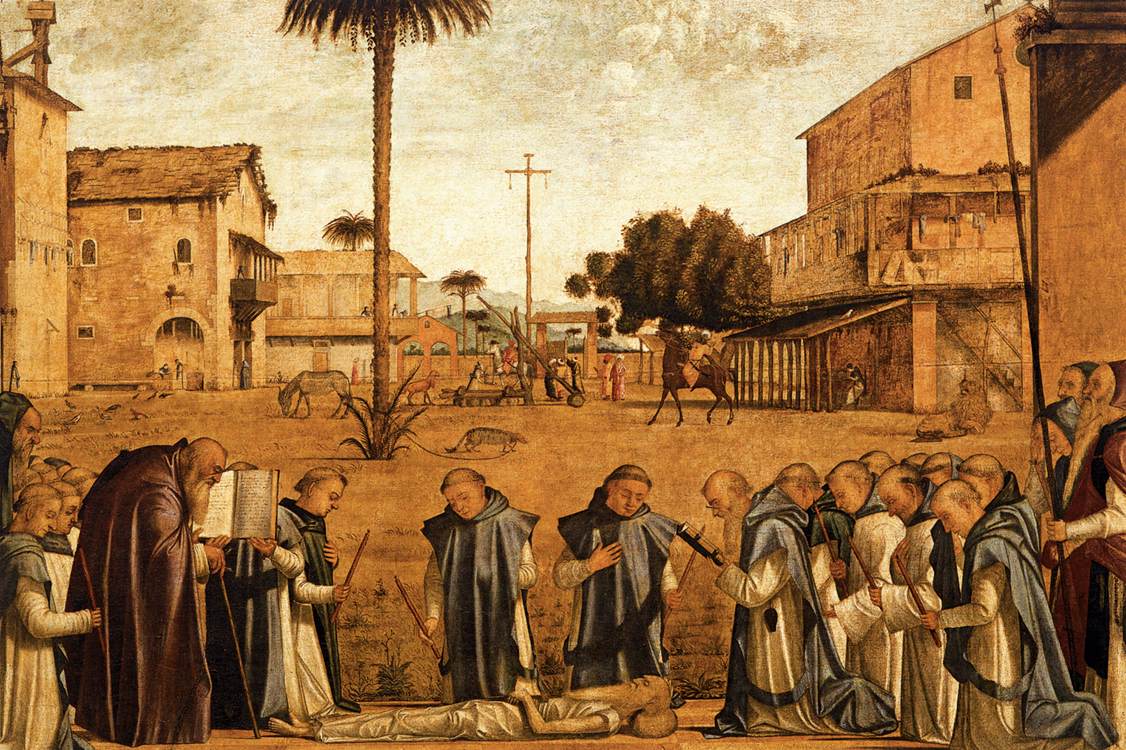
After this long penitence, he went to the town of Bethlehem, where he joined a monastery and ‘laboured for fifty-five years and six months at the translation of the scriptures’. It is in Bethlehem, at the end of his life, that Carpaccio takes up the story, in this (Figure 00 FIXME), the first of three pictures in the school:
The three are now ranged in sequence on the right hand wall, that is, opposite the George-cycle, as was originally intended, since the light is imagined as coming from the same window, and therefore from right to left in all three.
The story goes as follows:
‘One day, as evening was drawing on, and Jerome sat with the brethren to hear the sacred lessons, suddenly a lion came limping into the monastery. At the sight of him, all the other monks fled; but Jerome went forward to meet him as a host meets his guest.’
In the event, the saint removed a thorn from his paw, and the grateful lion remained in the service of Jerome and the monks for the rest of his life. There is a hilarious contrast here between the old man and the placid lion, and the monks who are dashing away—to the right, to the left, to the right with the stag, and to the left up the stairs.
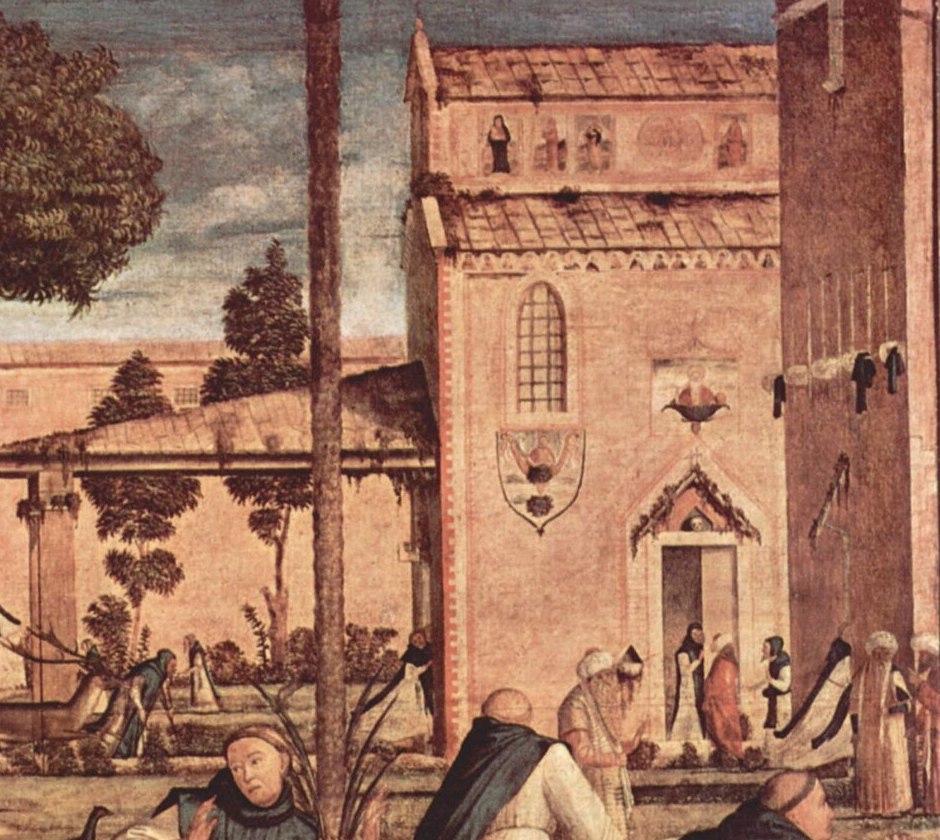
For my money, though, the ‘poetry’ of this picture lies in the setting. It ‘feels’ eastern in the rendering of the sandy soil, the scrub, the pines, the sunbleached buildings, but is in fact a fairly careful study of the complex of buildings in Venice where the picture still hangs.
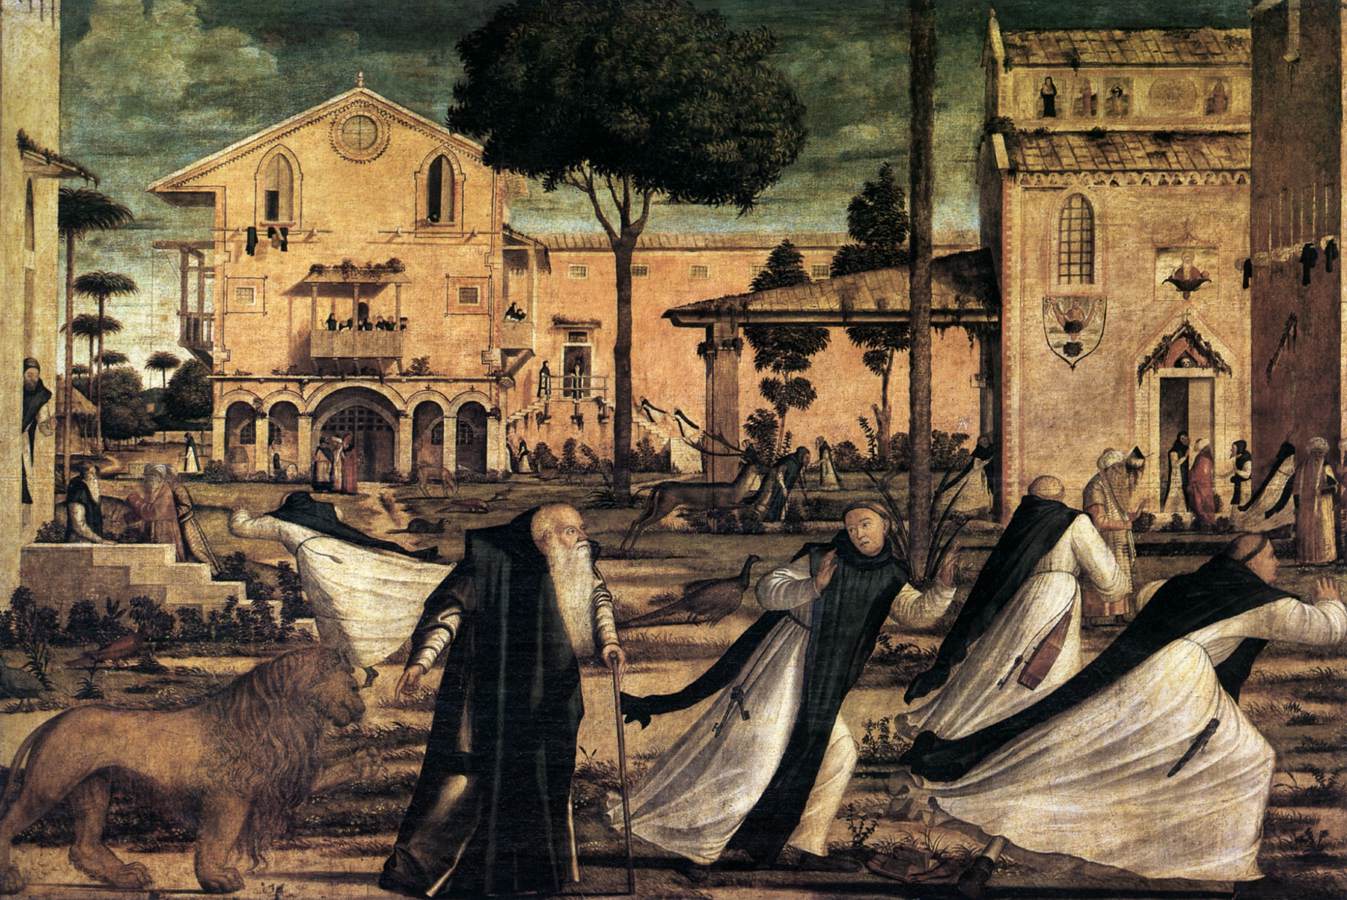
We can pick out the church of the Knights of St John, with its mosaics above the entry, below the window and in the clerestorey; we can see the bottom of the separate bell-tower; and we can see a building that closely resembles the School of St George itself, as we saw it in the woodcut of 1500 (which is why I asked you earlier to remember the pitched roof, the rose-window, and the two Gothic windows), with the main difference being that the painted building has been given an extra storey in the portico of the ground floor.
The same principles hold good for the appreciation of the second painting, identical in size (that is, about four and a half feet by seven), which shows the funeral service for the saint, who died at the age of ninety, in 420AD. There is painterly pleasure to be taken in the scroll with its signature, in the lizard lying above it, and in the rigidity of the corpse; and there is some gentle humour in the observation of the old men, especially the one wearing spectacles to read the funeral service.
But the greatest charm lies in the setting. It is meant to be the same monastery seen at an angle of ninety degrees with respect to the first scene, so that this one is inspired by the church, as the other was by the Scuola di San Giorgio. Yet seen from this angle, the buildings enclose a greater expanse of sand, the pines recede towards the distant hills, and the donkey is grazing near the birds, quite undisturbed by the lion.
We come now to the last painting in this lecture, which in Figure 00 FIXME I have placed in its correct relationship with the funeral [FIXME: check this relation preserved]:
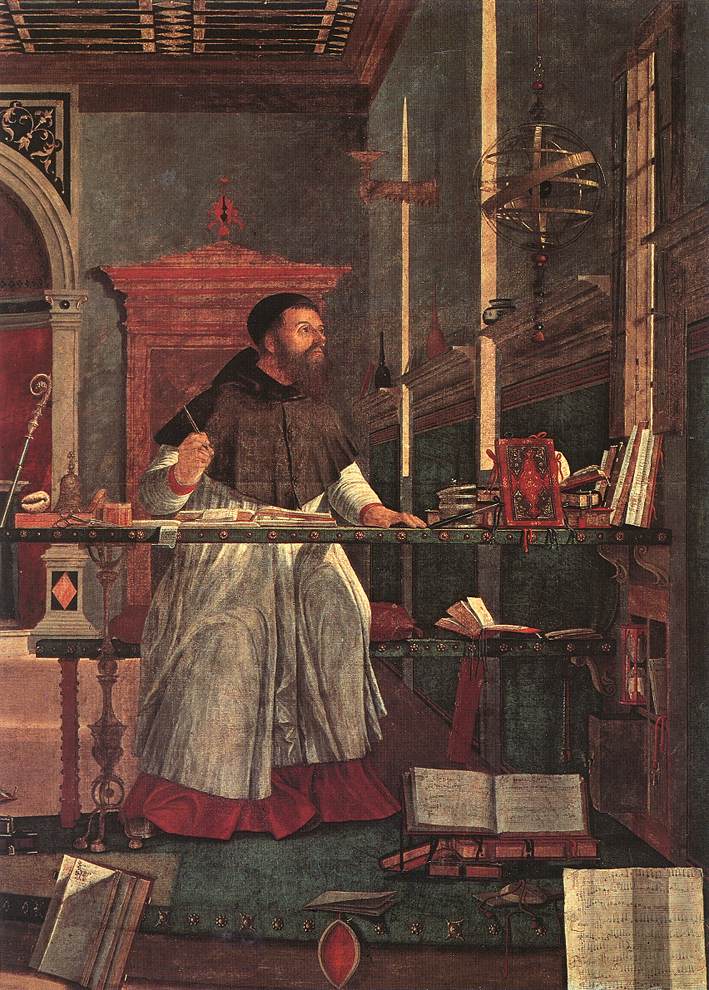
In fact, its place in the sequence was a mystery until the 1960s, because everybody assumed that it represented St Jerome in his study, exactly as we saw him in the little painting by Antonello. The question then was, why had it been placed last? It is now known, however that Carpaccio turned away from the Golden Legend to another version of Jerome’s life, published in Venice in 1485, and that the seated scholar is not Jerome but St Augustine, who was far away in north Africa, and who was in the act of writing a letter to Jerome when he became aware of a strange light, and heard a voice announcing that Jerome had just died.
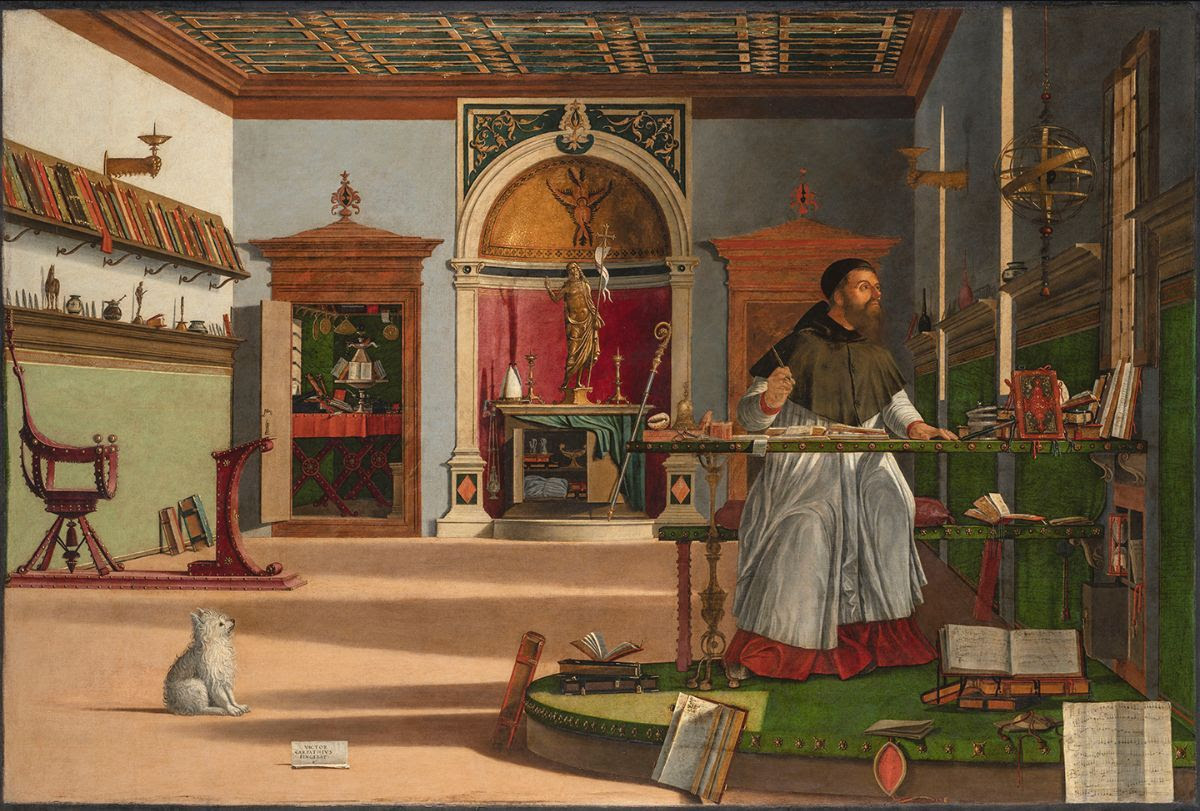
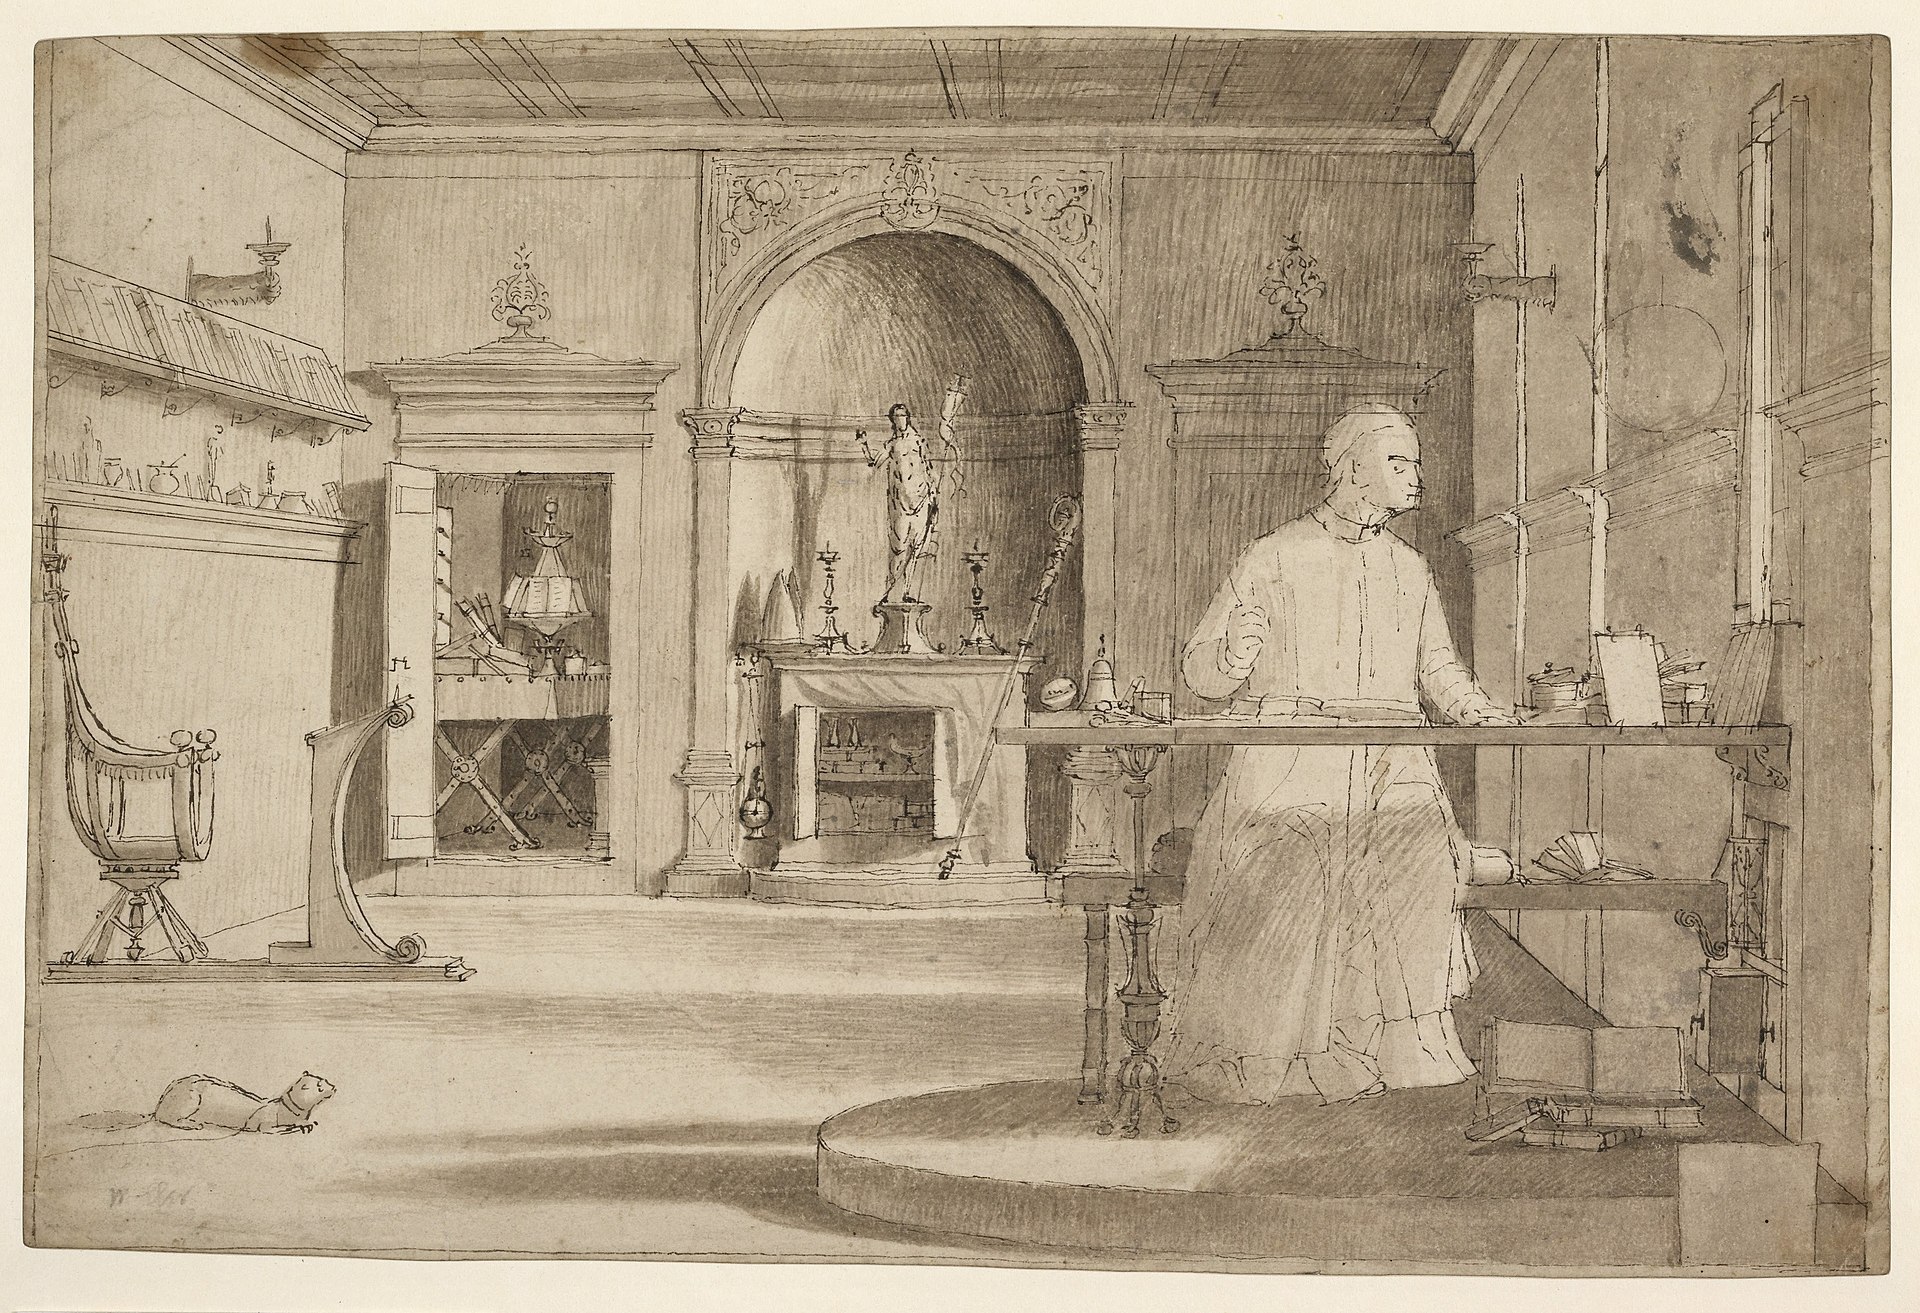
I am not alone in counting this as my favourite among all Carpaccio’s works, including the Ursula cycle. We are lucky enough to have a superb preliminary study, in ink and wash, which enables us to appreciate his control of perspective and his power to model forms merely with gradations of a grey scale without the distractions of colour and detail. Comparison with the study also shows how he later gave the story a greater impact by making the light more intense outside the window, and showing Augustine as far more rapt by what he sees and hears.
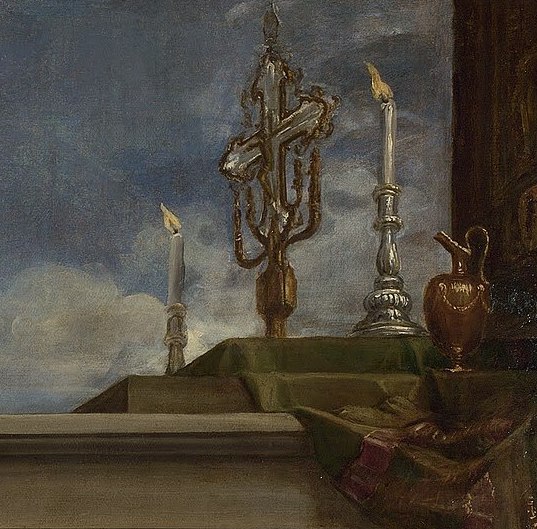
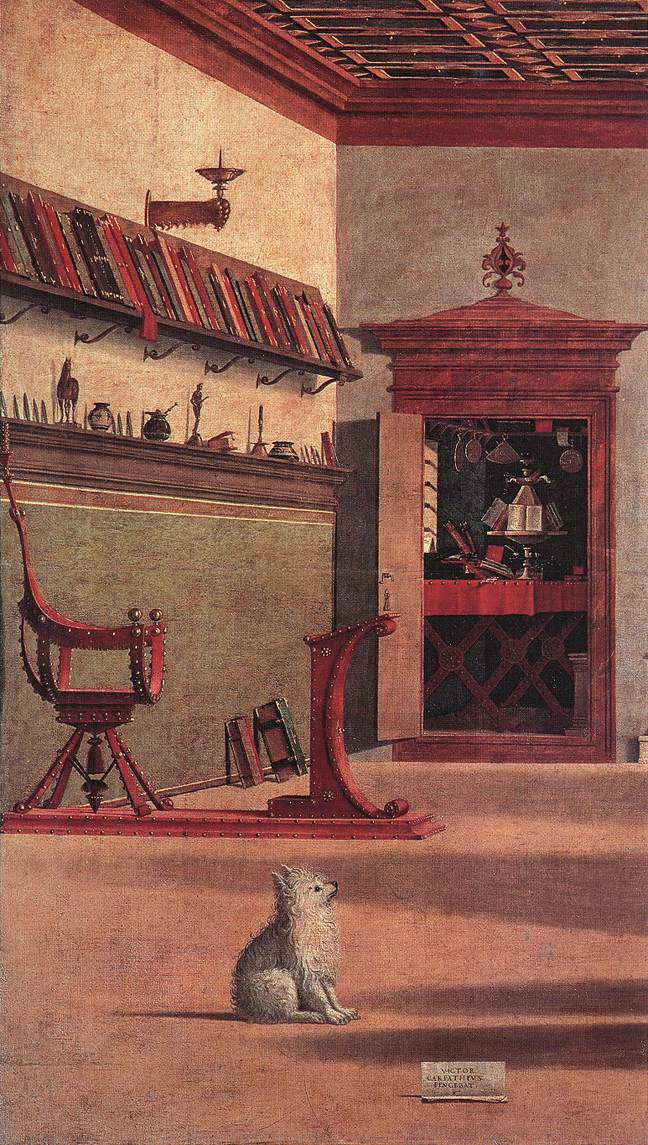
Even having looked hard at the drawing, though, one still wants to enjoy the colours of the original, and the amazing wealth of detail in this recreation of the study of a humanist cardinal in the late fifteenth century—some say that it is intended to be a posthumous portrait of Cardinal Bessarion, who had died in 1472, thirty years earlier. Focus on the altar, with its statue of the risen Redeemer, between the candlesticks and the bishop’s mitre and staff, and on the cupboard below which contains the vessels needed to celebrate mass, complete with a curtain to conceal the vessels when necessary. And enjoy the splendid red leather chair with brass studs, attached to the prie-dieu in front of the well-stocked bookshelf, and the sill with all its bric-a-brac; and in the corner (see detail in Figure 00 FIXME), notice the closet with a folding table, and a four-sided lectern with books and instruments.
The saint is at his desk on the dais, with books propped up against it, or lying open to reveal perfectly transcribeable Renaissance motets in three and four parts respectively:
His writing instruments lie on the table. There is a model of the planetary spheres and the Zodiac on the wall. And we must not neglect the ‘pooch’, who is rocking back on his haunches, his hair bristling, as he looks at the celestial light which illuminates both him and the notice, ‘Vittore Carpaccio painted it’.
PART TWO
THE LEGEND OF ST URSULA BY CARPACCIO
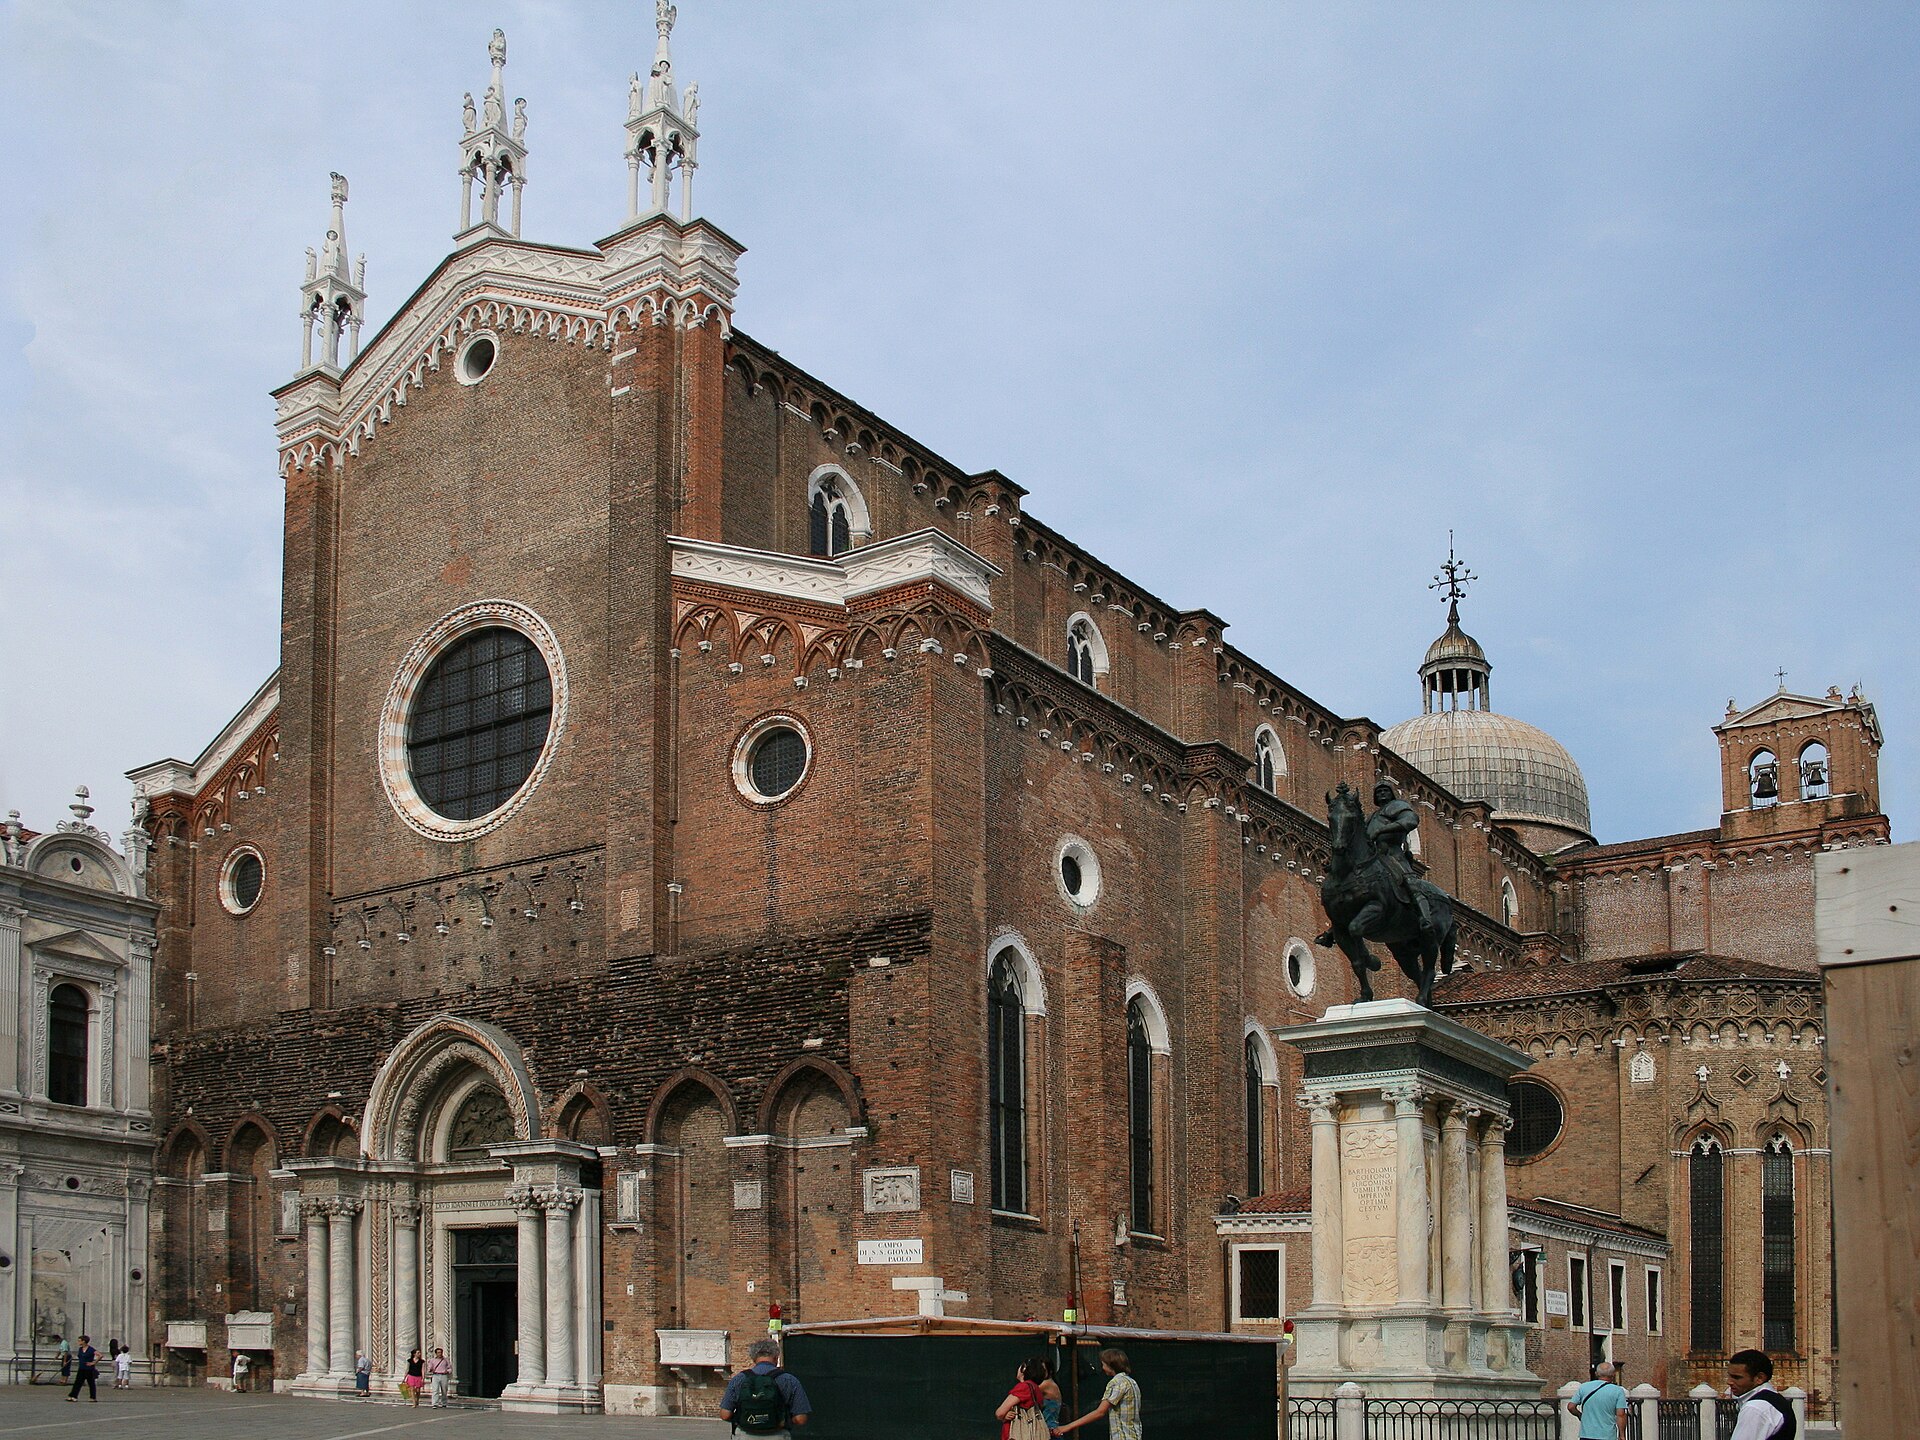
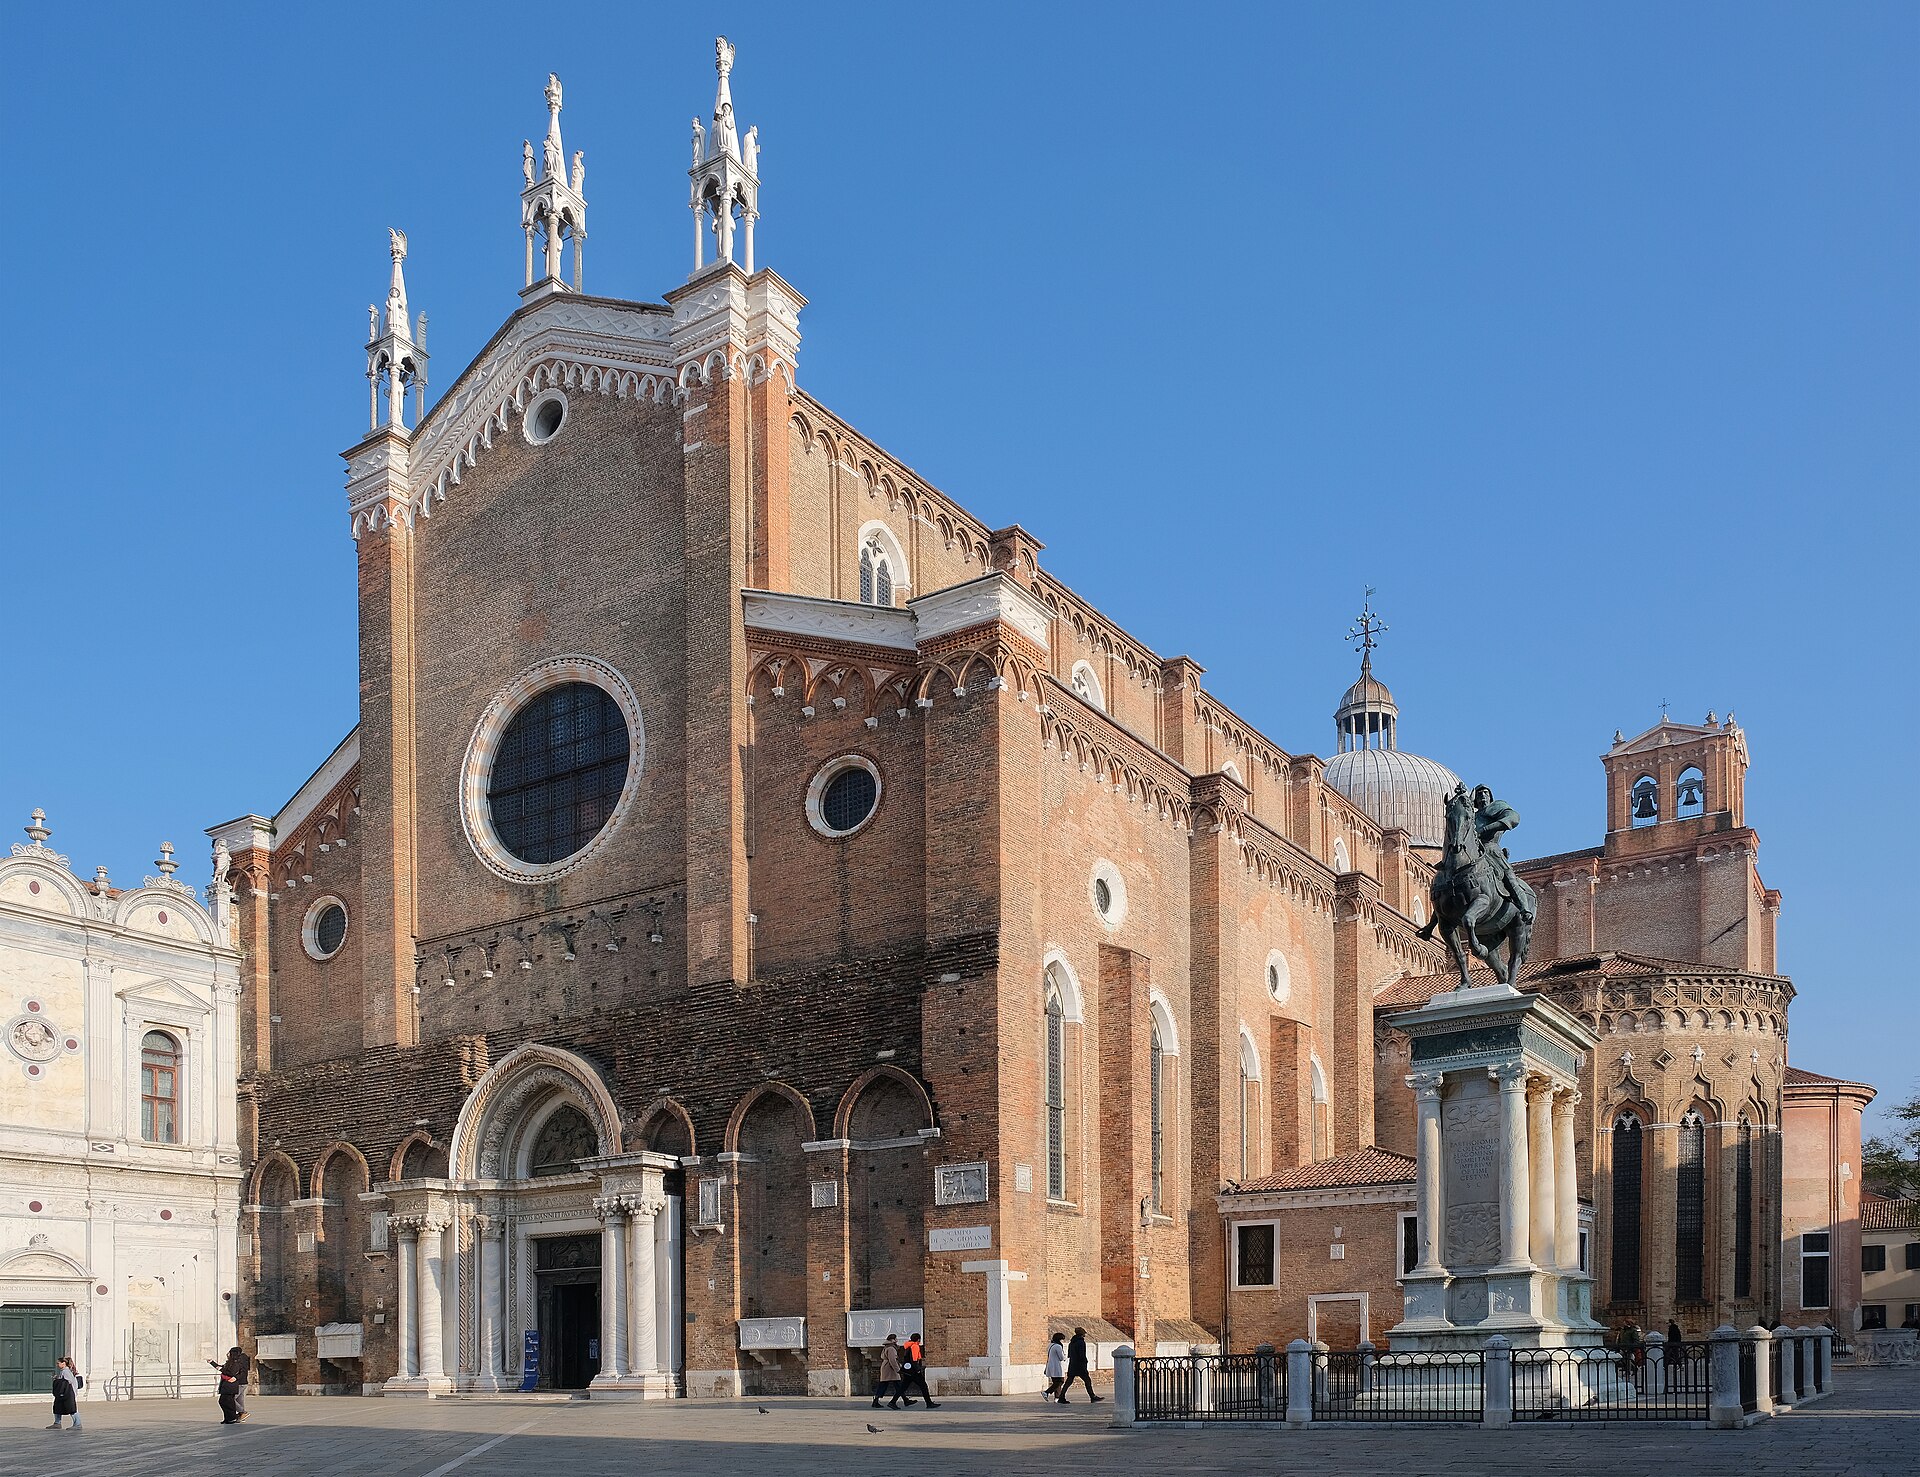
With the dimensions of the Sala dell’albergo room in the School of St George still in mind, we are ready to go to the School of St Ursula, which used to be attached to the huge Dominican church of Saints John and Paul, lying to the north-east of the city.
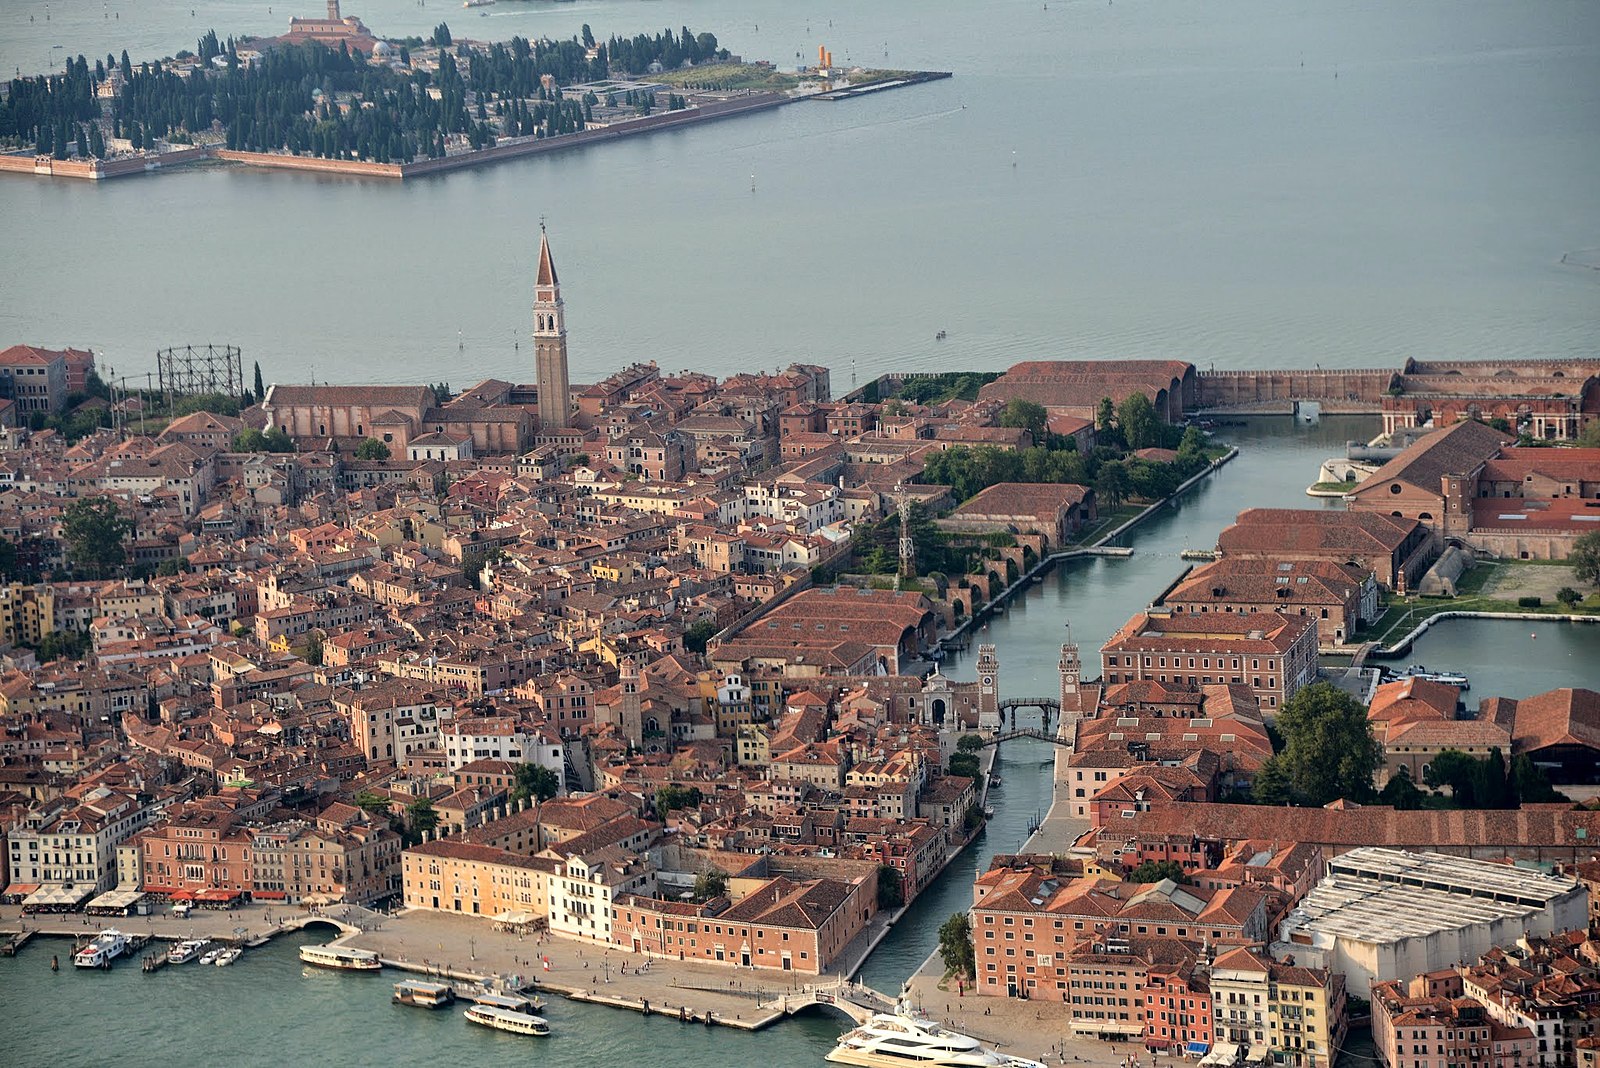
It was a very important church, because in the fifteenth century it had become a sort of Westminster Abbey, in the sense that most of the Doges were buried there. In FIXME Figure 00 a and b, I show you a view of it from the air in the 1950s, alongside one ‘taken’ in 1500, in a detail from the famous woodcut of Venice by Barbari:
After the confraternity was suppressed by Napoleon in 1806, the canvases were removed to the Accademia, and people forgot which of the flanking buildings had been the headquarters of the School.

PAT: NEED TO CHECK TEXT HERE AS YOU REFER TO IMAGES/PHOTOS THAT WE NO LONGER HAVE
This building lies just to the south of the five apses of the church of Saints John and Paul (not on the plan), and in a modern photograph, taken from the east, it looks like this:
It is not a very flattering photo, but it does at least give some idea of the scale and proportions. The main room inside was only about sixty feet long by twenty-five feet wide and so the elegant reconstruction-drawing offered by Ludwig and Molmenti is far too grand:
Ludwig and Molmenti not only opted for the wrong building, they got the pictures on the wrong walls, largely because they assumed that the main source of natural light in the room (typically, by this time, the source of the imagined light in the paintings will be made to coincide with the source of this natural light) came from the west wall (behind us in the illustration). In fact, it is now known that light came from the east window:
This means that, in reality, the story unfolded first along the south wall, crossed over, and returned up the north wall; and this is how the pictures are now arranged in the Accademia.
But let us come to the paintings themselves. These were commissioned in 1488, and executed between 1489 and 1500, with those for the north wall being painted first.


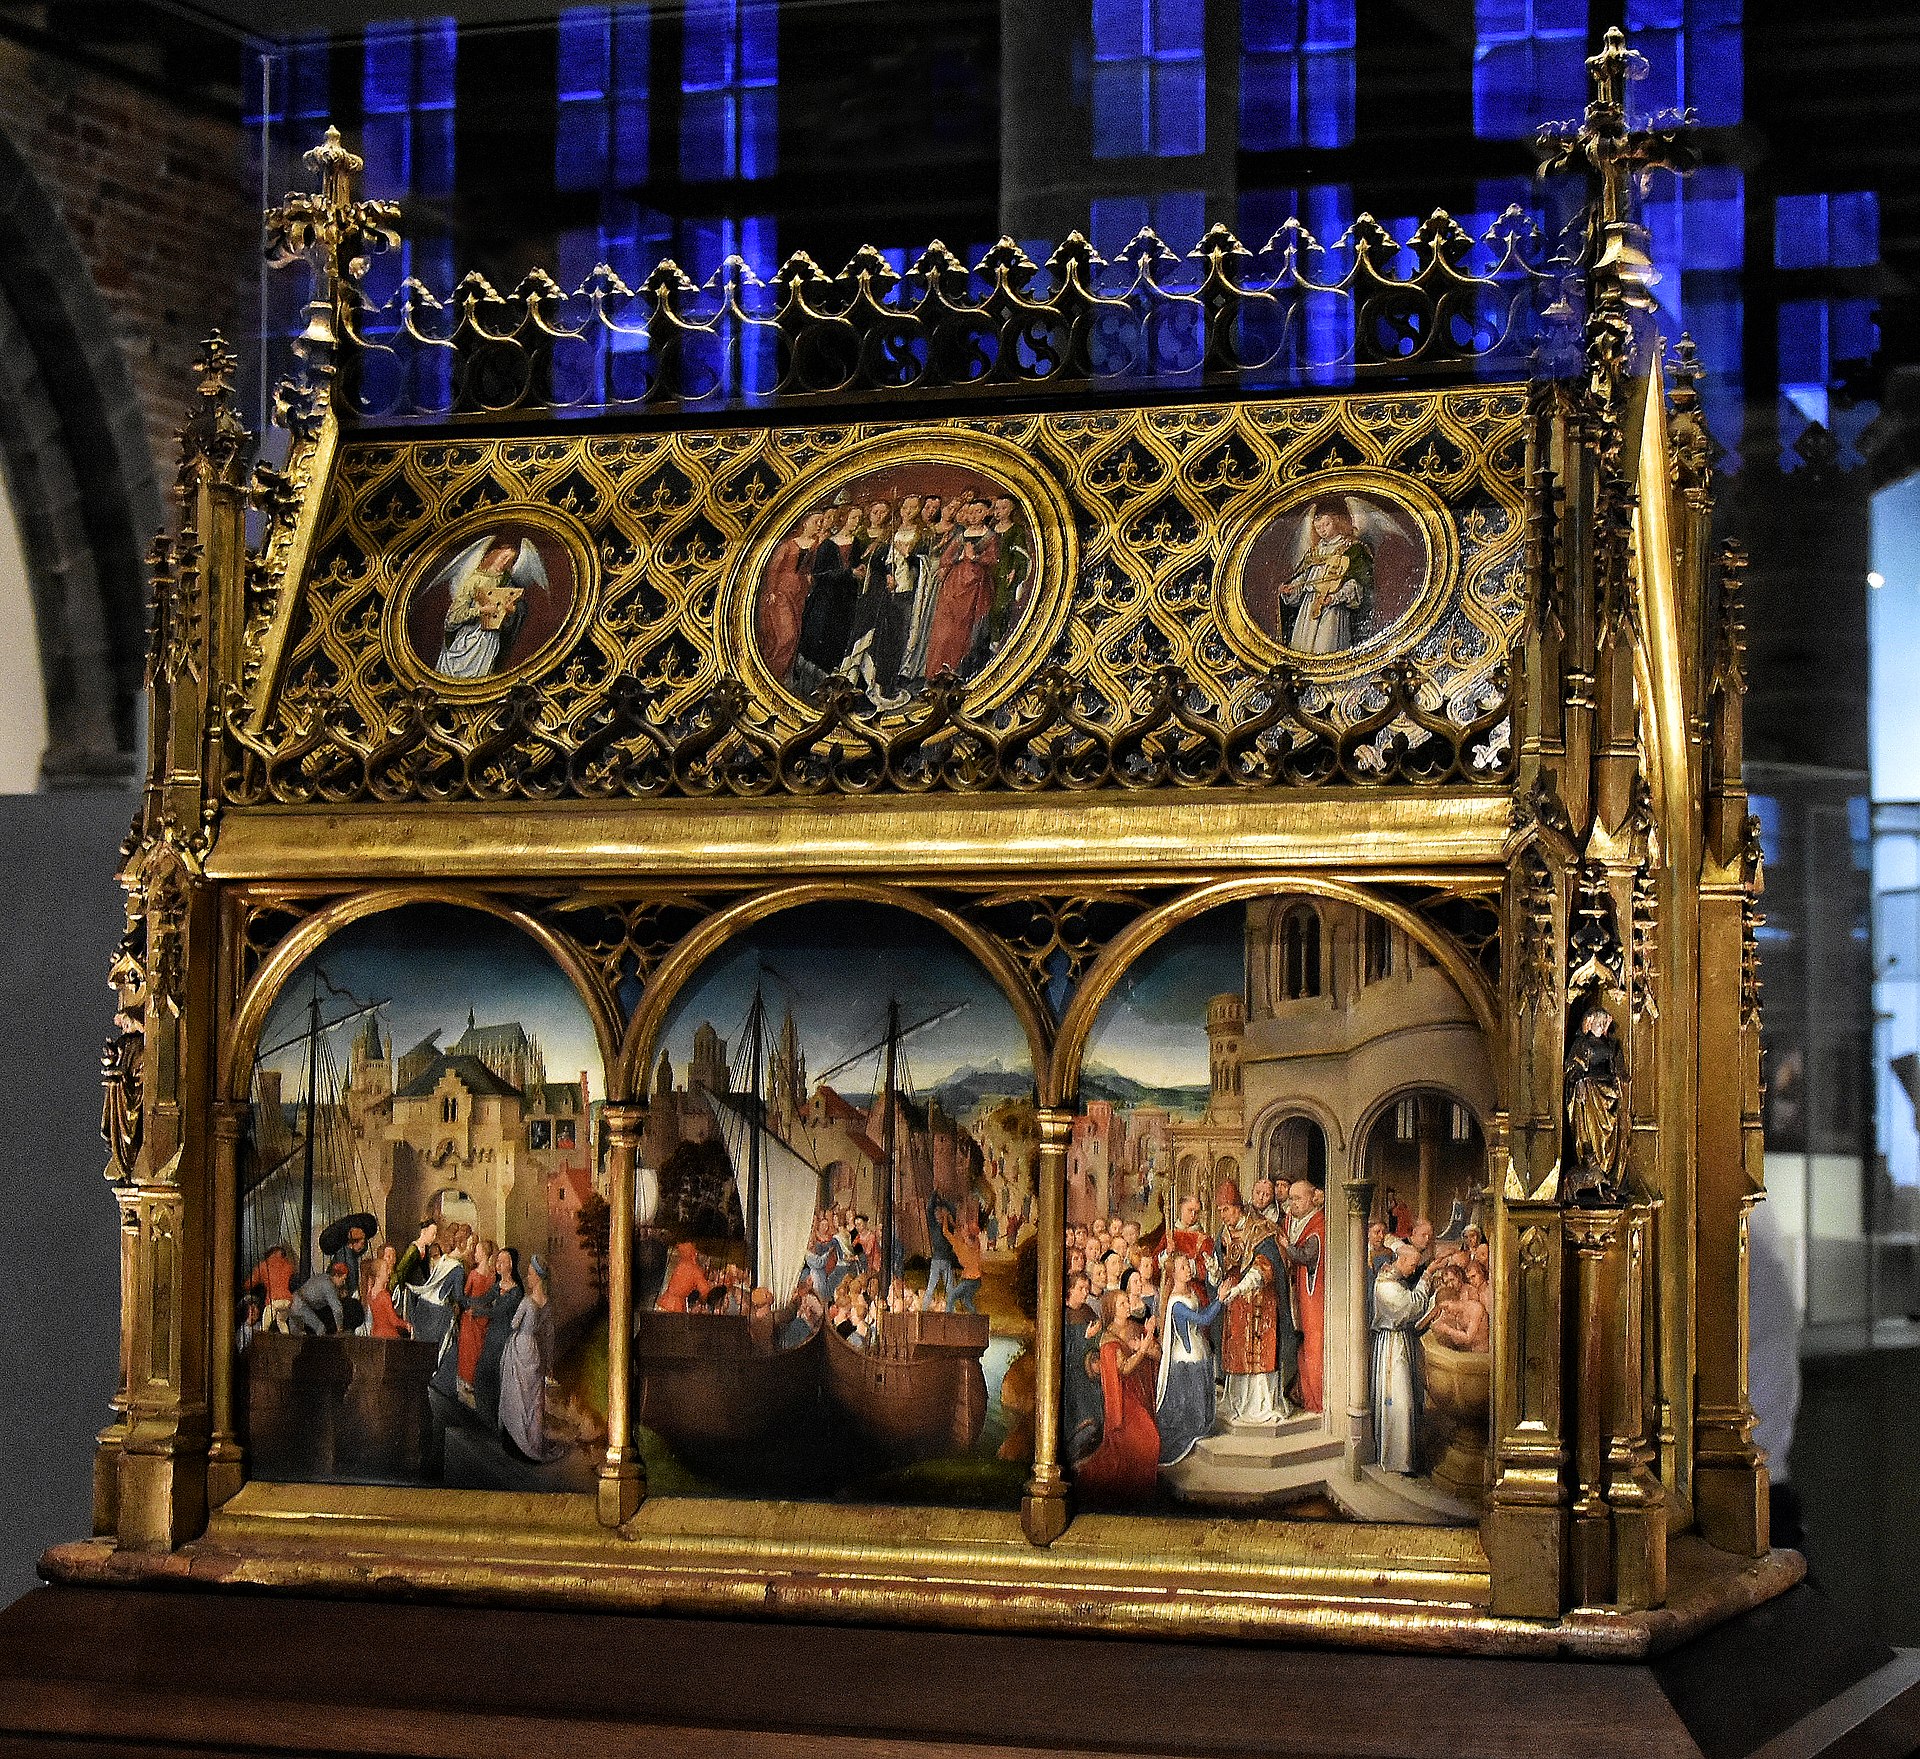
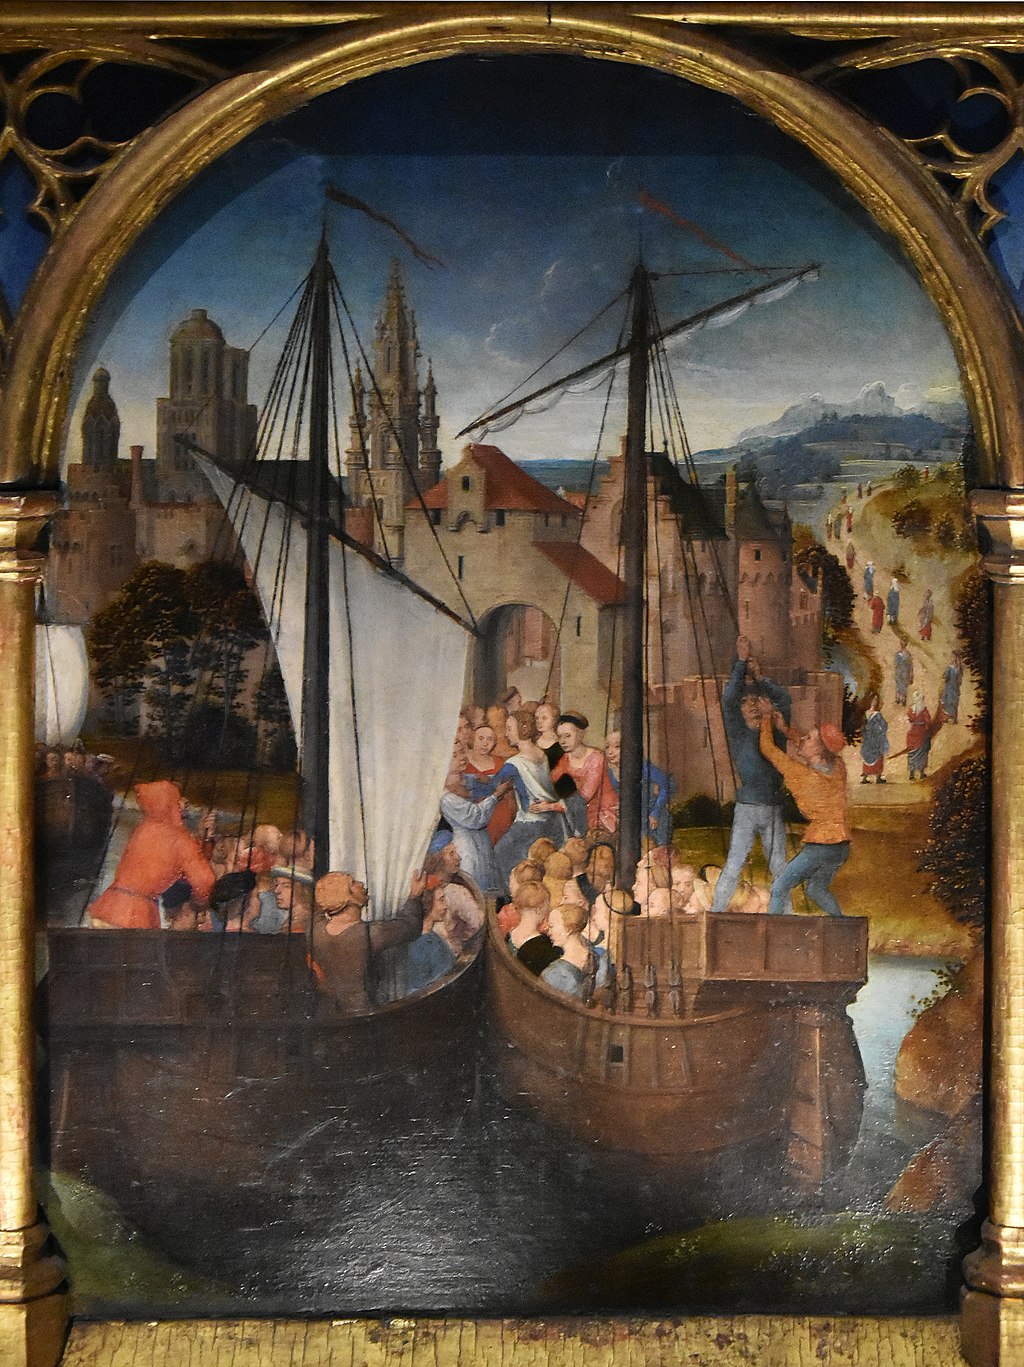
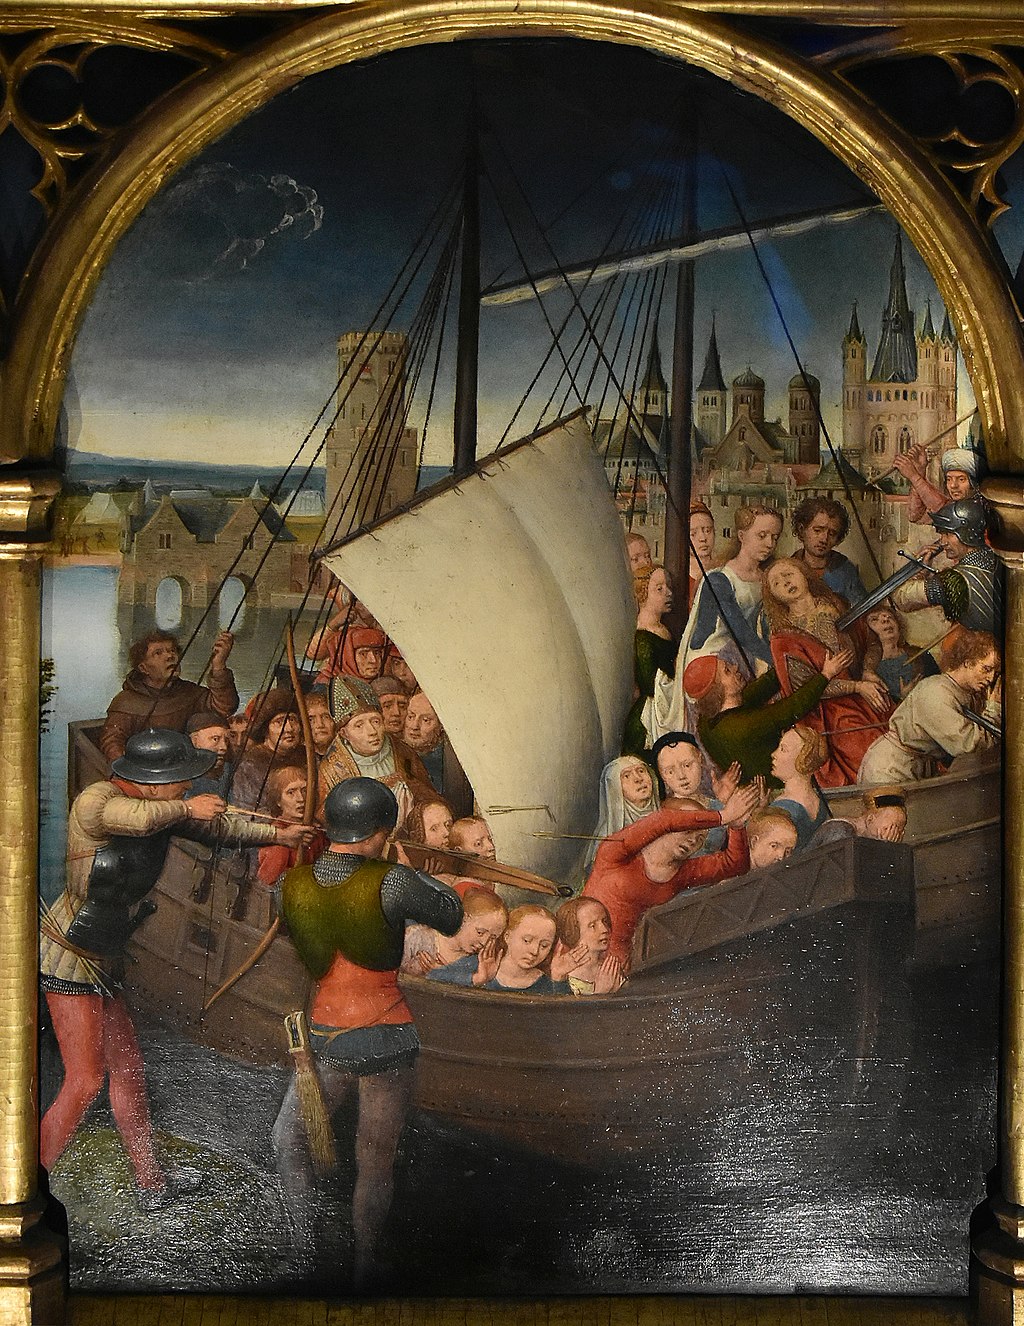
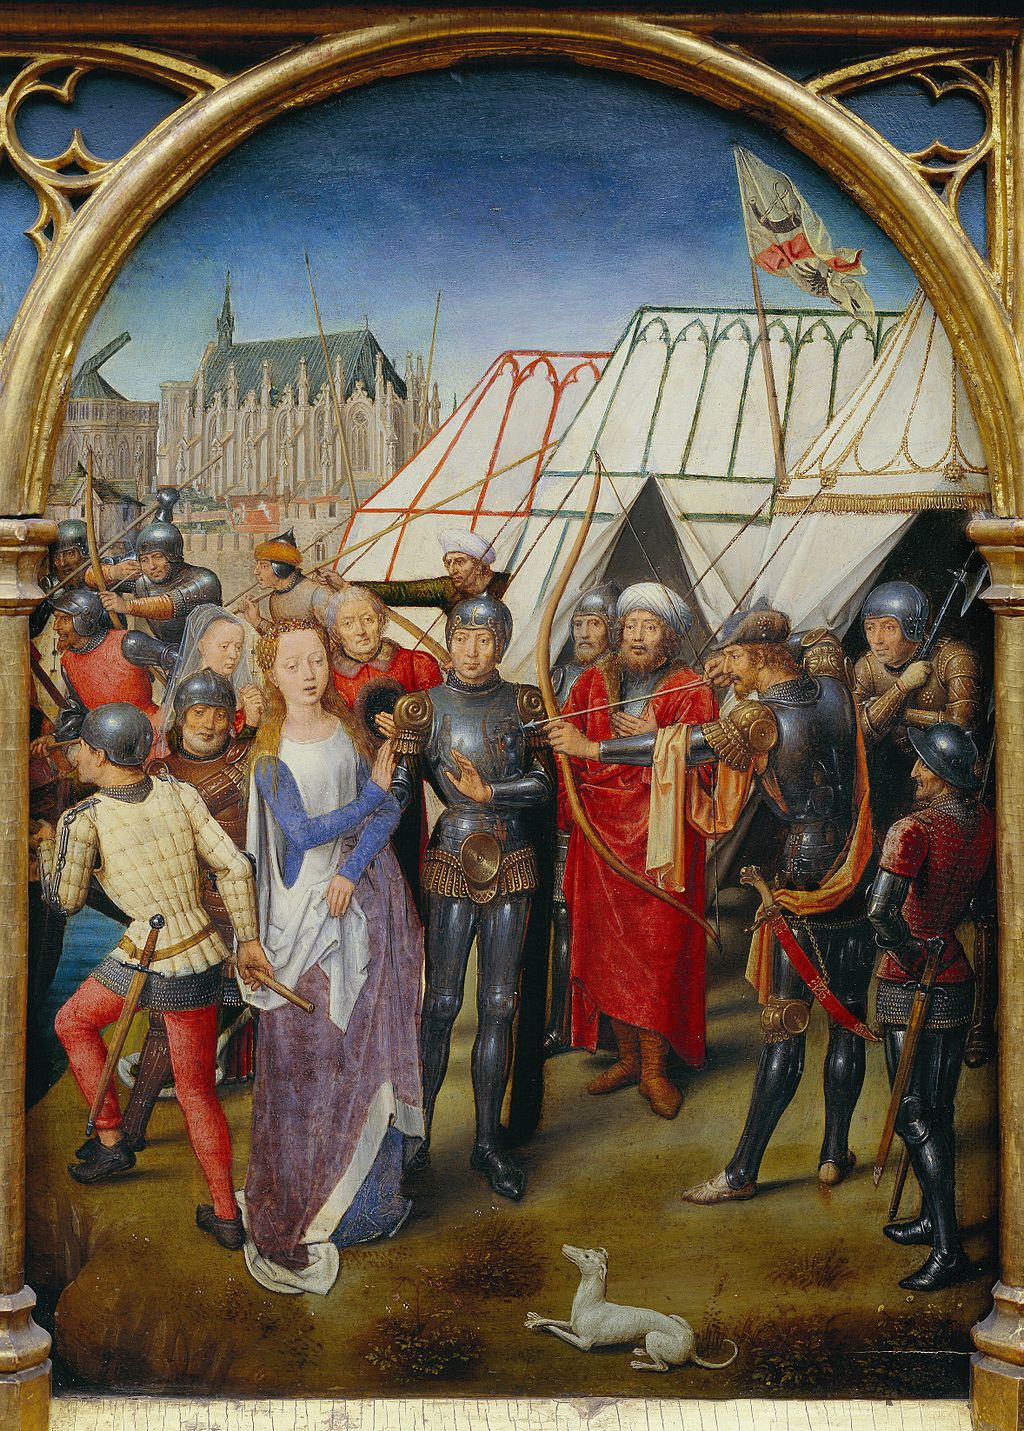
The details of story of the life and martyrdom of St Ursula and her companions were taken from the Golden Legend, in the entry for October 21st (the page of the Italian translation in Figure 00 FIXME was printed in Venice in the 1490s). The same story had just been interpreted, quite independently, by the Flemist artist Hans Memling, in the six panels on the side of the little reliquary in Figure 00 FIXME, just three feet high, which he did for the Hospital of St John in Bruges, shortly before 1489; and I will make use of Memling’s cycle later, both to provide some stylistic contrast and to fill out some missing scenes in the story.
The story itself is in essence a folk tale, a variant on the ancient motif of a princess who attemps to avoid marriage by imposing impossible conditions on her suitors. And apart from the gory end to the tale, most of the episodes are like those which make up so much of medieval romances: departures, farewells, arrivals, festivities and embassies.
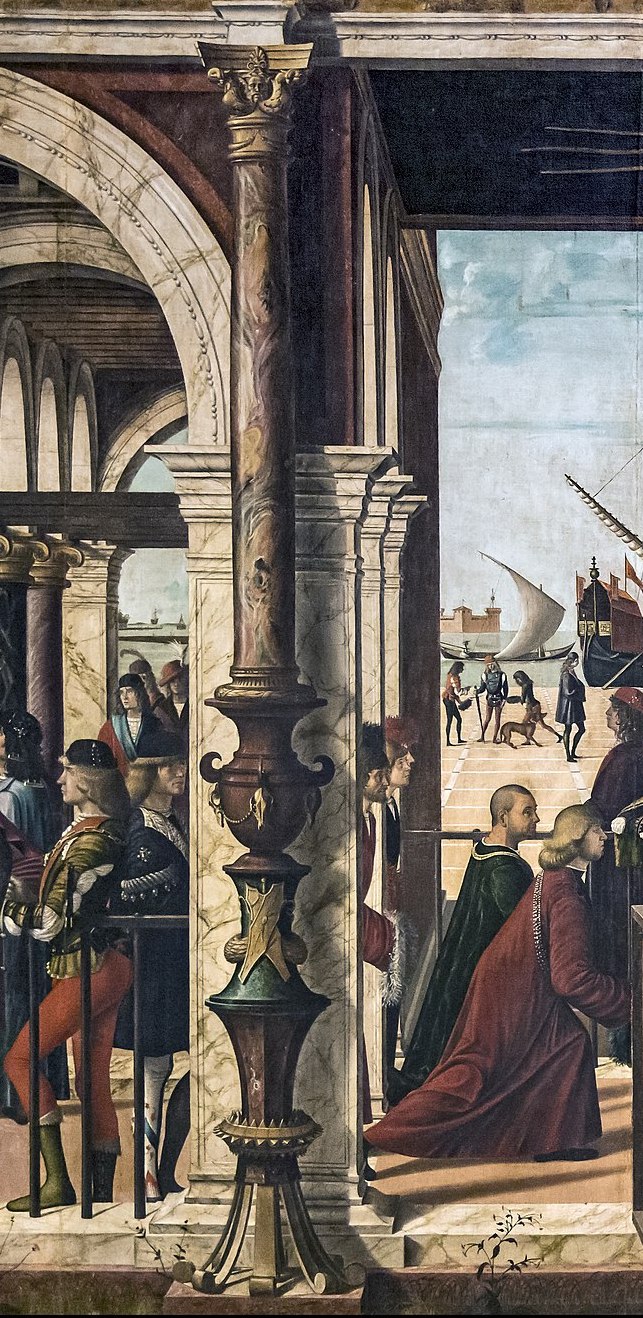
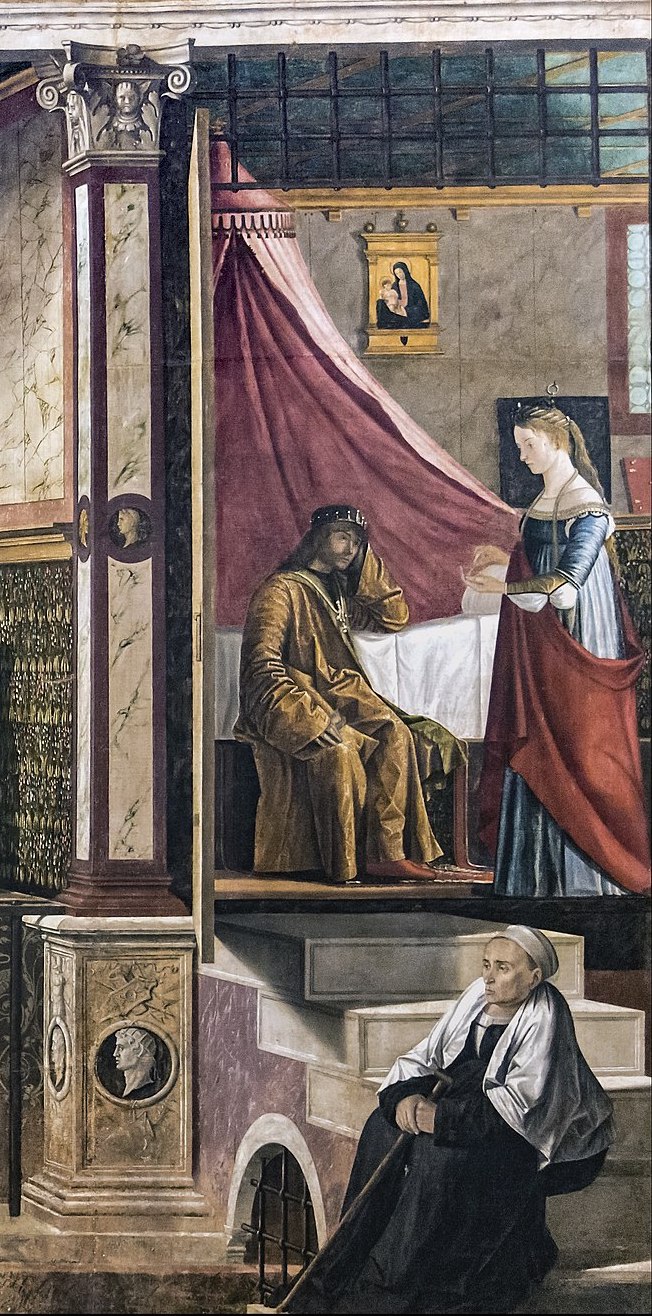
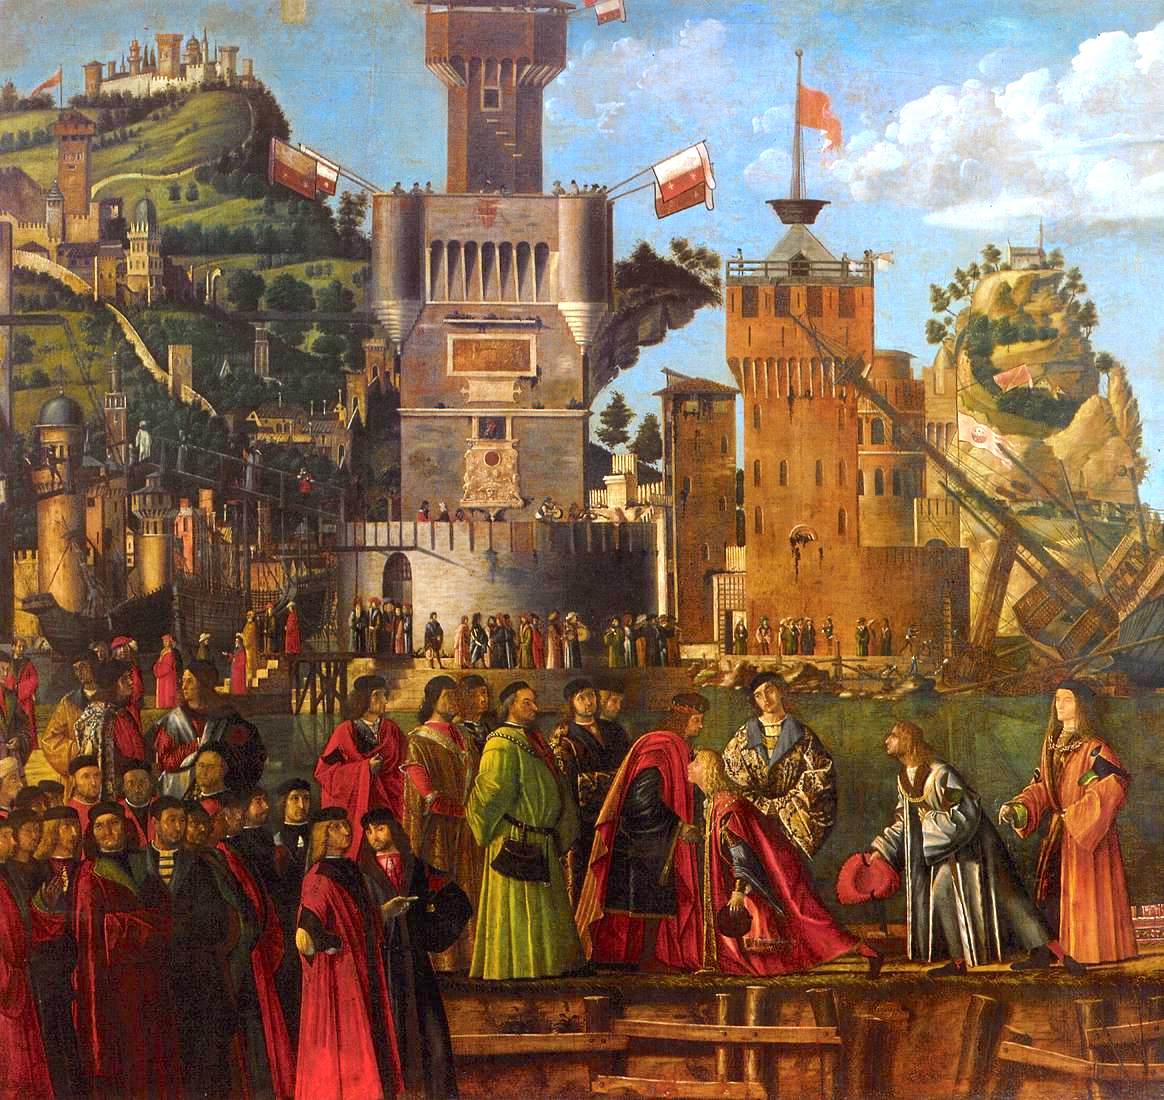
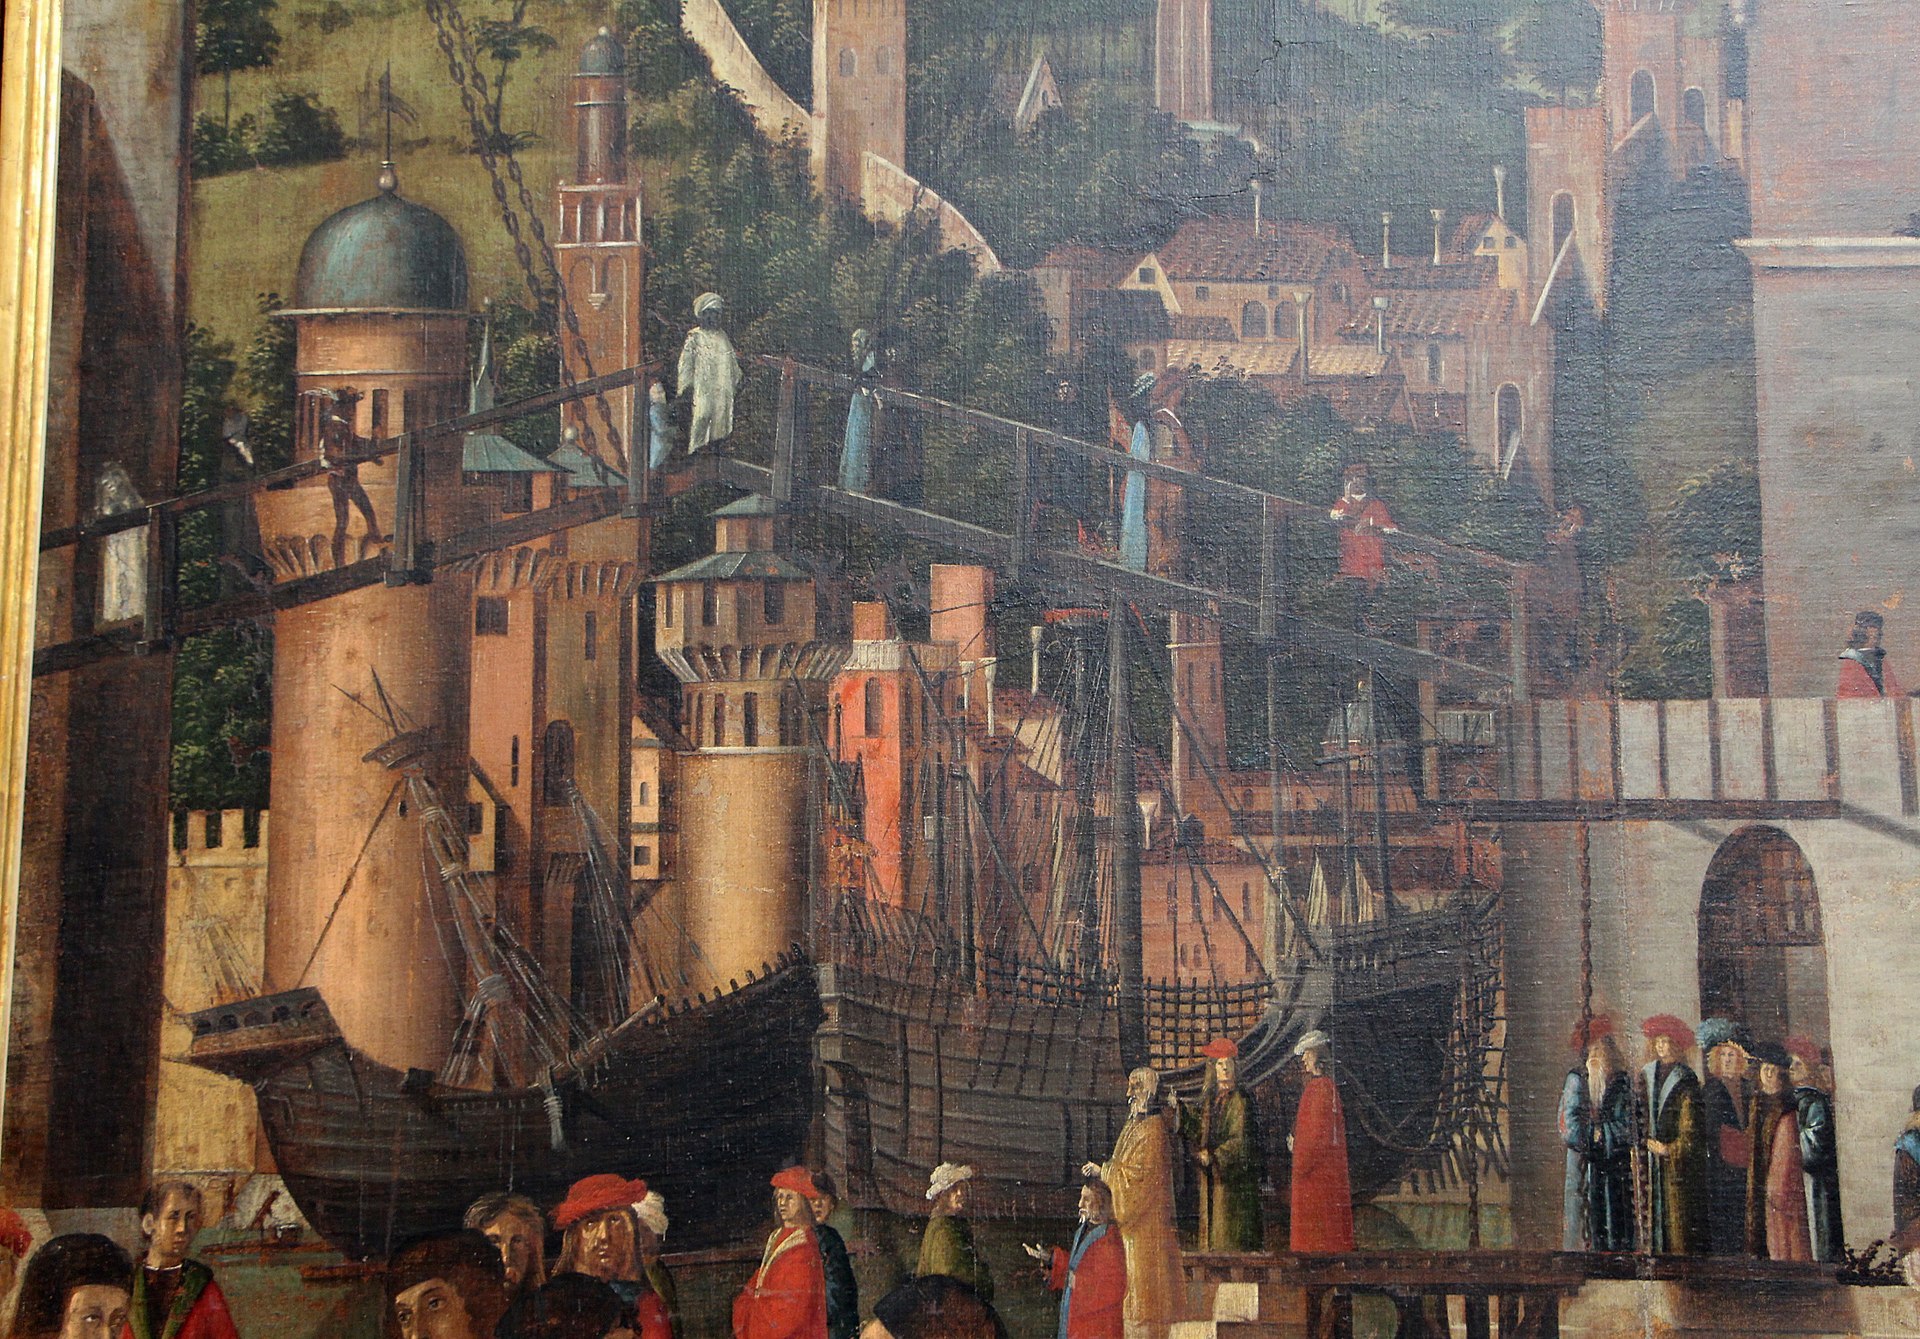
It is these motifs which Carpaccio seizes on in the opening canvasses (which, I remind you, lay on the south wall). The first (Figure 00 FIXME), which was intended to hand next to the altar, measures nine feet high by nineteen feet across:
Originally, it clearly extended for another foot to the left, where there must have been another marble column to match the one on the right [check].
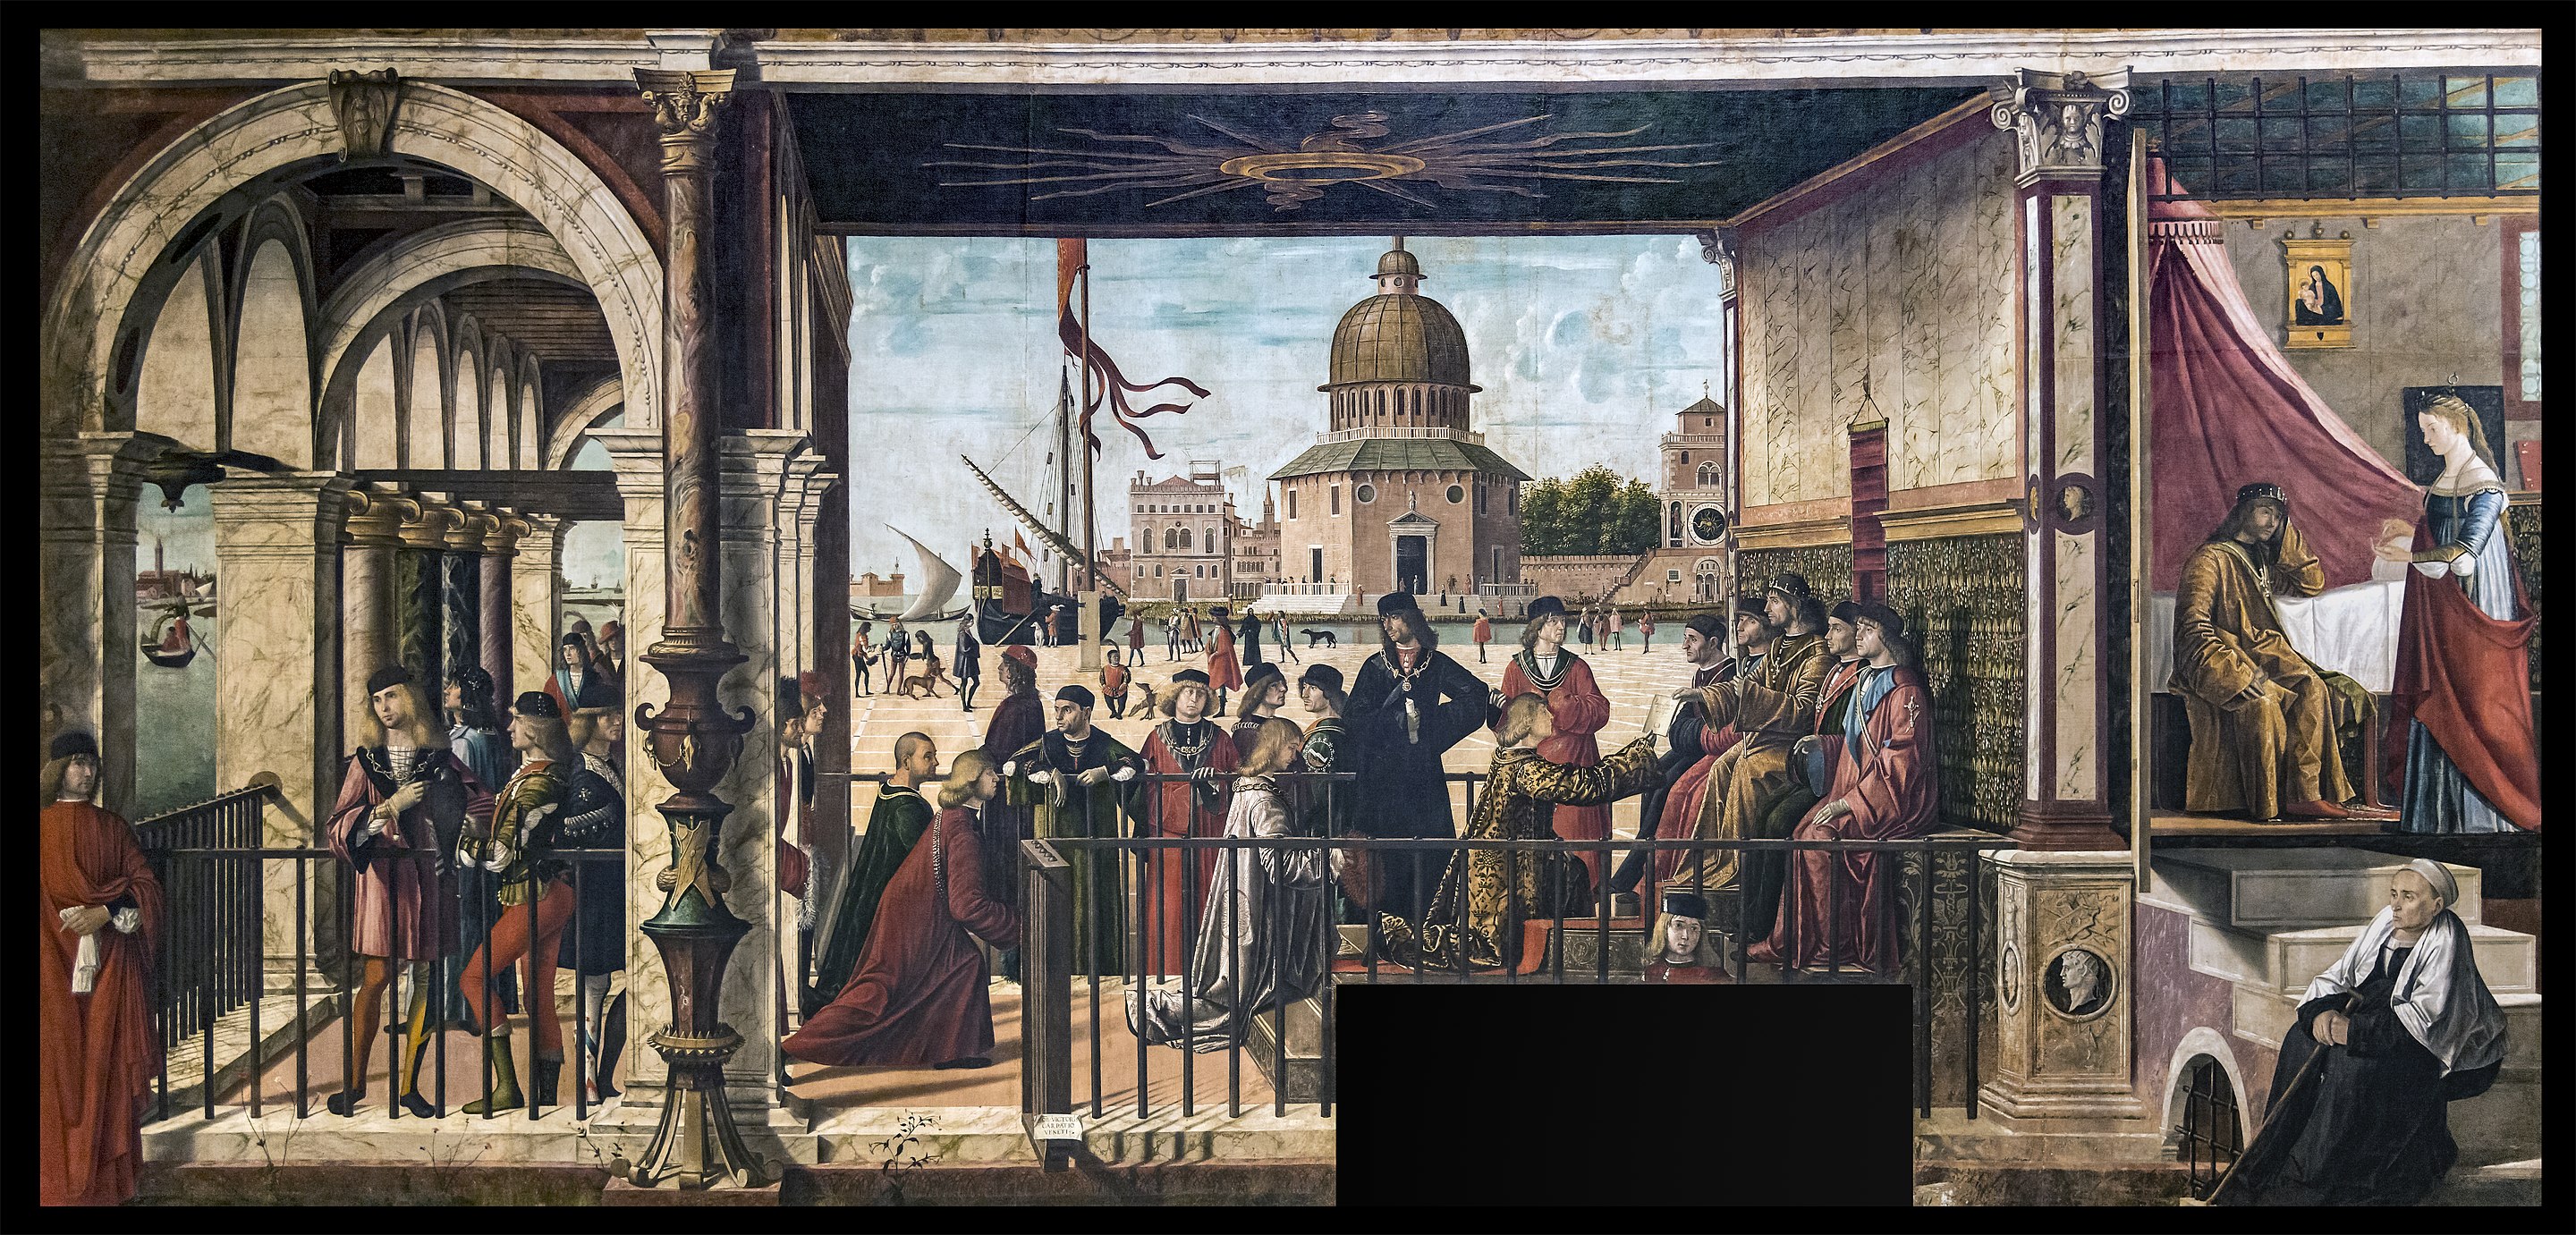
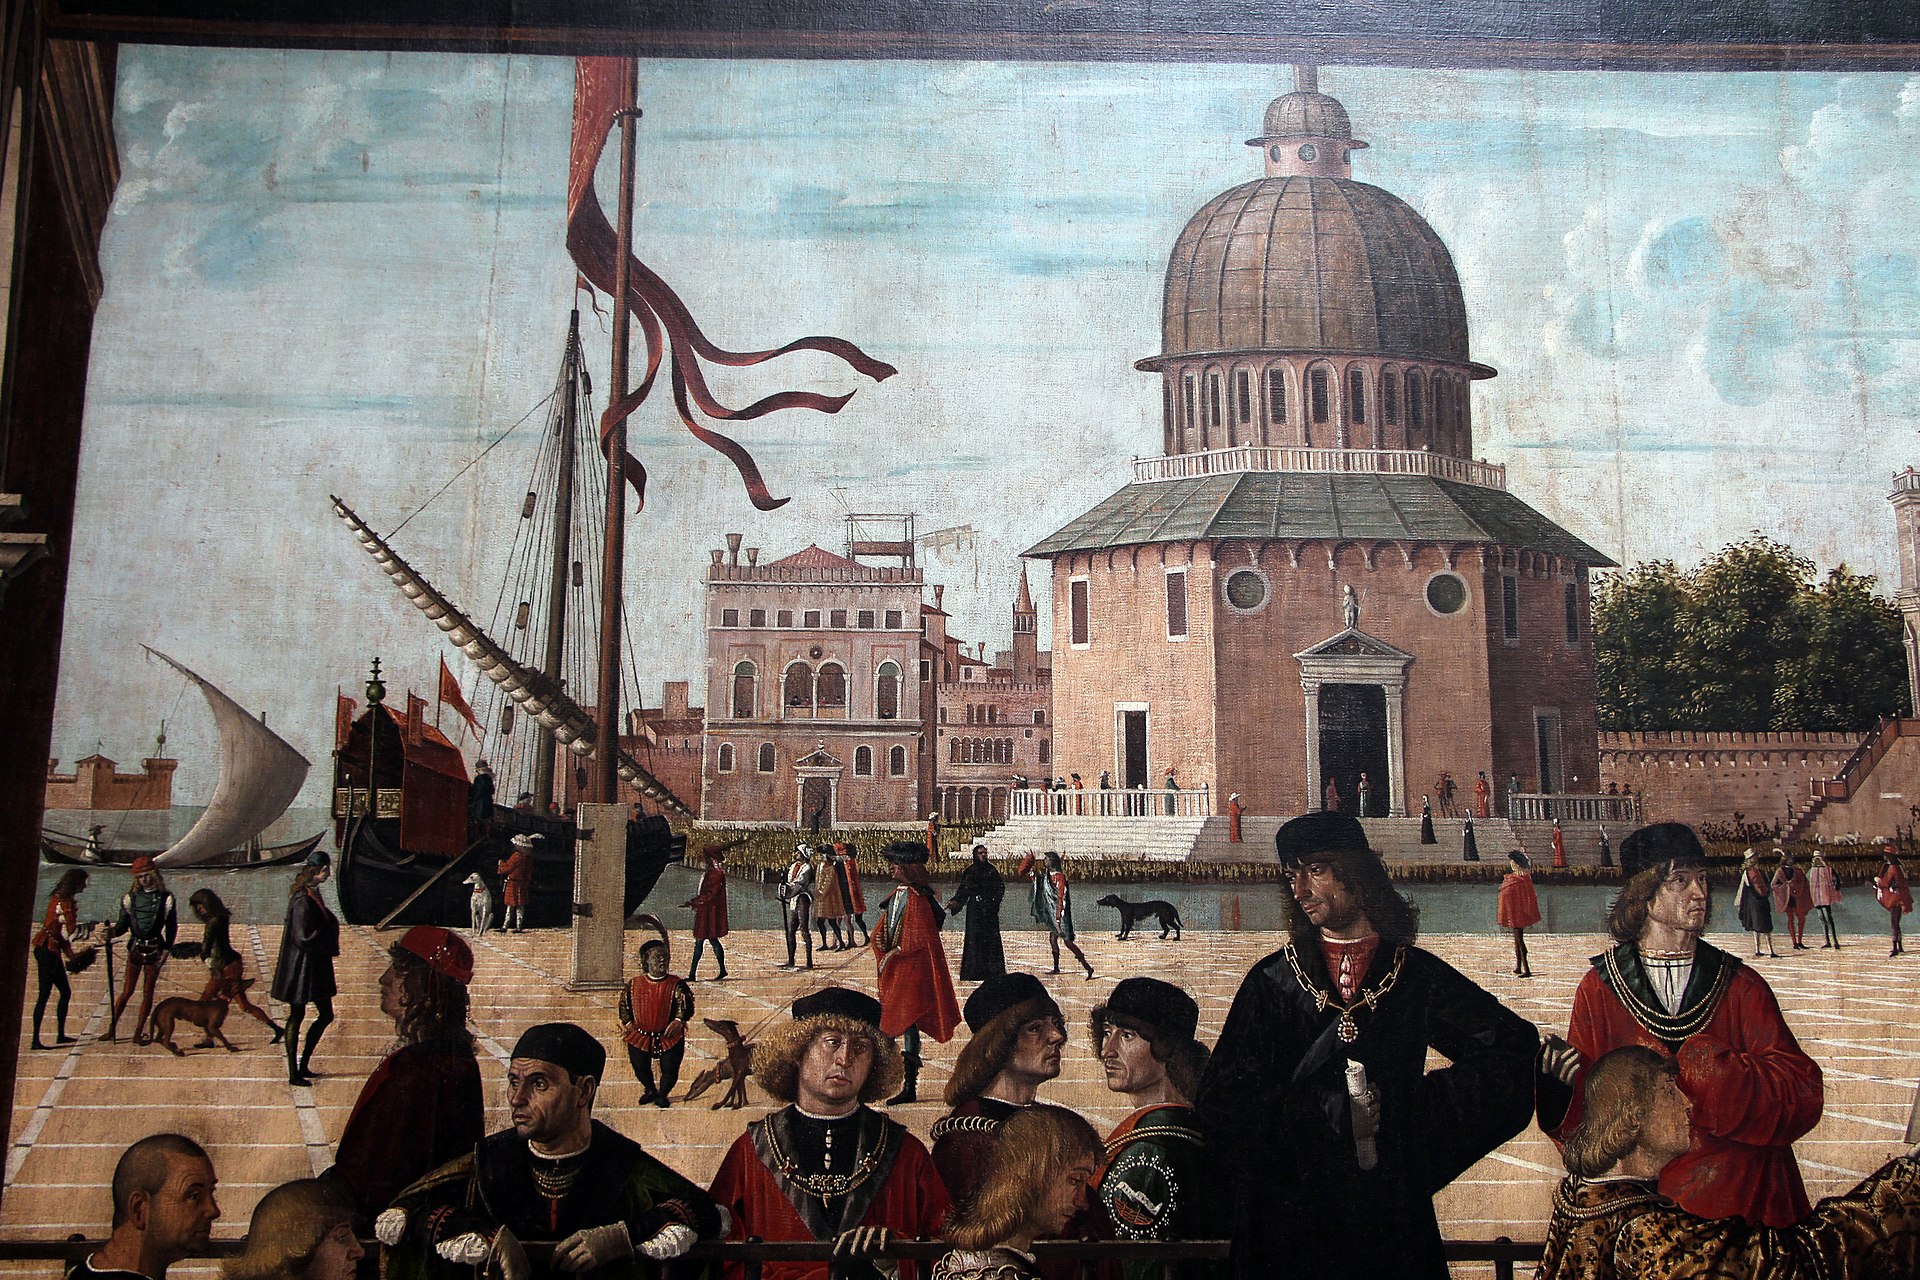
One’s first impression of the centre of the composition—shown in the detail in Figure 00 FIXME—is of a Venetian scene, or what would have later been called a Venetian ‘caprice’, implying that it offers a cheerful mixture of real and imaginary buildings:
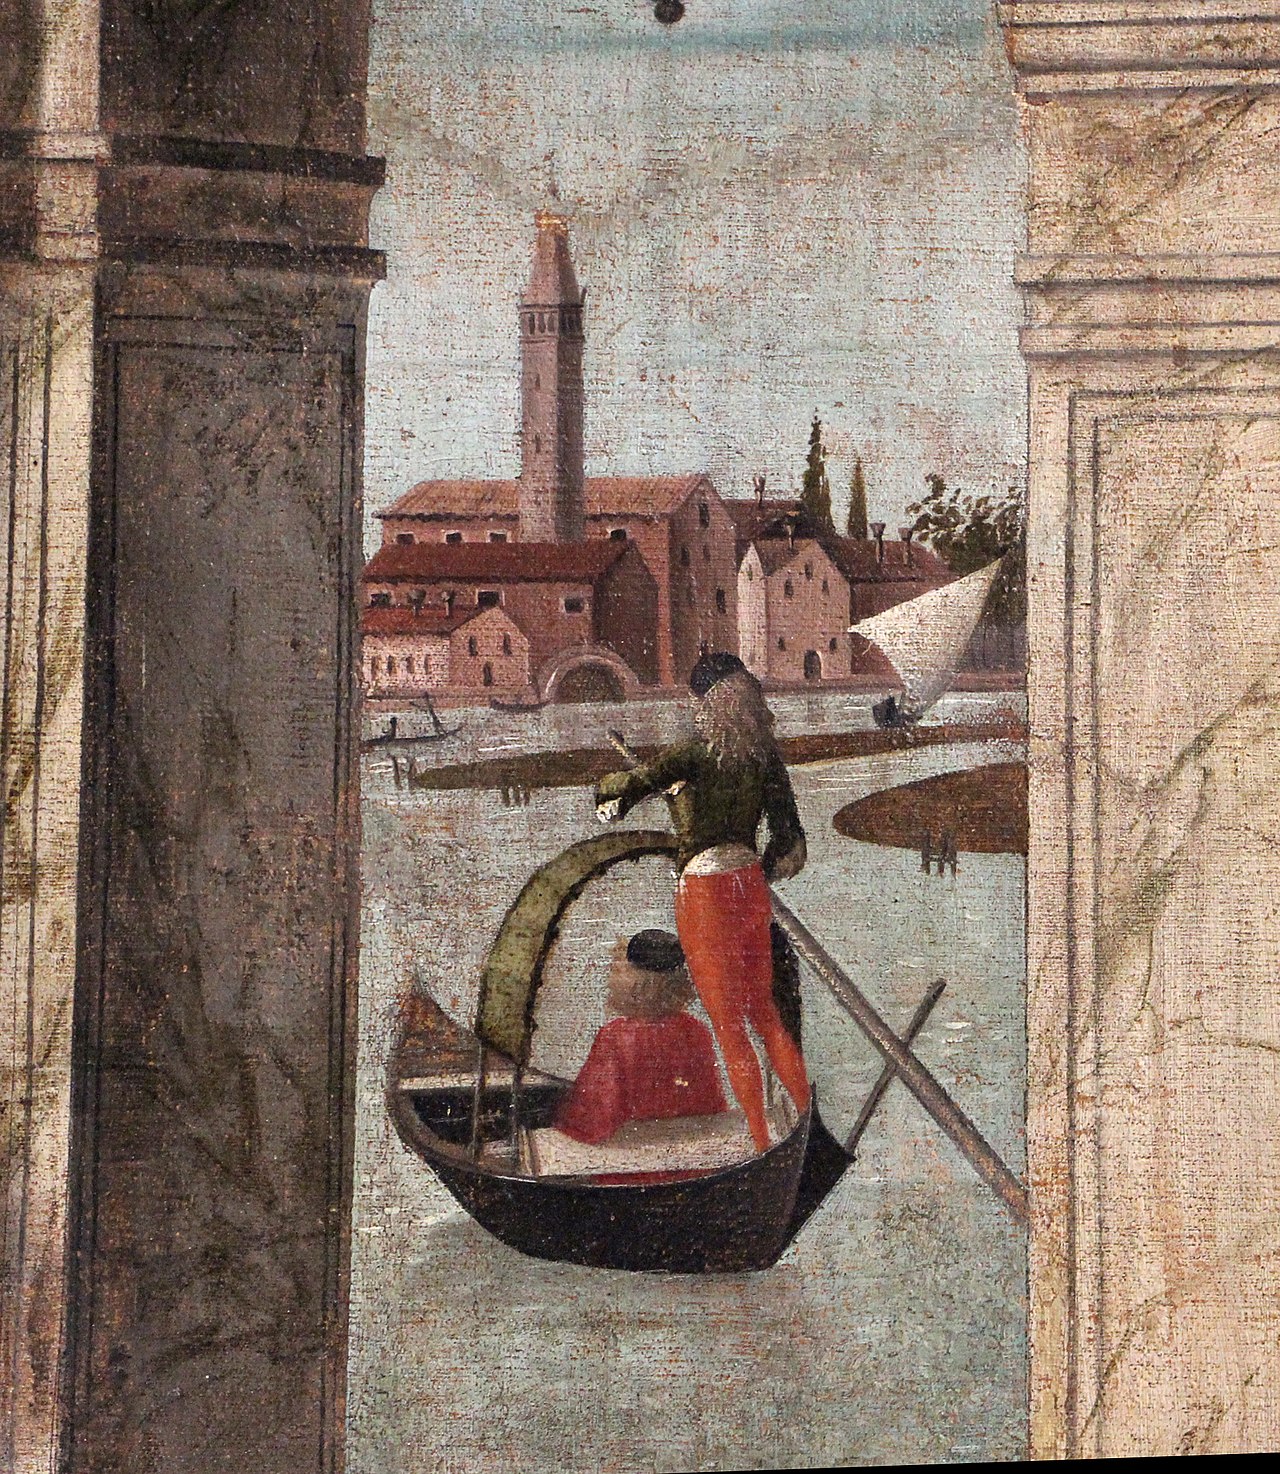
Over the water you see a distant cupola, a clock tower, a marble-faced palazzo, and water surrounding and piercing the city, deep enough to accommodate a sea-going ship. You can also see a wherry, with its billowing lateen sail, of the kind used for light transport between the islands or in the smaller canals; and in the shallow water to the left, through a conveniently missing column, you can see what has become for us the symbol of Venice—the passenger-carriage or ‘taxi’, the fifteenth-century ancestor of the modern one-oared gondola:
If the Venetian details are ‘capricious’ (in the extended sense, too, that they are only tenuously relevant to the story) there is nothing ‘capricious’ in Carpaccio’s technique, which represents one of the ‘points of arrival’ of fifteenth-century experiments with light and perspective. Look carefully at the cast shadows, which indicate that the light falls from high and over the left shoulder of the spectator. Focus on the shadow of the man [FIXME: in the foreground, check], or those of the pier and the railings; and, on the wall, the shadows created by the ceiling and the seated figures. Notice too a couple of refinements: those apparently unmotivated stripes of dark paint in the foreground are shadows cast by the five bars of the foreshortened railing, which is imagined as projecting into our space; and the apparently unmotivated shadow on the steps is from the foreshortened door that would swing shut over the stairs to the bedroom.
We should also pay attention to the perspective system: the main orthogonals converge, as required, on the vanishing point on the horizon which is placed at a comfortable height, affording plenty of ground on which to position the actors. But the system is asymmetrical, with the vanishing point placed well to the left of centre, with the result that the portico, with its Ionic columns, is nicely displayed in depth; the unimportant entry wall is almost cut off; while the right-hand wall spreads out to form an impressive backdrop to the crowned king and his counsellors.
The question remains, though—what is going on? Where are we supposed to be? The scene is in fact Brittany, and the Golden Legend version of the story begins as follows:
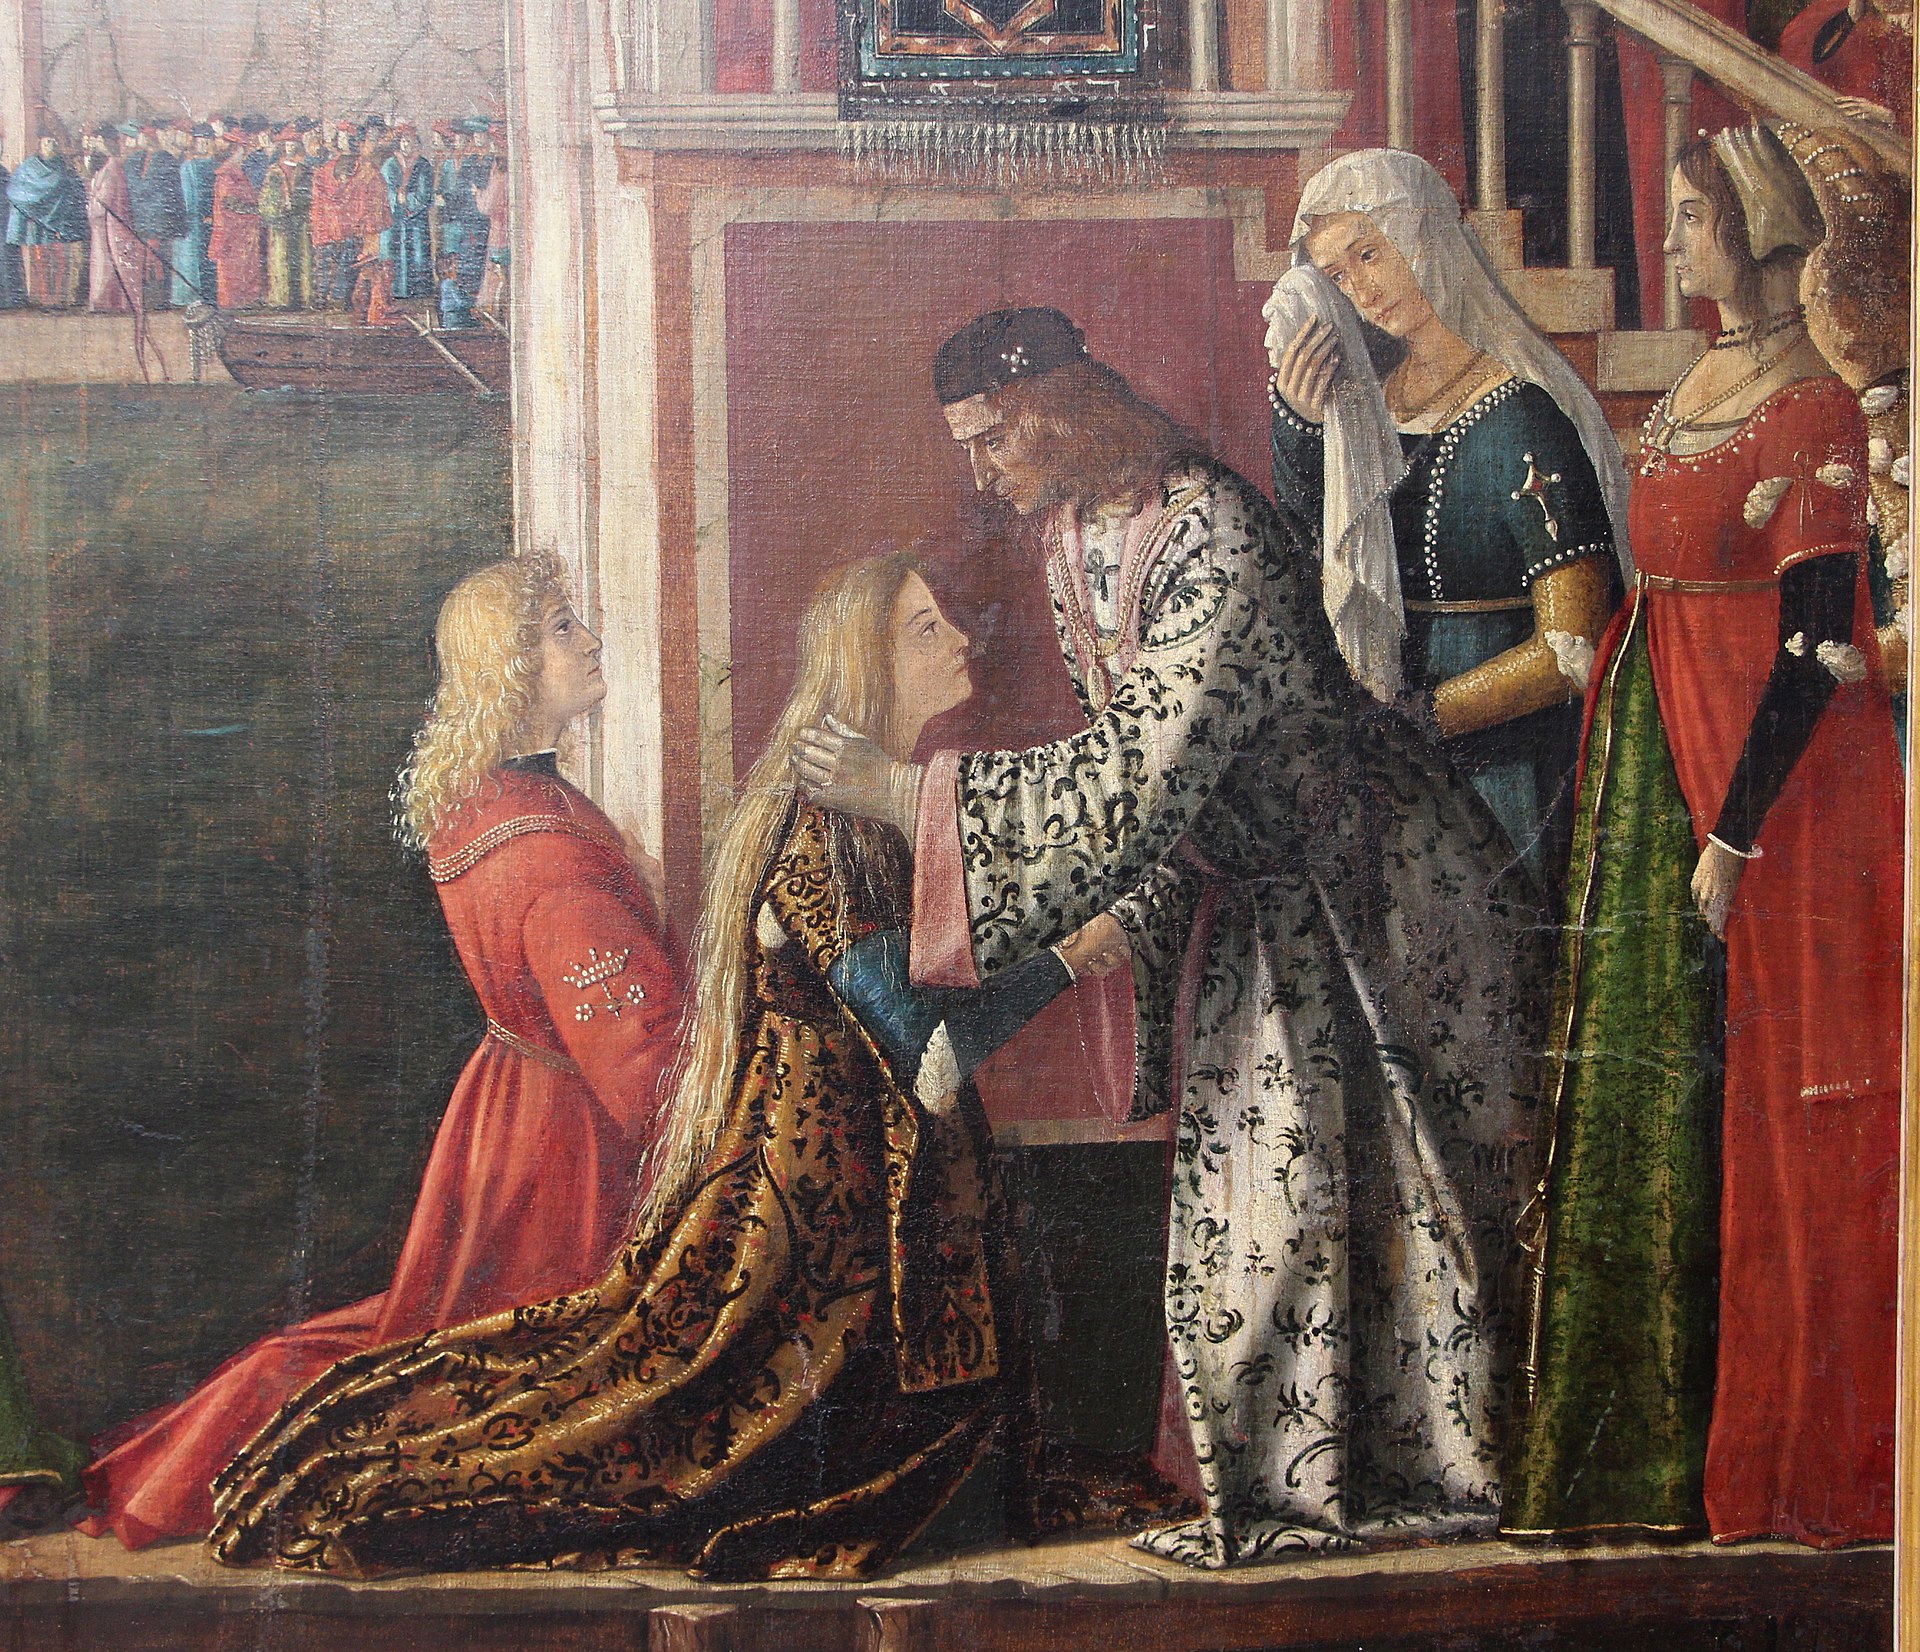
There was in Brittany a most Christian king named Maurus, who had a daughter called Ursula. She shone with such wisdom, beauty, and holiness of life, that her fame became known everywhere. The king of England heard the renown of this virgin, and declared that his happiness would be complete if she became the wife of his only son. He therefore sent a solemn embassy to the damsel’s father. The ambassadors lavished promises and flattery upon the king, but added dire threats if they should be sent back empty-handed.
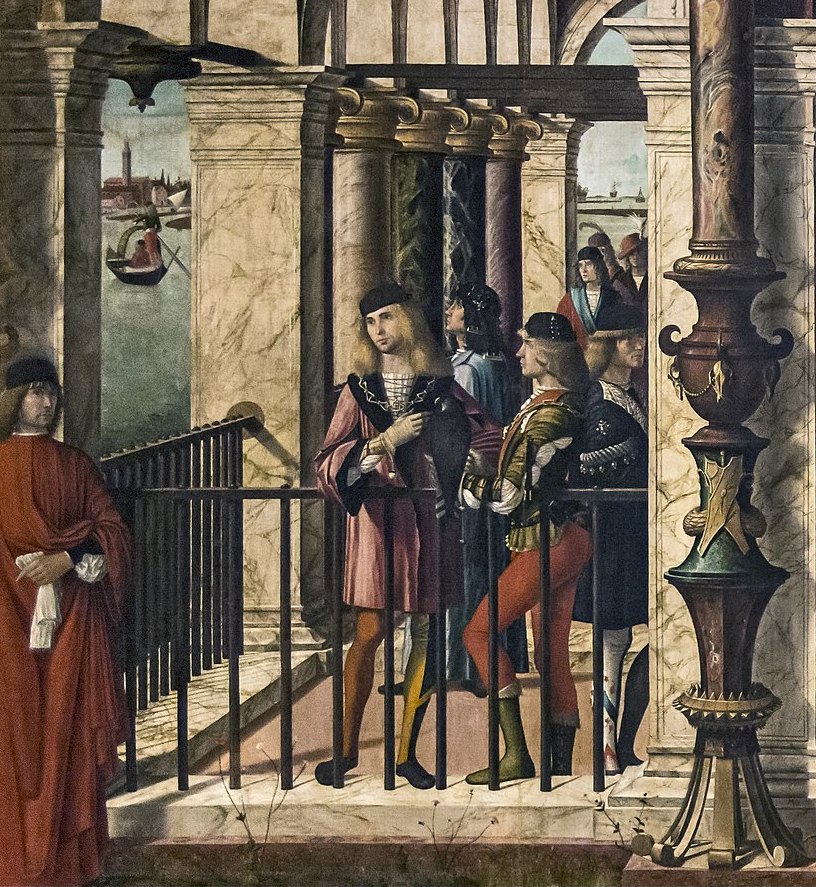
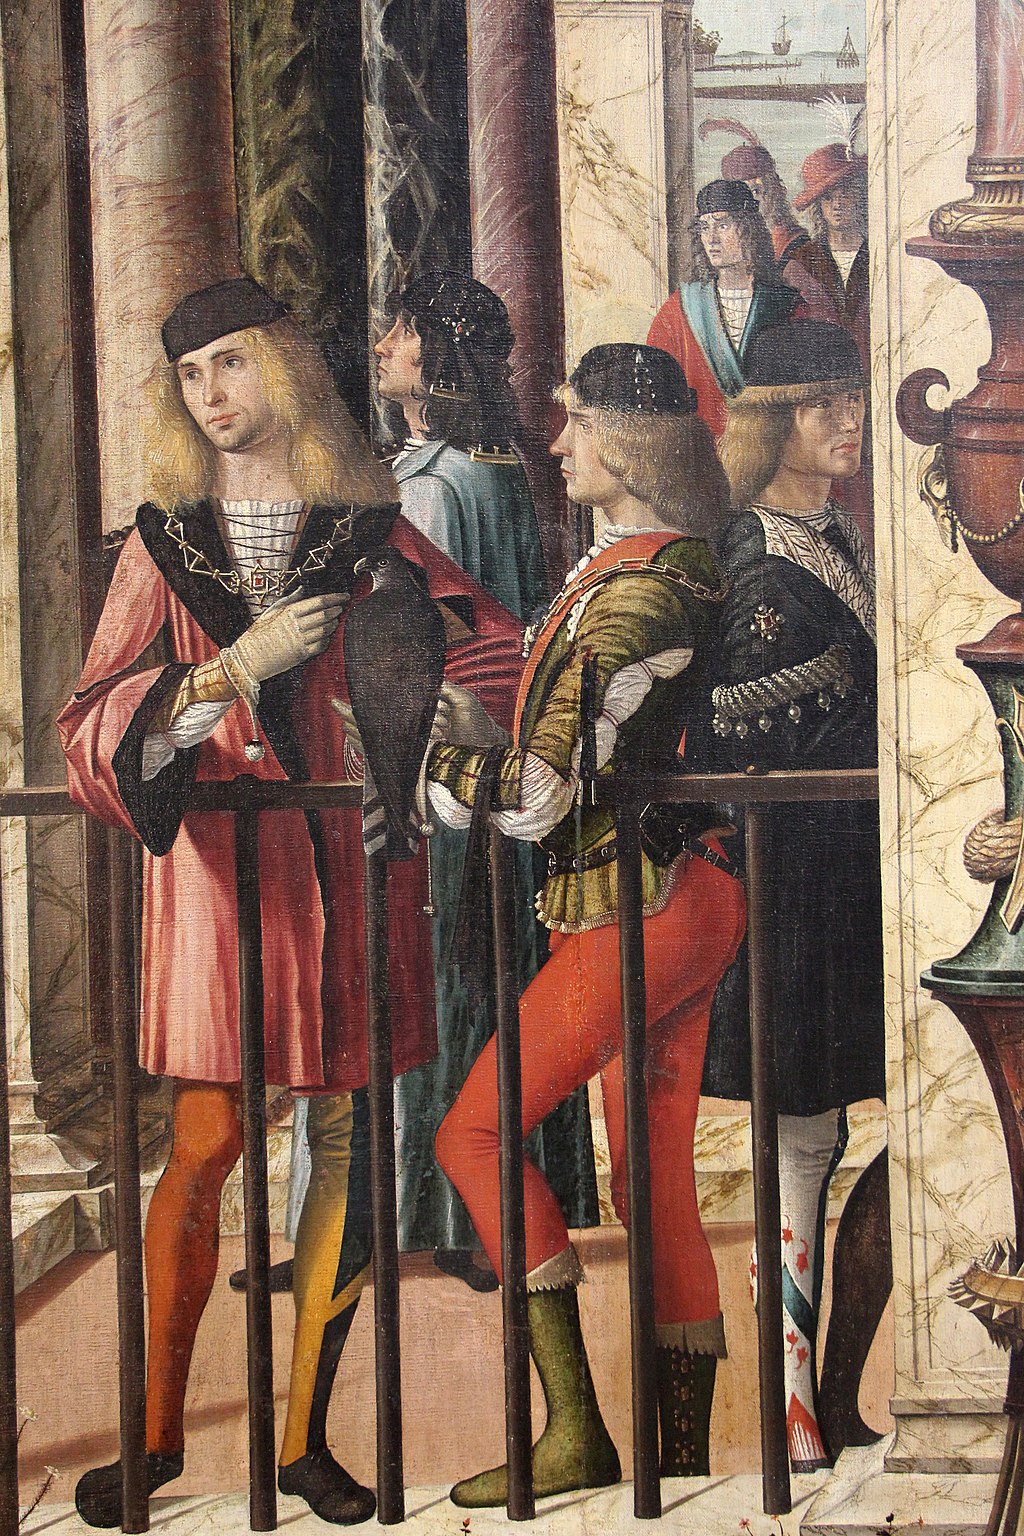
One may, then, interpret the gorgeous robes as a sign of ‘solemnity’, and the three levels of kneeling as a mixture of ‘flattery’ and ‘threat’. We should pause, though, to look at the area on the left in order to admire the magnificent polychrome marble column, (with its very unclassical base, and its very ‘Flemish’ cast shadow), and, in particular, the portrait studies of the young noblemen who are sitting negligently (con sprezzatura) with a falcon on the railing. Every detail of their attire is lovingly observed: the hose (wrinkles and all), the doublet or coat, the slashed sleeves and draw strings, the shoulder-length hair, and the flat hats.
We return now to the story, and to the scene in the bedroom on the right of the painting, where King Maurus is shown for a second time, listening attentively to his daughter who is of course the heroine of the tale:
The Golden Legend continues:
On hearing the demands, the king was distraught with fear, not only because he deemed it unworthy to hand over a Christian maiden to a worshipper of idols, but also because he knew that she would by no means consent. But Ursula, being inspired by God, proposed that he should yield to the king’s demand, putting as a condition that the suitor should grant her ten virgins as companions.
A condition, you might think, not unreasonable for the daughter of a king, and in perfect accord with the matter-of-fact way in which she is ticking off her points on her fingers. But then she goes on to demand that her suitor should also assign, to her and to each of her ten companions, a thousand other virgins –hence, eleven thousand and ten virgins in all! This is where the fairy-tale comes in.
I have already spent a long time on this first canvas, and must therefore hasten past the marvellous study of the old nurse, in her white shawl over the black dress, who seems to be seated in our space (almost in the room itself), providing a link between us and the stairs and the bedroom.
The second canvas (Figure 00 FIXME) is almost square, nine feet high by slightly over eight, and it used to lie immediately to the right of the first.
It is the following morning. The English ambassadors return to King Maurus to receive his response to their demands. He reads from a parchment the requirement outlined above and some even more amazing conditions, which are being recorded by the scribe with his quill.
“[The King of England] was to prepare a fleet for Ursula; to allow her a delay of three years which she might devote to the practice of virginity; his son was to be baptised and instructed in the faith; and after those three years, Ursula together with her 11,000 companions would go on a pilgrimage to Rome.
The scene is reversed with respect to the first, but the energy of the story is still travelling from left to right, since the king is dictating, not listening. Notice in this regard too, the hindermost of the English ambassadors: he is withdrawing, making his obeisance without turning his back, and his retreat is reinforced by the fall of the light, which is casting the shadows from left to right (as you see on the steps), and playing beautifully on the front of the robes of the young official. There is some virtuoso use of perspective, too; but I shall not guide you up the stairs or into the street, as I would rather show you (Figure 00 FIXME) the festoons, the foreshortened canopy, the intarsio pattern on the wall, and the chandelier.
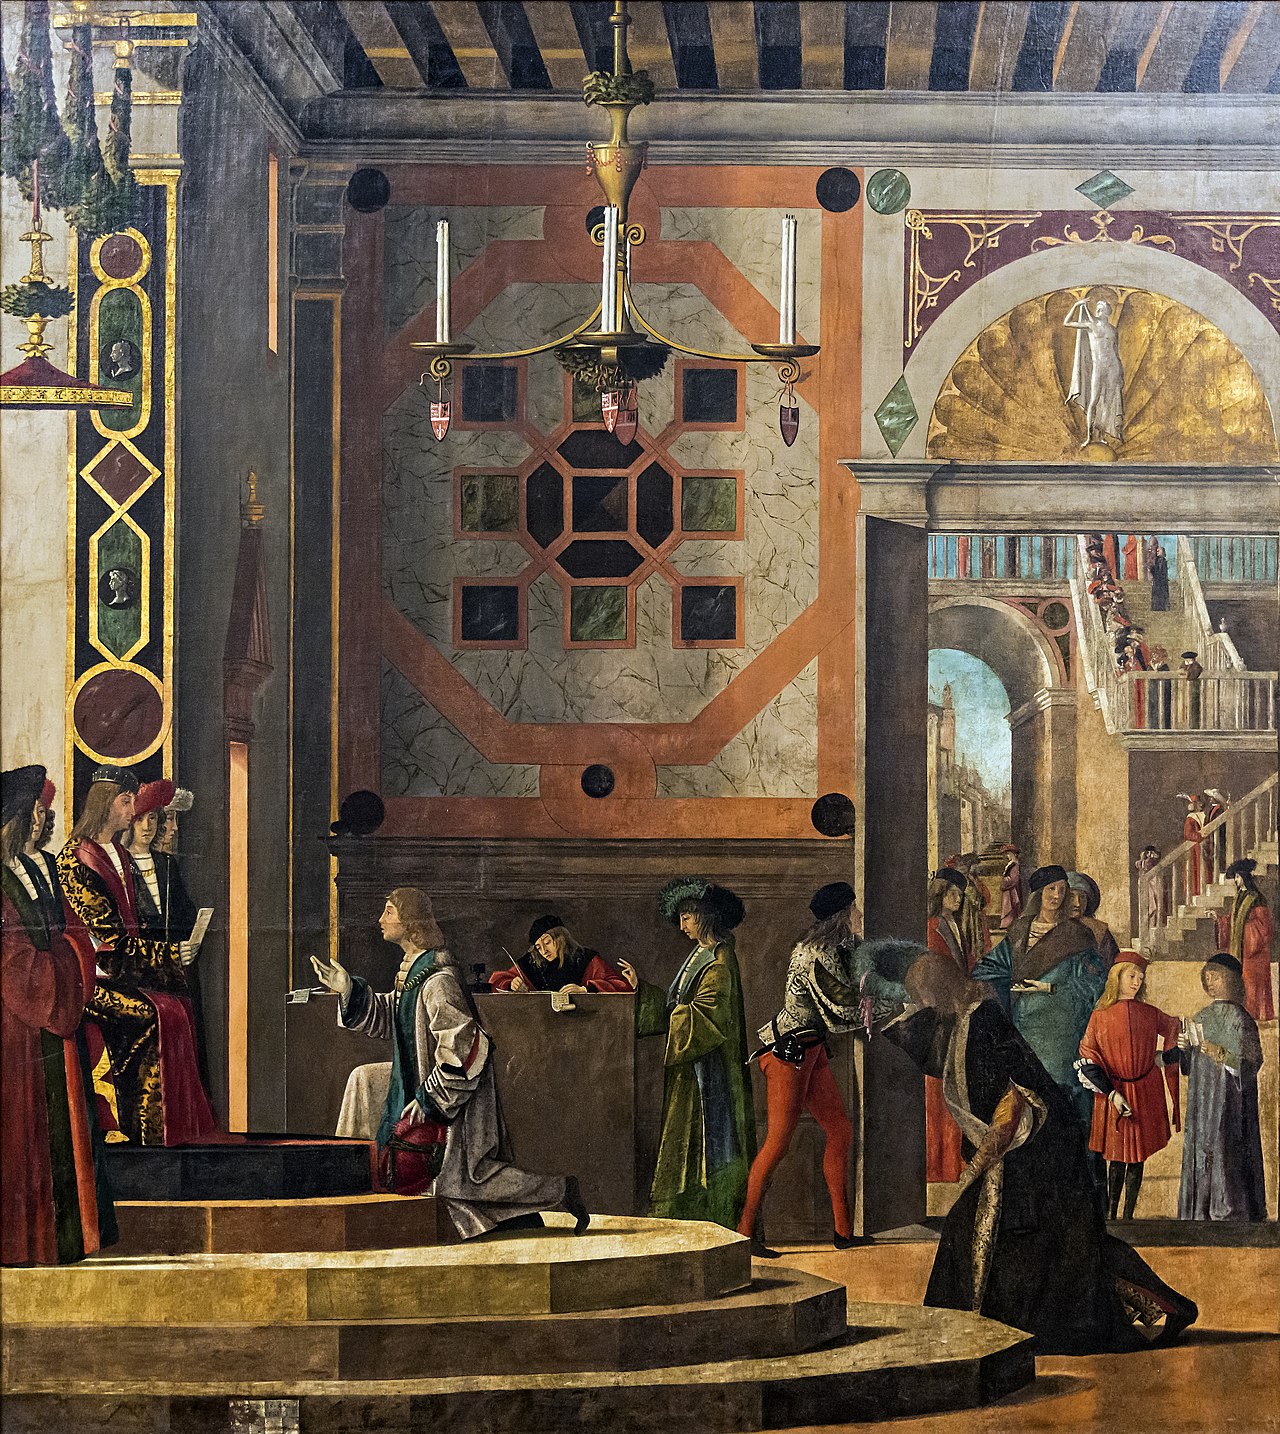
The third canvas lay to the right again. It is wider, being seventeen foot across.
As far as the development of the narrative is concerned, Carpaccio might be said to be ‘pushing his luck’. He sticks firmly to the fairy-tale theme of the ‘impossible demands’, and shows us the English ambassadors for the third time, as they arrive back in London. Again, we see only two of the ambassadors—one scuttling like the White Rabbit from the quayside (which needs weeding), the other already kneeling before his royal master, who receives him in an octagonal loggia raised on three marble steps of different colours. All we need to know for the story is that ‘the young prince gladly consented to the conditions, was baptised immediately, and gave orders that the virgin’s demands should be fulfilled with all speed.’
The composition exploits the full width of the canvas; the light, rather cooler, falls from the left again; and its direction is reinforced by that of the wind, which pushing out the ends of the pennant. London looks as much like Venice as Brittany did: notice the Venetian war galley which is being moored in front of brick towers that recall the shape of the Venetian Arsenal; the canal piercing the land under the low bridge; and the splendid, exotic, marble-faced palace, proportioned like a triumphal arch, with a balcony crowded with spectators.
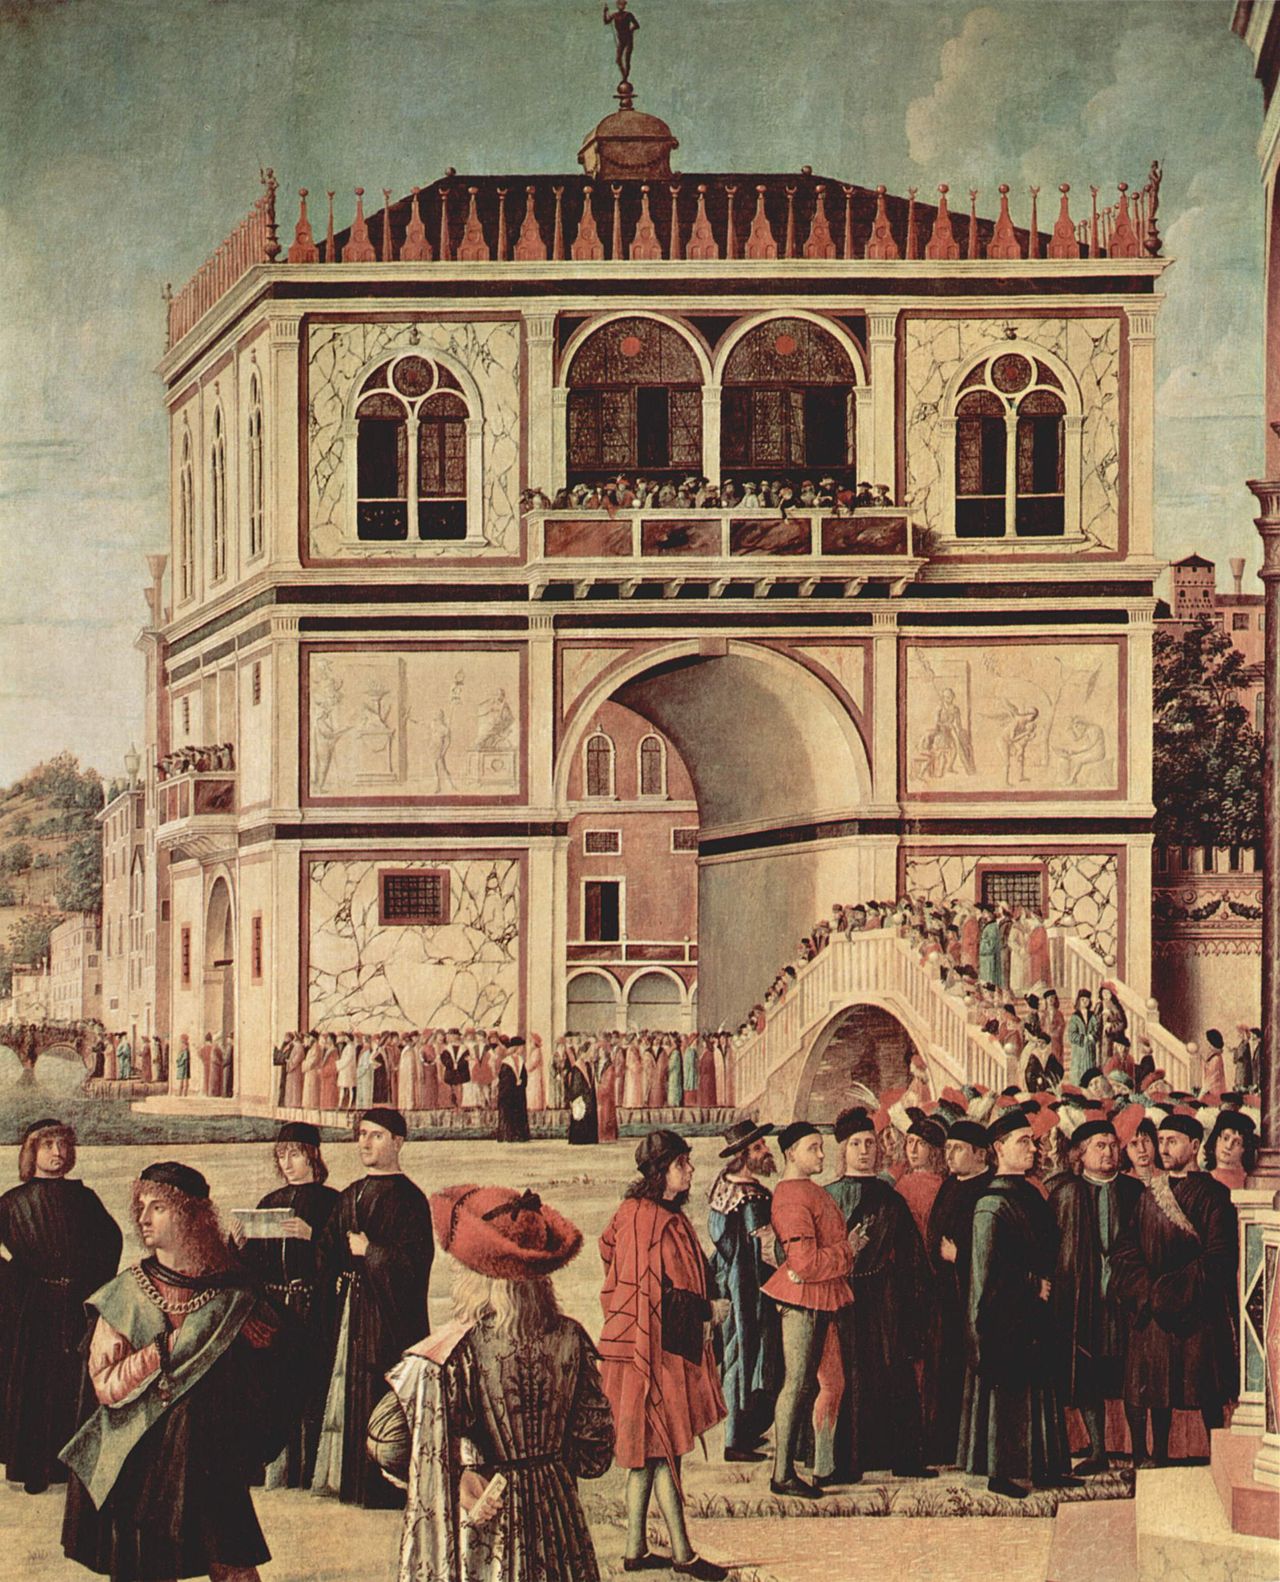
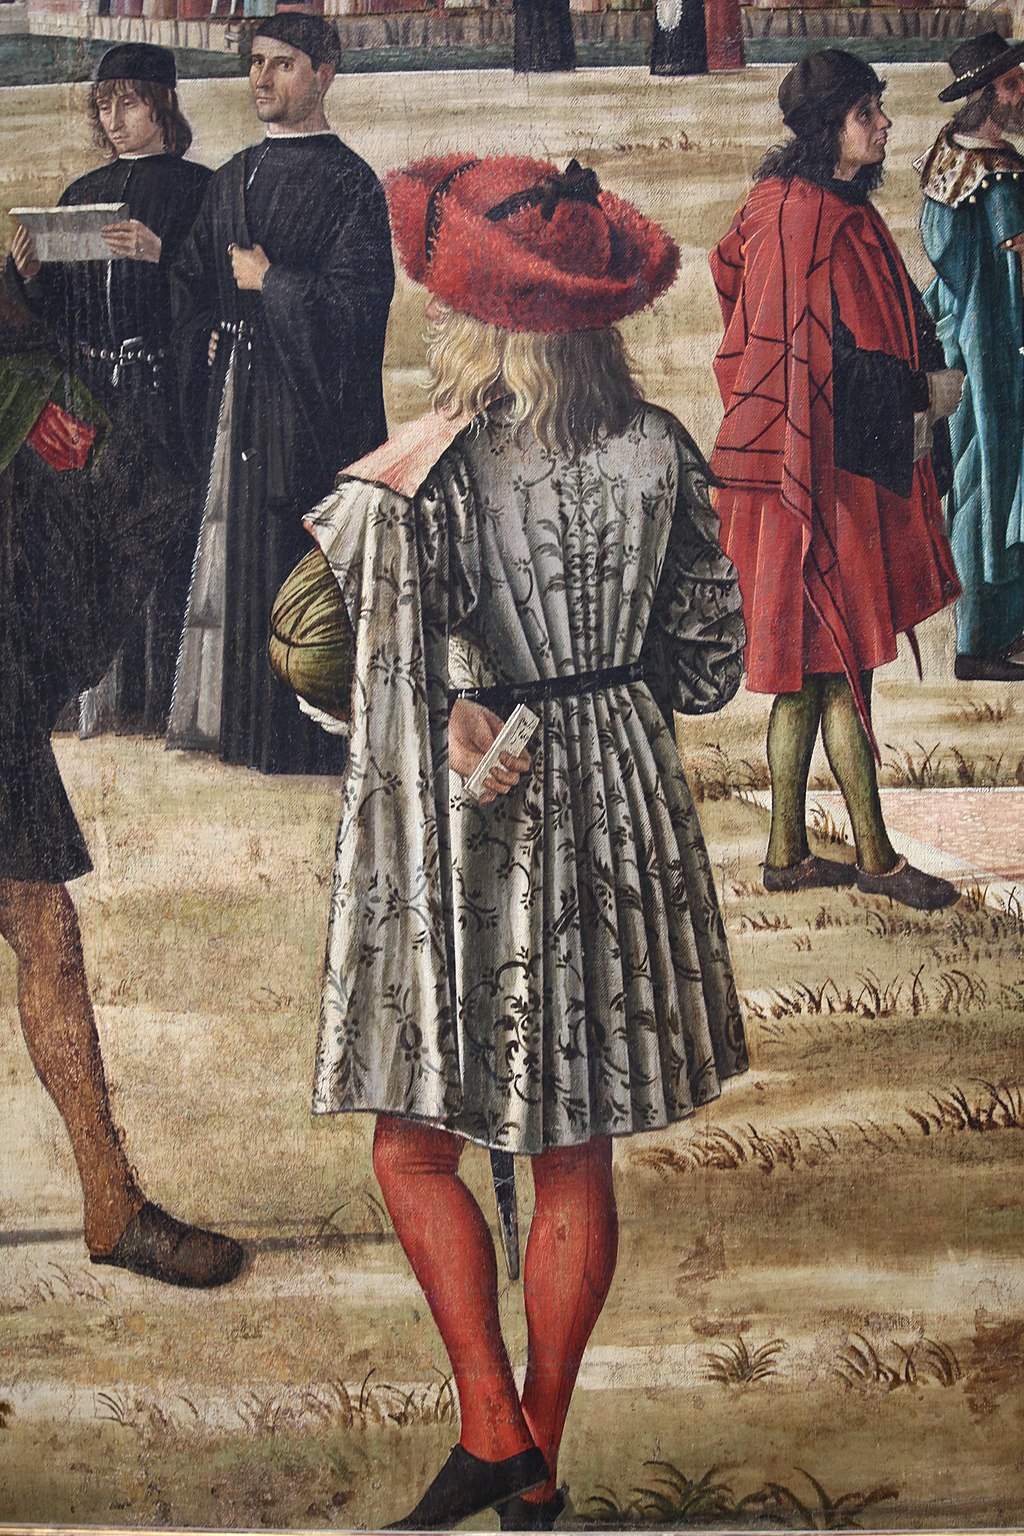
Male fashions too were clearly just as advanced in London as they were in Brittany, as you can see in the young man in the detail in Figure 00 FIXME, with his broad red hat over his blond locks, glorying in the pleats of his brocaded cloak:
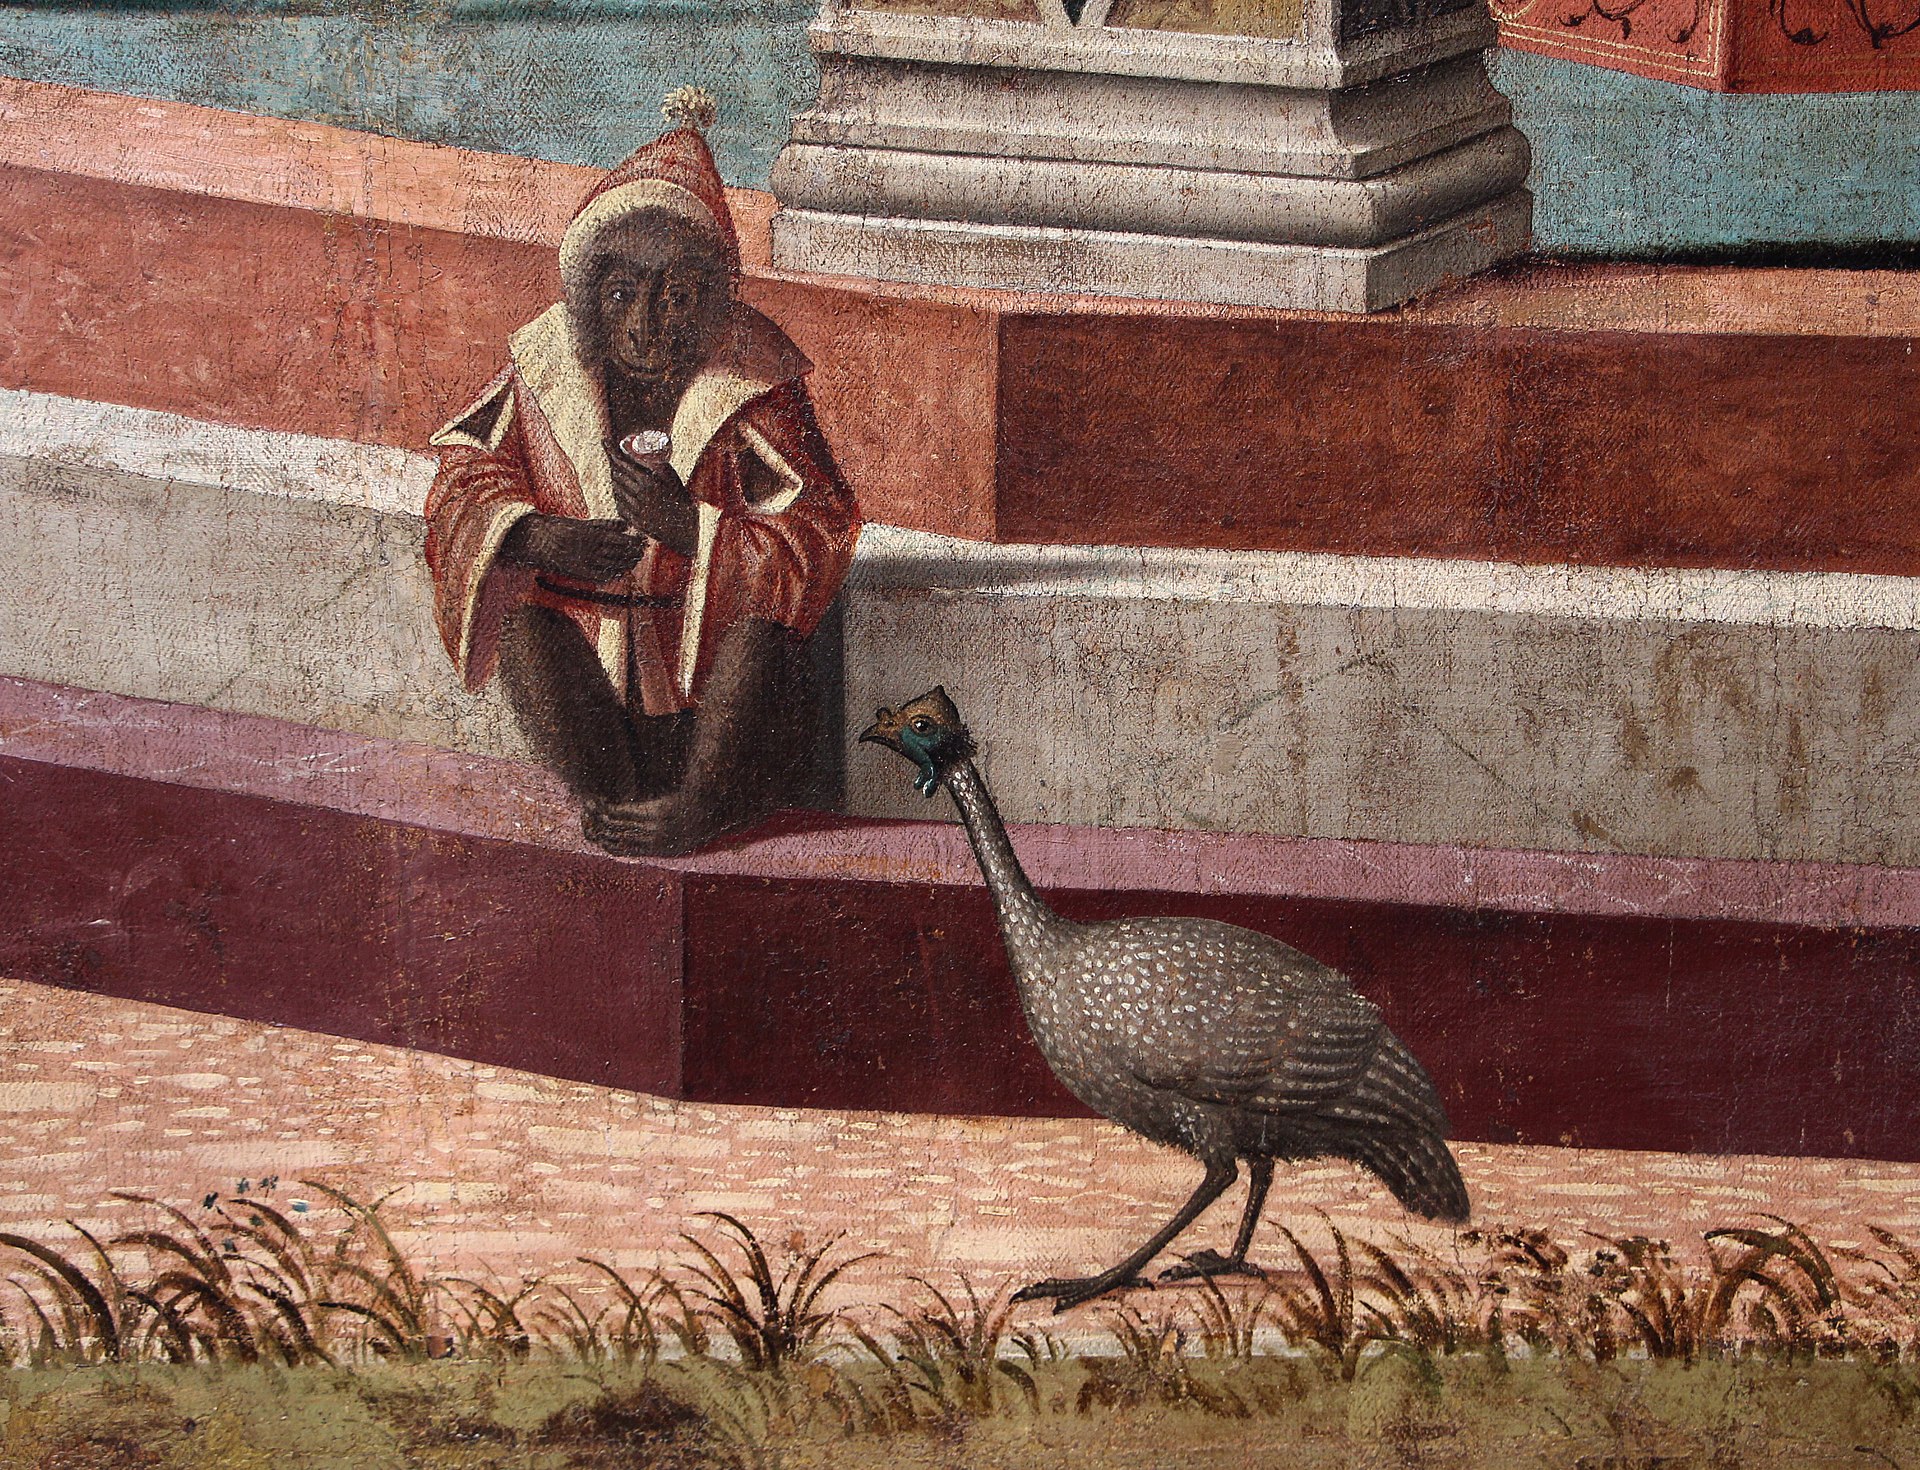
The whole surface is crowded with highly enjoyable details, but none is perhaps more charming than the monkey on the steps of the loggia (Figure 00 FIXME) who is dressed in a jester’s costume and senatorial robes, and is curling his toes just as babies do, while clearly determined not to give his ice-cream or bun to the advancing guinea fowl:
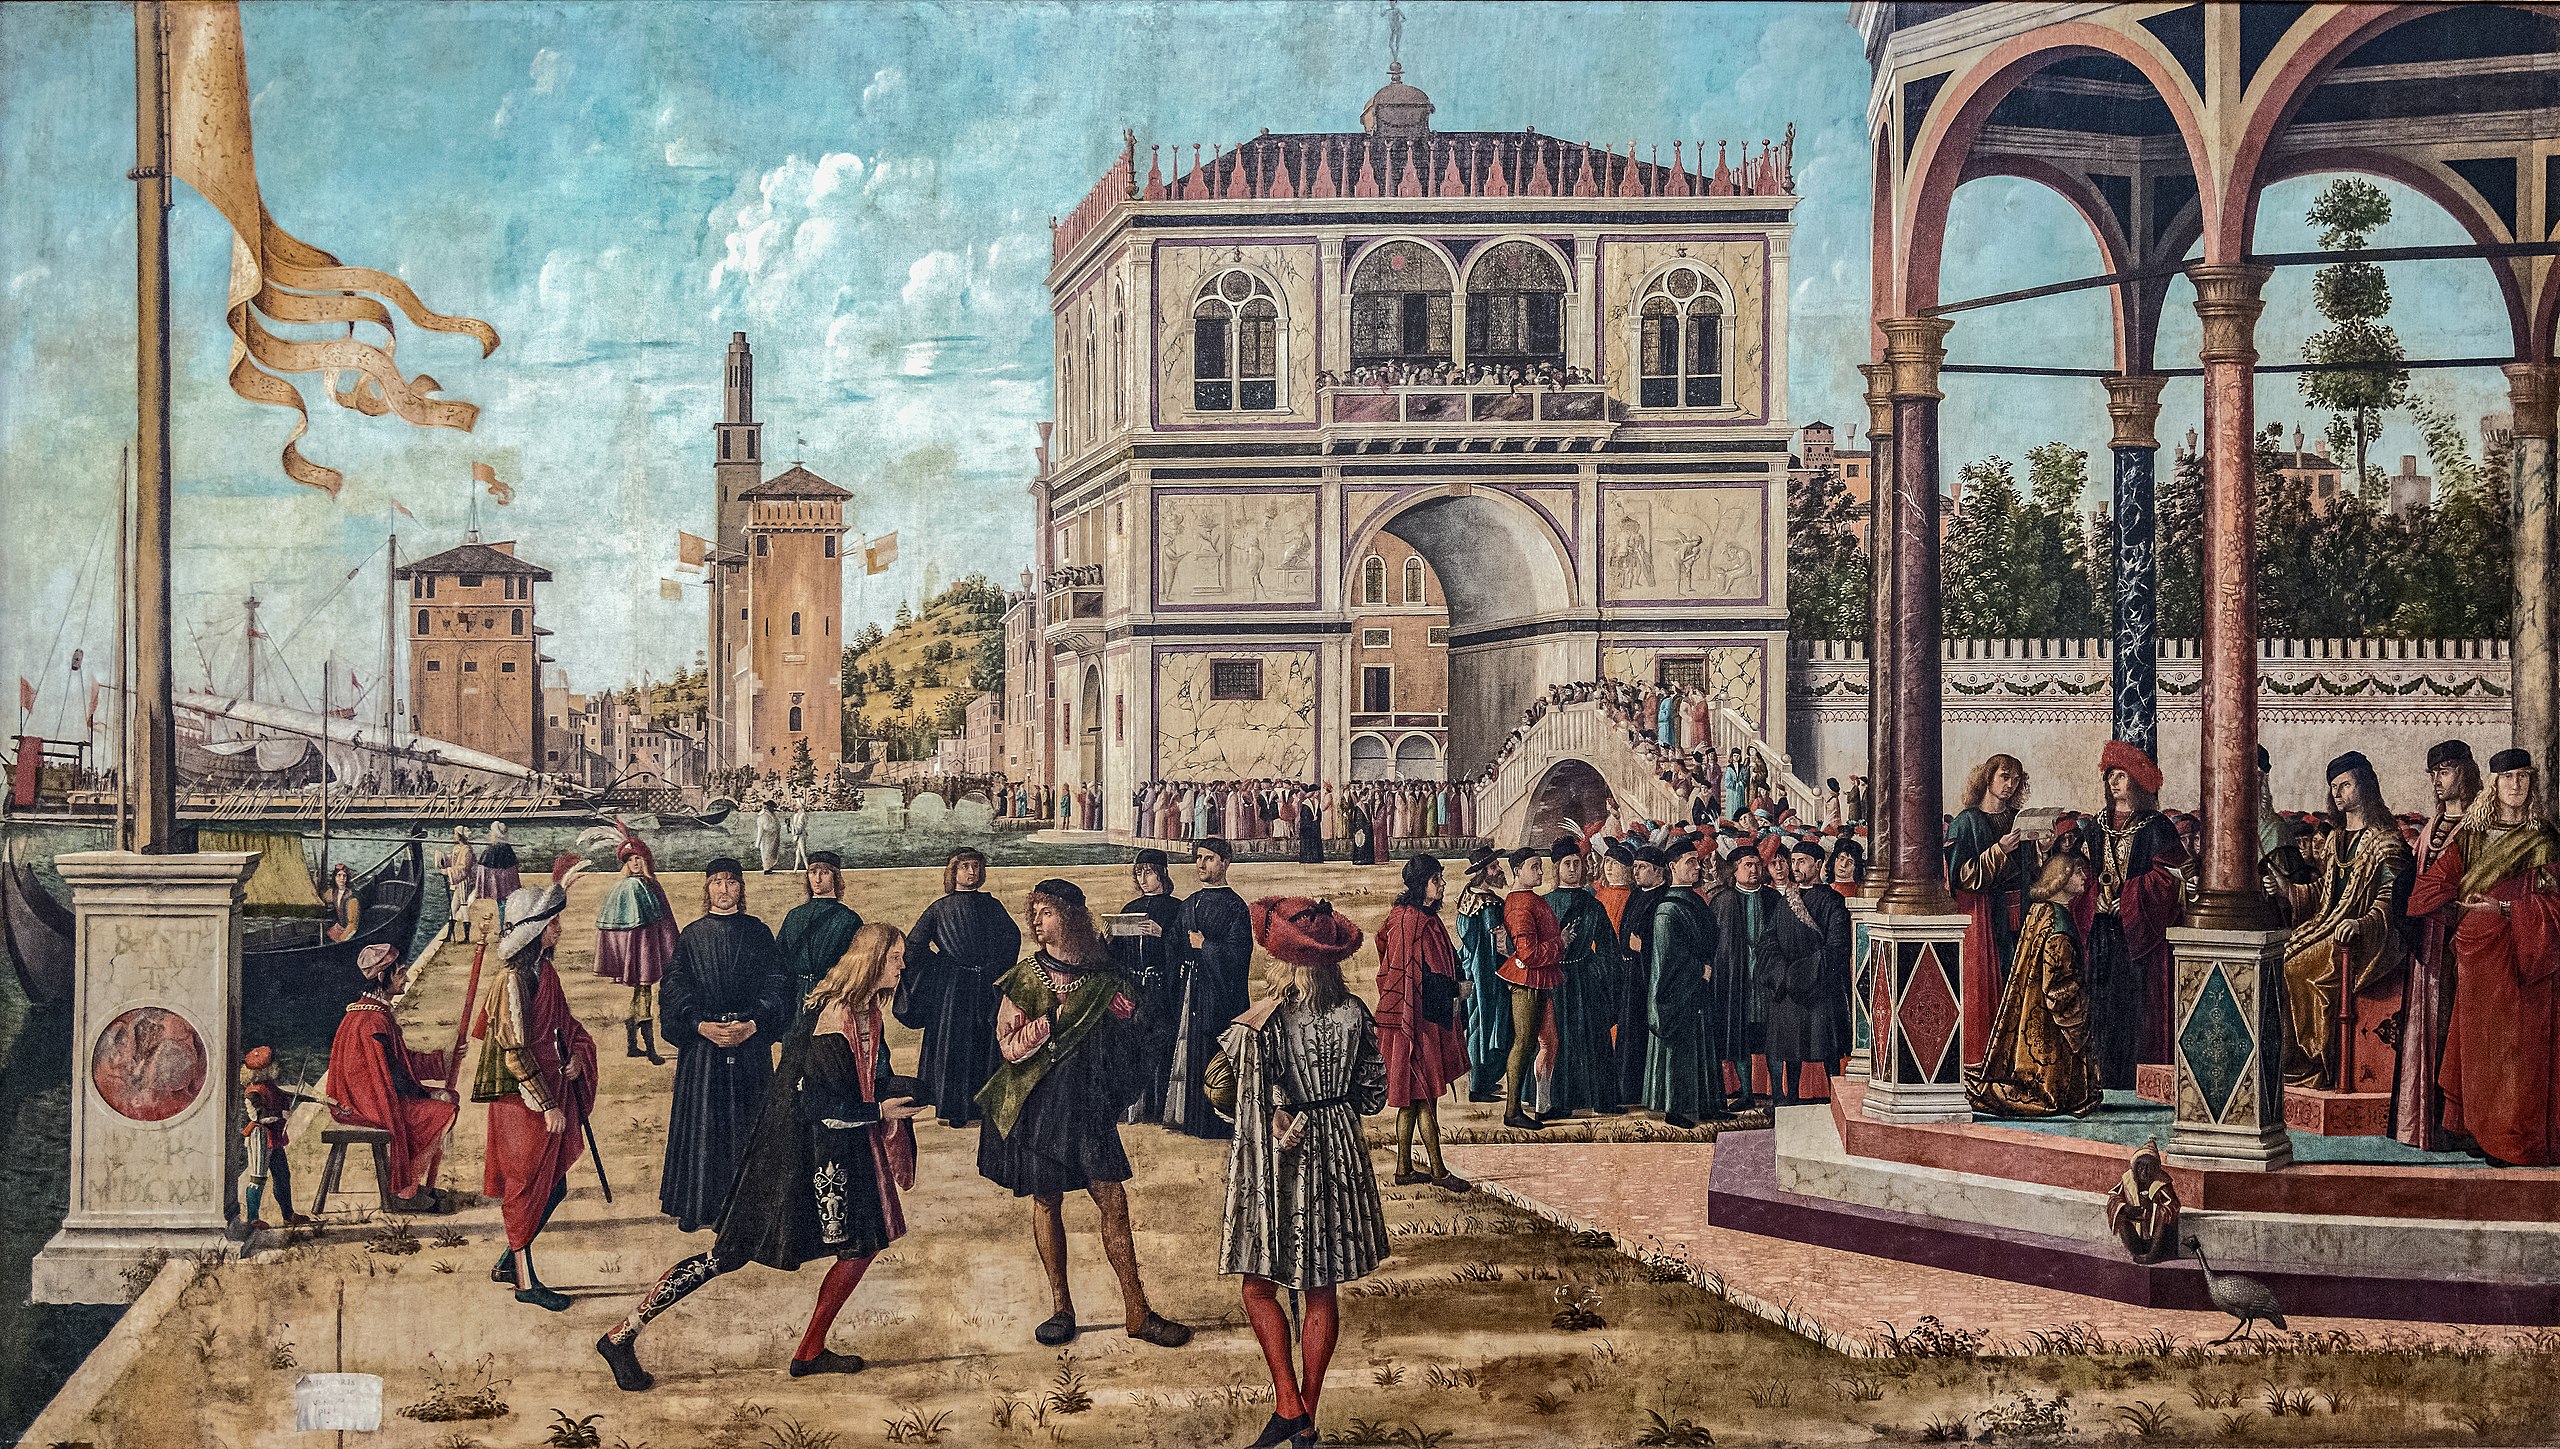
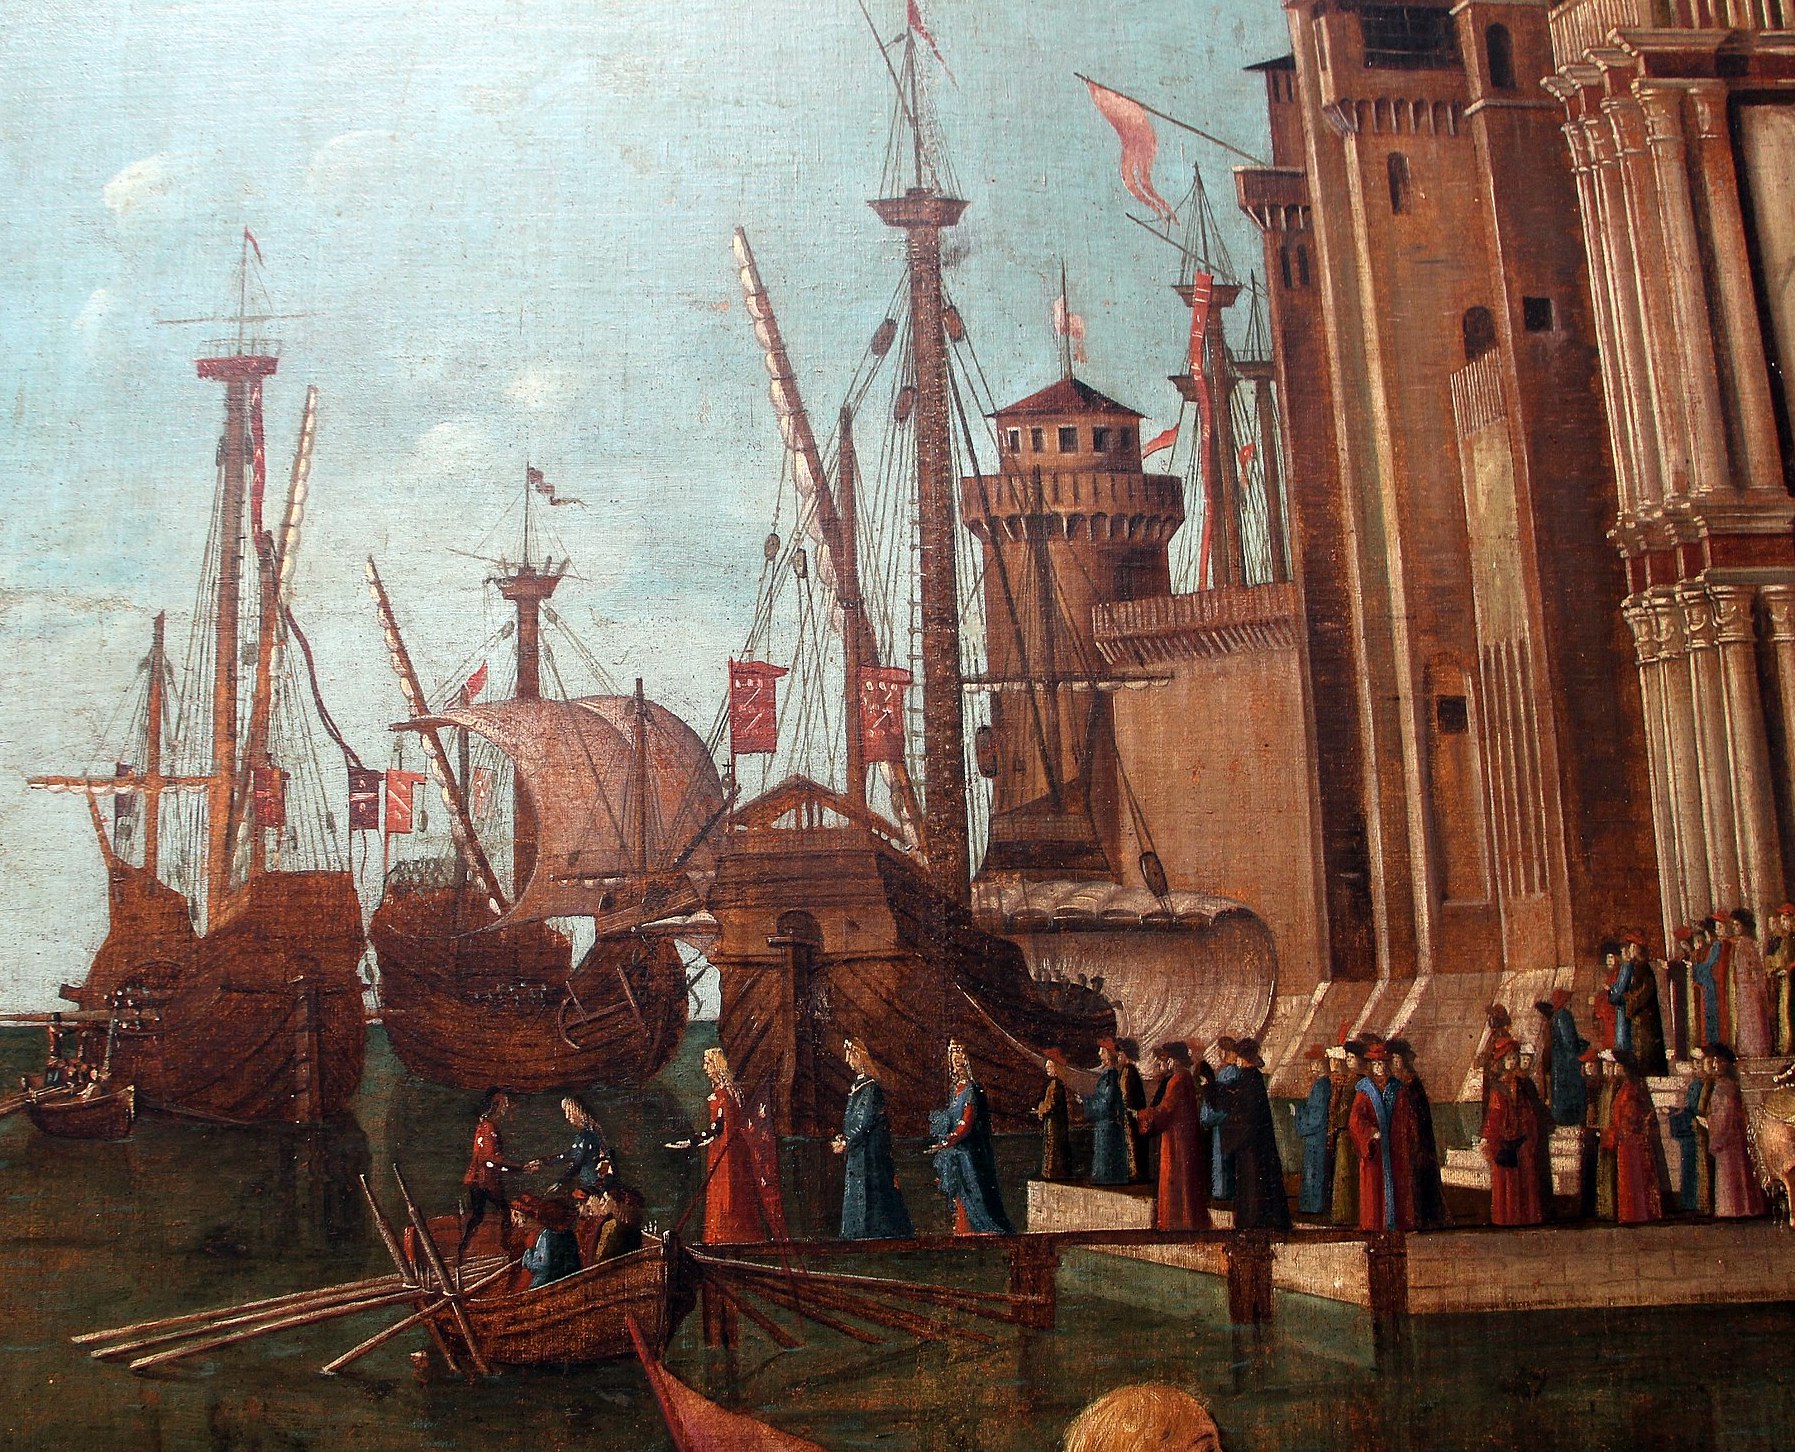
We now turn the corner to the west wall, where the main entry door lay underneath the widest of the canvasses (Figure 00 FIXME) which measures nine feet high by twenty feet across:
From the point of view of the narrative (which is still lacking in a sense of urgency), it combines the negotiations of the first and the third scenes, showing the consequences at the level of heads of state, rather than of ambassadors. There are two leave-takings, two embarkations, and one disembarkation. What looks like a single vast harbour, with a narrow neck, under the expanse of brilliant sky, is in the story, two harbours; and the flagpole with its pennant marks a division between places and events (typically, it is placed well off-centre).
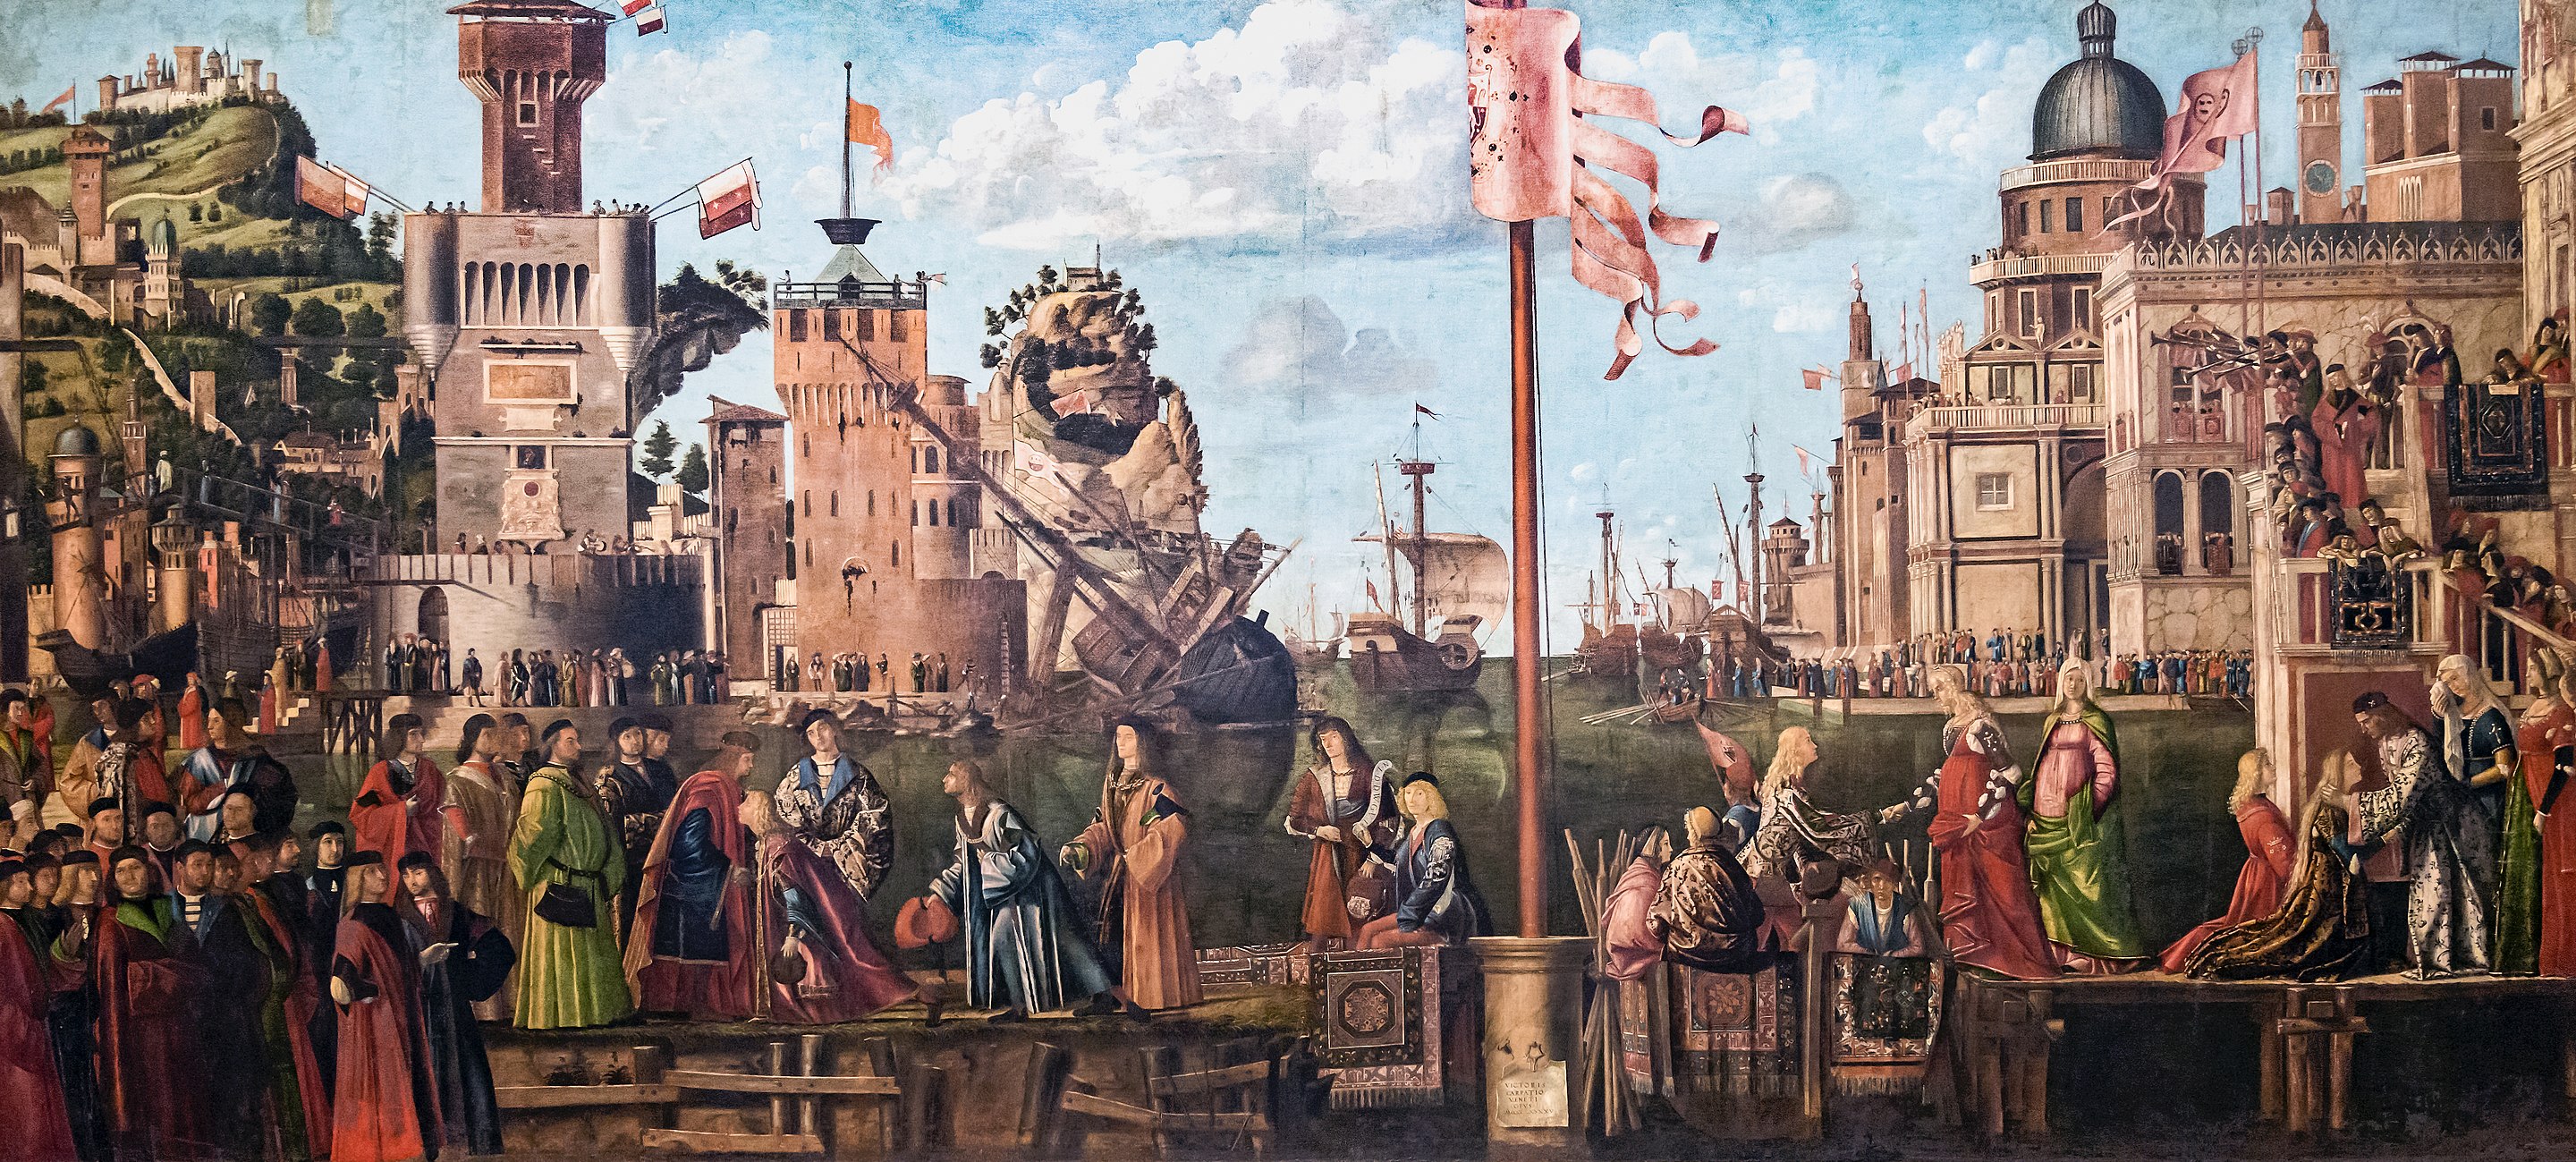
To the left, beneath steep hills and military buildings, lies a port in England; while to the right lies Brittany, with the cupola of a cathedral behind another splendid marble-faced palace, glowing brightly in the same clear light. There is almost nothing further to relate as regards the story, except to point out that Carpaccio has abandoned the Golden Legend for a different version of the legend, in which the groom actually accompanied his bride and the 11,000 virgins on their pilgrimage to Rome.
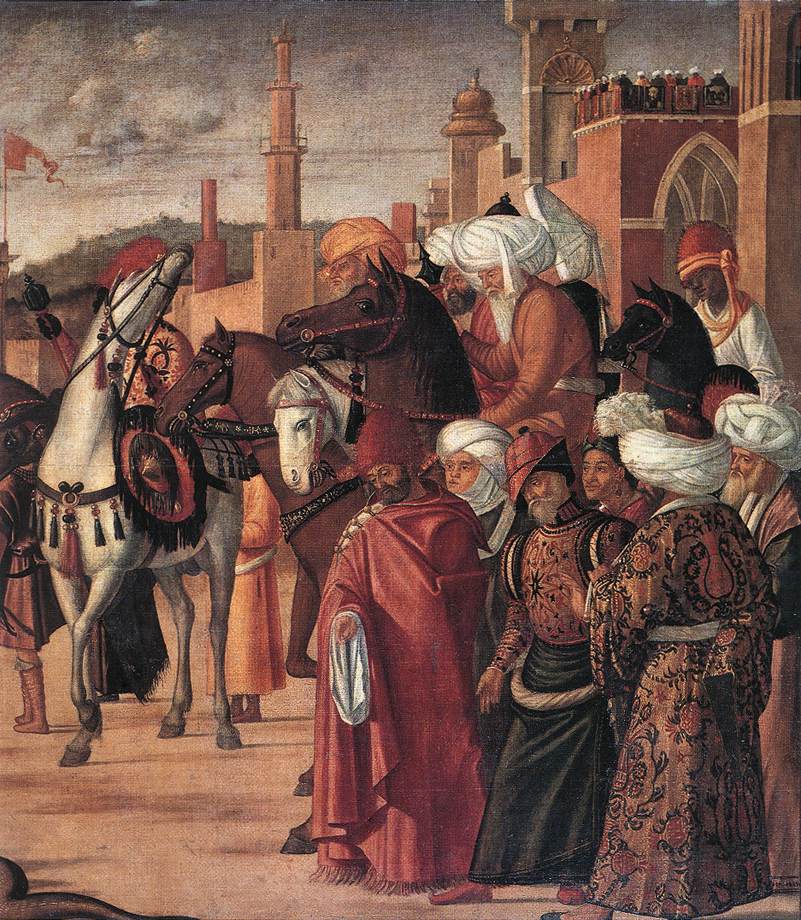
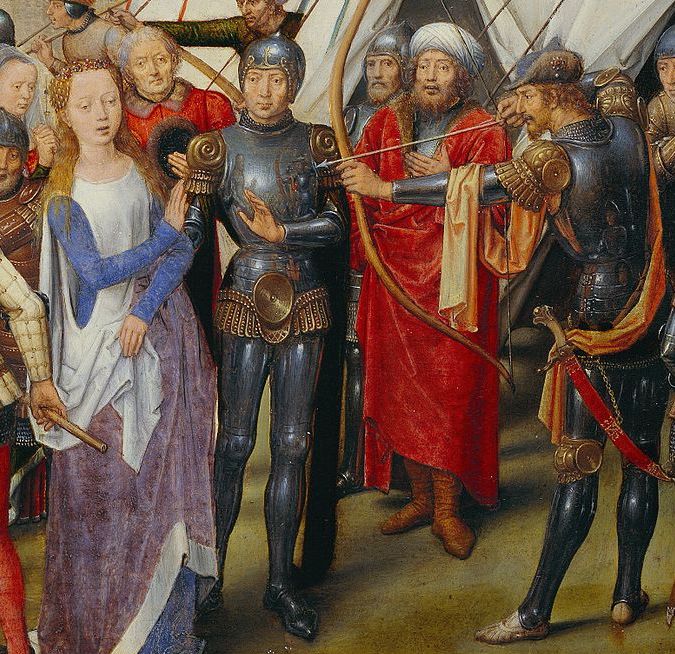
Closing in on the English side of the harbour (Figure 00 FIXME), look first at the group of nobles which contain many obvious portraits, and then at the royal gentlemen-in-waiting, behind King Conon of England, who is bidding farewell to his kneeling son, Prince Ethereus, whose attendant lord makes an obeisance behind him.
The cutter in which they are to embark lies on the far side of the jetty on which they are standing, except for its richly caparisoned stern (Figure 00 FIXME), where two young men are seated, holding a still enigmatic scroll:
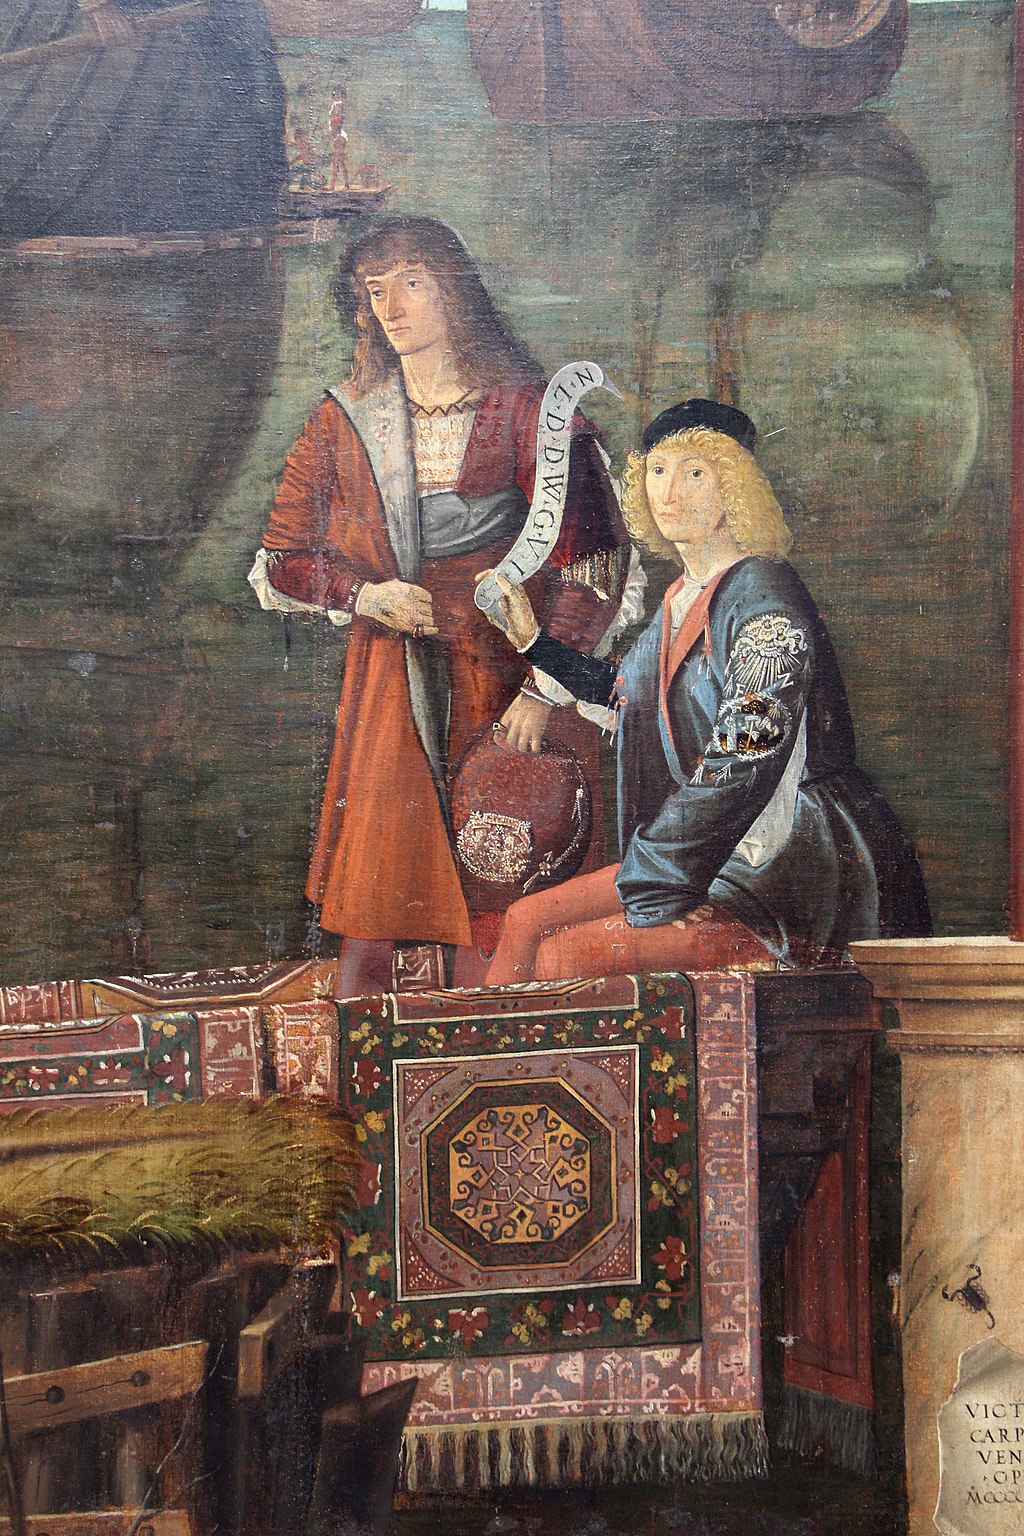
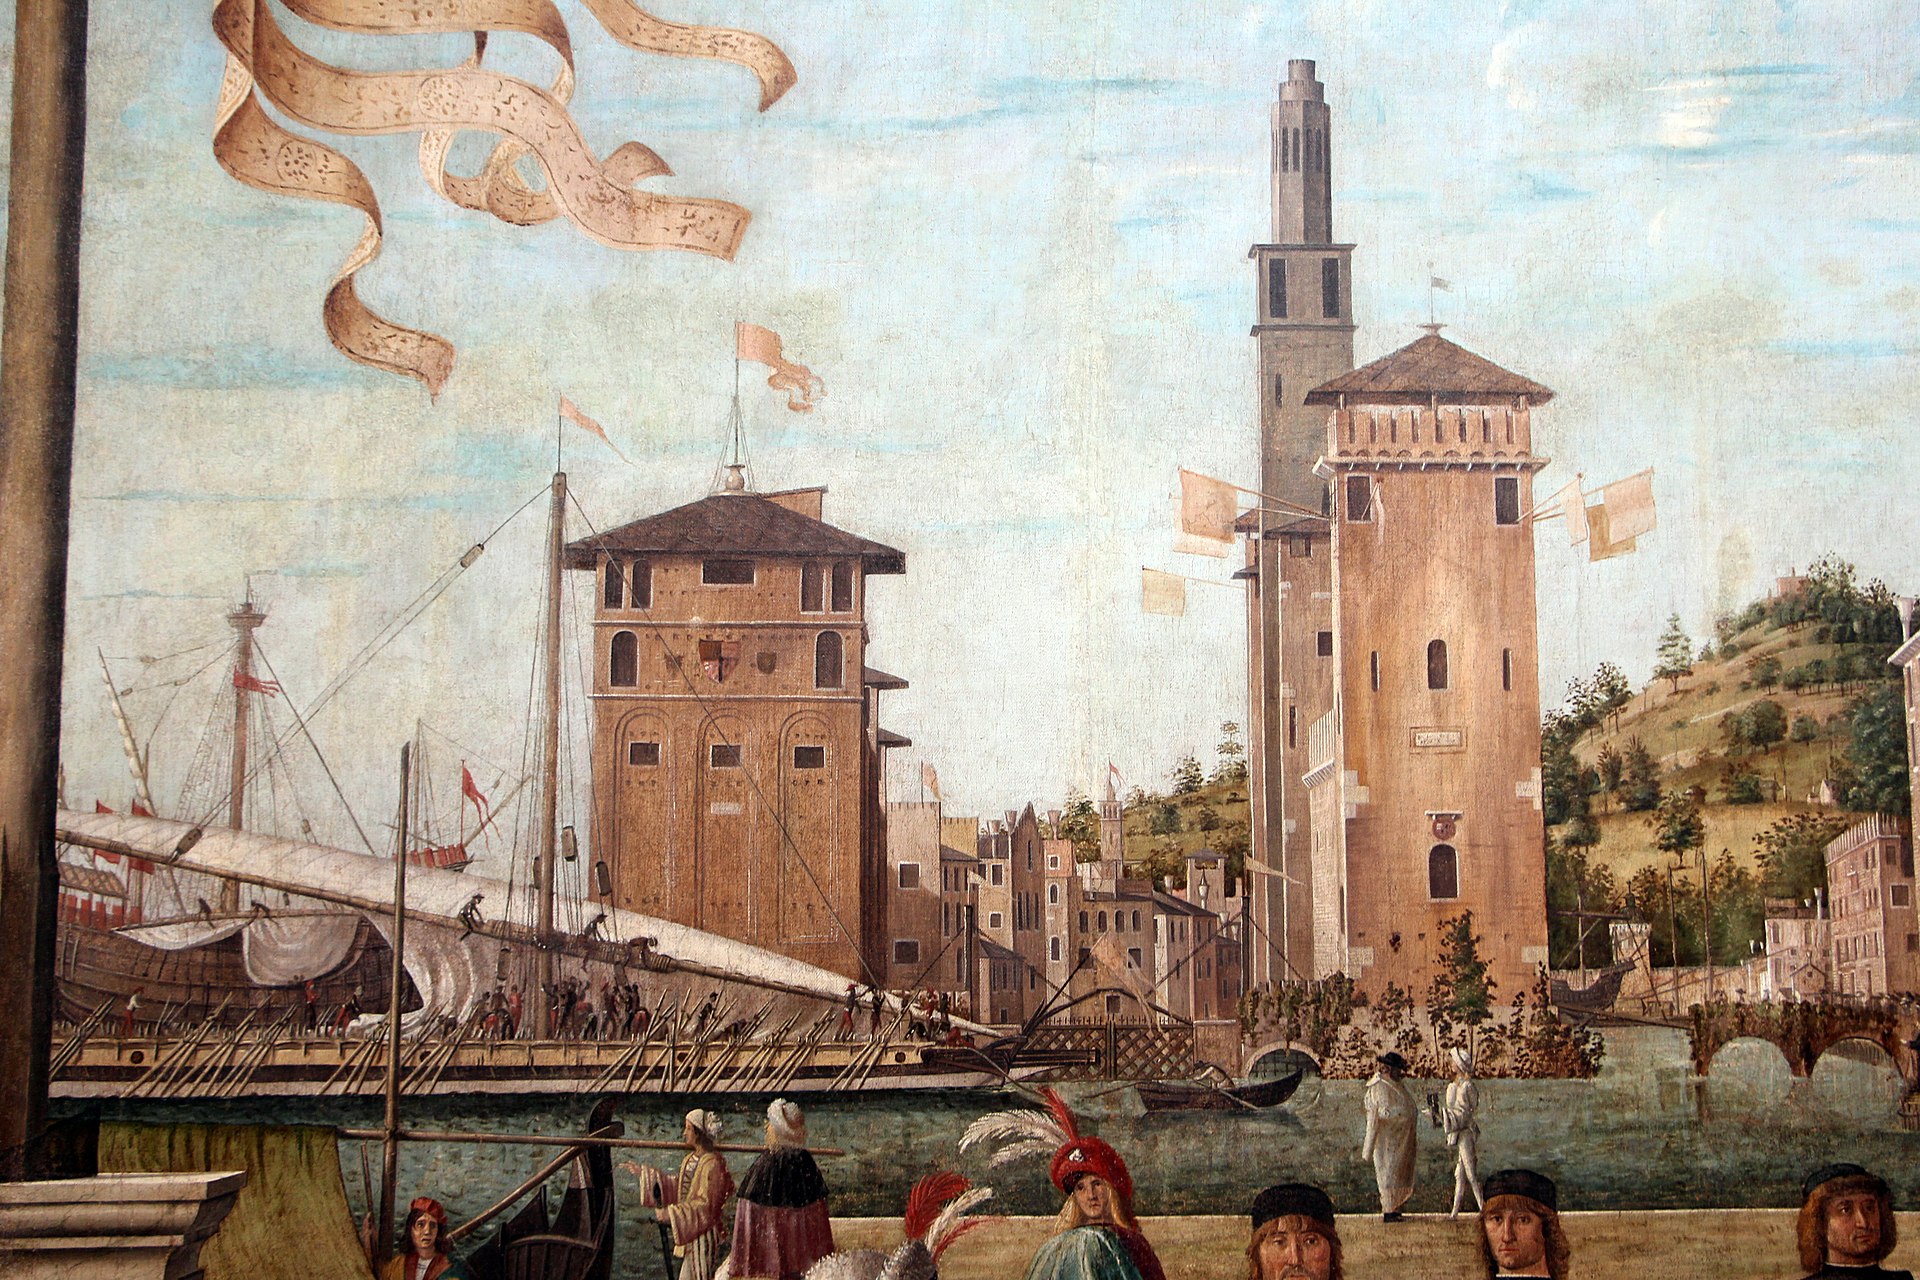
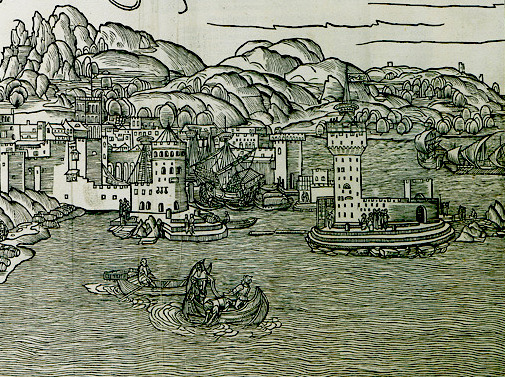
The fortifications in the background (brick and stone, unlike the marble of Brittany) are another ‘caprice’, derived from the woodcut in Figure 00 FIXME, published in the 1480s, showing the Venetian-controlled island of Rhodes (notice in particular the tower):
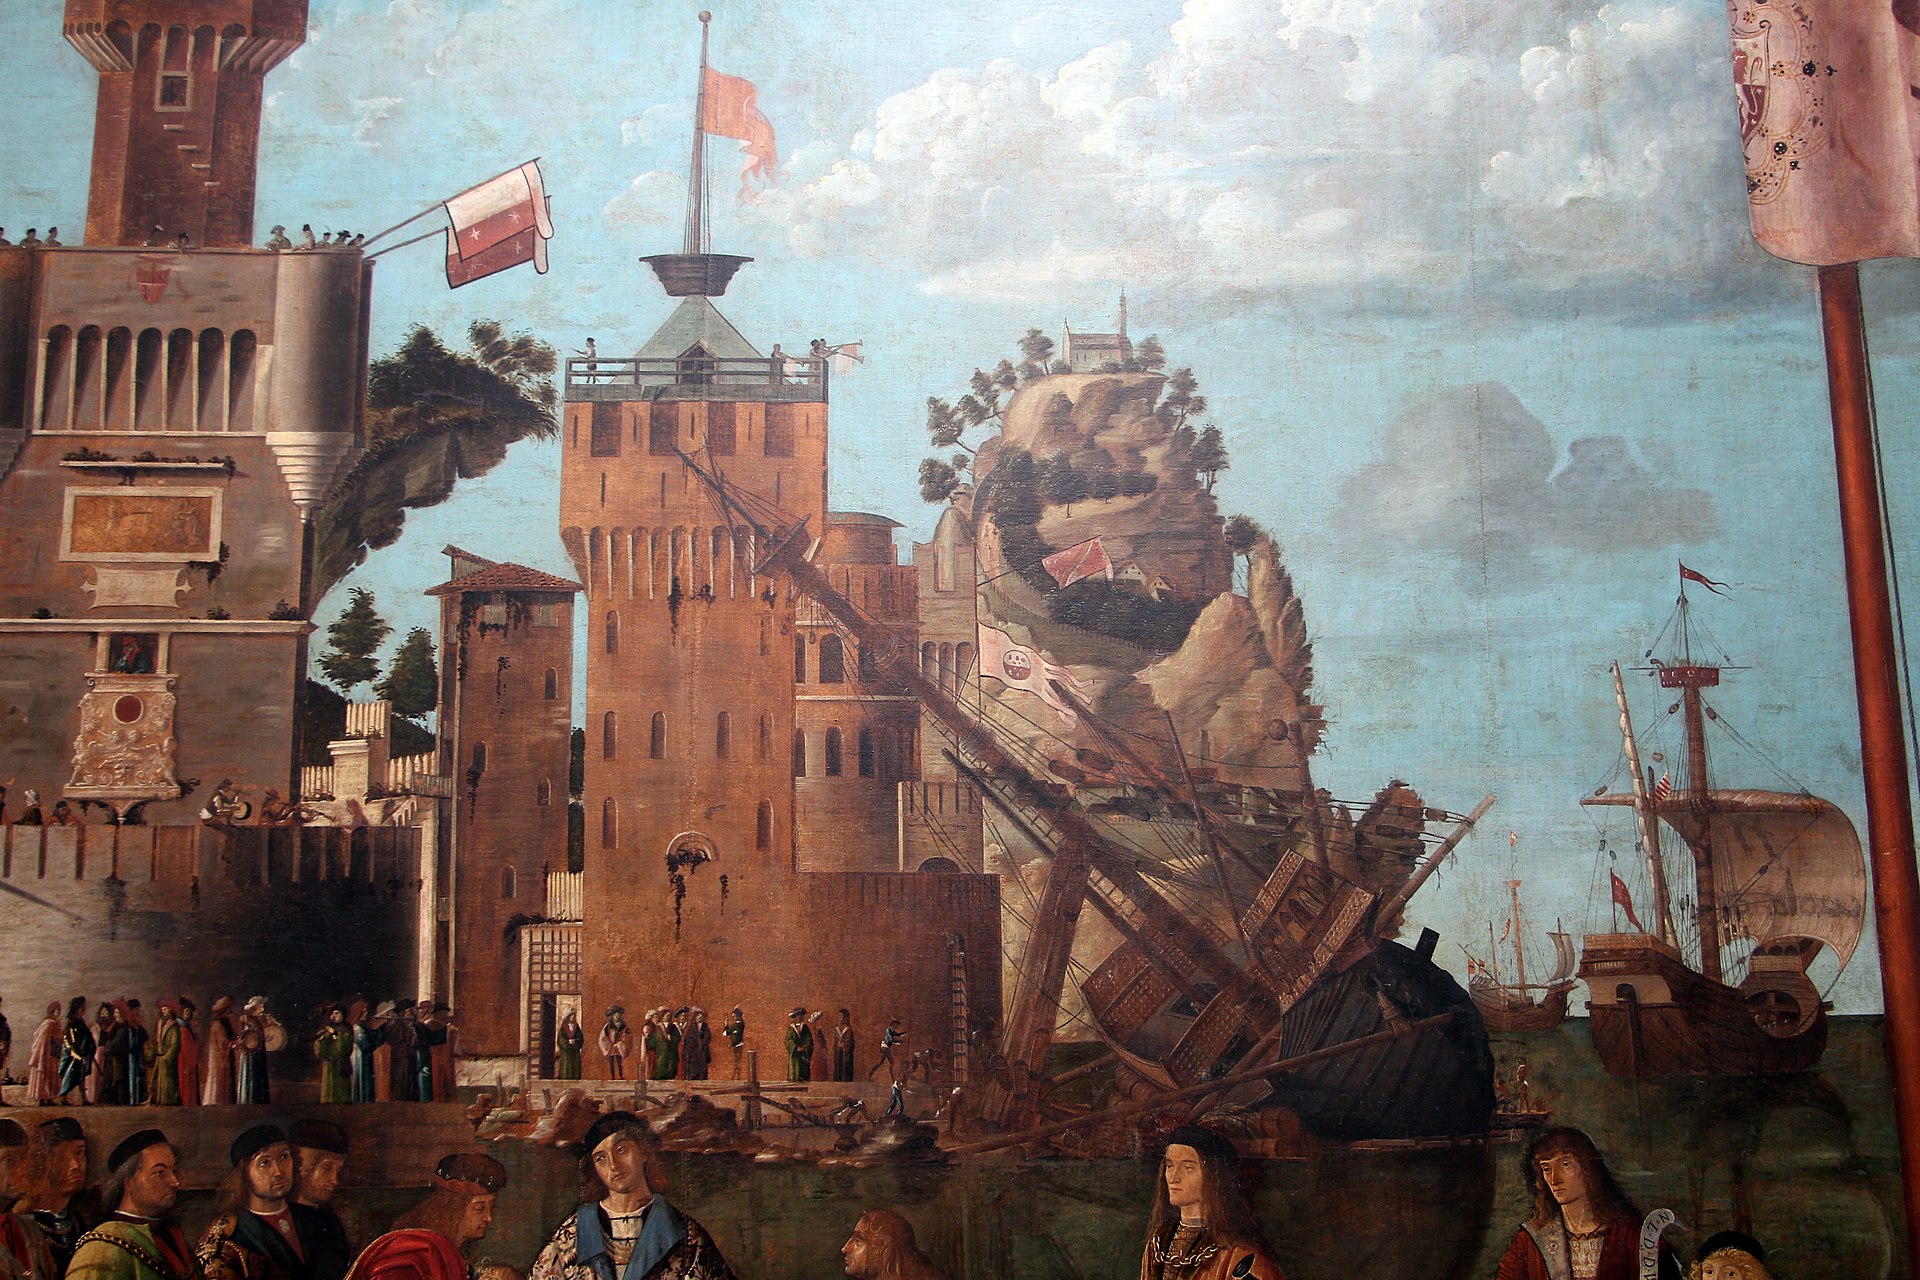
Again, there are hosts and hosts of wonderful details. I particularly enjoy the rickety wooden draw-bridge, suspended by chains left and right, and the amazing angle of the mast dragged by the battery of pulleys that serve to winch the ship over on its side so that repairs can be carried out below the water line:
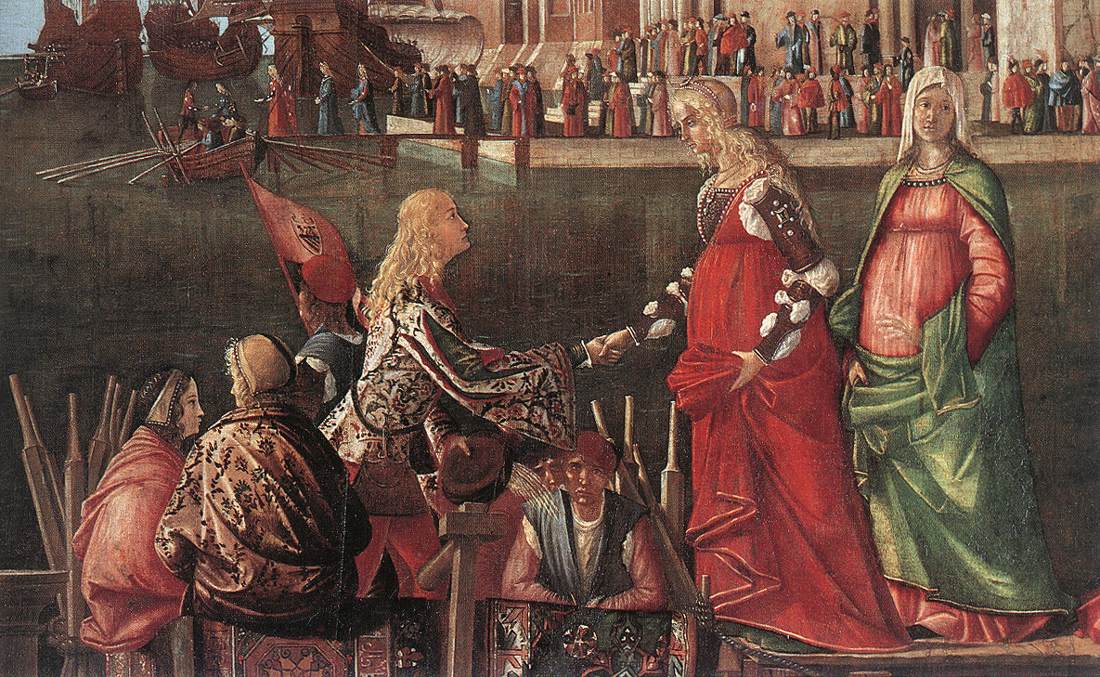
We now move, via the detail in Figure 00 FIXME, to the other side of the dividing flagpole, where we see Prince Ethereus disembarking from his ‘state barge’, which is presented stern on, with the tiller projecting towards us (notice how the oars have been carefully placed to pin the boat to the landing stage). He steps up and out, every bit the fairy-tale prince with his lovely brocaded coat and flowing blonde hair, and he is ‘received’ by Princess Ursula, dressed in the height of fashion—which has the side effect of making her look several months pregnant.
Scarcely have they met in person than a fleet (as stipulated in the marriage contract) begins to assemble in the harbour, to take the couple (and the 11,000 virgins!) on a voyage to the mouth of the Rhine, thence up the river to Basel, and overland to Rome.
We do not see the virgins yet, only the betrothed couple, kneeling side by side to pay farewell to King Maurus, while the nameless Queen dabs her eye, as a mother should. Now we must climb the stairs (Figure 00 FIXME), past the trumpeters sounding the fanfare, and proceed along the very Venetian fondamento in front of the marble palace and cathedral, until we come to the third cutter (Figure 00 FIXME).
This vessel, held with its oars in the shallow water against the little gangway, will soon take the royal couple out to the ships, which are already hoisting their foresails for the voyage.
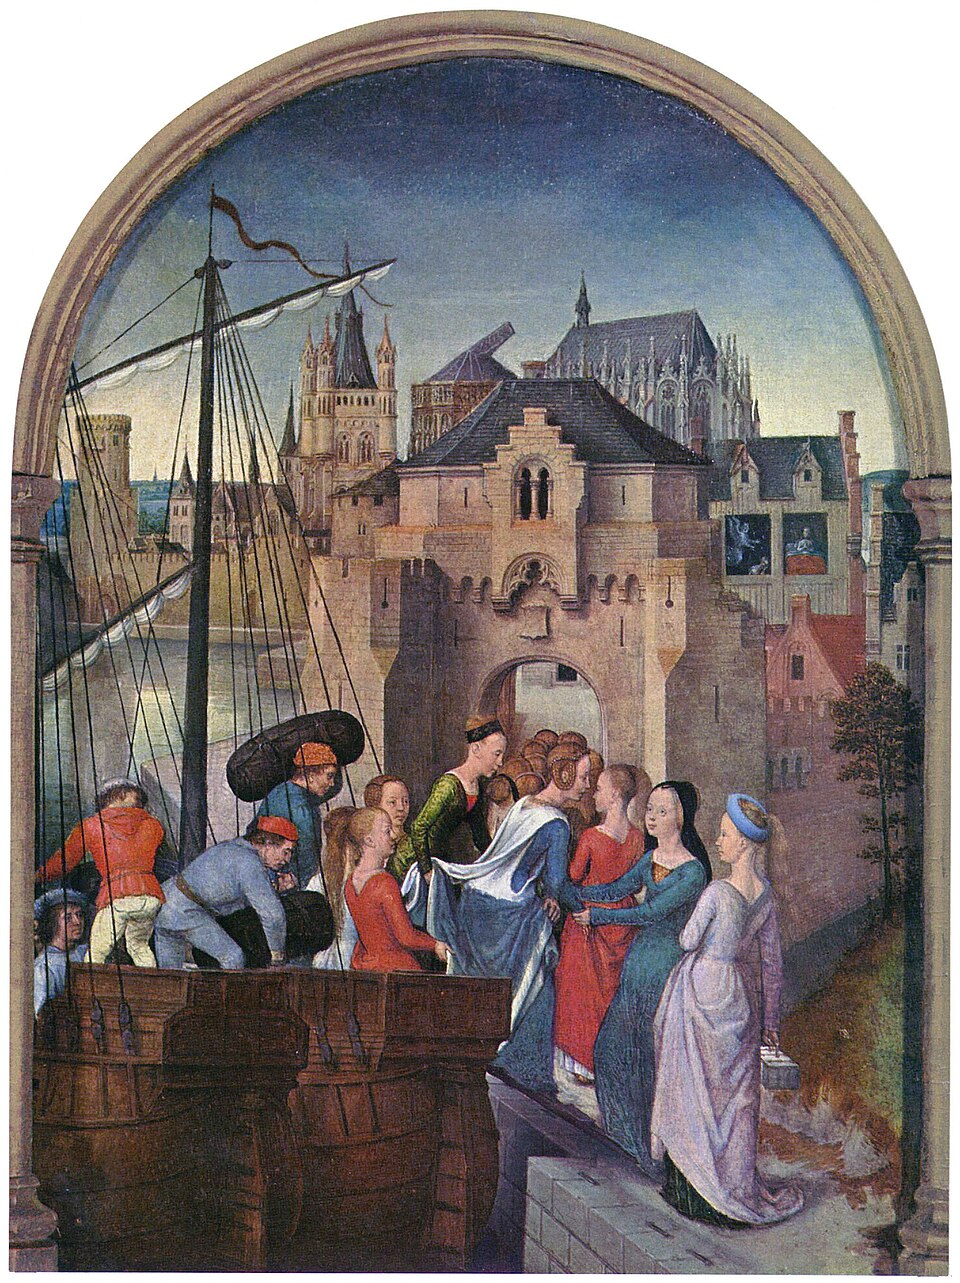
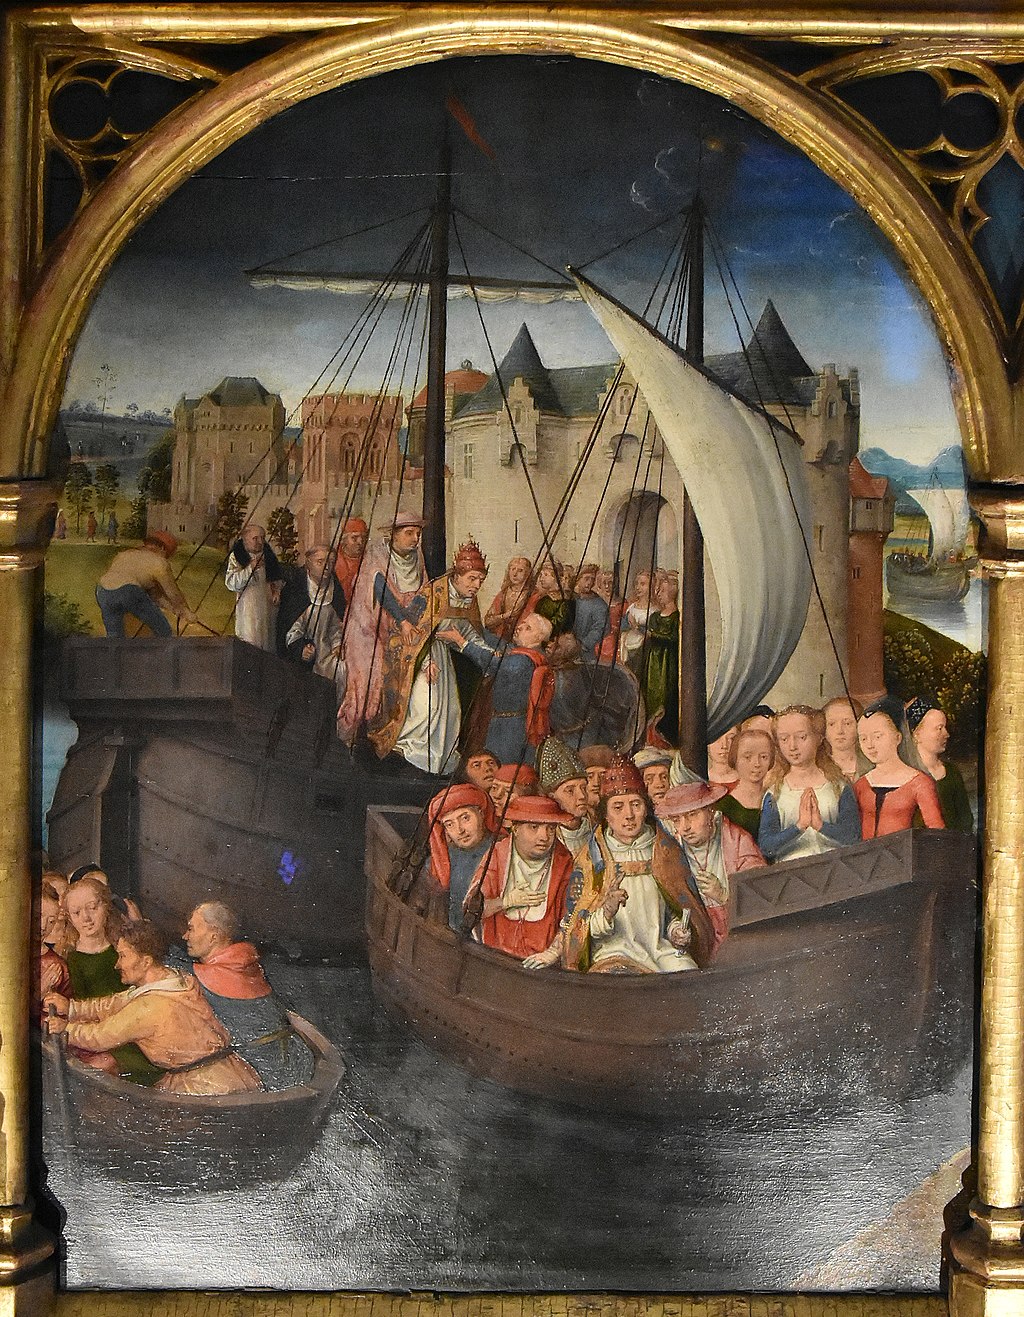
At this point I whisk you away from Venice in the 1490s to Bruges in the 1480s, and from a scale of nine feet high to a mere fifteen inches, as we look for a moment at the first panel in Memling’s reliquary:
The main point of the switch is to allow you to register the huge difference in conventions between Italian Renaissance Art and Northern Gothic Art; but Memling’s picture will also enable us to follow the eleven thousand virgins (here reduced to eleven) on their journey, because, in the words of the Legend: ‘At length in the space of one day a favourable wind bore them to a port in Gaul whence they went to Cologne’.
Notice the still unfinished cathedral in the background, and do not neglect the diminutive window of the bedroom in which Ursula had a vision of an angel before she continued her journey, because it is this dream (in a somewhat bigger bedroom) that forms the subject of the next canvas in Carpaccio’s cycle (Figure 00 FIXME), which was designed to cover the west end of the north wall of the Scuola di Sant’Orsola:
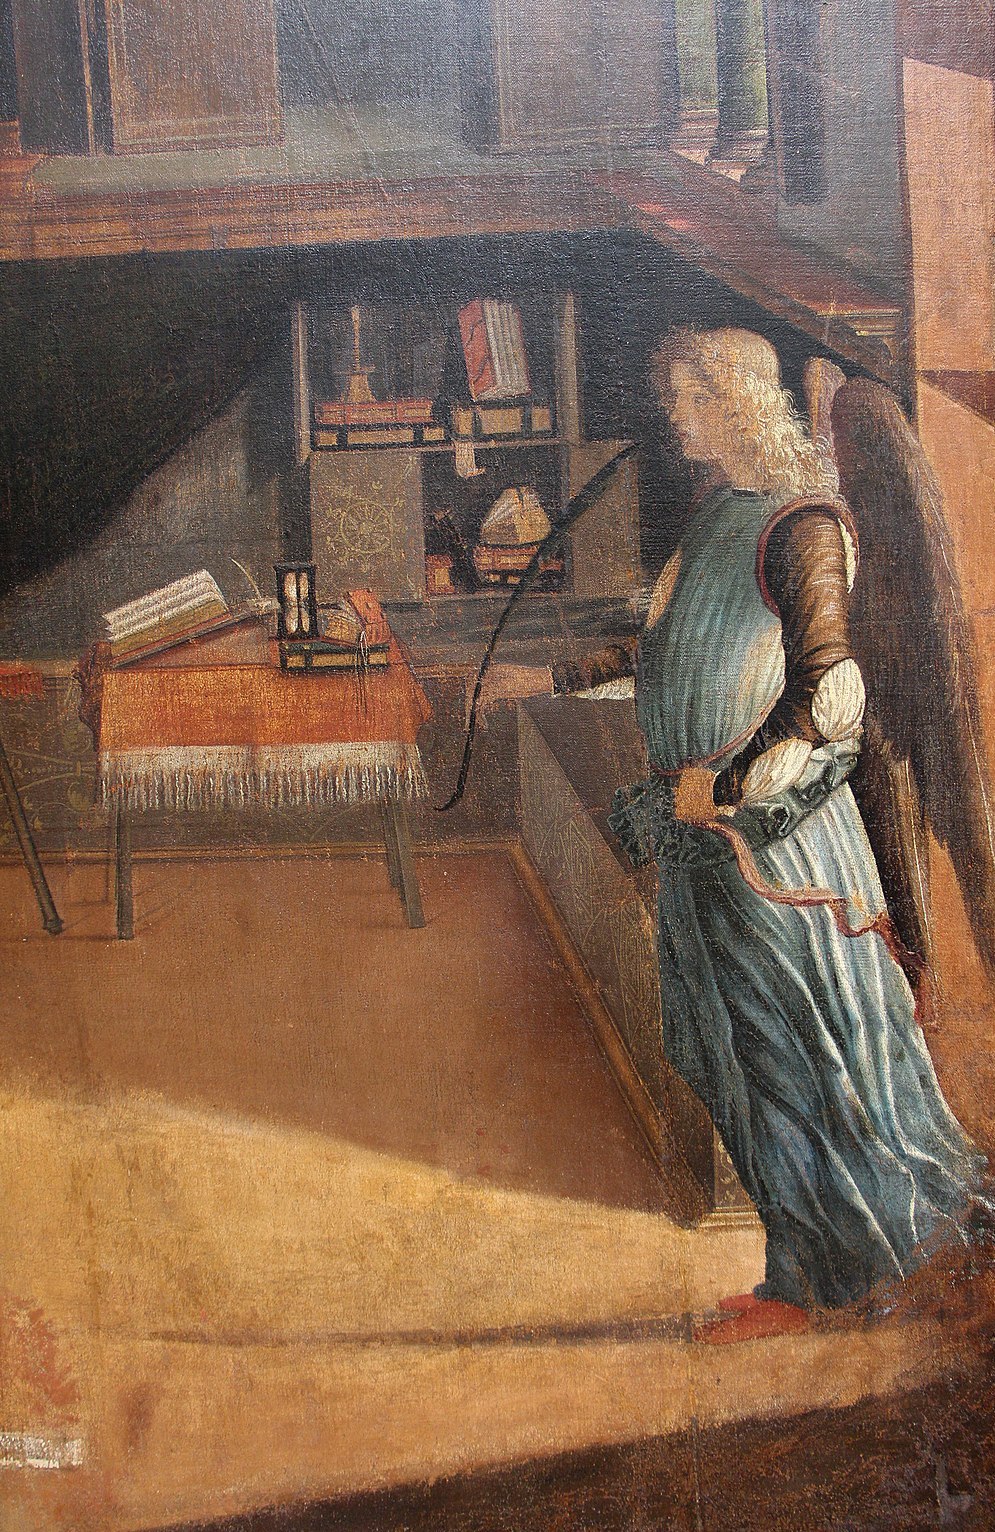
The story could hardly be simpler: ‘the Lord appeared to Ursula and foretold to her that they would every one return to Cologne, and would there win the crown of martyrdom’. But the supernatural vision provides the excuse for one of the most memorable and detailed domestic interiors to be found anywhere in Italian fifteenth-century painting, and also for one of the most ‘poetic’ studies of the fall of light. Remember that the natural light used to come from over the altar in the School of St Ursula (that is, from the east end), and notice that the pictorial light is represented as falling right to left, as you can clearly see in the detail (Figure 00 FIXME) of the angel holding the palm of martyrdom in his hand.
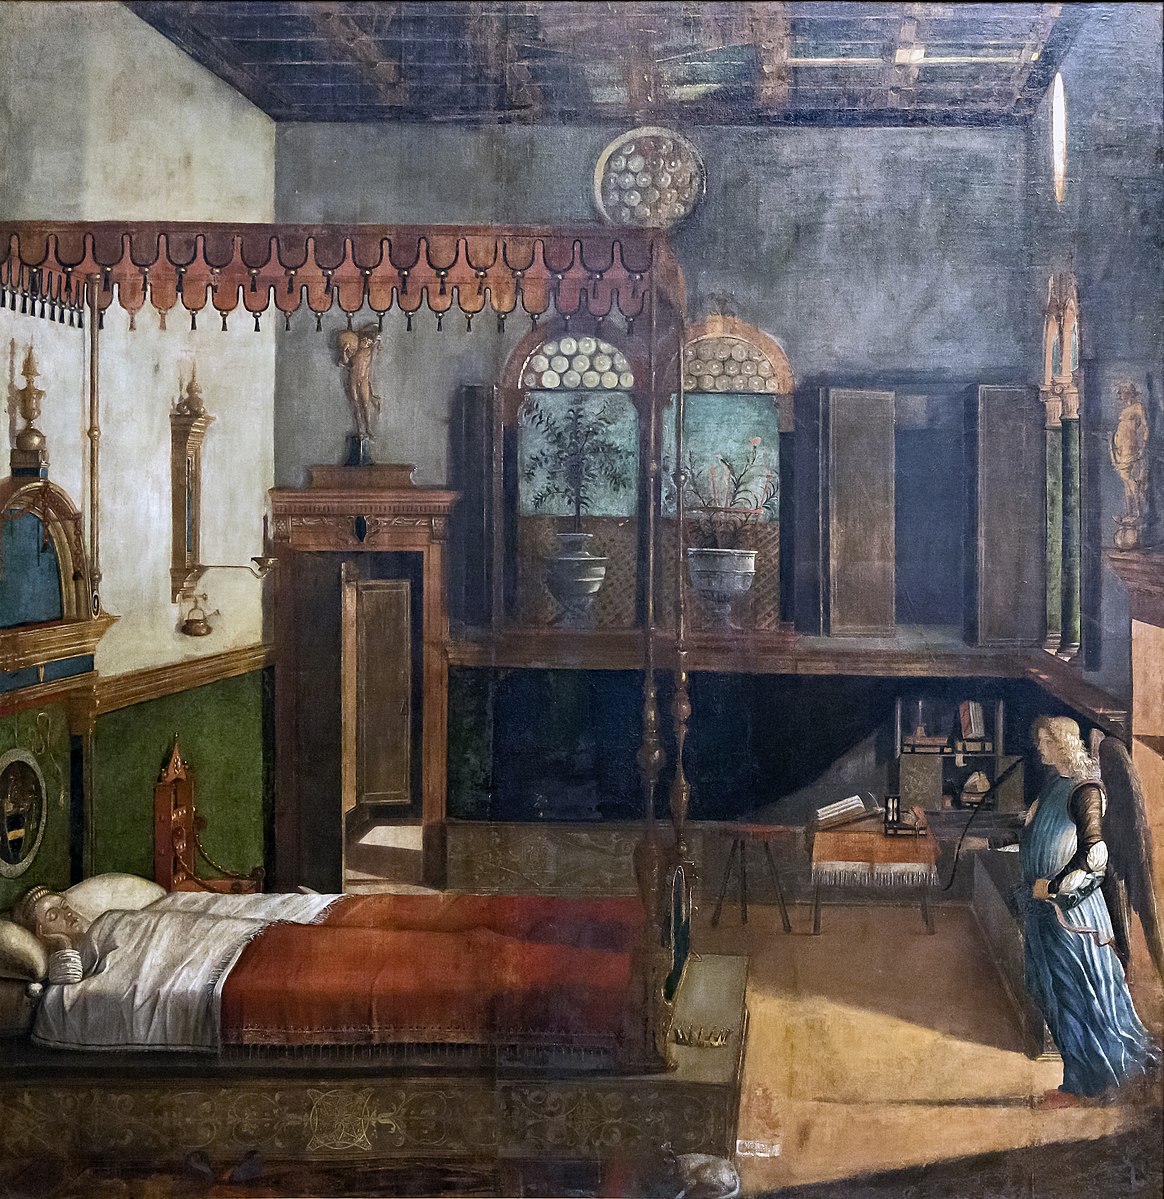
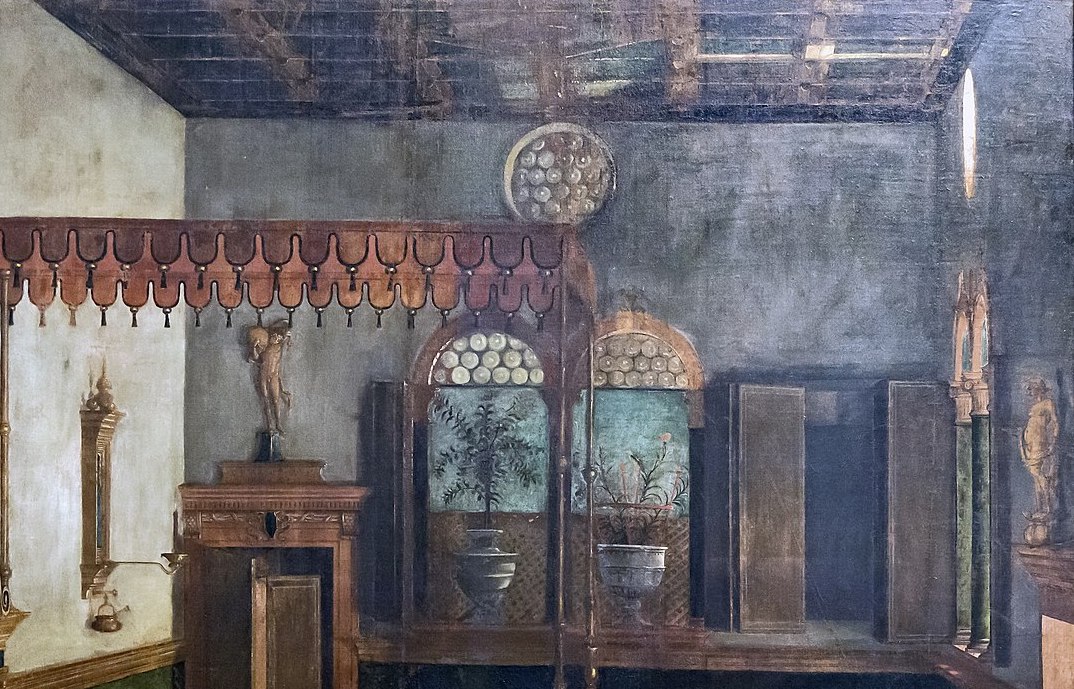
In some ways, the light is the most important agent here. It fans out over the pink floor, casting the angel’s shadow before him. From the oculus, it catches the rafters. From the right hand windows, it catches the underside of the canopy and falls to illuminate the bookcase, table and stool. Most importantly, it lights up the whole of wall opposite, thus inviting us to enjoy the bed-head, the chair, and the foreshortened icon with its candle-arm and little bowl for the holy water.
More light falls from a hidden window in the passage-way, and filters through the mullions and lattice of the rear window, which provides a light background for the potted plants, myrtle and carnations, which tell not of martyrdom, but of love and marriage.
Back to Memling again (Figure 00 FIXME) in the second panel on his reliquary, which is an illustration of the next sentence in the Golden Legend: ‘Thence, at the angel’s command, they set out [up the Rhine] for Rome; and making port at the city of Basel, they left their ships there, and continued their journey on foot.’ You can see these virgins resolutely tucking up their skirts and setting out up the lane towards the foothills of the Alps.
When they got to Rome, the pope, whose name was Cyriacus, ‘was overjoyed at their arrival, for he too was a native of Brittany, and found many kinswomen among their number; wherefore he and his clergy received them with the highest honours.’
We rejoin Carpaccio in Figure 00 FIXME, and you should experience quite a visual shock at the difference in style, because this scene was painted before any of the five we have looked at so far:
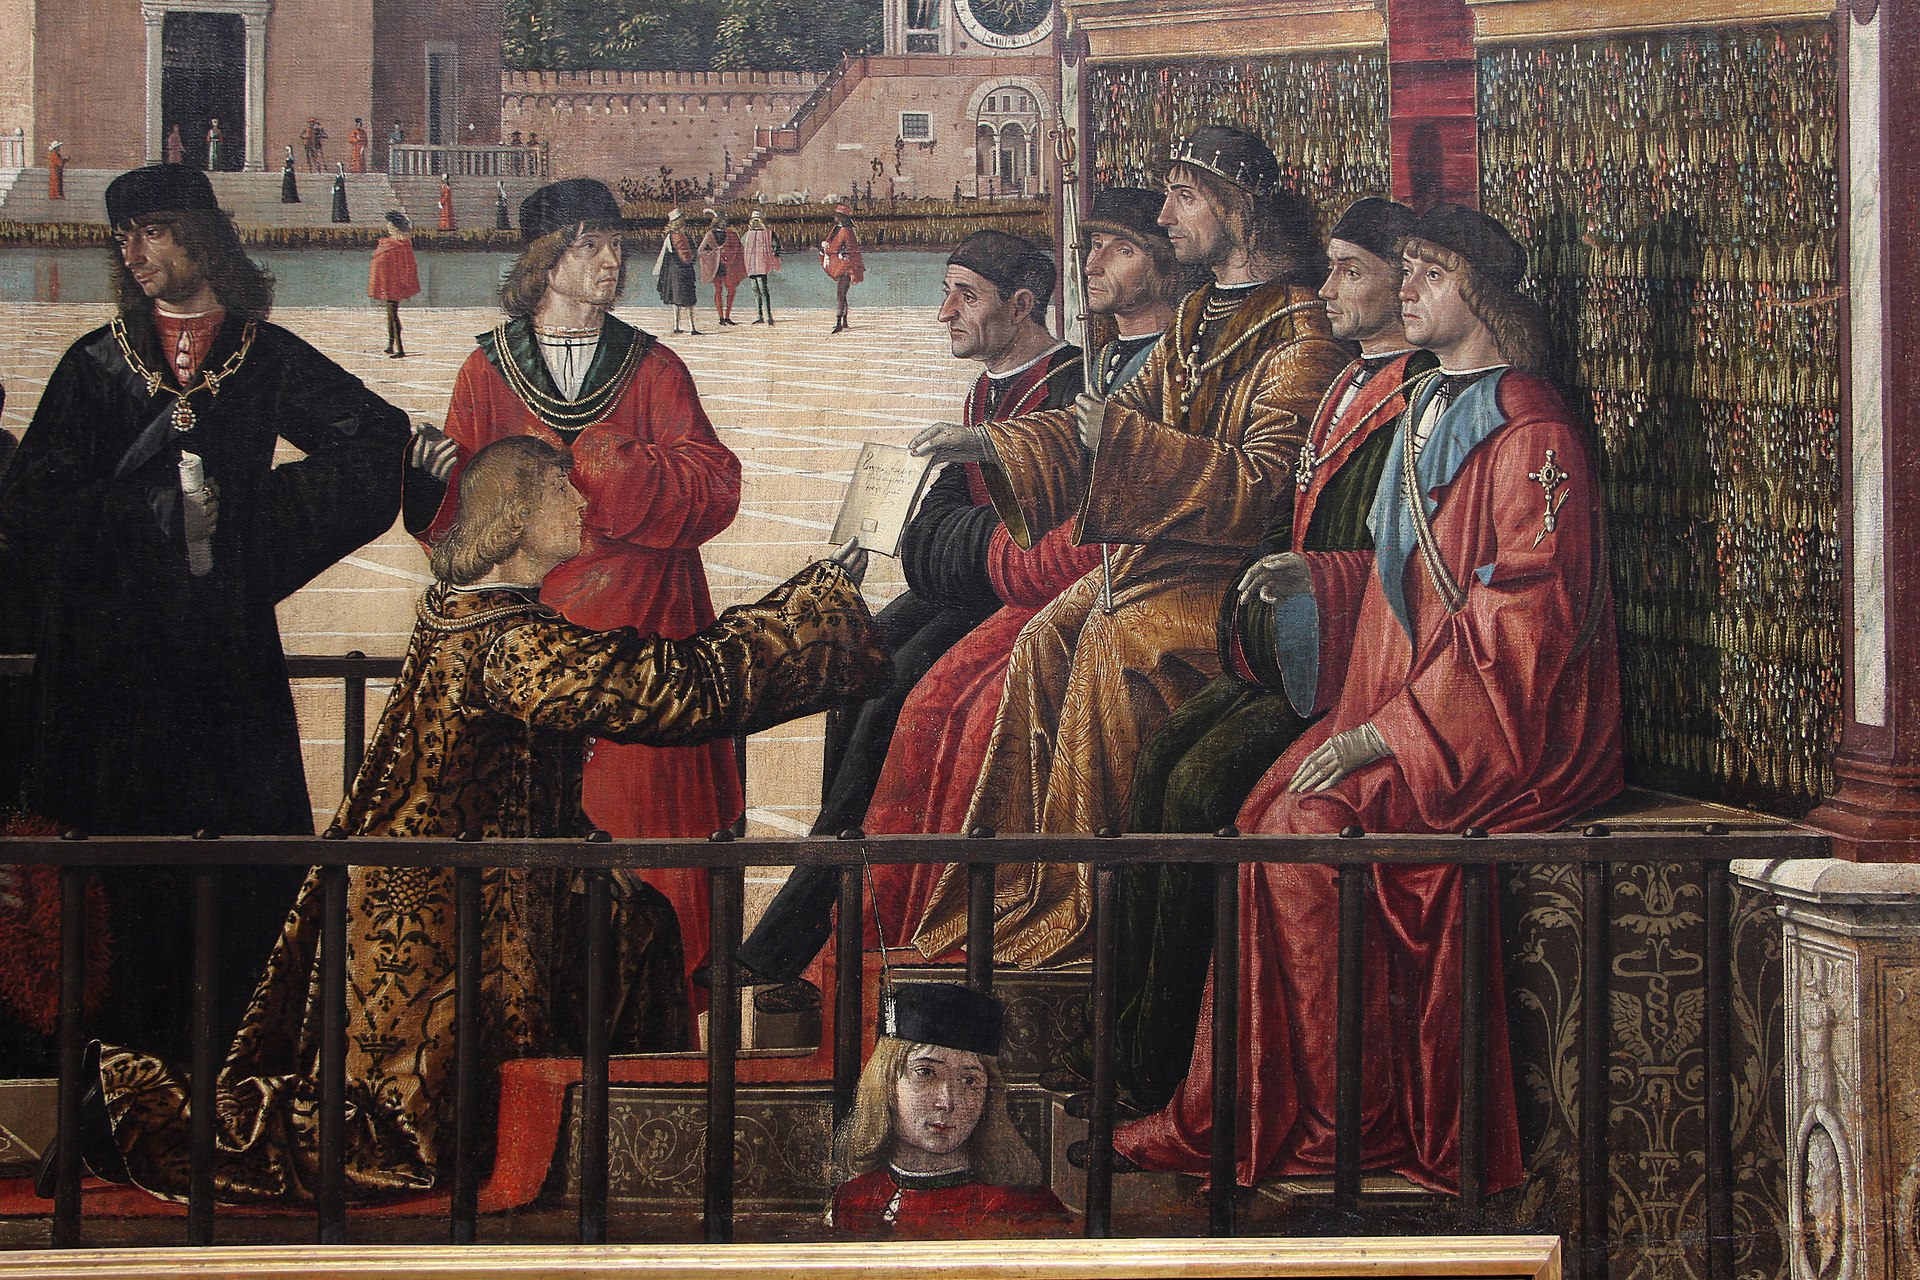
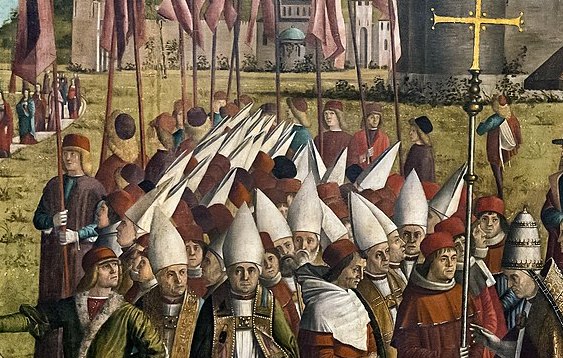
He chooses to represent the meeting of two processions. From the right, with the light behind them, the ‘clergy’ emerge from the gate of Rome—including an enormous number of bishops. Then they vanish from view, before reappearing to line up behind the pope, who is shown wearing his tiara underneath the portable baldacchino. Typically, Carpaccio relishes the opportunity to represent the superb ecclesiastical capes of the senior bishops in his retinue.
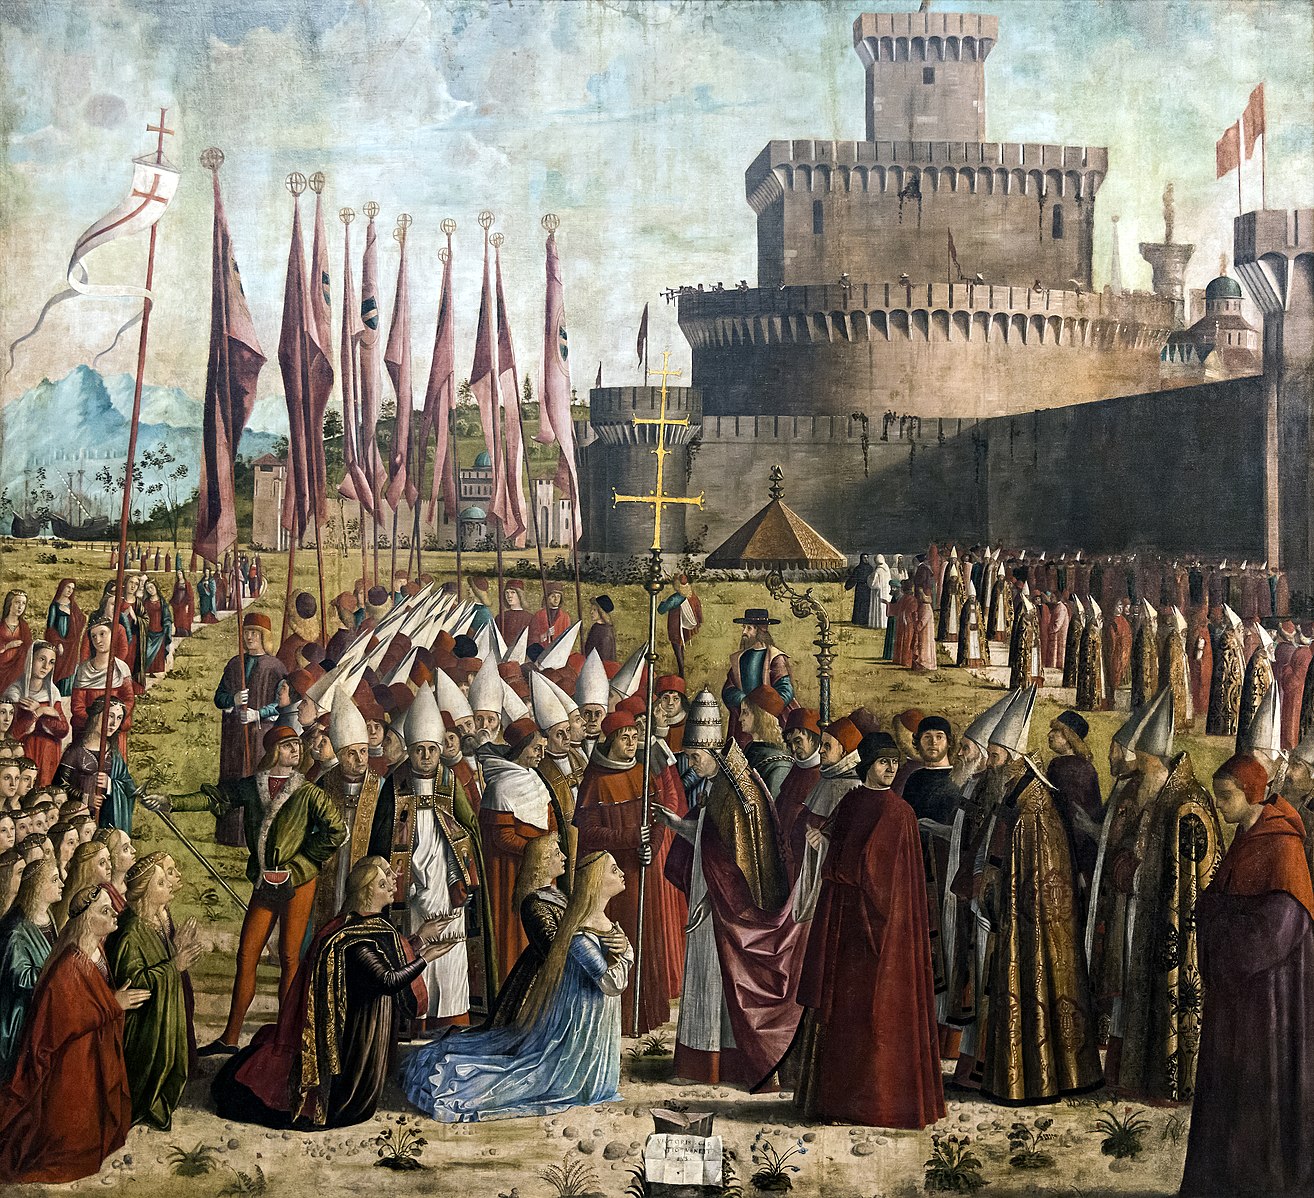
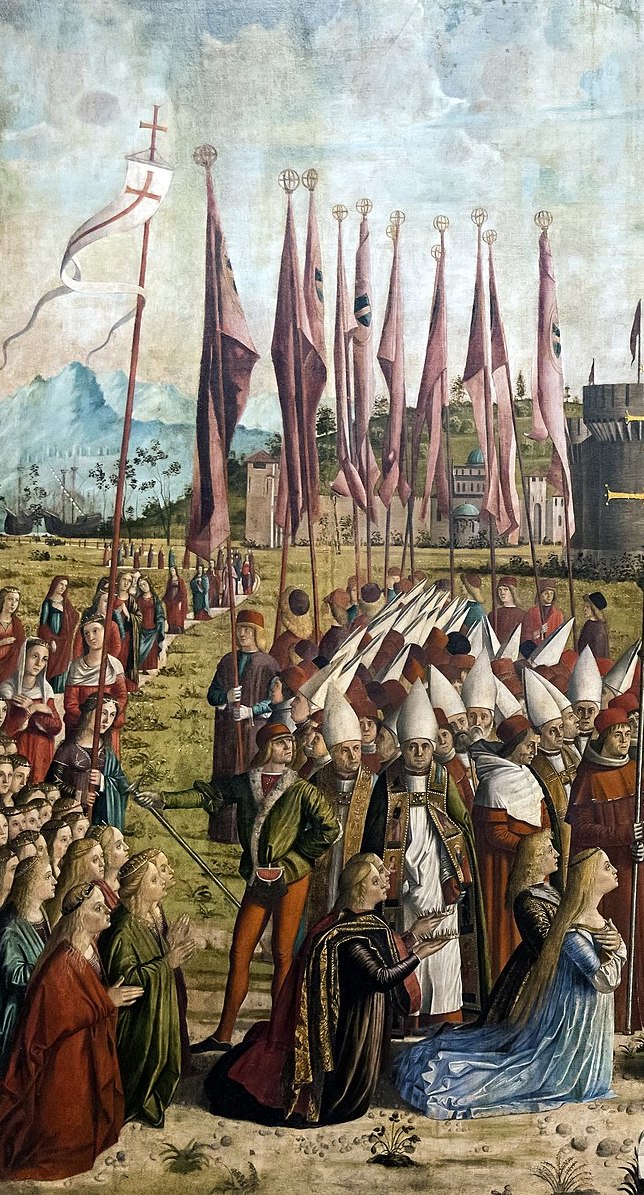
On the left, you can just make out some ships, from which there advance—on a narrow strip of carpet—the 11,000 virgins, who also disappear to the left (to suggest the numbers), and re-emerge, kneeling, in the left foreground behind Princess Ursula and Prince Ethereus. They are very much the royal couple, as the crowns held out behind them remind us.
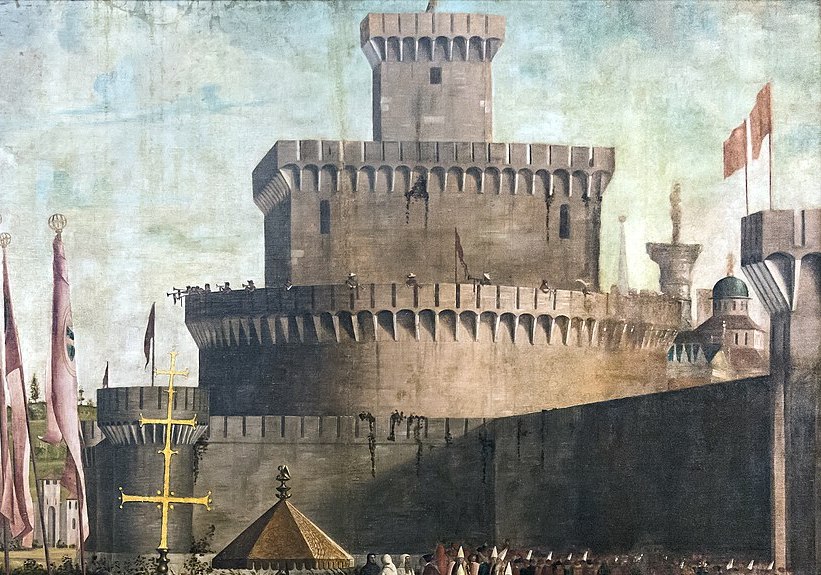
In the background, Carpaccio borrows from some woodcut or medal to give a fairly accurate representation of Castel Sant’Angelo, adding his own loving representation of the light that warms the right side of the gigantic barrel, and slants across the wall. But this early picture is chiefly remarkable for the contrast between the huge area of ochre (in walls, ground and clouds) and the bright colours and abstract patterns of the red banners and the white mitres of the bishops.
When Ursula and the 11,000 virgins set out from Rome on the return journey, they were accompanied by Cyriacus (who resigned the papacy) and a retinue of cardinals and bishops. You can see them clearly in the first panel on the second side of Memling’s reliquary (Figure 00 FIXME), where they are shown in front of the city gate of Basel, as they embark for the return journey down the Rhine towards Cologne:
However, all these celebrations and honours had excited the envy of two wicked captains of the Roman soldiery, Maximus and Africanus. Having informed themselves, therefore about the course of the virgins’ journey, they ‘sent messengers to their kinsman Julian, the king of the nation of the Huns, and urged him to lead his army against the virgins, since they were Christians, and to slaughter them when they arrived at Cologne.’ The story continues: ‘Thus when all the virgins with the aforementioned bishops returned to Cologne, they found the city besieged by the Huns.’
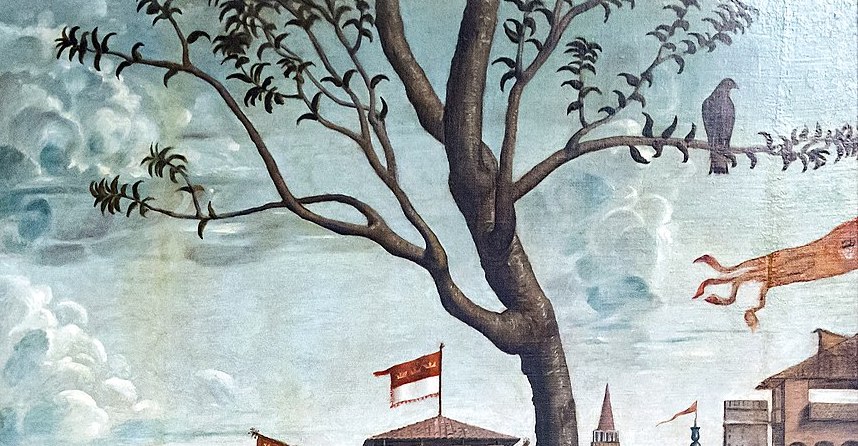
This is the subject of Carpaccio’s seventh canvas (Figure 00 FIXME), which was actually the first to be painted (it is signed and dated 1490) and was designed to lie in the middle of the north wall of the School, with the imagined light still consistently represented as coming from the east window to the right.
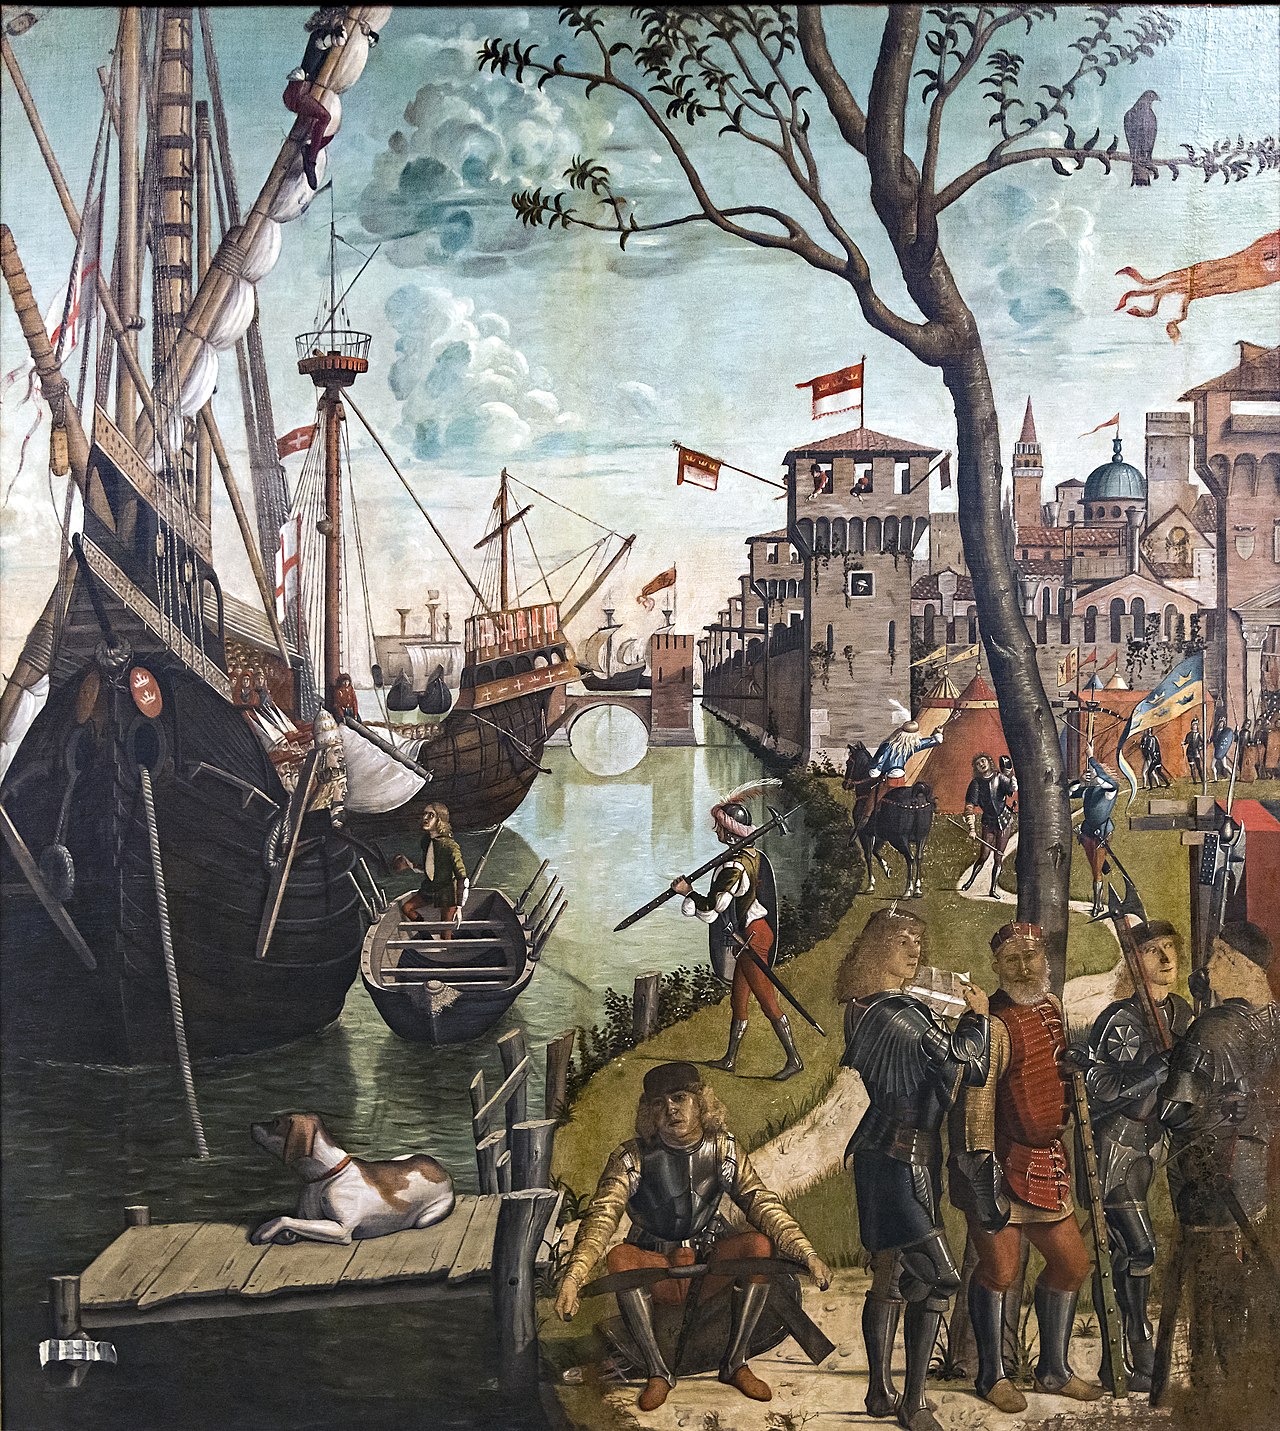
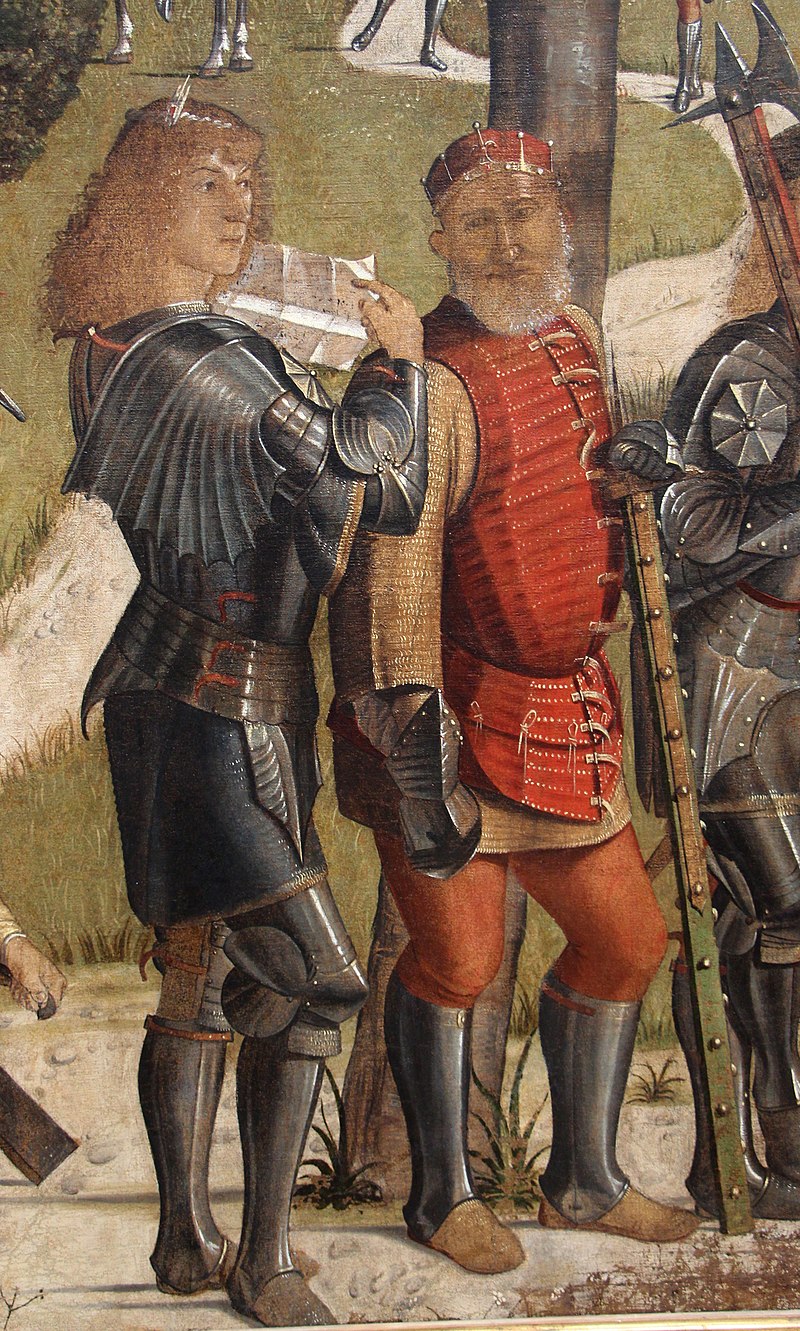
So the city is meant to be Cologne; and since the same flags fly over the city as over the tents of the besieging Huns, we may assume that the city has already been captured. In the foreground, we see (in red) the king of the Huns, Julian, identified by his crown, and a younger man, his son, who is reading from the letter despatched by the perfidious Maximus and Africanus. The impending violence is foreshadowed in the almost leafless tree with a solitary bird of prey perched on a branch
The river is therefore the Rhine, and on it we see the leading ships of the flotilla bearing the 11,000 virgins, sailing down towards the one that is already at anchor. The greatest charms of this rather uncertain composition are to be found in the play the light on the river (reflecting the arch of the bridge), in the details of the ship, (with anchor cable, bowsprit, sailor furling the sail), and the heads of Cyriacus and Ursula (who are ‘tiara-ed’ and ‘crowned’ respectively) who are seen in front of a huge cargo of cardinals in the hold amidships.

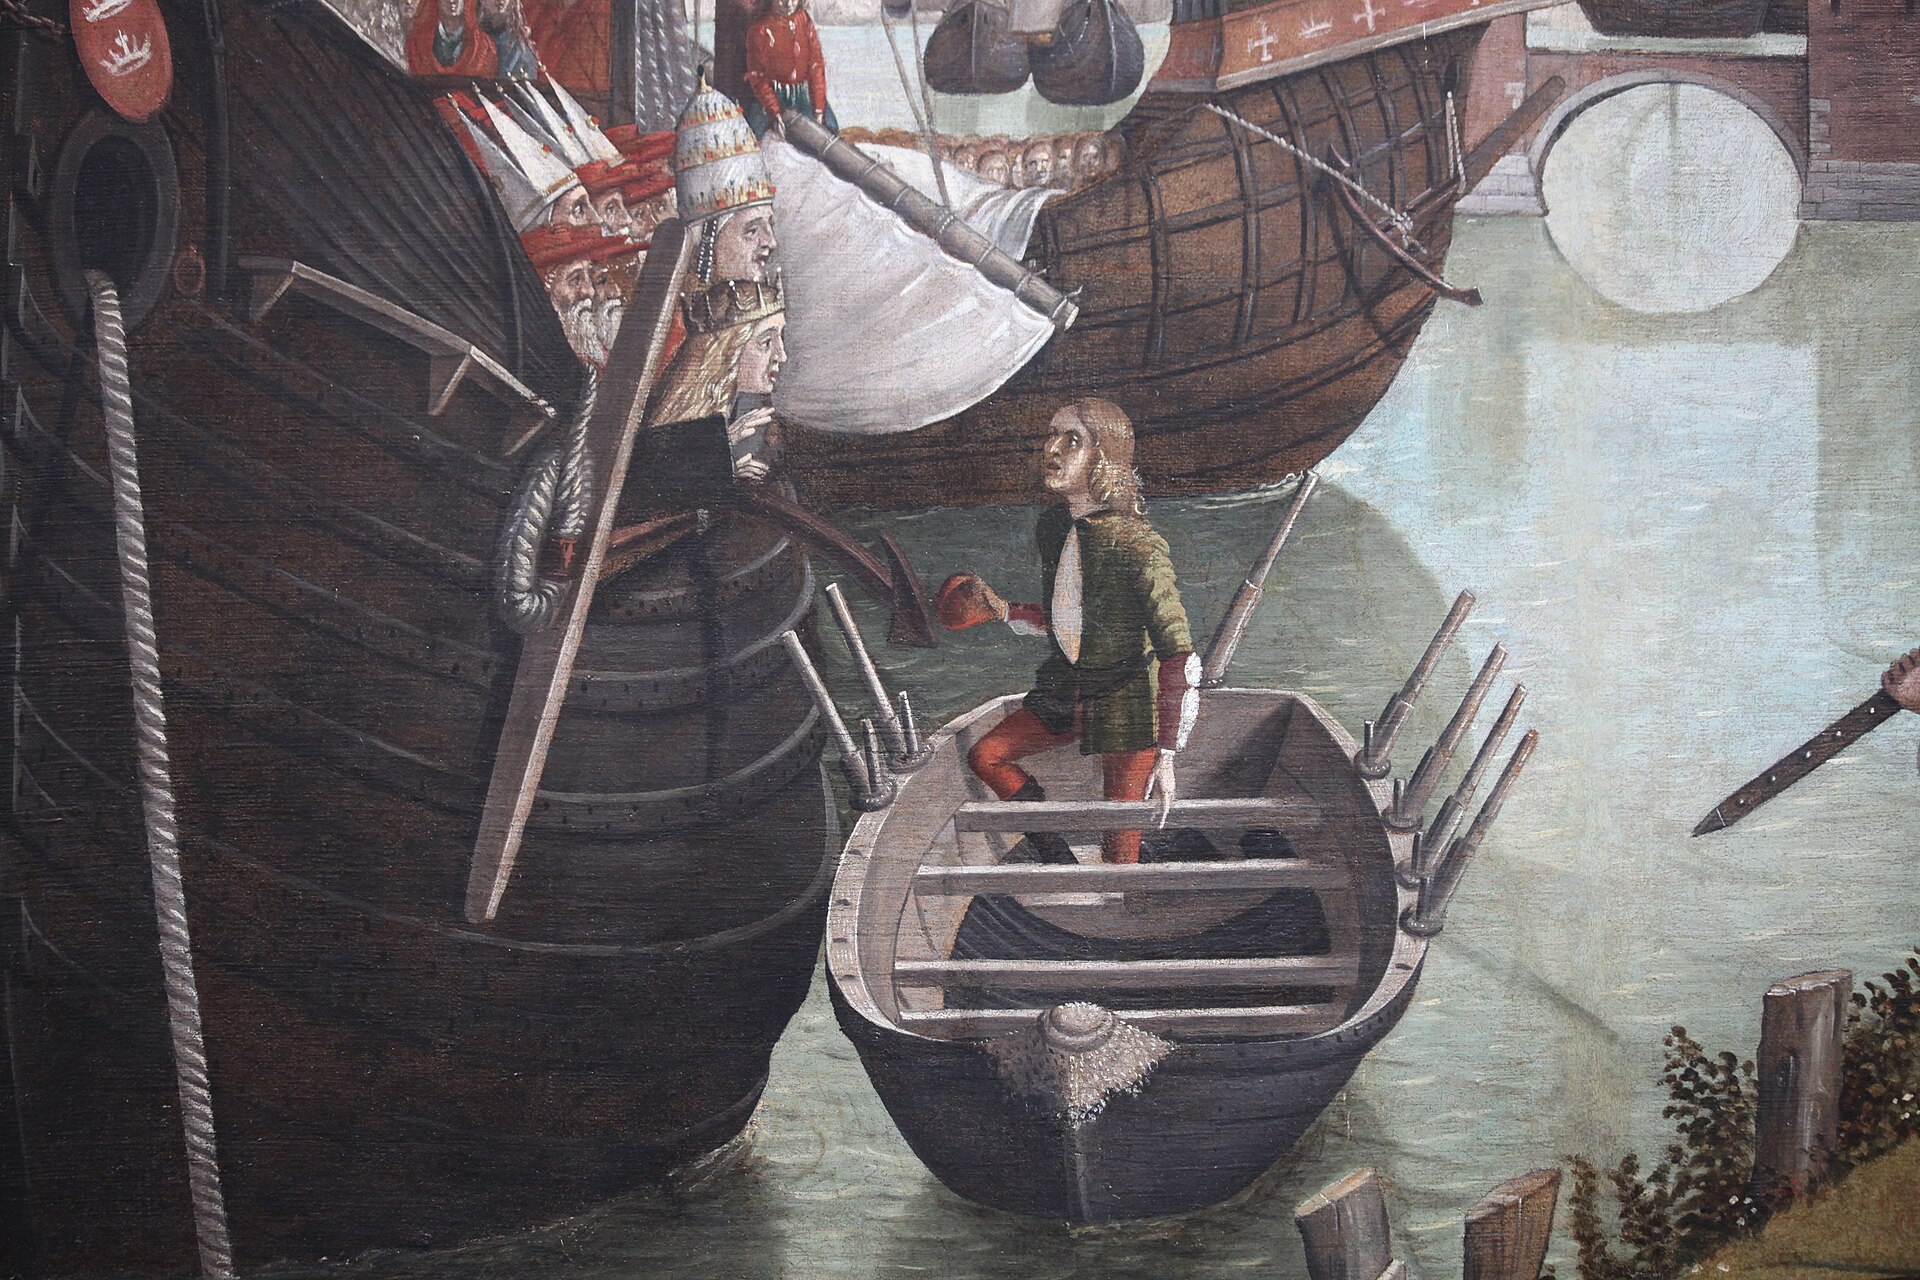
Figures 00 and 00 show the last two panels from Memling’s reliquary in Bruges, which provide an illustration for the conclusion of the story in the Golden Legend (notice that they share a continuous skyline and offer another study of the unfinished Gothic cathedral at Cologne).
[Thus all the virgins, with the aforementioned bishops, returned to Cologne, and found the city besieged by the Huns.] And when the barbarians saw them, they fell upon them with a tremendous shout, and, like wolves raging among the sheep, put the whole multitude to death.
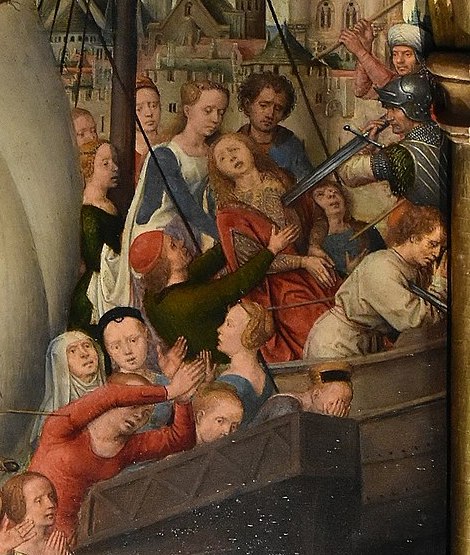
The detail in Figure 00 FIXME shows the saint and her betrothed supporting one of the virgins who has been stabbed by the fully-armoured Hun with his enormous broadsword.
The story continues:
And when the rest had been killed, they came to Ursula, and the prince was dumbfounded at her wondrous beauty. He consoled her for the death of the virgins, and promised that he would take her to wife. But she spurned the offer, and he, seeing himself treated with contempt, aimed an arrow at her, and pierced her through, and in this way consummated her martyrdom.
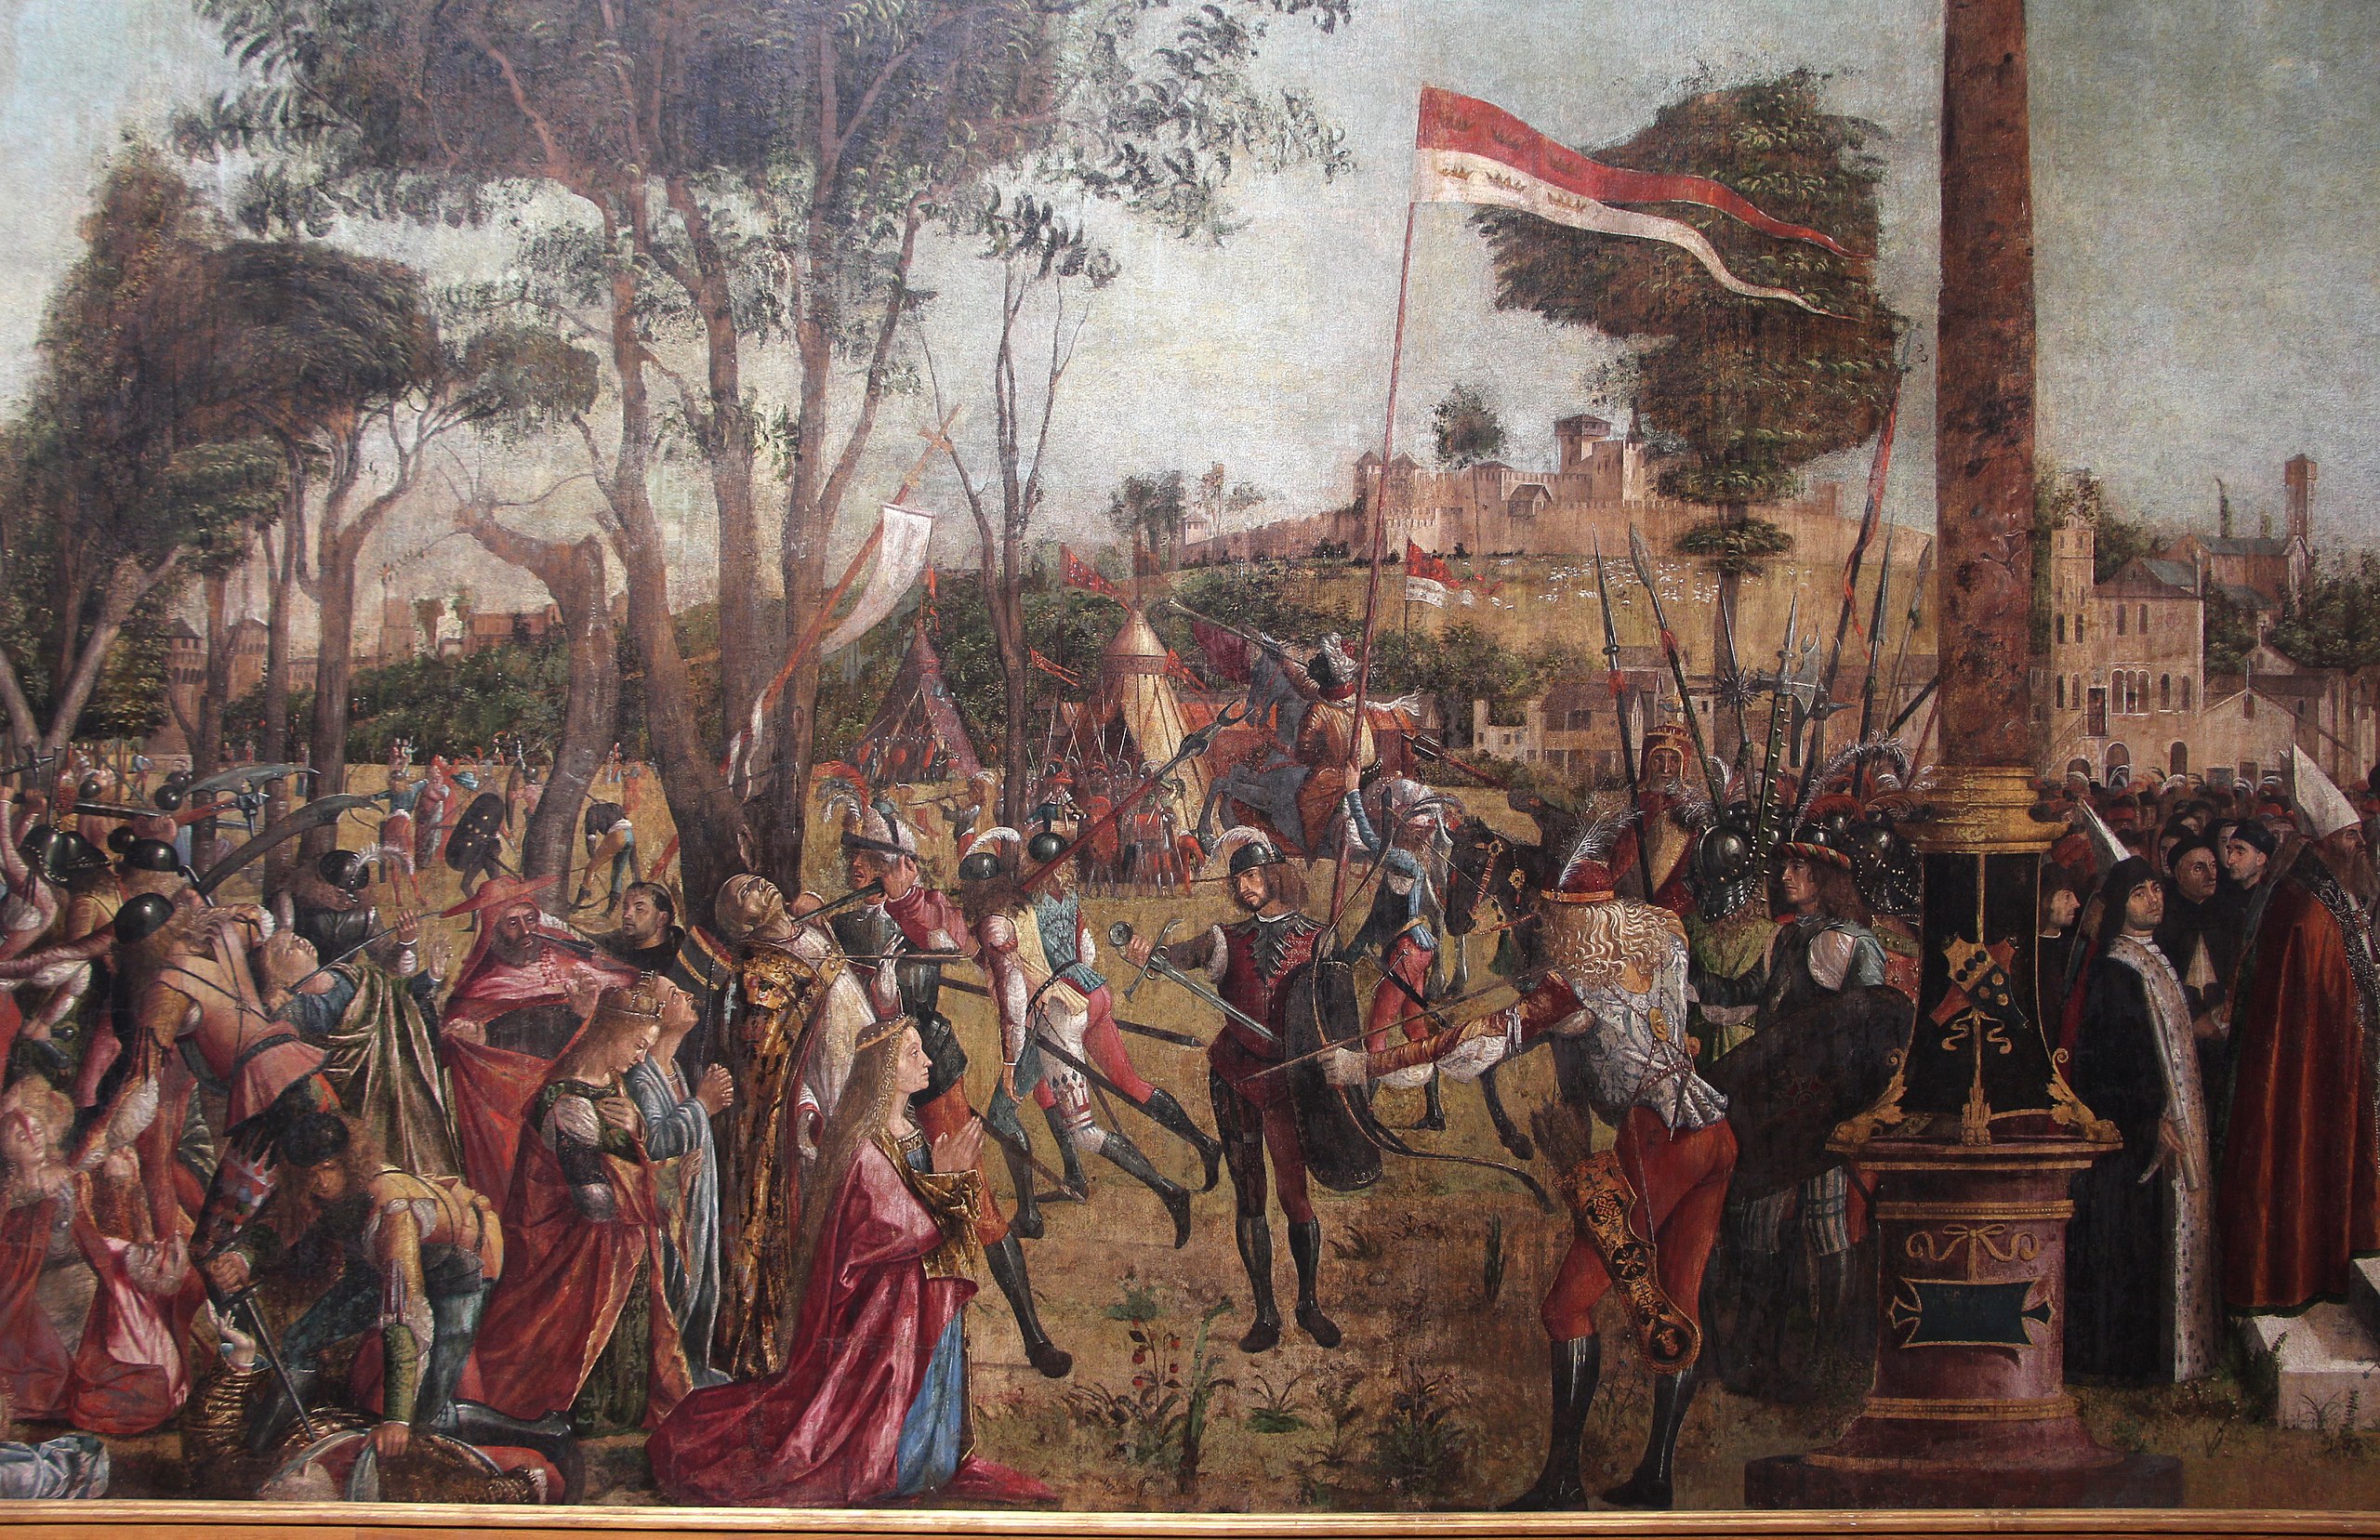
Carpaccio’s version is eighteen feet wide by nine feet high, and it used to lie immediately to the left of the altar wall in the School. It is divided by the column into two distinct moments: the martyrdom, and the funeral.

The martyrdom lies to the left of the divider. The wind blows through the Hunnish banner from left to right, but the column of trees and the slope of the hill, like the light, all follow the direction of the action, which unfolds from right to left. In his headquarters, marked by the pikes and halberds, King Julian gives the order, which is echoed by the galloping trumpeter. The officer unsheathes his sword, and the troops attack the unresisting victims: the pope is stabbed in the throat, the cardinal in the cheek, a girl has her throat cut from behind, and scimitars are splitting heads right back into the distance.
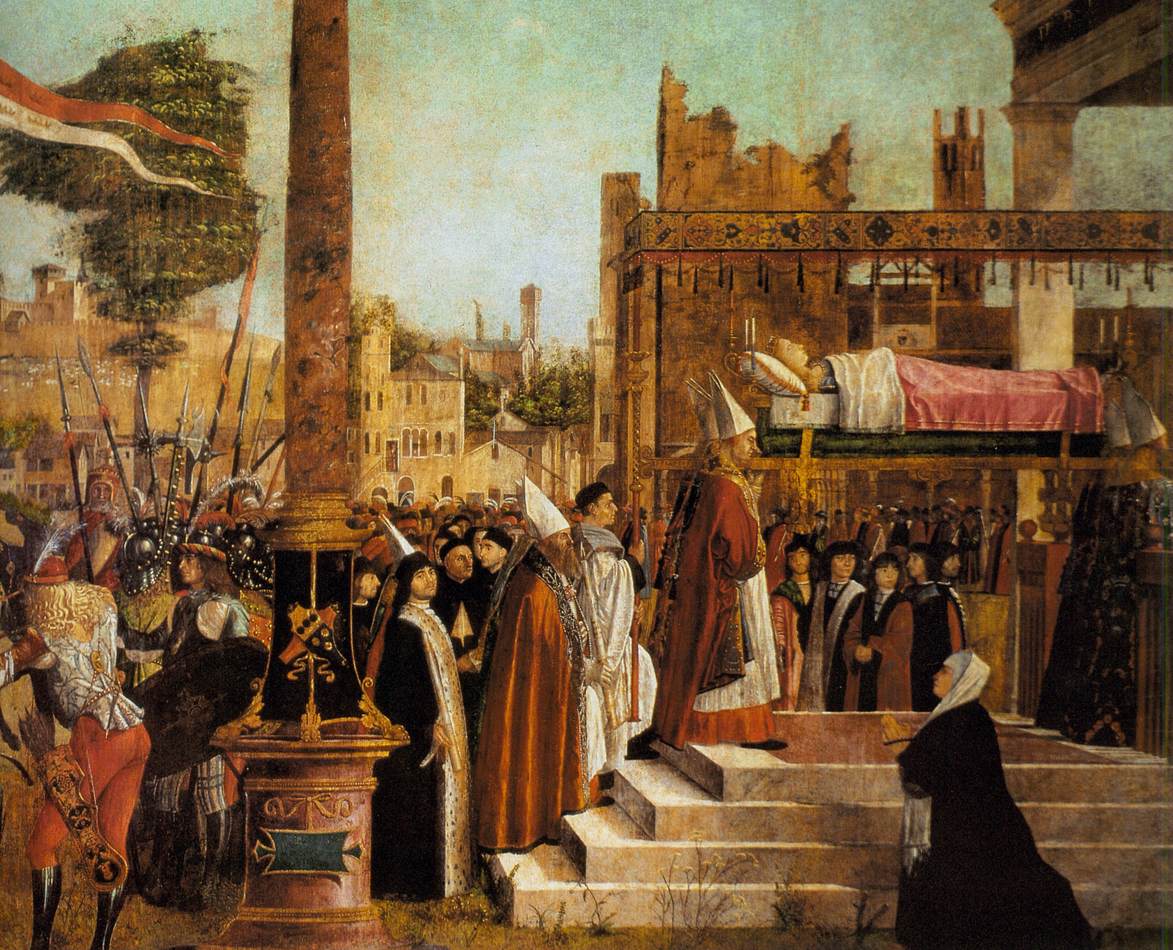
To the right of the column, we come to the last procession in which Ursula will take a part. As in the opening scenes, we see splendidly robed figures mounting white marble steps: four bishops are carrying Ursula’s body on their shoulders, underneath a superb canopy. They are moving off-stage into a huge mausoleum, which already bears the name ‘Ursula’. And just as Ursula’s body under the canopy should remind us of her dream in the bedroom, so the kneeling woman in the right foreground, dressed in black with a white shawl, should make us think of the old nurse in the first scene.
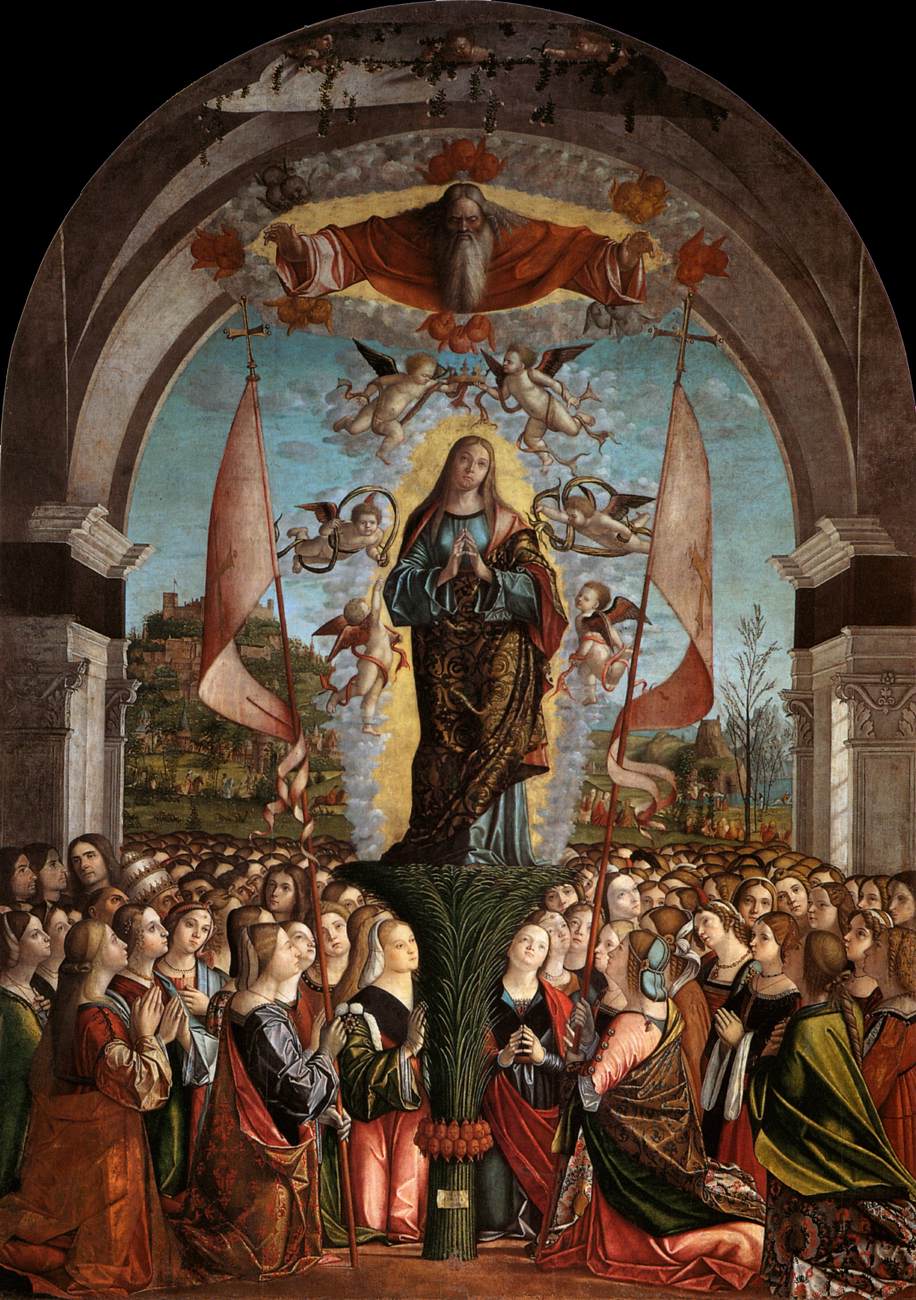
We come finally to the canvas intended for the east wall—a round-topped altarpiece, sixteen feet high, which represents the apotheosis of Ursula, or rather, her reception into heaven. God the Father opens his arms; Ursula balances on a ‘bush’ made up of 11,000 palms of martyrdom held together by two circles of angelic heads; the ground is packed with virgins, and you should also be able to spot Prince Ethereus and pope Cyriacus in his tiara.